Sandbox Testing
Learn more about simulating the Prove Unify flow using the Sandbox environment
When you interact with the Sandbox environment, you’ll be able to use test users to simulate different behaviors. Simulate the possession checks using the client-side SDK.
The testing environment doesn’t send text messages or validate real customer information.
If an unexpected code is returned, reference the Error and Status Codes page.
sandbox test users can only be used with project credentials. Attempting to use these test users with different project credentials will result in an unauthorized access error.
Test Users List
Short-Term Test User
Use the following test users for initial testing with cURL or Postman. This user always passes the possession check but no Prove Key is generated.
Phone Number | First Name | Last Name |
---|---|---|
2001004018 | Barbaraanne | Canet |
Phone Number | First Name | Last Name |
---|---|---|
2001004018 | Barbaraanne | Canet |
Phone Number | First Name | Last Name |
---|---|---|
+2001004029 | Janos | Martina |
After initial short-term testing, use the remaining test users to test your implementation.
Unify Test Users
Follow the Testing Steps for expected behavior per step.
Phone Number | First Name | Last Name |
---|---|---|
2001004014 | Lorant | Nerger |
2001004017 | Jesse | Mashro |
Phone Number | First Name | Last Name |
---|---|---|
2001004014 | Lorant | Nerger |
2001004017 | Jesse | Mashro |
Phone Number | First Name | Last Name |
---|---|---|
+2001004025 | Bertie | Fromont |
+2001004028 | Wendie | Strover |
Testing Steps
Now that you’ve done client-side, server-side, and CX implementation, test using the test users.
Follow the steps below to test the Prove Unify flow with Lorant Nerger on desktop. This user will pass the entire Unify flow using Prove’s possession and return success=true
in the /unify-status response.
Prompt Customer
Start the onboarding flow on the initial screen and enter the phone number for Lorant Nerger.
Initiate Start Request
Your front end will send the phone number, possession type, and final target URL to the back end. Your back end will then send the phone number to the /unify endpoint. The response will provide an auth token, correlation ID, and success=pending
because possession still needs to be performed.
Send Auth Token to the Front End
Your back end will send the authToken
to the front end. The front end will run Instant Link handling. You will see the following page.
Verify Mobile Number
Once the front end finishes the possession check, the back end calls the /unify-status endpoint with the correlation ID to validate the phone number. The response provides:
correlationId
that is tied to this flow.success=true
phoneNumber
that was initially passed.
You have a successful flow but no Prove key is placed as the Prove key only applies to mobile devices. Send the user on through your authenticated flow.
Follow the steps below to test the Prove Unify flow with Lorant Nerger on mobile. This user will fail Mobile Auth but pass OTP and return success=true
in the /unify-status response. The user can then be sent through the Prove Unify flow again using the same phone number with a Prove key, bypassing possession.
Prompt Customer
Start the onboarding flow on the initial screen and enter the phone number for Lorant Nerger.
Initiate Start Request
Your front end will send the phone number and possession type to the back end. Your back end will then send the phone number to the /unify endpoint. The response will provide an auth token, correlation ID, and success=pending
because possession still needs to be performed.
Send Auth Token to the Front End
Your back end will send the authToken
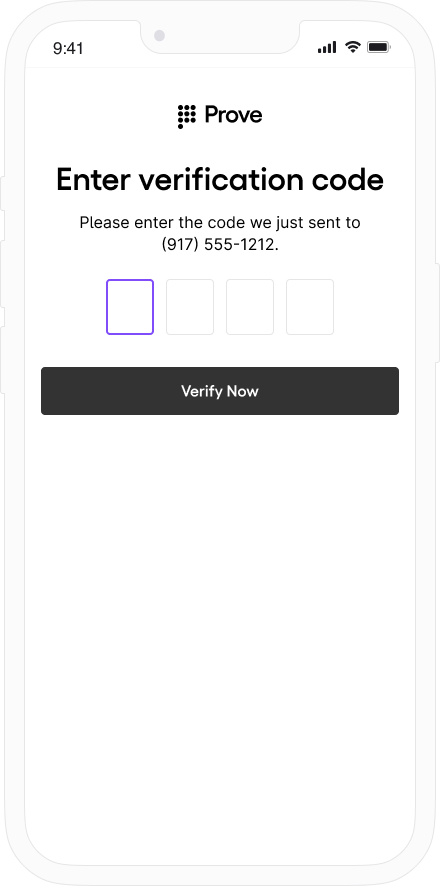
to the front end. The front end will fail Mobile Auth and then run OTP handling. You will see the following page. Enter 1234 to simulate a successful OTP.
Verify Mobile Number
Once the front end finishes the possession check, the back end calls the /unify-status endpoint with the correlation ID to validate the phone number. The response provides:
correlationId
that is tied to this flow.success=true
phoneNumber
that was initially passed.
You have a successful flow and a Prove key has been assigned to this phone number. Sending this user through again will bypass the possession check due to the Prove key. Send the user on through your authenticated flow.
Follow the steps below to test the Prove Unify flow with Lorant Nerger using customer-supplied possession. This user will pass the entire Unify flow using the customer’s possession and return success=true
in the /unify-bind response. The user can then be sent through the Prove Unify flow again using the same phone number with a Prove key, bypassing possession.
Prompt Customer
Start the onboarding flow on the initial screen and enter the phone number for Lorant Nerger.
Initiate Start Request
Your front end will send the phone number and possession type to the back end. Your back end will then send the phone number to the /unify endpoint. The response will provide an auth token, correlation ID, and success=pending
because possession still needs to be performed.
Verify Mobile Number
The back end then calls the /unify-status endpoint with the correlation ID to validate the phone number. The response provides:
correlationId
that is tied to this flow.success=possession_required
since Prove is not performing the possession check.phoneNumber
that was initially passed.
Bind Prove Key
The back end will then call the /unify-bind endpoint with the correlation ID and phone number. The response provides:
correlationId
that is tied to this flow.success=true
phoneNumber
that was initially passed.
You have a successful flow and a Prove key has been assigned to this phone number. Sending this user through again will bypass the possession check due to the Prove key. Send the user on through your authenticated flow.
Follow the steps below to test the Prove Unify flow with Lorant Nerger on desktop. This user will pass the entire Unify flow using Prove’s possession and return success=true
in the /unify-status response.
Prompt Customer
Start the onboarding flow on the initial screen and enter the phone number for Lorant Nerger.
Initiate Start Request
Your front end will send the phone number, possession type, and final target URL to the back end. Your back end will then send the phone number to the /unify endpoint. The response will provide an auth token, correlation ID, and success=pending
because possession still needs to be performed.
Send Auth Token to the Front End
Your back end will send the authToken
to the front end. The front end will run Instant Link handling. You will see the following page.
Verify Mobile Number
Once the front end finishes the possession check, the back end calls the /unify-status endpoint with the correlation ID to validate the phone number. The response provides:
correlationId
that is tied to this flow.success=true
phoneNumber
that was initially passed.
You have a successful flow but no Prove key is placed as the Prove key only applies to mobile devices. Send the user on through your authenticated flow.
Follow the steps below to test the Prove Unify flow with Lorant Nerger on mobile. This user will fail Mobile Auth but pass OTP and return success=true
in the /unify-status response. The user can then be sent through the Prove Unify flow again using the same phone number with a Prove key, bypassing possession.
Prompt Customer
Start the onboarding flow on the initial screen and enter the phone number for Lorant Nerger.
Initiate Start Request
Your front end will send the phone number and possession type to the back end. Your back end will then send the phone number to the /unify endpoint. The response will provide an auth token, correlation ID, and success=pending
because possession still needs to be performed.
Send Auth Token to the Front End
Your back end will send the authToken
to the front end. The front end will fail Mobile Auth and then run OTP handling. You will see the following page. Enter 1234 to simulate a successful OTP.
Verify Mobile Number
Once the front end finishes the possession check, the back end calls the /unify-status endpoint with the correlation ID to validate the phone number. The response provides:
correlationId
that is tied to this flow.success=true
phoneNumber
that was initially passed.
You have a successful flow and a Prove key has been assigned to this phone number. Sending this user through again will bypass the possession check due to the Prove key. Send the user on through your authenticated flow.
Follow the steps below to test the Prove Unify flow with Lorant Nerger using customer-supplied possession. This user will pass the entire Unify flow using the customer’s possession and return success=true
in the /unify-bind response. The user can then be sent through the Prove Unify flow again using the same phone number with a Prove key, bypassing possession.
Prompt Customer
Start the onboarding flow on the initial screen and enter the phone number for Lorant Nerger.
Initiate Start Request
Your front end will send the phone number and possession type to the back end. Your back end will then send the phone number to the /unify endpoint. The response will provide an auth token, correlation ID, and success=pending
because possession still needs to be performed.
Verify Mobile Number
The back end then calls the /unify-status endpoint with the correlation ID to validate the phone number. The response provides:
correlationId
that is tied to this flow.success=possession_required
since Prove is not performing the possession check.phoneNumber
that was initially passed.
Bind Prove Key
The back end will then call the /unify-bind endpoint with the correlation ID and phone number. The response provides:
correlationId
that is tied to this flow.success=true
phoneNumber
that was initially passed.
You have a successful flow and a Prove key has been assigned to this phone number. Sending this user through again will bypass the possession check due to the Prove key. Send the user on through your authenticated flow.
Follow the steps below to test the Prove Unify flow with Jesse Mashro on desktop. This user will fail the Unify flow using Prove’s possession and return success=false
in the /unify-status response.
Prompt Customer
Start the onboarding flow on the initial screen and enter the phone number for Jesse Mashro.
Initiate Start Request
Your front end will send the phone number, possession type, and final target URL to the back end. Your back end will then send the phone number to the /unify endpoint. The response will provide an auth token, correlation ID, and success=pending
because possession still needs to be performed.
Send Auth Token to the Front End
Your back end will send the authToken
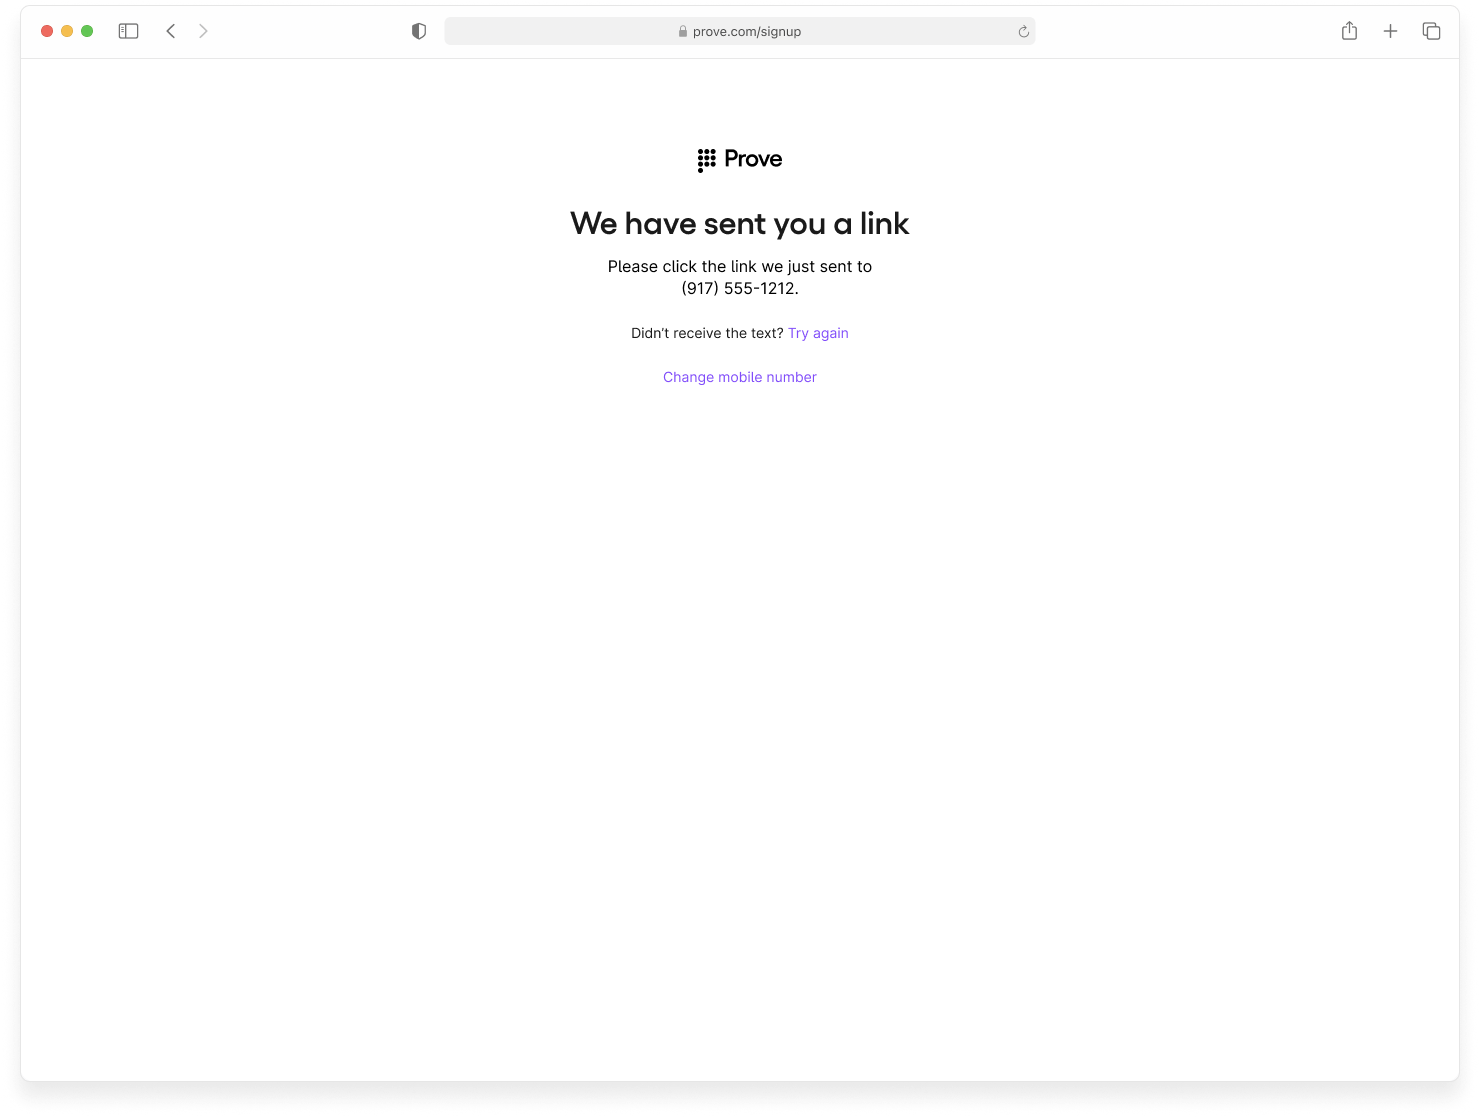
to the front end. The front end will run Instant Link handling. This user fails Instant Link.
Fail Possession Check
Once the front end finishes the possession check, the back end calls the /unify-status endpoint with the correlation ID to validate the phone number. The response provides:
correlationId
that is tied to this flow.success=false
phoneNumber
that was initially passed.
The test user failed. Send the user through your exception process.
Follow the steps below to test the Prove Unify flow with Jesse Mashro on mobile. This user will pass Mobile Auth and return success=true
in the /unify-status response. The user can then be sent through the Prove Unify flow again using the same phone number with a Prove key, bypassing possession.
Prompt Customer
Start the onboarding flow on the initial screen and enter the phone number for Jesse Mashro.
Initiate Start Request
Your front end will send the phone number and possession type to the back end. Your back end will then send the phone number to the /unify endpoint. The response will provide an auth token, correlation ID, and success=pending
because possession still needs to be performed.
Send Auth Token to the Front End
Your back end will send the authToken
to the front end. The front end will fail Mobile Auth and OTP without prompting.
Verify Mobile Number
Once the front end finishes the possession check, the back end calls the /unify-status endpoint with the correlation ID to validate the phone number. The response provides:
correlationId
that is tied to this flow.success=false
phoneNumber
that was initially passed.
The test user failed. Send the user through your exception process.
Follow the steps below to test the Prove Unify flow with Jesse Mashro using customer-supplied possession. This user will encounter a server error in the /unify-bind response, simulating an error when creating the Prove key.
Prompt Customer
Start the onboarding flow on the initial screen and enter the phone number for Jesse Mashro.
Initiate Start Request
Your front end will send the phone number and possession type to the back end. Your back end will then send the phone number to the /unify endpoint. The response will provide an auth token, correlation ID, and success=pending
because possession still needs to be performed.
Verify Mobile Number
The back end then calls the /unify-status endpoint with the correlation ID to validate the phone number. The response provides:
correlationId
that is tied to this flow.success=possession_required
since Prove is not performing the possession check.phoneNumber
that was initially passed.
Bind Prove Key
The back end will then call the /unify-bind endpoint with the correlation ID and phone number. You will receive a server error in the response.
The user has failed to generate a Prove key. Send the user through your exception process.
Follow the steps below to test the Prove Unify flow with Bertie Fromont on desktop. This user will pass the entire Unify flow using Prove’s possession and return success=true
in the /unify-status response.
Prompt Customer
Start the onboarding flow on the initial screen and enter the phone number for Bertie Fromont.
Initiate Start Request
Your front end will send the phone number, possession type, and final target URL to the back end. Your back end will then send the phone number to the /unify endpoint. The response will provide an auth token, correlation ID, and success=pending
because possession still needs to be performed.
Send Auth Token to the Front End
Your back end will send the authToken
to the front end. The front end will run Instant Link handling. You will see the following page.
Verify Mobile Number
Once the front end finishes the possession check, the back end calls the /unify-status endpoint with the correlation ID to validate the phone number. The response provides:
correlationId
that is tied to this flow.success=true
phoneNumber
that was initially passed.
You have a successful flow but no Prove key is placed as the Prove key only applies to mobile devices. Send the user on through your authenticated flow.
Follow the steps below to test the Prove Unify flow with Bertie Fromont on mobile. This user will fail Mobile Auth but pass OTP and return success=true
in the /unify-status response. The user can then be sent through the Prove Unify flow again using the same phone number with a Prove key, bypassing possession.
Prompt Customer
Start the onboarding flow on the initial screen and enter the phone number for Bertie Fromont.
Initiate Start Request
Your front end will send the phone number and possession type to the back end. Your back end will then send the phone number to the /unify endpoint. The response will provide an auth token, correlation ID, and success=pending
because possession still needs to be performed.
Send Auth Token to the Front End
Your back end will send the authToken
to the front end. The front end will run OTP handling. You will see the following page. Enter 1234 to simulate a successful OTP.
Verify Mobile Number
Once the front end finishes the possession check, the back end calls the /unify-status endpoint with the correlation ID to validate the phone number. The response provides:
correlationId
that is tied to this flow.success=true
phoneNumber
that was initially passed.
You have a successful flow and a Prove key has been assigned to this phone number. Send the user on through your authenticated flow.
Follow the steps below to test the Prove Unify flow with Bertie Fromont using customer-supplied possession. This user will pass the entire Unify flow using the customer’s possession and return success=true
in the /unify-bind response. The user can then be sent through the Prove Unify flow again using the same phone number with a Prove key, bypassing possession.
Prompt Customer
Start the onboarding flow on the initial screen and enter the phone number for Bertie Fromont.
Initiate Start Request
Your front end will send the phone number and possession type to the back end. Your back end will then send the phone number to the /unify endpoint. The response will provide an auth token, correlation ID, and success=pending
because possession still needs to be performed.
Verify Mobile Number
The back end then calls the /unify-status endpoint with the correlation ID to validate the phone number. The response provides:
correlationId
that is tied to this flow.success=possession_required
since Prove is not performing the possession check.phoneNumber
that was initially passed.
Bind Prove Key
The back end will then call the /unify-bind endpoint with the correlation ID and phone number. The response provides:
correlationId
that is tied to this flow.success=true
phoneNumber
that was initially passed.
You have a successful flow and a Prove key has been assigned to this phone number. Send the user on through your authenticated flow.
Follow the steps below to test the Prove Unify flow with Wendie Strover on desktop. This user will fail the Unify flow using Prove’s possession and return success=false
in the /unify-status response.
Prompt Customer
Start the onboarding flow on the initial screen and enter the phone number for Wendie Strover.
Initiate Start Request
Your front end will send the phone number, possession type, and final target URL to the back end. Your back end will then send the phone number to the /unify endpoint. The response will provide an auth token, correlation ID, and success=pending
because possession still needs to be performed.
Send Auth Token to the Front End
Your back end will send the authToken
to the front end. The front end will run Instant Link handling. You will see the following page.
Fail Possession Check
Once the front end finishes the possession check, the back end calls the /unify-status endpoint with the correlation ID to validate the phone number. The response provides:
correlationId
that is tied to this flow.success=false
phoneNumber
that was initially passed.
The test user failed. Send the user through your exception process.
Follow the steps below to test the Prove Unify flow with Wendie Strover on mobile. This user will pass Mobile Auth and return success=true
in the /unify-status response. The user can then be sent through the Prove Unify flow again using the same phone number with a Prove key, bypassing possession.
Prompt Customer
Start the onboarding flow on the initial screen and enter the phone number for Wendie Strover.
Initiate Start Request
Your front end will send the phone number and possession type to the back end. Your back end will then send the phone number to the /unify endpoint. The response will provide an auth token, correlation ID, and success=pending
because possession still needs to be performed.
Send Auth Token to the Front End
Your back end will send the authToken
to the front end. The front end will perform a successful Mobile Auth.
Verify Mobile Number
Once the front end finishes the possession check, the back end calls the /unify-status endpoint with the correlation ID to validate the phone number. The response provides:
correlationId
that is tied to this flow.success=true
phoneNumber
that was initially passed.
You have a successful flow and a Prove key has been assigned to this phone number. Send the user on through your authenticated flow.
Follow the steps below to test the Prove Unify flow with Wendie Strover using customer-supplied possession. This user will encounter a server error in the /unify-bind response, simulating an error when creating the Prove key.
Prompt Customer
Start the onboarding flow on the initial screen and enter the phone number for Wendie Strover.
Initiate Start Request
Your front end will send the phone number and possession type to the back end. Your back end will then send the phone number to the /unify endpoint. The response will provide an auth token, correlation ID, and success=pending
because possession still needs to be performed.
Verify Mobile Number
The back end then calls the /unify-status endpoint with the correlation ID to validate the phone number. The response provides:
correlationId
that is tied to this flow.success=possession_required
since Prove is not performing the possession check.phoneNumber
that was initially passed.
Bind Prove Key
The back end will then call the /unify-bind endpoint with the correlation ID and phone number. You will receive a server error in the response.
The user has failed to generate a Prove key. Send the user through your exception process.
Follow the steps below to test the Prove Unify flow with Lorant, Jesse, Bertie, or Wendie. This will introduce failures into the flow and return success=false
at various points.
Send Auth Token to the Front End
During the mobile flow, use 1111 to simulate a failed OTP when presented with the following OTP page.
Once the front end finishes the possession check, the back end calls the /unify-status endpoint with the correlation ID to validate the phone number.
The user then fails /unify-status.
The Prove flow is terminated and the front end proceeds to another authentication method.
Text
If you receive 400 or 500 response errors when running these test scenarios, refer to the Error and Status Codes page.
If you still have issues, send your correlationId
from a failing request. Use either the Support button in the Portal or contact your account representative.
For Production access, contact your sales representative.