Prerequisites
- Backend Unify integration — Your server can start a session and return an
authTokento the client (see the Unified Authentication implementation guide). - Credentials — Sandbox or Production access as provided by Prove.
- Android
- iOS
- Web
Installation
The Android SDK is a set of lightweight libraries delivered as Android Archive Repository files,.aar. The minimum supported version of Android is v7, level 24.Prove manages a maven repository with Android binaries to enable integration with Gradle.Update the dependencies object in the build.gradle file:dependencies {
// Existing dependencies are here.
// Add the Prove Link dependencies:
implementation 'com.prove.sdk:proveauth:6.10.7'
}
settings.gradle file with the Maven repository:dependencyResolutionManagement {
// Existing repository settings are here.
repositories {
// Existing repositories are here.
// Add the Prove Link Maven repository:
maven {
url = "https://prove.jfrog.io/artifactory/libs-public-maven/"
}
}
}
build.gradle file to also download dependency libraries:dependencies {
implementation fileTree('libs')
}
application@fullBackupContent value, you can resolve it by adding this line of code to your application AndroidManifest.xml file inside the <application>...</application> node. Add it as an attribute to the opening application tag:<application
...
tools:replace="android:fullBackupContent"
...>
</application>
Permissions
After install, confirm the SDK’s merged permissions meet your security and store policies. The SDK merges the following into your app manifest (you usually do not declare them again unless you need to document or override behavior):<!-- Required to perform authentication -->
<uses-permission android:name="android.permission.INTERNET" />
<!-- Required to access information about networks -->
<uses-permission android:name="android.permission.ACCESS_NETWORK_STATE" />
<!-- Required for ConnectivityManager.requestNetwork -->
<uses-permission android:name="android.permission.CHANGE_NETWORK_STATE" />
Send the type of flow: mobile
On Android, use the mobile flow: passmobile to Unify() on your server. OTP validation runs on the device; when it completes, your AuthFinishStep runs. For how this differs from desktop Web flows, see the Unified Authentication overview.Authenticate()
The SDK requires anauthToken as a parameter for the Authenticate() function. This token returns from the Unify() call of the server SDK. The token is session specific, limiting it to a single flow. It also expires after 15 minutes.Retrieve authToken
Send a request to your backend server with possession type, and an optional phone number if using the Prove possession check.String initialize(String phoneNumber, String possessionType) {
YourBackendClient backend = new YourBackendClient(); // Backend API client
// TODO: Build your InitializeRequest object
InitializeRequest initializeRequest = new InitializeRequest(phoneNumber, possessionType);
// Send an initialize request to your backend server to get authToken
InitializeResponse response = backend.initialize(initializeRequest);
// TODO: define your own InitializeResponse object to parse authToken string
return response.getAuthToken();
}
Setup authenticator
Once you have theauthToken, build the authenticator for the mobile flow.- Prove Possession
- Customer-Supplied OTP with Force Bind
Java
// Object implementing AuthFinishStep interface
AuthFinishStep authFinishStep = new AuthFinishStep() {
...
};
// Objects implementing OtpStartStep/OtpFinishStep interfaces
OtpStartStep otpStartStep = new OtpStartStep() {
...
};
OtpFinishStep otpFinishStep = new OtpFinishStep() {
...
};
ProveAuth proveAuth = ProveAuth.builder()
.withAuthFinishStep(authId -> verify(authId))
.withOtpFallback(otpStartStep, otpFinishStep)
.withContext(this)
.build();
Builder class offers a withTestMode(boolean testMode) method. This method permits simulated successful session results while connected to a Wi-Fi network only. Testing using a Wi-Fi connection is useful in the Sandbox environment.Java
ProveAuth proveAuth = ProveAuth.builder()
.withAuthFinishStep(authId -> verify(authId))
.withOtpFallback(otpStartStep, otpFinishStep)
.withContext(this)
.withTestMode(true) // Test mode flag
.build();
Java
// Object implementing AuthFinishStep interface
AuthFinishStep authFinishStep = new AuthFinishStep() {
...
};
ProveAuth proveAuth = ProveAuth.builder()
.withAuthFinishStep(authId -> verify(authId))
.withContext(this)
.build();
Builder class offers a withTestMode(boolean testMode) method. This method permits simulated successful session results while connected to a Wi-Fi network only. Testing using a Wi-Fi connection is useful in the Sandbox environment.Java
ProveAuth proveAuth = ProveAuth.builder()
.withAuthFinishStep(authId -> verify(authId))
.withContext(this)
.withTestMode(true) // Test mode flag
.build();
Performing the authentication
TheProveAuth object is thread safe. You can use it as a singleton. Most Prove Auth methods are blocking and therefore can’t execute in the main app thread. The app employs an executor service with a minimum of two threads to manage threads due to the ability to process concurrent blocking requests.public class MyAuthenticator {
private final MyBackendClient backend = new MyBackendClient(); // Backend API client
private ExecutorService executor = Executors.newCachedThreadPool();
private final AuthFinishStep authFinishStep = new AuthFinishStep() {
@Override
void execute(String authId) {
try {
AuthFinishResponse response = backend.authFinish("My App", authId);
... // Check the authentication status returned in the response
} catch (IOException e) {
String failureCause = e.getCause() != null ? e.getCause().getMessage() : "Failed to request authentication results";
// Authentication failed due to request failure
}
}
};
private ProveAuth proveAuth;
public MyAuthenticator(Context context) {
proveAuth = ProveAuth.builder()
.withAuthFinishStep(authFinishStep)
.withOtpFallback(otpStartStep, otpFinishStep)
.withContext(context)
.build();
}
public void authenticate() throws IOException, ProveAuthException {
AuthStartResponse response = backend.authStart("My Prove Auth App");
proveAuth.authenticate(response.getAuthToken());
}
}
public void authenticate() throws IOException, ProveAuthException {
// NOTE: blocking method proveAuth.authenticate() should be run in background thread
executor.submit(() -> {
AuthStartResponse response = backend.authStart("My Prove Auth App");
proveAuth.authenticate(response.getAuthToken());
}
}
Validate the mobile phone
In theAuthFinishStep, specify a function to call once the possession checks complete on the mobile phone. In the sample, notice an endpoint called /verify. This endpoint on your back end server calls the UnifyStatus() function to validate the phone number.// Send a verify request to get return customer information.
void verify(String authId) {
YourBackendClient backend = new YourBackendClient(); // Backend API client
// Build your VerifyRequest object
VerifyRequest verifyRequest = new VerifyRequest(authId, ...);
// Send a verify request to your backend server to get return customer information.
VerifyResponse response = backend.verify(verifyRequest);
}
Configure OTP
To use the Resend/Retry/Phone Change features, install the Android SDK version 6.5.0 or later.
withOtpFallback(otpStart: otpStartStep, otpFinish: otpFinishStep), requires implementing the OtpStartStep and OtpFinishStep.The OTP session has a two minute timeout from when it’s sent through SMS to when the customer can enter in the OTP.- Default
- Prompt for Phone Number
- Resend
- Retry OTP
- Phone Number Change
Follow these instructions if you are implementing OTP and you are passing in the phone number on the
/unify endpoint.Since you passed the phone number in the Unify() function, call OtpStartStepCallback.onSuccess(OtpStartInput); to communicate to the SDK you have the customer’s agreement to deliver the SMS message. Ensure you return an instance of OtpStartInput with empty string or null to OtpStartStepCallback.onSuccess() function.Call the OtpStartStepCallback.onError(); method to communicate to the SDK any issues while trying to obtain the phone number or the OTP. Report an error if the customer cancels the SMS transaction or presses the back button to leave the screen.In the finish step, call the OtpFinishStepCallback.onSuccess(OtpFinishInput); method to return the collected OTP value wrapped in OtpFinishInput.Swift
class OtpFinishStepNoPrompt: OtpFinishStep {
@ObservedObject var sheetObservable: SheetObservable
var callback: OtpFinishStepCallback?
init(sheetObservable: SheetObservable) {
self.sheetObservable = sheetObservable
}
// Implement this method to collect the OTP value delivered via SMS.
func execute(otpError: ProveAuthError?, callback: OtpFinishStepCallback) {
self.callback = callback
// Handle the OTP validation error if present.
// Signal to UI components to display OtpFinishView
DispatchQueue.main.async {
if case .otpValidationError = otpError {
print("found otpError: \(String(describing: otpError?.localizedDescription))")
// Signal to your UI components that the last provided OTP is invalid
self.sheetObservable.isOtpValidationError = true
} else {
self.sheetObservable.isOtpValidationError = false
}
self.sheetObservable.isOtpFinishActive = true
}
}
// Provide the collected OTP value to the SDK for validation.
func handleOtp(_ otp: String) {
guard let callback = self.callback else {
print("Error: OtpFinishStepCallback is not set ")
return
}
let otpFinishInput = OtpFinishInput(otp: otp)
callback.onSuccess(input: otpFinishInput)
}
// Notify the SDK of any issues encountered while obtaining the OTP value or if the user cancels the OTP flow.
func handleOtpFinishError() {
guard let callback = self.callback else {
print("Error: OtpFinishStepCallback is not set ")
return
}
callback.onError()
}
}
Follow these instructions if implementing MobileAuth in the US and collecting the phone number only if MobileAuth fails. This implements OTP without allowing SMS re-sends and phone number changes.In the start step, call the Implement the finish step:
International MobileAuth requires phone number input, whereas US MobileAuth allows silent authentication without phone number input.
OtpStartStepCallback.onSuccess(OtpStartInput); method to return the collected phone number to the SDK.Java
import com.prove.sdk.proveauth.OtpStartInput;
import com.prove.sdk.proveauth.OtpStartStep;
import com.prove.sdk.proveauth.OtpStartStepCallback;
import com.prove.sdk.proveauth.PhoneNumberValidationException;
import com.prove.sdk.proveauth.ProveAuthException;
public class PromptStart implements OtpStartStep {
@Override
public void execute(boolean phoneNumberNeeded, @Nullable ProveAuthException otpException,
OtpStartStepCallback callback) {
// If phone number is needed, need to ask the end user for phone number input.
if (phoneNumberNeeded) {
// If error message is found around phone number, handle it.
// The `PhoneNumberValidationException` is ONLY available when `phoneNumberNeeded`
// has a value.
if (otpException instanceof PhoneNumberValidationException) {
// Set to a variable and display it in a field.
// In this example, we don't do anything with the error.
String errorMsg = otpException.getMessage();
}
try {
// Prompt the user for phone number to receive OTP SMS. You can build UI to provide
// best UX based on your application and business logic, here we simplify to a
// generic function named promptForPhoneNumber which gives us the collected
// phone number.
String phoneNumber = promptForPhoneNumber();
callback.onSuccess(new OtpStartInput(phoneNumber));
} catch (Exception e) {
// if any issue with the phone number collection from the end user or the user
// wants to cancel then call onError to exit the flow.
// In this example we simplify it as catching an exception.
callback.onError();
}
} else {
// No phone number needed, no need to ask end user for input.
callback.onSuccess(new OtpStartInput(""));
}
}
}
Swift
class OtpFinishStepNoPrompt: OtpFinishStep {
@ObservedObject var sheetObservable: SheetObservable
var callback: OtpFinishStepCallback?
init(sheetObservable: SheetObservable) {
self.sheetObservable = sheetObservable
}
// Implement this method to collect the OTP value delivered via SMS.
func execute(otpError: ProveAuthError?, callback: OtpFinishStepCallback) {
self.callback = callback
// Handle the OTP validation error if present.
// Signal to UI components to display OtpFinishView
DispatchQueue.main.async {
if case .otpValidationError = otpError {
print("found otpError: \(String(describing: otpError?.localizedDescription))")
// Signal to your UI components that the last provided OTP is invalid
self.sheetObservable.isOtpValidationError = true
} else {
self.sheetObservable.isOtpValidationError = false
}
self.sheetObservable.isOtpFinishActive = true
}
}
// Provide the collected OTP value to the SDK for validation.
func handleOtp(_ otp: String) {
guard let callback = self.callback else {
print("Error: OtpFinishStepCallback is not set ")
return
}
let otpFinishInput = OtpFinishInput(otp: otp)
callback.onSuccess(input: otpFinishInput)
}
// Notify the SDK of any issues encountered while obtaining the OTP value or if the user cancels the OTP flow.
func handleOtpFinishError() {
guard let callback = self.callback else {
print("Error: OtpFinishStepCallback is not set ")
return
}
callback.onError()
}
}
Follow these instructions to allow the customer to request a new OTP via SMS using the same phone number. There is a max of three send attempts including the initial message.Implement the start step:You can then send a new OTP SMS to the same phone number by implementing the finish step like this:
Java
import com.prove.sdk.proveauth.OtpStartInput;
import com.prove.sdk.proveauth.OtpStartStep;
import com.prove.sdk.proveauth.OtpStartStepCallback;
import com.prove.sdk.proveauth.PhoneNumberValidationException;
import com.prove.sdk.proveauth.ProveAuthException;
public class PromptStart implements OtpStartStep {
@Override
public void execute(boolean phoneNumberNeeded, @Nullable ProveAuthException otpException,
OtpStartStepCallback callback) {
// If phone number is needed, need to ask the end user for phone number input.
if (phoneNumberNeeded) {
// If error message is found around phone number, handle it.
// The `PhoneNumberValidationException` is ONLY available when `phoneNumberNeeded`
// has a value.
if (otpException instanceof PhoneNumberValidationException) {
// Set to a variable and display it in a field.
// In this example, we don't do anything with the error.
String errorMsg = otpException.getMessage();
}
try {
// Prompt the user for phone number to receive OTP SMS. You can build UI to provide
// best UX based on your application and business logic, here we simplify to a
// generic function named promptForPhoneNumber which gives us the collected
// phone number.
String phoneNumber = promptForPhoneNumber();
callback.onSuccess(new OtpStartInput(phoneNumber));
} catch (Exception e) {
// if any issue with the phone number collection from the end user or the user
// wants to cancel then call onError to exit the flow.
// In this example we simplify it as catching an exception.
callback.onError();
}
} else {
// No phone number needed, no need to ask end user for input.
callback.onSuccess(new OtpStartInput(""));
}
}
}
Java
import com.prove.sdk.proveauth.OtpFinishInput;
import com.prove.sdk.proveauth.OtpFinishStep;
import com.prove.sdk.proveauth.OtpFinishStepCallback;
import com.prove.sdk.proveauth.OtpValidationException;
import com.prove.sdk.proveauth.ProveAuthException;
public class MultipleResendFinish implements OtpFinishStep {
@Override
public void execute(@Nullable ProveAuthException otpException,
OtpFinishStepCallback otpFinishStepCallback) {
// If error message is found, handle it.
if (otpException instanceof OtpValidationException) {
// Set to a variable and display it in a field.
// In this example, we don't do anything with the error.
String errorMsg = otpException.getMessage();
}
// Prompt the user for whether they received the SMS.
if (promptForResend("Didn't receive the SMS OTP? Click resend button for a new one!")) {
// If the end user wants to send again to the same phone number call onOtpResend().
otpFinishStepCallback.onOtpResend();
return;
}
try {
// Prompt the user for OTP delivered by SMS. You can build UI to provide
// best UX based on your application and business logic, here we simplify to a
// generic function named promptForOtpCode which gives us the OTP code.
String otpCode = promptForOtpCode();
otpFinishStepCallback.onSuccess(new OtpFinishInput(otpCode));
} catch (Exception e) {
// if any issue with the OTP collection from the end user or the user wants to cancel
// then call onError to exit the flow. In this example we simplify it as catching
// an exception.
otpFinishStepCallback.onError();
}
}
}
Follow these instructions to allow the customer to re-enter the OTP PIN if they type it wrong. There is a max of 3 attempts. To implement this capability, pass in Implement the finish step:
allowOTPRetry=true to the /unify endpoint.Implement the start step:Java
import com.prove.sdk.proveauth.OtpStartInput;
import com.prove.sdk.proveauth.OtpStartStep;
import com.prove.sdk.proveauth.OtpStartStepCallback;
import com.prove.sdk.proveauth.PhoneNumberValidationException;
import com.prove.sdk.proveauth.ProveAuthException;
public class PromptStart implements OtpStartStep {
@Override
public void execute(boolean phoneNumberNeeded, @Nullable ProveAuthException otpException,
OtpStartStepCallback callback) {
// If phone number is needed, need to ask the end user for phone number input.
if (phoneNumberNeeded) {
// If error message is found around phone number, handle it.
// The `PhoneNumberValidationException` is ONLY available when `phoneNumberNeeded`
// has a value.
if (otpException instanceof PhoneNumberValidationException) {
// Set to a variable and display it in a field.
// In this example, we don't do anything with the error.
String errorMsg = otpException.getMessage();
}
try {
// Prompt the user for phone number to receive OTP SMS. You can build UI to provide
// best UX based on your application and business logic, here we simplify to a
// generic function named promptForPhoneNumber which gives us the collected
// phone number.
String phoneNumber = promptForPhoneNumber();
callback.onSuccess(new OtpStartInput(phoneNumber));
} catch (Exception e) {
// if any issue with the phone number collection from the end user or the user
// wants to cancel then call onError to exit the flow.
// In this example we simplify it as catching an exception.
callback.onError();
}
} else {
// No phone number needed, no need to ask end user for input.
callback.onSuccess(new OtpStartInput(""));
}
}
}
Swift
class OtpFinishStepNoPrompt: OtpFinishStep {
@ObservedObject var sheetObservable: SheetObservable
var callback: OtpFinishStepCallback?
init(sheetObservable: SheetObservable) {
self.sheetObservable = sheetObservable
}
// Implement this method to collect the OTP value delivered via SMS.
func execute(otpError: ProveAuthError?, callback: OtpFinishStepCallback) {
self.callback = callback
// Handle the OTP validation error if present.
// Signal to UI components to display OtpFinishView
DispatchQueue.main.async {
if case .otpValidationError = otpError {
print("found otpError: \(String(describing: otpError?.localizedDescription))")
// Signal to your UI components that the last provided OTP is invalid
self.sheetObservable.isOtpValidationError = true
} else {
self.sheetObservable.isOtpValidationError = false
}
self.sheetObservable.isOtpFinishActive = true
}
}
// Provide the collected OTP value to the SDK for validation.
func handleOtp(_ otp: String) {
guard let callback = self.callback else {
print("Error: OtpFinishStepCallback is not set ")
return
}
let otpFinishInput = OtpFinishInput(otp: otp)
callback.onSuccess(input: otpFinishInput)
}
// Notify the SDK of any issues encountered while obtaining the OTP value or if the user cancels the OTP flow.
func handleOtpFinishError() {
guard let callback = self.callback else {
print("Error: OtpFinishStepCallback is not set ")
return
}
callback.onError()
}
}
Follow these instructions to allow the customer to re-enter their phone number. There is a max of three entries/send attempts.Implement the start step:You can prompt for a new phone number by implementing the finish step like this:
Manual Request RequiredTo enable phone number change capabilities on your credentials, contact your Prove representative.
Java
import com.prove.sdk.proveauth.OtpStartInput;
import com.prove.sdk.proveauth.OtpStartStep;
import com.prove.sdk.proveauth.OtpStartStepCallback;
import com.prove.sdk.proveauth.PhoneNumberValidationException;
import com.prove.sdk.proveauth.ProveAuthException;
public class PromptStart implements OtpStartStep {
@Override
public void execute(boolean phoneNumberNeeded, @Nullable ProveAuthException otpException,
OtpStartStepCallback callback) {
// If phone number is needed, need to ask the end user for phone number input.
if (phoneNumberNeeded) {
// If error message is found around phone number, handle it.
// The `PhoneNumberValidationException` is ONLY available when `phoneNumberNeeded`
// has a value.
if (otpException instanceof PhoneNumberValidationException) {
// Set to a variable and display it in a field.
// In this example, we don't do anything with the error.
String errorMsg = otpException.getMessage();
}
try {
// Prompt the user for phone number to receive OTP SMS. You can build UI to provide
// best UX based on your application and business logic, here we simplify to a
// generic function named promptForPhoneNumber which gives us the collected
// phone number.
String phoneNumber = promptForPhoneNumber();
callback.onSuccess(new OtpStartInput(phoneNumber));
} catch (Exception e) {
// if any issue with the phone number collection from the end user or the user
// wants to cancel then call onError to exit the flow.
// In this example we simplify it as catching an exception.
callback.onError();
}
} else {
// No phone number needed, no need to ask end user for input.
callback.onSuccess(new OtpStartInput(""));
}
}
}
Java
import com.prove.sdk.proveauth.OtpFinishInput;
import com.prove.sdk.proveauth.OtpFinishStep;
import com.prove.sdk.proveauth.OtpFinishStepCallback;
import com.prove.sdk.proveauth.OtpValidationException;
import com.prove.sdk.proveauth.ProveAuthException;
public class PhoneChangeFinish implements OtpFinishStep {
@Override
public void execute(@Nullable ProveAuthException otpException,
OtpFinishStepCallback otpFinishStepCallback) {
// If error message is found, handle it.
if (otpException instanceof OtpValidationException) {
// Set to a variable and display it in a field.
// In this example, we don't do anything with the error.
String errorMsg = otpException.getMessage();
}
// Prompt the user for whether they received the SMS.
if (promptForPhoneNumberChange("Didn't receive the SMS OTP? Try a different phone number.")) {
// If the end user wants to correct the phone number already in use, or changing to a
// different phone number to receive the future SMS OTP, call onMobileNumberChange(), and
// the otpStartStep will re-prompt for phone number input from the end user.
otpFinishStepCallback.onMobileNumberChange();
return;
}
try {
// Prompt the user for OTP delivered by SMS. You can build UI to provide
// best UX based on your application and business logic, here we simplify to a
// generic function named promptForOtpCode which gives us the OTP code.
String otpCode = promptForOtpCode();
otpFinishStepCallback.onSuccess(new OtpFinishInput(otpCode));
} catch (Exception e) {
// if any issue with the OTP collection from the end user or the user wants to cancel
// then call onError to exit the flow. In this example we simplify it as catching
// an exception.
otpFinishStepCallback.onError();
}
}
}
Configure Instant Link
Instant Link for Android is an add-on feature. To enable, contact your Prove representative.
Prerequisites
- Instant Link is enabled for your project (contact your Prove representative if needed).
- Verified App Links (recommended) so the SMS redirect opens your app with the full URL string. See App Links in the Android documentation.
withInstantLinkFallback(InstantLinkStartStep startStep, @Nullable InstantLinkRetryStep retryStep). Implement InstantLinkStartStep in every flow. Add InstantLinkRetryStep only if you support Resend or Phone Number Change (see those tabs). When you have a mobile number, pass it in InstantLinkStartInput (for example the mobileNumber field) to callback.onSuccess(...).Configure the client
Implement the Instant Link start step
Open the tab that matches how the phone number is collected and sent to Prove.Allow a new SMS to the same number (up to three send attempts including the first).Implement the start step:Then implement Allow the customer to re-enter the phone number (up to three entries/send attempts).Implement the start step:Then implement
- Default
- Prompt for Phone Number
- Resend
- Phone Number Change
Use this path when the server already has the phone number (for example from your initial Start call) and the client must not prompt again.Call
callback.onSuccess(InstantLinkStartInput input) so the SDK knows the customer agreed to receive the SMS.Java
InstantLinkStartStep noPromptStartStep = (phoneNumberNeeded, instantLinkError, callback) -> {
// No phone number needed, no need to ask end user for input.
if (!phoneNumberNeeded) {
callback.onSuccess(new InstantLinkStartInput(""));
}
};
Use this path when the client collects the number and you do not need resend or phone-number change.Call
callback.onSuccess(InstantLinkStartInput input) with the collected number. Call callback.onError() if collection fails, the customer cancels, or they leave the Instant Link start UI (for example with the back button).Java
InstantLinkStartStep promptStartStep = (phoneNumberNeeded, instantLinkError, callback) -> {
// No phone number needed, no need to ask end user for input.
if (phoneNumberNeeded) {
// If error message is found around phone number, handle it.
// The `PhoneNumberValidationException` is ONLY available when `phoneNumberNeeded`
// has a value.
if (instantLinkError instanceof PhoneNumberValidationException) {
// Set to a variable and display it in a field.
// In this example, we don't do anything with the error.
String errorMsg = instantLinkError.getMessage();
}
try {
// Prompt the user for phone number to receive InstantLink SMS.
// You can build UI to provide best UX based on your application and business logic,
// here we simplify to a generic function named promptForPhoneNumber which gives us
// the collected phone number.
String phoneNumber = promptForPhoneNumber();
callback.onSuccess(new InstantLinkStartInput(phoneNumber));
} catch (Exception e) {
// if any issue with the phone number collection from the end user or the user
// wants to cancel then call onError to exit the flow.
// In this example we simplify it as catching an exception.
callback.onError();
}
} else {
// No phone number needed, no need to ask end user for input.
callback.onSuccess(new InstantLinkStartInput(""));
}
};
To use the Resend/Phone Number Change features, install the Android SDK version 6.10.3 or later.
Java
InstantLinkStartStep promptStartStep = (phoneNumberNeeded, instantLinkError, callback) -> {
// No phone number needed, no need to ask end user for input.
if (phoneNumberNeeded) {
// If error message is found around phone number, handle it.
// The `PhoneNumberValidationException` is ONLY available when `phoneNumberNeeded`
// has a value.
if (instantLinkError instanceof PhoneNumberValidationException) {
// Set to a variable and display it in a field.
// In this example, we don't do anything with the error.
String errorMsg = instantLinkError.getMessage();
}
try {
// Prompt the user for phone number to receive InstantLink SMS.
// You can build UI to provide best UX based on your application and business logic,
// here we simplify to a generic function named promptForPhoneNumber which gives us
// the collected phone number.
String phoneNumber = promptForPhoneNumber();
callback.onSuccess(new InstantLinkStartInput(phoneNumber));
} catch (Exception e) {
// if any issue with the phone number collection from the end user or the user
// wants to cancel then call onError to exit the flow.
// In this example we simplify it as catching an exception.
callback.onError();
}
} else {
// No phone number needed, no need to ask end user for input.
callback.onSuccess(new InstantLinkStartInput(""));
}
};
InstantLinkRetryStep so the customer can request another SMS, for example:Java
InstantLinkRetryStep promptMultiResendRetryStep = callback -> {
// Prompt the user for whether they received the SMS.
if (promptForResend(
"Didn't receive the InstantLink SMS? Click resend button for a new one!")) {
// If the end user wants to send again to the same phone number call onResend().
callback.onResend();
}
};
To use the Resend/Phone Number Change features, install the Android SDK version 6.10.3 or later.
Manual Request RequiredTo enable phone number change capabilities on your credentials, contact your Prove representative.
Java
InstantLinkStartStep promptStartStep = (phoneNumberNeeded, instantLinkError, callback) -> {
// No phone number needed, no need to ask end user for input.
if (phoneNumberNeeded) {
// If error message is found around phone number, handle it.
// The `PhoneNumberValidationException` is ONLY available when `phoneNumberNeeded`
// has a value.
if (instantLinkError instanceof PhoneNumberValidationException) {
// Set to a variable and display it in a field.
// In this example, we don't do anything with the error.
String errorMsg = instantLinkError.getMessage();
}
try {
// Prompt the user for phone number to receive InstantLink SMS.
// You can build UI to provide best UX based on your application and business logic,
// here we simplify to a generic function named promptForPhoneNumber which gives us
// the collected phone number.
String phoneNumber = promptForPhoneNumber();
callback.onSuccess(new InstantLinkStartInput(phoneNumber));
} catch (Exception e) {
// if any issue with the phone number collection from the end user or the user
// wants to cancel then call onError to exit the flow.
// In this example we simplify it as catching an exception.
callback.onError();
}
} else {
// No phone number needed, no need to ask end user for input.
callback.onSuccess(new InstantLinkStartInput(""));
}
};
InstantLinkRetryStep to collect a new number, for example:Java
InstantLinkRetryStep promptPhoneNumChangeRetryStep = callback -> {
// Prompt the user for whether they received the SMS.
if (promptForChangePhoneNumber(
"Didn't receive the InstantLink SMS? Try a different phone number.")) {
// If the end user wants to send again to the same phone number call onResend().
callback.onResend();
}
};
Handle the redirect and resume the session
After the user finishes the web step outside your app, Prove redirects to the The redirect URL is your original
If required parameters are missing or invalid, the SDK throws
finalTargetUrl from your server Start call. Your App Link (or equivalent) must deliver that URL into your app so you can pass the full string—including query parameters—into finishInstantLink(String redirectUrl).Call finishInstantLink from the code path that handles the incoming deep link (for example onCreate() in your App Link activity).Register an activity similar to this (replace the host with yours):<activity android:name=".MyAppLinkHandlerActivity"
android:exported="true"
android:launchMode="singleTask"
android:excludeFromRecents="true"
android:taskAffinity="">
<intent-filter android:autoVerify="true">
<action android:name="android.intent.action.VIEW" />
<category android:name="android.intent.category.DEFAULT" />
<category android:name="android.intent.category.BROWSABLE" />
<data android:scheme="https" android:host="my.applink.com" />
</intent-filter>
</activity>
finalTargetUrl plus parameters the SDK needs. Example: if Start used https://yourDeepLinkUrl.com, the link might look like https://yourDeepLinkUrl.com?asc=true&authId=some-uuid-string.| Parameter | Meaning |
|---|---|
asc | "true" or "false": whether the server considers the auth session complete. |
authId | UUID for the session; the SDK uses it to match the redirect to the in-progress client session. |
ProveAuthException and does not continue the flow.Verify: In Sandbox, complete a flow where the SMS opens your handler activity; finishInstantLink should run with the full URL and the session should resume without ProveAuthException from a well-formed redirect.Installation
Prove provides the iOS SDK in Swift. It has a download size of 2.5 MB and an install size of 1.5 MB for the minimum required components. It relies on iOS native APIs. The iOS SDK supports the earlier three major versions. Prove has seen successful transactions with iOS v11.Xcode RequirementTo integrate with our iOS SDKs, build apps with Xcode 16.0 or later.
Prerequisites
- Xcode — Use the Xcode version required for your Prove iOS SDK (see the installation warning on this page if present).
- CocoaPods path — Ruby and the
cocoapods-artplugin; ability to edit the Podfile and runpod install. - SPM path — Swift toolchain with
swift package-registryavailable in your environment (terminal).
Add the dependency
- CocoaPods
- Swift Package Manager
Configure the Prove CocoaPods source, declare ProveAuth, then install pods.
# Install the cocoapods-art plugin (Artifactory)
gem install cocoapods-art
# Add the Prove pod repository
pod repo-art add prove.jfrog.io https://prove.jfrog.io/artifactory/api/pods/libs-public-cocoapods
# In your Podfile, add the Prove pod repository as a source
plugin 'cocoapods-art', :sources => [
'prove.jfrog.io'
]
# In your Podfile, add the SDK pod (pin the version you were onboarded to)
pod 'ProveAuth', '6.10.4'
# Install pods
pod install
Upgrading the SDK (CocoaPods)When you upgrade, set a single
ProveAuth version in your Podfile. Don’t add separate versions for ProveBase, ProveDeviceAuth, or ProveMobileAuth. CocoaPods resolves those as dependencies of ProveAuth, which keeps the components aligned and helps avoid version conflicts.Configure the Swift package registry
Register and log in to the Prove Swift registry (needed for both Xcode’s package UI andPackage.swift):swift package-registry set --global "https://prove.jfrog.io/artifactory/api/swift/libs-public-swift"
swift package-registry login "https://prove.jfrog.io/artifactory/api/swift/libs-public-swift"
# Press Enter when prompted for access token
Public registryThis registry is publicly accessible; you do not need a password or access token. Press Enter when prompted for an access token.
swift.proveauth from Xcode or from Package.swift.Add the package
Option A — Xcode- In Xcode, choose File → Add Package Dependencies.
-
Search for
swift.proveauthand add it to your target. -
For production builds, pin an exact package version (for example 6.10.4) so CI and local builds stay consistent.
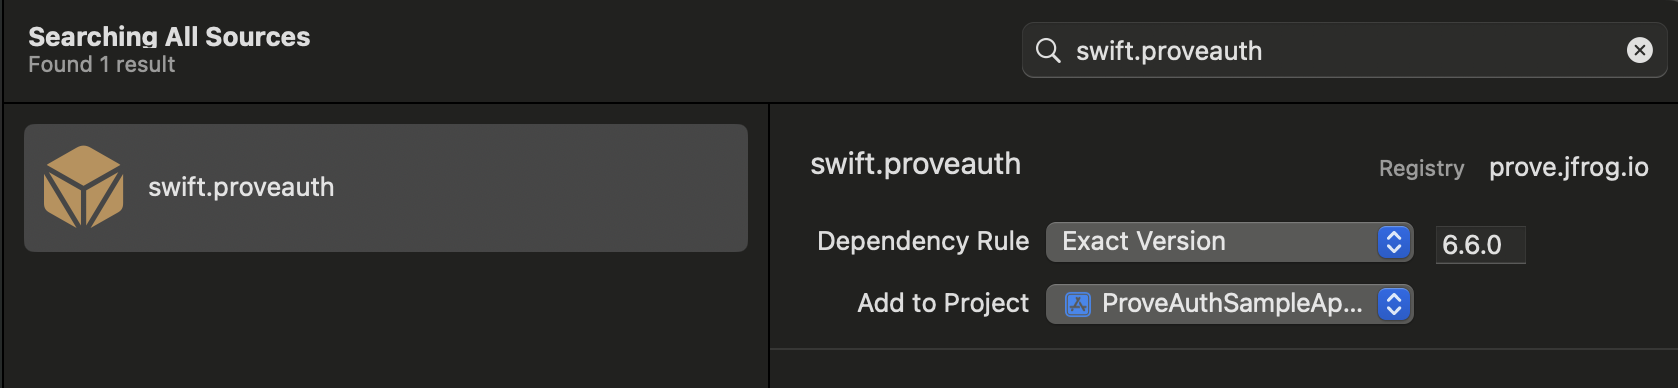
swift.proveauth in the package search field if it does not appear automatically.Option B — Package.swiftAdd the dependency and product to Package.swift:Swift
// swift-tools-version: 5.9
import PackageDescription
let package = Package(
name: "YourApp",
platforms: [.iOS(.v12)],
dependencies: [
.package(id: "swift.proveauth", from: "6.10.4"),
],
targets: [
.target(
name: "YourApp",
dependencies: [
.product(name: "ProveAuth", package: "swift.proveauth"),
]
)
]
)
swift package resolve
Upgrading the SDK (Swift Package Manager)When you upgrade, change only the
swift.proveauth package version. Dependent libraries resolve with that package.Verify
- Open the workspace (
.xcworkspacefor CocoaPods, or your SPM project) and build the app target (⌘B). The project should compile without missing ProveAuth symbols. - If resolution fails, confirm registry / Pod repo commands completed without errors and that you are on a network that can reach
prove.jfrog.io.
Send the type of flow: mobile
On iOS, use the mobile flow: passmobile to Unify() on your server. OTP validation runs on the device; when it completes, your AuthFinishStep runs. For how this differs from desktop Web flows, see the Unified Authentication overview.Authenticate()
The SDK requires an authToken as a parameter for the Authenticate() function. This token returns from the Unify() call of the server-side SDK. The token is session specific so it’s used for a single flow. It also expires after 15 minutes.Retrieve authToken
To start the flow, send a request to your back-end server with the possession type. Include a phone number if you are using Prove’s possession check.Swift
// The below example uses native iOS URLSession, but any other
// alternative networking approaches should also work
func initialize(phoneNumber: String, possessionType: String, completion: @escaping (Result<String, Error>) -> Void) {
guard let url = URL(string: "\(backendUrl)/initialize") else {
completion(.failure(URLError(.badURL)))
return
}
var request = URLRequest(url: url)
request.httpMethod = "POST"
request.addValue("application/json", forHTTPHeaderField: "Accept")
request.addValue("application/json", forHTTPHeaderField: "Content-Type")
// Set up the request body
let body: [String: Any] = [
"phoneNumber": phoneNumber,
"possessionType": possessionType
]
do {
request.httpBody = try JSONSerialization.data(withJSONObject: body, options: [])
} catch {
completion(.failure(error))
return
}
// Perform the request
let task = URLSession.shared.dataTask(with: request) { data, response, error in
// Handle network or connection errors
if let error = error {
completion(.failure(error))
return
}
// Check HTTP response status code
if let httpResponse = response as? HTTPURLResponse,
httpResponse.statusCode != 200 {
let statusError = NSError(domain: "", code: httpResponse.statusCode, userInfo: [NSLocalizedDescriptionKey: "HTTP error with status code: \(httpResponse.statusCode)"])
completion(.failure(statusError))
return
}
guard let data = data else {
let noDataError = NSError(domain: "", code: 0, userInfo: [NSLocalizedDescriptionKey: "No data received"])
completion(.failure(noDataError))
return
}
do {
if let json = try JSONSerialization.jsonObject(with: data, options: []) as? [String: Any],
let authToken = json["authToken"] as? String {
completion(.success(authToken))
} else {
let parsingError = NSError(domain: "", code: 0, userInfo: [NSLocalizedDescriptionKey: "Failed to parse JSON or authToken is missing"])
completion(.failure(parsingError))
}
} catch {
completion(.failure(error))
}
}
// Start the network call
task.resume()
}
Setup authenticator
Once you have theauthToken, build the authenticator for the mobile flow.- Prove Possession
- Customer-Supplied OTP with Force Bind
Swift
// Object implementing ProveAuthFinishStep protocols
let finishStep = FinishAuthStep()
// Objects implementing OtpStartStep/OtpFinishStep protocols
let otpStartStep = MobileOtpStartStep()
let otpFinishStep = MobileOtpFinishStep()
let proveAuthSdk: ProveAuth
proveAuthSdk = ProveAuth.builder(authFinish: finishStep)
.withOtpFallback(otpStart: otpStartStep, otpFinish: otpFinishStep)
.build()
Swift
// Object implementing ProveAuthFinishStep protocols
let finishStep = FinishAuthStep()
let proveAuthSdk: ProveAuth
proveAuthSdk = ProveAuth.builder(authFinish: finishStep)
.build()
Swift
proveAuthSdk = ProveAuth.builder(authFinish: finishStep)
.withMobileAuthTestMode() // Test mode flag
.build()
Performing the authentication
The Prove Auth object is thread safe and used as a singleton. Most Prove Auth methods are blocking and therefore can’t execute in the main app thread. The app employs an executor service with a minimum of two threads to manage threads due to the ability to process concurrent blocking requests.Swift
// authToken retrieved from your server via StartAuthRequest
proveAuthSdk.authenticate(authToken) { error in
DispatchQueue.main.async {
self.messages.finalResultMessage = "ProveAuth.authenticate returned error: \(error.localizedDescription)"
print(self.messages.finalResultMessage)
}
}
Validate the mobile phone
In theAuthFinishStep, specify a function to call once the possession checks complete on the mobile phone. In the sample, notice an endpoint called /verify. This endpoint on your back end server calls the UnifyStatus() function to validate the phone number.Swift
// Send a verify request.
// The below example uses native iOS URLSession, but any other
// alternative networking approaches should also work
func unifyVerify(authId: String, completion: @escaping (Error?) -> Void) {
guard let url = URL(string: "\(backendUrl)/verify") else {
completion(URLError(.badURL))
return
}
// Create the request
var request = URLRequest(url: url)
request.httpMethod = "POST"
request.addValue("application/json", forHTTPHeaderField: "Accept")
request.addValue("application/json", forHTTPHeaderField: "Content-Type")
// Set up the request body (empty JSON object) - authId is not needed so you can ignore.
let body: [String: Any] = ["authId": authId]
do {
request.httpBody = try JSONSerialization.data(withJSONObject: body, options: [])
} catch {
completion(error)
return
}
// Perform the request
let task = URLSession.shared.dataTask(with: request) { _, response, error in
if let error = error {
completion(error)
return
}
// Check HTTP response status code
if let httpResponse = response as? HTTPURLResponse,
httpResponse.statusCode != 200 {
let statusError = NSError(domain: "", code: httpResponse.statusCode, userInfo: [NSLocalizedDescriptionKey: "HTTP error with status code: \(httpResponse.statusCode)"])
completion(statusError)
return
}
completion(nil)
}
// Start the network call
task.resume()
}
Configure OTP
To use the Resend/Retry/Phone Change features, install the iOS SDK version 6.5.1 or later.
withOtpFallback(otpStart: otpStartStep, otpFinish: otpFinishStep), requires implementing the OtpStartStep and OtpFinishStep.The OTP session has a two minute timeout from when it’s sent through SMS to when the customer can enter in the OTP.- Default
- Prompt for Phone Number
- Resend
- Retry OTP
- Phone Number Change
Follow these instructions if you are implementing OTP and you are passing in the phone number on the Call the
/unify endpoint. In this case, you’ve already prompted for a phone number so don’t prompt for it in the client SDK.Since you passed the phone number in the Unify() function, call callback.onSuccess(input: nil) to communicate to the SDK you have the customer’s agreement to deliver the SMS message.Swift
class OtpStartStepNoPrompt: OtpStartStep {
@ObservedObject var sheetObservable: SheetObservable
var callback: OtpStartStepCallback?
init(sheetObservable: SheetObservable) {
self.sheetObservable = sheetObservable
}
// Implement this method to handle phone number collection for SMS OTP,
// or to obtain user confirmation for initiating an SMS message.
func execute(
phoneNumberNeeded: Bool, phoneValidationError: ProveAuthError?, callback: OtpStartStepCallback
) {
self.callback = callback
// Since no phone number is needed, don't prompt the user.
callback.onSuccess(input: nil)
}
}
callback.onError() method to communicate to the SDK any issues while trying to obtain the phone number or the OTP. Report an error if the customer cancels the SMS transaction or presses the back button to leave the screen.Swift
class OtpFinishStepNoPrompt: OtpFinishStep {
@ObservedObject var sheetObservable: SheetObservable
var callback: OtpFinishStepCallback?
init(sheetObservable: SheetObservable) {
self.sheetObservable = sheetObservable
}
// Implement this method to collect the OTP value delivered via SMS.
func execute(otpError: ProveAuthError?, callback: OtpFinishStepCallback) {
self.callback = callback
// Handle the OTP validation error if present.
// Signal to UI components to display OtpFinishView
DispatchQueue.main.async {
if case .otpValidationError = otpError {
print("found otpError: \(String(describing: otpError?.localizedDescription))")
// Signal to your UI components that the last provided OTP is invalid
self.sheetObservable.isOtpValidationError = true
} else {
self.sheetObservable.isOtpValidationError = false
}
self.sheetObservable.isOtpFinishActive = true
}
}
// Provide the collected OTP value to the SDK for validation.
func handleOtp(_ otp: String) {
guard let callback = self.callback else {
print("Error: OtpFinishStepCallback is not set ")
return
}
let otpFinishInput = OtpFinishInput(otp: otp)
callback.onSuccess(input: otpFinishInput)
}
// Notify the SDK of any issues encountered while obtaining the OTP value or if the user cancels the OTP flow.
func handleOtpFinishError() {
guard let callback = self.callback else {
print("Error: OtpFinishStepCallback is not set ")
return
}
callback.onError()
}
}
Follow these instructions if implementing MobileAuth in the US and collecting the phone number only if MobileAuth fails. This implements OTP without allowing SMS re-sends and phone number changes.In the start step, call the Implement the finish step:
International MobileAuth requires phone number input, whereas US MobileAuth allows silent authentication without phone number input.
callback.onSuccess(input: otpStartInput) method to return the collected phone number to the SDK.Swift
class OtpStartStepWithPrompt: OtpStartStep {
@ObservedObject var sheetObservable: SheetObservable
var callback: OtpStartStepCallback?
init(sheetObservable: SheetObservable) {
self.sheetObservable = sheetObservable
}
func execute(
phoneNumberNeeded: Bool, phoneValidationError: ProveAuthError?, callback: OtpStartStepCallback
) {
self.callback = callback
if !phoneNumberNeeded {
// If no phone number is needed, then don't prompt the user.
callback.onSuccess(input: nil)
} else {
DispatchQueue.main.async {
// If a phone number validation error is detected, ensure it is handled to provide feedback to the user.
if case .phoneNumberValidationError = phoneValidationError {
print(
"found phoneValidationError: \(String(describing: phoneValidationError?.localizedDescription))"
)
// Update UI components to display OtpStartView with the phone number validation error.
self.sheetObservable.isPhoneValidationError = true
} else {
self.sheetObservable.isPhoneValidationError = false
}
// Update UI components to display OtpStartView if a phone number is needed.
self.sheetObservable.isOtpStartActive = true
}
}
}
// Return collected phone number to the SDK
func handlePhoneNumber(phoneNumber: String) {
guard let callback = self.callback else {
print("Error: OtpStartStepCallback is not set ")
return
}
let otpStartInput = OtpStartInput(phoneNumber: phoneNumber)
// This is how you pass collected phone number to SDK
callback.onSuccess(input: otpStartInput)
}
// Communicate any issues encountered while trying to obtain the phone number to the SDK.
// Error should be reported if the customer explicitly cancels the SMS OTP transaction
// or presses the back button to exit out the SMS OTP start step screen.
func handleOtpStartError() {
guard let callback = self.callback else {
print("Error: OtpStartStepCallback is not set ")
return
}
callback.onError()
}
}
Swift
class OtpFinishStepNoPrompt: OtpFinishStep {
@ObservedObject var sheetObservable: SheetObservable
var callback: OtpFinishStepCallback?
init(sheetObservable: SheetObservable) {
self.sheetObservable = sheetObservable
}
// Implement this method to collect the OTP value delivered via SMS.
func execute(otpError: ProveAuthError?, callback: OtpFinishStepCallback) {
self.callback = callback
// Handle the OTP validation error if present.
// Signal to UI components to display OtpFinishView
DispatchQueue.main.async {
if case .otpValidationError = otpError {
print("found otpError: \(String(describing: otpError?.localizedDescription))")
// Signal to your UI components that the last provided OTP is invalid
self.sheetObservable.isOtpValidationError = true
} else {
self.sheetObservable.isOtpValidationError = false
}
self.sheetObservable.isOtpFinishActive = true
}
}
// Provide the collected OTP value to the SDK for validation.
func handleOtp(_ otp: String) {
guard let callback = self.callback else {
print("Error: OtpFinishStepCallback is not set ")
return
}
let otpFinishInput = OtpFinishInput(otp: otp)
callback.onSuccess(input: otpFinishInput)
}
// Notify the SDK of any issues encountered while obtaining the OTP value or if the user cancels the OTP flow.
func handleOtpFinishError() {
guard let callback = self.callback else {
print("Error: OtpFinishStepCallback is not set ")
return
}
callback.onError()
}
}
Follow these instructions to allow the customer to request a new OTP via SMS using the same phone number. There is a max of three send attempts including the initial message.Implement the start step:You can then send a new OTP SMS to the same phone number by implementing the finish step like this:
Swift
class OtpStartStepWithPrompt: OtpStartStep {
@ObservedObject var sheetObservable: SheetObservable
var callback: OtpStartStepCallback?
init(sheetObservable: SheetObservable) {
self.sheetObservable = sheetObservable
}
func execute(
phoneNumberNeeded: Bool, phoneValidationError: ProveAuthError?, callback: OtpStartStepCallback
) {
self.callback = callback
if !phoneNumberNeeded {
// If no phone number is needed, then don't prompt the user.
callback.onSuccess(input: nil)
} else {
DispatchQueue.main.async {
// If a phone number validation error is detected, ensure it is handled to provide feedback to the user.
if case .phoneNumberValidationError = phoneValidationError {
print(
"found phoneValidationError: \(String(describing: phoneValidationError?.localizedDescription))"
)
// Update UI components to display OtpStartView with the phone number validation error.
self.sheetObservable.isPhoneValidationError = true
} else {
self.sheetObservable.isPhoneValidationError = false
}
// Update UI components to display OtpStartView if a phone number is needed.
self.sheetObservable.isOtpStartActive = true
}
}
}
// Return collected phone number to the SDK
func handlePhoneNumber(phoneNumber: String) {
guard let callback = self.callback else {
print("Error: OtpStartStepCallback is not set ")
return
}
let otpStartInput = OtpStartInput(phoneNumber: phoneNumber)
// This is how you pass collected phone number to SDK
callback.onSuccess(input: otpStartInput)
}
// Communicate any issues encountered while trying to obtain the phone number to the SDK.
// Error should be reported if the customer explicitly cancels the SMS OTP transaction
// or presses the back button to exit out the SMS OTP start step screen.
func handleOtpStartError() {
guard let callback = self.callback else {
print("Error: OtpStartStepCallback is not set ")
return
}
callback.onError()
}
}
Swift
class OtpFinishStepMultipleResend: OtpFinishStep {
@ObservedObject var sheetObservable: SheetObservable
var callback: OtpFinishStepCallback?
init(sheetObservable: SheetObservable) {
self.sheetObservable = sheetObservable
}
// Implement this method to collect the OTP value delivered in the SMS message.
func execute(otpError: ProveAuthError?, callback: OtpFinishStepCallback) {
self.callback = callback
// Handle the OTP validation error if present.
// Update your UI to display the OtpFinishView
DispatchQueue.main.async {
if case .otpValidationError = otpError {
print("found otpError: \(String(describing: otpError?.localizedDescription))")
// Update your UI to indicate that the provided OTP is invalid
self.sheetObservable.isOtpValidationError = true
} else {
self.sheetObservable.isOtpValidationError = false
}
self.sheetObservable.isOtpFinishActive = true
}
}
// Return the OTP value to the SDK
func handleOtp(_ otp: String) {
guard let callback = self.callback else {
print("Error: OtpFinishStepCallback is not set ")
return
}
let otpFinishInput = OtpFinishInput(otp: otp)
callback.onSuccess(input: otpFinishInput)
}
// Communicate to the SDK any issues when host app trys to obtain the OTP value
// or when users cancel the OTP flow
func handleOtpFinishError() {
guard let callback = self.callback else {
print("Error: OtpFinishStepCallback is not set ")
return
}
callback.onError()
}
// Call this method to request a new OTP code for the same mobile number.
func sendNewOtp() {
guard let callback = self.callback else {
print("Error: OtpFinishStepCallback is not set ")
return
}
callback.onOtpResend()
}
}
Follow these instructions to allow the customer to re-enter the OTP PIN if they type it wrong. There is a max of 3 attempts. To implement this capability, pass in Implement the finish step - no client side code changes necessary. If the OTP is invalid, call the finish step again to prompt the user for a new input. Once you reach the max attempts, the
allowOTPRetry=true to the /unify endpoint.Implement the start step:Swift
class OtpStartStepWithPrompt: OtpStartStep {
@ObservedObject var sheetObservable: SheetObservable
var callback: OtpStartStepCallback?
init(sheetObservable: SheetObservable) {
self.sheetObservable = sheetObservable
}
func execute(
phoneNumberNeeded: Bool, phoneValidationError: ProveAuthError?, callback: OtpStartStepCallback
) {
self.callback = callback
if !phoneNumberNeeded {
// If no phone number is needed, then don't prompt the user.
callback.onSuccess(input: nil)
} else {
DispatchQueue.main.async {
// If a phone number validation error is detected, ensure it is handled to provide feedback to the user.
if case .phoneNumberValidationError = phoneValidationError {
print(
"found phoneValidationError: \(String(describing: phoneValidationError?.localizedDescription))"
)
// Update UI components to display OtpStartView with the phone number validation error.
self.sheetObservable.isPhoneValidationError = true
} else {
self.sheetObservable.isPhoneValidationError = false
}
// Update UI components to display OtpStartView if a phone number is needed.
self.sheetObservable.isOtpStartActive = true
}
}
}
// Return collected phone number to the SDK
func handlePhoneNumber(phoneNumber: String) {
guard let callback = self.callback else {
print("Error: OtpStartStepCallback is not set ")
return
}
let otpStartInput = OtpStartInput(phoneNumber: phoneNumber)
// This is how you pass collected phone number to SDK
callback.onSuccess(input: otpStartInput)
}
// Communicate any issues encountered while trying to obtain the phone number to the SDK.
// Error should be reported if the customer explicitly cancels the SMS OTP transaction
// or presses the back button to exit out the SMS OTP start step screen.
func handleOtpStartError() {
guard let callback = self.callback else {
print("Error: OtpStartStepCallback is not set ")
return
}
callback.onError()
}
}
AuthFinish function runs.Swift
class OtpFinishStepNoPrompt: OtpFinishStep {
@ObservedObject var sheetObservable: SheetObservable
var callback: OtpFinishStepCallback?
init(sheetObservable: SheetObservable) {
self.sheetObservable = sheetObservable
}
// Implement this method to collect the OTP value delivered via SMS.
func execute(otpError: ProveAuthError?, callback: OtpFinishStepCallback) {
self.callback = callback
// Handle the OTP validation error if present.
// Signal to UI components to display OtpFinishView
DispatchQueue.main.async {
if case .otpValidationError = otpError {
print("found otpError: \(String(describing: otpError?.localizedDescription))")
// Signal to your UI components that the last provided OTP is invalid
self.sheetObservable.isOtpValidationError = true
} else {
self.sheetObservable.isOtpValidationError = false
}
self.sheetObservable.isOtpFinishActive = true
}
}
// Provide the collected OTP value to the SDK for validation.
func handleOtp(_ otp: String) {
guard let callback = self.callback else {
print("Error: OtpFinishStepCallback is not set ")
return
}
let otpFinishInput = OtpFinishInput(otp: otp)
callback.onSuccess(input: otpFinishInput)
}
// Notify the SDK of any issues encountered while obtaining the OTP value or if the user cancels the OTP flow.
func handleOtpFinishError() {
guard let callback = self.callback else {
print("Error: OtpFinishStepCallback is not set ")
return
}
callback.onError()
}
}
Follow these instructions to allow the customer to re-enter their phone number. There is a max of three entries/send attempts.Implement the start step:You can prompt for a new phone number by implementing the finish step like this:
Manual Request RequiredTo enable phone number change capabilities on your credentials, contact your Prove representative.
Swift
class OtpStartStepWithPrompt: OtpStartStep {
@ObservedObject var sheetObservable: SheetObservable
var callback: OtpStartStepCallback?
init(sheetObservable: SheetObservable) {
self.sheetObservable = sheetObservable
}
func execute(
phoneNumberNeeded: Bool, phoneValidationError: ProveAuthError?, callback: OtpStartStepCallback
) {
self.callback = callback
if !phoneNumberNeeded {
// If no phone number is needed, then don't prompt the user.
callback.onSuccess(input: nil)
} else {
DispatchQueue.main.async {
// If a phone number validation error is detected, ensure it is handled to provide feedback to the user.
if case .phoneNumberValidationError = phoneValidationError {
print(
"found phoneValidationError: \(String(describing: phoneValidationError?.localizedDescription))"
)
// Update UI components to display OtpStartView with the phone number validation error.
self.sheetObservable.isPhoneValidationError = true
} else {
self.sheetObservable.isPhoneValidationError = false
}
// Update UI components to display OtpStartView if a phone number is needed.
self.sheetObservable.isOtpStartActive = true
}
}
}
// Return collected phone number to the SDK
func handlePhoneNumber(phoneNumber: String) {
guard let callback = self.callback else {
print("Error: OtpStartStepCallback is not set ")
return
}
let otpStartInput = OtpStartInput(phoneNumber: phoneNumber)
// This is how you pass collected phone number to SDK
callback.onSuccess(input: otpStartInput)
}
// Communicate any issues encountered while trying to obtain the phone number to the SDK.
// Error should be reported if the customer explicitly cancels the SMS OTP transaction
// or presses the back button to exit out the SMS OTP start step screen.
func handleOtpStartError() {
guard let callback = self.callback else {
print("Error: OtpStartStepCallback is not set ")
return
}
callback.onError()
}
}
Swift
class OtpFinishStepWithPhoneChange: OtpFinishStep {
@ObservedObject var sheetObservable: SheetObservable
var callback: OtpFinishStepCallback?
init(sheetObservable: SheetObservable) {
self.sheetObservable = sheetObservable
}
// Implement this method to collect the OTP value delivered via SMS.
func execute(otpError: ProveAuthError?, callback: OtpFinishStepCallback) {
self.callback = callback
// Handle the OTP validation error if present.
// Update your UI to display the OTP finish view.
DispatchQueue.main.async {
if case .otpValidationError = otpError {
print("found otpError: \(String(describing: otpError?.localizedDescription))")
// Update your UI to indicate that the provided OTP is invalid.
self.sheetObservable.isOtpValidationError = true
} else {
self.sheetObservable.isOtpValidationError = false
}
self.sheetObservable.isOtpFinishActive = true
}
}
// Return the collected OTP value to the SDK.
func handleOtp(_ otp: String) {
guard let callback = self.callback else {
print("Error: OtpFinishStepCallback is not set ")
return
}
let otpFinishInput = OtpFinishInput(otp: otp)
callback.onSuccess(input: otpFinishInput)
}
// When callback.onMobileNumberChange() is evoked, OtpStartStep will be re-initiated
// so that end-users can enter a different phone number via OtpStartStep.
func handleMobileNumberChange() {
guard let callback = self.callback else {
print("Error: OtpFinishStepCallback is not set")
return
}
callback.onMobileNumberChange()
}
}
Configure Instant Link
Instant Link for iOS is an add-on feature. To enable, contact your Prove representative.
Prerequisites
- Instant Link is enabled for your project (contact your Prove representative if needed).
- Universal Links (recommended) so the SMS redirect opens your app with the full URL string. See Supporting universal links in your app in the Apple documentation.
withInstantLinkFallback(startStep: InstantLinkStartStep, retryStep: InstantLinkRetryStep?). Implement InstantLinkStartStep in every flow. Add InstantLinkRetryStep only if you support Resend or Phone Number Change (see those tabs). When the client supplies a number, pass it in InstantLinkStartInput (for example the phoneNumber field) to callback.onSuccess(...).Configure the client
Implement the Instant Link start step
Open the tab that matches how the phone number is collected and sent to Prove.Allow a new SMS to the same number (up to three send attempts including the first).Implement the start step:Then implement Allow the customer to re-enter the phone number (up to three entries/send attempts).Implement the start step:Then implement
- Default
- Prompt for Phone Number
- Resend
- Phone Number Change
Use this path when the server already has the phone number (for example from your initial Start call) and the client must not prompt again.Call
callback.onSuccess(input: nil) so the SDK knows the customer agreed to receive the SMS.Swift
class InstantLinkStartStepNoPrompt: InstantLinkStartStep {
@ObservedObject var sheetObservable: SheetObservable
var callback: InstantLinkStartStepCallback?
init(sheetObservable: SheetObservable) {
self.sheetObservable = sheetObservable
}
// Implement this method to handle phone number collection for instant link,
// or to obtain user confirmation for initiating an instant link.
func execute(
phoneNumberNeeded: Bool,
phoneValidationError: ProveAuthError?,
callback: InstantLinkStartStepCallback
) {
self.callback = callback
// Since no phone number is needed, don't prompt the user.
callback.onSuccess(input: nil)
}
}
Use this path when the iOS app collects the number and you do not need resend or phone-number change.Call
callback.onSuccess(input: instantLinkStartInput) with the collected number. Call callback.onError() if collection fails, the customer cancels, or they leave the Instant Link start UI (for example with the back button).Swift
class InstantLinkStartStepWithPrompt: InstantLinkStartStep {
@ObservedObject var sheetObservable: SheetObservable
var callback: InstantLinkStartStepCallback?
init(sheetObservable: SheetObservable) {
self.sheetObservable = sheetObservable
}
func execute(
phoneNumberNeeded: Bool,
phoneValidationError: ProveAuthError?,
callback: InstantLinkStartStepCallback
) {
self.callback = callback
if !phoneNumberNeeded {
// If no phone number is needed, then don't prompt the user.
callback.onSuccess(input: nil)
} else {
DispatchQueue.main.async {
// If a phone number validation error is detected, ensure it is handled to provide feedback to the user.
if case .phoneNumberValidationError = phoneValidationError {
print(
"found phoneValidationError: \(String(describing: phoneValidationError?.localizedDescription))"
)
// Update UI components to display InstantLinkStartView with the phone number validation error.
self.sheetObservable.isPhoneValidationError = true
} else {
self.sheetObservable.isPhoneValidationError = false
}
// Update UI components to display InstantLinkStartView if a phone number is needed.
self.sheetObservable.isInstantLinkStartActive = true
}
}
}
// Return collected phone number to the SDK.
func handlePhoneNumber(phoneNumber: String) {
guard let callback = self.callback else {
print("Error: InstantLinkStartStepCallback is not set ")
return
}
let instantLinkStartInput = InstantLinkStartInput(phoneNumber: phoneNumber)
callback.onSuccess(input: instantLinkStartInput)
}
// Communicate any issues encountered while trying to obtain the phone number to the SDK.
// Error should be reported if the user cancels the instant link flow or exits the start step screen.
func handleInstantLinkStartError() {
guard let callback = self.callback else {
print("Error: InstantLinkStartStepCallback is not set ")
return
}
callback.onError()
}
}
To use the Resend/Phone Number Change features, install the iOS SDK version 6.10.2 or later.
Swift
class InstantLinkStartStepWithPrompt: InstantLinkStartStep {
@ObservedObject var sheetObservable: SheetObservable
var callback: InstantLinkStartStepCallback?
init(sheetObservable: SheetObservable) {
self.sheetObservable = sheetObservable
}
func execute(
phoneNumberNeeded: Bool,
phoneValidationError: ProveAuthError?,
callback: InstantLinkStartStepCallback
) {
self.callback = callback
if !phoneNumberNeeded {
// If no phone number is needed, then don't prompt the user.
callback.onSuccess(input: nil)
} else {
DispatchQueue.main.async {
// If a phone number validation error is detected, ensure it is handled to provide feedback to the user.
if case .phoneNumberValidationError = phoneValidationError {
print(
"found phoneValidationError: \(String(describing: phoneValidationError?.localizedDescription))"
)
// Update UI components to display InstantLinkStartView with the phone number validation error.
self.sheetObservable.isPhoneValidationError = true
} else {
self.sheetObservable.isPhoneValidationError = false
}
// Update UI components to display InstantLinkStartView if a phone number is needed.
self.sheetObservable.isInstantLinkStartActive = true
}
}
}
// Return collected phone number to the SDK.
func handlePhoneNumber(phoneNumber: String) {
guard let callback = self.callback else {
print("Error: InstantLinkStartStepCallback is not set ")
return
}
let instantLinkStartInput = InstantLinkStartInput(phoneNumber: phoneNumber)
callback.onSuccess(input: instantLinkStartInput)
}
// Communicate any issues encountered while trying to obtain the phone number to the SDK.
// Error should be reported if the user cancels the instant link flow or exits the start step screen.
func handleInstantLinkStartError() {
guard let callback = self.callback else {
print("Error: InstantLinkStartStepCallback is not set ")
return
}
callback.onError()
}
}
InstantLinkRetryStep so the customer can request another SMS, for example:Swift
class InstantLinkRetryStepMultipleResend: InstantLinkRetryStep {
@ObservedObject var sheetObservable: SheetObservable
var callback: InstantLinkRetryStepCallback?
init(sheetObservable: SheetObservable) {
self.sheetObservable = sheetObservable
}
// Implement this method to present retry options: resend to the same phone number or cancel.
func execute(callback: InstantLinkRetryStepCallback) {
self.callback = callback
// Update your UI to display the InstantLinkRetryView (e.g. "Did you receive a text message?").
// User can confirm (close modal / finish) or request resend to the same phone number.
DispatchQueue.main.async {
self.sheetObservable.isInstantLinkRetryActive = true
}
}
// Call this method to request a new instant link to the same phone number.
func handleResend() {
guard let callback = self.callback else {
print("Error: InstantLinkRetryStepCallback is not set ")
return
}
callback.onResend()
}
// Notify the SDK if the user cancels or if the app fails to handle the retry step.
func handleInstantLinkRetryError() {
guard let callback = self.callback else {
print("Error: InstantLinkRetryStepCallback is not set ")
return
}
callback.onError()
}
}
To use the Resend/Phone Number Change features, install the iOS SDK version 6.10.2 or later.
Manual Request RequiredTo enable phone number change capabilities on your credentials, contact your Prove representative.
Swift
class InstantLinkStartStepWithPrompt: InstantLinkStartStep {
@ObservedObject var sheetObservable: SheetObservable
var callback: InstantLinkStartStepCallback?
init(sheetObservable: SheetObservable) {
self.sheetObservable = sheetObservable
}
func execute(
phoneNumberNeeded: Bool,
phoneValidationError: ProveAuthError?,
callback: InstantLinkStartStepCallback
) {
self.callback = callback
if !phoneNumberNeeded {
// If no phone number is needed, then don't prompt the user.
callback.onSuccess(input: nil)
} else {
DispatchQueue.main.async {
// If a phone number validation error is detected, ensure it is handled to provide feedback to the user.
if case .phoneNumberValidationError = phoneValidationError {
print(
"found phoneValidationError: \(String(describing: phoneValidationError?.localizedDescription))"
)
// Update UI components to display InstantLinkStartView with the phone number validation error.
self.sheetObservable.isPhoneValidationError = true
} else {
self.sheetObservable.isPhoneValidationError = false
}
// Update UI components to display InstantLinkStartView if a phone number is needed.
self.sheetObservable.isInstantLinkStartActive = true
}
}
}
// Return collected phone number to the SDK.
func handlePhoneNumber(phoneNumber: String) {
guard let callback = self.callback else {
print("Error: InstantLinkStartStepCallback is not set ")
return
}
let instantLinkStartInput = InstantLinkStartInput(phoneNumber: phoneNumber)
callback.onSuccess(input: instantLinkStartInput)
}
// Communicate any issues encountered while trying to obtain the phone number to the SDK.
// Error should be reported if the user cancels the instant link flow or exits the start step screen.
func handleInstantLinkStartError() {
guard let callback = self.callback else {
print("Error: InstantLinkStartStepCallback is not set ")
return
}
callback.onError()
}
}
InstantLinkRetryStep to collect a new number, for example:Swift
class InstantLinkRetryStepPhoneChange: InstantLinkRetryStep {
@ObservedObject var sheetObservable: SheetObservable
var callback: InstantLinkRetryStepCallback?
init(sheetObservable: SheetObservable) {
self.sheetObservable = sheetObservable
}
// Implement this method to present retry options: resend, change phone number, or cancel.
func execute(callback: InstantLinkRetryStepCallback) {
self.callback = callback
// Update your UI to display the InstantLinkRetryView (e.g. "Did you receive a text message?").
// User can confirm (close modal / finish), request resend, or request phone number change.
DispatchQueue.main.async {
self.sheetObservable.isInstantLinkRetryActive = true
}
}
// Call this method to request resend to the same phone number.
func handleResend() {
guard let callback = self.callback else {
print("Error: InstantLinkRetryStepCallback is not set ")
return
}
callback.onResend()
}
// When this is invoked, InstantLinkStartStep will be re-initiated so that the user
// can enter a different phone number.
func handleMobileNumberChange() {
guard let callback = self.callback else {
print("Error: InstantLinkRetryStepCallback is not set ")
return
}
callback.onMobileNumberChange()
}
// Notify the SDK if the user cancels or if the app fails to handle the retry step.
func handleInstantLinkRetryError() {
guard let callback = self.callback else {
print("Error: InstantLinkRetryStepCallback is not set ")
return
}
callback.onError()
}
}
Handle the redirect and resume the session
After you implement the start step above and the user finishes the web step outside your app, Prove redirects to the The redirect URL is your original
If required parameters are missing or invalid, the SDK surfaces an error via the
finalTargetUrl from your server Start call. Your Universal Link handling must deliver that URL into your app so you can pass the full string—including query parameters—into finishInstantLink(redirectUrl:).For how finalTargetUrl fits into server-side Start with Mobile Auth and Instant Link fallback, see Prove Pre-Fill implementation guide.Call finishInstantLink from the entry point that receives the opened URL, for example application(_:open:options:) or application(_:continue:restorationHandler:).Swift
/// Finishes the Instant Link authentication flow using the redirect URL from the deep link.
/// This is the URL to which the user is redirected after tapping the Instant Link in SMS.
finishInstantLink(redirectUrl: redirectUrl) { error in
// Handle errors due to invalid format of redirectUrl here
}
finalTargetUrl plus parameters the SDK needs. Example: if Start used https://yourDeepLinkUrl.com, the link might look like https://yourDeepLinkUrl.com?asc=true&authId=some-uuid-string.| Parameter | Meaning |
|---|---|
asc | "true" or "false": whether the server considers the auth session complete. |
authId | UUID for the session; the SDK uses it to match the redirect to the in-progress client session. |
finishInstantLink completion and does not continue the flow.Verify: In Sandbox, complete a flow where the SMS opens your app with the full URL; finishInstantLink should run and the session should resume without an error from a well-formed redirect.Supported languages
Prove provides client web SDKs in the following languages: TypeScript and JavaScript.Installation
The Prove Platform Web SDK has an unpacked size of 324 KB, and a single dependency:@prove-identity/mobile-auth. Install the client-side SDK of your choice by running a command in your terminal, or by using a dependency management tool specific to your project.# Run this command to install the package (ensure you have the latest version).
npm install @prove-identity/prove-auth@3.4.2
If you’re including the file from jsDelivr and using Content Security Policy headers, ensure you add
https://cdn.jsdelivr.net/npm/@prove-identity/ to script-src,
plus corresponding sha256-... or nonce-....Find the type of flow: mobile or desktop
Detect the browser type, then passmobile or desktop from your server when starting the session (same contract as in the implementation guide). For how OTP vs Instant Link and WebSockets behave in each flow, see the Unified Authentication overview.// Check if the customer is on a mobile or desktop browser.
const authCheck = new proveAuth.AuthenticatorBuilder().build();
let isMobile = authCheck.isMobileWeb()
Authenticate()
The SDK requires an authToken as a parameter for the Authenticate() function. This token returns from the Start() call of the server-side SDK. The token is session specific, limiting it to a single flow. It also expires after 15 minutes.Retrieve authToken
Send a request to your back end server with the possession type, and an optional phone number if you are using the Prove possession check.async function initialize(phoneNumber, possessionType) {
const response = await fetch(backendUrl + "/initialize", {
method: "POST",
headers: {
Accept: "application/json",
"Content-Type": "application/json",
},
body: JSON.stringify({
phoneNumber: phoneNumber,
possessionType: possessionType,
}),
});
const rsp = await response.json();
const authToken = rsp.authToken;
return authToken;
}
Setup authenticator
Once you have theauthToken, build the authenticator for both the mobile and desktop flows.Mobile Auth Implementations OnlyIf your app uses Content Security Policy headers, you must configure them to allow WebSocket connections to Prove’s authentication services:Sandbox Environment
https://device.uat.proveapis.com:4443https://device.uat.proveapis.comhttp://device.uat.proveapis.com:4443http://device.uat.proveapis.com
https://device.proveapis.com:4443https://device.proveapis.comhttp://device.proveapis.com:4443http://device.proveapis.comhttps://auth.svcs.verizon.com:22790
const isMobileWeb = flowType.value === "mobile";
const isDesktop = flowType.value === "desktop";
let builder = new proveAuth.AuthenticatorBuilder();
if (isMobileWeb) {
// Set up the authenticator for either mobile or desktop flow.
// Set up Mobile Auth and OTP.
builder = builder
.withAuthFinishStep(() => clientFinished())
.withMobileAuthImplementation("fetch")
.withOtpFallback(otpStart, otpFinish);
} else if (isDesktop){
// Set up Instant Link.
builder = builder
.withAuthFinishStep(() => clientFinished())
.withInstantLinkFallback(instantLink)
.withRole("secondary");
} else {
// Customer provided possession.
builder = builder
.withAuthFinishStep(() => clientFinished());
const authenticator = builder.build();
authenticator.authenticate(authToken);
}
Validate the mobile phone
In theAuthFinishStep, you’ll specify a function to call once the possession checks complete on the mobile phone. This endpoint on your back end server calls the Unify-Status() function to validate the phone number. The AuthFinishStep then completes. If the user cancels, the server makes a call to the Unify-Status() function and returns success=false.// Send a verify request.
async function verify() {
const response = await fetch(backendUrl + "/verify", {
method: "POST",
headers: {
Accept: "application/json",
"Content-Type": "application/json",
},
body: JSON.stringify({}),
});
const results = await response.json();
const rsp = JSON.stringify(results);
return null;
}
Configure OTP
Use this section to configure SMS OTP fallback in the Web SDK: wireOtpStartStep and OtpFinishStep so the SDK can send the code, collect the PIN, and optionally support resend, OTP retry, or phone-number change.Prerequisites
- After Prove sends the SMS, the customer has about two minutes to enter the OTP before the session times out.
- When building the authenticator, call
withOtpFallback(startStep: OtpStartStep | OtpStartStepFn, finishStep: OtpFinishStep | OtpFinishStepFn)and implement bothOtpStartStepandOtpFinishStep. Return the phone number from your start step as an object with aphoneNumberfield passed toresolve(...); usereject('message')when collection fails. The Prove client SDK orchestrates when each step runs—do not duplicate that orchestration in app code (see Invalid OTP and step orchestration below).
Invalid OTP and step orchestrationWhen the customer enters an invalid OTP, the Prove client SDK detects it and may surface activity related to
AuthFinishStep that looks unexpected. This behavior is expected.Do not add your own extra invocation of the OTP finish step to pass the error in otpError. The SDK runs your OtpFinishStep when retry or error UI is needed.Implement the required step functions, but let the Prove client SDK orchestrate when each step runs.Configure the client
Implement start and finish for your use case
Open the tab that matches how the phone number is collected and which OTP options you need.Allow a new OTP SMS to the same number (up to three send attempts including the first).Implement the start step:Then implement the finish step so the customer can request another SMS, for example:Allow the customer to re-enter the OTP after a wrong PIN (up to three attempts). On the server, pass Implement the finish step—no extra client changes. If the OTP is invalid, the finish step drives retry UI until attempts are exhausted, then Allow the customer to re-enter the phone number (up to three entries/send attempts).Implement the start step:Then implement the finish step so the customer can supply a new number, for example:
- Default
- Prompt for Phone Number
- Resend
- Retry OTP
- Phone Number Change
Use this path when the server already has the phone number (for example from Call
POST /v3/start or your server Start wrapper) and the browser must not prompt for it again.Call resolve(null) (or the equivalent in your snippet) so the SDK knows the customer agreed to receive the SMS. Follow the sample for the exact resolve shape your SDK version expects.function otpStartStep(phoneNumberNeeded, phoneValidationError) {
return new Promise((resolve, reject) => {
// Since no phone number is needed, don't prompt the user.
resolve(null);
});
}
reject('some error message') if something prevents sending the SMS or completing the flow (for example the customer cancels or leaves the UI with the back button).In the finish step, return the OTP through resolve(result: OtpFinishResult) with the OnSuccess result type and the value wrapped in OtpFinishInput, as in the snippet below.function otpFinishStep(otpError) {
return new Promise((resolve, reject) => {
// If error message is found, handle it.
if (otpError) {
// Set to a variable and display it in a field.
// In this example, we don't do anything with the error.
var someErrorMessage = otpError.message;
}
// Prompt the user for whether they received the SMS.
// Typically, this is a page that shows the OTP already. We are simplifying
// it by requiring an input.
var input = confirm('Did you receive a text message?');
if (!input) {
// Close the modal if a text message was not received.
return;
}
// Prompt the user for the OTP.
var otp = prompt('Enter OTP code:');
if (otp) {
// If the input is valid and the user clicked `OK`, return the OTP.
resolve({
input: { otp }, // OTP value
resultType: 0, // OnSuccess enum type = 0
});
} else {
// Else, exit the flow.
reject('phone invalid or user cancelled');
}
});
}
Use this path when the page collects the phone number in the browser and you do not need SMS resend, dedicated OTP retry handling beyond defaults, or phone-number change. For those capabilities, use Resend, Retry OTP, or Phone Number Change.In the start step, call Implement the finish step:
resolve(input) with an object that includes the collected phoneNumber.function otpStartStep(phoneNumberNeeded, phoneValidationError) {
return new Promise((resolve, reject) => {
// If no phone number is needed, then don't prompt the user.
if (!phoneNumberNeeded) {
resolve(null);
return;
}
// If error message is found around phone number, handle it.
// The `phoneValidationError` is ONLY available when `phoneNumberNeeded`
// has a value.
if (phoneValidationError) {
// Set to a variable and display it in a field.
// In this example, we don't do anything with the error.
var someErrorMessage = phoneValidationError.message;
}
// Prompt the user for the phone number.
var input = prompt('Enter phone number:');
if (input) {
// If the input is valid and the user clicked `OK`, return the phone
// number.
resolve({
phoneNumber: input,
});
} else {
// Else, exit the flow.
reject('phone invalid or user cancelled');
}
});
}
function otpFinishStep(otpError) {
return new Promise((resolve, reject) => {
// If error message is found, handle it.
if (otpError) {
// Set to a variable and display it in a field.
// In this example, we don't do anything with the error.
var someErrorMessage = otpError.message;
}
// Prompt the user for whether they received the SMS.
// Typically, this is a page that shows the OTP already. We are simplifying
// it by requiring an input.
var input = confirm('Did you receive a text message?');
if (!input) {
// Close the modal if a text message was not received.
return;
}
// Prompt the user for the OTP.
var otp = prompt('Enter OTP code:');
if (otp) {
// If the input is valid and the user clicked `OK`, return the OTP.
resolve({
input: { otp }, // OTP value
resultType: 0, // OnSuccess enum type = 0
});
} else {
// Else, exit the flow.
reject('phone invalid or user cancelled');
}
});
}
To use the Resend/Retry/Phone Change features, install the Web SDK version 2.15.1 or later.
function otpStartStep(phoneNumberNeeded, phoneValidationError) {
return new Promise((resolve, reject) => {
// If no phone number is needed, then don't prompt the user.
if (!phoneNumberNeeded) {
resolve(null);
return;
}
// If error message is found around phone number, handle it.
// The `phoneValidationError` is ONLY available when `phoneNumberNeeded`
// has a value.
if (phoneValidationError) {
// Set to a variable and display it in a field.
// In this example, we don't do anything with the error.
var someErrorMessage = phoneValidationError.message;
}
// Prompt the user for the phone number.
var input = prompt('Enter phone number:');
if (input) {
// If the input is valid and the user clicked `OK`, return the phone
// number.
resolve({
phoneNumber: input,
});
} else {
// Else, exit the flow.
reject('phone invalid or user cancelled');
}
});
}
function otpFinishStep(otpError) {
return new Promise((resolve, reject) => {
// If error message is found, handle it.
if (otpError) {
// Set to a variable and display it in a field.
// In this example, we don't do anything with the error.
var someErrorMessage = otpError.message;
}
// Prompt the user for whether they received the SMS.
// Typically, this is a page that shows the OTP already. We are simplifying
// it by requiring an input.
var input = confirm('Did you receive a text message?');
if (!input) {
// If `Cancel`, then resend to the same phone number.
resolve({
resultType: 1, // OnResendOtp enum type = 1
});
return;
}
// Prompt the user for the OTP.
var otp = prompt('Enter OTP code:');
if (otp) {
// If the input is valid and the user clicked `OK`, return the OTP.
resolve({
input: { otp }, // OTP value
resultType: 0, // OnSuccess enum type = 0
});
} else {
// Else, exit the flow.
reject('phone invalid or user cancelled');
}
});
}
To use the Resend/Retry/Phone Change features, install the Web SDK version 2.15.1 or later.
allowOTPRetry=true on POST /v3/start (or your equivalent Start request).Implement the start step—no extra client changes beyond your normal prompt path:function otpStartStep(phoneNumberNeeded, phoneValidationError) {
return new Promise((resolve, reject) => {
// If no phone number is needed, then don't prompt the user.
if (!phoneNumberNeeded) {
resolve(null);
return;
}
// If error message is found around phone number, handle it.
// The `phoneValidationError` is ONLY available when `phoneNumberNeeded`
// has a value.
if (phoneValidationError) {
// Set to a variable and display it in a field.
// In this example, we don't do anything with the error.
var someErrorMessage = phoneValidationError.message;
}
// Prompt the user for the phone number.
var input = prompt('Enter phone number:');
if (input) {
// If the input is valid and the user clicked `OK`, return the phone
// number.
resolve({
phoneNumber: input,
});
} else {
// Else, exit the flow.
reject('phone invalid or user cancelled');
}
});
}
AuthFinish runs.function otpFinishStep(otpError) {
return new Promise((resolve, reject) => {
// If error message is found, handle it.
if (otpError) {
// Set to a variable and display it in a field.
// In this example, we don't do anything with the error.
var someErrorMessage = otpError.message;
}
// Prompt the user for whether they received the SMS.
// Typically, this is a page that shows the OTP already. We are simplifying
// it by requiring an input.
var input = confirm('Did you receive a text message?');
if (!input) {
// Close the modal if a text message was not received.
return;
}
// Prompt the user for the OTP.
var otp = prompt('Enter OTP code:');
if (otp) {
// If the input is valid and the user clicked `OK`, return the OTP.
resolve({
input: { otp }, // OTP value
resultType: 0, // OnSuccess enum type = 0
});
} else {
// Else, exit the flow.
reject('phone invalid or user cancelled');
}
});
}
To use the Resend/Retry/Phone Change features, install the Web SDK version 2.15.1 or later.
Manual Request RequiredTo enable phone number change capabilities on your credentials, contact your Prove representative.
function otpStartStep(phoneNumberNeeded, phoneValidationError) {
return new Promise((resolve, reject) => {
// If no phone number is needed, then don't prompt the user.
if (!phoneNumberNeeded) {
resolve(null);
return;
}
// If error message is found around phone number, handle it.
// The `phoneValidationError` is ONLY available when `phoneNumberNeeded`
// has a value.
if (phoneValidationError) {
// Set to a variable and display it in a field.
// In this example, we don't do anything with the error.
var someErrorMessage = phoneValidationError.message;
}
// Prompt the user for the phone number.
var input = prompt('Enter phone number:');
if (input) {
// If the input is valid and the user clicked `OK`, return the phone
// number.
resolve({
phoneNumber: input,
});
} else {
// Else, exit the flow.
reject('phone invalid or user cancelled');
}
});
}
function otpFinishStep(otpError) {
return new Promise((resolve, reject) => {
// If error message is found, handle it.
if (otpError) {
// Set to a variable and display it in a field.
// In this example, we don't do anything with the error.
var someErrorMessage = otpError.message;
}
// Prompt the user for whether they received the SMS.
// Typically, this is a page that shows the OTP already. We are simplifying
// it by requiring an input.
var input = confirm('Did you receive a text message?');
if (!input) {
// If `Cancel`, then trigger the otpStartStep to re-prompt for
// phone number.
resolve({
resultType: 2, // OnMobileNumberChange enum type = 2
});
return;
}
// Prompt the user for the OTP.
var otp = prompt('Enter OTP code:');
if (otp) {
// If the input is valid and the user clicked `OK`, return the OTP.
resolve({
input: { otp }, // OTP value
resultType: 0, // OnSuccess enum type = 0
});
} else {
// Else, exit the flow.
reject('phone invalid or user cancelled');
}
});
}
Verify the integration
In Sandbox, walk each shipped path (default, prompt, resend, retry if enabled, phone change if enabled). Confirm SMS delivery, OTP entry within the timeout, and that you never stack extra
OtpFinishStep invocations on top of the SDK’s invalid-OTP handling—the SDK should remain the single orchestrator for retries and errors.Configure Instant Link
Use this section to configure the Web SDK so Instant Link SMS can be sent from the browser flow and optional resend or phone-number change behaves as expected.Instant Link for mobile web isn’t supported.
Custom or vanity Instant Links aren’t supported. You can’t substitute a custom link for the default Instant Link.
Prerequisites
- Integrate on desktop (or other supported) web; see the callout above for mobile web.
withInstantLinkFallback(startStep: InstantLinkStartStep | InstantLinkStartStepFn, retryStep?: InstantLinkRetryStep | InstantLinkRetryStepFn). Implement InstantLinkStartStep in every flow. Add InstantLinkRetryStep only if you support Resend or Phone Number Change (see those tabs). Return the phone number from your step as an object with a phoneNumber field passed to resolve(...); use reject('message') when collection fails.Configure the client
Implement the Instant Link start and optional retry
Open the tab that matches how the phone number is collected and sent to Prove.Allow a new SMS to the same number (up to three send attempts including the first).Implement the start step:Then implement Allow the customer to re-enter the phone number (up to three entries/send attempts).Implement the start step:Then implement
- Default
- Prompt for Phone Number
- Resend
- Phone Number Change
Use this path when the server already has the phone number (for example from
POST /v3/start or your server Start wrapper) and the browser must not prompt again.Call resolve(null) (or the equivalent in your snippet) so the SDK knows the customer agreed to receive the SMS. Follow the sample for the exact resolve shape your SDK version expects.function instantLinkStartStep(phoneNumberNeeded, phoneValidationError) {
return new Promise((resolve, reject) => {
// Since no phone number is needed, don't prompt the user.
resolve(null);
});
}
Use this path when the page collects the number in the browser and you do not need resend or phone-number change. For resend or change, use the other tabs.Call
resolve(input) with an object that includes the collected phoneNumber. Call reject('some error message') if collection fails, the customer cancels, or they leave the Instant Link start UI (for example with the back button).function instantLinkStartStep(phoneNumberNeeded, phoneValidationError) {
return new Promise((resolve, reject) => {
// If no phone number is needed, then don't prompt the user.
if (!phoneNumberNeeded) {
resolve(null);
return;
}
// If error message is found around phone number, handle it.
// The `phoneValidationError` is ONLY available when `phoneNumberNeeded`
// has a value.
if (phoneValidationError) {
// Set to a variable and display it in a field.
// In this example, we don't do anything with the error.
var someErrorMessage = phoneValidationError.message;
}
// Prompt the user for the phone number.
var input = prompt('Enter phone number:');
if (input) {
// If the input is valid and the user clicked `OK`, return the phone
// number.
resolve({
phoneNumber: input,
});
} else {
// Else, exit the flow.
reject('phone invalid or user cancelled');
}
});
}
To use the Resend/Retry/Phone Number Change features, install the Web SDK version 2.15.1 or later.
function instantLinkStartStep(phoneNumberNeeded, phoneValidationError) {
return new Promise((resolve, reject) => {
// If no phone number is needed, then don't prompt the user.
if (!phoneNumberNeeded) {
resolve(null);
return;
}
// If error message is found around phone number, handle it.
// The `phoneValidationError` is ONLY available when `phoneNumberNeeded`
// has a value.
if (phoneValidationError) {
// Set to a variable and display it in a field.
// In this example, we don't do anything with the error.
var someErrorMessage = phoneValidationError.message;
}
// Prompt the user for the phone number.
var input = prompt('Enter phone number:');
if (input) {
// If the input is valid and the user clicked `OK`, return the phone
// number.
resolve({
phoneNumber: input,
});
} else {
// Else, exit the flow.
reject('phone invalid or user cancelled');
}
});
}
InstantLinkRetryStep so the customer can request another SMS, for example:function instantLinkRetryStep() {
return new Promise((resolve, reject) => {
// There are multiple return options:
// - resolve(0): request resend to the same phone number
// - reject('user clicked cancel'): error out of the possession flow
// Prompt the user for the phone number.
// Typically, this is a page that is automatically closed or redirected
// once the `AuthFinish` function is called. We are simplifying it by
// requiring an input.
var input = confirm('Did you receive a text message?');
if (input) {
// If `OK`, close the modal.
return;
}
// Else `Cancel`, then resend to the same phone number.
resolve(0);
});
}
To use the Resend/Retry/Phone Number Change features, install the Web SDK version 2.15.1 or later.
Manual Request RequiredTo enable phone number change capabilities on your credentials, contact your Prove representative.
function instantLinkStartStep(phoneNumberNeeded, phoneValidationError) {
return new Promise((resolve, reject) => {
// If no phone number is needed, then don't prompt the user.
if (!phoneNumberNeeded) {
resolve(null);
return;
}
// If error message is found around phone number, handle it.
// The `phoneValidationError` is ONLY available when `phoneNumberNeeded`
// has a value.
if (phoneValidationError) {
// Set to a variable and display it in a field.
// In this example, we don't do anything with the error.
var someErrorMessage = phoneValidationError.message;
}
// Prompt the user for the phone number.
var input = prompt('Enter phone number:');
if (input) {
// If the input is valid and the user clicked `OK`, return the phone
// number.
resolve({
phoneNumber: input,
});
} else {
// Else, exit the flow.
reject('phone invalid or user cancelled');
}
});
}
InstantLinkRetryStep to collect a new number, for example:function instantLinkRetryStep() {
return new Promise((resolve, reject) => {
// There are multiple return options:
// - resolve(0): request resend to the same phone number
// - resolve(1): request phone number change/re-prompt
// - reject('user clicked cancel'): error out of the possession flow
// Prompt the user for the phone number.
// Typically, this is a page that is automatically closed or redirected
// once the `AuthFinish` function is called. We are simplifying it by
// requiring an input.
var input = confirm('Did you receive a text message?');
if (input) {
// If `OK`, close the modal.
return;
}
// Else `Cancel`, then trigger the instantLinkStartStep to re-prompt for
// phone number.
resolve(1);
});
}
Prove Key and Device Context (Web)
Prove Key rules (inactivity,rebind, iOS vs Web, and when Device Context applies) are explained in Unified Authentication overview — Prove Key validity and expiration. The steps below cover only enabling Device Context in the Web SDK when you need stronger persistence across browser data clearing.Prove Key persistence enhancement
If the Prove Key may be lost when the browser clearslocalStorage or IndexedDB, enable Device Context using the steps in this section.Contact Prove to enable this add-on feature and receive your public API keys.
Installation
Install the device context module:NPM
npm install @prove-identity/prove-auth-device-context
Activation
Activate the module in your app:import * as dcMod from "@prove-identity/prove-auth-device-context";
dcMod.activate();
If you’re using Content Security Policy headers, ensure you allow access to the following common resources:
script-src https://fpnpmcdn.net https://*.prove-auth.proveapis.com,connect-src https://api.fpjs.io https://*.api.fpjs.io https://*.prove-auth.proveapis.comworker-src blob:
https://cdn.jsdelivr.net/npm/@prove-identity/ to script-src,
plus corresponding sha256-... or nonce-....Configure authenticator with device context
AddwithDeviceContext() to your authenticator builder:// Public API Key provided by Prove for your environment
const publicApiKey = "apiKeyAssignedForThisBuildConfig";
const buildConfig = BuildConfig.US_UAT; // or BuildConfig.US_PROD, BuildConfig.EU_UAT, etc.
const options = {
publicApiKey: publicApiKey,
buildConfig: buildConfig,
};
let builder = new proveAuth.AuthenticatorBuilder();
builder = builder
.withAuthFinishStep((input) => verify(input.authId))
.withMobileAuthImplementation("fetch")
.withOtpFallback(otpStart, otpFinish)
.withDeviceContext(options);
const authenticator = builder.build();
Call
builder.build() after the web app loads to enable early signal collection and reduce authentication latency.Enable cookies for auth requests
Enable cookies when makingAuthStart and AuthFinish calls:axios.post(backendUrl + '/authStart', data, { withCredentials: true });
axios.post(backendUrl + '/authFinish', data, { withCredentials: true });