# Implementing Prove Account Opening
Source: https://developer.prove.com/docs/account-opening-flow
Prove Account Opening returns identity information linked to an authenticated phone number
Begin by implementing [Step 2: Authentication](/docs/check-for-prove-key) to authenticate the user's device. This step is crucial as it establishes a trusted connection between the user and their phone number, which is the foundation for the Account Opening solution.
 This step must be complete before proceeding with Account Opening.
Collect the required customer information from your CRM or database:
* Phone number
* First name
* Last name
Make a request to the [`/v3/verify endpoint`](https://developer.prove.com/reference/verify) including the Authorization header. Generate a bearer token as outlined on the [Authentication page](https://developer.prove.com/reference/authentication). Include the following required parameters:
* `phoneNumber`: the phone number of the customer.
* `firstName`: the first name of the customer.
* `lastName`: the last name of the customer.
* `verificationType`: the type of verification to be performed. Set this value to `accountOpening`.
* `clientRequestId`: client-generated unique ID for a specific session. This can be used to identify specific requests.
Always provide unique `clientRequestId` values for each request to enable proper tracking and troubleshooting.
The optional parameters:
* `emailAddress`: the email address of the customer.
* `ipAddress`: the IP address of the customer's device.
* `userAgent`: the user agent of the customer.
* `clientCustomerId`: the client-generated unique ID for a specific customer. This can be used by clients to link calls related to the same customer, across different requests or sessions.
* `clientHumanId`: a client-generated unique ID for a consumer across business lines.
* `proveId`: the Prove ID associated with the customer, if known.
```bash cURL theme={"dark"}
curl -X POST "https://platform.uat.proveapis.com/v3/verify" \
-H "Authorization: Bearer YOUR_ACCESS_TOKEN" \
-H "Content-Type: application/json" \
-d '{
"verificationType": "accountOpening",
"firstName": "Bettina",
"lastName": "Halbert",
"phoneNumber": "2001004049",
"clientRequestId": "test-request-001",
"clientCustomerId": "test-customer-001"
}'
```
You will test this example in the Sandbox environment using the test users provided in the [Sandbox Testing guide](https://developer.prove.com/docs/account-opening-flow#sandbox-testing).
The response includes comprehensive identity information and verification results:
* `success`: the result of the verification.
* `correlationId`: the unique ID that Prove generates for the flow.
* `clientRequestId`: the client-generated unique ID for a specific session, provided in the request.
* `phoneNumber`: the phone number provided in the request.
* `assuranceLevel`: the [`confidence level (AL-1, AL0, AL1, AL2, AL3)`](https://developer.prove.com/docs/assurance-levels).
* `clientCustomerId`: the client-generated unique ID for a specific customer, provided in the request.
* `proveId`: the unique Prove-assigned ID tied to the consumer.
* `provePhoneAlias`: the unique Prove-assigned ID tied to the phone number.
* `identity`: the verified identity information. This object contains:
* `firstName`: the first name provided in the request.
* `lastName`: the last name provided in the request.
* `additionalIdentities`: object containing any additional identities found for the phone number.
* `evaluation`: object containing the results of the authentication and risk evaluations. Refer to the [Global Fraud Policy](https://developer.prove.com/docs/global-fraud-policy) for more details.
```json Example Response theme={"dark"}
{
"success": "true",
"correlationId": "d427c049-0ae8-491d-8300-75d23610d0ff",
"clientRequestId": "d427c049-0ae8-491d-8300-75d23610d0ff",
"phoneNumber": "2001004049",
"assuranceLevel": "AL2",
"clientCustomerId": "test-customer-001",
"proveId": "b7e54823-0068-4e23-9e07-60d382518bcf",
"provePhoneAlias": "4B2C41FC4VKDEO100F960011D0AD4A8050MEK19P4SF9PD23EFE27CD2C76A6FAA8375E60AC0550604F6G32D9ED60E06262CCC570F3C15F2D16900184E",
"identity": {
"firstName": "Bettina",
"lastName": "Halbert"
},
"additionalIdentities": [
{
"firstName": "Johnny",
"lastName": "Halbert"
}
],
"evaluation": {
"authentication": {
"result": "pass"
},
"risk": {
"result": "pass"
}
}
}
```
**Best Practices**
* Check the `success` field to handle different verification outcomes appropriately.
* Save the `proveId` and `correlationId` for future reference and to enable cross-domain linking if needed.
* Use assurance levels to implement adaptive security policies based on transaction risk.
***
## Sandbox testing
### Test users
The following test users are available for testing Account Opening using the `/v3/verify` endpoint in the Sandbox environment. Use these test users to simulate different verification scenarios and outcomes.
| Phone Number | First Name | Last Name | Verification Type | Expected Outcome |
| ------------ | ------------------- | ------------ | ----------------- | ---------------- |
| `2001004049` | [Bettina](#bettina) | Halbert | `accountOpening` | Success |
| `2001004050` | [Laurel](#laurel) | Van Der Beek | `accountOpening` | Failed |
Use these test phone numbers exactly as shown. The sandbox environment doesn't validate real customer information.
### Testing steps
Use test user Bettina Halbert to verify a successful verification:
```bash cURL theme={"dark"}
curl -X POST "https://platform.uat.proveapis.com/v3/verify" \
-H "Authorization: Bearer YOUR_ACCESS_TOKEN" \
-H "Content-Type: application/json" \
-d '{
"verificationType": "accountOpening",
"firstName": "Bettina",
"lastName": "Halbert",
"phoneNumber": "2001004049",
"clientRequestId": "test-request-001",
"clientCustomerId": "test-customer-001"
}'
```
Expected response:
```json theme={"dark"}
{
"success": "true",
"correlationId": "ab1e9b42-da4f-4d13-8690-5d32eae76c6f",
"clientRequestId": "ab1e9b42-da4f-4d13-8690-5d32eae76c6f",
"phoneNumber": "2001004049",
"assuranceLevel": "AL2",
"clientCustomerId": "test-customer-001",
"proveId": "b7e54823-0068-4e23-9e07-60d382518bcf",
"provePhoneAlias": "4B2C41FC4VKDEO100F960011D0AD4A8050MEK19P4SF9PD23EFE27CD2C76A6FAA8375E60AC0550604F6G32D9ED60E06262CCC570F3C15F2D16900184E",
"identity": {
"firstName": "Bettina",
"lastName": "Halbert"
},
"additionalIdentities": [
{
"firstName": "Johnny",
"lastName": "Halbert"
}
],
"evaluation": {
"authentication": {
"result": "pass"
},
"risk": {
"result": "pass"
}
}
}
```
Use test user Laurel Van Der Beek to simulate a failed verification:
```bash cURL theme={"dark"}
curl -X POST "https://platform.uat.proveapis.com/v3/verify" \
-H "Authorization: Bearer YOUR_ACCESS_TOKEN" \
-H "Content-Type: application/json" \
-d '{
"verificationType": "accountOpening",
"firstName": "Laurel",
"lastName": "Van Der Beek",
"phoneNumber": "2001004050",
"clientRequestId": "test-request-002",
"clientCustomerId": "test-customer-002"
}'
```
Expected response:
```json theme={"dark"}
{
"success": "false",
"correlationId": "46280df3-1c6f-4a98-bbb9-5a333c47e70b",
"clientRequestId": "46280df3-1c6f-4a98-bbb9-5a333c47e70b",
"phoneNumber": "2001004050",
"assuranceLevel": "AL0",
"clientCustomerId": "test-customer-002",
"identity": {
"firstName": "Laurel",
"lastName": "Van Der Beek"
},
"evaluation": {
"authentication": {
"failureReasons": {
"9175": "No active identity can be associated with the phone number.",
"9177": "No information can be found for the identity or phone number."
},
"result": "fail"
},
"risk": {
"result": "pass"
}
}
}
```
# Prove Account Opening Overview
Source: https://developer.prove.com/docs/account-opening-overview
Prove Account Opening returns identity information linked to an authenticated phone number.
This step must be complete before proceeding with Account Opening.
Collect the required customer information from your CRM or database:
* Phone number
* First name
* Last name
Make a request to the [`/v3/verify endpoint`](https://developer.prove.com/reference/verify) including the Authorization header. Generate a bearer token as outlined on the [Authentication page](https://developer.prove.com/reference/authentication). Include the following required parameters:
* `phoneNumber`: the phone number of the customer.
* `firstName`: the first name of the customer.
* `lastName`: the last name of the customer.
* `verificationType`: the type of verification to be performed. Set this value to `accountOpening`.
* `clientRequestId`: client-generated unique ID for a specific session. This can be used to identify specific requests.
Always provide unique `clientRequestId` values for each request to enable proper tracking and troubleshooting.
The optional parameters:
* `emailAddress`: the email address of the customer.
* `ipAddress`: the IP address of the customer's device.
* `userAgent`: the user agent of the customer.
* `clientCustomerId`: the client-generated unique ID for a specific customer. This can be used by clients to link calls related to the same customer, across different requests or sessions.
* `clientHumanId`: a client-generated unique ID for a consumer across business lines.
* `proveId`: the Prove ID associated with the customer, if known.
```bash cURL theme={"dark"}
curl -X POST "https://platform.uat.proveapis.com/v3/verify" \
-H "Authorization: Bearer YOUR_ACCESS_TOKEN" \
-H "Content-Type: application/json" \
-d '{
"verificationType": "accountOpening",
"firstName": "Bettina",
"lastName": "Halbert",
"phoneNumber": "2001004049",
"clientRequestId": "test-request-001",
"clientCustomerId": "test-customer-001"
}'
```
You will test this example in the Sandbox environment using the test users provided in the [Sandbox Testing guide](https://developer.prove.com/docs/account-opening-flow#sandbox-testing).
The response includes comprehensive identity information and verification results:
* `success`: the result of the verification.
* `correlationId`: the unique ID that Prove generates for the flow.
* `clientRequestId`: the client-generated unique ID for a specific session, provided in the request.
* `phoneNumber`: the phone number provided in the request.
* `assuranceLevel`: the [`confidence level (AL-1, AL0, AL1, AL2, AL3)`](https://developer.prove.com/docs/assurance-levels).
* `clientCustomerId`: the client-generated unique ID for a specific customer, provided in the request.
* `proveId`: the unique Prove-assigned ID tied to the consumer.
* `provePhoneAlias`: the unique Prove-assigned ID tied to the phone number.
* `identity`: the verified identity information. This object contains:
* `firstName`: the first name provided in the request.
* `lastName`: the last name provided in the request.
* `additionalIdentities`: object containing any additional identities found for the phone number.
* `evaluation`: object containing the results of the authentication and risk evaluations. Refer to the [Global Fraud Policy](https://developer.prove.com/docs/global-fraud-policy) for more details.
```json Example Response theme={"dark"}
{
"success": "true",
"correlationId": "d427c049-0ae8-491d-8300-75d23610d0ff",
"clientRequestId": "d427c049-0ae8-491d-8300-75d23610d0ff",
"phoneNumber": "2001004049",
"assuranceLevel": "AL2",
"clientCustomerId": "test-customer-001",
"proveId": "b7e54823-0068-4e23-9e07-60d382518bcf",
"provePhoneAlias": "4B2C41FC4VKDEO100F960011D0AD4A8050MEK19P4SF9PD23EFE27CD2C76A6FAA8375E60AC0550604F6G32D9ED60E06262CCC570F3C15F2D16900184E",
"identity": {
"firstName": "Bettina",
"lastName": "Halbert"
},
"additionalIdentities": [
{
"firstName": "Johnny",
"lastName": "Halbert"
}
],
"evaluation": {
"authentication": {
"result": "pass"
},
"risk": {
"result": "pass"
}
}
}
```
**Best Practices**
* Check the `success` field to handle different verification outcomes appropriately.
* Save the `proveId` and `correlationId` for future reference and to enable cross-domain linking if needed.
* Use assurance levels to implement adaptive security policies based on transaction risk.
***
## Sandbox testing
### Test users
The following test users are available for testing Account Opening using the `/v3/verify` endpoint in the Sandbox environment. Use these test users to simulate different verification scenarios and outcomes.
| Phone Number | First Name | Last Name | Verification Type | Expected Outcome |
| ------------ | ------------------- | ------------ | ----------------- | ---------------- |
| `2001004049` | [Bettina](#bettina) | Halbert | `accountOpening` | Success |
| `2001004050` | [Laurel](#laurel) | Van Der Beek | `accountOpening` | Failed |
Use these test phone numbers exactly as shown. The sandbox environment doesn't validate real customer information.
### Testing steps
Use test user Bettina Halbert to verify a successful verification:
```bash cURL theme={"dark"}
curl -X POST "https://platform.uat.proveapis.com/v3/verify" \
-H "Authorization: Bearer YOUR_ACCESS_TOKEN" \
-H "Content-Type: application/json" \
-d '{
"verificationType": "accountOpening",
"firstName": "Bettina",
"lastName": "Halbert",
"phoneNumber": "2001004049",
"clientRequestId": "test-request-001",
"clientCustomerId": "test-customer-001"
}'
```
Expected response:
```json theme={"dark"}
{
"success": "true",
"correlationId": "ab1e9b42-da4f-4d13-8690-5d32eae76c6f",
"clientRequestId": "ab1e9b42-da4f-4d13-8690-5d32eae76c6f",
"phoneNumber": "2001004049",
"assuranceLevel": "AL2",
"clientCustomerId": "test-customer-001",
"proveId": "b7e54823-0068-4e23-9e07-60d382518bcf",
"provePhoneAlias": "4B2C41FC4VKDEO100F960011D0AD4A8050MEK19P4SF9PD23EFE27CD2C76A6FAA8375E60AC0550604F6G32D9ED60E06262CCC570F3C15F2D16900184E",
"identity": {
"firstName": "Bettina",
"lastName": "Halbert"
},
"additionalIdentities": [
{
"firstName": "Johnny",
"lastName": "Halbert"
}
],
"evaluation": {
"authentication": {
"result": "pass"
},
"risk": {
"result": "pass"
}
}
}
```
Use test user Laurel Van Der Beek to simulate a failed verification:
```bash cURL theme={"dark"}
curl -X POST "https://platform.uat.proveapis.com/v3/verify" \
-H "Authorization: Bearer YOUR_ACCESS_TOKEN" \
-H "Content-Type: application/json" \
-d '{
"verificationType": "accountOpening",
"firstName": "Laurel",
"lastName": "Van Der Beek",
"phoneNumber": "2001004050",
"clientRequestId": "test-request-002",
"clientCustomerId": "test-customer-002"
}'
```
Expected response:
```json theme={"dark"}
{
"success": "false",
"correlationId": "46280df3-1c6f-4a98-bbb9-5a333c47e70b",
"clientRequestId": "46280df3-1c6f-4a98-bbb9-5a333c47e70b",
"phoneNumber": "2001004050",
"assuranceLevel": "AL0",
"clientCustomerId": "test-customer-002",
"identity": {
"firstName": "Laurel",
"lastName": "Van Der Beek"
},
"evaluation": {
"authentication": {
"failureReasons": {
"9175": "No active identity can be associated with the phone number.",
"9177": "No information can be found for the identity or phone number."
},
"result": "fail"
},
"risk": {
"result": "pass"
}
}
}
```
# Prove Account Opening Overview
Source: https://developer.prove.com/docs/account-opening-overview
Prove Account Opening returns identity information linked to an authenticated phone number.
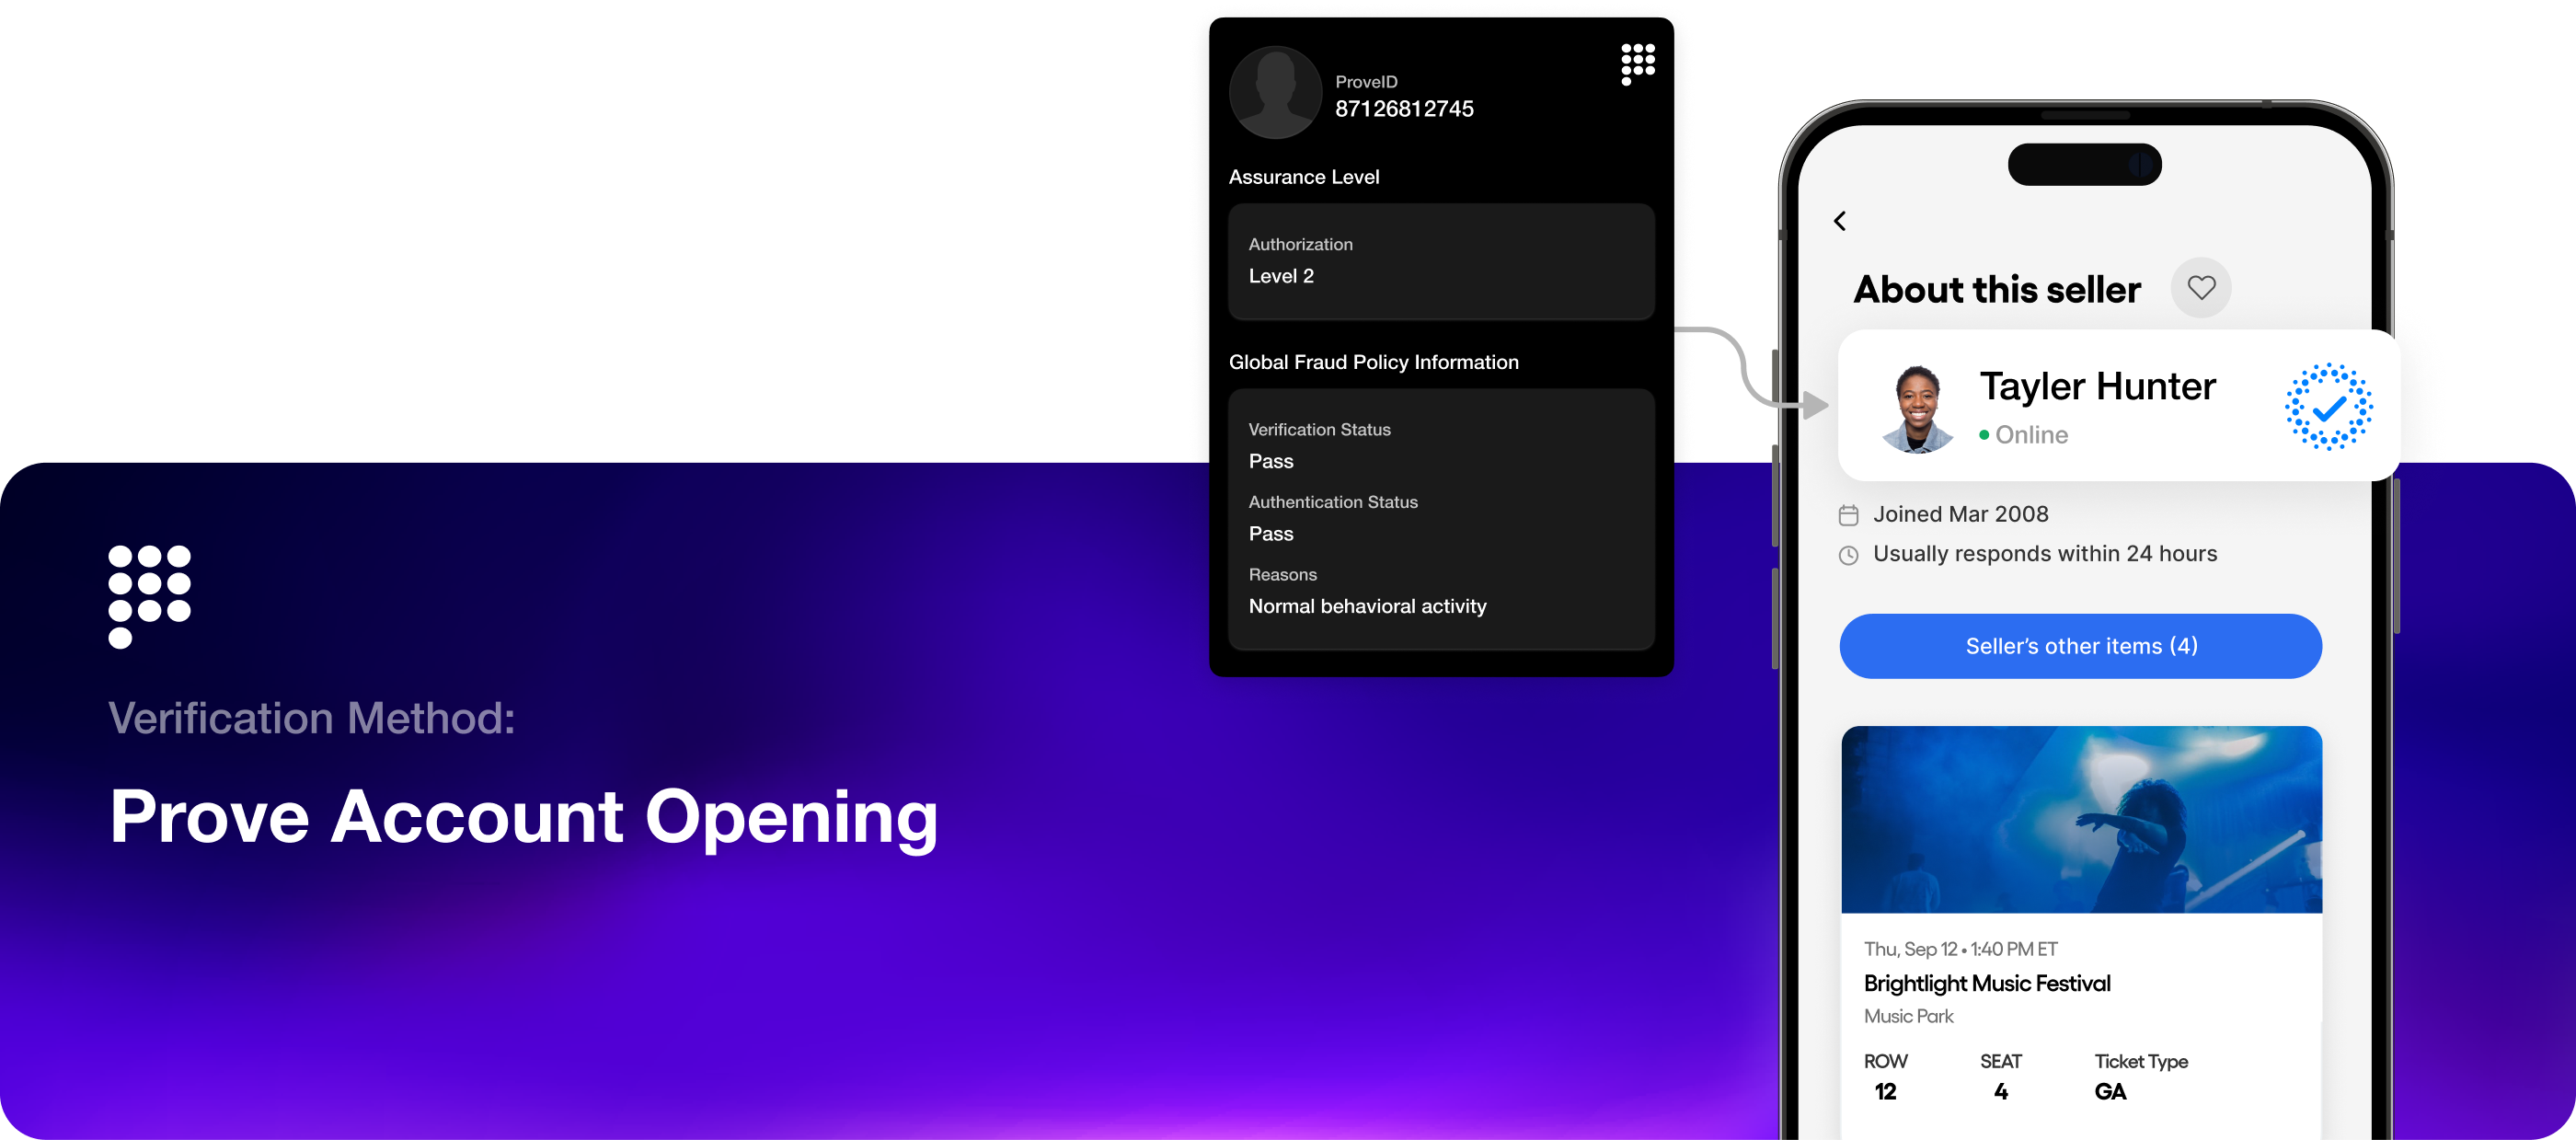 ## Prove Account Opening solution
Prove Account Opening verifies new customers in seconds using as little as a phone number. It authenticates the individual’s mobile identity through Prove’s Identity Network™, ensuring the person behind the device truly owns and controls that number. Businesses can stop fraud before it starts while giving genuine customers a smooth onboarding experience.
Ready to start implementing Account Opening? Check out the [Account Opening Implementation Guide](https://developer.prove.com/docs/account-opening-flow).
# Sandbox Testing
Source: https://developer.prove.com/docs/account-opening-sandbox-testing
# Assurance Levels
Source: https://developer.prove.com/docs/assurance-levels
Understand Prove's Assurance Levels (AL) and how they indicate the confidence in a verified identity.
## Overview
Assurance levels are Prove’s tiered confidence metric, ranging from -1 to 3, that dynamically adapts to user behavior and various authentication keys. It allows for adaptive security policies, meaning you can require different levels of verification for different types of transactions.
| AL | Reason | Description |
| :----: | :----: | :-------------------------------------------------------------------------------------------------------- |
| **-1** | -1A | Poor Quality Identity |
| | -1E | Porting Attack |
| | -1F | Unusual Linetype |
| | -1G | Online Temp Phone |
| | -1H | High Activity Online Temp Phone |
| | -1M | High Telco Event Activity |
| **0** | 0B | No Data |
| | 0D | Previously active, but not used anymore |
| | 0E | Low Tenure |
| | 0F | Unusually High Activity / Positive Bot Identification |
| **1** | 1A | The phone is behaviorally active (there is evidence of it being used on the network) |
| | 1B | The phone has been asserted in conjunction with an identity |
| | 1A+1B | Data sources have current data and there are no recent disconnects + Prove has seen this identity before |
| | 1C | IsHuman ML Bot Model identified person as human |
| | 1D | Network Active Member |
| **2** | 2A | Prove has seen this phone + identity before at moderate-to-high confidence |
| | 2B | Prove corroborated data across multiple identity data sources |
| **3** | 3A | Prove has seen this phone + identity before at very high confidence, this is this person’s primary number |
# Implementing Prove Bot Detection
Source: https://developer.prove.com/docs/bot-detection-flow
Prove Bot Detection returns Assurance Level information linked to a phone number to distinguish between Consumers and non-humans
Begin by implementing [Step 2: Authentication](/docs/check-for-prove-key) to authenticate the user's device. This step is crucial as it establishes a trusted connection between the user and their phone number, which is the foundation for the Bot Detection solution.
This step must be complete before proceeding with Bot Detection.
Collect the phone number from your CRM or database.
Make a request to the [`/v3/verify endpoint`](https://developer.prove.com/reference/verify) including the Authorization header. Generate a bearer token as outlined on the [Authentication page](https://developer.prove.com/reference/authentication). Include the following required parameters:
* `phoneNumber`: the phone number of the customer.
* `verificationType`: the type of verification to be performed. Set this value to `bot`.
* `clientRequestId`: client-generated unique ID for a specific session. This can be used to identify specific requests.
Always provide unique `clientRequestId` values for each request to enable proper tracking and troubleshooting.
The optional parameters:
* `emailAddress`: the email address of the customer.
* `ipAddress`: the IP address of the customer's device.
* `userAgent`: the user agent of the customer.
* `clientCustomerId`: the client-generated unique ID for a specific customer. This can be used by clients to link calls related to the same customer, across different requests or sessions.
* `clientHumanId`: a client-generated unique ID for a consumer across business lines.
* `proveId`: the Prove ID associated with the customer, if known.
```bash cURL theme={"dark"}
curl -X POST "https://platform.uat.proveapis.com/v3/verify" \
-H "Authorization: Bearer YOUR_ACCESS_TOKEN" \
-H "Content-Type: application/json" \
-d '{
"verificationType": "bot",
"phoneNumber": "2001004051",
"clientRequestId": "test-request-001",
"clientCustomerId": "test-customer-001"
}'
```
You will test this example in the Sandbox environment using the test users provided in the [Sandbox Testing guide](https://developer.prove.com/docs/bot-detection-flow#sandbox-testing).
The response includes comprehensive identity information and verification results:
* `success`: the result of the verification.
* `correlationId`: the unique ID that Prove generates for the flow.
* `clientRequestId`: the client-generated unique ID for a specific session, provided in the request.
* `phoneNumber`: the phone number provided in the request.
* `assuranceLevel`: the [`confidence level (AL-1, AL0, AL1, AL2, AL3)`](https://developer.prove.com/docs/assurance-levels).
* `clientCustomerId`: the client-generated unique ID for a specific customer, provided in the request.
* `proveId`: the unique Prove-assigned ID tied to the consumer.
* `provePhoneAlias`: the unique Prove-assigned ID tied to the phone number.
* `evaluation`: object containing the results of the authentication and risk evaluations. Refer to the [Global Fraud Policy](https://developer.prove.com/docs/global-fraud-policy) for more details.
```json Example Response theme={"dark"}
{
"success": "true",
"correlationId": "e4f4e229-ce65-4b43-bdb4-551556b3b68a",
"clientRequestId": "e4f4e229-ce65-4b43-bdb4-551556b3b68a",
"phoneNumber": "2001004051",
"assuranceLevel": "AL1",
"clientCustomerId": "test-customer-001",
"proveId": "b7e54823-0068-4e23-9e07-60d382518bcf",
"provePhoneAlias": "4B2C41FC4VKDEO100F960011D0AD4A8050MEK19P4SF9PD23EFE27CD2C76A6FAA8375E60AC0550604F6G32D9ED60E06262CCC570F3C15F2D16900184E",
"identity": {},
"evaluation": {
"authentication": {
"result": "pass"
},
"risk": {
"result": "pass"
}
}
}
```
**Best Practices**
* Check the `success` field to handle different verification outcomes appropriately.
* Save the `proveId` and `correlationId` for future reference and to enable cross-domain linking if needed.
* Use assurance levels to implement adaptive security policies based on transaction risk.
***
## Sandbox testing
### Test users
The following test users are available for testing Bot Detection using the `/v3/verify` endpoint in the Sandbox environment. Use these test users to simulate different verification scenarios and outcomes.
| Phone Number | First Name | Last Name | Verification Type | Expected Outcome |
| ------------ | ----------------- | ---------- | ----------------- | ---------------- |
| `2001004051` | [Ewen](#ewen) | Brimilcome | `bot` | Success |
| `2001004052` | [Hilary](#hilary) | Kumaar | `bot` | Failed |
Use these test phone numbers exactly as shown. The sandbox environment doesn't validate real customer information.
### Testing steps
Use test user Ewen Brimilcome to verify a successful verification:
```bash cURL theme={"dark"}
curl -X POST "https://platform.uat.proveapis.com/v3/verify" \
-H "Authorization: Bearer YOUR_ACCESS_TOKEN" \
-H "Content-Type: application/json" \
-d '{
"verificationType": "bot",
"phoneNumber": "2001004051",
"clientRequestId": "test-request-001",
"clientCustomerId": "test-customer-001"
}'
```
Expected response:
```json theme={"dark"}
{
"success": "true",
"correlationId": "e4f4e229-ce65-4b43-bdb4-551556b3b68a",
"clientRequestId": "e4f4e229-ce65-4b43-bdb4-551556b3b68a",
"phoneNumber": "2001004051",
"assuranceLevel": "AL1",
"clientCustomerId": "test-customer-001",
"proveId": "b7e54823-0068-4e23-9e07-60d382518bcf",
"provePhoneAlias": "4B2C41FC4VKDEO100F960011D0AD4A8050MEK19P4SF9PD23EFE27CD2C76A6FAA8375E60AC0550604F6G32D9ED60E06262CCC570F3C15F2D16900184E",
"identity": {},
"evaluation": {
"authentication": {
"result": "pass"
},
"risk": {
"result": "pass"
}
}
}
```
Use test user Hilary Kumaar to simulate a failed verification:
```bash cURL theme={"dark"}
curl -X POST "https://platform.uat.proveapis.com/v3/verify" \
-H "Authorization: Bearer YOUR_ACCESS_TOKEN" \
-H "Content-Type: application/json" \
-d '{
"verificationType": "bot",
"phoneNumber": "2001004052",
"clientRequestId": "test-request-002",
"clientCustomerId": "test-customer-002"
}'
```
Expected response:
```json theme={"dark"}
{
"success": "false",
"correlationId": "4020b95e-c2b8-4ce1-a381-1034a0620bb6",
"clientRequestId": "4020b95e-c2b8-4ce1-a381-1034a0620bb6",
"phoneNumber": "2001004052",
"assuranceLevel": "AL-1",
"clientCustomerId": "test-customer-002",
"identity": {},
"evaluation": {
"authentication": {
"failureReasons": {
"9176": "The phone number and identity is strongly associated with a fraud vector."
},
"result": "fail"
},
"risk": {
"failureReasons": {
"9304": "Suspicious large amount of recent activity across different identity attributes."
},
"result": "fail"
}
}
}
```
# Prove Bot Detection Overview
Source: https://developer.prove.com/docs/bot-detection-overview
Prove Bot Detection returns Assurance Level information linked to a phone number to distinguish between Consumers and non-humans.
## Prove Account Opening solution
Prove Account Opening verifies new customers in seconds using as little as a phone number. It authenticates the individual’s mobile identity through Prove’s Identity Network™, ensuring the person behind the device truly owns and controls that number. Businesses can stop fraud before it starts while giving genuine customers a smooth onboarding experience.
Ready to start implementing Account Opening? Check out the [Account Opening Implementation Guide](https://developer.prove.com/docs/account-opening-flow).
# Sandbox Testing
Source: https://developer.prove.com/docs/account-opening-sandbox-testing
# Assurance Levels
Source: https://developer.prove.com/docs/assurance-levels
Understand Prove's Assurance Levels (AL) and how they indicate the confidence in a verified identity.
## Overview
Assurance levels are Prove’s tiered confidence metric, ranging from -1 to 3, that dynamically adapts to user behavior and various authentication keys. It allows for adaptive security policies, meaning you can require different levels of verification for different types of transactions.
| AL | Reason | Description |
| :----: | :----: | :-------------------------------------------------------------------------------------------------------- |
| **-1** | -1A | Poor Quality Identity |
| | -1E | Porting Attack |
| | -1F | Unusual Linetype |
| | -1G | Online Temp Phone |
| | -1H | High Activity Online Temp Phone |
| | -1M | High Telco Event Activity |
| **0** | 0B | No Data |
| | 0D | Previously active, but not used anymore |
| | 0E | Low Tenure |
| | 0F | Unusually High Activity / Positive Bot Identification |
| **1** | 1A | The phone is behaviorally active (there is evidence of it being used on the network) |
| | 1B | The phone has been asserted in conjunction with an identity |
| | 1A+1B | Data sources have current data and there are no recent disconnects + Prove has seen this identity before |
| | 1C | IsHuman ML Bot Model identified person as human |
| | 1D | Network Active Member |
| **2** | 2A | Prove has seen this phone + identity before at moderate-to-high confidence |
| | 2B | Prove corroborated data across multiple identity data sources |
| **3** | 3A | Prove has seen this phone + identity before at very high confidence, this is this person’s primary number |
# Implementing Prove Bot Detection
Source: https://developer.prove.com/docs/bot-detection-flow
Prove Bot Detection returns Assurance Level information linked to a phone number to distinguish between Consumers and non-humans
Begin by implementing [Step 2: Authentication](/docs/check-for-prove-key) to authenticate the user's device. This step is crucial as it establishes a trusted connection between the user and their phone number, which is the foundation for the Bot Detection solution.
This step must be complete before proceeding with Bot Detection.
Collect the phone number from your CRM or database.
Make a request to the [`/v3/verify endpoint`](https://developer.prove.com/reference/verify) including the Authorization header. Generate a bearer token as outlined on the [Authentication page](https://developer.prove.com/reference/authentication). Include the following required parameters:
* `phoneNumber`: the phone number of the customer.
* `verificationType`: the type of verification to be performed. Set this value to `bot`.
* `clientRequestId`: client-generated unique ID for a specific session. This can be used to identify specific requests.
Always provide unique `clientRequestId` values for each request to enable proper tracking and troubleshooting.
The optional parameters:
* `emailAddress`: the email address of the customer.
* `ipAddress`: the IP address of the customer's device.
* `userAgent`: the user agent of the customer.
* `clientCustomerId`: the client-generated unique ID for a specific customer. This can be used by clients to link calls related to the same customer, across different requests or sessions.
* `clientHumanId`: a client-generated unique ID for a consumer across business lines.
* `proveId`: the Prove ID associated with the customer, if known.
```bash cURL theme={"dark"}
curl -X POST "https://platform.uat.proveapis.com/v3/verify" \
-H "Authorization: Bearer YOUR_ACCESS_TOKEN" \
-H "Content-Type: application/json" \
-d '{
"verificationType": "bot",
"phoneNumber": "2001004051",
"clientRequestId": "test-request-001",
"clientCustomerId": "test-customer-001"
}'
```
You will test this example in the Sandbox environment using the test users provided in the [Sandbox Testing guide](https://developer.prove.com/docs/bot-detection-flow#sandbox-testing).
The response includes comprehensive identity information and verification results:
* `success`: the result of the verification.
* `correlationId`: the unique ID that Prove generates for the flow.
* `clientRequestId`: the client-generated unique ID for a specific session, provided in the request.
* `phoneNumber`: the phone number provided in the request.
* `assuranceLevel`: the [`confidence level (AL-1, AL0, AL1, AL2, AL3)`](https://developer.prove.com/docs/assurance-levels).
* `clientCustomerId`: the client-generated unique ID for a specific customer, provided in the request.
* `proveId`: the unique Prove-assigned ID tied to the consumer.
* `provePhoneAlias`: the unique Prove-assigned ID tied to the phone number.
* `evaluation`: object containing the results of the authentication and risk evaluations. Refer to the [Global Fraud Policy](https://developer.prove.com/docs/global-fraud-policy) for more details.
```json Example Response theme={"dark"}
{
"success": "true",
"correlationId": "e4f4e229-ce65-4b43-bdb4-551556b3b68a",
"clientRequestId": "e4f4e229-ce65-4b43-bdb4-551556b3b68a",
"phoneNumber": "2001004051",
"assuranceLevel": "AL1",
"clientCustomerId": "test-customer-001",
"proveId": "b7e54823-0068-4e23-9e07-60d382518bcf",
"provePhoneAlias": "4B2C41FC4VKDEO100F960011D0AD4A8050MEK19P4SF9PD23EFE27CD2C76A6FAA8375E60AC0550604F6G32D9ED60E06262CCC570F3C15F2D16900184E",
"identity": {},
"evaluation": {
"authentication": {
"result": "pass"
},
"risk": {
"result": "pass"
}
}
}
```
**Best Practices**
* Check the `success` field to handle different verification outcomes appropriately.
* Save the `proveId` and `correlationId` for future reference and to enable cross-domain linking if needed.
* Use assurance levels to implement adaptive security policies based on transaction risk.
***
## Sandbox testing
### Test users
The following test users are available for testing Bot Detection using the `/v3/verify` endpoint in the Sandbox environment. Use these test users to simulate different verification scenarios and outcomes.
| Phone Number | First Name | Last Name | Verification Type | Expected Outcome |
| ------------ | ----------------- | ---------- | ----------------- | ---------------- |
| `2001004051` | [Ewen](#ewen) | Brimilcome | `bot` | Success |
| `2001004052` | [Hilary](#hilary) | Kumaar | `bot` | Failed |
Use these test phone numbers exactly as shown. The sandbox environment doesn't validate real customer information.
### Testing steps
Use test user Ewen Brimilcome to verify a successful verification:
```bash cURL theme={"dark"}
curl -X POST "https://platform.uat.proveapis.com/v3/verify" \
-H "Authorization: Bearer YOUR_ACCESS_TOKEN" \
-H "Content-Type: application/json" \
-d '{
"verificationType": "bot",
"phoneNumber": "2001004051",
"clientRequestId": "test-request-001",
"clientCustomerId": "test-customer-001"
}'
```
Expected response:
```json theme={"dark"}
{
"success": "true",
"correlationId": "e4f4e229-ce65-4b43-bdb4-551556b3b68a",
"clientRequestId": "e4f4e229-ce65-4b43-bdb4-551556b3b68a",
"phoneNumber": "2001004051",
"assuranceLevel": "AL1",
"clientCustomerId": "test-customer-001",
"proveId": "b7e54823-0068-4e23-9e07-60d382518bcf",
"provePhoneAlias": "4B2C41FC4VKDEO100F960011D0AD4A8050MEK19P4SF9PD23EFE27CD2C76A6FAA8375E60AC0550604F6G32D9ED60E06262CCC570F3C15F2D16900184E",
"identity": {},
"evaluation": {
"authentication": {
"result": "pass"
},
"risk": {
"result": "pass"
}
}
}
```
Use test user Hilary Kumaar to simulate a failed verification:
```bash cURL theme={"dark"}
curl -X POST "https://platform.uat.proveapis.com/v3/verify" \
-H "Authorization: Bearer YOUR_ACCESS_TOKEN" \
-H "Content-Type: application/json" \
-d '{
"verificationType": "bot",
"phoneNumber": "2001004052",
"clientRequestId": "test-request-002",
"clientCustomerId": "test-customer-002"
}'
```
Expected response:
```json theme={"dark"}
{
"success": "false",
"correlationId": "4020b95e-c2b8-4ce1-a381-1034a0620bb6",
"clientRequestId": "4020b95e-c2b8-4ce1-a381-1034a0620bb6",
"phoneNumber": "2001004052",
"assuranceLevel": "AL-1",
"clientCustomerId": "test-customer-002",
"identity": {},
"evaluation": {
"authentication": {
"failureReasons": {
"9176": "The phone number and identity is strongly associated with a fraud vector."
},
"result": "fail"
},
"risk": {
"failureReasons": {
"9304": "Suspicious large amount of recent activity across different identity attributes."
},
"result": "fail"
}
}
}
```
# Prove Bot Detection Overview
Source: https://developer.prove.com/docs/bot-detection-overview
Prove Bot Detection returns Assurance Level information linked to a phone number to distinguish between Consumers and non-humans.
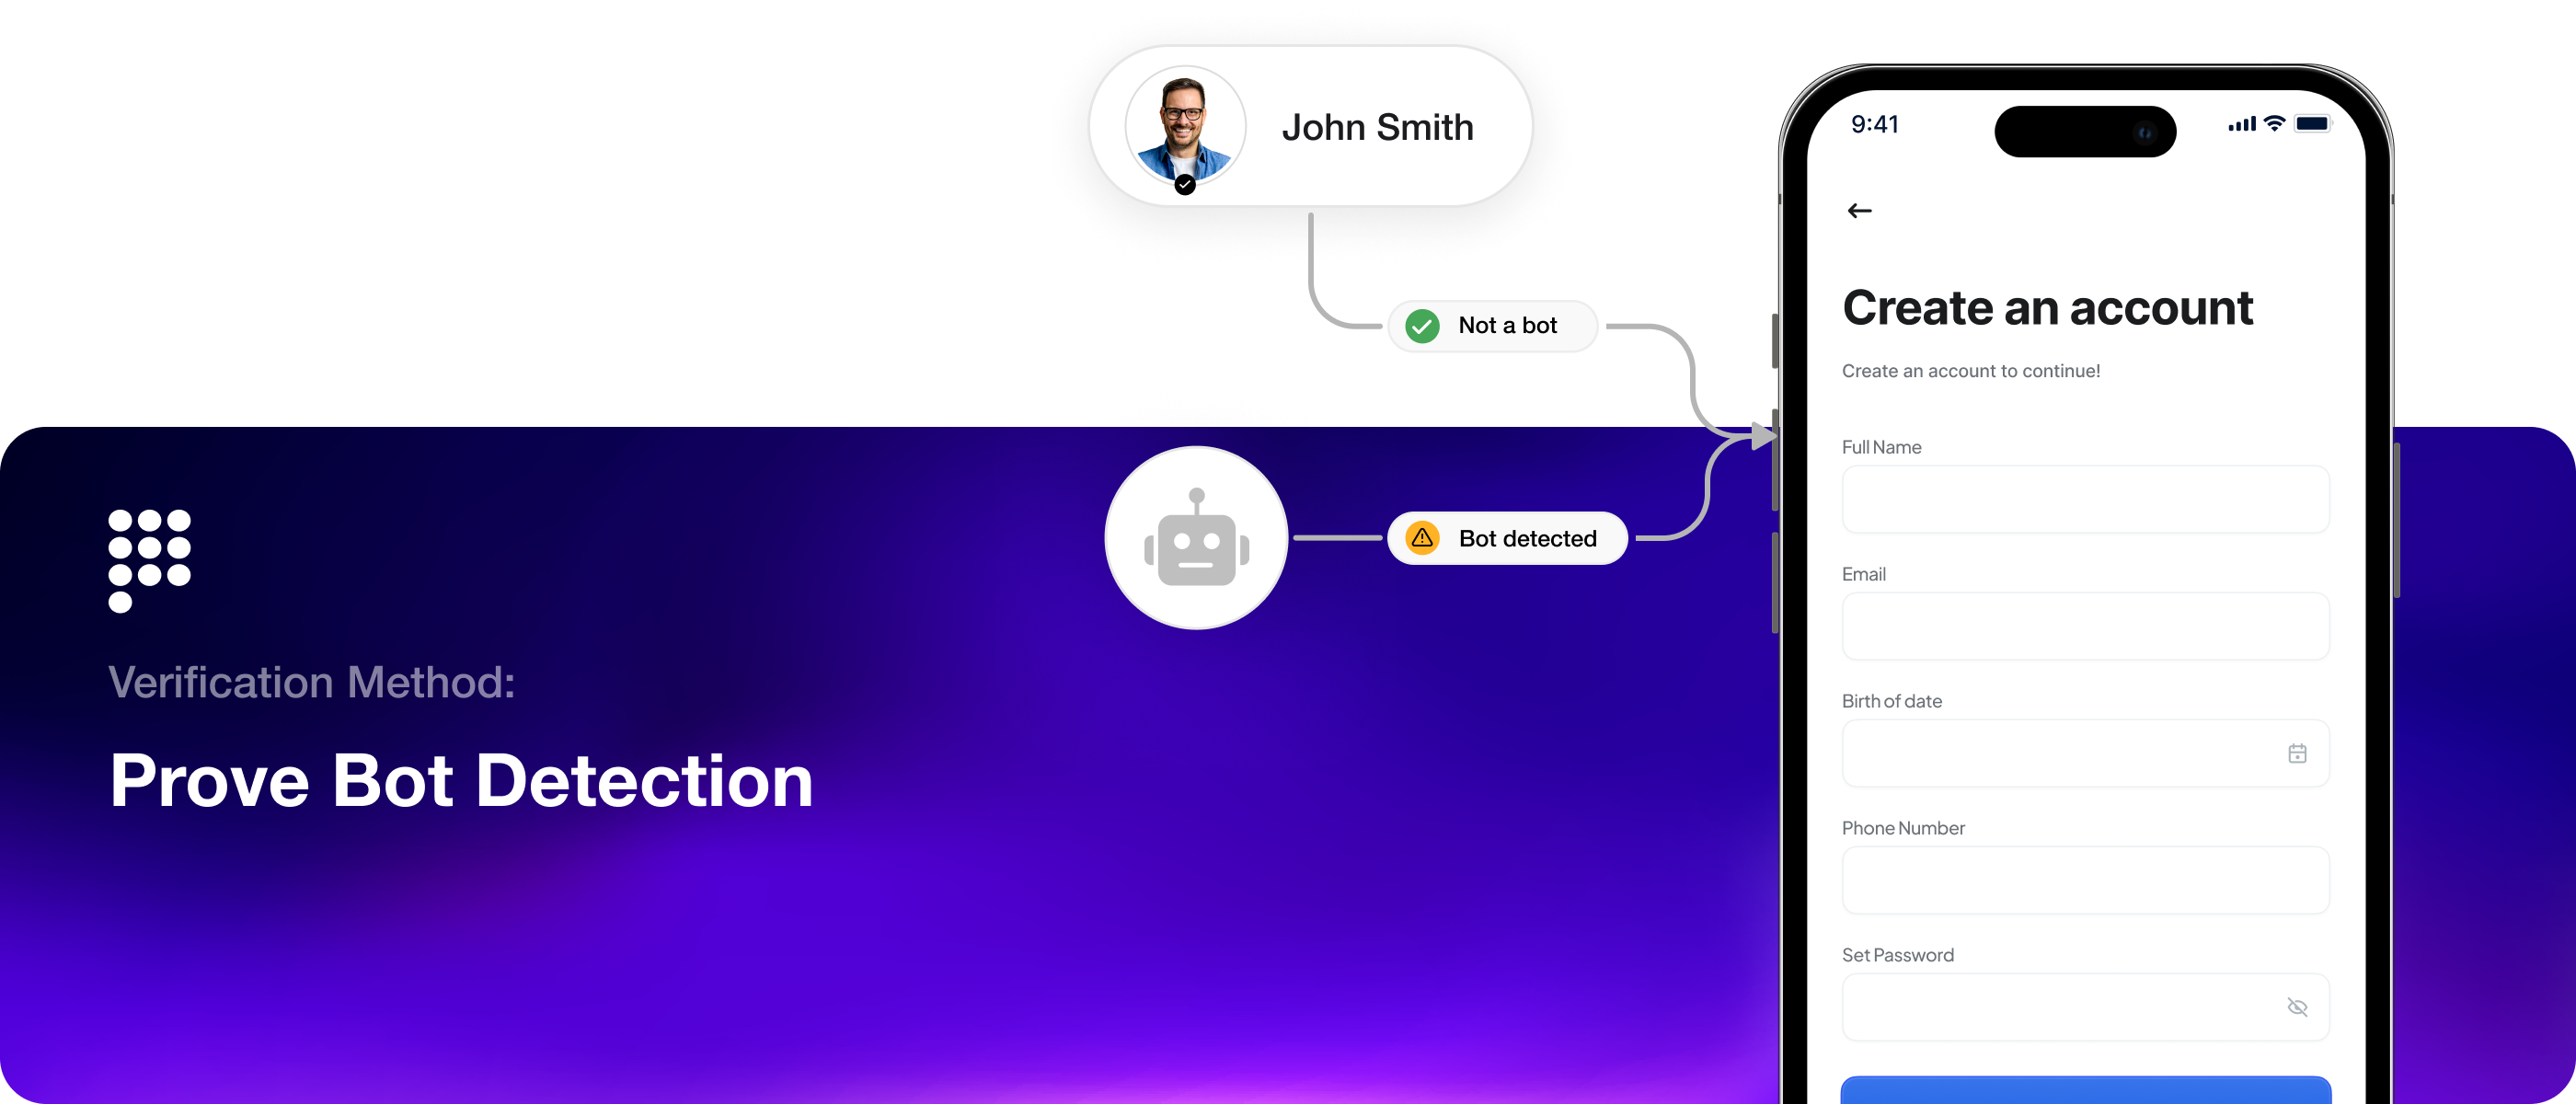 ## Prove Bot Detection solution
Prove Bot Detection helps businesses tell real humans apart from malicious bots in real time, before fraud happens. It passively verifies whether a phone is truly tied to a human device, not a virtual machine, emulator, or IoT SIM. By analyzing phone reputation, activity patterns, and Prove’s proprietary device intelligence, we can flag suspicious automation instantly, without adding friction for legitimate customers.
Ready to start implementing Bot Detection? Check out the [Bot Detection Implementation Guide](https://developer.prove.com/docs/bot-detection-flow).
# Sandbox Testing
Source: https://developer.prove.com/docs/bot-sandbox-testing
# Build Prove with LLMs
Source: https://developer.prove.com/docs/build-with-llm
Learn how to use large language models (LLMs) to assist in building Prove integrations
## Plain text docs
You can access our documentation as plain text markdown files by adding .md to the end of any URL. For example, you can find the plain text version of this page itself at [https://developer.prove.com/build-with-llm.md](https://developer.prove.com/build-with-llm.md).
This helps AI tools and agents consume our content and copy and paste the entire contents of a doc into an LLM. This format is preferable to scraping or copying from our HTML and JavaScript-rendered pages because:
* Plain text has fewer formatting tokens.
* The plain text version renders content that the default view doesn’t show; for example, content hidden in a tab on a given page.
* LLMs can parse and understand markdown hierarchy.
We also host [/llms.txt](https://developer.prove.com/llms.txt) and [/llms-full.txt](https://developer.prove.com/llms-full.txt) files which instruct AI tools and agents how to retrieve the plain text versions of our pages. The /llms.txt file is an [emerging standard](https://llmstxt.org/) for making websites and content more accessible to LLMs.
## Context menu
The documentation provides a drop-down menu to give an array of relevant links and information for LLMs. These include:
* copying the current page as markdown.
* viewing the markdown version of the current page.
* opening popular LLM tools to ask a question about the current page.
* connecting the MCP server to your LLM agent.
This menu is available at the beginning of each page.
The Prove [Model Context Protocol (MCP)](https://developer.prove.com/docs/model-context-protocol) defines a set of tools that AI agents can use to search Prove’s documentation.
# Challenge Page Requirements - Mobile Auth℠
Source: https://developer.prove.com/docs/challenge-page-requirements-mobile-authsm
Learn how to design the front end for the Challenge Page after authenticating with Mobile Auth℠
## Prove Bot Detection solution
Prove Bot Detection helps businesses tell real humans apart from malicious bots in real time, before fraud happens. It passively verifies whether a phone is truly tied to a human device, not a virtual machine, emulator, or IoT SIM. By analyzing phone reputation, activity patterns, and Prove’s proprietary device intelligence, we can flag suspicious automation instantly, without adding friction for legitimate customers.
Ready to start implementing Bot Detection? Check out the [Bot Detection Implementation Guide](https://developer.prove.com/docs/bot-detection-flow).
# Sandbox Testing
Source: https://developer.prove.com/docs/bot-sandbox-testing
# Build Prove with LLMs
Source: https://developer.prove.com/docs/build-with-llm
Learn how to use large language models (LLMs) to assist in building Prove integrations
## Plain text docs
You can access our documentation as plain text markdown files by adding .md to the end of any URL. For example, you can find the plain text version of this page itself at [https://developer.prove.com/build-with-llm.md](https://developer.prove.com/build-with-llm.md).
This helps AI tools and agents consume our content and copy and paste the entire contents of a doc into an LLM. This format is preferable to scraping or copying from our HTML and JavaScript-rendered pages because:
* Plain text has fewer formatting tokens.
* The plain text version renders content that the default view doesn’t show; for example, content hidden in a tab on a given page.
* LLMs can parse and understand markdown hierarchy.
We also host [/llms.txt](https://developer.prove.com/llms.txt) and [/llms-full.txt](https://developer.prove.com/llms-full.txt) files which instruct AI tools and agents how to retrieve the plain text versions of our pages. The /llms.txt file is an [emerging standard](https://llmstxt.org/) for making websites and content more accessible to LLMs.
## Context menu
The documentation provides a drop-down menu to give an array of relevant links and information for LLMs. These include:
* copying the current page as markdown.
* viewing the markdown version of the current page.
* opening popular LLM tools to ask a question about the current page.
* connecting the MCP server to your LLM agent.
This menu is available at the beginning of each page.
The Prove [Model Context Protocol (MCP)](https://developer.prove.com/docs/model-context-protocol) defines a set of tools that AI agents can use to search Prove’s documentation.
# Challenge Page Requirements - Mobile Auth℠
Source: https://developer.prove.com/docs/challenge-page-requirements-mobile-authsm
Learn how to design the front end for the Challenge Page after authenticating with Mobile Auth℠
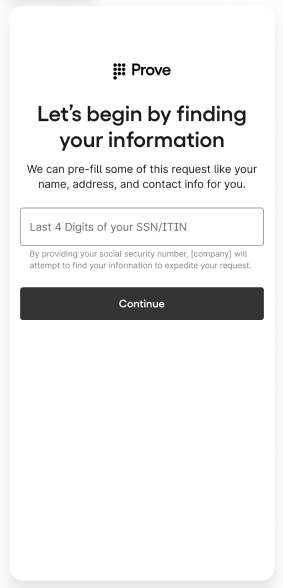 ## Page summary requirements
Page Summary Language: Let's Begin by Finding Your Information
## Page summary requirements
Page Summary Language: Let's Begin by Finding Your Information
Page Summary Description: We can prefill some of this request like your name, address, and contact info for you.
## Data entry requirements
The table outlines your options for prompting the challenge data.
| Contracted Solution | Customer Prompt Language Requirements | Required Challenge Data |
| :---------------------- | :-------------------------------------------------------------------------------------------------------------------------------------------- | :------------------------------------------------------------------------------------------------------------------------------------------------------------------------------------------------------------------------------------------------------------------------ |
| Prove Pre-Fill | Customer can choose one from the following prompts:
"Last 4 SSN/ITIN"
"SSN/ITIN"
"MM/DD/YYYY"
"MM/YYYY"
"MM/DD" | Last 4 SSN/ITIN
Full SSN\*
Full DOB
DOB - Month and Year
DOB - Month and Day
\*If the customer is applying to open a demand deposit account (DDA), the customer must enter their full social security number (SSN) for the challenge |
| Prove Pre-Fill with KYC | "Full SSN/ITIN" | Full SSN |
# Challenge Page Requirements - When Mobile Auth℠ Fails
Source: https://developer.prove.com/docs/challenge-page-requirements-when-mobile-authsm-fails
Learn how to design the frontend for the Challenge Page if MobileAuth Fails or if using the Desktop flow
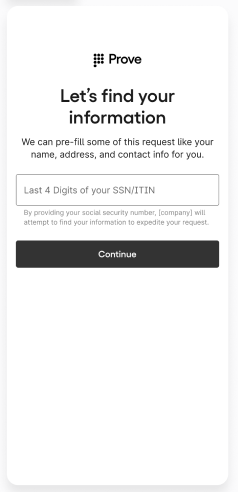
Users see the Challenge Page when they can't complete Mobile Auth℠ successfully or when they proceed through the Desktop authentication flow. On this page, users enter or confirm their personal information to continue with the verification process.
The following image illustrates the Challenge Page interface:
 ## Page summary requirements
Page Summary Heading: Let's find your Information
## Page summary requirements
Page Summary Heading: Let's find your Information
Page Summary Description: We can prefill some of this request like your name, address, and contact info for you.
## Data entry requirements
The table outlines your options for prompting the challenge data.
| Contracted Solution | Customer Prompt Language Requirements | Required Challenge Data |
| :---------------------- | :-------------------------------------------------------------------------------------------------------------------------------------------- | :------------------------------------------------------------------------------------------------------------------------------------------------------------------------------------------------------------------------------------------------------------------------ |
| Prove Pre-Fill | Customer can choose one from the following prompts:
"Last 4 SSN/ITIN"
"SSN/ITIN"
"MM/DD/YYYY"
"MM/YYYY"
"MM/DD" | Last 4 SSN/ITIN
Full SSN\*
Full DOB
DOB - Month and Year
DOB - Month and Day
\*If the customer is applying to open a demand deposit account (DDA), the customer must enter their full social security number (SSN) for the challenge |
| Prove Pre-Fill with KYC | "Full SSN/ITIN" | Full SSN |
# Authentication Overview
Source: https://developer.prove.com/docs/check-for-prove-key
The Prove SDK simplifies and strengthens your authentication security by automatically choosing the correct authenticator based on trusted device recognition and authenticator availability—reducing friction while protecting against fraud.
## How to implement
To integrate Prove authentication, you must use the client-side SDK.
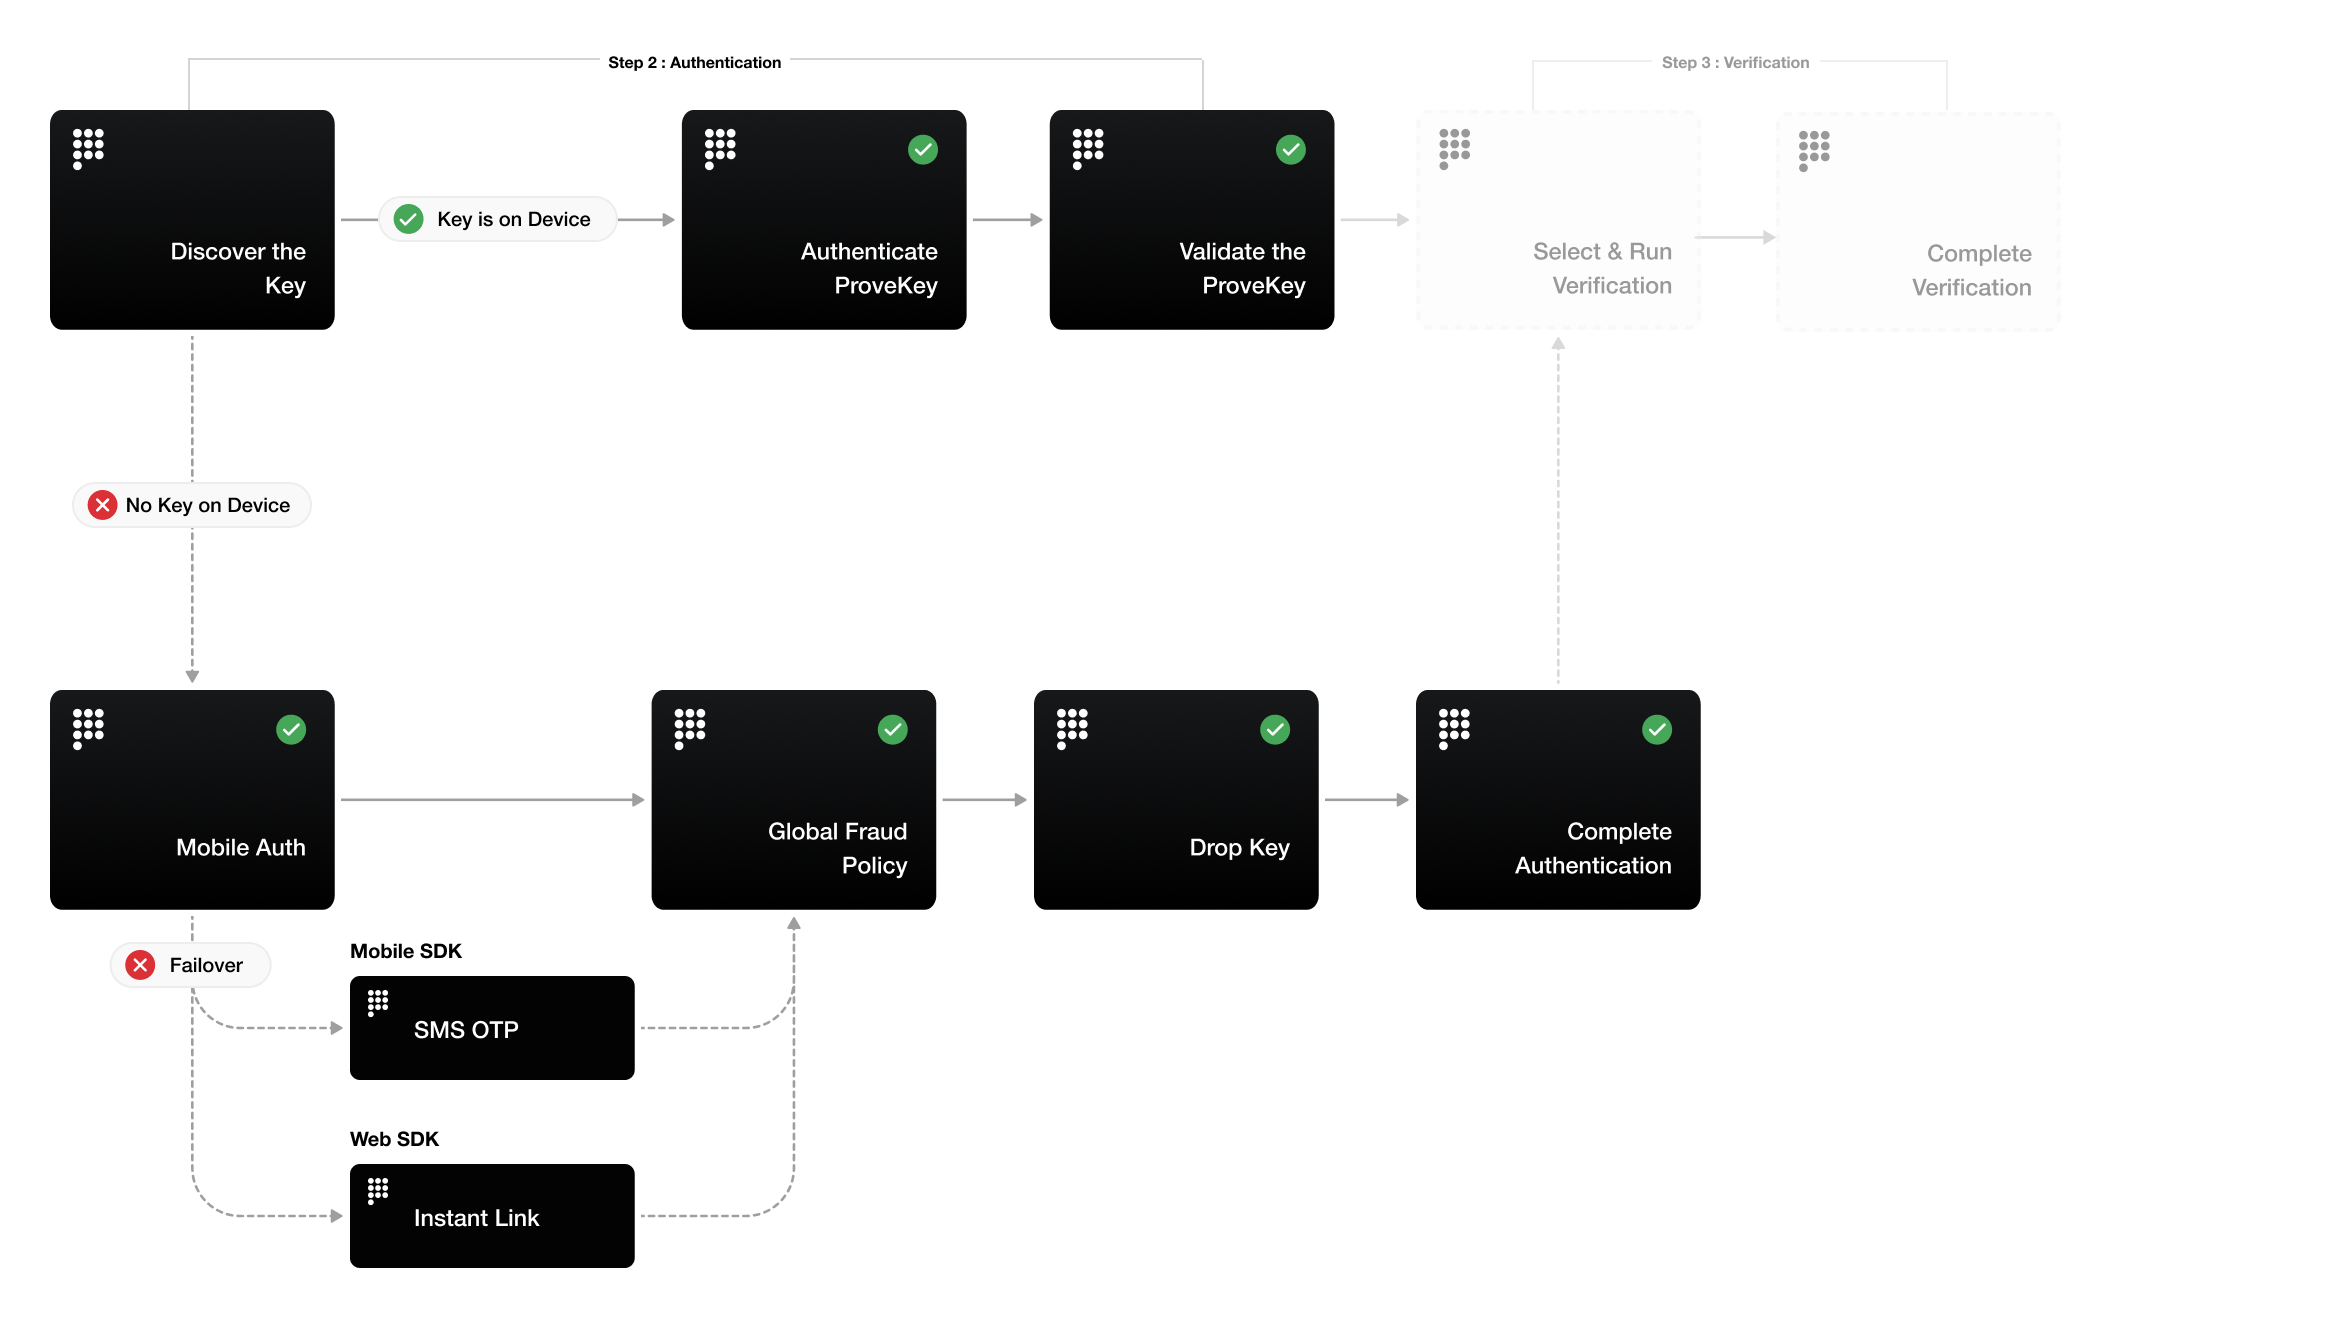 Determine if the customer is on a mobile or desktop browser using this example. If the `isMobile` is true, set `mobile` as the `possessionType` for the `Start()` function on the server, otherwise you can set `desktop`:
```javascript JavaScript theme={"dark"}
// Check if the customer is on a mobile or desktop browser.
const authCheck = new proveAuth.AuthenticatorBuilder().build();
let isMobile = authCheck.isMobileWeb()
```
```typescript TypeScript theme={"dark"}
// Check if the customer is on a mobile or desktop browser.
const authCheck = new proveAuth.AuthenticatorBuilder().build();
let isMobile = authCheck.isMobileWeb()
```
When using the Android SDK, set `mobile` as the `possessionType` for the `Start()` function on the server.
When using the iOS SDK, set `mobile` as the `possessionType` for the `Start()` function on the server.
Send a request to your back end server with the phone number and possession type to start the flow. For additional optional parameters, see the [v3/unify API reference](https://developer.prove.com/reference/unify-request).
```go Go theme={"dark"}
// Send the Unify request.
rspUnify, err := client.V3.V3UnifyRequest(ctx, &components.V3UnifyRequest{
PhoneNumber: "2001004014",
PossessionType: "mobile",
ClientRequestId: "test-001",
})
if err != nil {
t.Fatal(err)
}
```
```typescript TypeScript theme={"dark"}
let unifyReq = {
phoneNumber: '2001004014',
possessionType: 'mobile',
clientRequestId: 'test-001',
}
// Send the Unify request.
const rspUnify = await sdk.v3.v3UnifyRequest(unifyReq);
if (!rspUnify) {
console.error("Unify error.")
return
}
```
```java Java theme={"dark"}
// Send the Unify request.
V3UnifyRequest req = V3UnifyRequest.builder()
.phoneNumber("2001004014")
.possessionType("mobile")
.clientRequestId("test-001")
.build();
// You may want to use the .get() method when working with the response object.
```
```csharp .NET theme={"dark"}
using Prove.Proveapi;
using Prove.Proveapi.Models.Components;
var sdk = new ProveAPI(auth: "");
V3StartRequest req = new V3UnifyRequest() {
PhoneNumber = "2001004014",
PossessionType = "mobile",
ClientRequestId = "test-001",
};
var res = await sdk.V3.V3StartRequestAsync(req);
```
{/* step { "httpRequest": { "url": "https://platform.uat.proveapis.com/token", "method": "POST", "request": { "headers": { "Content-Type": "application/x-www-form-urlencoded" }, "body": { "grant_type": "client_credentials", "client_id": "proveauthdemo-3383da66-88fb-4729-b516-2bc585ecc268-1761831182242", "client_secret": "Up3es8RcRbsM8vkFxG7wnu7dIizOkC0b" } } },"variables": { "token": "$$response.body.access_token" } } */}
The function returns the following fields:
* `authToken`: send this to your client-side code to pass into the `Authenticate()` function - it’s a short lived JSON Web Token (JWT) tied to the current flow and used for the possession checks.
* `correlationId`: save this in your current session, then pass it in to the `UnifyStatus()` function call of the same flow. The correlation ID ties together different system calls for the same Prove flow. It also aids in troubleshooting. The session expires in 15 minutes from when the correlation ID returns from the `Unify()` call.
* `success`: will return `pending` for this initial call.
Return the `authToken` in a response to the front end.
Once you have the `authToken`, build the authenticator for both the mobile and desktop flows.
```javascript JavaScript theme={"dark"}
async function authenticate(isMobileWeb, authToken) {
// Set up the authenticator for either mobile or desktop flow.
let builder = new proveAuth.AuthenticatorBuilder();
if (isMobileWeb) {
// Set up Mobile Auth and OTP.
builder = builder
.withAuthFinishStep((input) => verify(input.authId))
.withMobileAuthImplementation("fetch")
.withOtpFallback(otpStart, otpFinish);
} else {
// Set up Instant Link.
builder = builder
.withAuthFinishStep((input) => verify(input.authId))
.withInstantLinkFallback(instantLink)
.withRole("secondary");
}
const authenticator = builder.build();
// Authenticate with the authToken.
return authenticator.authenticate(authToken);
}
```
```typescript TypeScript theme={"dark"}
async function authenticate(isMobileWeb: boolean, authToken: string) {
// Set up the authenticator for either mobile or desktop flow.
let builder = new proveAuth.AuthenticatorBuilder();
if (isMobileWeb) {
// Set up Mobile Auth and OTP.
builder = builder
.withAuthFinishStep((input) => verify(input.authId))
.withMobileAuthImplementation("fetch")
.withOtpFallback(otpStart, otpFinish);
} else {
// Set up Instant Link.
builder = builder
.withAuthFinishStep((input) => verify(input.authId))
.withInstantLinkFallback(instantLink)
.withRole("secondary");
}
const authenticator = builder.build();
// Authenticate with the authToken.
return authenticator.authenticate(authToken);
}
```
## Configure OTP
To use the Resend/Retry/Phone Change features, you need to install the Web SDK version 2.15.1 or later.
To set the One-Time Password (OTP) handler, `withOtpFallback(startStep: OtpStartStep | OtpStartStepFn, finishStep: OtpFinishStep | OtpFinishStepFn)`, requires implementing the `OtpStartStep` and `OtpFinishStep`. When returning the phone number in the functions, ensure you return an object with the field `phoneNumber` to the `resolve()` function.
The OTP session has a two minute timeout from when it's sent through Short Message Service (SMS) to when the customer can enter in the OTP.
Follow these instructions if you are implementing OTP and you are passing in the phone number on the `/v3/start` endpoint. In this case, you've already prompted for a phone number so you don't need to prompt for it in the client SDK.
Since you passed the phone number in the `Start()` function, call `resolve(null)` to communicate to the SDK you have the customer's agreement to deliver the SMS message. Ensure you return an object to `resolve()` function.
```javascript JavaScript theme={"dark"}
function otpStartStep(phoneNumberNeeded, phoneValidationError) {
return new Promise((resolve, reject) => {
// Since no phone number is needed, don't prompt the user.
resolve(null);
});
}
```
```typescript TypeScript theme={"dark"}
const otpStartStep: OtpStartStep = {
execute: async (
phoneNumberNeeded: boolean,
phoneValidationError?: PhoneValidationError
): Promise => {
return new Promise((resolve, reject) => {
// Since no phone number is needed, don't prompt the user.
resolve(null);
});
},
};
```
Call the `reject('some error message')` method to communicate to the SDK any issues while trying to obtain the phone number or the OTP. Report an error if the customer cancels the SMS transaction or presses the back button to leave the screen.
In the finish step, call the `resolve(result: OtpFinishResult)` method to return the collected OTP value in which `result` variable has `OnSuccess` value for `OtpFinishResultType` and the OTP value wrapped in `OtpFinishInput`.
```javascript JavaScript theme={"dark"}
function otpFinishStep(otpError) {
return new Promise((resolve, reject) => {
// If error message is found, handle it.
if (otpError) {
// Set to a variable and display it in a field.
// In this example, we don't do anything with the error.
var someErrorMessage = otpError.message;
}
// Prompt the user for whether they received the SMS.
// Typically, this is a page that shows the OTP already. We are simplifying
// it by requiring an input.
var input = confirm('Did you receive a text message?');
if (!input) {
// Close the modal if a text message was not received.
return;
}
// Prompt the user for the OTP.
var otp = prompt('Enter OTP code:');
if (otp) {
// If the input is valid and the user clicked `OK`, return the OTP.
resolve({
input: { otp }, // OTP value
resultType: 0, // OnSuccess enum type = 0
});
} else {
// Else, exit the flow.
reject('phone invalid or user cancelled');
}
});
}
```
```typescript TypeScript theme={"dark"}
const otpFinishStep: OtpFinishStep = {
execute: async (otpError?: OtpError): Promise => {
return new Promise((resolve, reject) => {
// If error message is found, handle it.
if (otpError) {
// Set to a variable and display it in a field.
// In this example, we don't do anything with the error.
var someErrorMessage = otpError.message;
}
// Prompt the user for whether they received the SMS.
// Typically, this is a page that shows the OTP already. We are simplifying
// it by requiring an input.
var input = confirm('Did you receive a text message?');
if (!input) {
// Close the modal if a text message was not received.
return;
}
// Prompt the user for the OTP.
var otp = prompt('Enter OTP code:');
if (otp) {
// If the input is valid and the user clicked `OK`, return the OTP.
resolve({
input: { otp }, // OTP value
resultType: OtpFinishResultType.OnSuccess,
});
} else {
// Else, exit the flow.
reject('phone invalid or user cancelled');
}
});
},
};
```
Follow these instructions if implementing MobileAuth and collecting the phone number only if MobileAuth fails. This will implement OTP without allowing for SMS resends and phone number changes. If you do want those capabilities, please reference the subsequent tabs (Resend, Retry OTP, and Phone Number Change).
In the start step, call the `resolve(input: OtpStartInput)` method to return the collected phone number to the SDK.
```javascript JavaScript theme={"dark"}
function otpStartStep(phoneNumberNeeded, phoneValidationError) {
return new Promise((resolve, reject) => {
// If no phone number is needed, then don't prompt the user.
if (!phoneNumberNeeded) {
resolve(null);
return;
}
// If error message is found around phone number, handle it.
// The `phoneValidationError` is ONLY available when `phoneNumberNeeded`
// has a value.
if (phoneValidationError) {
// Set to a variable and display it in a field.
// In this example, we don't do anything with the error.
var someErrorMessage = phoneValidationError.message;
}
// Prompt the user for the phone number.
var input = prompt('Enter phone number:');
if (input) {
// If the input is valid and the user clicked `OK`, return the phone
// number.
resolve({
phoneNumber: input,
});
} else {
// Else, exit the flow.
reject('phone invalid or user cancelled');
}
});
}
```
```typescript TypeScript theme={"dark"}
const otpPromptStartStep: OtpStartStep = {
execute: async (
phoneNumberNeeded: boolean,
phoneValidationError?: PhoneValidationError
): Promise => {
return new Promise((resolve, reject) => {
// If no phone number is needed, then don't prompt the user.
if (!phoneNumberNeeded) {
resolve(null);
return;
}
// If error message is found around phone number, handle it.
// The `phoneValidationError` is ONLY available when `phoneNumberNeeded`
// has a value.
if (phoneValidationError) {
// Set to a variable and display it in a field.
// In this example, we don't do anything with the error.
var someErrorMessage = phoneValidationError.message;
}
// Prompt the user for the phone number.
var input = prompt('Enter phone number:');
if (input) {
// If the input is valid and the user clicked `OK`, return the phone
// number.
resolve({
phoneNumber: input,
});
} else {
// Else, exit the flow.
reject('phone invalid or user cancelled');
}
});
},
};
```
The finish step is implemented the same as the previous tab:
```javascript JavaScript theme={"dark"}
function otpFinishStep(otpError) {
return new Promise((resolve, reject) => {
// If error message is found, handle it.
if (otpError) {
// Set to a variable and display it in a field.
// In this example, we don't do anything with the error.
var someErrorMessage = otpError.message;
}
// Prompt the user for whether they received the SMS.
// Typically, this is a page that shows the OTP already. We are simplifying
// it by requiring an input.
var input = confirm('Did you receive a text message?');
if (!input) {
// Close the modal if a text message was not received.
return;
}
// Prompt the user for the OTP.
var otp = prompt('Enter OTP code:');
if (otp) {
// If the input is valid and the user clicked `OK`, return the OTP.
resolve({
input: { otp }, // OTP value
resultType: 0, // OnSuccess enum type = 0
});
} else {
// Else, exit the flow.
reject('phone invalid or user cancelled');
}
});
}
```
```typescript TypeScript theme={"dark"}
const otpFinishStep: OtpFinishStep = {
execute: async (otpError?: OtpError): Promise => {
return new Promise((resolve, reject) => {
// If error message is found, handle it.
if (otpError) {
// Set to a variable and display it in a field.
// In this example, we don't do anything with the error.
var someErrorMessage = otpError.message;
}
// Prompt the user for whether they received the SMS.
// Typically, this is a page that shows the OTP already. We are simplifying
// it by requiring an input.
var input = confirm('Did you receive a text message?');
if (!input) {
// Close the modal if a text message was not received.
return;
}
// Prompt the user for the OTP.
var otp = prompt('Enter OTP code:');
if (otp) {
// If the input is valid and the user clicked `OK`, return the OTP.
resolve({
input: { otp }, // OTP value
resultType: OtpFinishResultType.OnSuccess,
});
} else {
// Else, exit the flow.
reject('phone invalid or user cancelled');
}
});
},
};
```
Follow these instructions to allow the customer to request a new OTP via SMS using the same phone number. There is a max of three send attempts including the initial message.
The start step is implemented the same as the previous tab:
```javascript JavaScript theme={"dark"}
function otpStartStep(phoneNumberNeeded, phoneValidationError) {
return new Promise((resolve, reject) => {
// If no phone number is needed, then don't prompt the user.
if (!phoneNumberNeeded) {
resolve(null);
return;
}
// If error message is found around phone number, handle it.
// The `phoneValidationError` is ONLY available when `phoneNumberNeeded`
// has a value.
if (phoneValidationError) {
// Set to a variable and display it in a field.
// In this example, we don't do anything with the error.
var someErrorMessage = phoneValidationError.message;
}
// Prompt the user for the phone number.
var input = prompt('Enter phone number:');
if (input) {
// If the input is valid and the user clicked `OK`, return the phone
// number.
resolve({
phoneNumber: input,
});
} else {
// Else, exit the flow.
reject('phone invalid or user cancelled');
}
});
}
```
```typescript TypeScript theme={"dark"}
const otpPromptStartStep: OtpStartStep = {
execute: async (
phoneNumberNeeded: boolean,
phoneValidationError?: PhoneValidationError
): Promise => {
return new Promise((resolve, reject) => {
// If no phone number is needed, then don't prompt the user.
if (!phoneNumberNeeded) {
resolve(null);
return;
}
// If error message is found around phone number, handle it.
// The `phoneValidationError` is ONLY available when `phoneNumberNeeded`
// has a value.
if (phoneValidationError) {
// Set to a variable and display it in a field.
// In this example, we don't do anything with the error.
var someErrorMessage = phoneValidationError.message;
}
// Prompt the user for the phone number.
var input = prompt('Enter phone number:');
if (input) {
// If the input is valid and the user clicked `OK`, return the phone
// number.
resolve({
phoneNumber: input,
});
} else {
// Else, exit the flow.
reject('phone invalid or user cancelled');
}
});
},
};
```
You can then send a new OTP SMS to the same phone number by implementing the finish step like this:
```javascript JavaScript theme={"dark"}
function otpFinishStep(otpError) {
return new Promise((resolve, reject) => {
// If error message is found, handle it.
if (otpError) {
// Set to a variable and display it in a field.
// In this example, we don't do anything with the error.
var someErrorMessage = otpError.message;
}
// Prompt the user for whether they received the SMS.
// Typically, this is a page that shows the OTP already. We are simplifying
// it by requiring an input.
var input = confirm('Did you receive a text message?');
if (!input) {
// If `Cancel`, then resend to the same phone number.
resolve({
resultType: 1, // OnResendOtp enum type = 1
});
return;
}
// Prompt the user for the OTP.
var otp = prompt('Enter OTP code:');
if (otp) {
// If the input is valid and the user clicked `OK`, return the OTP.
resolve({
input: { otp }, // OTP value
resultType: 0, // OnSuccess enum type = 0
});
} else {
// Else, exit the flow.
reject('phone invalid or user cancelled');
}
});
}
```
```typescript TypeScript theme={"dark"}
const otpMultipleResendFinishStep: OtpFinishStep = {
execute: async (otpError?: OtpError): Promise => {
return new Promise((resolve, reject) => {
// If error message is found, handle it.
if (otpError) {
// Set to a variable and display it in a field.
// In this example, we don't do anything with the error.
var someErrorMessage = otpError.message;
}
// Prompt the user for whether they received the SMS.
// Typically, this is a page that shows the OTP already. We are simplifying
// it by requiring an input.
var input = confirm('Did you receive a text message?');
if (!input) {
// If `Cancel`, then resend to the same phone number.
resolve({
resultType: 1, // OnResendOtp enum type = 1
});
return;
}
// Prompt the user for the OTP.
var otp = prompt('Enter OTP code:');
if (otp) {
// If the input is valid and the user clicked `OK`, return the OTP.
resolve({
input: { otp }, // OTP value
resultType: OtpFinishResultType.OnSuccess,
});
} else {
// Else, exit the flow.
reject('phone invalid or user cancelled');
}
});
},
};
```
Follow these instructions to allow the customer to re-enter the OTP PIN if they type it wrong. There is a max of 3 attempts. To implement this functionality, you also need to pass in `allowOTPRetry=true` to the `/v3/start` endpoint.
The start step is implemented the same as either of the the previous tabs - no client side code changes necessary:
```javascript JavaScript theme={"dark"}
function otpStartStep(phoneNumberNeeded, phoneValidationError) {
return new Promise((resolve, reject) => {
// If no phone number is needed, then don't prompt the user.
if (!phoneNumberNeeded) {
resolve(null);
return;
}
// If error message is found around phone number, handle it.
// The `phoneValidationError` is ONLY available when `phoneNumberNeeded`
// has a value.
if (phoneValidationError) {
// Set to a variable and display it in a field.
// In this example, we don't do anything with the error.
var someErrorMessage = phoneValidationError.message;
}
// Prompt the user for the phone number.
var input = prompt('Enter phone number:');
if (input) {
// If the input is valid and the user clicked `OK`, return the phone
// number.
resolve({
phoneNumber: input,
});
} else {
// Else, exit the flow.
reject('phone invalid or user cancelled');
}
});
}
```
```typescript TypeScript theme={"dark"}
const otpPromptStartStep: OtpStartStep = {
execute: async (
phoneNumberNeeded: boolean,
phoneValidationError?: PhoneValidationError
): Promise => {
return new Promise((resolve, reject) => {
// If no phone number is needed, then don't prompt the user.
if (!phoneNumberNeeded) {
resolve(null);
return;
}
// If error message is found around phone number, handle it.
// The `phoneValidationError` is ONLY available when `phoneNumberNeeded`
// has a value.
if (phoneValidationError) {
// Set to a variable and display it in a field.
// In this example, we don't do anything with the error.
var someErrorMessage = phoneValidationError.message;
}
// Prompt the user for the phone number.
var input = prompt('Enter phone number:');
if (input) {
// If the input is valid and the user clicked `OK`, return the phone
// number.
resolve({
phoneNumber: input,
});
} else {
// Else, exit the flow.
reject('phone invalid or user cancelled');
}
});
},
};
```
The finish step is implemented the same as either of the the previous tabs - no client side code changes necessary. If the OTP is invalid, the finish step will be called again to prompt the user for a new input. Once the max attempts is reached, the `AuthFinish` function will be called.
```javascript JavaScript theme={"dark"}
function otpFinishStep(otpError) {
return new Promise((resolve, reject) => {
// If error message is found, handle it.
if (otpError) {
// Set to a variable and display it in a field.
// In this example, we don't do anything with the error.
var someErrorMessage = otpError.message;
}
// Prompt the user for whether they received the SMS.
// Typically, this is a page that shows the OTP already. We are simplifying
// it by requiring an input.
var input = confirm('Did you receive a text message?');
if (!input) {
// Close the modal if a text message was not received.
return;
}
// Prompt the user for the OTP.
var otp = prompt('Enter OTP code:');
if (otp) {
// If the input is valid and the user clicked `OK`, return the OTP.
resolve({
input: { otp }, // OTP value
resultType: 0, // OnSuccess enum type = 0
});
} else {
// Else, exit the flow.
reject('phone invalid or user cancelled');
}
});
}
```
```typescript TypeScript theme={"dark"}
const otpFinishStep: OtpFinishStep = {
execute: async (otpError?: OtpError): Promise => {
return new Promise((resolve, reject) => {
// If error message is found, handle it.
if (otpError) {
// Set to a variable and display it in a field.
// In this example, we don't do anything with the error.
var someErrorMessage = otpError.message;
}
// Prompt the user for whether they received the SMS.
// Typically, this is a page that shows the OTP already. We are simplifying
// it by requiring an input.
var input = confirm('Did you receive a text message?');
if (!input) {
// Close the modal if a text message was not received.
return;
}
// Prompt the user for the OTP.
var otp = prompt('Enter OTP code:');
if (otp) {
// If the input is valid and the user clicked `OK`, return the OTP.
resolve({
input: { otp }, // OTP value
resultType: OtpFinishResultType.OnSuccess,
});
} else {
// Else, exit the flow.
reject('phone invalid or user cancelled');
}
});
},
};
```
Follow these instructions to allow the customer to re-enter their phone number. There is a max of three entries/send attempts.
Manual Request Required
To enable phone number change capabilities on your credentials, contact your Prove representative.
The start step is implemented the same as the previous tab:
```javascript JavaScript theme={"dark"}
function otpStartStep(phoneNumberNeeded, phoneValidationError) {
return new Promise((resolve, reject) => {
// If no phone number is needed, then don't prompt the user.
if (!phoneNumberNeeded) {
resolve(null);
return;
}
// If error message is found around phone number, handle it.
// The `phoneValidationError` is ONLY available when `phoneNumberNeeded`
// has a value.
if (phoneValidationError) {
// Set to a variable and display it in a field.
// In this example, we don't do anything with the error.
var someErrorMessage = phoneValidationError.message;
}
// Prompt the user for the phone number.
var input = prompt('Enter phone number:');
if (input) {
// If the input is valid and the user clicked `OK`, return the phone
// number.
resolve({
phoneNumber: input,
});
} else {
// Else, exit the flow.
reject('phone invalid or user cancelled');
}
});
}
```
```typescript TypeScript theme={"dark"}
const otpPromptStartStep: OtpStartStep = {
execute: async (
phoneNumberNeeded: boolean,
phoneValidationError?: PhoneValidationError
): Promise => {
return new Promise((resolve, reject) => {
// If no phone number is needed, then don't prompt the user.
if (!phoneNumberNeeded) {
resolve(null);
return;
}
// If error message is found around phone number, handle it.
// The `phoneValidationError` is ONLY available when `phoneNumberNeeded`
// has a value.
if (phoneValidationError) {
// Set to a variable and display it in a field.
// In this example, we don't do anything with the error.
var someErrorMessage = phoneValidationError.message;
}
// Prompt the user for the phone number.
var input = prompt('Enter phone number:');
if (input) {
// If the input is valid and the user clicked `OK`, return the phone
// number.
resolve({
phoneNumber: input,
});
} else {
// Else, exit the flow.
reject('phone invalid or user cancelled');
}
});
},
};
```
You can prompt for a new phone numberby implementing the finish step like this:
```javascript JavaScript theme={"dark"}
function otpFinishStep(otpError) {
return new Promise((resolve, reject) => {
// If error message is found, handle it.
if (otpError) {
// Set to a variable and display it in a field.
// In this example, we don't do anything with the error.
var someErrorMessage = otpError.message;
}
// Prompt the user for whether they received the SMS.
// Typically, this is a page that shows the OTP already. We are simplifying
// it by requiring an input.
var input = confirm('Did you receive a text message?');
if (!input) {
// If `Cancel`, then trigger the otpStartStep to re-prompt for
// phone number.
resolve({
resultType: 2, // OnMobileNumberChange enum type = 2
});
return;
}
// Prompt the user for the OTP.
var otp = prompt('Enter OTP code:');
if (otp) {
// If the input is valid and the user clicked `OK`, return the OTP.
resolve({
input: { otp }, // OTP value
resultType: 0, // OnSuccess enum type = 0
});
} else {
// Else, exit the flow.
reject('phone invalid or user cancelled');
}
});
}
```
```typescript TypeScript theme={"dark"}
const otpPhoneChangeFinishStep: OtpFinishStep = {
execute: async (otpError?: OtpError): Promise => {
return new Promise((resolve, reject) => {
// If error message is found, handle it.
if (otpError) {
// Set to a variable and display it in a field.
// In this example, we don't do anything with the error.
var someErrorMessage = otpError.message;
}
// Prompt the user for whether they received the SMS.
// Typically, this is a page that shows the OTP already. We are simplifying
// it by requiring an input.
var input = confirm('Did you receive a text message?');
if (!input) {
// If `Cancel`, then trigger the otpStartStep to re-prompt for
// phone number.
resolve({
resultType: 2, // OnMobileNumberChange enum type = 2
});
return;
}
// Prompt the user for the OTP.
var otp = prompt('Enter OTP code:');
if (otp) {
// If the input is valid and the user clicked `OK`, return the OTP.
resolve({
input: { otp }, // OTP value
resultType: OtpFinishResultType.OnSuccess,
});
} else {
// Else, exit the flow.
reject('phone invalid or user cancelled');
}
});
},
};
```
## Configure Instant Link
To use the Resend/Retry/Phone Change features, you need to install the Web SDK version 2.15.1 or later.
To set the Instant Link handler, `withInstantLinkFallback(startStep: InstantLinkStartStep | InstantLinkStartStepFn, retryStep?: InstantLinkRetryStep | InstantLinkRetryStepFn)` requires implementing the `InstantLinkStartStep` interface and optionally the `InstantLinkRetryStep` interface if you wish for advanced capabilities. When returning the phone number in the functions, ensure you return an object with the field `phoneNumber` to the `resolve()` function.
The Instant Link session has a three minute timeout from when it's sent through Short Message Service (SMS) to when the customer can click the received link.
Follow these instructions if you are implementing Instant Link and you are passing in the phone number on the `/v3/start` endpoint. In this case, you've already prompted for a phone number so you don't need to prompt for it in the client SDK.
Since you passed the phone number in the `Start()` function, call `resolve(null)` to communicate to the SDK you have the customer's agreement to deliver the SMS message. Ensure you return an object to `resolve()` function.
```javascript JavaScript theme={"dark"}
function instantLinkStartStep(phoneNumberNeeded, phoneValidationError) {
return new Promise((resolve, reject) => {
// Since no phone number is needed, don't prompt the user.
resolve(null);
});
}
```
```typescript TypeScript theme={"dark"}
const instantLinkNoPromptStartStep: InstantLinkStartStep = {
execute: async (
phoneNumberNeeded: boolean,
phoneValidationError?: PhoneValidationError
): Promise => {
return new Promise((resolve, reject) => {
// Since no phone number is needed, don't prompt the user.
resolve(null);
});
},
};
```
Follow these instructions if implementing MobileAuth and collecting the phone number for desktop. This will implement Instant Link without allowing for SMS resends and phone number changes. If you do want those capabilities, please reference the subsequent tabs (Resend and Phone Number Change).
Call the `resolve(input: InstantStartInput)` method to return the collected phone number to the SDK.
Call the `reject('some error message')` method to communicate to the SDK any issues while trying to obtain the phone number. Report an error if the customer cancels the Instant Link transaction or presses the back button to leave the Instant Link start step dialog.
```javascript JavaScript theme={"dark"}
function instantLinkStartStep(phoneNumberNeeded, phoneValidationError) {
return new Promise((resolve, reject) => {
// If no phone number is needed, then don't prompt the user.
if (!phoneNumberNeeded) {
resolve(null);
return;
}
// If error message is found around phone number, handle it.
// The `phoneValidationError` is ONLY available when `phoneNumberNeeded`
// has a value.
if (phoneValidationError) {
// Set to a variable and display it in a field.
// In this example, we don't do anything with the error.
var someErrorMessage = phoneValidationError.message;
}
// Prompt the user for the phone number.
var input = prompt('Enter phone number:');
if (input) {
// If the input is valid and the user clicked `OK`, return the phone
// number.
resolve({
phoneNumber: input,
});
} else {
// Else, exit the flow.
reject('phone invalid or user cancelled');
}
});
}
```
```typescript TypeScript theme={"dark"}
const instantLinkStartStep: InstantLinkStartStep = {
execute: async (
phoneNumberNeeded: boolean,
phoneValidationError?: PhoneValidationError
): Promise => {
return new Promise((resolve, reject) => {
// If no phone number is needed, then don't prompt the user.
if (!phoneNumberNeeded) {
resolve(null);
return;
}
// If error message is found around phone number, handle it.
// The `phoneValidationError` is ONLY available when `phoneNumberNeeded`
// has a value.
if (phoneValidationError) {
// Set to a variable and display it in a field.
// In this example, we don't do anything with the error.
var someErrorMessage = phoneValidationError.message;
}
// Prompt the user for the phone number.
var input = prompt('Enter phone number:');
if (input) {
// If the input is valid and the user clicked `OK`, return the phone
// number.
resolve({
phoneNumber: input,
} as InstantLinkStartInput);
} else {
// Else, exit the flow.
reject('phone invalid or user cancelled');
}
});
},
};
```
Follow these instructions to allow the customer to request a new SMS using the same phone number. There is a max of three send attempts including the initial message.
The start step is implemented the same as the previous tab:
```javascript JavaScript theme={"dark"}
function instantLinkStartStep(phoneNumberNeeded, phoneValidationError) {
return new Promise((resolve, reject) => {
// If no phone number is needed, then don't prompt the user.
if (!phoneNumberNeeded) {
resolve(null);
return;
}
// If error message is found around phone number, handle it.
// The `phoneValidationError` is ONLY available when `phoneNumberNeeded`
// has a value.
if (phoneValidationError) {
// Set to a variable and display it in a field.
// In this example, we don't do anything with the error.
var someErrorMessage = phoneValidationError.message;
}
// Prompt the user for the phone number.
var input = prompt('Enter phone number:');
if (input) {
// If the input is valid and the user clicked `OK`, return the phone
// number.
resolve({
phoneNumber: input,
});
} else {
// Else, exit the flow.
reject('phone invalid or user cancelled');
}
});
}
```
```typescript TypeScript theme={"dark"}
const instantLinkStartStep: InstantLinkStartStep = {
execute: async (
phoneNumberNeeded: boolean,
phoneValidationError?: PhoneValidationError
): Promise => {
return new Promise((resolve, reject) => {
// If no phone number is needed, then don't prompt the user.
if (!phoneNumberNeeded) {
resolve(null);
return;
}
// If error message is found around phone number, handle it.
// The `phoneValidationError` is ONLY available when `phoneNumberNeeded`
// has a value.
if (phoneValidationError) {
// Set to a variable and display it in a field.
// In this example, we don't do anything with the error.
var someErrorMessage = phoneValidationError.message;
}
// Prompt the user for the phone number.
var input = prompt('Enter phone number:');
if (input) {
// If the input is valid and the user clicked `OK`, return the phone
// number.
resolve({
phoneNumber: input,
} as InstantLinkStartInput);
} else {
// Else, exit the flow.
reject('phone invalid or user cancelled');
}
});
},
};
```
You can then send a new Instant Link SMS to the same phone number by implementing the `InstantLinkRetryStep` interface, for example:
```javascript JavaScript theme={"dark"}
function instantLinkRetryStep() {
return new Promise((resolve, reject) => {
// There are multiple return options:
// - resolve(0): request resend to the same phone number
// - reject('user clicked cancel'): error out of the possession flow
// Prompt the user for the phone number.
// Typically, this is a page that is automatically closed or redirected
// once the `AuthFinish` function is called. We are simplifying it by
// requiring an input.
var input = confirm('Did you receive a text message?');
if (input) {
// If `OK`, close the modal.
return;
}
// Else `Cancel`, then resend to the same phone number.
resolve(0);
});
}
```
```typescript TypeScript theme={"dark"}
const instantLinkMultipleResendRetryStep: InstantLinkRetryStep = {
execute: async (): Promise => {
return new Promise((resolve, reject) => {
// There are multiple return options:
// - resolve(0): request resend to the same phone number
// - reject('user clicked cancel'): error out of the possession flow
// Prompt the user for the phone number.
// Typically, this is a page that is automatically closed or redirected
// once the `AuthFinish` function is called. We are simplifying it by
// requiring an input.
var input = confirm('Did you receive a text message?');
if (input) {
// If `OK`, close the modal.
return;
}
// Else `Cancel`, then resend to the same phone number.
resolve(InstantLinkResultType.OnResend);
});
},
};
```
Follow these instructions to allow the customer to re-enter their phone number. There is a max of three entries/send attempts.
Manual Request Required
To enable phone number change capabilities on your credentials, contact your Prove representative.
The start step is implemented the same as the previous tab:
```javascript JavaScript theme={"dark"}
function instantLinkStartStep(phoneNumberNeeded, phoneValidationError) {
return new Promise((resolve, reject) => {
// If no phone number is needed, then don't prompt the user.
if (!phoneNumberNeeded) {
resolve(null);
return;
}
// If error message is found around phone number, handle it.
// The `phoneValidationError` is ONLY available when `phoneNumberNeeded`
// has a value.
if (phoneValidationError) {
// Set to a variable and display it in a field.
// In this example, we don't do anything with the error.
var someErrorMessage = phoneValidationError.message;
}
// Prompt the user for the phone number.
var input = prompt('Enter phone number:');
if (input) {
// If the input is valid and the user clicked `OK`, return the phone
// number.
resolve({
phoneNumber: input,
});
} else {
// Else, exit the flow.
reject('phone invalid or user cancelled');
}
});
}
```
```typescript TypeScript theme={"dark"}
const instantLinkStartStep: InstantLinkStartStep = {
execute: async (
phoneNumberNeeded: boolean,
phoneValidationError?: PhoneValidationError
): Promise => {
return new Promise((resolve, reject) => {
// If no phone number is needed, then don't prompt the user.
if (!phoneNumberNeeded) {
resolve(null);
return;
}
// If error message is found around phone number, handle it.
// The `phoneValidationError` is ONLY available when `phoneNumberNeeded`
// has a value.
if (phoneValidationError) {
// Set to a variable and display it in a field.
// In this example, we don't do anything with the error.
var someErrorMessage = phoneValidationError.message;
}
// Prompt the user for the phone number.
var input = prompt('Enter phone number:');
if (input) {
// If the input is valid and the user clicked `OK`, return the phone
// number.
resolve({
phoneNumber: input,
} as InstantLinkStartInput);
} else {
// Else, exit the flow.
reject('phone invalid or user cancelled');
}
});
},
};
```
You can prompt for a new phone number by implementing the `InstantLinkRetryStep` interface, for example:
```javascript JavaScript theme={"dark"}
function instantLinkRetryStep() {
return new Promise((resolve, reject) => {
// There are multiple return options:
// - resolve(0): request resend to the same phone number
// - resolve(1): request phone number change/re-prompt
// - reject('user clicked cancel'): error out of the possession flow
// Prompt the user for the phone number.
// Typically, this is a page that is automatically closed or redirected
// once the `AuthFinish` function is called. We are simplifying it by
// requiring an input.
var input = confirm('Did you receive a text message?');
if (input) {
// If `OK`, close the modal.
return;
}
// Else `Cancel`, then trigger the instantLinkStartStep to re-prompt for
// phone number.
resolve(1);
});
}
```
```typescript TypeScript theme={"dark"}
const instantLinkPhoneChangeRetryStep: InstantLinkRetryStep = {
execute: async (): Promise => {
return new Promise((resolve, reject) => {
// There are multiple return options:
// - resolve(0): request resend to the same phone number
// - resolve(1): request phone number change/re-prompt
// - reject('user clicked cancel'): error out of the possession flow
// Prompt the user for the phone number.
// Typically, this is a page that is automatically closed or redirected
// once the `AuthFinish` function is called. We are simplifying it by
// requiring an input.
var input = confirm('Did you receive a text message?');
if (input) {
// If `OK`, close the modal.
return;
}
// Else `Cancel`, then trigger the instantLinkStartStep to re-prompt for
// phone number.
resolve(InstantLinkResultType.OnMobileNumberChange);
});
},
};
```
In the desktop flow, a WebSocket opens for three minutes on the desktop browser while waiting for the customer to select the link in the text message. Once clicked, the WebSocket closes and the `AuthFinishStep` function finishes.
If you're using [Content Security Policy headers](https://content-security-policy.com/), ensure you allow `wss: device.uat.proveapis.com` and `wss: device.proveapis.com`.
```java Java theme={"dark"}
// Object implementing AuthFinishStep interface
AuthFinishStep authFinishStep = new AuthFinishStep() {
...
};
// Objects implementing OtpStartStep/OtpFinishStep interfaces
OtpStartStep otpStartStep = new OtpStartStep() {
...
};
OtpFinishStep otpFinishStep = new OtpFinishStep() {
...
};
ProveAuth proveAuth = ProveAuth.builder()
.withAuthFinishStep(authId -> verify(authId)) // verify(authId) call defined in #Validate the Mobile Phone section
.withOtpFallback(otpStartStep, otpFinishStep)
.withContext(this)
.build();
```
The cellular data connection can sometimes be unavailable during testing. The `Builder` class offers a `withTestMode(boolean testMode)` method, which permits simulated successful session results while connected to a Wi-Fi network only (without a cellular data connection available). Testing using a Wi-Fi connection is useful in the Sandbox environment.
```java Java theme={"dark"}
ProveAuth proveAuth = ProveAuth.builder()
.withAuthFinishStep(authId -> verify(authId))
.withOtpFallback(otpStartStep, otpFinishStep)
.withContext(this)
.withTestMode(true) // Test mode flag
.build();
```
The `ProveAuth` object is thread safe. You can use it as a singleton. Most Prove Auth methods are blocking and therefore can't execute in the main application thread. The application employs an executor service with a minimum of two threads to manage threads due to the SDK's ability to process concurrent blocking requests.
```java Java theme={"dark"}
public class MyAuthenticator {
private final MyBackendClient backend = new MyBackendClient(); // Backend API client
private final AuthFinishStep authFinishStep = new AuthFinishStep() {
@Override
void execute(String authId) {
try {
AuthFinishResponse response = backend.authFinish("My App", authId);
... // Check the authentication status returned in the response
} catch (IOException e) {
String failureCause = e.getCause() != null ? e.getCause().getMessage() : "Failed to request authentication results";
// Authentication failed due to request failure
}
}
};
private ProveAuth proveAuth;
public MyAuthenticator(Context context) {
proveAuth = ProveAuth.builder()
.withAuthFinishStep(authFinishStep)
.withOtpFallback(otpStartStep, otpFinishStep)
.withContext(context)
.build();
}
public void authenticate() throws IOException, ProveAuthException {
AuthStartResponse response = backend.authStart("My Prove Auth App");
proveAuth.authenticate(response.getAuthToken());
}
}
```
## Configure OTP
To use the Resend/Retry/Phone Change features, you need to install the Android SDK version 6.5.0 or later.
To set the One-Time Password (OTP) handler, `withOtpFallback(otpStart: otpStartStep, otpFinish: otpFinishStep)`, requires implementing the `OtpStartStep` and `OtpFinishStep`.
The OTP session has a two minute timeout from when it's sent through SMS to when the customer can enter in the OTP.
Follow these instructions if you are implementing OTP and you are passing in the phone number on the `/v3/start` endpoint. In this case, you've already prompted for a phone number so you don't need to prompt for it in the client SDK.
Since you passed the phone number in the `Start()` function, call `OtpStartStepCallback.onSuccess(OtpStartInput);` to communicate to the SDK you have the customer's agreement to deliver the SMS message. Ensure you return an instance of `OtpStartInput` with empty string or `null` to `OtpStartStepCallback.onSuccess()` function.
```java Java theme={"dark"}
import com.prove.sdk.proveauth.OtpStartInput;
import com.prove.sdk.proveauth.OtpStartStep;
import com.prove.sdk.proveauth.OtpStartStepCallback;
import com.prove.sdk.proveauth.ProveAuthException;
public class NoPromptStart implements OtpStartStep {
@Override
public void execute(boolean phoneNumberNeeded, ProveAuthException otpException,
OtpStartStepCallback callback) {
// No phone number needed, no need to ask end user for input.
callback.onSuccess(new OtpStartInput(""));
}
}
```
Call the `OtpStartStepCallback.onError();` method to communicate to the SDK any issues while trying to obtain the phone number or the OTP. Report an error if the customer cancels the SMS transaction or presses the back button to leave the screen.
In the finish step, call the `OtpFinishStepCallback.onSuccess(OtpFinishInput);` method to return the collected OTP value wrapped in `OtpFinishInput`.
```java Java theme={"dark"}
import com.prove.sdk.proveauth.OtpFinishInput;
import com.prove.sdk.proveauth.OtpFinishStep;
import com.prove.sdk.proveauth.OtpFinishStepCallback;
import com.prove.sdk.proveauth.OtpValidationException;
import com.prove.sdk.proveauth.ProveAuthException;
public class NoPromptFinish implements OtpFinishStep {
@Override
public void execute(@Nullable ProveAuthException otpException,
OtpFinishStepCallback otpFinishStepCallback) {
// If error message is found, handle it.
if (otpException instanceof OtpValidationException) {
// Set to a variable and display it in a field.
// In this example, we don't do anything with the error.
String errorMsg = otpException.getMessage();
}
try {
// Prompt the user for OTP delivered by SMS. You can build UI to provide
// best UX based on your application and business logic, here we simplify to a
// generic function named promptForOtpCode which gives us the OTP code.
String otpCode = promptForOtpCode();
otpFinishStepCallback.onSuccess(new OtpFinishInput(otpCode));
} catch (Exception e) {
// if any issue with the OTP collection from the end user or the user wants to cancel
// then call onError to exit the flow. In this example we simplify it as catching
// an exception.
otpFinishStepCallback.onError();
}
}
}
```
Follow these instructions if implementing MobileAuth and collecting the phone number only if MobileAuth fails. This will implement OTP without allowing for SMS resends and phone number changes. If you do want those capabilities, please reference the subsequent tabs (Resend, Retry OTP, and Phone Number Change).
In the start step, call the `OtpStartStepCallback.onSuccess(OtpStartInput);` method to return the collected phone number to the SDK.
```java Java theme={"dark"}
import com.prove.sdk.proveauth.OtpStartInput;
import com.prove.sdk.proveauth.OtpStartStep;
import com.prove.sdk.proveauth.OtpStartStepCallback;
import com.prove.sdk.proveauth.PhoneNumberValidationException;
import com.prove.sdk.proveauth.ProveAuthException;
public class PromptStart implements OtpStartStep {
@Override
public void execute(boolean phoneNumberNeeded, @Nullable ProveAuthException otpException,
OtpStartStepCallback callback) {
// If phone number is needed, need to ask the end user for phone number input.
if (phoneNumberNeeded) {
// If error message is found around phone number, handle it.
// The `PhoneNumberValidationException` is ONLY available when `phoneNumberNeeded`
// has a value.
if (otpException instanceof PhoneNumberValidationException) {
// Set to a variable and display it in a field.
// In this example, we don't do anything with the error.
String errorMsg = otpException.getMessage();
}
try {
// Prompt the user for phone number to receive OTP SMS. You can build UI to provide
// best UX based on your application and business logic, here we simplify to a
// generic function named promptForPhoneNumber which gives us the collected
// phone number.
String phoneNumber = promptForPhoneNumber();
callback.onSuccess(new OtpStartInput(phoneNumber));
} catch (Exception e) {
// if any issue with the phone number collection from the end user or the user
// wants to cancel then call onError to exit the flow.
// In this example we simplify it as catching an exception.
callback.onError();
}
} else {
// No phone number needed, no need to ask end user for input.
callback.onSuccess(new OtpStartInput(""));
}
}
}
```
The finish step is implemented the same as the previous tab:
```java Java theme={"dark"}
import com.prove.sdk.proveauth.OtpFinishInput;
import com.prove.sdk.proveauth.OtpFinishStep;
import com.prove.sdk.proveauth.OtpFinishStepCallback;
import com.prove.sdk.proveauth.OtpValidationException;
import com.prove.sdk.proveauth.ProveAuthException;
public class NoPromptFinish implements OtpFinishStep {
@Override
public void execute(@Nullable ProveAuthException otpException,
OtpFinishStepCallback otpFinishStepCallback) {
// If error message is found, handle it.
if (otpException instanceof OtpValidationException) {
// Set to a variable and display it in a field.
// In this example, we don't do anything with the error.
String errorMsg = otpException.getMessage();
}
try {
// Prompt the user for OTP delivered by SMS. You can build UI to provide
// best UX based on your application and business logic, here we simplify to a
// generic function named promptForOtpCode which gives us the OTP code.
String otpCode = promptForOtpCode();
otpFinishStepCallback.onSuccess(new OtpFinishInput(otpCode));
} catch (Exception e) {
// if any issue with the OTP collection from the end user or the user wants to cancel
// then call onError to exit the flow. In this example we simplify it as catching
// an exception.
otpFinishStepCallback.onError();
}
}
}
```
Follow these instructions to allow the customer to request a new OTP via SMS using the same phone number. There is a max of three send attempts including the initial message.
The start step is implemented the same as the previous tab:
```java Java theme={"dark"}
import com.prove.sdk.proveauth.OtpStartInput;
import com.prove.sdk.proveauth.OtpStartStep;
import com.prove.sdk.proveauth.OtpStartStepCallback;
import com.prove.sdk.proveauth.PhoneNumberValidationException;
import com.prove.sdk.proveauth.ProveAuthException;
public class PromptStart implements OtpStartStep {
@Override
public void execute(boolean phoneNumberNeeded, @Nullable ProveAuthException otpException,
OtpStartStepCallback callback) {
// If phone number is needed, need to ask the end user for phone number input.
if (phoneNumberNeeded) {
// If error message is found around phone number, handle it.
// The `PhoneNumberValidationException` is ONLY available when `phoneNumberNeeded`
// has a value.
if (otpException instanceof PhoneNumberValidationException) {
// Set to a variable and display it in a field.
// In this example, we don't do anything with the error.
String errorMsg = otpException.getMessage();
}
try {
// Prompt the user for phone number to receive OTP SMS. You can build UI to provide
// best UX based on your application and business logic, here we simplify to a
// generic function named promptForPhoneNumber which gives us the collected
// phone number.
String phoneNumber = promptForPhoneNumber();
callback.onSuccess(new OtpStartInput(phoneNumber));
} catch (Exception e) {
// if any issue with the phone number collection from the end user or the user
// wants to cancel then call onError to exit the flow.
// In this example we simplify it as catching an exception.
callback.onError();
}
} else {
// No phone number needed, no need to ask end user for input.
callback.onSuccess(new OtpStartInput(""));
}
}
}
```
You can then send a new OTP SMS to the same phone number by implementing the finish step like this:
```java Java theme={"dark"}
import com.prove.sdk.proveauth.OtpFinishInput;
import com.prove.sdk.proveauth.OtpFinishStep;
import com.prove.sdk.proveauth.OtpFinishStepCallback;
import com.prove.sdk.proveauth.OtpValidationException;
import com.prove.sdk.proveauth.ProveAuthException;
public class MultipleResendFinish implements OtpFinishStep {
@Override
public void execute(@Nullable ProveAuthException otpException,
OtpFinishStepCallback otpFinishStepCallback) {
// If error message is found, handle it.
if (otpException instanceof OtpValidationException) {
// Set to a variable and display it in a field.
// In this example, we don't do anything with the error.
String errorMsg = otpException.getMessage();
}
// Prompt the user for whether they received the SMS.
if (promptForResend("Didn't receive the SMS OTP? Click resend button for a new one!")) {
// If the end user wants to send again to the same phone number call onOtpResend().
otpFinishStepCallback.onOtpResend();
return;
}
try {
// Prompt the user for OTP delivered by SMS. You can build UI to provide
// best UX based on your application and business logic, here we simplify to a
// generic function named promptForOtpCode which gives us the OTP code.
String otpCode = promptForOtpCode();
otpFinishStepCallback.onSuccess(new OtpFinishInput(otpCode));
} catch (Exception e) {
// if any issue with the OTP collection from the end user or the user wants to cancel
// then call onError to exit the flow. In this example we simplify it as catching
// an exception.
otpFinishStepCallback.onError();
}
}
}
```
Follow these instructions to allow the customer to re-enter the OTP PIN if they type it wrong. There is a max of 3 attempts. To implement this functionality, you also need to pass in `allowOTPRetry=true` to the `/v3/start` endpoint.
The start step is implemented the same as either of the the previous tabs - no client side code changes necessary:
```java Java theme={"dark"}
import com.prove.sdk.proveauth.OtpStartInput;
import com.prove.sdk.proveauth.OtpStartStep;
import com.prove.sdk.proveauth.OtpStartStepCallback;
import com.prove.sdk.proveauth.PhoneNumberValidationException;
import com.prove.sdk.proveauth.ProveAuthException;
public class PromptStart implements OtpStartStep {
@Override
public void execute(boolean phoneNumberNeeded, @Nullable ProveAuthException otpException,
OtpStartStepCallback callback) {
// If phone number is needed, need to ask the end user for phone number input.
if (phoneNumberNeeded) {
// If error message is found around phone number, handle it.
// The `PhoneNumberValidationException` is ONLY available when `phoneNumberNeeded`
// has a value.
if (otpException instanceof PhoneNumberValidationException) {
// Set to a variable and display it in a field.
// In this example, we don't do anything with the error.
String errorMsg = otpException.getMessage();
}
try {
// Prompt the user for phone number to receive OTP SMS. You can build UI to provide
// best UX based on your application and business logic, here we simplify to a
// generic function named promptForPhoneNumber which gives us the collected
// phone number.
String phoneNumber = promptForPhoneNumber();
callback.onSuccess(new OtpStartInput(phoneNumber));
} catch (Exception e) {
// if any issue with the phone number collection from the end user or the user
// wants to cancel then call onError to exit the flow.
// In this example we simplify it as catching an exception.
callback.onError();
}
} else {
// No phone number needed, no need to ask end user for input.
callback.onSuccess(new OtpStartInput(""));
}
}
}
```
The finish step is implemented the same as either of the the previous tabs - no client side code changes necessary. If the OTP is invalid, the finish step will be called again to prompt the user for a new input. Once the max attempts is reached, the `AuthFinish` function will be called.
```java Java theme={"dark"}
import com.prove.sdk.proveauth.OtpFinishInput;
import com.prove.sdk.proveauth.OtpFinishStep;
import com.prove.sdk.proveauth.OtpFinishStepCallback;
import com.prove.sdk.proveauth.OtpValidationException;
import com.prove.sdk.proveauth.ProveAuthException;
public class NoPromptFinish implements OtpFinishStep {
@Override
public void execute(@Nullable ProveAuthException otpException,
OtpFinishStepCallback otpFinishStepCallback) {
// If error message is found, handle it.
if (otpException instanceof OtpValidationException) {
// Set to a variable and display it in a field.
// In this example, we don't do anything with the error.
String errorMsg = otpException.getMessage();
}
try {
// Prompt the user for OTP delivered by SMS. You can build UI to provide
// best UX based on your application and business logic, here we simplify to a
// generic function named promptForOtpCode which gives us the OTP code.
String otpCode = promptForOtpCode();
otpFinishStepCallback.onSuccess(new OtpFinishInput(otpCode));
} catch (Exception e) {
// if any issue with the OTP collection from the end user or the user wants to cancel
// then call onError to exit the flow. In this example we simplify it as catching
// an exception.
otpFinishStepCallback.onError();
}
}
}
```
Follow these instructions to allow the customer to re-enter their phone number. There is a max of three entries/send attempts.
Manual Request Required
To enable phone number change capabilities on your credentials, contact your Prove representative.
The start step is implemented the same as the previous tab:
```java Java theme={"dark"}
import com.prove.sdk.proveauth.OtpStartInput;
import com.prove.sdk.proveauth.OtpStartStep;
import com.prove.sdk.proveauth.OtpStartStepCallback;
import com.prove.sdk.proveauth.PhoneNumberValidationException;
import com.prove.sdk.proveauth.ProveAuthException;
public class PromptStart implements OtpStartStep {
@Override
public void execute(boolean phoneNumberNeeded, @Nullable ProveAuthException otpException,
OtpStartStepCallback callback) {
// If phone number is needed, need to ask the end user for phone number input.
if (phoneNumberNeeded) {
// If error message is found around phone number, handle it.
// The `PhoneNumberValidationException` is ONLY available when `phoneNumberNeeded`
// has a value.
if (otpException instanceof PhoneNumberValidationException) {
// Set to a variable and display it in a field.
// In this example, we don't do anything with the error.
String errorMsg = otpException.getMessage();
}
try {
// Prompt the user for phone number to receive OTP SMS. You can build UI to provide
// best UX based on your application and business logic, here we simplify to a
// generic function named promptForPhoneNumber which gives us the collected
// phone number.
String phoneNumber = promptForPhoneNumber();
callback.onSuccess(new OtpStartInput(phoneNumber));
} catch (Exception e) {
// if any issue with the phone number collection from the end user or the user
// wants to cancel then call onError to exit the flow.
// In this example we simplify it as catching an exception.
callback.onError();
}
} else {
// No phone number needed, no need to ask end user for input.
callback.onSuccess(new OtpStartInput(""));
}
}
}
```
You can prompt for a new phone number by implementing the finish step like this:
```java Java theme={"dark"}
import com.prove.sdk.proveauth.OtpFinishInput;
import com.prove.sdk.proveauth.OtpFinishStep;
import com.prove.sdk.proveauth.OtpFinishStepCallback;
import com.prove.sdk.proveauth.OtpValidationException;
import com.prove.sdk.proveauth.ProveAuthException;
public class PhoneChangeFinish implements OtpFinishStep {
@Override
public void execute(@Nullable ProveAuthException otpException,
OtpFinishStepCallback otpFinishStepCallback) {
// If error message is found, handle it.
if (otpException instanceof OtpValidationException) {
// Set to a variable and display it in a field.
// In this example, we don't do anything with the error.
String errorMsg = otpException.getMessage();
}
// Prompt the user for whether they received the SMS.
if (promptForPhoneNumberChange("Didn't receive the SMS OTP? Try a different phone number.")) {
// If the end user wants to correct the phone number already in use, or changing to a
// different phone number to receive the future SMS OTP, call onMobileNumberChange(), and
// the otpStartStep will re-prompt for phone number input from the end user.
otpFinishStepCallback.onMobileNumberChange();
return;
}
try {
// Prompt the user for OTP delivered by SMS. You can build UI to provide
// best UX based on your application and business logic, here we simplify to a
// generic function named promptForOtpCode which gives us the OTP code.
String otpCode = promptForOtpCode();
otpFinishStepCallback.onSuccess(new OtpFinishInput(otpCode));
} catch (Exception e) {
// if any issue with the OTP collection from the end user or the user wants to cancel
// then call onError to exit the flow. In this example we simplify it as catching
// an exception.
otpFinishStepCallback.onError();
}
}
}
```
```swift Swift theme={"dark"}
// Object implementing ProveAuthFinishStep protocols
let finishStep = FinishAuthStep()
// Objects implementing OtpStartStep/OtpFinishStep protocols
let otpStartStep = MobileOtpStartStep()
let otpFinishStep = MobileOtpFinishStep()
let proveAuthSdk: ProveAuth
proveAuthSdk = ProveAuth.builder(authFinish: finishStep)
.withOtpFallback(otpStart: otpStartStep, otpFinish: otpFinishStep)
.build()
```
In the event a cellular data connection is unavailable during testing, use the Builder class. It permits simulated successful session results while connected to a Wi-Fi network. Testing using a Wi-Fi connection is useful in the Sandbox environment.
```swift Swift theme={"dark"}
proveAuthSdk = ProveAuth.builder(authFinish: finishStep)
.withMobileAuthTestMode() // Test mode flag
.build()
```
The Prove Auth object is thread safe and used as a singleton. Most Prove Auth methods are blocking and therefore can't execute in the main application thread. The application employs an executor service with a minimum of two threads to manage threads due to the SDK's ability to process concurrent blocking requests.
```swift Swift theme={"dark"}
// authToken retrieved from your server via StartAuthRequest
proveAuthSdk.authenticate(authToken) { error in
DispatchQueue.main.async {
self.messages.finalResultMessage = "ProveAuth.authenticate returned error: \(error.localizedDescription)"
print(self.messages.finalResultMessage)
}
}
```
## Configure OTP
To use the Resend/Retry/Phone Change features, you need to install the iOS SDK version 6.5.1 or later.
To set the One-Time Password (OTP) handler, `withOtpFallback(otpStart: otpStartStep, otpFinish: otpFinishStep)`, requires implementing the `OtpStartStep` and `OtpFinishStep`.
The OTP session has a two minute timeout from when it's sent through SMS to when the customer can enter in the OTP.
Follow these instructions if you are implementing OTP and you are passing in the phone number on the `/v3/start` endpoint. In this case, you've already prompted for a phone number so you don't need to prompt for it in the client SDK.
Since you passed the phone number in the `Start()` function, call `callback.onSuccess(input: nil)` to communicate to the SDK you have the customer's agreement to deliver the SMS message.
```swift Swift theme={"dark"}
import Foundation
import ProveAuth
import SwiftUI
class MobileOtpStartStep: OtpStartStep {
@ObservedObject var sheetObservable: SheetObservable
var callback: OtpStartStepCallback?
init(sheetObservable: SheetObservable) {
self.sheetObservable = sheetObservable
}
// Implement this method to handle phone number collection for SMS OTP,
// or to obtain user confirmation for initiating an SMS message.
func execute(
phoneNumberNeeded: Bool, phoneValidationError: ProveAuthError?, callback: OtpStartStepCallback
) {
self.callback = callback
// Since no phone number is needed, don't prompt the user.
callback.onSuccess(input: nil)
}
}
```
Call the `callback.onError()` method to communicate to the SDK any issues while trying to obtain the phone number or the OTP. Report an error if the customer cancels the SMS transaction or presses the back button to leave the screen.
```swift Swift theme={"dark"}
import Foundation
import SwiftUI
import ProveAuth
class MobileOtpFinishStep: OtpFinishStep {
@ObservedObject var sheetObservable: SheetObservable
var callback: OtpFinishStepCallback?
init(sheetObservable: SheetObservable){
self.sheetObservable = sheetObservable
}
// Implement this method to collect the OTP value delivered via SMS.
func execute(otpError: ProveAuthError?, callback: OtpFinishStepCallback) {
self.callback = callback
// Handle the OTP validation error if present.
if case .otpValidationError = otpError {
print("found otpError: \(String(describing: otpError?.localizedDescription))")
// Signal to your UI components that the last provided OTP is invalid
self.sheetObservable.otpError = true
} else {
self.sheetObservable.otpError = false
}
// Signal to UI components to display OtpFinishView
DispatchQueue.main.async {
self.sheetObservable.isOtpFinishActive = true
}
}
// Provide the collected OTP value to the SDK for validation.
func handleOtp(_ otp: String) {
guard let callback = self.callback else {
print("Error: OtpFinishStepCallback is not set ")
return
}
let otpFinishInput = OtpFinishInput(otp: otp)
callback.onSuccess(input: otpFinishInput)
}
// Notify the SDK of any issues encountered while obtaining the OTP value or if the user cancels the OTP flow.
func handleOtpFinishError() {
guard let callback = self.callback else {
print("Error: OtpFinishStepCallback is not set ")
return
}
callback.onError()
}
}
```
Follow these instructions if implementing MobileAuth and collecting the phone number only if MobileAuth fails. This will implement OTP without allowing for SMS resends and phone number changes. If you do want those capabilities, please reference the subsequent tabs (Resend, Retry OTP, and Phone Number Change).
In the start step, call the `callback.onSuccess(input: otpStartInput)` method to return the collected phone number to the SDK.
```swift Swift theme={"dark"}
import Foundation
import ProveAuth
import SwiftUI
class MobileOtpStartStep: OtpStartStep {
@ObservedObject var sheetObservable: SheetObservable
var callback: OtpStartStepCallback?
init(sheetObservable: SheetObservable) {
self.sheetObservable = sheetObservable
}
func execute(
phoneNumberNeeded: Bool, phoneValidationError: ProveAuthError?, callback: OtpStartStepCallback
) {
self.callback = callback
if !phoneNumberNeeded {
// If no phone number is needed, then don't prompt the user.
callback.onSuccess(input: nil)
} else {
DispatchQueue.main.async {
// If a phone number validation error is detected, ensure it is handled to provide feedback to the user.
if case .phoneNumberValidationError = phoneValidationError {
print(
"found phoneValidationError: \(String(describing: phoneValidationError?.localizedDescription))"
)
// Update UI components to display OtpStartView with the phone number validation error.
self.sheetObservable.isPhoneValidationError = true
} else {
self.sheetObservable.isPhoneValidationError = false
}
// Update UI components to display OtpStartView if a phone number is needed.
self.sheetObservable.isOtpStartActive = true
}
}
}
// Return collected phone number to the SDK
func handlePhoneNumber(phoneNumber: String) {
guard let callback = self.callback else {
print("Error: OtpStartStepCallback is not set ")
return
}
let otpStartInput = OtpStartInput(phoneNumber: phoneNumber)
// This is how you pass collected phone number to SDK
callback.onSuccess(input: otpStartInput)
}
// Communicate any issues encountered while trying to obtain the phone number to the SDK.
// Error should be reported if the customer explicitly cancels the SMS OTP transaction
// or presses the back button to exit out the SMS OTP start step screen.
func handleOtpStartError() {
guard let callback = self.callback else {
print("Error: OtpStartStepCallback is not set ")
return
}
callback.onError()
}
}
```
The finish step is implemented the same as the previous tab:
```swift Swift theme={"dark"}
import Foundation
import SwiftUI
import ProveAuth
class MobileOtpFinishStep: OtpFinishStep {
@ObservedObject var sheetObservable: SheetObservable
var callback: OtpFinishStepCallback?
init(sheetObservable: SheetObservable){
self.sheetObservable = sheetObservable
}
// Implement this method to collect the OTP value delivered via SMS.
func execute(otpError: ProveAuthError?, callback: OtpFinishStepCallback) {
self.callback = callback
// Handle the OTP validation error if present.
if case .otpValidationError = otpError {
print("found otpError: \(String(describing: otpError?.localizedDescription))")
// Signal to your UI components that the last provided OTP is invalid
self.sheetObservable.otpError = true
} else {
self.sheetObservable.otpError = false
}
// Signal to UI components to display OtpFinishView
DispatchQueue.main.async {
self.sheetObservable.isOtpFinishActive = true
}
}
// Provide the collected OTP value to the SDK for validation.
func handleOtp(_ otp: String) {
guard let callback = self.callback else {
print("Error: OtpFinishStepCallback is not set ")
return
}
let otpFinishInput = OtpFinishInput(otp: otp)
callback.onSuccess(input: otpFinishInput)
}
// Notify the SDK of any issues encountered while obtaining the OTP value or if the user cancels the OTP flow.
func handleOtpFinishError() {
guard let callback = self.callback else {
print("Error: OtpFinishStepCallback is not set ")
return
}
callback.onError()
}
}
```
Follow these instructions to allow the customer to request a new OTP via SMS using the same phone number. There is a max of three send attempts including the initial message.
The start step is implemented the same as the previous tab:
```swift Swift theme={"dark"}
import Foundation
import ProveAuth
import SwiftUI
class MobileOtpStartStep: OtpStartStep {
@ObservedObject var sheetObservable: SheetObservable
var callback: OtpStartStepCallback?
init(sheetObservable: SheetObservable) {
self.sheetObservable = sheetObservable
}
func execute(
phoneNumberNeeded: Bool, phoneValidationError: ProveAuthError?, callback: OtpStartStepCallback
) {
self.callback = callback
if !phoneNumberNeeded {
// If no phone number is needed, then don't prompt the user.
callback.onSuccess(input: nil)
} else {
DispatchQueue.main.async {
// If a phone number validation error is detected, ensure it is handled to provide feedback to the user.
if case .phoneNumberValidationError = phoneValidationError {
print(
"found phoneValidationError: \(String(describing: phoneValidationError?.localizedDescription))"
)
// Update UI components to display OtpStartView with the phone number validation error.
self.sheetObservable.isPhoneValidationError = true
} else {
self.sheetObservable.isPhoneValidationError = false
}
// Update UI components to display OtpStartView if a phone number is needed.
self.sheetObservable.isOtpStartActive = true
}
}
}
// Return collected phone number to the SDK
func handlePhoneNumber(phoneNumber: String) {
guard let callback = self.callback else {
print("Error: OtpStartStepCallback is not set ")
return
}
let otpStartInput = OtpStartInput(phoneNumber: phoneNumber)
// This is how you pass collected phone number to SDK
callback.onSuccess(input: otpStartInput)
}
// Communicate any issues encountered while trying to obtain the phone number to the SDK.
// Error should be reported if the customer explicitly cancels the SMS OTP transaction
// or presses the back button to exit out the SMS OTP start step screen.
func handleOtpStartError() {
guard let callback = self.callback else {
print("Error: OtpStartStepCallback is not set ")
return
}
callback.onError()
}
}
```
You can then send a new OTP SMS to the same phone number by implementing the finish step like this:
```swift Swift theme={"dark"}
import Foundation
import SwiftUI
import ProveAuth
class MobileOtpFinishStep: OtpFinishStep {
@ObservedObject var sheetObservable: SheetObservable
var callback: OtpFinishStepCallback?
init(sheetObservable: SheetObservable){
self.sheetObservable = sheetObservable
}
// Implement this method to collect the OTP value delivered in the SMS message.
func execute(otpError: ProveAuthError?, callback: OtpFinishStepCallback) {
self.callback = callback
// Handle the OTP validation error if present.
if case .otpValidationError = otpError {
print("found otpError: \(String(describing: otpError?.localizedDescription))")
// Update your UI to indicate that the provided OTP is invalid
self.sheetObservable.otpError = true
} else {
self.sheetObservable.otpError = false
}
// Update your UI to display the OtpFinishView
DispatchQueue.main.async {
self.sheetObservable.isOtpFinishActive = true
}
}
// Return the OTP value to the SDK
func handleOtp(_ otp: String) {
guard let callback = self.callback else {
print("Error: OtpFinishStepCallback is not set ")
return
}
let otpFinishInput = OtpFinishInput(otp: otp)
callback.onSuccess(input: otpFinishInput)
}
// Communicate to the SDK any issues when host app trys to obtain the OTP value
// or when users cancel the OTP flow
func handleOtpFinishError() {
guard let callback = self.callback else {
print("Error: OtpFinishStepCallback is not set ")
return
}
callback.onError()
}
// Call this method to request a new OTP code for the same mobile number.
func sendNewOtp() {
guard let callback = self.callback else {
print("Error: OtpFinishStepCallback is not set ")
return
}
callback.onOtpResend()
}
}
```
Follow these instructions to allow the customer to re-enter the OTP PIN if they type it wrong. There is a max of 3 attempts. To implement this functionality, you also need to pass in `allowOTPRetry=true` to the `/v3/start` endpoint.
The start step is implemented the same as either of the the previous tabs - no client side code changes necessary:
```swift Swift theme={"dark"}
import Foundation
import ProveAuth
import SwiftUI
class MobileOtpStartStep: OtpStartStep {
@ObservedObject var sheetObservable: SheetObservable
var callback: OtpStartStepCallback?
init(sheetObservable: SheetObservable) {
self.sheetObservable = sheetObservable
}
func execute(
phoneNumberNeeded: Bool, phoneValidationError: ProveAuthError?, callback: OtpStartStepCallback
) {
self.callback = callback
if !phoneNumberNeeded {
// If no phone number is needed, then don't prompt the user.
callback.onSuccess(input: nil)
} else {
DispatchQueue.main.async {
// If a phone number validation error is detected, ensure it is handled to provide feedback to the user.
if case .phoneNumberValidationError = phoneValidationError {
print(
"found phoneValidationError: \(String(describing: phoneValidationError?.localizedDescription))"
)
// Update UI components to display OtpStartView with the phone number validation error.
self.sheetObservable.isPhoneValidationError = true
} else {
self.sheetObservable.isPhoneValidationError = false
}
// Update UI components to display OtpStartView if a phone number is needed.
self.sheetObservable.isOtpStartActive = true
}
}
}
// Return collected phone number to the SDK
func handlePhoneNumber(phoneNumber: String) {
guard let callback = self.callback else {
print("Error: OtpStartStepCallback is not set ")
return
}
let otpStartInput = OtpStartInput(phoneNumber: phoneNumber)
// This is how you pass collected phone number to SDK
callback.onSuccess(input: otpStartInput)
}
// Communicate any issues encountered while trying to obtain the phone number to the SDK.
// Error should be reported if the customer explicitly cancels the SMS OTP transaction
// or presses the back button to exit out the SMS OTP start step screen.
func handleOtpStartError() {
guard let callback = self.callback else {
print("Error: OtpStartStepCallback is not set ")
return
}
callback.onError()
}
}
```
The finish step is implemented the same as either of the the previous tabs - no client side code changes necessary. If the OTP is invalid, the finish step will be called again to prompt the user for a new input. Once the max attempts is reached, the `AuthFinish` function will be called.
```swift Swift theme={"dark"}
import Foundation
import SwiftUI
import ProveAuth
class MobileOtpFinishStep: OtpFinishStep {
@ObservedObject var sheetObservable: SheetObservable
var callback: OtpFinishStepCallback?
init(sheetObservable: SheetObservable){
self.sheetObservable = sheetObservable
}
// Implement this method to collect the OTP value delivered via SMS.
func execute(otpError: ProveAuthError?, callback: OtpFinishStepCallback) {
self.callback = callback
// Handle the OTP validation error if present.
if case .otpValidationError = otpError {
print("found otpError: \(String(describing: otpError?.localizedDescription))")
// Signal to your UI components that the last provided OTP is invalid
self.sheetObservable.otpError = true
} else {
self.sheetObservable.otpError = false
}
// Signal to UI components to display OtpFinishView
DispatchQueue.main.async {
self.sheetObservable.isOtpFinishActive = true
}
}
// Provide the collected OTP value to the SDK for validation.
func handleOtp(_ otp: String) {
guard let callback = self.callback else {
print("Error: OtpFinishStepCallback is not set ")
return
}
let otpFinishInput = OtpFinishInput(otp: otp)
callback.onSuccess(input: otpFinishInput)
}
// Notify the SDK of any issues encountered while obtaining the OTP value or if the user cancels the OTP flow.
func handleOtpFinishError() {
guard let callback = self.callback else {
print("Error: OtpFinishStepCallback is not set ")
return
}
callback.onError()
}
}
```
Follow these instructions to allow the customer to re-enter their phone number. There is a max of three entries/send attempts.
Manual Request Required
To enable phone number change capabilities on your credentials, contact your Prove representative.
The start step is implemented the same as the previous tab:
```swift Swift theme={"dark"}
import Foundation
import ProveAuth
import SwiftUI
class MobileOtpStartStep: OtpStartStep {
@ObservedObject var sheetObservable: SheetObservable
var callback: OtpStartStepCallback?
init(sheetObservable: SheetObservable) {
self.sheetObservable = sheetObservable
}
func execute(
phoneNumberNeeded: Bool, phoneValidationError: ProveAuthError?, callback: OtpStartStepCallback
) {
self.callback = callback
if !phoneNumberNeeded {
// If no phone number is needed, then don't prompt the user.
callback.onSuccess(input: nil)
} else {
DispatchQueue.main.async {
// If a phone number validation error is detected, ensure it is handled to provide feedback to the user.
if case .phoneNumberValidationError = phoneValidationError {
print(
"found phoneValidationError: \(String(describing: phoneValidationError?.localizedDescription))"
)
// Update UI components to display OtpStartView with the phone number validation error.
self.sheetObservable.isPhoneValidationError = true
} else {
self.sheetObservable.isPhoneValidationError = false
}
// Update UI components to display OtpStartView if a phone number is needed.
self.sheetObservable.isOtpStartActive = true
}
}
}
// Return collected phone number to the SDK
func handlePhoneNumber(phoneNumber: String) {
guard let callback = self.callback else {
print("Error: OtpStartStepCallback is not set ")
return
}
let otpStartInput = OtpStartInput(phoneNumber: phoneNumber)
// This is how you pass collected phone number to SDK
callback.onSuccess(input: otpStartInput)
}
// Communicate any issues encountered while trying to obtain the phone number to the SDK.
// Error should be reported if the customer explicitly cancels the SMS OTP transaction
// or presses the back button to exit out the SMS OTP start step screen.
func handleOtpStartError() {
guard let callback = self.callback else {
print("Error: OtpStartStepCallback is not set ")
return
}
callback.onError()
}
}
```
You can prompt for a new phone number by implementing the finish step like this:
```swift Swift theme={"dark"}
import Foundation
import SwiftUI
import ProveAuth
class MobileOtpFinishStep: OtpFinishStep {
@ObservedObject var sheetObservable: SheetObservable
var callback: OtpFinishStepCallback?
init(sheetObservable: SheetObservable){
self.sheetObservable = sheetObservable
}
// Implement this method to collect the OTP value delivered via SMS.
func execute(otpError: ProveAuthError?, callback: OtpFinishStepCallback) {
self.callback = callback
// Handle the OTP validation error if present.
if case .otpValidationError = otpError {
print("found otpError: \(String(describing: otpError?.localizedDescription))")
// Update your UI to indicate that the provided OTP is invalid.
self.sheetObservable.otpError = true
} else {
self.sheetObservable.otpError = false
}
// Update your UI to display the OTP finish view.
DispatchQueue.main.async {
self.sheetObservable.isOtpFinishActive = true
}
}
// Return the collected OTP value to the SDK.
func handleOtp(_ otp: String) {
guard let callback = self.callback else {
print("Error: OtpFinishStepCallback is not set ")
return
}
let otpFinishInput = OtpFinishInput(otp: otp)
callback.onSuccess(input: otpFinishInput)
}
// When callback.onMobileNumberChange() is evoked, OtpStartStep will be re-initiated
// so that end-users can enter a different phone number via OtpStartStep.
func handleMobileNumberChange() {
guard let callback = self.callback else {
print("Error: OtpFinishStepCallback is not set")
return
}
callback.onMobileNumberChange()
}
}
```
In the `AuthFinishStep`, you'll specify a function to call once the possession checks complete on the mobile phone. This endpoint on your back end server calls the `UnifyStatus()` function to validate the phone number. The `AuthFinishStep` then completes.
```go Go theme={"dark"}
rspUnifyStatus, err := client.V3.V3UnifyStatusRequest(context.TODO(), &components.V3UnifyStatusRequest{
CorrelationID: rspUnify.V3UnifyResponse.CorrelationID,
})
if err != nil {
return fmt.Errorf("error on UnifyStatus(): %w", err)
}
```
```typescript TypeScript theme={"dark"}
const rspUnifyStatus = await sdk.v3.v3UnifyStatusRequest({
correlationId: rspUnify.v3UnifyResponse?.correlationId || '',
},
});
if (!rspUnifyStatus) {
console.error("Unify Status error.")
return
}
```
```java Java theme={"dark"}
V3UnifyStatusRequest req = V3UnifyStatusRequest.builder()
.correlationId("713189b8-5555-4b08-83ba-75d08780aebd")
.build();
V3UnifyStatusResponse res = sdk.v3().v3UnifyStatusRequest()
.request(req)
.call();
// You may want to use the .get() method when working with the response object.
```
The function returns the following fields:
* `success`: either `true` if the mobile number validation was successful, or `false` if it failed.
* `phoneNumber`: the phone number associated with the possession check.
* `clientHumanId`: a client-generated unique ID to identify a specific customer across business lines.
* `clientRequestId`: a client-generated unique ID for a specific session. This can be used to identify specific requests.
* `deviceId`: the unique identifier for the Prove Key on the device.
* `evaluation`: the evaluation result for the Global Fraud Policy.
* `proveId`: a unique ID to identify a specific customer obtained from a successful possession check.
You can then respond to the front end with the results of the authentication.
Only mobile channels are supported for this flow.
You need to send a request to your back end server with the phone number and `possessionType=none` to start the flow.
Additional parameters:
* `finalTargetURL`: required when `flowType=desktop`. This should be a URL you maintain. Once the customer clicks the Instant Link, they will be redirected to this URL. It should instruct the customer to continue the workflow. Maximum length is 128 characters.
* `checkReputation`: if true, TrustScore verification will be performed.
* `clientHumanId`: a client-generated unique ID to identify a specific customer across business lines.
* `smsMessage`: optional field to customize the message body sent in the Instant Link or OTP SMS message. Otherwise, you can use Prove defaults.
* `clientCustomerId`: a client-generated unique ID for a specific customer. You can link calls related to the same customer, across different requests or sessions. The client defines the format of this ID.
* `deviceId`: the unique identifier for the Prove Key on the device.
* `emailAddress`: the email address of the customer.
* `ipAddress`: the IP address of the customer.
* `proveId`: a unique ID to identify a specific customer obtained from a previous successful authentication.
* `rebind`: if `true`, rebinds the Prove Key with the newly verified phone number.
* `allowOTPRetry`: set to `true` to allow the customer to re-enter the OTP up to three times. Defaults to `false`.
For OTP retries, make sure to implement client SDK changes in the next step.
```go Go theme={"dark"}
// Send the Unify request.
rspUnify, err := client.V3.V3UnifyRequest(ctx, &components.V3UnifyRequest{
PhoneNumber: "2001004014",
PossessionType: "mobile",
})
if err != nil {
t.Fatal(err)
}
```
```typescript TypeScript theme={"dark"}
let unifyReq = {
phoneNumber: '2001004014',
possessionType: 'mobile'
}
// Send the Unify request.
const rspUnify = await sdk.v3.v3UnifyRequest(unifyReq);
if (!rspUnify) {
console.error("Unify error.")
return
}
```
```java Java theme={"dark"}
// Send the Unify request.
V3UnifyRequest req = V3UnifyRequest.builder()
.phoneNumber("2001004014")
.possessionType("mobile")
.build();
// You may want to use the .get() method when working with the response object.
```
```csharp .NET theme={"dark"}
using Prove.Proveapi;
using Prove.Proveapi.Models.Components;
var sdk = new ProveAPI(auth: "");
V3StartRequest req = new V3UnifyRequest() {
PhoneNumber = "2001004014",
PossessionType = "mobile",
};
var res = await sdk.V3.V3StartRequestAsync(req);
```
The function returns the following fields:
* `authToken`: send this to your client-side code to pass into the `Authenticate()` function - it’s a short lived JSON Web Token (JWT) tied to the current flow and used for the possession checks.
* `correlationId`: save this in your current session, then pass it in to the `UnifyStatus()` function call of the same flow. The correlation ID ties together different system calls for the same Prove flow. It also aids in troubleshooting. The session expires in 15 minutes from when the correlation ID returns from the `Unify()` call.
* `success`: will return `pending` for this initial call.
Return the `authToken` in a response to the front end.
Initialize the client-side SDK to place a Prove key on the device or to check if a Prove key is bound.
```javascript JavaScript theme={"dark"}
async function authenticate(isMobileWeb, authToken) {
// Set up the authenticator for the mobile flow.
let builder = new proveAuth.AuthenticatorBuilder();
builder = builder
.withAuthFinishStep((input) => verify(input.authId));
const authenticator = builder.build();
// Authenticate with the authToken.
return authenticator.authenticate(authToken);
}
```
```typescript TypeScript theme={"dark"}
async function authenticate(isMobileWeb: boolean, authToken: string) {
// Set up the authenticator for the mobile flow.
let builder = new proveAuth.AuthenticatorBuilder();
builder = builder
.withAuthFinishStep((input) => verify(input.authId));
const authenticator = builder.build();
// Authenticate with the authToken.
return authenticator.authenticate(authToken);
}
```
In the `AuthFinishStep` of the client SDK, you'll need to have the function make a call to an endpoint on your back end server. Your backend server should then call the `UnifyStatus()` function to validate the phone number. The `AuthFinishStep` then completes.
```go Go theme={"dark"}
rspUnifyStatus, err := client.V3.V3UnifyStatusRequest(context.TODO(), &components.V3UnifyStatusRequest{
CorrelationID: rspUnify.V3UnifyResponse.CorrelationID,
})
if err != nil {
return fmt.Errorf("error on UnifyStatus(): %w", err)
}
```
```typescript TypeScript theme={"dark"}
const rspUnifyStatus = await sdk.v3.v3UnifyStatusRequest({
correlationId: rspUnify.v3UnifyResponse?.correlationId || '',
},
});
if (!rspUnifyStatus) {
console.error("Unify Status error.")
return
}
```
```java Java theme={"dark"}
V3UnifyStatusRequest req = V3UnifyStatusRequest.builder()
.correlationId("713189b8-5555-4b08-83ba-75d08780aebd")
.build();
V3UnifyStatusResponse res = sdk.v3().v3UnifyStatusRequest()
.request(req)
.call();
// You may want to use the .get() method when working with the response object.
```
The function returns the following fields:
* `success`: either `possession_required` if the reputation check was successful, or `false` if it failed.
* `phoneNumber`: the phone number associated with the possession check.
* `clientHumanId`: a client-generated unique ID to identify a specific customer across business lines.
* `clientRequestId`: a client-generated unique ID for a specific session. This can be used to identify specific requests.
* `deviceId`: the unique identifier for the Prove Key on the device.
* `evaluation`: the evaluation result for the Global Fraud Policy.
* `proveId`: a unique ID to identify a specific customer obtained from a successful possession check.
You can then respond to the front end with the results of the authentication.
If possession is required, your application needs to perform a customer-supplied possession check such as SMS OTP.
Call `UnifyBind()` after `UnifyStatus()` returns `success=possession_required`. Ensure your own possession check has succeeded. This binds the phone number to the Prove Key for future authentications.
This function takes these required parameters:
* `correlationId`: the ID returned by the `Unify()` function.
* `phoneNumber`: the phone number to bind to the Prove Key.
* `clientRequestId`: a client-generated unique ID for a specific session. This can be used to identify specific requests.
```go Go theme={"dark"}
rspUnifyBind, err := client.V3.V3UnifyBindRequest(context.TODO(), &components.V3UnifyBindRequest{
CorrelationID: rspUnify.V3UnifyResponse.CorrelationID,
PhoneNumber: "2001004018",
})
if err != nil {
return fmt.Errorf("error on UnifyBind(): %w", err)
}
```
```typescript TypeScript theme={"dark"}
const rspUnifyBind = await sdk.v3.v3UnifyBindRequest({
correlationId: rspUnify.v3UnifyResponse?.correlationId || '',
phoneNumber: '2001004018',
},
});
if (!rspUnifyBind) {
console.error("Unify Bind error.")
return
}
```
```java Java theme={"dark"}
V3UnifyBindRequest req = V3UnifyBindRequest.builder()
.correlationId("713189b8-5555-4b08-83ba-75d08780aebd")
.phoneNumber("2001004018")
.build();
V3UnifyBindResponse res = sdk.v3().v3UnifyBindRequest()
.request(req)
.call();
// You may want to use the .get() method when working with the response object.
```
The function returns the following fields:
* `success`: `true` if the binding succeeded, `false` if it failed.
* `phoneNumber`: the phone number that was bound to the Prove Key.
* `clientHumanId`: a client-generated unique ID to identify a specific customer across business lines.
* `clientRequestId`: a client-generated unique ID for a specific session. This can be used to identify specific requests.
* `deviceId`: the unique identifier for the Prove Key on the device.
* `evaluation`: the evaluation result for the Global Fraud Policy.
## Test your Prove implementation
Next, reference the Sandbox test scenarios to test users and simulate different behaviors encountered in production.
Production Launch
To launch in Production, please contact your Prove representative.
Prove Key Behavior
The following are things to be aware of when using the Prove Key:
The Prove Key is ignored and Instant Link is performed.
If you send a different phone number to /unify than the one registered to the Prove key, you will receive `success=false` when calling /unify-status. This is because the Prove Key is bound to a different number. Run the flow again with `rebind=true` in the /unify endpoint. This will force a full possession check and then, if valid, will rebind the Prove Key to the new phone number.
If you send a different phone number to /unify than the one registered to the Prove key, the customer will receive `possession_required` on the /unify-status call. You will need to call /unify-bind to rebind the Prove Key to the new number. Once it's rebound, the previous number will ask for `possession_required`. The Prove key only supports one phone number.
***
## Sandbox testing
### Test users list
Follow the [Testing Steps](#testing-steps) for expected behavior per step.
| Phone Number | First Name | Last Name |
| :----------- | :--------- | :-------- |
| 2001004014 | Lorant | Nerger |
| 2001004017 | Jesse | Mashro |
| Phone Number | First Name | Last Name |
| :----------- | :--------- | :-------- |
| +2001004025 | Bertie | Fremont |
| +2001004028 | Wendy | Strover |
### Testing steps
Now that you’ve done client-side, server-side, and CX implementation, test using the test users.
Follow the steps below to test the Prove Unified Authentication flow with Lorant Nerger on desktop. This user will pass the entire Unified Authentication flow using Prove's possession and return `success=true` in the /unify-status response.
Start the onboarding flow on the initial screen and enter the phone number for Lorant Nerger.
Your front end will send the phone number, possession type, and final target URL to the back end. Your back end will then send the phone number to the /unify endpoint. The response will provide an auth token, correlation ID, and `success=pending` because possession still needs to be performed.
Your back end will send the `authToken` to the front end. The front end will run Instant Link handling.
Determine if the customer is on a mobile or desktop browser using this example. If the `isMobile` is true, set `mobile` as the `possessionType` for the `Start()` function on the server, otherwise you can set `desktop`:
```javascript JavaScript theme={"dark"}
// Check if the customer is on a mobile or desktop browser.
const authCheck = new proveAuth.AuthenticatorBuilder().build();
let isMobile = authCheck.isMobileWeb()
```
```typescript TypeScript theme={"dark"}
// Check if the customer is on a mobile or desktop browser.
const authCheck = new proveAuth.AuthenticatorBuilder().build();
let isMobile = authCheck.isMobileWeb()
```
When using the Android SDK, set `mobile` as the `possessionType` for the `Start()` function on the server.
When using the iOS SDK, set `mobile` as the `possessionType` for the `Start()` function on the server.
Send a request to your back end server with the phone number and possession type to start the flow. For additional optional parameters, see the [v3/unify API reference](https://developer.prove.com/reference/unify-request).
```go Go theme={"dark"}
// Send the Unify request.
rspUnify, err := client.V3.V3UnifyRequest(ctx, &components.V3UnifyRequest{
PhoneNumber: "2001004014",
PossessionType: "mobile",
ClientRequestId: "test-001",
})
if err != nil {
t.Fatal(err)
}
```
```typescript TypeScript theme={"dark"}
let unifyReq = {
phoneNumber: '2001004014',
possessionType: 'mobile',
clientRequestId: 'test-001',
}
// Send the Unify request.
const rspUnify = await sdk.v3.v3UnifyRequest(unifyReq);
if (!rspUnify) {
console.error("Unify error.")
return
}
```
```java Java theme={"dark"}
// Send the Unify request.
V3UnifyRequest req = V3UnifyRequest.builder()
.phoneNumber("2001004014")
.possessionType("mobile")
.clientRequestId("test-001")
.build();
// You may want to use the .get() method when working with the response object.
```
```csharp .NET theme={"dark"}
using Prove.Proveapi;
using Prove.Proveapi.Models.Components;
var sdk = new ProveAPI(auth: "");
V3StartRequest req = new V3UnifyRequest() {
PhoneNumber = "2001004014",
PossessionType = "mobile",
ClientRequestId = "test-001",
};
var res = await sdk.V3.V3StartRequestAsync(req);
```
{/* step { "httpRequest": { "url": "https://platform.uat.proveapis.com/token", "method": "POST", "request": { "headers": { "Content-Type": "application/x-www-form-urlencoded" }, "body": { "grant_type": "client_credentials", "client_id": "proveauthdemo-3383da66-88fb-4729-b516-2bc585ecc268-1761831182242", "client_secret": "Up3es8RcRbsM8vkFxG7wnu7dIizOkC0b" } } },"variables": { "token": "$$response.body.access_token" } } */}
The function returns the following fields:
* `authToken`: send this to your client-side code to pass into the `Authenticate()` function - it’s a short lived JSON Web Token (JWT) tied to the current flow and used for the possession checks.
* `correlationId`: save this in your current session, then pass it in to the `UnifyStatus()` function call of the same flow. The correlation ID ties together different system calls for the same Prove flow. It also aids in troubleshooting. The session expires in 15 minutes from when the correlation ID returns from the `Unify()` call.
* `success`: will return `pending` for this initial call.
Return the `authToken` in a response to the front end.
Once you have the `authToken`, build the authenticator for both the mobile and desktop flows.
```javascript JavaScript theme={"dark"}
async function authenticate(isMobileWeb, authToken) {
// Set up the authenticator for either mobile or desktop flow.
let builder = new proveAuth.AuthenticatorBuilder();
if (isMobileWeb) {
// Set up Mobile Auth and OTP.
builder = builder
.withAuthFinishStep((input) => verify(input.authId))
.withMobileAuthImplementation("fetch")
.withOtpFallback(otpStart, otpFinish);
} else {
// Set up Instant Link.
builder = builder
.withAuthFinishStep((input) => verify(input.authId))
.withInstantLinkFallback(instantLink)
.withRole("secondary");
}
const authenticator = builder.build();
// Authenticate with the authToken.
return authenticator.authenticate(authToken);
}
```
```typescript TypeScript theme={"dark"}
async function authenticate(isMobileWeb: boolean, authToken: string) {
// Set up the authenticator for either mobile or desktop flow.
let builder = new proveAuth.AuthenticatorBuilder();
if (isMobileWeb) {
// Set up Mobile Auth and OTP.
builder = builder
.withAuthFinishStep((input) => verify(input.authId))
.withMobileAuthImplementation("fetch")
.withOtpFallback(otpStart, otpFinish);
} else {
// Set up Instant Link.
builder = builder
.withAuthFinishStep((input) => verify(input.authId))
.withInstantLinkFallback(instantLink)
.withRole("secondary");
}
const authenticator = builder.build();
// Authenticate with the authToken.
return authenticator.authenticate(authToken);
}
```
## Configure OTP
To use the Resend/Retry/Phone Change features, you need to install the Web SDK version 2.15.1 or later.
To set the One-Time Password (OTP) handler, `withOtpFallback(startStep: OtpStartStep | OtpStartStepFn, finishStep: OtpFinishStep | OtpFinishStepFn)`, requires implementing the `OtpStartStep` and `OtpFinishStep`. When returning the phone number in the functions, ensure you return an object with the field `phoneNumber` to the `resolve()` function.
The OTP session has a two minute timeout from when it's sent through Short Message Service (SMS) to when the customer can enter in the OTP.
Follow these instructions if you are implementing OTP and you are passing in the phone number on the `/v3/start` endpoint. In this case, you've already prompted for a phone number so you don't need to prompt for it in the client SDK.
Since you passed the phone number in the `Start()` function, call `resolve(null)` to communicate to the SDK you have the customer's agreement to deliver the SMS message. Ensure you return an object to `resolve()` function.
```javascript JavaScript theme={"dark"}
function otpStartStep(phoneNumberNeeded, phoneValidationError) {
return new Promise((resolve, reject) => {
// Since no phone number is needed, don't prompt the user.
resolve(null);
});
}
```
```typescript TypeScript theme={"dark"}
const otpStartStep: OtpStartStep = {
execute: async (
phoneNumberNeeded: boolean,
phoneValidationError?: PhoneValidationError
): Promise => {
return new Promise((resolve, reject) => {
// Since no phone number is needed, don't prompt the user.
resolve(null);
});
},
};
```
Call the `reject('some error message')` method to communicate to the SDK any issues while trying to obtain the phone number or the OTP. Report an error if the customer cancels the SMS transaction or presses the back button to leave the screen.
In the finish step, call the `resolve(result: OtpFinishResult)` method to return the collected OTP value in which `result` variable has `OnSuccess` value for `OtpFinishResultType` and the OTP value wrapped in `OtpFinishInput`.
```javascript JavaScript theme={"dark"}
function otpFinishStep(otpError) {
return new Promise((resolve, reject) => {
// If error message is found, handle it.
if (otpError) {
// Set to a variable and display it in a field.
// In this example, we don't do anything with the error.
var someErrorMessage = otpError.message;
}
// Prompt the user for whether they received the SMS.
// Typically, this is a page that shows the OTP already. We are simplifying
// it by requiring an input.
var input = confirm('Did you receive a text message?');
if (!input) {
// Close the modal if a text message was not received.
return;
}
// Prompt the user for the OTP.
var otp = prompt('Enter OTP code:');
if (otp) {
// If the input is valid and the user clicked `OK`, return the OTP.
resolve({
input: { otp }, // OTP value
resultType: 0, // OnSuccess enum type = 0
});
} else {
// Else, exit the flow.
reject('phone invalid or user cancelled');
}
});
}
```
```typescript TypeScript theme={"dark"}
const otpFinishStep: OtpFinishStep = {
execute: async (otpError?: OtpError): Promise => {
return new Promise((resolve, reject) => {
// If error message is found, handle it.
if (otpError) {
// Set to a variable and display it in a field.
// In this example, we don't do anything with the error.
var someErrorMessage = otpError.message;
}
// Prompt the user for whether they received the SMS.
// Typically, this is a page that shows the OTP already. We are simplifying
// it by requiring an input.
var input = confirm('Did you receive a text message?');
if (!input) {
// Close the modal if a text message was not received.
return;
}
// Prompt the user for the OTP.
var otp = prompt('Enter OTP code:');
if (otp) {
// If the input is valid and the user clicked `OK`, return the OTP.
resolve({
input: { otp }, // OTP value
resultType: OtpFinishResultType.OnSuccess,
});
} else {
// Else, exit the flow.
reject('phone invalid or user cancelled');
}
});
},
};
```
Follow these instructions if implementing MobileAuth and collecting the phone number only if MobileAuth fails. This will implement OTP without allowing for SMS resends and phone number changes. If you do want those capabilities, please reference the subsequent tabs (Resend, Retry OTP, and Phone Number Change).
In the start step, call the `resolve(input: OtpStartInput)` method to return the collected phone number to the SDK.
```javascript JavaScript theme={"dark"}
function otpStartStep(phoneNumberNeeded, phoneValidationError) {
return new Promise((resolve, reject) => {
// If no phone number is needed, then don't prompt the user.
if (!phoneNumberNeeded) {
resolve(null);
return;
}
// If error message is found around phone number, handle it.
// The `phoneValidationError` is ONLY available when `phoneNumberNeeded`
// has a value.
if (phoneValidationError) {
// Set to a variable and display it in a field.
// In this example, we don't do anything with the error.
var someErrorMessage = phoneValidationError.message;
}
// Prompt the user for the phone number.
var input = prompt('Enter phone number:');
if (input) {
// If the input is valid and the user clicked `OK`, return the phone
// number.
resolve({
phoneNumber: input,
});
} else {
// Else, exit the flow.
reject('phone invalid or user cancelled');
}
});
}
```
```typescript TypeScript theme={"dark"}
const otpPromptStartStep: OtpStartStep = {
execute: async (
phoneNumberNeeded: boolean,
phoneValidationError?: PhoneValidationError
): Promise => {
return new Promise((resolve, reject) => {
// If no phone number is needed, then don't prompt the user.
if (!phoneNumberNeeded) {
resolve(null);
return;
}
// If error message is found around phone number, handle it.
// The `phoneValidationError` is ONLY available when `phoneNumberNeeded`
// has a value.
if (phoneValidationError) {
// Set to a variable and display it in a field.
// In this example, we don't do anything with the error.
var someErrorMessage = phoneValidationError.message;
}
// Prompt the user for the phone number.
var input = prompt('Enter phone number:');
if (input) {
// If the input is valid and the user clicked `OK`, return the phone
// number.
resolve({
phoneNumber: input,
});
} else {
// Else, exit the flow.
reject('phone invalid or user cancelled');
}
});
},
};
```
The finish step is implemented the same as the previous tab:
```javascript JavaScript theme={"dark"}
function otpFinishStep(otpError) {
return new Promise((resolve, reject) => {
// If error message is found, handle it.
if (otpError) {
// Set to a variable and display it in a field.
// In this example, we don't do anything with the error.
var someErrorMessage = otpError.message;
}
// Prompt the user for whether they received the SMS.
// Typically, this is a page that shows the OTP already. We are simplifying
// it by requiring an input.
var input = confirm('Did you receive a text message?');
if (!input) {
// Close the modal if a text message was not received.
return;
}
// Prompt the user for the OTP.
var otp = prompt('Enter OTP code:');
if (otp) {
// If the input is valid and the user clicked `OK`, return the OTP.
resolve({
input: { otp }, // OTP value
resultType: 0, // OnSuccess enum type = 0
});
} else {
// Else, exit the flow.
reject('phone invalid or user cancelled');
}
});
}
```
```typescript TypeScript theme={"dark"}
const otpFinishStep: OtpFinishStep = {
execute: async (otpError?: OtpError): Promise => {
return new Promise((resolve, reject) => {
// If error message is found, handle it.
if (otpError) {
// Set to a variable and display it in a field.
// In this example, we don't do anything with the error.
var someErrorMessage = otpError.message;
}
// Prompt the user for whether they received the SMS.
// Typically, this is a page that shows the OTP already. We are simplifying
// it by requiring an input.
var input = confirm('Did you receive a text message?');
if (!input) {
// Close the modal if a text message was not received.
return;
}
// Prompt the user for the OTP.
var otp = prompt('Enter OTP code:');
if (otp) {
// If the input is valid and the user clicked `OK`, return the OTP.
resolve({
input: { otp }, // OTP value
resultType: OtpFinishResultType.OnSuccess,
});
} else {
// Else, exit the flow.
reject('phone invalid or user cancelled');
}
});
},
};
```
Follow these instructions to allow the customer to request a new OTP via SMS using the same phone number. There is a max of three send attempts including the initial message.
The start step is implemented the same as the previous tab:
```javascript JavaScript theme={"dark"}
function otpStartStep(phoneNumberNeeded, phoneValidationError) {
return new Promise((resolve, reject) => {
// If no phone number is needed, then don't prompt the user.
if (!phoneNumberNeeded) {
resolve(null);
return;
}
// If error message is found around phone number, handle it.
// The `phoneValidationError` is ONLY available when `phoneNumberNeeded`
// has a value.
if (phoneValidationError) {
// Set to a variable and display it in a field.
// In this example, we don't do anything with the error.
var someErrorMessage = phoneValidationError.message;
}
// Prompt the user for the phone number.
var input = prompt('Enter phone number:');
if (input) {
// If the input is valid and the user clicked `OK`, return the phone
// number.
resolve({
phoneNumber: input,
});
} else {
// Else, exit the flow.
reject('phone invalid or user cancelled');
}
});
}
```
```typescript TypeScript theme={"dark"}
const otpPromptStartStep: OtpStartStep = {
execute: async (
phoneNumberNeeded: boolean,
phoneValidationError?: PhoneValidationError
): Promise => {
return new Promise((resolve, reject) => {
// If no phone number is needed, then don't prompt the user.
if (!phoneNumberNeeded) {
resolve(null);
return;
}
// If error message is found around phone number, handle it.
// The `phoneValidationError` is ONLY available when `phoneNumberNeeded`
// has a value.
if (phoneValidationError) {
// Set to a variable and display it in a field.
// In this example, we don't do anything with the error.
var someErrorMessage = phoneValidationError.message;
}
// Prompt the user for the phone number.
var input = prompt('Enter phone number:');
if (input) {
// If the input is valid and the user clicked `OK`, return the phone
// number.
resolve({
phoneNumber: input,
});
} else {
// Else, exit the flow.
reject('phone invalid or user cancelled');
}
});
},
};
```
You can then send a new OTP SMS to the same phone number by implementing the finish step like this:
```javascript JavaScript theme={"dark"}
function otpFinishStep(otpError) {
return new Promise((resolve, reject) => {
// If error message is found, handle it.
if (otpError) {
// Set to a variable and display it in a field.
// In this example, we don't do anything with the error.
var someErrorMessage = otpError.message;
}
// Prompt the user for whether they received the SMS.
// Typically, this is a page that shows the OTP already. We are simplifying
// it by requiring an input.
var input = confirm('Did you receive a text message?');
if (!input) {
// If `Cancel`, then resend to the same phone number.
resolve({
resultType: 1, // OnResendOtp enum type = 1
});
return;
}
// Prompt the user for the OTP.
var otp = prompt('Enter OTP code:');
if (otp) {
// If the input is valid and the user clicked `OK`, return the OTP.
resolve({
input: { otp }, // OTP value
resultType: 0, // OnSuccess enum type = 0
});
} else {
// Else, exit the flow.
reject('phone invalid or user cancelled');
}
});
}
```
```typescript TypeScript theme={"dark"}
const otpMultipleResendFinishStep: OtpFinishStep = {
execute: async (otpError?: OtpError): Promise => {
return new Promise((resolve, reject) => {
// If error message is found, handle it.
if (otpError) {
// Set to a variable and display it in a field.
// In this example, we don't do anything with the error.
var someErrorMessage = otpError.message;
}
// Prompt the user for whether they received the SMS.
// Typically, this is a page that shows the OTP already. We are simplifying
// it by requiring an input.
var input = confirm('Did you receive a text message?');
if (!input) {
// If `Cancel`, then resend to the same phone number.
resolve({
resultType: 1, // OnResendOtp enum type = 1
});
return;
}
// Prompt the user for the OTP.
var otp = prompt('Enter OTP code:');
if (otp) {
// If the input is valid and the user clicked `OK`, return the OTP.
resolve({
input: { otp }, // OTP value
resultType: OtpFinishResultType.OnSuccess,
});
} else {
// Else, exit the flow.
reject('phone invalid or user cancelled');
}
});
},
};
```
Follow these instructions to allow the customer to re-enter the OTP PIN if they type it wrong. There is a max of 3 attempts. To implement this functionality, you also need to pass in `allowOTPRetry=true` to the `/v3/start` endpoint.
The start step is implemented the same as either of the the previous tabs - no client side code changes necessary:
```javascript JavaScript theme={"dark"}
function otpStartStep(phoneNumberNeeded, phoneValidationError) {
return new Promise((resolve, reject) => {
// If no phone number is needed, then don't prompt the user.
if (!phoneNumberNeeded) {
resolve(null);
return;
}
// If error message is found around phone number, handle it.
// The `phoneValidationError` is ONLY available when `phoneNumberNeeded`
// has a value.
if (phoneValidationError) {
// Set to a variable and display it in a field.
// In this example, we don't do anything with the error.
var someErrorMessage = phoneValidationError.message;
}
// Prompt the user for the phone number.
var input = prompt('Enter phone number:');
if (input) {
// If the input is valid and the user clicked `OK`, return the phone
// number.
resolve({
phoneNumber: input,
});
} else {
// Else, exit the flow.
reject('phone invalid or user cancelled');
}
});
}
```
```typescript TypeScript theme={"dark"}
const otpPromptStartStep: OtpStartStep = {
execute: async (
phoneNumberNeeded: boolean,
phoneValidationError?: PhoneValidationError
): Promise => {
return new Promise((resolve, reject) => {
// If no phone number is needed, then don't prompt the user.
if (!phoneNumberNeeded) {
resolve(null);
return;
}
// If error message is found around phone number, handle it.
// The `phoneValidationError` is ONLY available when `phoneNumberNeeded`
// has a value.
if (phoneValidationError) {
// Set to a variable and display it in a field.
// In this example, we don't do anything with the error.
var someErrorMessage = phoneValidationError.message;
}
// Prompt the user for the phone number.
var input = prompt('Enter phone number:');
if (input) {
// If the input is valid and the user clicked `OK`, return the phone
// number.
resolve({
phoneNumber: input,
});
} else {
// Else, exit the flow.
reject('phone invalid or user cancelled');
}
});
},
};
```
The finish step is implemented the same as either of the the previous tabs - no client side code changes necessary. If the OTP is invalid, the finish step will be called again to prompt the user for a new input. Once the max attempts is reached, the `AuthFinish` function will be called.
```javascript JavaScript theme={"dark"}
function otpFinishStep(otpError) {
return new Promise((resolve, reject) => {
// If error message is found, handle it.
if (otpError) {
// Set to a variable and display it in a field.
// In this example, we don't do anything with the error.
var someErrorMessage = otpError.message;
}
// Prompt the user for whether they received the SMS.
// Typically, this is a page that shows the OTP already. We are simplifying
// it by requiring an input.
var input = confirm('Did you receive a text message?');
if (!input) {
// Close the modal if a text message was not received.
return;
}
// Prompt the user for the OTP.
var otp = prompt('Enter OTP code:');
if (otp) {
// If the input is valid and the user clicked `OK`, return the OTP.
resolve({
input: { otp }, // OTP value
resultType: 0, // OnSuccess enum type = 0
});
} else {
// Else, exit the flow.
reject('phone invalid or user cancelled');
}
});
}
```
```typescript TypeScript theme={"dark"}
const otpFinishStep: OtpFinishStep = {
execute: async (otpError?: OtpError): Promise => {
return new Promise((resolve, reject) => {
// If error message is found, handle it.
if (otpError) {
// Set to a variable and display it in a field.
// In this example, we don't do anything with the error.
var someErrorMessage = otpError.message;
}
// Prompt the user for whether they received the SMS.
// Typically, this is a page that shows the OTP already. We are simplifying
// it by requiring an input.
var input = confirm('Did you receive a text message?');
if (!input) {
// Close the modal if a text message was not received.
return;
}
// Prompt the user for the OTP.
var otp = prompt('Enter OTP code:');
if (otp) {
// If the input is valid and the user clicked `OK`, return the OTP.
resolve({
input: { otp }, // OTP value
resultType: OtpFinishResultType.OnSuccess,
});
} else {
// Else, exit the flow.
reject('phone invalid or user cancelled');
}
});
},
};
```
Follow these instructions to allow the customer to re-enter their phone number. There is a max of three entries/send attempts.
Manual Request Required
To enable phone number change capabilities on your credentials, contact your Prove representative.
The start step is implemented the same as the previous tab:
```javascript JavaScript theme={"dark"}
function otpStartStep(phoneNumberNeeded, phoneValidationError) {
return new Promise((resolve, reject) => {
// If no phone number is needed, then don't prompt the user.
if (!phoneNumberNeeded) {
resolve(null);
return;
}
// If error message is found around phone number, handle it.
// The `phoneValidationError` is ONLY available when `phoneNumberNeeded`
// has a value.
if (phoneValidationError) {
// Set to a variable and display it in a field.
// In this example, we don't do anything with the error.
var someErrorMessage = phoneValidationError.message;
}
// Prompt the user for the phone number.
var input = prompt('Enter phone number:');
if (input) {
// If the input is valid and the user clicked `OK`, return the phone
// number.
resolve({
phoneNumber: input,
});
} else {
// Else, exit the flow.
reject('phone invalid or user cancelled');
}
});
}
```
```typescript TypeScript theme={"dark"}
const otpPromptStartStep: OtpStartStep = {
execute: async (
phoneNumberNeeded: boolean,
phoneValidationError?: PhoneValidationError
): Promise => {
return new Promise((resolve, reject) => {
// If no phone number is needed, then don't prompt the user.
if (!phoneNumberNeeded) {
resolve(null);
return;
}
// If error message is found around phone number, handle it.
// The `phoneValidationError` is ONLY available when `phoneNumberNeeded`
// has a value.
if (phoneValidationError) {
// Set to a variable and display it in a field.
// In this example, we don't do anything with the error.
var someErrorMessage = phoneValidationError.message;
}
// Prompt the user for the phone number.
var input = prompt('Enter phone number:');
if (input) {
// If the input is valid and the user clicked `OK`, return the phone
// number.
resolve({
phoneNumber: input,
});
} else {
// Else, exit the flow.
reject('phone invalid or user cancelled');
}
});
},
};
```
You can prompt for a new phone numberby implementing the finish step like this:
```javascript JavaScript theme={"dark"}
function otpFinishStep(otpError) {
return new Promise((resolve, reject) => {
// If error message is found, handle it.
if (otpError) {
// Set to a variable and display it in a field.
// In this example, we don't do anything with the error.
var someErrorMessage = otpError.message;
}
// Prompt the user for whether they received the SMS.
// Typically, this is a page that shows the OTP already. We are simplifying
// it by requiring an input.
var input = confirm('Did you receive a text message?');
if (!input) {
// If `Cancel`, then trigger the otpStartStep to re-prompt for
// phone number.
resolve({
resultType: 2, // OnMobileNumberChange enum type = 2
});
return;
}
// Prompt the user for the OTP.
var otp = prompt('Enter OTP code:');
if (otp) {
// If the input is valid and the user clicked `OK`, return the OTP.
resolve({
input: { otp }, // OTP value
resultType: 0, // OnSuccess enum type = 0
});
} else {
// Else, exit the flow.
reject('phone invalid or user cancelled');
}
});
}
```
```typescript TypeScript theme={"dark"}
const otpPhoneChangeFinishStep: OtpFinishStep = {
execute: async (otpError?: OtpError): Promise => {
return new Promise((resolve, reject) => {
// If error message is found, handle it.
if (otpError) {
// Set to a variable and display it in a field.
// In this example, we don't do anything with the error.
var someErrorMessage = otpError.message;
}
// Prompt the user for whether they received the SMS.
// Typically, this is a page that shows the OTP already. We are simplifying
// it by requiring an input.
var input = confirm('Did you receive a text message?');
if (!input) {
// If `Cancel`, then trigger the otpStartStep to re-prompt for
// phone number.
resolve({
resultType: 2, // OnMobileNumberChange enum type = 2
});
return;
}
// Prompt the user for the OTP.
var otp = prompt('Enter OTP code:');
if (otp) {
// If the input is valid and the user clicked `OK`, return the OTP.
resolve({
input: { otp }, // OTP value
resultType: OtpFinishResultType.OnSuccess,
});
} else {
// Else, exit the flow.
reject('phone invalid or user cancelled');
}
});
},
};
```
## Configure Instant Link
To use the Resend/Retry/Phone Change features, you need to install the Web SDK version 2.15.1 or later.
To set the Instant Link handler, `withInstantLinkFallback(startStep: InstantLinkStartStep | InstantLinkStartStepFn, retryStep?: InstantLinkRetryStep | InstantLinkRetryStepFn)` requires implementing the `InstantLinkStartStep` interface and optionally the `InstantLinkRetryStep` interface if you wish for advanced capabilities. When returning the phone number in the functions, ensure you return an object with the field `phoneNumber` to the `resolve()` function.
The Instant Link session has a three minute timeout from when it's sent through Short Message Service (SMS) to when the customer can click the received link.
Follow these instructions if you are implementing Instant Link and you are passing in the phone number on the `/v3/start` endpoint. In this case, you've already prompted for a phone number so you don't need to prompt for it in the client SDK.
Since you passed the phone number in the `Start()` function, call `resolve(null)` to communicate to the SDK you have the customer's agreement to deliver the SMS message. Ensure you return an object to `resolve()` function.
```javascript JavaScript theme={"dark"}
function instantLinkStartStep(phoneNumberNeeded, phoneValidationError) {
return new Promise((resolve, reject) => {
// Since no phone number is needed, don't prompt the user.
resolve(null);
});
}
```
```typescript TypeScript theme={"dark"}
const instantLinkNoPromptStartStep: InstantLinkStartStep = {
execute: async (
phoneNumberNeeded: boolean,
phoneValidationError?: PhoneValidationError
): Promise => {
return new Promise((resolve, reject) => {
// Since no phone number is needed, don't prompt the user.
resolve(null);
});
},
};
```
Follow these instructions if implementing MobileAuth and collecting the phone number for desktop. This will implement Instant Link without allowing for SMS resends and phone number changes. If you do want those capabilities, please reference the subsequent tabs (Resend and Phone Number Change).
Call the `resolve(input: InstantStartInput)` method to return the collected phone number to the SDK.
Call the `reject('some error message')` method to communicate to the SDK any issues while trying to obtain the phone number. Report an error if the customer cancels the Instant Link transaction or presses the back button to leave the Instant Link start step dialog.
```javascript JavaScript theme={"dark"}
function instantLinkStartStep(phoneNumberNeeded, phoneValidationError) {
return new Promise((resolve, reject) => {
// If no phone number is needed, then don't prompt the user.
if (!phoneNumberNeeded) {
resolve(null);
return;
}
// If error message is found around phone number, handle it.
// The `phoneValidationError` is ONLY available when `phoneNumberNeeded`
// has a value.
if (phoneValidationError) {
// Set to a variable and display it in a field.
// In this example, we don't do anything with the error.
var someErrorMessage = phoneValidationError.message;
}
// Prompt the user for the phone number.
var input = prompt('Enter phone number:');
if (input) {
// If the input is valid and the user clicked `OK`, return the phone
// number.
resolve({
phoneNumber: input,
});
} else {
// Else, exit the flow.
reject('phone invalid or user cancelled');
}
});
}
```
```typescript TypeScript theme={"dark"}
const instantLinkStartStep: InstantLinkStartStep = {
execute: async (
phoneNumberNeeded: boolean,
phoneValidationError?: PhoneValidationError
): Promise => {
return new Promise((resolve, reject) => {
// If no phone number is needed, then don't prompt the user.
if (!phoneNumberNeeded) {
resolve(null);
return;
}
// If error message is found around phone number, handle it.
// The `phoneValidationError` is ONLY available when `phoneNumberNeeded`
// has a value.
if (phoneValidationError) {
// Set to a variable and display it in a field.
// In this example, we don't do anything with the error.
var someErrorMessage = phoneValidationError.message;
}
// Prompt the user for the phone number.
var input = prompt('Enter phone number:');
if (input) {
// If the input is valid and the user clicked `OK`, return the phone
// number.
resolve({
phoneNumber: input,
} as InstantLinkStartInput);
} else {
// Else, exit the flow.
reject('phone invalid or user cancelled');
}
});
},
};
```
Follow these instructions to allow the customer to request a new SMS using the same phone number. There is a max of three send attempts including the initial message.
The start step is implemented the same as the previous tab:
```javascript JavaScript theme={"dark"}
function instantLinkStartStep(phoneNumberNeeded, phoneValidationError) {
return new Promise((resolve, reject) => {
// If no phone number is needed, then don't prompt the user.
if (!phoneNumberNeeded) {
resolve(null);
return;
}
// If error message is found around phone number, handle it.
// The `phoneValidationError` is ONLY available when `phoneNumberNeeded`
// has a value.
if (phoneValidationError) {
// Set to a variable and display it in a field.
// In this example, we don't do anything with the error.
var someErrorMessage = phoneValidationError.message;
}
// Prompt the user for the phone number.
var input = prompt('Enter phone number:');
if (input) {
// If the input is valid and the user clicked `OK`, return the phone
// number.
resolve({
phoneNumber: input,
});
} else {
// Else, exit the flow.
reject('phone invalid or user cancelled');
}
});
}
```
```typescript TypeScript theme={"dark"}
const instantLinkStartStep: InstantLinkStartStep = {
execute: async (
phoneNumberNeeded: boolean,
phoneValidationError?: PhoneValidationError
): Promise => {
return new Promise((resolve, reject) => {
// If no phone number is needed, then don't prompt the user.
if (!phoneNumberNeeded) {
resolve(null);
return;
}
// If error message is found around phone number, handle it.
// The `phoneValidationError` is ONLY available when `phoneNumberNeeded`
// has a value.
if (phoneValidationError) {
// Set to a variable and display it in a field.
// In this example, we don't do anything with the error.
var someErrorMessage = phoneValidationError.message;
}
// Prompt the user for the phone number.
var input = prompt('Enter phone number:');
if (input) {
// If the input is valid and the user clicked `OK`, return the phone
// number.
resolve({
phoneNumber: input,
} as InstantLinkStartInput);
} else {
// Else, exit the flow.
reject('phone invalid or user cancelled');
}
});
},
};
```
You can then send a new Instant Link SMS to the same phone number by implementing the `InstantLinkRetryStep` interface, for example:
```javascript JavaScript theme={"dark"}
function instantLinkRetryStep() {
return new Promise((resolve, reject) => {
// There are multiple return options:
// - resolve(0): request resend to the same phone number
// - reject('user clicked cancel'): error out of the possession flow
// Prompt the user for the phone number.
// Typically, this is a page that is automatically closed or redirected
// once the `AuthFinish` function is called. We are simplifying it by
// requiring an input.
var input = confirm('Did you receive a text message?');
if (input) {
// If `OK`, close the modal.
return;
}
// Else `Cancel`, then resend to the same phone number.
resolve(0);
});
}
```
```typescript TypeScript theme={"dark"}
const instantLinkMultipleResendRetryStep: InstantLinkRetryStep = {
execute: async (): Promise => {
return new Promise((resolve, reject) => {
// There are multiple return options:
// - resolve(0): request resend to the same phone number
// - reject('user clicked cancel'): error out of the possession flow
// Prompt the user for the phone number.
// Typically, this is a page that is automatically closed or redirected
// once the `AuthFinish` function is called. We are simplifying it by
// requiring an input.
var input = confirm('Did you receive a text message?');
if (input) {
// If `OK`, close the modal.
return;
}
// Else `Cancel`, then resend to the same phone number.
resolve(InstantLinkResultType.OnResend);
});
},
};
```
Follow these instructions to allow the customer to re-enter their phone number. There is a max of three entries/send attempts.
Manual Request Required
To enable phone number change capabilities on your credentials, contact your Prove representative.
The start step is implemented the same as the previous tab:
```javascript JavaScript theme={"dark"}
function instantLinkStartStep(phoneNumberNeeded, phoneValidationError) {
return new Promise((resolve, reject) => {
// If no phone number is needed, then don't prompt the user.
if (!phoneNumberNeeded) {
resolve(null);
return;
}
// If error message is found around phone number, handle it.
// The `phoneValidationError` is ONLY available when `phoneNumberNeeded`
// has a value.
if (phoneValidationError) {
// Set to a variable and display it in a field.
// In this example, we don't do anything with the error.
var someErrorMessage = phoneValidationError.message;
}
// Prompt the user for the phone number.
var input = prompt('Enter phone number:');
if (input) {
// If the input is valid and the user clicked `OK`, return the phone
// number.
resolve({
phoneNumber: input,
});
} else {
// Else, exit the flow.
reject('phone invalid or user cancelled');
}
});
}
```
```typescript TypeScript theme={"dark"}
const instantLinkStartStep: InstantLinkStartStep = {
execute: async (
phoneNumberNeeded: boolean,
phoneValidationError?: PhoneValidationError
): Promise => {
return new Promise((resolve, reject) => {
// If no phone number is needed, then don't prompt the user.
if (!phoneNumberNeeded) {
resolve(null);
return;
}
// If error message is found around phone number, handle it.
// The `phoneValidationError` is ONLY available when `phoneNumberNeeded`
// has a value.
if (phoneValidationError) {
// Set to a variable and display it in a field.
// In this example, we don't do anything with the error.
var someErrorMessage = phoneValidationError.message;
}
// Prompt the user for the phone number.
var input = prompt('Enter phone number:');
if (input) {
// If the input is valid and the user clicked `OK`, return the phone
// number.
resolve({
phoneNumber: input,
} as InstantLinkStartInput);
} else {
// Else, exit the flow.
reject('phone invalid or user cancelled');
}
});
},
};
```
You can prompt for a new phone number by implementing the `InstantLinkRetryStep` interface, for example:
```javascript JavaScript theme={"dark"}
function instantLinkRetryStep() {
return new Promise((resolve, reject) => {
// There are multiple return options:
// - resolve(0): request resend to the same phone number
// - resolve(1): request phone number change/re-prompt
// - reject('user clicked cancel'): error out of the possession flow
// Prompt the user for the phone number.
// Typically, this is a page that is automatically closed or redirected
// once the `AuthFinish` function is called. We are simplifying it by
// requiring an input.
var input = confirm('Did you receive a text message?');
if (input) {
// If `OK`, close the modal.
return;
}
// Else `Cancel`, then trigger the instantLinkStartStep to re-prompt for
// phone number.
resolve(1);
});
}
```
```typescript TypeScript theme={"dark"}
const instantLinkPhoneChangeRetryStep: InstantLinkRetryStep = {
execute: async (): Promise => {
return new Promise((resolve, reject) => {
// There are multiple return options:
// - resolve(0): request resend to the same phone number
// - resolve(1): request phone number change/re-prompt
// - reject('user clicked cancel'): error out of the possession flow
// Prompt the user for the phone number.
// Typically, this is a page that is automatically closed or redirected
// once the `AuthFinish` function is called. We are simplifying it by
// requiring an input.
var input = confirm('Did you receive a text message?');
if (input) {
// If `OK`, close the modal.
return;
}
// Else `Cancel`, then trigger the instantLinkStartStep to re-prompt for
// phone number.
resolve(InstantLinkResultType.OnMobileNumberChange);
});
},
};
```
In the desktop flow, a WebSocket opens for three minutes on the desktop browser while waiting for the customer to select the link in the text message. Once clicked, the WebSocket closes and the `AuthFinishStep` function finishes.
If you're using [Content Security Policy headers](https://content-security-policy.com/), ensure you allow `wss: device.uat.proveapis.com` and `wss: device.proveapis.com`.
```java Java theme={"dark"}
// Object implementing AuthFinishStep interface
AuthFinishStep authFinishStep = new AuthFinishStep() {
...
};
// Objects implementing OtpStartStep/OtpFinishStep interfaces
OtpStartStep otpStartStep = new OtpStartStep() {
...
};
OtpFinishStep otpFinishStep = new OtpFinishStep() {
...
};
ProveAuth proveAuth = ProveAuth.builder()
.withAuthFinishStep(authId -> verify(authId)) // verify(authId) call defined in #Validate the Mobile Phone section
.withOtpFallback(otpStartStep, otpFinishStep)
.withContext(this)
.build();
```
The cellular data connection can sometimes be unavailable during testing. The `Builder` class offers a `withTestMode(boolean testMode)` method, which permits simulated successful session results while connected to a Wi-Fi network only (without a cellular data connection available). Testing using a Wi-Fi connection is useful in the Sandbox environment.
```java Java theme={"dark"}
ProveAuth proveAuth = ProveAuth.builder()
.withAuthFinishStep(authId -> verify(authId))
.withOtpFallback(otpStartStep, otpFinishStep)
.withContext(this)
.withTestMode(true) // Test mode flag
.build();
```
The `ProveAuth` object is thread safe. You can use it as a singleton. Most Prove Auth methods are blocking and therefore can't execute in the main application thread. The application employs an executor service with a minimum of two threads to manage threads due to the SDK's ability to process concurrent blocking requests.
```java Java theme={"dark"}
public class MyAuthenticator {
private final MyBackendClient backend = new MyBackendClient(); // Backend API client
private final AuthFinishStep authFinishStep = new AuthFinishStep() {
@Override
void execute(String authId) {
try {
AuthFinishResponse response = backend.authFinish("My App", authId);
... // Check the authentication status returned in the response
} catch (IOException e) {
String failureCause = e.getCause() != null ? e.getCause().getMessage() : "Failed to request authentication results";
// Authentication failed due to request failure
}
}
};
private ProveAuth proveAuth;
public MyAuthenticator(Context context) {
proveAuth = ProveAuth.builder()
.withAuthFinishStep(authFinishStep)
.withOtpFallback(otpStartStep, otpFinishStep)
.withContext(context)
.build();
}
public void authenticate() throws IOException, ProveAuthException {
AuthStartResponse response = backend.authStart("My Prove Auth App");
proveAuth.authenticate(response.getAuthToken());
}
}
```
## Configure OTP
To use the Resend/Retry/Phone Change features, you need to install the Android SDK version 6.5.0 or later.
To set the One-Time Password (OTP) handler, `withOtpFallback(otpStart: otpStartStep, otpFinish: otpFinishStep)`, requires implementing the `OtpStartStep` and `OtpFinishStep`.
The OTP session has a two minute timeout from when it's sent through SMS to when the customer can enter in the OTP.
Follow these instructions if you are implementing OTP and you are passing in the phone number on the `/v3/start` endpoint. In this case, you've already prompted for a phone number so you don't need to prompt for it in the client SDK.
Since you passed the phone number in the `Start()` function, call `OtpStartStepCallback.onSuccess(OtpStartInput);` to communicate to the SDK you have the customer's agreement to deliver the SMS message. Ensure you return an instance of `OtpStartInput` with empty string or `null` to `OtpStartStepCallback.onSuccess()` function.
```java Java theme={"dark"}
import com.prove.sdk.proveauth.OtpStartInput;
import com.prove.sdk.proveauth.OtpStartStep;
import com.prove.sdk.proveauth.OtpStartStepCallback;
import com.prove.sdk.proveauth.ProveAuthException;
public class NoPromptStart implements OtpStartStep {
@Override
public void execute(boolean phoneNumberNeeded, ProveAuthException otpException,
OtpStartStepCallback callback) {
// No phone number needed, no need to ask end user for input.
callback.onSuccess(new OtpStartInput(""));
}
}
```
Call the `OtpStartStepCallback.onError();` method to communicate to the SDK any issues while trying to obtain the phone number or the OTP. Report an error if the customer cancels the SMS transaction or presses the back button to leave the screen.
In the finish step, call the `OtpFinishStepCallback.onSuccess(OtpFinishInput);` method to return the collected OTP value wrapped in `OtpFinishInput`.
```java Java theme={"dark"}
import com.prove.sdk.proveauth.OtpFinishInput;
import com.prove.sdk.proveauth.OtpFinishStep;
import com.prove.sdk.proveauth.OtpFinishStepCallback;
import com.prove.sdk.proveauth.OtpValidationException;
import com.prove.sdk.proveauth.ProveAuthException;
public class NoPromptFinish implements OtpFinishStep {
@Override
public void execute(@Nullable ProveAuthException otpException,
OtpFinishStepCallback otpFinishStepCallback) {
// If error message is found, handle it.
if (otpException instanceof OtpValidationException) {
// Set to a variable and display it in a field.
// In this example, we don't do anything with the error.
String errorMsg = otpException.getMessage();
}
try {
// Prompt the user for OTP delivered by SMS. You can build UI to provide
// best UX based on your application and business logic, here we simplify to a
// generic function named promptForOtpCode which gives us the OTP code.
String otpCode = promptForOtpCode();
otpFinishStepCallback.onSuccess(new OtpFinishInput(otpCode));
} catch (Exception e) {
// if any issue with the OTP collection from the end user or the user wants to cancel
// then call onError to exit the flow. In this example we simplify it as catching
// an exception.
otpFinishStepCallback.onError();
}
}
}
```
Follow these instructions if implementing MobileAuth and collecting the phone number only if MobileAuth fails. This will implement OTP without allowing for SMS resends and phone number changes. If you do want those capabilities, please reference the subsequent tabs (Resend, Retry OTP, and Phone Number Change).
In the start step, call the `OtpStartStepCallback.onSuccess(OtpStartInput);` method to return the collected phone number to the SDK.
```java Java theme={"dark"}
import com.prove.sdk.proveauth.OtpStartInput;
import com.prove.sdk.proveauth.OtpStartStep;
import com.prove.sdk.proveauth.OtpStartStepCallback;
import com.prove.sdk.proveauth.PhoneNumberValidationException;
import com.prove.sdk.proveauth.ProveAuthException;
public class PromptStart implements OtpStartStep {
@Override
public void execute(boolean phoneNumberNeeded, @Nullable ProveAuthException otpException,
OtpStartStepCallback callback) {
// If phone number is needed, need to ask the end user for phone number input.
if (phoneNumberNeeded) {
// If error message is found around phone number, handle it.
// The `PhoneNumberValidationException` is ONLY available when `phoneNumberNeeded`
// has a value.
if (otpException instanceof PhoneNumberValidationException) {
// Set to a variable and display it in a field.
// In this example, we don't do anything with the error.
String errorMsg = otpException.getMessage();
}
try {
// Prompt the user for phone number to receive OTP SMS. You can build UI to provide
// best UX based on your application and business logic, here we simplify to a
// generic function named promptForPhoneNumber which gives us the collected
// phone number.
String phoneNumber = promptForPhoneNumber();
callback.onSuccess(new OtpStartInput(phoneNumber));
} catch (Exception e) {
// if any issue with the phone number collection from the end user or the user
// wants to cancel then call onError to exit the flow.
// In this example we simplify it as catching an exception.
callback.onError();
}
} else {
// No phone number needed, no need to ask end user for input.
callback.onSuccess(new OtpStartInput(""));
}
}
}
```
The finish step is implemented the same as the previous tab:
```java Java theme={"dark"}
import com.prove.sdk.proveauth.OtpFinishInput;
import com.prove.sdk.proveauth.OtpFinishStep;
import com.prove.sdk.proveauth.OtpFinishStepCallback;
import com.prove.sdk.proveauth.OtpValidationException;
import com.prove.sdk.proveauth.ProveAuthException;
public class NoPromptFinish implements OtpFinishStep {
@Override
public void execute(@Nullable ProveAuthException otpException,
OtpFinishStepCallback otpFinishStepCallback) {
// If error message is found, handle it.
if (otpException instanceof OtpValidationException) {
// Set to a variable and display it in a field.
// In this example, we don't do anything with the error.
String errorMsg = otpException.getMessage();
}
try {
// Prompt the user for OTP delivered by SMS. You can build UI to provide
// best UX based on your application and business logic, here we simplify to a
// generic function named promptForOtpCode which gives us the OTP code.
String otpCode = promptForOtpCode();
otpFinishStepCallback.onSuccess(new OtpFinishInput(otpCode));
} catch (Exception e) {
// if any issue with the OTP collection from the end user or the user wants to cancel
// then call onError to exit the flow. In this example we simplify it as catching
// an exception.
otpFinishStepCallback.onError();
}
}
}
```
Follow these instructions to allow the customer to request a new OTP via SMS using the same phone number. There is a max of three send attempts including the initial message.
The start step is implemented the same as the previous tab:
```java Java theme={"dark"}
import com.prove.sdk.proveauth.OtpStartInput;
import com.prove.sdk.proveauth.OtpStartStep;
import com.prove.sdk.proveauth.OtpStartStepCallback;
import com.prove.sdk.proveauth.PhoneNumberValidationException;
import com.prove.sdk.proveauth.ProveAuthException;
public class PromptStart implements OtpStartStep {
@Override
public void execute(boolean phoneNumberNeeded, @Nullable ProveAuthException otpException,
OtpStartStepCallback callback) {
// If phone number is needed, need to ask the end user for phone number input.
if (phoneNumberNeeded) {
// If error message is found around phone number, handle it.
// The `PhoneNumberValidationException` is ONLY available when `phoneNumberNeeded`
// has a value.
if (otpException instanceof PhoneNumberValidationException) {
// Set to a variable and display it in a field.
// In this example, we don't do anything with the error.
String errorMsg = otpException.getMessage();
}
try {
// Prompt the user for phone number to receive OTP SMS. You can build UI to provide
// best UX based on your application and business logic, here we simplify to a
// generic function named promptForPhoneNumber which gives us the collected
// phone number.
String phoneNumber = promptForPhoneNumber();
callback.onSuccess(new OtpStartInput(phoneNumber));
} catch (Exception e) {
// if any issue with the phone number collection from the end user or the user
// wants to cancel then call onError to exit the flow.
// In this example we simplify it as catching an exception.
callback.onError();
}
} else {
// No phone number needed, no need to ask end user for input.
callback.onSuccess(new OtpStartInput(""));
}
}
}
```
You can then send a new OTP SMS to the same phone number by implementing the finish step like this:
```java Java theme={"dark"}
import com.prove.sdk.proveauth.OtpFinishInput;
import com.prove.sdk.proveauth.OtpFinishStep;
import com.prove.sdk.proveauth.OtpFinishStepCallback;
import com.prove.sdk.proveauth.OtpValidationException;
import com.prove.sdk.proveauth.ProveAuthException;
public class MultipleResendFinish implements OtpFinishStep {
@Override
public void execute(@Nullable ProveAuthException otpException,
OtpFinishStepCallback otpFinishStepCallback) {
// If error message is found, handle it.
if (otpException instanceof OtpValidationException) {
// Set to a variable and display it in a field.
// In this example, we don't do anything with the error.
String errorMsg = otpException.getMessage();
}
// Prompt the user for whether they received the SMS.
if (promptForResend("Didn't receive the SMS OTP? Click resend button for a new one!")) {
// If the end user wants to send again to the same phone number call onOtpResend().
otpFinishStepCallback.onOtpResend();
return;
}
try {
// Prompt the user for OTP delivered by SMS. You can build UI to provide
// best UX based on your application and business logic, here we simplify to a
// generic function named promptForOtpCode which gives us the OTP code.
String otpCode = promptForOtpCode();
otpFinishStepCallback.onSuccess(new OtpFinishInput(otpCode));
} catch (Exception e) {
// if any issue with the OTP collection from the end user or the user wants to cancel
// then call onError to exit the flow. In this example we simplify it as catching
// an exception.
otpFinishStepCallback.onError();
}
}
}
```
Follow these instructions to allow the customer to re-enter the OTP PIN if they type it wrong. There is a max of 3 attempts. To implement this functionality, you also need to pass in `allowOTPRetry=true` to the `/v3/start` endpoint.
The start step is implemented the same as either of the the previous tabs - no client side code changes necessary:
```java Java theme={"dark"}
import com.prove.sdk.proveauth.OtpStartInput;
import com.prove.sdk.proveauth.OtpStartStep;
import com.prove.sdk.proveauth.OtpStartStepCallback;
import com.prove.sdk.proveauth.PhoneNumberValidationException;
import com.prove.sdk.proveauth.ProveAuthException;
public class PromptStart implements OtpStartStep {
@Override
public void execute(boolean phoneNumberNeeded, @Nullable ProveAuthException otpException,
OtpStartStepCallback callback) {
// If phone number is needed, need to ask the end user for phone number input.
if (phoneNumberNeeded) {
// If error message is found around phone number, handle it.
// The `PhoneNumberValidationException` is ONLY available when `phoneNumberNeeded`
// has a value.
if (otpException instanceof PhoneNumberValidationException) {
// Set to a variable and display it in a field.
// In this example, we don't do anything with the error.
String errorMsg = otpException.getMessage();
}
try {
// Prompt the user for phone number to receive OTP SMS. You can build UI to provide
// best UX based on your application and business logic, here we simplify to a
// generic function named promptForPhoneNumber which gives us the collected
// phone number.
String phoneNumber = promptForPhoneNumber();
callback.onSuccess(new OtpStartInput(phoneNumber));
} catch (Exception e) {
// if any issue with the phone number collection from the end user or the user
// wants to cancel then call onError to exit the flow.
// In this example we simplify it as catching an exception.
callback.onError();
}
} else {
// No phone number needed, no need to ask end user for input.
callback.onSuccess(new OtpStartInput(""));
}
}
}
```
The finish step is implemented the same as either of the the previous tabs - no client side code changes necessary. If the OTP is invalid, the finish step will be called again to prompt the user for a new input. Once the max attempts is reached, the `AuthFinish` function will be called.
```java Java theme={"dark"}
import com.prove.sdk.proveauth.OtpFinishInput;
import com.prove.sdk.proveauth.OtpFinishStep;
import com.prove.sdk.proveauth.OtpFinishStepCallback;
import com.prove.sdk.proveauth.OtpValidationException;
import com.prove.sdk.proveauth.ProveAuthException;
public class NoPromptFinish implements OtpFinishStep {
@Override
public void execute(@Nullable ProveAuthException otpException,
OtpFinishStepCallback otpFinishStepCallback) {
// If error message is found, handle it.
if (otpException instanceof OtpValidationException) {
// Set to a variable and display it in a field.
// In this example, we don't do anything with the error.
String errorMsg = otpException.getMessage();
}
try {
// Prompt the user for OTP delivered by SMS. You can build UI to provide
// best UX based on your application and business logic, here we simplify to a
// generic function named promptForOtpCode which gives us the OTP code.
String otpCode = promptForOtpCode();
otpFinishStepCallback.onSuccess(new OtpFinishInput(otpCode));
} catch (Exception e) {
// if any issue with the OTP collection from the end user or the user wants to cancel
// then call onError to exit the flow. In this example we simplify it as catching
// an exception.
otpFinishStepCallback.onError();
}
}
}
```
Follow these instructions to allow the customer to re-enter their phone number. There is a max of three entries/send attempts.
Manual Request Required
To enable phone number change capabilities on your credentials, contact your Prove representative.
The start step is implemented the same as the previous tab:
```java Java theme={"dark"}
import com.prove.sdk.proveauth.OtpStartInput;
import com.prove.sdk.proveauth.OtpStartStep;
import com.prove.sdk.proveauth.OtpStartStepCallback;
import com.prove.sdk.proveauth.PhoneNumberValidationException;
import com.prove.sdk.proveauth.ProveAuthException;
public class PromptStart implements OtpStartStep {
@Override
public void execute(boolean phoneNumberNeeded, @Nullable ProveAuthException otpException,
OtpStartStepCallback callback) {
// If phone number is needed, need to ask the end user for phone number input.
if (phoneNumberNeeded) {
// If error message is found around phone number, handle it.
// The `PhoneNumberValidationException` is ONLY available when `phoneNumberNeeded`
// has a value.
if (otpException instanceof PhoneNumberValidationException) {
// Set to a variable and display it in a field.
// In this example, we don't do anything with the error.
String errorMsg = otpException.getMessage();
}
try {
// Prompt the user for phone number to receive OTP SMS. You can build UI to provide
// best UX based on your application and business logic, here we simplify to a
// generic function named promptForPhoneNumber which gives us the collected
// phone number.
String phoneNumber = promptForPhoneNumber();
callback.onSuccess(new OtpStartInput(phoneNumber));
} catch (Exception e) {
// if any issue with the phone number collection from the end user or the user
// wants to cancel then call onError to exit the flow.
// In this example we simplify it as catching an exception.
callback.onError();
}
} else {
// No phone number needed, no need to ask end user for input.
callback.onSuccess(new OtpStartInput(""));
}
}
}
```
You can prompt for a new phone number by implementing the finish step like this:
```java Java theme={"dark"}
import com.prove.sdk.proveauth.OtpFinishInput;
import com.prove.sdk.proveauth.OtpFinishStep;
import com.prove.sdk.proveauth.OtpFinishStepCallback;
import com.prove.sdk.proveauth.OtpValidationException;
import com.prove.sdk.proveauth.ProveAuthException;
public class PhoneChangeFinish implements OtpFinishStep {
@Override
public void execute(@Nullable ProveAuthException otpException,
OtpFinishStepCallback otpFinishStepCallback) {
// If error message is found, handle it.
if (otpException instanceof OtpValidationException) {
// Set to a variable and display it in a field.
// In this example, we don't do anything with the error.
String errorMsg = otpException.getMessage();
}
// Prompt the user for whether they received the SMS.
if (promptForPhoneNumberChange("Didn't receive the SMS OTP? Try a different phone number.")) {
// If the end user wants to correct the phone number already in use, or changing to a
// different phone number to receive the future SMS OTP, call onMobileNumberChange(), and
// the otpStartStep will re-prompt for phone number input from the end user.
otpFinishStepCallback.onMobileNumberChange();
return;
}
try {
// Prompt the user for OTP delivered by SMS. You can build UI to provide
// best UX based on your application and business logic, here we simplify to a
// generic function named promptForOtpCode which gives us the OTP code.
String otpCode = promptForOtpCode();
otpFinishStepCallback.onSuccess(new OtpFinishInput(otpCode));
} catch (Exception e) {
// if any issue with the OTP collection from the end user or the user wants to cancel
// then call onError to exit the flow. In this example we simplify it as catching
// an exception.
otpFinishStepCallback.onError();
}
}
}
```
```swift Swift theme={"dark"}
// Object implementing ProveAuthFinishStep protocols
let finishStep = FinishAuthStep()
// Objects implementing OtpStartStep/OtpFinishStep protocols
let otpStartStep = MobileOtpStartStep()
let otpFinishStep = MobileOtpFinishStep()
let proveAuthSdk: ProveAuth
proveAuthSdk = ProveAuth.builder(authFinish: finishStep)
.withOtpFallback(otpStart: otpStartStep, otpFinish: otpFinishStep)
.build()
```
In the event a cellular data connection is unavailable during testing, use the Builder class. It permits simulated successful session results while connected to a Wi-Fi network. Testing using a Wi-Fi connection is useful in the Sandbox environment.
```swift Swift theme={"dark"}
proveAuthSdk = ProveAuth.builder(authFinish: finishStep)
.withMobileAuthTestMode() // Test mode flag
.build()
```
The Prove Auth object is thread safe and used as a singleton. Most Prove Auth methods are blocking and therefore can't execute in the main application thread. The application employs an executor service with a minimum of two threads to manage threads due to the SDK's ability to process concurrent blocking requests.
```swift Swift theme={"dark"}
// authToken retrieved from your server via StartAuthRequest
proveAuthSdk.authenticate(authToken) { error in
DispatchQueue.main.async {
self.messages.finalResultMessage = "ProveAuth.authenticate returned error: \(error.localizedDescription)"
print(self.messages.finalResultMessage)
}
}
```
## Configure OTP
To use the Resend/Retry/Phone Change features, you need to install the iOS SDK version 6.5.1 or later.
To set the One-Time Password (OTP) handler, `withOtpFallback(otpStart: otpStartStep, otpFinish: otpFinishStep)`, requires implementing the `OtpStartStep` and `OtpFinishStep`.
The OTP session has a two minute timeout from when it's sent through SMS to when the customer can enter in the OTP.
Follow these instructions if you are implementing OTP and you are passing in the phone number on the `/v3/start` endpoint. In this case, you've already prompted for a phone number so you don't need to prompt for it in the client SDK.
Since you passed the phone number in the `Start()` function, call `callback.onSuccess(input: nil)` to communicate to the SDK you have the customer's agreement to deliver the SMS message.
```swift Swift theme={"dark"}
import Foundation
import ProveAuth
import SwiftUI
class MobileOtpStartStep: OtpStartStep {
@ObservedObject var sheetObservable: SheetObservable
var callback: OtpStartStepCallback?
init(sheetObservable: SheetObservable) {
self.sheetObservable = sheetObservable
}
// Implement this method to handle phone number collection for SMS OTP,
// or to obtain user confirmation for initiating an SMS message.
func execute(
phoneNumberNeeded: Bool, phoneValidationError: ProveAuthError?, callback: OtpStartStepCallback
) {
self.callback = callback
// Since no phone number is needed, don't prompt the user.
callback.onSuccess(input: nil)
}
}
```
Call the `callback.onError()` method to communicate to the SDK any issues while trying to obtain the phone number or the OTP. Report an error if the customer cancels the SMS transaction or presses the back button to leave the screen.
```swift Swift theme={"dark"}
import Foundation
import SwiftUI
import ProveAuth
class MobileOtpFinishStep: OtpFinishStep {
@ObservedObject var sheetObservable: SheetObservable
var callback: OtpFinishStepCallback?
init(sheetObservable: SheetObservable){
self.sheetObservable = sheetObservable
}
// Implement this method to collect the OTP value delivered via SMS.
func execute(otpError: ProveAuthError?, callback: OtpFinishStepCallback) {
self.callback = callback
// Handle the OTP validation error if present.
if case .otpValidationError = otpError {
print("found otpError: \(String(describing: otpError?.localizedDescription))")
// Signal to your UI components that the last provided OTP is invalid
self.sheetObservable.otpError = true
} else {
self.sheetObservable.otpError = false
}
// Signal to UI components to display OtpFinishView
DispatchQueue.main.async {
self.sheetObservable.isOtpFinishActive = true
}
}
// Provide the collected OTP value to the SDK for validation.
func handleOtp(_ otp: String) {
guard let callback = self.callback else {
print("Error: OtpFinishStepCallback is not set ")
return
}
let otpFinishInput = OtpFinishInput(otp: otp)
callback.onSuccess(input: otpFinishInput)
}
// Notify the SDK of any issues encountered while obtaining the OTP value or if the user cancels the OTP flow.
func handleOtpFinishError() {
guard let callback = self.callback else {
print("Error: OtpFinishStepCallback is not set ")
return
}
callback.onError()
}
}
```
Follow these instructions if implementing MobileAuth and collecting the phone number only if MobileAuth fails. This will implement OTP without allowing for SMS resends and phone number changes. If you do want those capabilities, please reference the subsequent tabs (Resend, Retry OTP, and Phone Number Change).
In the start step, call the `callback.onSuccess(input: otpStartInput)` method to return the collected phone number to the SDK.
```swift Swift theme={"dark"}
import Foundation
import ProveAuth
import SwiftUI
class MobileOtpStartStep: OtpStartStep {
@ObservedObject var sheetObservable: SheetObservable
var callback: OtpStartStepCallback?
init(sheetObservable: SheetObservable) {
self.sheetObservable = sheetObservable
}
func execute(
phoneNumberNeeded: Bool, phoneValidationError: ProveAuthError?, callback: OtpStartStepCallback
) {
self.callback = callback
if !phoneNumberNeeded {
// If no phone number is needed, then don't prompt the user.
callback.onSuccess(input: nil)
} else {
DispatchQueue.main.async {
// If a phone number validation error is detected, ensure it is handled to provide feedback to the user.
if case .phoneNumberValidationError = phoneValidationError {
print(
"found phoneValidationError: \(String(describing: phoneValidationError?.localizedDescription))"
)
// Update UI components to display OtpStartView with the phone number validation error.
self.sheetObservable.isPhoneValidationError = true
} else {
self.sheetObservable.isPhoneValidationError = false
}
// Update UI components to display OtpStartView if a phone number is needed.
self.sheetObservable.isOtpStartActive = true
}
}
}
// Return collected phone number to the SDK
func handlePhoneNumber(phoneNumber: String) {
guard let callback = self.callback else {
print("Error: OtpStartStepCallback is not set ")
return
}
let otpStartInput = OtpStartInput(phoneNumber: phoneNumber)
// This is how you pass collected phone number to SDK
callback.onSuccess(input: otpStartInput)
}
// Communicate any issues encountered while trying to obtain the phone number to the SDK.
// Error should be reported if the customer explicitly cancels the SMS OTP transaction
// or presses the back button to exit out the SMS OTP start step screen.
func handleOtpStartError() {
guard let callback = self.callback else {
print("Error: OtpStartStepCallback is not set ")
return
}
callback.onError()
}
}
```
The finish step is implemented the same as the previous tab:
```swift Swift theme={"dark"}
import Foundation
import SwiftUI
import ProveAuth
class MobileOtpFinishStep: OtpFinishStep {
@ObservedObject var sheetObservable: SheetObservable
var callback: OtpFinishStepCallback?
init(sheetObservable: SheetObservable){
self.sheetObservable = sheetObservable
}
// Implement this method to collect the OTP value delivered via SMS.
func execute(otpError: ProveAuthError?, callback: OtpFinishStepCallback) {
self.callback = callback
// Handle the OTP validation error if present.
if case .otpValidationError = otpError {
print("found otpError: \(String(describing: otpError?.localizedDescription))")
// Signal to your UI components that the last provided OTP is invalid
self.sheetObservable.otpError = true
} else {
self.sheetObservable.otpError = false
}
// Signal to UI components to display OtpFinishView
DispatchQueue.main.async {
self.sheetObservable.isOtpFinishActive = true
}
}
// Provide the collected OTP value to the SDK for validation.
func handleOtp(_ otp: String) {
guard let callback = self.callback else {
print("Error: OtpFinishStepCallback is not set ")
return
}
let otpFinishInput = OtpFinishInput(otp: otp)
callback.onSuccess(input: otpFinishInput)
}
// Notify the SDK of any issues encountered while obtaining the OTP value or if the user cancels the OTP flow.
func handleOtpFinishError() {
guard let callback = self.callback else {
print("Error: OtpFinishStepCallback is not set ")
return
}
callback.onError()
}
}
```
Follow these instructions to allow the customer to request a new OTP via SMS using the same phone number. There is a max of three send attempts including the initial message.
The start step is implemented the same as the previous tab:
```swift Swift theme={"dark"}
import Foundation
import ProveAuth
import SwiftUI
class MobileOtpStartStep: OtpStartStep {
@ObservedObject var sheetObservable: SheetObservable
var callback: OtpStartStepCallback?
init(sheetObservable: SheetObservable) {
self.sheetObservable = sheetObservable
}
func execute(
phoneNumberNeeded: Bool, phoneValidationError: ProveAuthError?, callback: OtpStartStepCallback
) {
self.callback = callback
if !phoneNumberNeeded {
// If no phone number is needed, then don't prompt the user.
callback.onSuccess(input: nil)
} else {
DispatchQueue.main.async {
// If a phone number validation error is detected, ensure it is handled to provide feedback to the user.
if case .phoneNumberValidationError = phoneValidationError {
print(
"found phoneValidationError: \(String(describing: phoneValidationError?.localizedDescription))"
)
// Update UI components to display OtpStartView with the phone number validation error.
self.sheetObservable.isPhoneValidationError = true
} else {
self.sheetObservable.isPhoneValidationError = false
}
// Update UI components to display OtpStartView if a phone number is needed.
self.sheetObservable.isOtpStartActive = true
}
}
}
// Return collected phone number to the SDK
func handlePhoneNumber(phoneNumber: String) {
guard let callback = self.callback else {
print("Error: OtpStartStepCallback is not set ")
return
}
let otpStartInput = OtpStartInput(phoneNumber: phoneNumber)
// This is how you pass collected phone number to SDK
callback.onSuccess(input: otpStartInput)
}
// Communicate any issues encountered while trying to obtain the phone number to the SDK.
// Error should be reported if the customer explicitly cancels the SMS OTP transaction
// or presses the back button to exit out the SMS OTP start step screen.
func handleOtpStartError() {
guard let callback = self.callback else {
print("Error: OtpStartStepCallback is not set ")
return
}
callback.onError()
}
}
```
You can then send a new OTP SMS to the same phone number by implementing the finish step like this:
```swift Swift theme={"dark"}
import Foundation
import SwiftUI
import ProveAuth
class MobileOtpFinishStep: OtpFinishStep {
@ObservedObject var sheetObservable: SheetObservable
var callback: OtpFinishStepCallback?
init(sheetObservable: SheetObservable){
self.sheetObservable = sheetObservable
}
// Implement this method to collect the OTP value delivered in the SMS message.
func execute(otpError: ProveAuthError?, callback: OtpFinishStepCallback) {
self.callback = callback
// Handle the OTP validation error if present.
if case .otpValidationError = otpError {
print("found otpError: \(String(describing: otpError?.localizedDescription))")
// Update your UI to indicate that the provided OTP is invalid
self.sheetObservable.otpError = true
} else {
self.sheetObservable.otpError = false
}
// Update your UI to display the OtpFinishView
DispatchQueue.main.async {
self.sheetObservable.isOtpFinishActive = true
}
}
// Return the OTP value to the SDK
func handleOtp(_ otp: String) {
guard let callback = self.callback else {
print("Error: OtpFinishStepCallback is not set ")
return
}
let otpFinishInput = OtpFinishInput(otp: otp)
callback.onSuccess(input: otpFinishInput)
}
// Communicate to the SDK any issues when host app trys to obtain the OTP value
// or when users cancel the OTP flow
func handleOtpFinishError() {
guard let callback = self.callback else {
print("Error: OtpFinishStepCallback is not set ")
return
}
callback.onError()
}
// Call this method to request a new OTP code for the same mobile number.
func sendNewOtp() {
guard let callback = self.callback else {
print("Error: OtpFinishStepCallback is not set ")
return
}
callback.onOtpResend()
}
}
```
Follow these instructions to allow the customer to re-enter the OTP PIN if they type it wrong. There is a max of 3 attempts. To implement this functionality, you also need to pass in `allowOTPRetry=true` to the `/v3/start` endpoint.
The start step is implemented the same as either of the the previous tabs - no client side code changes necessary:
```swift Swift theme={"dark"}
import Foundation
import ProveAuth
import SwiftUI
class MobileOtpStartStep: OtpStartStep {
@ObservedObject var sheetObservable: SheetObservable
var callback: OtpStartStepCallback?
init(sheetObservable: SheetObservable) {
self.sheetObservable = sheetObservable
}
func execute(
phoneNumberNeeded: Bool, phoneValidationError: ProveAuthError?, callback: OtpStartStepCallback
) {
self.callback = callback
if !phoneNumberNeeded {
// If no phone number is needed, then don't prompt the user.
callback.onSuccess(input: nil)
} else {
DispatchQueue.main.async {
// If a phone number validation error is detected, ensure it is handled to provide feedback to the user.
if case .phoneNumberValidationError = phoneValidationError {
print(
"found phoneValidationError: \(String(describing: phoneValidationError?.localizedDescription))"
)
// Update UI components to display OtpStartView with the phone number validation error.
self.sheetObservable.isPhoneValidationError = true
} else {
self.sheetObservable.isPhoneValidationError = false
}
// Update UI components to display OtpStartView if a phone number is needed.
self.sheetObservable.isOtpStartActive = true
}
}
}
// Return collected phone number to the SDK
func handlePhoneNumber(phoneNumber: String) {
guard let callback = self.callback else {
print("Error: OtpStartStepCallback is not set ")
return
}
let otpStartInput = OtpStartInput(phoneNumber: phoneNumber)
// This is how you pass collected phone number to SDK
callback.onSuccess(input: otpStartInput)
}
// Communicate any issues encountered while trying to obtain the phone number to the SDK.
// Error should be reported if the customer explicitly cancels the SMS OTP transaction
// or presses the back button to exit out the SMS OTP start step screen.
func handleOtpStartError() {
guard let callback = self.callback else {
print("Error: OtpStartStepCallback is not set ")
return
}
callback.onError()
}
}
```
The finish step is implemented the same as either of the the previous tabs - no client side code changes necessary. If the OTP is invalid, the finish step will be called again to prompt the user for a new input. Once the max attempts is reached, the `AuthFinish` function will be called.
```swift Swift theme={"dark"}
import Foundation
import SwiftUI
import ProveAuth
class MobileOtpFinishStep: OtpFinishStep {
@ObservedObject var sheetObservable: SheetObservable
var callback: OtpFinishStepCallback?
init(sheetObservable: SheetObservable){
self.sheetObservable = sheetObservable
}
// Implement this method to collect the OTP value delivered via SMS.
func execute(otpError: ProveAuthError?, callback: OtpFinishStepCallback) {
self.callback = callback
// Handle the OTP validation error if present.
if case .otpValidationError = otpError {
print("found otpError: \(String(describing: otpError?.localizedDescription))")
// Signal to your UI components that the last provided OTP is invalid
self.sheetObservable.otpError = true
} else {
self.sheetObservable.otpError = false
}
// Signal to UI components to display OtpFinishView
DispatchQueue.main.async {
self.sheetObservable.isOtpFinishActive = true
}
}
// Provide the collected OTP value to the SDK for validation.
func handleOtp(_ otp: String) {
guard let callback = self.callback else {
print("Error: OtpFinishStepCallback is not set ")
return
}
let otpFinishInput = OtpFinishInput(otp: otp)
callback.onSuccess(input: otpFinishInput)
}
// Notify the SDK of any issues encountered while obtaining the OTP value or if the user cancels the OTP flow.
func handleOtpFinishError() {
guard let callback = self.callback else {
print("Error: OtpFinishStepCallback is not set ")
return
}
callback.onError()
}
}
```
Follow these instructions to allow the customer to re-enter their phone number. There is a max of three entries/send attempts.
Manual Request Required
To enable phone number change capabilities on your credentials, contact your Prove representative.
The start step is implemented the same as the previous tab:
```swift Swift theme={"dark"}
import Foundation
import ProveAuth
import SwiftUI
class MobileOtpStartStep: OtpStartStep {
@ObservedObject var sheetObservable: SheetObservable
var callback: OtpStartStepCallback?
init(sheetObservable: SheetObservable) {
self.sheetObservable = sheetObservable
}
func execute(
phoneNumberNeeded: Bool, phoneValidationError: ProveAuthError?, callback: OtpStartStepCallback
) {
self.callback = callback
if !phoneNumberNeeded {
// If no phone number is needed, then don't prompt the user.
callback.onSuccess(input: nil)
} else {
DispatchQueue.main.async {
// If a phone number validation error is detected, ensure it is handled to provide feedback to the user.
if case .phoneNumberValidationError = phoneValidationError {
print(
"found phoneValidationError: \(String(describing: phoneValidationError?.localizedDescription))"
)
// Update UI components to display OtpStartView with the phone number validation error.
self.sheetObservable.isPhoneValidationError = true
} else {
self.sheetObservable.isPhoneValidationError = false
}
// Update UI components to display OtpStartView if a phone number is needed.
self.sheetObservable.isOtpStartActive = true
}
}
}
// Return collected phone number to the SDK
func handlePhoneNumber(phoneNumber: String) {
guard let callback = self.callback else {
print("Error: OtpStartStepCallback is not set ")
return
}
let otpStartInput = OtpStartInput(phoneNumber: phoneNumber)
// This is how you pass collected phone number to SDK
callback.onSuccess(input: otpStartInput)
}
// Communicate any issues encountered while trying to obtain the phone number to the SDK.
// Error should be reported if the customer explicitly cancels the SMS OTP transaction
// or presses the back button to exit out the SMS OTP start step screen.
func handleOtpStartError() {
guard let callback = self.callback else {
print("Error: OtpStartStepCallback is not set ")
return
}
callback.onError()
}
}
```
You can prompt for a new phone number by implementing the finish step like this:
```swift Swift theme={"dark"}
import Foundation
import SwiftUI
import ProveAuth
class MobileOtpFinishStep: OtpFinishStep {
@ObservedObject var sheetObservable: SheetObservable
var callback: OtpFinishStepCallback?
init(sheetObservable: SheetObservable){
self.sheetObservable = sheetObservable
}
// Implement this method to collect the OTP value delivered via SMS.
func execute(otpError: ProveAuthError?, callback: OtpFinishStepCallback) {
self.callback = callback
// Handle the OTP validation error if present.
if case .otpValidationError = otpError {
print("found otpError: \(String(describing: otpError?.localizedDescription))")
// Update your UI to indicate that the provided OTP is invalid.
self.sheetObservable.otpError = true
} else {
self.sheetObservable.otpError = false
}
// Update your UI to display the OTP finish view.
DispatchQueue.main.async {
self.sheetObservable.isOtpFinishActive = true
}
}
// Return the collected OTP value to the SDK.
func handleOtp(_ otp: String) {
guard let callback = self.callback else {
print("Error: OtpFinishStepCallback is not set ")
return
}
let otpFinishInput = OtpFinishInput(otp: otp)
callback.onSuccess(input: otpFinishInput)
}
// When callback.onMobileNumberChange() is evoked, OtpStartStep will be re-initiated
// so that end-users can enter a different phone number via OtpStartStep.
func handleMobileNumberChange() {
guard let callback = self.callback else {
print("Error: OtpFinishStepCallback is not set")
return
}
callback.onMobileNumberChange()
}
}
```
In the `AuthFinishStep`, you'll specify a function to call once the possession checks complete on the mobile phone. This endpoint on your back end server calls the `UnifyStatus()` function to validate the phone number. The `AuthFinishStep` then completes.
```go Go theme={"dark"}
rspUnifyStatus, err := client.V3.V3UnifyStatusRequest(context.TODO(), &components.V3UnifyStatusRequest{
CorrelationID: rspUnify.V3UnifyResponse.CorrelationID,
})
if err != nil {
return fmt.Errorf("error on UnifyStatus(): %w", err)
}
```
```typescript TypeScript theme={"dark"}
const rspUnifyStatus = await sdk.v3.v3UnifyStatusRequest({
correlationId: rspUnify.v3UnifyResponse?.correlationId || '',
},
});
if (!rspUnifyStatus) {
console.error("Unify Status error.")
return
}
```
```java Java theme={"dark"}
V3UnifyStatusRequest req = V3UnifyStatusRequest.builder()
.correlationId("713189b8-5555-4b08-83ba-75d08780aebd")
.build();
V3UnifyStatusResponse res = sdk.v3().v3UnifyStatusRequest()
.request(req)
.call();
// You may want to use the .get() method when working with the response object.
```
The function returns the following fields:
* `success`: either `true` if the mobile number validation was successful, or `false` if it failed.
* `phoneNumber`: the phone number associated with the possession check.
* `clientHumanId`: a client-generated unique ID to identify a specific customer across business lines.
* `clientRequestId`: a client-generated unique ID for a specific session. This can be used to identify specific requests.
* `deviceId`: the unique identifier for the Prove Key on the device.
* `evaluation`: the evaluation result for the Global Fraud Policy.
* `proveId`: a unique ID to identify a specific customer obtained from a successful possession check.
You can then respond to the front end with the results of the authentication.
Only mobile channels are supported for this flow.
You need to send a request to your back end server with the phone number and `possessionType=none` to start the flow.
Additional parameters:
* `finalTargetURL`: required when `flowType=desktop`. This should be a URL you maintain. Once the customer clicks the Instant Link, they will be redirected to this URL. It should instruct the customer to continue the workflow. Maximum length is 128 characters.
* `checkReputation`: if true, TrustScore verification will be performed.
* `clientHumanId`: a client-generated unique ID to identify a specific customer across business lines.
* `smsMessage`: optional field to customize the message body sent in the Instant Link or OTP SMS message. Otherwise, you can use Prove defaults.
* `clientCustomerId`: a client-generated unique ID for a specific customer. You can link calls related to the same customer, across different requests or sessions. The client defines the format of this ID.
* `deviceId`: the unique identifier for the Prove Key on the device.
* `emailAddress`: the email address of the customer.
* `ipAddress`: the IP address of the customer.
* `proveId`: a unique ID to identify a specific customer obtained from a previous successful authentication.
* `rebind`: if `true`, rebinds the Prove Key with the newly verified phone number.
* `allowOTPRetry`: set to `true` to allow the customer to re-enter the OTP up to three times. Defaults to `false`.
For OTP retries, make sure to implement client SDK changes in the next step.
```go Go theme={"dark"}
// Send the Unify request.
rspUnify, err := client.V3.V3UnifyRequest(ctx, &components.V3UnifyRequest{
PhoneNumber: "2001004014",
PossessionType: "mobile",
})
if err != nil {
t.Fatal(err)
}
```
```typescript TypeScript theme={"dark"}
let unifyReq = {
phoneNumber: '2001004014',
possessionType: 'mobile'
}
// Send the Unify request.
const rspUnify = await sdk.v3.v3UnifyRequest(unifyReq);
if (!rspUnify) {
console.error("Unify error.")
return
}
```
```java Java theme={"dark"}
// Send the Unify request.
V3UnifyRequest req = V3UnifyRequest.builder()
.phoneNumber("2001004014")
.possessionType("mobile")
.build();
// You may want to use the .get() method when working with the response object.
```
```csharp .NET theme={"dark"}
using Prove.Proveapi;
using Prove.Proveapi.Models.Components;
var sdk = new ProveAPI(auth: "");
V3StartRequest req = new V3UnifyRequest() {
PhoneNumber = "2001004014",
PossessionType = "mobile",
};
var res = await sdk.V3.V3StartRequestAsync(req);
```
The function returns the following fields:
* `authToken`: send this to your client-side code to pass into the `Authenticate()` function - it’s a short lived JSON Web Token (JWT) tied to the current flow and used for the possession checks.
* `correlationId`: save this in your current session, then pass it in to the `UnifyStatus()` function call of the same flow. The correlation ID ties together different system calls for the same Prove flow. It also aids in troubleshooting. The session expires in 15 minutes from when the correlation ID returns from the `Unify()` call.
* `success`: will return `pending` for this initial call.
Return the `authToken` in a response to the front end.
Initialize the client-side SDK to place a Prove key on the device or to check if a Prove key is bound.
```javascript JavaScript theme={"dark"}
async function authenticate(isMobileWeb, authToken) {
// Set up the authenticator for the mobile flow.
let builder = new proveAuth.AuthenticatorBuilder();
builder = builder
.withAuthFinishStep((input) => verify(input.authId));
const authenticator = builder.build();
// Authenticate with the authToken.
return authenticator.authenticate(authToken);
}
```
```typescript TypeScript theme={"dark"}
async function authenticate(isMobileWeb: boolean, authToken: string) {
// Set up the authenticator for the mobile flow.
let builder = new proveAuth.AuthenticatorBuilder();
builder = builder
.withAuthFinishStep((input) => verify(input.authId));
const authenticator = builder.build();
// Authenticate with the authToken.
return authenticator.authenticate(authToken);
}
```
In the `AuthFinishStep` of the client SDK, you'll need to have the function make a call to an endpoint on your back end server. Your backend server should then call the `UnifyStatus()` function to validate the phone number. The `AuthFinishStep` then completes.
```go Go theme={"dark"}
rspUnifyStatus, err := client.V3.V3UnifyStatusRequest(context.TODO(), &components.V3UnifyStatusRequest{
CorrelationID: rspUnify.V3UnifyResponse.CorrelationID,
})
if err != nil {
return fmt.Errorf("error on UnifyStatus(): %w", err)
}
```
```typescript TypeScript theme={"dark"}
const rspUnifyStatus = await sdk.v3.v3UnifyStatusRequest({
correlationId: rspUnify.v3UnifyResponse?.correlationId || '',
},
});
if (!rspUnifyStatus) {
console.error("Unify Status error.")
return
}
```
```java Java theme={"dark"}
V3UnifyStatusRequest req = V3UnifyStatusRequest.builder()
.correlationId("713189b8-5555-4b08-83ba-75d08780aebd")
.build();
V3UnifyStatusResponse res = sdk.v3().v3UnifyStatusRequest()
.request(req)
.call();
// You may want to use the .get() method when working with the response object.
```
The function returns the following fields:
* `success`: either `possession_required` if the reputation check was successful, or `false` if it failed.
* `phoneNumber`: the phone number associated with the possession check.
* `clientHumanId`: a client-generated unique ID to identify a specific customer across business lines.
* `clientRequestId`: a client-generated unique ID for a specific session. This can be used to identify specific requests.
* `deviceId`: the unique identifier for the Prove Key on the device.
* `evaluation`: the evaluation result for the Global Fraud Policy.
* `proveId`: a unique ID to identify a specific customer obtained from a successful possession check.
You can then respond to the front end with the results of the authentication.
If possession is required, your application needs to perform a customer-supplied possession check such as SMS OTP.
Call `UnifyBind()` after `UnifyStatus()` returns `success=possession_required`. Ensure your own possession check has succeeded. This binds the phone number to the Prove Key for future authentications.
This function takes these required parameters:
* `correlationId`: the ID returned by the `Unify()` function.
* `phoneNumber`: the phone number to bind to the Prove Key.
* `clientRequestId`: a client-generated unique ID for a specific session. This can be used to identify specific requests.
```go Go theme={"dark"}
rspUnifyBind, err := client.V3.V3UnifyBindRequest(context.TODO(), &components.V3UnifyBindRequest{
CorrelationID: rspUnify.V3UnifyResponse.CorrelationID,
PhoneNumber: "2001004018",
})
if err != nil {
return fmt.Errorf("error on UnifyBind(): %w", err)
}
```
```typescript TypeScript theme={"dark"}
const rspUnifyBind = await sdk.v3.v3UnifyBindRequest({
correlationId: rspUnify.v3UnifyResponse?.correlationId || '',
phoneNumber: '2001004018',
},
});
if (!rspUnifyBind) {
console.error("Unify Bind error.")
return
}
```
```java Java theme={"dark"}
V3UnifyBindRequest req = V3UnifyBindRequest.builder()
.correlationId("713189b8-5555-4b08-83ba-75d08780aebd")
.phoneNumber("2001004018")
.build();
V3UnifyBindResponse res = sdk.v3().v3UnifyBindRequest()
.request(req)
.call();
// You may want to use the .get() method when working with the response object.
```
The function returns the following fields:
* `success`: `true` if the binding succeeded, `false` if it failed.
* `phoneNumber`: the phone number that was bound to the Prove Key.
* `clientHumanId`: a client-generated unique ID to identify a specific customer across business lines.
* `clientRequestId`: a client-generated unique ID for a specific session. This can be used to identify specific requests.
* `deviceId`: the unique identifier for the Prove Key on the device.
* `evaluation`: the evaluation result for the Global Fraud Policy.
## Test your Prove implementation
Next, reference the Sandbox test scenarios to test users and simulate different behaviors encountered in production.
Production Launch
To launch in Production, please contact your Prove representative.
Prove Key Behavior
The following are things to be aware of when using the Prove Key:
The Prove Key is ignored and Instant Link is performed.
If you send a different phone number to /unify than the one registered to the Prove key, you will receive `success=false` when calling /unify-status. This is because the Prove Key is bound to a different number. Run the flow again with `rebind=true` in the /unify endpoint. This will force a full possession check and then, if valid, will rebind the Prove Key to the new phone number.
If you send a different phone number to /unify than the one registered to the Prove key, the customer will receive `possession_required` on the /unify-status call. You will need to call /unify-bind to rebind the Prove Key to the new number. Once it's rebound, the previous number will ask for `possession_required`. The Prove key only supports one phone number.
***
## Sandbox testing
### Test users list
Follow the [Testing Steps](#testing-steps) for expected behavior per step.
| Phone Number | First Name | Last Name |
| :----------- | :--------- | :-------- |
| 2001004014 | Lorant | Nerger |
| 2001004017 | Jesse | Mashro |
| Phone Number | First Name | Last Name |
| :----------- | :--------- | :-------- |
| +2001004025 | Bertie | Fremont |
| +2001004028 | Wendy | Strover |
### Testing steps
Now that you’ve done client-side, server-side, and CX implementation, test using the test users.
Follow the steps below to test the Prove Unified Authentication flow with Lorant Nerger on desktop. This user will pass the entire Unified Authentication flow using Prove's possession and return `success=true` in the /unify-status response.
Start the onboarding flow on the initial screen and enter the phone number for Lorant Nerger.
Your front end will send the phone number, possession type, and final target URL to the back end. Your back end will then send the phone number to the /unify endpoint. The response will provide an auth token, correlation ID, and `success=pending` because possession still needs to be performed.
Your back end will send the `authToken` to the front end. The front end will run Instant Link handling.
 Once the front end finishes the possession check, the back end calls the /unify-status endpoint with the correlation ID to validate the phone number. The response provides:
* `proveId` that is tied to this user.
* `success=true`
* `phoneNumber` that was initially passed.
You have a successful flow but no device ID is placed as it only applies to mobile devices. Send the user on through your authenticated flow.
Follow the steps below to test the Prove Unified Authentication flow with Lorant Nerger on mobile. This user will fail Mobile Auth but pass OTP and return `success=true` in the /unify-status response. The user can then be sent through the Prove Unified Authentication flow again using the same phone number with a Prove key, bypassing possession.
Start the onboarding flow on the initial screen and enter the phone number for Lorant Nerger.
Your front end will send the phone number and possession type to the back end. Your back end will then send the phone number to the /unify endpoint. The response will provide an auth token, correlation ID, and `success=pending` because possession still needs to be performed.
Your back end will send the `authToken` to the front end. The front end will run OTP handling. You will see the following page. Enter 1234 to simulate a successful OTP.
Once the front end finishes the possession check, the back end calls the /unify-status endpoint with the correlation ID to validate the phone number. The response provides:
* `proveId` that is tied to this user.
* `success=true`
* `phoneNumber` that was initially passed.
You have a successful flow but no device ID is placed as it only applies to mobile devices. Send the user on through your authenticated flow.
Follow the steps below to test the Prove Unified Authentication flow with Lorant Nerger on mobile. This user will fail Mobile Auth but pass OTP and return `success=true` in the /unify-status response. The user can then be sent through the Prove Unified Authentication flow again using the same phone number with a Prove key, bypassing possession.
Start the onboarding flow on the initial screen and enter the phone number for Lorant Nerger.
Your front end will send the phone number and possession type to the back end. Your back end will then send the phone number to the /unify endpoint. The response will provide an auth token, correlation ID, and `success=pending` because possession still needs to be performed.
Your back end will send the `authToken` to the front end. The front end will run OTP handling. You will see the following page. Enter 1234 to simulate a successful OTP.
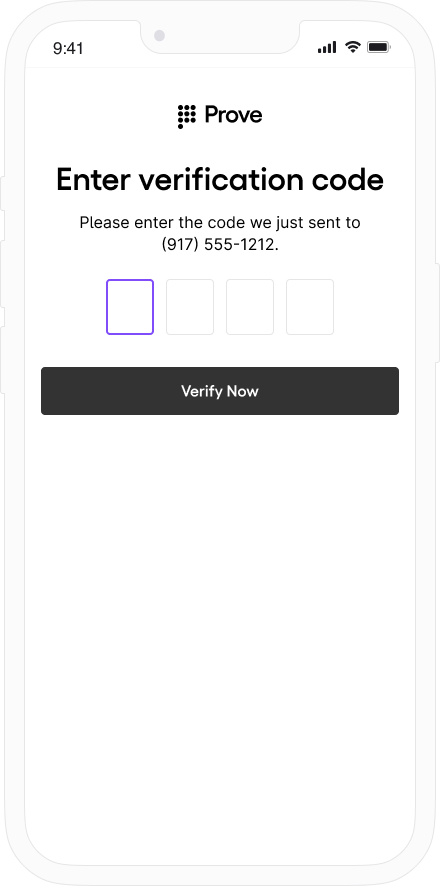 Once the front end finishes the possession check, the back end calls the /unify-status endpoint with the correlation ID to validate the phone number. The response provides:
* `deviceId` that's an external identifier of the Prove ID.
* `proveId` that is tied to this user.
* `success=true`
* `phoneNumber` that was initially passed.
You have a successful flow and a Prove key has been assigned to this phone number. Sending this user through again will bypass the possession check due to the Prove key. Send the user on through your authenticated flow.
Follow the steps below to test the Prove Unified Authentication flow with Lorant Nerger using customer-supplied possession. This user will pass the entire Unified Authentication flow using the customer's possession and return `success=true` in the /unify-bind response. The user can then be sent through the Prove Unified Authentication flow again using the same phone number with a Prove key, bypassing possession.
Start the onboarding flow on the initial screen and enter the phone number for Lorant Nerger.
Your front end will send the phone number and possession type to the back end. Your back end will then send the phone number to the /unify endpoint. The response will provide an auth token, correlation ID, and `success=pending` because possession still needs to be performed.
The back end then calls the /unify-status endpoint with the correlation ID to validate the phone number. The response provides:
* `success=possession_required` since Prove is not performing the possession check.
The back end will then call the /unify-bind endpoint with the correlation ID. The response provides:
* `proveId` that is tied to this user.
* `success=true`
* `phoneNumber` that was initially passed.
You have a successful flow and a Prove key has been assigned to this phone number. Sending this user through again will bypass the possession check due to the Prove key. Send the user on through your authenticated flow.
Follow the steps below to test the Prove Unified Authentication flow with Jesse Mashiro on desktop. This user will fail the Unified Authentication flow using Prove's possession and return `success=false` in the /unify-status response.
Start the onboarding flow on the initial screen and enter the phone number for Jesse Mashru.
Your front end will send the phone number, possession type, and final target URL to the back end. Your back end will then send the phone number to the /unify endpoint. The response will provide an auth token, correlation ID, and `success=pending` because possession still needs to be performed.
Your back end will send the `authToken` to the front end. The front end will run Instant Link handling. This user fails Instant Link.
Once the front end finishes the possession check, the back end calls the /unify-status endpoint with the correlation ID to validate the phone number. The response provides:
* `success=false`
* `phoneNumber` that was initially passed.
The test user failed. Send the user through your exception process.
Follow the steps below to test the Prove Unified Authentication flow with Jesse Mashro on mobile. This user will pass Mobile Auth and return `success=true` in the /unify-status response. The user can then be sent through the Prove Unified Authentication flow again using the same phone number with a Prove key, bypassing possession.
Start the onboarding flow on the initial screen and enter the phone number for Jesse Mashro.
Your front end will send the phone number and possession type to the back end. Your back end will then send the phone number to the /unify endpoint. The response will provide an auth token, correlation ID, and `success=pending` because possession still needs to be performed.
Your back end will send the `authToken` to the front end. The front end will fail Mobile Auth and OTP without prompting.
Once the front end finishes the possession check, the back end calls the /unify-status endpoint with the correlation ID to validate the phone number. The response provides:
* `success=false`
* `phoneNumber` that was initially passed.
The test user failed. Send the user through your exception process.
Follow the steps below to test the Prove Unified Authentication flow with Jesse Mashro using customer-supplied possession. This user will encounter a server error in the /unify-bind response, simulating an error when creating the Prove key.
Start the onboarding flow on the initial screen and enter the phone number for Jesse Mashro.
Your front end will send the phone number and possession type to the back end. Your back end will then send the phone number to the /unify endpoint. The response will provide an auth token, correlation ID, and `success=pending` because possession still needs to be performed.
The back end then calls the /unify-status endpoint with the correlation ID to validate the phone number. The response provides:
* `correlationId` that's tied to this flow.
* `success=possession_required` since Prove is not performing the possession check.
* `phoneNumber` that was initially passed.
The back end will then call the /unify-bind endpoint with the correlation ID and phone number. You will receive a server error in the response.
```json Response theme={"dark"}
{
"code": 8000,
"message": "error at prove, try again later"
}
```
The user has failed to generate a Prove key. Send the user through your exception process.
Follow the steps below to test the Prove Unified Authentication flow with Bertie Fermont on desktop. This user will pass the entire Unified Authentication flow using Prove's possession and return `success=true` in the /unify-status response.
Start the onboarding flow on the initial screen and enter the phone number for Bertie Fremont.
Your front end will send the phone number, possession type, and final target URL to the back end. Your back end will then send the phone number to the /unify endpoint. The response will provide an auth token, correlation ID, and `success=pending` because possession still needs to be performed.
Your back end will send the `authToken` to the front end. The front end will run Instant Link handling. You will see the following page.
Once the front end finishes the possession check, the back end calls the /unify-status endpoint with the correlation ID to validate the phone number. The response provides:
* `proveId` that is tied to this user.
* `success=true`
* `phoneNumber` that was initially passed.
You have a successful flow but no Prove key is placed as the Prove key only applies to mobile devices. Send the user on through your authenticated flow.
Follow the steps below to test the Prove Unified Authentication flow with Bertie Fromont on mobile. This user will fail Mobile Auth but pass OTP and return `success=true` in the /unify-status response. The user can then be sent through the Prove Unified Authentication flow again using the same phone number with a Prove key, bypassing possession.
Start the onboarding flow on the initial screen and enter the phone number for Bertie Fromont.
Your front end will send the phone number and possession type to the back end. Your back end will then send the phone number to the /unify endpoint. The response will provide an auth token, correlation ID, and `success=pending` because possession still needs to be performed.
Your back end will send the `authToken` to the front end. The front end will run OTP handling. You will see the following page. Enter 1234 to simulate a successful OTP.
Once the front end finishes the possession check, the back end calls the /unify-status endpoint with the correlation ID to validate the phone number. The response provides:
* `deviceId` that's an external identifier of the Prove ID.
* `proveId` that is tied to this user.
* `success=true`
* `phoneNumber` that was initially passed.
You have a successful flow and a Prove key has been assigned to this phone number. Send the user on through your authenticated flow.
Follow the steps below to test the Prove Unified Authentication flow with Bertie Fromont using customer-supplied possession. This user will pass the entire Unified Authentication flow using the customer's possession and return `success=true` in the /unify-bind response. The user can then be sent through the Prove Unified Authentication flow again using the same phone number with a Prove key, bypassing possession.
Start the onboarding flow on the initial screen and enter the phone number for Bertie Fromont.
Your front end will send the phone number and possession type to the back end. Your back end will then send the phone number to the /unify endpoint. The response will provide an auth token, correlation ID, and `success=pending` because possession still needs to be performed.
The back end then calls the /unify-status endpoint with the correlation ID to validate the phone number. The response provides:
* `correlationId` that's tied to this flow.
* `success=possession_required` since Prove is not performing the possession check.
* `phoneNumber` that was initially passed.
The back end will then call the /unify-bind endpoint with the correlation ID and phone number. The response provides:
* `correlationId` that's tied to this flow.
* `success=true`
* `phoneNumber` that was initially passed.
You have a successful flow and a Prove key has been assigned to this phone number. Send the user on through your authenticated flow.
Follow the steps below to test the Prove Unified Authentication flow with Wendy Stover on desktop. This user will fail the Unified Authentication flow using Proof's possession and return `success=false` in the /unify-status response.
Start the onboarding flow on the initial screen and enter the phone number for Wendy Strover.
Your front end will send the phone number, possession type, and final target URL to the back end. Your back end will then send the phone number to the /unify endpoint. The response will provide an auth token, correlation ID, and `success=pending` because possession still needs to be performed.
Your back end will send the `authToken` to the front end. The front end will run Instant Link handling. You will see the following page.
Once the front end finishes the possession check, the back end calls the /unify-status endpoint with the correlation ID to validate the phone number. The response provides:
* `correlationId` that is tied to this flow.
* `success=false`
* `phoneNumber` that was initially passed.
The test user failed. Send the user through your exception process.
Follow the steps below to test the Prove Unified Authentication flow with Wendy Strover on mobile. This user will pass Mobile Auth and return `success=true` in the /unify-status response. The user can then be sent through the Prove Unified Authentication flow again using the same phone number with a Prove key, bypassing possession.
Start the onboarding flow on the initial screen and enter the phone number for Wendie Strover.
Your front end will send the phone number and possession type to the back end. Your back end will then send the phone number to the /unify endpoint. The response will provide an auth token, correlation ID, and `success=pending` because possession still needs to be performed.
Your back end will send the `authToken` to the front end. The front end will perform a successful Mobile Auth.
Once the front end finishes the possession check, the back end calls the /unify-status endpoint with the correlation ID to validate the phone number. The response provides:
* `correlationId` that is tied to this flow.
* `success=true`
* `phoneNumber` that was initially passed.
You have a successful flow and a Prove key has been assigned to this phone number. Send the user on through your authenticated flow.
Follow the steps below to test the Prove Unified Authentication flow with Wendie Strover using customer-supplied possession. This user will encounter a server error in the /unify-bind response, simulating an error when creating the Prove key.
Start the onboarding flow on the initial screen and enter the phone number for Wendie Strover.
Your front end will send the phone number and possession type to the back end. Your back end will then send the phone number to the /unify endpoint. The response will provide an auth token, correlation ID, and `success=pending` because possession still needs to be performed.
The back end then calls the /unify-status endpoint with the correlation ID to validate the phone number. The response provides:
* `correlationId` that is tied to this flow.
* `success=possession_required` since Prove is not performing the possession check.
* `phoneNumber` that was initially passed.
The back end will then call the /unify-bind endpoint with the correlation ID and phone number. You will receive a server error in the response.
```json Response theme={"dark"}
{
"code": 8000,
"message": "error at prove, try again later"
}
```
The user has failed to generate a Prove key. Send the user through your exception process.
# Connect to Identity Graph Overview
Source: https://developer.prove.com/docs/connect-to-identity-graph-overview
Learn how to connect to the Prove Identity Graph, the core engine of the Prove Platform that unifies tokenized identities with their associated devices, credentials, and authenticators.
Once the front end finishes the possession check, the back end calls the /unify-status endpoint with the correlation ID to validate the phone number. The response provides:
* `deviceId` that's an external identifier of the Prove ID.
* `proveId` that is tied to this user.
* `success=true`
* `phoneNumber` that was initially passed.
You have a successful flow and a Prove key has been assigned to this phone number. Sending this user through again will bypass the possession check due to the Prove key. Send the user on through your authenticated flow.
Follow the steps below to test the Prove Unified Authentication flow with Lorant Nerger using customer-supplied possession. This user will pass the entire Unified Authentication flow using the customer's possession and return `success=true` in the /unify-bind response. The user can then be sent through the Prove Unified Authentication flow again using the same phone number with a Prove key, bypassing possession.
Start the onboarding flow on the initial screen and enter the phone number for Lorant Nerger.
Your front end will send the phone number and possession type to the back end. Your back end will then send the phone number to the /unify endpoint. The response will provide an auth token, correlation ID, and `success=pending` because possession still needs to be performed.
The back end then calls the /unify-status endpoint with the correlation ID to validate the phone number. The response provides:
* `success=possession_required` since Prove is not performing the possession check.
The back end will then call the /unify-bind endpoint with the correlation ID. The response provides:
* `proveId` that is tied to this user.
* `success=true`
* `phoneNumber` that was initially passed.
You have a successful flow and a Prove key has been assigned to this phone number. Sending this user through again will bypass the possession check due to the Prove key. Send the user on through your authenticated flow.
Follow the steps below to test the Prove Unified Authentication flow with Jesse Mashiro on desktop. This user will fail the Unified Authentication flow using Prove's possession and return `success=false` in the /unify-status response.
Start the onboarding flow on the initial screen and enter the phone number for Jesse Mashru.
Your front end will send the phone number, possession type, and final target URL to the back end. Your back end will then send the phone number to the /unify endpoint. The response will provide an auth token, correlation ID, and `success=pending` because possession still needs to be performed.
Your back end will send the `authToken` to the front end. The front end will run Instant Link handling. This user fails Instant Link.
Once the front end finishes the possession check, the back end calls the /unify-status endpoint with the correlation ID to validate the phone number. The response provides:
* `success=false`
* `phoneNumber` that was initially passed.
The test user failed. Send the user through your exception process.
Follow the steps below to test the Prove Unified Authentication flow with Jesse Mashro on mobile. This user will pass Mobile Auth and return `success=true` in the /unify-status response. The user can then be sent through the Prove Unified Authentication flow again using the same phone number with a Prove key, bypassing possession.
Start the onboarding flow on the initial screen and enter the phone number for Jesse Mashro.
Your front end will send the phone number and possession type to the back end. Your back end will then send the phone number to the /unify endpoint. The response will provide an auth token, correlation ID, and `success=pending` because possession still needs to be performed.
Your back end will send the `authToken` to the front end. The front end will fail Mobile Auth and OTP without prompting.
Once the front end finishes the possession check, the back end calls the /unify-status endpoint with the correlation ID to validate the phone number. The response provides:
* `success=false`
* `phoneNumber` that was initially passed.
The test user failed. Send the user through your exception process.
Follow the steps below to test the Prove Unified Authentication flow with Jesse Mashro using customer-supplied possession. This user will encounter a server error in the /unify-bind response, simulating an error when creating the Prove key.
Start the onboarding flow on the initial screen and enter the phone number for Jesse Mashro.
Your front end will send the phone number and possession type to the back end. Your back end will then send the phone number to the /unify endpoint. The response will provide an auth token, correlation ID, and `success=pending` because possession still needs to be performed.
The back end then calls the /unify-status endpoint with the correlation ID to validate the phone number. The response provides:
* `correlationId` that's tied to this flow.
* `success=possession_required` since Prove is not performing the possession check.
* `phoneNumber` that was initially passed.
The back end will then call the /unify-bind endpoint with the correlation ID and phone number. You will receive a server error in the response.
```json Response theme={"dark"}
{
"code": 8000,
"message": "error at prove, try again later"
}
```
The user has failed to generate a Prove key. Send the user through your exception process.
Follow the steps below to test the Prove Unified Authentication flow with Bertie Fermont on desktop. This user will pass the entire Unified Authentication flow using Prove's possession and return `success=true` in the /unify-status response.
Start the onboarding flow on the initial screen and enter the phone number for Bertie Fremont.
Your front end will send the phone number, possession type, and final target URL to the back end. Your back end will then send the phone number to the /unify endpoint. The response will provide an auth token, correlation ID, and `success=pending` because possession still needs to be performed.
Your back end will send the `authToken` to the front end. The front end will run Instant Link handling. You will see the following page.
Once the front end finishes the possession check, the back end calls the /unify-status endpoint with the correlation ID to validate the phone number. The response provides:
* `proveId` that is tied to this user.
* `success=true`
* `phoneNumber` that was initially passed.
You have a successful flow but no Prove key is placed as the Prove key only applies to mobile devices. Send the user on through your authenticated flow.
Follow the steps below to test the Prove Unified Authentication flow with Bertie Fromont on mobile. This user will fail Mobile Auth but pass OTP and return `success=true` in the /unify-status response. The user can then be sent through the Prove Unified Authentication flow again using the same phone number with a Prove key, bypassing possession.
Start the onboarding flow on the initial screen and enter the phone number for Bertie Fromont.
Your front end will send the phone number and possession type to the back end. Your back end will then send the phone number to the /unify endpoint. The response will provide an auth token, correlation ID, and `success=pending` because possession still needs to be performed.
Your back end will send the `authToken` to the front end. The front end will run OTP handling. You will see the following page. Enter 1234 to simulate a successful OTP.
Once the front end finishes the possession check, the back end calls the /unify-status endpoint with the correlation ID to validate the phone number. The response provides:
* `deviceId` that's an external identifier of the Prove ID.
* `proveId` that is tied to this user.
* `success=true`
* `phoneNumber` that was initially passed.
You have a successful flow and a Prove key has been assigned to this phone number. Send the user on through your authenticated flow.
Follow the steps below to test the Prove Unified Authentication flow with Bertie Fromont using customer-supplied possession. This user will pass the entire Unified Authentication flow using the customer's possession and return `success=true` in the /unify-bind response. The user can then be sent through the Prove Unified Authentication flow again using the same phone number with a Prove key, bypassing possession.
Start the onboarding flow on the initial screen and enter the phone number for Bertie Fromont.
Your front end will send the phone number and possession type to the back end. Your back end will then send the phone number to the /unify endpoint. The response will provide an auth token, correlation ID, and `success=pending` because possession still needs to be performed.
The back end then calls the /unify-status endpoint with the correlation ID to validate the phone number. The response provides:
* `correlationId` that's tied to this flow.
* `success=possession_required` since Prove is not performing the possession check.
* `phoneNumber` that was initially passed.
The back end will then call the /unify-bind endpoint with the correlation ID and phone number. The response provides:
* `correlationId` that's tied to this flow.
* `success=true`
* `phoneNumber` that was initially passed.
You have a successful flow and a Prove key has been assigned to this phone number. Send the user on through your authenticated flow.
Follow the steps below to test the Prove Unified Authentication flow with Wendy Stover on desktop. This user will fail the Unified Authentication flow using Proof's possession and return `success=false` in the /unify-status response.
Start the onboarding flow on the initial screen and enter the phone number for Wendy Strover.
Your front end will send the phone number, possession type, and final target URL to the back end. Your back end will then send the phone number to the /unify endpoint. The response will provide an auth token, correlation ID, and `success=pending` because possession still needs to be performed.
Your back end will send the `authToken` to the front end. The front end will run Instant Link handling. You will see the following page.
Once the front end finishes the possession check, the back end calls the /unify-status endpoint with the correlation ID to validate the phone number. The response provides:
* `correlationId` that is tied to this flow.
* `success=false`
* `phoneNumber` that was initially passed.
The test user failed. Send the user through your exception process.
Follow the steps below to test the Prove Unified Authentication flow with Wendy Strover on mobile. This user will pass Mobile Auth and return `success=true` in the /unify-status response. The user can then be sent through the Prove Unified Authentication flow again using the same phone number with a Prove key, bypassing possession.
Start the onboarding flow on the initial screen and enter the phone number for Wendie Strover.
Your front end will send the phone number and possession type to the back end. Your back end will then send the phone number to the /unify endpoint. The response will provide an auth token, correlation ID, and `success=pending` because possession still needs to be performed.
Your back end will send the `authToken` to the front end. The front end will perform a successful Mobile Auth.
Once the front end finishes the possession check, the back end calls the /unify-status endpoint with the correlation ID to validate the phone number. The response provides:
* `correlationId` that is tied to this flow.
* `success=true`
* `phoneNumber` that was initially passed.
You have a successful flow and a Prove key has been assigned to this phone number. Send the user on through your authenticated flow.
Follow the steps below to test the Prove Unified Authentication flow with Wendie Strover using customer-supplied possession. This user will encounter a server error in the /unify-bind response, simulating an error when creating the Prove key.
Start the onboarding flow on the initial screen and enter the phone number for Wendie Strover.
Your front end will send the phone number and possession type to the back end. Your back end will then send the phone number to the /unify endpoint. The response will provide an auth token, correlation ID, and `success=pending` because possession still needs to be performed.
The back end then calls the /unify-status endpoint with the correlation ID to validate the phone number. The response provides:
* `correlationId` that is tied to this flow.
* `success=possession_required` since Prove is not performing the possession check.
* `phoneNumber` that was initially passed.
The back end will then call the /unify-bind endpoint with the correlation ID and phone number. You will receive a server error in the response.
```json Response theme={"dark"}
{
"code": 8000,
"message": "error at prove, try again later"
}
```
The user has failed to generate a Prove key. Send the user through your exception process.
# Connect to Identity Graph Overview
Source: https://developer.prove.com/docs/connect-to-identity-graph-overview
Learn how to connect to the Prove Identity Graph, the core engine of the Prove Platform that unifies tokenized identities with their associated devices, credentials, and authenticators.
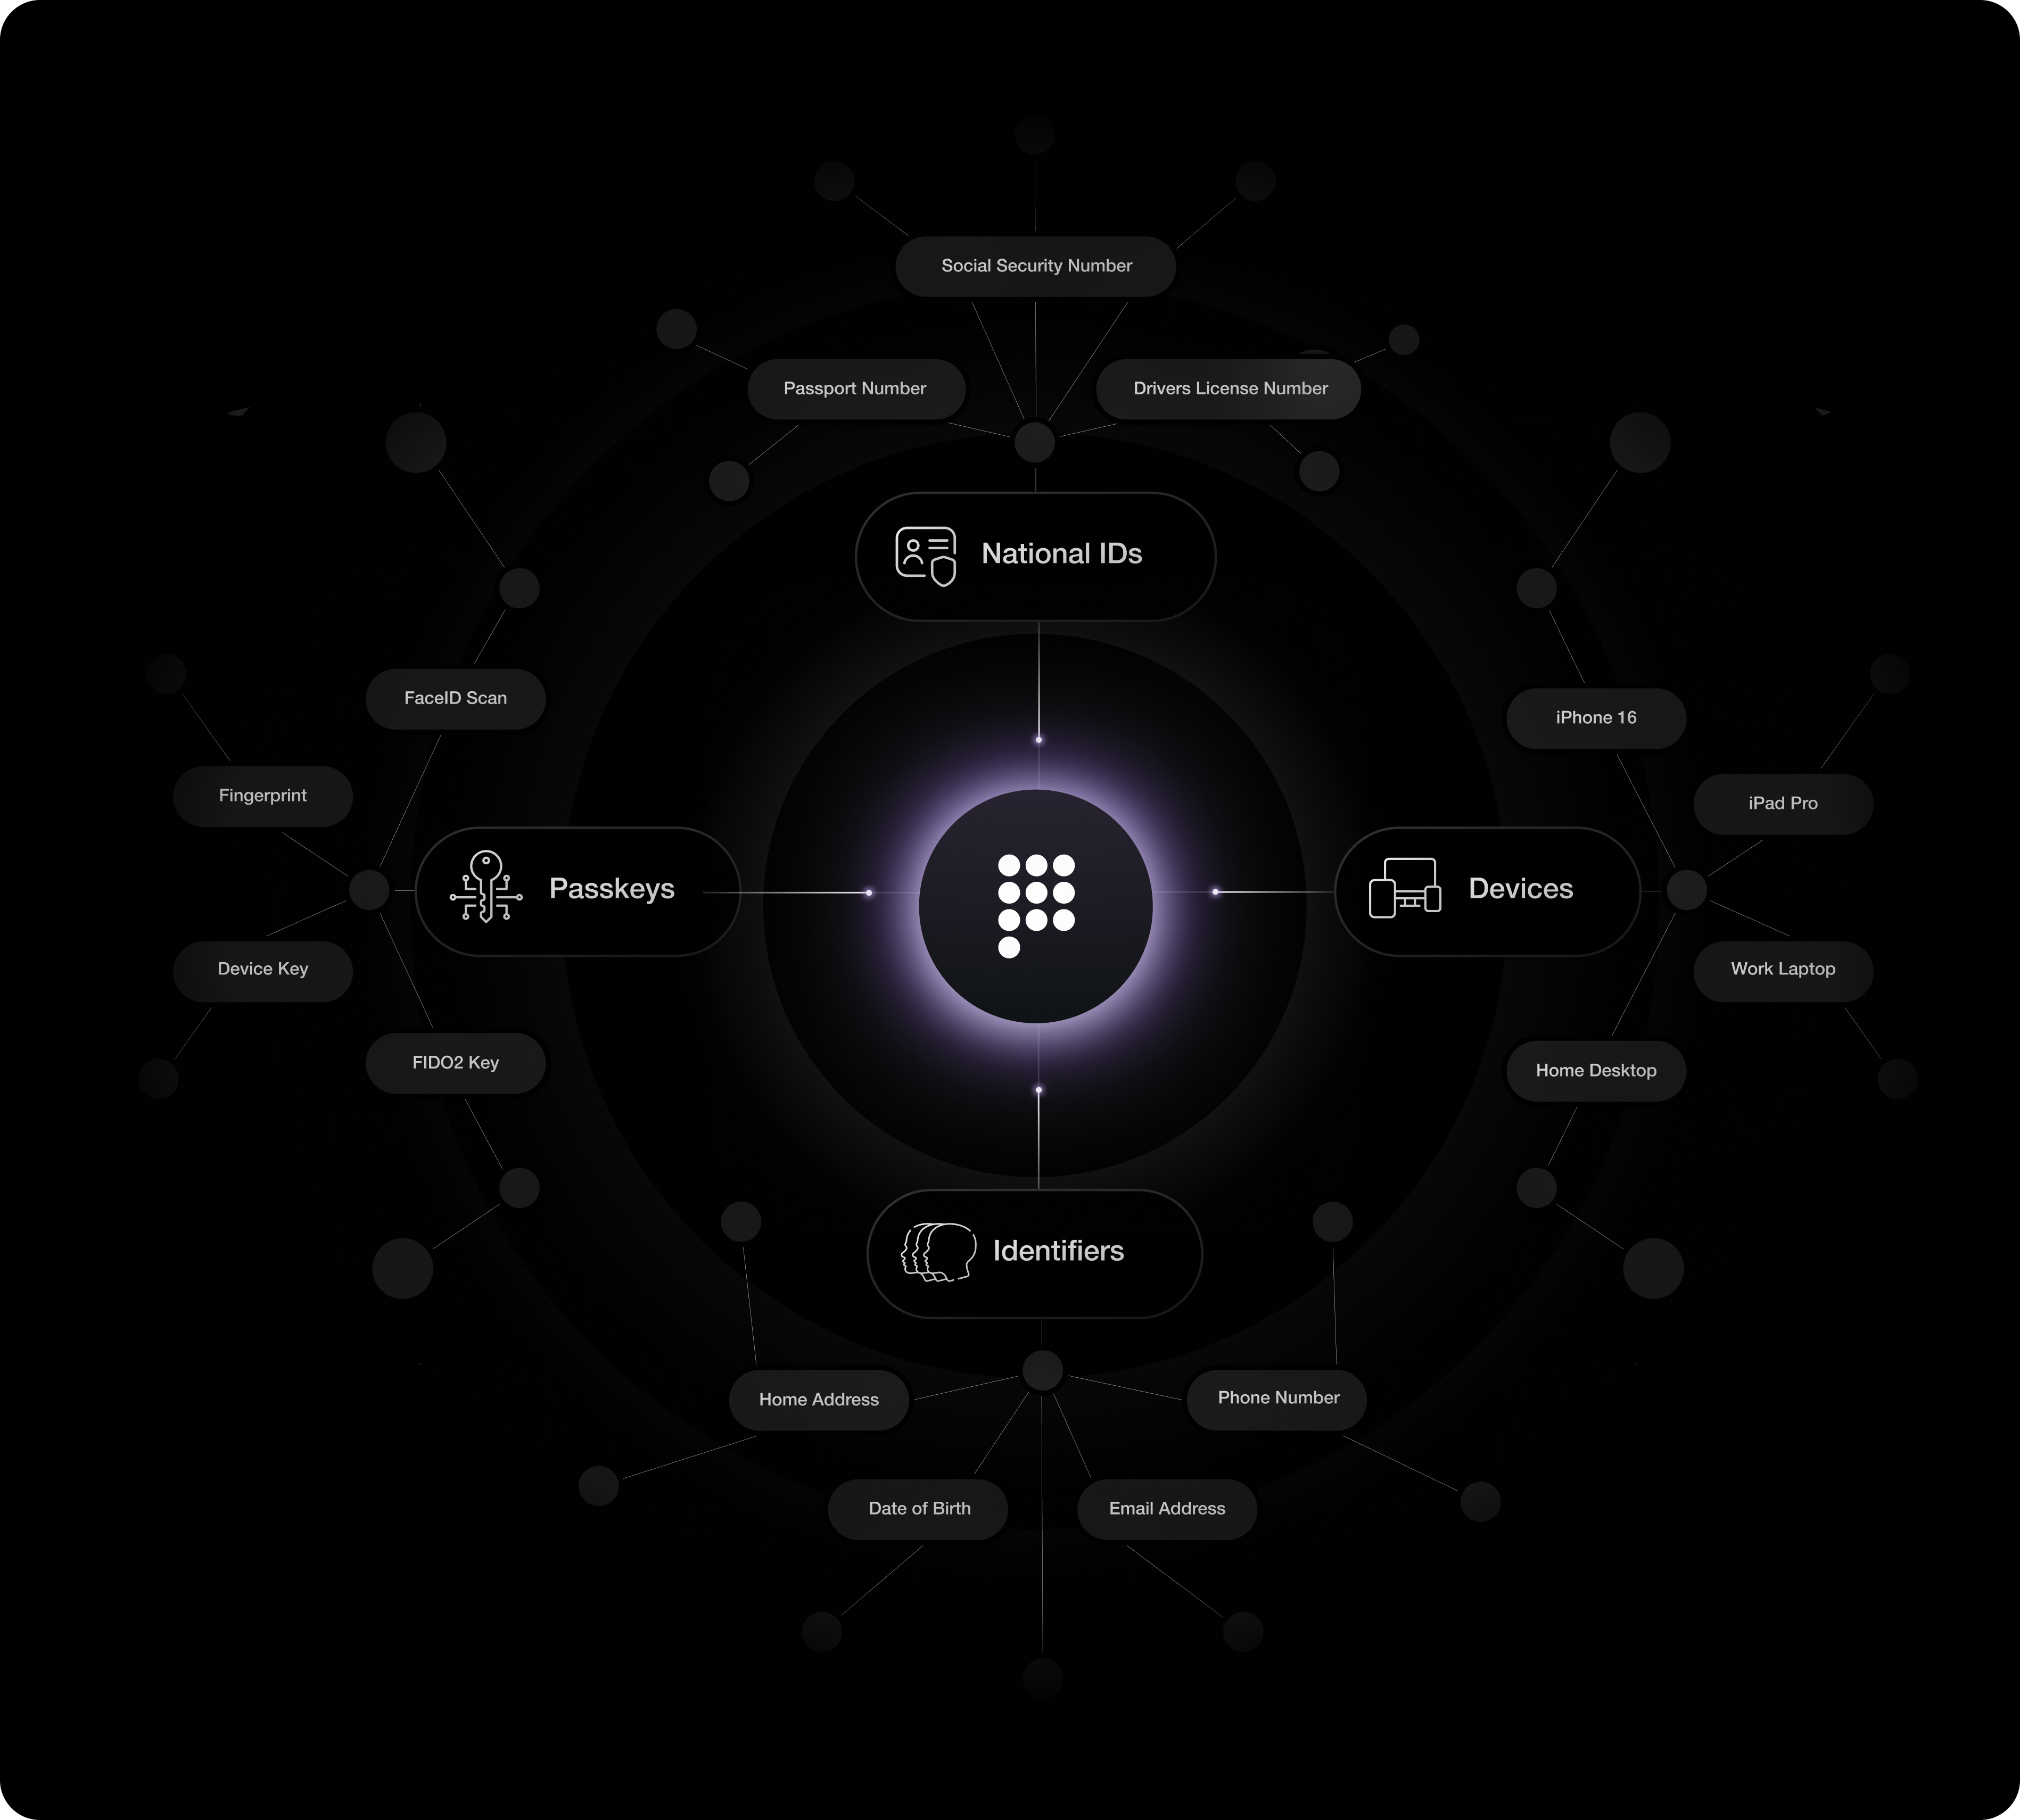 ## The Prove Identity Graph
The **Prove Identity Graph** is the core engine of the Prove Platform, establishing the future of digital trust. It serves as a persistent, deterministic network that unifies tokenized identities with their associated devices, credentials, and authenticators, enabling seamless authentication, identity resolution, and comprehensive risk management.
## The central anchor: Prove ID
At the heart of the Identity Graph is the **Prove ID**.
The **Prove ID** is a **persistent anchor** that securely binds a user's common language identifiers like phone numbers, emails, and social security numbers into a single trusted and unified identity.
This standardized anchor ensures that an identity verified in one context is recognizable across many platforms without requiring repeated re-verification.
## Identity Resolution
A primary function of the Identity Graph is Identity Resolution: the process of consistently and deterministically linking a client's customer account ID (sometimes called a user ID) to a Prove ID.
### Batch enrollment verification options
For Offline Batch Enrollment, clients can select from three verification options that help resolve the identity:
* Assurance Level 1 using Bot Detection
* Assurance Level 2 using Verified Users
* Cross-Domain Identity Resolution
## Privacy-preserving techniques
What makes the Identity Graph powerful is its method. It achieves this unified view of identity using privacy-preserving techniques, such as a clean room technique.
This method ensures that the platform can build a deterministic, unified identity view without ever sharing or exposing the underlying Personally Identifiable Information (PII). This commitment ensures both regulatory compliance and enhanced data privacy for the end-user.
# Set Up Your Development Environment
Source: https://developer.prove.com/docs/dev-environment
Follow these steps to set up your development environment for Prove solutions
## Load API keys
Ensure you have Prove Sandbox credentials from the [Developer Portal](https://portal.prove.com). To access the Prove API, use your OAuth 2.0 client ID and client secret. You can load these from environment variables or another method:
```go Go theme={"dark"}
clientID := os.Getenv("PROVE_CLIENT_ID")
clientSecret := os.Getenv("PROVE_CLIENT_SECRET")
proveEnv := "uat-us" // Use UAT in US region.
client := provesdkservergo.New(
provesdkservergo.WithServer(proveEnv),
provesdkservergo.WithSecurity(components.Security{
ClientID: provesdkservergo.String(clientID),
ClientSecret: provesdkservergo.String(clientSecret),
}),
)
```
```typescript TypeScript theme={"dark"}
export const DEVICE_API_BASE_URL = process.env.DEVICE_API_BASE_URL || '';
export const PROVE_CLIENT_ID = process.env.PROVE_CLIENT_ID;
export const PROVE_CLIENT_SECRET = process.env.PROVE_CLIENT_SECRET;
export function getProveSdk(): Proveapi {
return new Proveapi({
server: 'uat-us',
security: {
clientID: PROVE_CLIENT_ID,
clientSecret: PROVE_CLIENT_SECRET,
},
});
}
```
```java Java theme={"dark"}
String clientId = System.getenv("PROVE_CLIENT_ID");
String clientSecret = System.getenv("PROVE_CLIENT_SECRET");
Proveapi sdk = Proveapi.builder()
.security(Security.builder()
.clientID(clientId)
.clientSecret(clientSecret)
.build())
.build();
```
```csharp .NET theme={"dark"}
var clientId = Environment.GetEnvironmentVariable("PROVE_CLIENT_ID");
var clientSecret = Environment.GetEnvironmentVariable("PROVE_CLIENT_SECRET");
var sdk = new ProveAPI(serverUrl: "https://platform.uat.proveapis.com");
var tokenRequest = new V3TokenRequest
{
ClientId = clientId,
ClientSecret = clientSecret,
GrantType = "client_credentials"
};
var tokenResponse = await sdk.V3.V3TokenRequestAsync(tokenRequest);
var accessToken = tokenResponse.V3TokenResponse?.AccessToken;
_sdk = new ProveAPI(auth: accessToken, serverUrl: "https://platform.uat.proveapis.com");
```
Replace `uat-us` with `uat-eu` if performing testing outside of North America.
## Install server-side SDK
Install the server-side SDK of your choice by running a command in your terminal, or by using a dependency management tool specific to your project.
```go Go theme={"dark"}
# The Go library is hosted on GitHub so you can use this command to import it
# to your Go application.
go get github.com/prove-identity/prove-sdk-server-go
# Ensure you import the SDK in your code like this:
import (
provesdkservergo "github.com/prove-identity/prove-sdk-server-go"
"github.com/prove-identity/prove-sdk-server-go/models/components"
)
```
```typescript TypeScript theme={"dark"}
# Run this command to install package from GitHub and save as a dependency
npm install -S @prove-identity/prove-api
# Import the SDK in your code like this:
import { Proveapi } from "@prove-identity/prove-api";
import { OAuthClient, WithAuthorization } from "@prove-identity/prove-api/sdk/oauth"
```
```java Java theme={"dark"}
# See the latest version number here: https://central.sonatype.com/artifact/com.prove/proveapi
Gradle:
implementation 'com.prove:proveapi:0.10.0'
Maven:
com.prove
proveapi
0.10.0
```
```csharp .NET theme={"dark"}
// Run this command to install package from Nuget and save as a dependency
dotnet add package Prove.Proveapi --version 1.0.1
// Ensure you import the SDK in your code like this:
using Prove.Proveapi;
using Prove.Proveapi.Models.Components;
```
## Install client-side SDK
Install the client-side SDK of your choice by running a command in your terminal, or by using a dependency management tool specific to your project.
```shell NPM theme={"dark"}
# Run this command to install the package (ensure you have the latest version).
npm install @prove-identity/prove-auth@2.8.2
```
```html No Package Manager theme={"dark"}
# You can include this file in your web application from jsDelivr (update with the latest version).
# You can also download the JavaScript file from https://cdn.jsdelivr.net/npm/@prove-identity/prove-auth@2.8.2/build/bundle/release/prove-auth.js and store it locally.
```
Prove manages a maven repository with Android binaries to enable integration with Gradle.
Update the dependencies object in the `build.gradle` file:
```java Java theme={"dark"}
dependencies {
// Existing dependencies are here.
// Add the Prove Link dependencies:
implementation 'com.prove.sdk:proveauth:6.6.0'
}
```
You'll also need to point to the repository by updating your `settings.gradle` file with the Maven repository:
```java Java theme={"dark"}
dependencyResolutionManagement {
// Existing repository settings are here.
repositories {
// Existing repositories are here.
// Add the Prove Link Maven repository:
maven {
url = "https://prove.jfrog.io/artifactory/libs-public-maven/"
}
}
}
```
The following needs added to the `build.gradle` file to also download dependency libraries:
```java Java theme={"dark"}
dependencies {
implementation fileTree('libs')
}
```
If you receive an error message on the `application@fullBackupContent` value, you can resolve it by adding this line of code to your application `AndroidManifest.xml` file inside the `...` node. Add it as an attribute to the opening `application` tag:
```xml XML theme={"dark"}
```
The Prove Auth SDK and its children SDKs merge the following permissions into the main application:
```xml XML theme={"dark"}
```
Prove manages a repository with the libraries to enable integration.
Execute the following to import CocoaPod from the Prove pod repository:
```shell shell theme={"dark"}
# Run this command to install the cocoapods-art plugin (authored by Artifactory)
gem install cocoapods-art
# Run this command to add the Prove pod repository
pod repo-art add prove.jfrog.io https://prove.jfrog.io/artifactory/api/pods/libs-public-cocoapods
# In your Podfile, paste in the Prove pod repository as a source
plugin 'cocoapods-art', :sources => [
'prove.jfrog.io'
]
# In your Podfile, paste in the SDK pods
pod 'ProveAuth', '6.6.0'
# Run this command to install the SDK pods
pod install
```
# Global Fraud Policy - Current
Source: https://developer.prove.com/docs/global-fraud-policy
This document outlines the global fraud policy for our organization, detailing the measures in place to prevent, detect, and respond to fraudulent activities.
## Platform integration
The Global Fraud Policy (GFP) serves as Prove's comprehensive set of business intelligence for combating fraud across all its products. This policy translates collaborative intelligence—drawn from both Prove's data and our clients' firsthand fraud experiences. It turns it into a unified output including identification and authentication results with specific failure reason codes designed to maximize pass rates for legitimate consumers while simultaneously mitigating risk.
The automated engine that applies the GFP within Prove's Products and Solutions includes the latest fraud insights, and Prove updates it to account for ever-evolving fraud trends. For every Prove Platform transaction, the Platform generates a result output status based on the GFP. The automated engine assesses a wide array of identity attributes—such as phone tenure and address matching—together with our proprietary risk intelligence. This analysis generates a holistic assessment across four key categories:
1. **Identification -** Validates personal details such as name, address, date of birth, and national identifier to confirm an individual's identity, ensuring the accuracy of provided information.
2. **Authentication -** Verifies a person is truly the identity they're claiming to be in the identification step.
3. **Compliance -** The adherence to the appropriate regulatory rules to satisfy minimum requirements for that industry and use case.
4. **Risk -** Other risks related to the transaction outside of identification and authentication.
This detailed, multi-faceted output is then seamlessly integrated into the final transaction output for your immediate use under the `evaluation` object.
## Output examples
Following is an example of a successful result output from the v3/complete API:
```
{
"success": true,
"next": {
"done": "done"
},
"evaluation": {
"authentication": {
"result": "pass"
},
"identification": {
"result": "pass"
}
}
}
```
Following is an example of a failed result output from the v3/complete API:
```
{
"success": false,
"next": {
"done": "done"
},
"evaluation": {
"authentication": {
"result": "fail",
"failureReasons": {
"9161": "Very short tenure association between phone number and identity.",
"9171": "Potential injection attack due to 2 identities both with short tenure association to the phone number.",
"9180": "No phone ownership confirmed using 4 elements."
}
},
"identification": {
"result": "fail",
"failureReasons": {
"9001": "Identification is not confirmed using 4 elements."
}
}
}
}
```
The Failure Reason code outputs from the Global Fraud Policy are as follows:
| **Failure Reason** | **Category** | **Result Description** |
| :----------------- | :------------- | :------------------------------------------------------------------------------------------------------------------------------------------------------------------------- |
| 9001 | Identification | Identification is not confirmed using 4 elements. |
| 9003 | Identification | Identity is not found |
| 9011 | Identification | Identification is not confirmed using less than 4 elements. |
| 9012 | Identification | SSN does not match. |
| 9013 | Identification | Birth Date does not match. |
| 9014 | Identification | Name does not match. |
| 9015 | Identification | Address does not match. |
| 9081 | Identification | SSN is issued before the birth date. |
| 9082 | Identification | Address is a correctional facility. |
| 9083 | Identification | Deceased indicator is present for individual. |
| 9100 | Authentication | Phone possession incomplete |
| 9131 | Authentication | Indicates the phone number is at a higher risk for fraud due to being listed as a non-mobile line on the Override Services Registry (OSR). |
| 9132 | Authentication | This phone number is listed on a public website with the contents of its text messages posted publicly in order to allow a user to bypass phone possession check controls. |
| 9133 | Authentication | The phone is not trusted based on the SIM Key Trust Score. |
| 9134 | Authentication | The phone is not trusted because it is a non-fixed VoIP number. |
| 9135 | Authentication | Potential ATO due to recent SIM Swap under 24 hours. |
| 9136 | Authentication | Potential ATO due to recent Port under 24 hours. |
| 9137 | Authentication | Potential ATO due to call forwarding enabled for phone number. |
| 9161 | Authentication | Very short tenure association between phone number and identity. |
| 9162 | Authentication | Short tenure association between phone number and identity. |
| 9163 | Authentication | Potential recycled phone fraud due to a high number of identities associated to phone number with a newer owner present. |
| 9164 | Authentication | Potential recycled phone fraud due to identity having no recent association to phone number and a phone disconnect event is observed after the phone association. |
| 9165 | Authentication | Potential recycled phone fraud due to a newer owner observed and a phone disconnect event is observed after the phone association. |
| 9166 | Authentication | Address is a correctional facility. |
| 9167 | Authentication | Deceased indicator is present for individual. |
| 9168 | Authentication | Person verification was performed indicating phone ownership is not verified |
| 9171 | Authentication | Potential injection attack due to 2 identities both with short tenure association to the phone number. |
| 9172 | Authentication | Potential injection attack due to 3 identities all with short tenure association to the phone number. |
| 9173 | Authentication | Potential injection attack due to 4 identities all with short tenure association to the phone number. |
| 9174 | Authentication | Potential injection attack due to 5 or more identities all with short tenure association to the phone number. |
| 9180 | Authentication | No phone ownership confirmed using 4 elements. |
| 9181 | Authentication | No phone ownership confirmed using less than 4 elements |
# Prove Marketplace
Source: https://developer.prove.com/docs/grow-overview
Overview of Prove's Marketplace Add-ons
## Overview
The Prove Marketplace is a curated ecosystem that connects trusted data and service partners through the power of the Prove Identity Graph. It enables Prove customers to unlock richer insights and actions beyond identity—securely and in real time—by linking each partner’s data to a verified Prove ID.
Built on Prove’s privacy-first foundation, the Marketplace provides seamless access to Prove-Ready partners—each rigorously vetted for quality, security, and interoperability. Through this certification process, every integration meets the same high standards that define Prove’s identity infrastructure.
The result is a growing network of premium partners offering data and services. These include payment credentials, credit risk insights, background checks, and more—empowering enterprises to enrich onboarding, payments, and risk workflows without adding friction or complexity.
```mermaid theme={"dark"}
sequenceDiagram
actor Consumer
Consumer ->> Merchant Client: Create Account
Merchant Client ->> Merchant Server: Submit
Merchant Server ->> Prove Server: Pre-Fill with Prove
Prove Server ->> Merchant Server:
Merchant Server ->> Prove Server: Discovery (ProveID, Wallet Types Array)
Prove Server ->> Marketplace Payment Wallet: (ProveID, Phone Number, Email)
Marketplace Payment Wallet ->> Prove Server:
Prove Server ->> Merchant Server: Return Discovery
Merchant Server ->> Merchant Client: Prompt User
Merchant Client ->> Consumer: Permission
Consumer ->> Merchant Client:
Merchant Client ->> Merchant Server: OK
Merchant Server ->> Prove Server: Fetch (Marketplace Partner ID Array, Key, Evidence)
Prove Server ->> Marketplace Payment Wallet: Get Wallet ID (ProveID, aSSN, aPhone Number, aEmail)
Marketplace Payment Wallet ->> Prove Server:
Prove Server ->> Merchant Server: Return Wallet ID
Merchant Server -->> Merchant Client:
Merchant Client -->> Merchant Server: 2FA Optional
Consumer ->> Merchant Client: Choose Payment Method
Merchant Client ->> Consumer: Show Success
Merchant Server ->> Marketplace Payment Wallet: Get Wallet
```
# How To Implement
Source: https://developer.prove.com/docs/how-to-implement-authentication
# Identity Management Overview
Source: https://developer.prove.com/docs/identity-management-overview
Prove Identity Manager acts as a real-time registry of phone identity tokens.
Prove Identity Manager helps businesses proactively manage consumers' phone numbers and other vital identity attributes as they change throughout their lifecycle, providing continuous monitoring and alerts about identity changes.
## Ongoing monitoring and maintenance
Once a user's information mapped to a Prove ID and enrolled in the Identity Manager, their information is accessible by the client to support ongoing operations, including:
* **Cross-Domain Identity:** Seeing where the same human user exists across different client domains.
* **Marketplace Integration:** Connecting the user base to other Prove products and services available in the marketplace.
# Prove Identity Manager Overview
Source: https://developer.prove.com/docs/identity-manager-flow
Learn about the components that make up the Prove Identity Manager solution
## Prove Identity Manager solution
The Prove Identity Manager solution provides phone risk change events based on the connection between an enrolled consumer ID and their phone number via webhook. Updates can include, but aren't limited to, the following attributes:
* Phone Number Disconnects
* Phone Number Changes
* Line Type Changes
* Carrier Changes
# Implement Prove Identity Manager
Source: https://developer.prove.com/docs/identity-manager-implementation-guide
Learn how to implement Prove Identity Manager
## Prerequisites
* **Sandbox credentials:** Ensure you have Prove Sandbox credentials from the [Developer Portal](https://portal.prove.com). To access Sandbox credentials, follow the steps outlined on the [Authentication page](https://developer.prove.com/reference/authentication). To access the Prove API, use your OAuth 2.0 client ID and client secret. You can load these from environment variables or another method:
```go Go theme={"dark"}
clientID := os.Getenv("PROVE_CLIENT_ID")
clientSecret := os.Getenv("PROVE_CLIENT_SECRET")
proveEnv := "uat-us" // Use UAT in US region.
client := provesdkservergo.New(
provesdkservergo.WithServer(proveEnv),
provesdkservergo.WithSecurity(components.Security{
ClientID: provesdkservergo.String(clientID),
ClientSecret: provesdkservergo.String(clientSecret),
}),
)
```
```typescript TypeScript theme={"dark"}
export const DEVICE_API_BASE_URL = process.env.DEVICE_API_BASE_URL || '';
export const PROVE_CLIENT_ID = process.env.PROVE_CLIENT_ID;
export const PROVE_CLIENT_SECRET = process.env.PROVE_CLIENT_SECRET;
export function getProveSdk(): Proveapi {
return new Proveapi({
server: 'uat-us',
security: {
clientID: PROVE_CLIENT_ID,
clientSecret: PROVE_CLIENT_SECRET,
},
});
}
```
```java Java theme={"dark"}
String clientId = System.getenv("PROVE_CLIENT_ID");
String clientSecret = System.getenv("PROVE_CLIENT_SECRET");
Proveapi sdk = Proveapi.builder()
.security(Security.builder()
.clientID(clientId)
.clientSecret(clientSecret)
.build())
.build();
```
```csharp .NET theme={"dark"}
var clientId = Environment.GetEnvironmentVariable("PROVE_CLIENT_ID");
var clientSecret = Environment.GetEnvironmentVariable("PROVE_CLIENT_SECRET");
var sdk = new ProveAPI(serverUrl: "https://platform.uat.proveapis.com");
var tokenRequest = new V3TokenRequest
{
ClientId = clientId,
ClientSecret = clientSecret,
GrantType = "client_credentials"
};
var tokenResponse = await sdk.V3.V3TokenRequestAsync(tokenRequest);
var accessToken = tokenResponse.V3TokenResponse?.AccessToken;
_sdk = new ProveAPI(auth: accessToken, serverUrl: "https://platform.uat.proveapis.com");
```
**Token Expiration**
The OAuth token expires after 60 minutes, requiring you to get another token.
* **Server-side SDK:** Install the server-side SDK of your choice by running a command in your terminal, or by using a dependency management tool specific to your project.
```go Go theme={"dark"}
# The Go library is hosted on GitHub so you can use this command to import it
# to your Go application.
go get github.com/prove-identity/prove-sdk-server-go
# Ensure you import the SDK in your code like this:
import (
provesdkservergo "github.com/prove-identity/prove-sdk-server-go"
"github.com/prove-identity/prove-sdk-server-go/models/components"
)
```
```typescript TypeScript theme={"dark"}
# Run this command to install package from GitHub and save as a dependency
npm install -S @prove-identity/prove-api
# Import the SDK in your code like this:
import { Proveapi } from "@prove-identity/prove-api";
import { OAuthClient, WithAuthorization } from "@prove-identity/prove-api/sdk/oauth"
```
```java Java theme={"dark"}
# See the latest version number here: https://central.sonatype.com/artifact/com.prove/proveapi
Gradle:
implementation 'com.prove:proveapi:0.10.0'
Maven:
com.prove
proveapi
0.10.0
```
```csharp .NET theme={"dark"}
// Run this command to install package from Nuget and save as a dependency
dotnet add package Prove.Proveapi --version 1.0.1
// Ensure you import the SDK in your code like this:
using Prove.Proveapi;
using Prove.Proveapi.Models.Components;
```
## Implement Prove Identity Manager
Use the Enroll Identity endpoint to enroll a single customer for monitoring:
```go Go theme={"dark"}
// Enroll a single identity for monitoring
rspEnrollIdentity, err := client.IdentityManager.V3EnrollIdentity(ctx &components.V3EnrollIdentityRequest{
PhoneNumber: "2001004031",
ClientCustomerId: provesdkservergo.String("customer-123"),
})
if err != nil {
return fmt.Errorf("error creating identity: %w", err)
}
```
```typescript TypeScript theme={"dark"}
// Enroll a single identity for monitoring
const enrollIdentityReq = {
phoneNumber: '2001004031',
clientCustomerId: 'customer-123'
};
const rspEnrollIdentity = await sdk.identityManager.enrollIdentity(enrollIdentityReq);
if (!rspEnrollIdentity) {
console.error("Enroll identity error.")
return
}
```
```java Java theme={"dark"}
// Enroll a single identity for monitoring
EnrollIdentityRequest req = V3EnrollIdentityRequest.builder()
.phoneNumber("2001004031")
.clientCustomerId("customer-123")
.build();
EnrollIdentityResponse res = sdk.identityManager().enrollIdentity()
.request(req)
.call();
```
The function returns:
* `identityId`: a unique Prove-generated identifier for the enrolled identity.
* `success`: if true, the request was successful and the identity was created.
For bulk operations, use the Batch Enroll Identities endpoint to enroll up to 100 customers at once:
```go Go theme={"dark"}
// Enroll multiple identities in a batch
identities := []components.IdentityItem{
{
PhoneNumber: "2001004031",
ClientCustomerId: provesdkservergo.String("customer-123"),
},
{
PhoneNumber: "2001004035",
ClientCustomerId: provesdkservergo.String("customer-124"),
},
}
rspBatchEnroll, err := client.IdentityManager.V3BatchEnrollIdentities(ctx, &components.V3BatchEnrollIdentitiesRequest{
Identities: identities,
})
if err != nil {
return fmt.Errorf("error batch enrolling identities: %w", err)
}
```
```typescript TypeScript theme={"dark"}
// Enroll multiple identities in a batch
const batchEnrollReq = {
identities: [
{
phoneNumber: '2001004031',
clientCustomerId: 'customer-123'
},
{
phoneNumber: '2001004035',
clientCustomerId: 'customer-124'
}
]
};
const rspBatchEnroll = await sdk.identityManager.v3batchEnrollIdentities(batchEnrollReq);
```
```java Java theme={"dark"}
// Enroll multiple identities in a batch
List identities = Arrays.asList(
IdentityData.builder()
.phoneNumber("2001004031")
.clientCustomerId("customer-123")
.build(),
IdentityData.builder()
.phoneNumber("2001004035")
.clientCustomerId("customer-124")
.build()
);
V3BatchEnrollIdentitiesRequest req = V3BatchEnrollIdentitiesRequest.builder()
.identities(identities)
.build();
```
### Webhook notifications
Webhooks are the method by which Prove sends risk change events. Webhook integration is necessary to receive change notifications for enrolled consumers.
Here's how to get these webhook notifications up and running:
Login to [the Portal](https://portal.prove.com/en/login).
Navigate to your Identity Manager project.
Using the Configure tab, select the Configure button next to the Sandbox webhook.
If you would like a sample URL to test, you can use [Webhook.site](https://webhook.site/) to generate a unique URL for testing.
## The Prove Identity Graph
The **Prove Identity Graph** is the core engine of the Prove Platform, establishing the future of digital trust. It serves as a persistent, deterministic network that unifies tokenized identities with their associated devices, credentials, and authenticators, enabling seamless authentication, identity resolution, and comprehensive risk management.
## The central anchor: Prove ID
At the heart of the Identity Graph is the **Prove ID**.
The **Prove ID** is a **persistent anchor** that securely binds a user's common language identifiers like phone numbers, emails, and social security numbers into a single trusted and unified identity.
This standardized anchor ensures that an identity verified in one context is recognizable across many platforms without requiring repeated re-verification.
## Identity Resolution
A primary function of the Identity Graph is Identity Resolution: the process of consistently and deterministically linking a client's customer account ID (sometimes called a user ID) to a Prove ID.
### Batch enrollment verification options
For Offline Batch Enrollment, clients can select from three verification options that help resolve the identity:
* Assurance Level 1 using Bot Detection
* Assurance Level 2 using Verified Users
* Cross-Domain Identity Resolution
## Privacy-preserving techniques
What makes the Identity Graph powerful is its method. It achieves this unified view of identity using privacy-preserving techniques, such as a clean room technique.
This method ensures that the platform can build a deterministic, unified identity view without ever sharing or exposing the underlying Personally Identifiable Information (PII). This commitment ensures both regulatory compliance and enhanced data privacy for the end-user.
# Set Up Your Development Environment
Source: https://developer.prove.com/docs/dev-environment
Follow these steps to set up your development environment for Prove solutions
## Load API keys
Ensure you have Prove Sandbox credentials from the [Developer Portal](https://portal.prove.com). To access the Prove API, use your OAuth 2.0 client ID and client secret. You can load these from environment variables or another method:
```go Go theme={"dark"}
clientID := os.Getenv("PROVE_CLIENT_ID")
clientSecret := os.Getenv("PROVE_CLIENT_SECRET")
proveEnv := "uat-us" // Use UAT in US region.
client := provesdkservergo.New(
provesdkservergo.WithServer(proveEnv),
provesdkservergo.WithSecurity(components.Security{
ClientID: provesdkservergo.String(clientID),
ClientSecret: provesdkservergo.String(clientSecret),
}),
)
```
```typescript TypeScript theme={"dark"}
export const DEVICE_API_BASE_URL = process.env.DEVICE_API_BASE_URL || '';
export const PROVE_CLIENT_ID = process.env.PROVE_CLIENT_ID;
export const PROVE_CLIENT_SECRET = process.env.PROVE_CLIENT_SECRET;
export function getProveSdk(): Proveapi {
return new Proveapi({
server: 'uat-us',
security: {
clientID: PROVE_CLIENT_ID,
clientSecret: PROVE_CLIENT_SECRET,
},
});
}
```
```java Java theme={"dark"}
String clientId = System.getenv("PROVE_CLIENT_ID");
String clientSecret = System.getenv("PROVE_CLIENT_SECRET");
Proveapi sdk = Proveapi.builder()
.security(Security.builder()
.clientID(clientId)
.clientSecret(clientSecret)
.build())
.build();
```
```csharp .NET theme={"dark"}
var clientId = Environment.GetEnvironmentVariable("PROVE_CLIENT_ID");
var clientSecret = Environment.GetEnvironmentVariable("PROVE_CLIENT_SECRET");
var sdk = new ProveAPI(serverUrl: "https://platform.uat.proveapis.com");
var tokenRequest = new V3TokenRequest
{
ClientId = clientId,
ClientSecret = clientSecret,
GrantType = "client_credentials"
};
var tokenResponse = await sdk.V3.V3TokenRequestAsync(tokenRequest);
var accessToken = tokenResponse.V3TokenResponse?.AccessToken;
_sdk = new ProveAPI(auth: accessToken, serverUrl: "https://platform.uat.proveapis.com");
```
Replace `uat-us` with `uat-eu` if performing testing outside of North America.
## Install server-side SDK
Install the server-side SDK of your choice by running a command in your terminal, or by using a dependency management tool specific to your project.
```go Go theme={"dark"}
# The Go library is hosted on GitHub so you can use this command to import it
# to your Go application.
go get github.com/prove-identity/prove-sdk-server-go
# Ensure you import the SDK in your code like this:
import (
provesdkservergo "github.com/prove-identity/prove-sdk-server-go"
"github.com/prove-identity/prove-sdk-server-go/models/components"
)
```
```typescript TypeScript theme={"dark"}
# Run this command to install package from GitHub and save as a dependency
npm install -S @prove-identity/prove-api
# Import the SDK in your code like this:
import { Proveapi } from "@prove-identity/prove-api";
import { OAuthClient, WithAuthorization } from "@prove-identity/prove-api/sdk/oauth"
```
```java Java theme={"dark"}
# See the latest version number here: https://central.sonatype.com/artifact/com.prove/proveapi
Gradle:
implementation 'com.prove:proveapi:0.10.0'
Maven:
com.prove
proveapi
0.10.0
```
```csharp .NET theme={"dark"}
// Run this command to install package from Nuget and save as a dependency
dotnet add package Prove.Proveapi --version 1.0.1
// Ensure you import the SDK in your code like this:
using Prove.Proveapi;
using Prove.Proveapi.Models.Components;
```
## Install client-side SDK
Install the client-side SDK of your choice by running a command in your terminal, or by using a dependency management tool specific to your project.
```shell NPM theme={"dark"}
# Run this command to install the package (ensure you have the latest version).
npm install @prove-identity/prove-auth@2.8.2
```
```html No Package Manager theme={"dark"}
# You can include this file in your web application from jsDelivr (update with the latest version).
# You can also download the JavaScript file from https://cdn.jsdelivr.net/npm/@prove-identity/prove-auth@2.8.2/build/bundle/release/prove-auth.js and store it locally.
```
Prove manages a maven repository with Android binaries to enable integration with Gradle.
Update the dependencies object in the `build.gradle` file:
```java Java theme={"dark"}
dependencies {
// Existing dependencies are here.
// Add the Prove Link dependencies:
implementation 'com.prove.sdk:proveauth:6.6.0'
}
```
You'll also need to point to the repository by updating your `settings.gradle` file with the Maven repository:
```java Java theme={"dark"}
dependencyResolutionManagement {
// Existing repository settings are here.
repositories {
// Existing repositories are here.
// Add the Prove Link Maven repository:
maven {
url = "https://prove.jfrog.io/artifactory/libs-public-maven/"
}
}
}
```
The following needs added to the `build.gradle` file to also download dependency libraries:
```java Java theme={"dark"}
dependencies {
implementation fileTree('libs')
}
```
If you receive an error message on the `application@fullBackupContent` value, you can resolve it by adding this line of code to your application `AndroidManifest.xml` file inside the `...` node. Add it as an attribute to the opening `application` tag:
```xml XML theme={"dark"}
```
The Prove Auth SDK and its children SDKs merge the following permissions into the main application:
```xml XML theme={"dark"}
```
Prove manages a repository with the libraries to enable integration.
Execute the following to import CocoaPod from the Prove pod repository:
```shell shell theme={"dark"}
# Run this command to install the cocoapods-art plugin (authored by Artifactory)
gem install cocoapods-art
# Run this command to add the Prove pod repository
pod repo-art add prove.jfrog.io https://prove.jfrog.io/artifactory/api/pods/libs-public-cocoapods
# In your Podfile, paste in the Prove pod repository as a source
plugin 'cocoapods-art', :sources => [
'prove.jfrog.io'
]
# In your Podfile, paste in the SDK pods
pod 'ProveAuth', '6.6.0'
# Run this command to install the SDK pods
pod install
```
# Global Fraud Policy - Current
Source: https://developer.prove.com/docs/global-fraud-policy
This document outlines the global fraud policy for our organization, detailing the measures in place to prevent, detect, and respond to fraudulent activities.
## Platform integration
The Global Fraud Policy (GFP) serves as Prove's comprehensive set of business intelligence for combating fraud across all its products. This policy translates collaborative intelligence—drawn from both Prove's data and our clients' firsthand fraud experiences. It turns it into a unified output including identification and authentication results with specific failure reason codes designed to maximize pass rates for legitimate consumers while simultaneously mitigating risk.
The automated engine that applies the GFP within Prove's Products and Solutions includes the latest fraud insights, and Prove updates it to account for ever-evolving fraud trends. For every Prove Platform transaction, the Platform generates a result output status based on the GFP. The automated engine assesses a wide array of identity attributes—such as phone tenure and address matching—together with our proprietary risk intelligence. This analysis generates a holistic assessment across four key categories:
1. **Identification -** Validates personal details such as name, address, date of birth, and national identifier to confirm an individual's identity, ensuring the accuracy of provided information.
2. **Authentication -** Verifies a person is truly the identity they're claiming to be in the identification step.
3. **Compliance -** The adherence to the appropriate regulatory rules to satisfy minimum requirements for that industry and use case.
4. **Risk -** Other risks related to the transaction outside of identification and authentication.
This detailed, multi-faceted output is then seamlessly integrated into the final transaction output for your immediate use under the `evaluation` object.
## Output examples
Following is an example of a successful result output from the v3/complete API:
```
{
"success": true,
"next": {
"done": "done"
},
"evaluation": {
"authentication": {
"result": "pass"
},
"identification": {
"result": "pass"
}
}
}
```
Following is an example of a failed result output from the v3/complete API:
```
{
"success": false,
"next": {
"done": "done"
},
"evaluation": {
"authentication": {
"result": "fail",
"failureReasons": {
"9161": "Very short tenure association between phone number and identity.",
"9171": "Potential injection attack due to 2 identities both with short tenure association to the phone number.",
"9180": "No phone ownership confirmed using 4 elements."
}
},
"identification": {
"result": "fail",
"failureReasons": {
"9001": "Identification is not confirmed using 4 elements."
}
}
}
}
```
The Failure Reason code outputs from the Global Fraud Policy are as follows:
| **Failure Reason** | **Category** | **Result Description** |
| :----------------- | :------------- | :------------------------------------------------------------------------------------------------------------------------------------------------------------------------- |
| 9001 | Identification | Identification is not confirmed using 4 elements. |
| 9003 | Identification | Identity is not found |
| 9011 | Identification | Identification is not confirmed using less than 4 elements. |
| 9012 | Identification | SSN does not match. |
| 9013 | Identification | Birth Date does not match. |
| 9014 | Identification | Name does not match. |
| 9015 | Identification | Address does not match. |
| 9081 | Identification | SSN is issued before the birth date. |
| 9082 | Identification | Address is a correctional facility. |
| 9083 | Identification | Deceased indicator is present for individual. |
| 9100 | Authentication | Phone possession incomplete |
| 9131 | Authentication | Indicates the phone number is at a higher risk for fraud due to being listed as a non-mobile line on the Override Services Registry (OSR). |
| 9132 | Authentication | This phone number is listed on a public website with the contents of its text messages posted publicly in order to allow a user to bypass phone possession check controls. |
| 9133 | Authentication | The phone is not trusted based on the SIM Key Trust Score. |
| 9134 | Authentication | The phone is not trusted because it is a non-fixed VoIP number. |
| 9135 | Authentication | Potential ATO due to recent SIM Swap under 24 hours. |
| 9136 | Authentication | Potential ATO due to recent Port under 24 hours. |
| 9137 | Authentication | Potential ATO due to call forwarding enabled for phone number. |
| 9161 | Authentication | Very short tenure association between phone number and identity. |
| 9162 | Authentication | Short tenure association between phone number and identity. |
| 9163 | Authentication | Potential recycled phone fraud due to a high number of identities associated to phone number with a newer owner present. |
| 9164 | Authentication | Potential recycled phone fraud due to identity having no recent association to phone number and a phone disconnect event is observed after the phone association. |
| 9165 | Authentication | Potential recycled phone fraud due to a newer owner observed and a phone disconnect event is observed after the phone association. |
| 9166 | Authentication | Address is a correctional facility. |
| 9167 | Authentication | Deceased indicator is present for individual. |
| 9168 | Authentication | Person verification was performed indicating phone ownership is not verified |
| 9171 | Authentication | Potential injection attack due to 2 identities both with short tenure association to the phone number. |
| 9172 | Authentication | Potential injection attack due to 3 identities all with short tenure association to the phone number. |
| 9173 | Authentication | Potential injection attack due to 4 identities all with short tenure association to the phone number. |
| 9174 | Authentication | Potential injection attack due to 5 or more identities all with short tenure association to the phone number. |
| 9180 | Authentication | No phone ownership confirmed using 4 elements. |
| 9181 | Authentication | No phone ownership confirmed using less than 4 elements |
# Prove Marketplace
Source: https://developer.prove.com/docs/grow-overview
Overview of Prove's Marketplace Add-ons
## Overview
The Prove Marketplace is a curated ecosystem that connects trusted data and service partners through the power of the Prove Identity Graph. It enables Prove customers to unlock richer insights and actions beyond identity—securely and in real time—by linking each partner’s data to a verified Prove ID.
Built on Prove’s privacy-first foundation, the Marketplace provides seamless access to Prove-Ready partners—each rigorously vetted for quality, security, and interoperability. Through this certification process, every integration meets the same high standards that define Prove’s identity infrastructure.
The result is a growing network of premium partners offering data and services. These include payment credentials, credit risk insights, background checks, and more—empowering enterprises to enrich onboarding, payments, and risk workflows without adding friction or complexity.
```mermaid theme={"dark"}
sequenceDiagram
actor Consumer
Consumer ->> Merchant Client: Create Account
Merchant Client ->> Merchant Server: Submit
Merchant Server ->> Prove Server: Pre-Fill with Prove
Prove Server ->> Merchant Server:
Merchant Server ->> Prove Server: Discovery (ProveID, Wallet Types Array)
Prove Server ->> Marketplace Payment Wallet: (ProveID, Phone Number, Email)
Marketplace Payment Wallet ->> Prove Server:
Prove Server ->> Merchant Server: Return Discovery
Merchant Server ->> Merchant Client: Prompt User
Merchant Client ->> Consumer: Permission
Consumer ->> Merchant Client:
Merchant Client ->> Merchant Server: OK
Merchant Server ->> Prove Server: Fetch (Marketplace Partner ID Array, Key, Evidence)
Prove Server ->> Marketplace Payment Wallet: Get Wallet ID (ProveID, aSSN, aPhone Number, aEmail)
Marketplace Payment Wallet ->> Prove Server:
Prove Server ->> Merchant Server: Return Wallet ID
Merchant Server -->> Merchant Client:
Merchant Client -->> Merchant Server: 2FA Optional
Consumer ->> Merchant Client: Choose Payment Method
Merchant Client ->> Consumer: Show Success
Merchant Server ->> Marketplace Payment Wallet: Get Wallet
```
# How To Implement
Source: https://developer.prove.com/docs/how-to-implement-authentication
# Identity Management Overview
Source: https://developer.prove.com/docs/identity-management-overview
Prove Identity Manager acts as a real-time registry of phone identity tokens.
Prove Identity Manager helps businesses proactively manage consumers' phone numbers and other vital identity attributes as they change throughout their lifecycle, providing continuous monitoring and alerts about identity changes.
## Ongoing monitoring and maintenance
Once a user's information mapped to a Prove ID and enrolled in the Identity Manager, their information is accessible by the client to support ongoing operations, including:
* **Cross-Domain Identity:** Seeing where the same human user exists across different client domains.
* **Marketplace Integration:** Connecting the user base to other Prove products and services available in the marketplace.
# Prove Identity Manager Overview
Source: https://developer.prove.com/docs/identity-manager-flow
Learn about the components that make up the Prove Identity Manager solution
## Prove Identity Manager solution
The Prove Identity Manager solution provides phone risk change events based on the connection between an enrolled consumer ID and their phone number via webhook. Updates can include, but aren't limited to, the following attributes:
* Phone Number Disconnects
* Phone Number Changes
* Line Type Changes
* Carrier Changes
# Implement Prove Identity Manager
Source: https://developer.prove.com/docs/identity-manager-implementation-guide
Learn how to implement Prove Identity Manager
## Prerequisites
* **Sandbox credentials:** Ensure you have Prove Sandbox credentials from the [Developer Portal](https://portal.prove.com). To access Sandbox credentials, follow the steps outlined on the [Authentication page](https://developer.prove.com/reference/authentication). To access the Prove API, use your OAuth 2.0 client ID and client secret. You can load these from environment variables or another method:
```go Go theme={"dark"}
clientID := os.Getenv("PROVE_CLIENT_ID")
clientSecret := os.Getenv("PROVE_CLIENT_SECRET")
proveEnv := "uat-us" // Use UAT in US region.
client := provesdkservergo.New(
provesdkservergo.WithServer(proveEnv),
provesdkservergo.WithSecurity(components.Security{
ClientID: provesdkservergo.String(clientID),
ClientSecret: provesdkservergo.String(clientSecret),
}),
)
```
```typescript TypeScript theme={"dark"}
export const DEVICE_API_BASE_URL = process.env.DEVICE_API_BASE_URL || '';
export const PROVE_CLIENT_ID = process.env.PROVE_CLIENT_ID;
export const PROVE_CLIENT_SECRET = process.env.PROVE_CLIENT_SECRET;
export function getProveSdk(): Proveapi {
return new Proveapi({
server: 'uat-us',
security: {
clientID: PROVE_CLIENT_ID,
clientSecret: PROVE_CLIENT_SECRET,
},
});
}
```
```java Java theme={"dark"}
String clientId = System.getenv("PROVE_CLIENT_ID");
String clientSecret = System.getenv("PROVE_CLIENT_SECRET");
Proveapi sdk = Proveapi.builder()
.security(Security.builder()
.clientID(clientId)
.clientSecret(clientSecret)
.build())
.build();
```
```csharp .NET theme={"dark"}
var clientId = Environment.GetEnvironmentVariable("PROVE_CLIENT_ID");
var clientSecret = Environment.GetEnvironmentVariable("PROVE_CLIENT_SECRET");
var sdk = new ProveAPI(serverUrl: "https://platform.uat.proveapis.com");
var tokenRequest = new V3TokenRequest
{
ClientId = clientId,
ClientSecret = clientSecret,
GrantType = "client_credentials"
};
var tokenResponse = await sdk.V3.V3TokenRequestAsync(tokenRequest);
var accessToken = tokenResponse.V3TokenResponse?.AccessToken;
_sdk = new ProveAPI(auth: accessToken, serverUrl: "https://platform.uat.proveapis.com");
```
**Token Expiration**
The OAuth token expires after 60 minutes, requiring you to get another token.
* **Server-side SDK:** Install the server-side SDK of your choice by running a command in your terminal, or by using a dependency management tool specific to your project.
```go Go theme={"dark"}
# The Go library is hosted on GitHub so you can use this command to import it
# to your Go application.
go get github.com/prove-identity/prove-sdk-server-go
# Ensure you import the SDK in your code like this:
import (
provesdkservergo "github.com/prove-identity/prove-sdk-server-go"
"github.com/prove-identity/prove-sdk-server-go/models/components"
)
```
```typescript TypeScript theme={"dark"}
# Run this command to install package from GitHub and save as a dependency
npm install -S @prove-identity/prove-api
# Import the SDK in your code like this:
import { Proveapi } from "@prove-identity/prove-api";
import { OAuthClient, WithAuthorization } from "@prove-identity/prove-api/sdk/oauth"
```
```java Java theme={"dark"}
# See the latest version number here: https://central.sonatype.com/artifact/com.prove/proveapi
Gradle:
implementation 'com.prove:proveapi:0.10.0'
Maven:
com.prove
proveapi
0.10.0
```
```csharp .NET theme={"dark"}
// Run this command to install package from Nuget and save as a dependency
dotnet add package Prove.Proveapi --version 1.0.1
// Ensure you import the SDK in your code like this:
using Prove.Proveapi;
using Prove.Proveapi.Models.Components;
```
## Implement Prove Identity Manager
Use the Enroll Identity endpoint to enroll a single customer for monitoring:
```go Go theme={"dark"}
// Enroll a single identity for monitoring
rspEnrollIdentity, err := client.IdentityManager.V3EnrollIdentity(ctx &components.V3EnrollIdentityRequest{
PhoneNumber: "2001004031",
ClientCustomerId: provesdkservergo.String("customer-123"),
})
if err != nil {
return fmt.Errorf("error creating identity: %w", err)
}
```
```typescript TypeScript theme={"dark"}
// Enroll a single identity for monitoring
const enrollIdentityReq = {
phoneNumber: '2001004031',
clientCustomerId: 'customer-123'
};
const rspEnrollIdentity = await sdk.identityManager.enrollIdentity(enrollIdentityReq);
if (!rspEnrollIdentity) {
console.error("Enroll identity error.")
return
}
```
```java Java theme={"dark"}
// Enroll a single identity for monitoring
EnrollIdentityRequest req = V3EnrollIdentityRequest.builder()
.phoneNumber("2001004031")
.clientCustomerId("customer-123")
.build();
EnrollIdentityResponse res = sdk.identityManager().enrollIdentity()
.request(req)
.call();
```
The function returns:
* `identityId`: a unique Prove-generated identifier for the enrolled identity.
* `success`: if true, the request was successful and the identity was created.
For bulk operations, use the Batch Enroll Identities endpoint to enroll up to 100 customers at once:
```go Go theme={"dark"}
// Enroll multiple identities in a batch
identities := []components.IdentityItem{
{
PhoneNumber: "2001004031",
ClientCustomerId: provesdkservergo.String("customer-123"),
},
{
PhoneNumber: "2001004035",
ClientCustomerId: provesdkservergo.String("customer-124"),
},
}
rspBatchEnroll, err := client.IdentityManager.V3BatchEnrollIdentities(ctx, &components.V3BatchEnrollIdentitiesRequest{
Identities: identities,
})
if err != nil {
return fmt.Errorf("error batch enrolling identities: %w", err)
}
```
```typescript TypeScript theme={"dark"}
// Enroll multiple identities in a batch
const batchEnrollReq = {
identities: [
{
phoneNumber: '2001004031',
clientCustomerId: 'customer-123'
},
{
phoneNumber: '2001004035',
clientCustomerId: 'customer-124'
}
]
};
const rspBatchEnroll = await sdk.identityManager.v3batchEnrollIdentities(batchEnrollReq);
```
```java Java theme={"dark"}
// Enroll multiple identities in a batch
List identities = Arrays.asList(
IdentityData.builder()
.phoneNumber("2001004031")
.clientCustomerId("customer-123")
.build(),
IdentityData.builder()
.phoneNumber("2001004035")
.clientCustomerId("customer-124")
.build()
);
V3BatchEnrollIdentitiesRequest req = V3BatchEnrollIdentitiesRequest.builder()
.identities(identities)
.build();
```
### Webhook notifications
Webhooks are the method by which Prove sends risk change events. Webhook integration is necessary to receive change notifications for enrolled consumers.
Here's how to get these webhook notifications up and running:
Login to [the Portal](https://portal.prove.com/en/login).
Navigate to your Identity Manager project.
Using the Configure tab, select the Configure button next to the Sandbox webhook.
If you would like a sample URL to test, you can use [Webhook.site](https://webhook.site/) to generate a unique URL for testing.
 Enter your webhook endpoint URL in the provided field.
Select Save and Test Webhook. This saves your configuration and sends a test webhook to your endpoint.
The webhook URL requires authentication using Prove’s secret for JSON Web Token (JWT). The JWT is a synchronous token using the HS256 algorithm.
This secret is used to sign the JWT token that Prove sends with the webhook notifications. Add the appropriate code snippet from the webhook configuration to your server-side implementation, replacing `whsec_your_secret` with the secret provided by the Portal.
The secret value is autogenerated when the appropriate URL is entered and you select Save and Test Webhook or Configure Webhook.
The following snippet shows an example of each type of change event you could receive from Prove. Each notification comes as an array of event objects.
```json Example Payload theme={"dark"}
{
"notifications": [
{
"eventID": "c3702333-ddd0-4aad-8f8f-c2813c1dd253",
"event": "phone number change detected",
"eventType": "PHONE_NUMBER_CHANGE",
"eventTimestamp": "2025-01-23T10:11:12Z",
"clientCustomerId": "c3702333-ddd0-4aad-8f8f-c2813c1dd253",
"identityID": "81d3829a-7207-4fd7-9a78-2dbf33fd54ad"
},
{
"eventId": "c3702333-ddd0-4aad-8f8f-c2813c1dd253",
"event": "phone number disconnected",
"eventType": "DISCONNECT",
"eventTimeStamp": "2025-01-23T10:11:12Z",
"clientCustomerId": "c3702333-ddd0-4aad-8f8f-c2813c1dd253",
"identityID": "81d3829a-7207-4fd7-9a78-2dbf33fd54ad"
},
{
"eventId": "c3702333-ddd0-4aad-8f8f-c2813c1dd253",
"event": "phone number ported to new provider",
"eventType": "PORT",
"eventTimestamp": "2025-01-23T10:11:12Z",
"clientCustomerId": "c3702333-ddd0-4aad-8f8f-c2813c1dd253",
"identityID": "81d3829a-7207-4fd7-9a78-2dbf33fd54ad",
"newCarrier": "AT&T Wireless"
},
{
"eventId": "c3702333-ddd0-4aad-8f8f-c2813c1dd253",
"event": "phone number line type changed",
"eventType": "LINETYPE_CHANGE",
"eventTimestamp": "2025-01-23T10:11:12Z",
"clientCustomerId": "c3702333-ddd0-4aad-8f8f-c2813c1dd253",
"identityID": "81d3829a-7207-4fd7-9a78-2dbf33fd54ad",
"newLineType": "Mobile"
},
{
"eventId": "c3702333-ddd0-4aad-8f8f-c2813c1dd253",
"event": "phone number moved out of coverage",
"eventType": "MOVED_OUT_OF_COVERAGE",
"eventTimestamp": "2025-01-23T10:11:12Z",
"clientCustomerId": "c3702333-ddd0-4aad-8f8f-c2813c1dd253",
"identityId": "81d3829a-7207-4fd7-9a78-2dbf33fd54ad"
}
]
}
```
A unique event ID to reference if you need support.
A description of the event.
The event type. Identity Manager supports: PHONE\_NUMBER\_CHANGE, DISCONNECT, PORT, LINE\_TYPE\_CHANGE and MOVED\_OUT\_OF\_COVERAGE.
The time the event is sent.
The client customer ID if one is associated with the identity.
A unique Prove-generated identifier.
Once you have successfully tested the webhook and finished your implementation, test your production webhook URL. This will allow you to receive notifications for live events.
Why Am I Not Receiving Notifications?
* Prove will not send retroactive notifications that occur before the webhook is configured.
* Deactivated identities will not generate webhook notifications until reactivated.
* A phone number change, disconnect, or moved out of coverage event will result in no further notifications for that identity.
In the event your customer provides an updated phone number, we'd recommend completing verification for this number and then enrolling the updated phone number.
## Test your Prove implementation
Next, reference the Sandbox test scenarios to test users and simulate different behaviors encountered in production.
Production Launch
To launch in Production, please contact your Prove representative.
# Test Your Implementation
Source: https://developer.prove.com/docs/identity-manager-sandbox-testing
Learn more about testing your Identity Manager implementation using the Sandbox environment
Prove Identity Manager sandbox test users work only with Identity Manager project credentials. Attempting to use these test users with different project credentials results in an unauthorized access error.
## Test users
The following test users are available for testing Identity Manager in the Sandbox environment:
| Phone Number | First Name | Last Name |
| ------------ | ---------- | ---------- |
| `2001004031` | Merla | Schumacher |
| `2001004035` | Jamie | Beddoe |
| `2001004036` | Stanley | Ovid |
Use these test phone numbers exactly as shown. The sandbox environment doesn't validate real customer information or send actual webhook notifications for these test users.
## Testing steps
Use the Enroll Identity endpoint with test user data:
```bash cURL theme={"dark"}
curl -X POST "https://platform.uat.proveapis.com/v3/identity" \
-H "Authorization: Bearer YOUR_ACCESS_TOKEN" \
-H "Content-Type: application/json" \
-d '{
"phoneNumber": "2001004031",
"clientCustomerId": "test-customer-123"
}'
```
Expected response:
```json theme={"dark"}
{
"identityId": "d15b9920-39f3-4620-a12a-66724b331f20",
"success": true
}
```
Test the Batch Enroll Identities endpoint with multiple test users:
```bash cURL theme={"dark"}
curl -X POST "https://platform.uat.proveapis.com/v3/identity/batch" \
-H "Authorization: Bearer YOUR_ACCESS_TOKEN" \
-H "Content-Type: application/json" \
-d '{
"items": [
{
"phoneNumber": "2001004031",
"clientCustomerId": "test-customer-123"
},
{
"phoneNumber": "2001004035",
"clientCustomerId": "test-customer-124"
},
{
"phoneNumber": "2001004036",
"clientCustomerId": "test-customer-125"
}
]
}'
```
Expected response:
```json theme={"dark"}
{
"results": [
{
"identityId": "64ec34e4-6b91-427c-839c-b443dd1570fc"
},
{
"identityId": "75fd45f5-7c92-538d-94da-c554ee2681gd"
},
{
"identityId": "86ge56g6-8d03-649e-a5eb-d665ff3792he"
}
]
}
```
## Webhook testing
Login to [the Portal](https://portal.prove.com).
Navigate to your Identity Manager project in the Portal.
Select the Configure button using the Configure tab, next to the Sandbox webhook.
Click the "Save and Test Webhook" button in the Portal to send a sample webhook payload to your configured endpoint.
Confirm that your webhook endpoint receives and processes the test payload correctly.
In the sandbox environment, you trigger webhooks manually rather than through actual change events, since test users don't generate real-world phone number changes.
# Verification Overview
Source: https://developer.prove.com/docs/know-verification-overview
Enter your webhook endpoint URL in the provided field.
Select Save and Test Webhook. This saves your configuration and sends a test webhook to your endpoint.
The webhook URL requires authentication using Prove’s secret for JSON Web Token (JWT). The JWT is a synchronous token using the HS256 algorithm.
This secret is used to sign the JWT token that Prove sends with the webhook notifications. Add the appropriate code snippet from the webhook configuration to your server-side implementation, replacing `whsec_your_secret` with the secret provided by the Portal.
The secret value is autogenerated when the appropriate URL is entered and you select Save and Test Webhook or Configure Webhook.
The following snippet shows an example of each type of change event you could receive from Prove. Each notification comes as an array of event objects.
```json Example Payload theme={"dark"}
{
"notifications": [
{
"eventID": "c3702333-ddd0-4aad-8f8f-c2813c1dd253",
"event": "phone number change detected",
"eventType": "PHONE_NUMBER_CHANGE",
"eventTimestamp": "2025-01-23T10:11:12Z",
"clientCustomerId": "c3702333-ddd0-4aad-8f8f-c2813c1dd253",
"identityID": "81d3829a-7207-4fd7-9a78-2dbf33fd54ad"
},
{
"eventId": "c3702333-ddd0-4aad-8f8f-c2813c1dd253",
"event": "phone number disconnected",
"eventType": "DISCONNECT",
"eventTimeStamp": "2025-01-23T10:11:12Z",
"clientCustomerId": "c3702333-ddd0-4aad-8f8f-c2813c1dd253",
"identityID": "81d3829a-7207-4fd7-9a78-2dbf33fd54ad"
},
{
"eventId": "c3702333-ddd0-4aad-8f8f-c2813c1dd253",
"event": "phone number ported to new provider",
"eventType": "PORT",
"eventTimestamp": "2025-01-23T10:11:12Z",
"clientCustomerId": "c3702333-ddd0-4aad-8f8f-c2813c1dd253",
"identityID": "81d3829a-7207-4fd7-9a78-2dbf33fd54ad",
"newCarrier": "AT&T Wireless"
},
{
"eventId": "c3702333-ddd0-4aad-8f8f-c2813c1dd253",
"event": "phone number line type changed",
"eventType": "LINETYPE_CHANGE",
"eventTimestamp": "2025-01-23T10:11:12Z",
"clientCustomerId": "c3702333-ddd0-4aad-8f8f-c2813c1dd253",
"identityID": "81d3829a-7207-4fd7-9a78-2dbf33fd54ad",
"newLineType": "Mobile"
},
{
"eventId": "c3702333-ddd0-4aad-8f8f-c2813c1dd253",
"event": "phone number moved out of coverage",
"eventType": "MOVED_OUT_OF_COVERAGE",
"eventTimestamp": "2025-01-23T10:11:12Z",
"clientCustomerId": "c3702333-ddd0-4aad-8f8f-c2813c1dd253",
"identityId": "81d3829a-7207-4fd7-9a78-2dbf33fd54ad"
}
]
}
```
A unique event ID to reference if you need support.
A description of the event.
The event type. Identity Manager supports: PHONE\_NUMBER\_CHANGE, DISCONNECT, PORT, LINE\_TYPE\_CHANGE and MOVED\_OUT\_OF\_COVERAGE.
The time the event is sent.
The client customer ID if one is associated with the identity.
A unique Prove-generated identifier.
Once you have successfully tested the webhook and finished your implementation, test your production webhook URL. This will allow you to receive notifications for live events.
Why Am I Not Receiving Notifications?
* Prove will not send retroactive notifications that occur before the webhook is configured.
* Deactivated identities will not generate webhook notifications until reactivated.
* A phone number change, disconnect, or moved out of coverage event will result in no further notifications for that identity.
In the event your customer provides an updated phone number, we'd recommend completing verification for this number and then enrolling the updated phone number.
## Test your Prove implementation
Next, reference the Sandbox test scenarios to test users and simulate different behaviors encountered in production.
Production Launch
To launch in Production, please contact your Prove representative.
# Test Your Implementation
Source: https://developer.prove.com/docs/identity-manager-sandbox-testing
Learn more about testing your Identity Manager implementation using the Sandbox environment
Prove Identity Manager sandbox test users work only with Identity Manager project credentials. Attempting to use these test users with different project credentials results in an unauthorized access error.
## Test users
The following test users are available for testing Identity Manager in the Sandbox environment:
| Phone Number | First Name | Last Name |
| ------------ | ---------- | ---------- |
| `2001004031` | Merla | Schumacher |
| `2001004035` | Jamie | Beddoe |
| `2001004036` | Stanley | Ovid |
Use these test phone numbers exactly as shown. The sandbox environment doesn't validate real customer information or send actual webhook notifications for these test users.
## Testing steps
Use the Enroll Identity endpoint with test user data:
```bash cURL theme={"dark"}
curl -X POST "https://platform.uat.proveapis.com/v3/identity" \
-H "Authorization: Bearer YOUR_ACCESS_TOKEN" \
-H "Content-Type: application/json" \
-d '{
"phoneNumber": "2001004031",
"clientCustomerId": "test-customer-123"
}'
```
Expected response:
```json theme={"dark"}
{
"identityId": "d15b9920-39f3-4620-a12a-66724b331f20",
"success": true
}
```
Test the Batch Enroll Identities endpoint with multiple test users:
```bash cURL theme={"dark"}
curl -X POST "https://platform.uat.proveapis.com/v3/identity/batch" \
-H "Authorization: Bearer YOUR_ACCESS_TOKEN" \
-H "Content-Type: application/json" \
-d '{
"items": [
{
"phoneNumber": "2001004031",
"clientCustomerId": "test-customer-123"
},
{
"phoneNumber": "2001004035",
"clientCustomerId": "test-customer-124"
},
{
"phoneNumber": "2001004036",
"clientCustomerId": "test-customer-125"
}
]
}'
```
Expected response:
```json theme={"dark"}
{
"results": [
{
"identityId": "64ec34e4-6b91-427c-839c-b443dd1570fc"
},
{
"identityId": "75fd45f5-7c92-538d-94da-c554ee2681gd"
},
{
"identityId": "86ge56g6-8d03-649e-a5eb-d665ff3792he"
}
]
}
```
## Webhook testing
Login to [the Portal](https://portal.prove.com).
Navigate to your Identity Manager project in the Portal.
Select the Configure button using the Configure tab, next to the Sandbox webhook.
Click the "Save and Test Webhook" button in the Portal to send a sample webhook payload to your configured endpoint.
Confirm that your webhook endpoint receives and processes the test payload correctly.
In the sandbox environment, you trigger webhooks manually rather than through actual change events, since test users don't generate real-world phone number changes.
# Verification Overview
Source: https://developer.prove.com/docs/know-verification-overview
 The Know solutions help reduce fraud, improve customer experience, and lower the cost of traditional authentication methods.
* [**Verified Users:**](/docs/verified-users-flow) This solution helps protect against fraudsters, enhances trust and engagement on digital platforms, and enables smoother digital experiences by balancing strong security with a seamless user experience.
The Global Fraud Policy (GFP) screens all these solutions through a consistent, globally deployed framework that continuously updates to protect against defined fraud vectors.
# Install the Model Context Protocol (MCP)
Source: https://developer.prove.com/docs/model-context-protocol
Let your AI agents interact with Prove documentation by using MCP tools
The Prove Model Context Protocol (MCP) server has a tool called `searchProve` that AI agents can use to search our documentation.
If you use AI-powered code editors like Cursor or Windsurf, or general-purpose tools like Claude Desktop, you can use the MCP server.
## Remote server
Prove hosts an HTTP MCP server that’s available at [https://developer.prove.com/mcp](https://developer.prove.com/mcp).
Add the following to your `~/.cursor/mcp.json` file. To learn more, see the Cursor [documentation](https://www.cursor.com/docs/context/mcp).
```json mcp.json theme={"dark"}
{
"mcpServers": {
"prove": {
"url": "developer.prove.com/mcp"
}
}
}
```
Add the following to your `.vscode/mcp.json` file. To learn more, see the VS Code [documentation](https://code.visualstudio.com/docs/copilot/chat/mcp-servers).
```json mcp.json theme={"dark"}
{
"servers": {
"prove": {
"type": "http",
"url": "developer.prove.com/mcp"
}
}
}
```
To add MCP to Claude code, run the following command:
```shell Command Line theme={"dark"}
claude mcp add --transport http prove https://developer.prove.com/mcp
```
To learn more, see the Claude Code [documentation](https://docs.anthropic.com/en/docs/claude-code/mcp#configure-mcp-servers).
# Pre-Fill® CX Requirements - MobileAuth℠
Source: https://developer.prove.com/docs/pre-fill-cx-requirements-mobileauthsm
Review the Prove Standard℠ frontend requirements for Pre-Fill when implementing with MobileAuth℠
## Getting started
The Prove Standard customer experience (CX) requirements maximizes your value with Prove Pre-Fill and takes guesswork out of key design decisions.
When building the experience, you must follow the CX requirements for several key reasons:
* Minimizes Friction: Clunky onboarding processes impact customer conversion rates and results in a negative experience.
* Drives CX Simplicity and Clarity: Keeps your onboarding process straightforward with concise language and visual design to avoid overwhelming customers with too much information or too many steps.
* Establishes Security and Trust: Highlights the security measures in place to protect customers’ personal information - clear terms and conditions, privacy policies, and explanations of data usage build customer trust and ensure informed consent.
* Meets Compliance and Regulatory Needs: Ensures that your onboarding process complies with relevant regulations and legal requirements.
# Pre-Filled Customer Review Page Requirements - Mobile Auth℠
Source: https://developer.prove.com/docs/pre-filled-consumer-review-page-requirements-mobile-authsm
Learn how to design the front end for your Customer Review Page when using Mobile Auth℠
The Know solutions help reduce fraud, improve customer experience, and lower the cost of traditional authentication methods.
* [**Verified Users:**](/docs/verified-users-flow) This solution helps protect against fraudsters, enhances trust and engagement on digital platforms, and enables smoother digital experiences by balancing strong security with a seamless user experience.
The Global Fraud Policy (GFP) screens all these solutions through a consistent, globally deployed framework that continuously updates to protect against defined fraud vectors.
# Install the Model Context Protocol (MCP)
Source: https://developer.prove.com/docs/model-context-protocol
Let your AI agents interact with Prove documentation by using MCP tools
The Prove Model Context Protocol (MCP) server has a tool called `searchProve` that AI agents can use to search our documentation.
If you use AI-powered code editors like Cursor or Windsurf, or general-purpose tools like Claude Desktop, you can use the MCP server.
## Remote server
Prove hosts an HTTP MCP server that’s available at [https://developer.prove.com/mcp](https://developer.prove.com/mcp).
Add the following to your `~/.cursor/mcp.json` file. To learn more, see the Cursor [documentation](https://www.cursor.com/docs/context/mcp).
```json mcp.json theme={"dark"}
{
"mcpServers": {
"prove": {
"url": "developer.prove.com/mcp"
}
}
}
```
Add the following to your `.vscode/mcp.json` file. To learn more, see the VS Code [documentation](https://code.visualstudio.com/docs/copilot/chat/mcp-servers).
```json mcp.json theme={"dark"}
{
"servers": {
"prove": {
"type": "http",
"url": "developer.prove.com/mcp"
}
}
}
```
To add MCP to Claude code, run the following command:
```shell Command Line theme={"dark"}
claude mcp add --transport http prove https://developer.prove.com/mcp
```
To learn more, see the Claude Code [documentation](https://docs.anthropic.com/en/docs/claude-code/mcp#configure-mcp-servers).
# Pre-Fill® CX Requirements - MobileAuth℠
Source: https://developer.prove.com/docs/pre-fill-cx-requirements-mobileauthsm
Review the Prove Standard℠ frontend requirements for Pre-Fill when implementing with MobileAuth℠
## Getting started
The Prove Standard customer experience (CX) requirements maximizes your value with Prove Pre-Fill and takes guesswork out of key design decisions.
When building the experience, you must follow the CX requirements for several key reasons:
* Minimizes Friction: Clunky onboarding processes impact customer conversion rates and results in a negative experience.
* Drives CX Simplicity and Clarity: Keeps your onboarding process straightforward with concise language and visual design to avoid overwhelming customers with too much information or too many steps.
* Establishes Security and Trust: Highlights the security measures in place to protect customers’ personal information - clear terms and conditions, privacy policies, and explanations of data usage build customer trust and ensure informed consent.
* Meets Compliance and Regulatory Needs: Ensures that your onboarding process complies with relevant regulations and legal requirements.
# Pre-Filled Customer Review Page Requirements - Mobile Auth℠
Source: https://developer.prove.com/docs/pre-filled-consumer-review-page-requirements-mobile-authsm
Learn how to design the front end for your Customer Review Page when using Mobile Auth℠
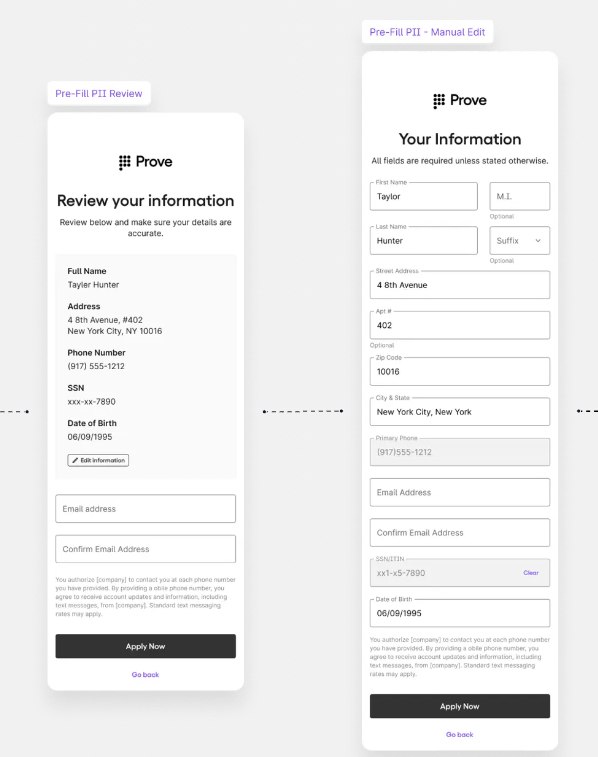 ## Display fields and requirements
| Required Display Field | Display Requirements | Editable Field |
| :---------------------------------------------------------------------------------- | :--------------------------------- | :------------- |
| First Name | Yes - unmasked | Yes |
| Last Name | Yes - unmasked | Yes |
| Address | Yes - unmasked | Yes |
| Extended Address | Yes - unmasked | Yes |
| City | Yes - unmasked | Yes |
| State | Yes - unmasked | Yes |
| Postal Code | Yes - unmasked | Yes |
| Phone Number | Yes - unmasked | No |
| Social Security Number (SSN) | Mask first five, display last four | Yes\* |
| Date of Birth | Yes - MM/DD/YYYY | Yes\*\* |
| \* Upon edit, clear data and require customer to enter full SSN. | | |
| \*\*Upon edit, clear the data and require customer to enter the full date of birth. | | |
| Required Display Field | Display Requirements | Editable Field |
| :--------------------------------------------------------------------------------- | :--------------------------------- | :-------------------------------------------- |
| First Name | Yes - unmasked | Yes |
| Last Name | Yes - unmasked | Yes |
| Address | Yes - unmasked | Yes |
| Extended Address | Yes - unmasked | Yes |
| City | Yes - unmasked | Yes |
| State | Yes - unmasked | Yes |
| Postal Code | Yes - unmasked | Yes |
| Phone Number | Yes - unmasked | No |
| Social Security Number | Mask first five, display last four | No, full SSN entered at beginning of process. |
| Date of Birth | Yes - MM/DD/YYYY | Yes\* |
| \* Upon edit, clear the data and require customer to enter the full date of birth. | | |
Know Your Customer (KYC) Required Customer Confirmation
Include this statement before the submit button. You can include an optional check box.
"I have reviewed the information provided and confirm it's accurate."
# Implementation Guide
Source: https://developer.prove.com/docs/prove-identity-implementation-guide
Learn how to implement Prove Identity
export const solution_0 = "Prove Identity"
## Prerequisites
* Sandbox credentials: Ensure you have Prove Sandbox credentials from the [Developer Portal](https://portal.prove.com). To access Sandbox credentials, follow the steps outlined on the [Authentication page](https://developer.prove.com/reference/authentication). To access the Prove API, use your OAuth 2.0 client ID and client secret. You can load these from environment variables or another method:
```go Go theme={"dark"}
clientID := os.Getenv("PROVE_CLIENT_ID")
clientSecret := os.Getenv("PROVE_CLIENT_SECRET")
proveEnv := "uat-us" // Use UAT in US region.
client := provesdkservergo.New(
provesdkservergo.WithServer(proveEnv),
provesdkservergo.WithSecurity(components.Security{
ClientID: provesdkservergo.String(clientID),
ClientSecret: provesdkservergo.String(clientSecret),
}),
)
```
```typescript TypeScript theme={"dark"}
export const DEVICE_API_BASE_URL = process.env.DEVICE_API_BASE_URL || '';
export const PROVE_CLIENT_ID = process.env.PROVE_CLIENT_ID;
export const PROVE_CLIENT_SECRET = process.env.PROVE_CLIENT_SECRET;
export function getProveSdk(): Proveapi {
return new Proveapi({
server: 'uat-us',
security: {
clientID: PROVE_CLIENT_ID,
clientSecret: PROVE_CLIENT_SECRET,
},
});
}
```
```java Java theme={"dark"}
String clientId = System.getenv("PROVE_CLIENT_ID");
String clientSecret = System.getenv("PROVE_CLIENT_SECRET");
Proveapi sdk = Proveapi.builder()
.security(Security.builder()
.clientID(clientId)
.clientSecret(clientSecret)
.build())
.build();
```
```csharp .NET theme={"dark"}
var clientId = Environment.GetEnvironmentVariable("PROVE_CLIENT_ID");
var clientSecret = Environment.GetEnvironmentVariable("PROVE_CLIENT_SECRET");
var sdk = new ProveAPI(serverUrl: "https://platform.uat.proveapis.com");
var tokenRequest = new V3TokenRequest
{
ClientId = clientId,
ClientSecret = clientSecret,
GrantType = "client_credentials"
};
var tokenResponse = await sdk.V3.V3TokenRequestAsync(tokenRequest);
var accessToken = tokenResponse.V3TokenResponse?.AccessToken;
_sdk = new ProveAPI(auth: accessToken, serverUrl: "https://platform.uat.proveapis.com");
```
Token Expiration
The OAuth token expires after 60 minutes, requiring you to get another token.
* Server-side SDK: Install the server-side SDK of your choice by running a command in your terminal, or by using a dependency management tool specific to your project.
```go Go theme={"dark"}
# The Go library is hosted on GitHub so you can use this command to import it
# to your Go application.
go get github.com/prove-identity/prove-sdk-server-go
# Ensure you import the SDK in your code like this:
import (
provesdkservergo "github.com/prove-identity/prove-sdk-server-go"
"github.com/prove-identity/prove-sdk-server-go/models/components"
)
```
```typescript TypeScript theme={"dark"}
# Run this command to install package from GitHub and save as a dependency
npm install -S @prove-identity/prove-api
# Import the SDK in your code like this:
import { Proveapi } from "@prove-identity/prove-api";
import { OAuthClient, WithAuthorization } from "@prove-identity/prove-api/sdk/oauth"
```
```java Java theme={"dark"}
# See the latest version number here: https://central.sonatype.com/artifact/com.prove/proveapi
Gradle:
implementation 'com.prove:proveapi:0.10.0'
Maven:
com.prove
proveapi
0.10.0
```
```csharp .NET theme={"dark"}
// Run this command to install package from Nuget and save as a dependency
dotnet add package Prove.Proveapi --version 1.0.1
// Ensure you import the SDK in your code like this:
using Prove.Proveapi;
using Prove.Proveapi.Models.Components;
```
* Client-side SDK: Install the client-side SDK of your choice by running a command in your terminal, or by using a dependency management tool specific to your project.
To integrate {solution_0} solutions, you must use the client-side SDK.
```shell NPM theme={"dark"}
# Run this command to install the package (ensure you have the latest version).
npm install @prove-identity/prove-auth@3.1.1
npm install @prove-identity/prove-auth@3.1.1
```
```html No Package Manager theme={"dark"}
# You can include this file in your web application from jsDelivr (update with the latest version).
# You can also download the JavaScript file from https://cdn.jsdelivr.net/npm/@prove-identity/prove-auth@3.1.1/build/bundle/release/prove-auth.js and store it locally.
# You can also download the JavaScript file from https://cdn.jsdelivr.net/npm/@prove-identity/prove-auth@3.1.1/build/bundle/release/prove-auth.js and store it locally.
```
Prove manages a maven repository with Android binaries to enable integration with Gradle.
Update the dependencies object in the `build.gradle` file:
```java Java theme={"dark"}
dependencies {
// Existing dependencies are here.
// Add the Prove Link dependencies:
implementation 'com.prove.sdk:proveauth:6.9.0'
}
```
You'll also need to point to the repository by updating your `settings.gradle` file with the Maven repository:
```java Java theme={"dark"}
dependencyResolutionManagement {
// Existing repository settings are here.
repositories {
// Existing repositories are here.
// Add the Prove Link Maven repository:
maven {
url = "https://prove.jfrog.io/artifactory/libs-public-maven/"
}
}
}
```
The following needs added to the `build.gradle` file to also download dependency libraries:
```java Java theme={"dark"}
dependencies {
implementation fileTree('libs')
}
```
If you receive an error message on the `application@fullBackupContent` value, you can resolve it by adding this line of code to your application `AndroidManifest.xml` file inside the `...` node. Add it as an attribute to the opening `application` tag:
```xml XML theme={"dark"}
```
The Prove Auth SDK and its children SDKs merge the following permissions into the main application:
```xml XML theme={"dark"}
```
Prove manages a repository with the libraries to enable integration. You can install the SDK using either CocoaPods or Swift Package Manager.
Execute the following to import CocoaPod from the Prove pod repository:
```shell shell theme={"dark"}
# Run this command to install the cocoapods-art plugin (authored by Artifactory)
gem install cocoapods-art
# Run this command to add the Prove pod repository
pod repo-art add prove.jfrog.io https://prove.jfrog.io/artifactory/api/pods/libs-public-cocoapods
# In your Podfile, paste in the Prove pod repository as a source
plugin 'cocoapods-art', :sources => [
'prove.jfrog.io'
]
# In your Podfile, paste in the SDK pods
pod 'ProveAuth', '6.9.1'
# Run this command to install the SDK pods
pod install
```
### Step 1: Connect to JFrog Registry
Set up the registry globally (required for both Xcode UI and Package.swift):
```bash theme={"dark"}
swift package-registry set --global "https://prove.jfrog.io/artifactory/api/swift/libs-public-swift"
swift package-registry login "https://prove.jfrog.io/artifactory/api/swift/libs-public-swift"
# Press Enter when prompted for access token
```
Public Registry
This is a publicly accessible registry - no password or access token is needed. Simply press Enter when prompted for an access token.
The registry connection is configured via command line only. Once this setup is complete, you can add packages using either Xcode UI or Package.swift.
### Step 2: Adding Dependencies
#### Method 1: Using Xcode UI
1. In Xcode, go to **File** → **Add Package Dependencies**
2. Search for the package you want (e.g., `swift.proveauth`)
3. Select the version and add to your target
The latest stable version is 6.9.1. Select "Exact Version" for production applications to ensure consistent builds.
## Display fields and requirements
| Required Display Field | Display Requirements | Editable Field |
| :---------------------------------------------------------------------------------- | :--------------------------------- | :------------- |
| First Name | Yes - unmasked | Yes |
| Last Name | Yes - unmasked | Yes |
| Address | Yes - unmasked | Yes |
| Extended Address | Yes - unmasked | Yes |
| City | Yes - unmasked | Yes |
| State | Yes - unmasked | Yes |
| Postal Code | Yes - unmasked | Yes |
| Phone Number | Yes - unmasked | No |
| Social Security Number (SSN) | Mask first five, display last four | Yes\* |
| Date of Birth | Yes - MM/DD/YYYY | Yes\*\* |
| \* Upon edit, clear data and require customer to enter full SSN. | | |
| \*\*Upon edit, clear the data and require customer to enter the full date of birth. | | |
| Required Display Field | Display Requirements | Editable Field |
| :--------------------------------------------------------------------------------- | :--------------------------------- | :-------------------------------------------- |
| First Name | Yes - unmasked | Yes |
| Last Name | Yes - unmasked | Yes |
| Address | Yes - unmasked | Yes |
| Extended Address | Yes - unmasked | Yes |
| City | Yes - unmasked | Yes |
| State | Yes - unmasked | Yes |
| Postal Code | Yes - unmasked | Yes |
| Phone Number | Yes - unmasked | No |
| Social Security Number | Mask first five, display last four | No, full SSN entered at beginning of process. |
| Date of Birth | Yes - MM/DD/YYYY | Yes\* |
| \* Upon edit, clear the data and require customer to enter the full date of birth. | | |
Know Your Customer (KYC) Required Customer Confirmation
Include this statement before the submit button. You can include an optional check box.
"I have reviewed the information provided and confirm it's accurate."
# Implementation Guide
Source: https://developer.prove.com/docs/prove-identity-implementation-guide
Learn how to implement Prove Identity
export const solution_0 = "Prove Identity"
## Prerequisites
* Sandbox credentials: Ensure you have Prove Sandbox credentials from the [Developer Portal](https://portal.prove.com). To access Sandbox credentials, follow the steps outlined on the [Authentication page](https://developer.prove.com/reference/authentication). To access the Prove API, use your OAuth 2.0 client ID and client secret. You can load these from environment variables or another method:
```go Go theme={"dark"}
clientID := os.Getenv("PROVE_CLIENT_ID")
clientSecret := os.Getenv("PROVE_CLIENT_SECRET")
proveEnv := "uat-us" // Use UAT in US region.
client := provesdkservergo.New(
provesdkservergo.WithServer(proveEnv),
provesdkservergo.WithSecurity(components.Security{
ClientID: provesdkservergo.String(clientID),
ClientSecret: provesdkservergo.String(clientSecret),
}),
)
```
```typescript TypeScript theme={"dark"}
export const DEVICE_API_BASE_URL = process.env.DEVICE_API_BASE_URL || '';
export const PROVE_CLIENT_ID = process.env.PROVE_CLIENT_ID;
export const PROVE_CLIENT_SECRET = process.env.PROVE_CLIENT_SECRET;
export function getProveSdk(): Proveapi {
return new Proveapi({
server: 'uat-us',
security: {
clientID: PROVE_CLIENT_ID,
clientSecret: PROVE_CLIENT_SECRET,
},
});
}
```
```java Java theme={"dark"}
String clientId = System.getenv("PROVE_CLIENT_ID");
String clientSecret = System.getenv("PROVE_CLIENT_SECRET");
Proveapi sdk = Proveapi.builder()
.security(Security.builder()
.clientID(clientId)
.clientSecret(clientSecret)
.build())
.build();
```
```csharp .NET theme={"dark"}
var clientId = Environment.GetEnvironmentVariable("PROVE_CLIENT_ID");
var clientSecret = Environment.GetEnvironmentVariable("PROVE_CLIENT_SECRET");
var sdk = new ProveAPI(serverUrl: "https://platform.uat.proveapis.com");
var tokenRequest = new V3TokenRequest
{
ClientId = clientId,
ClientSecret = clientSecret,
GrantType = "client_credentials"
};
var tokenResponse = await sdk.V3.V3TokenRequestAsync(tokenRequest);
var accessToken = tokenResponse.V3TokenResponse?.AccessToken;
_sdk = new ProveAPI(auth: accessToken, serverUrl: "https://platform.uat.proveapis.com");
```
Token Expiration
The OAuth token expires after 60 minutes, requiring you to get another token.
* Server-side SDK: Install the server-side SDK of your choice by running a command in your terminal, or by using a dependency management tool specific to your project.
```go Go theme={"dark"}
# The Go library is hosted on GitHub so you can use this command to import it
# to your Go application.
go get github.com/prove-identity/prove-sdk-server-go
# Ensure you import the SDK in your code like this:
import (
provesdkservergo "github.com/prove-identity/prove-sdk-server-go"
"github.com/prove-identity/prove-sdk-server-go/models/components"
)
```
```typescript TypeScript theme={"dark"}
# Run this command to install package from GitHub and save as a dependency
npm install -S @prove-identity/prove-api
# Import the SDK in your code like this:
import { Proveapi } from "@prove-identity/prove-api";
import { OAuthClient, WithAuthorization } from "@prove-identity/prove-api/sdk/oauth"
```
```java Java theme={"dark"}
# See the latest version number here: https://central.sonatype.com/artifact/com.prove/proveapi
Gradle:
implementation 'com.prove:proveapi:0.10.0'
Maven:
com.prove
proveapi
0.10.0
```
```csharp .NET theme={"dark"}
// Run this command to install package from Nuget and save as a dependency
dotnet add package Prove.Proveapi --version 1.0.1
// Ensure you import the SDK in your code like this:
using Prove.Proveapi;
using Prove.Proveapi.Models.Components;
```
* Client-side SDK: Install the client-side SDK of your choice by running a command in your terminal, or by using a dependency management tool specific to your project.
To integrate {solution_0} solutions, you must use the client-side SDK.
```shell NPM theme={"dark"}
# Run this command to install the package (ensure you have the latest version).
npm install @prove-identity/prove-auth@3.1.1
npm install @prove-identity/prove-auth@3.1.1
```
```html No Package Manager theme={"dark"}
# You can include this file in your web application from jsDelivr (update with the latest version).
# You can also download the JavaScript file from https://cdn.jsdelivr.net/npm/@prove-identity/prove-auth@3.1.1/build/bundle/release/prove-auth.js and store it locally.
# You can also download the JavaScript file from https://cdn.jsdelivr.net/npm/@prove-identity/prove-auth@3.1.1/build/bundle/release/prove-auth.js and store it locally.
```
Prove manages a maven repository with Android binaries to enable integration with Gradle.
Update the dependencies object in the `build.gradle` file:
```java Java theme={"dark"}
dependencies {
// Existing dependencies are here.
// Add the Prove Link dependencies:
implementation 'com.prove.sdk:proveauth:6.9.0'
}
```
You'll also need to point to the repository by updating your `settings.gradle` file with the Maven repository:
```java Java theme={"dark"}
dependencyResolutionManagement {
// Existing repository settings are here.
repositories {
// Existing repositories are here.
// Add the Prove Link Maven repository:
maven {
url = "https://prove.jfrog.io/artifactory/libs-public-maven/"
}
}
}
```
The following needs added to the `build.gradle` file to also download dependency libraries:
```java Java theme={"dark"}
dependencies {
implementation fileTree('libs')
}
```
If you receive an error message on the `application@fullBackupContent` value, you can resolve it by adding this line of code to your application `AndroidManifest.xml` file inside the `...` node. Add it as an attribute to the opening `application` tag:
```xml XML theme={"dark"}
```
The Prove Auth SDK and its children SDKs merge the following permissions into the main application:
```xml XML theme={"dark"}
```
Prove manages a repository with the libraries to enable integration. You can install the SDK using either CocoaPods or Swift Package Manager.
Execute the following to import CocoaPod from the Prove pod repository:
```shell shell theme={"dark"}
# Run this command to install the cocoapods-art plugin (authored by Artifactory)
gem install cocoapods-art
# Run this command to add the Prove pod repository
pod repo-art add prove.jfrog.io https://prove.jfrog.io/artifactory/api/pods/libs-public-cocoapods
# In your Podfile, paste in the Prove pod repository as a source
plugin 'cocoapods-art', :sources => [
'prove.jfrog.io'
]
# In your Podfile, paste in the SDK pods
pod 'ProveAuth', '6.9.1'
# Run this command to install the SDK pods
pod install
```
### Step 1: Connect to JFrog Registry
Set up the registry globally (required for both Xcode UI and Package.swift):
```bash theme={"dark"}
swift package-registry set --global "https://prove.jfrog.io/artifactory/api/swift/libs-public-swift"
swift package-registry login "https://prove.jfrog.io/artifactory/api/swift/libs-public-swift"
# Press Enter when prompted for access token
```
Public Registry
This is a publicly accessible registry - no password or access token is needed. Simply press Enter when prompted for an access token.
The registry connection is configured via command line only. Once this setup is complete, you can add packages using either Xcode UI or Package.swift.
### Step 2: Adding Dependencies
#### Method 1: Using Xcode UI
1. In Xcode, go to **File** → **Add Package Dependencies**
2. Search for the package you want (e.g., `swift.proveauth`)
3. Select the version and add to your target
The latest stable version is 6.9.1. Select "Exact Version" for production applications to ensure consistent builds.
 Once the command line setup is complete, you only need to enter the package name (e.g., `swift.proveauth`) in Xcode - no need to enter the full registry URL to Xcode.
#### Method 2: Using Package.swift
Add dependencies to your `Package.swift` file:
```swift Swift theme={"dark"}
// swift-tools-version: 5.9
import PackageDescription
let package = Package(
name: "YourApp",
platforms: [.iOS(.v12)],
dependencies: [
.package(id: "swift.proveauth", from: "6.9.1"),
],
targets: [
.target(
name: "YourApp",
dependencies: [
.product(name: "ProveAuth", package: "swift.proveauth"),
]
)
]
)
```
Then run the following command to resolve and fetch the dependencies:
```bash theme={"dark"}
swift package resolve
```
## Implement Prove Identity
Create or update your first screen to gather customer data.
Create or update your first screen to prompt the customer to accept the terms and conditions. This allows Mobile Auth to verify the customer.
In order for Mobile Auth to succeed:
* Disable VPN.
* Disable Private Relay on iOS.
When testing, you can ignore any Chrome error messages that mention `ERR_TUNNEL_CONNECTION_FAILED` - this is due to the VPN, but the SDK fallbacks to OTP.
Determine if the customer is on a mobile or desktop browser using this example. If the `isMobile` is true, set `mobile` as the `flowType` for the `Start()` function on the server, otherwise you can set `desktop`:
```javascript JavaScript theme={"dark"}
// Check if the customer is on a mobile or desktop browser.
const authCheck = new proveAuth.AuthenticatorBuilder().build();
let isMobile = authCheck.isMobileWeb()
```
```typescript TypeScript theme={"dark"}
// Check if the customer is on a mobile or desktop browser.
const authCheck = new proveAuth.AuthenticatorBuilder().build();
let isMobile = authCheck.isMobileWeb()
```
When using the Android SDK, set `mobile` as the `flowType` for the `Start()` function on the server.
When using the iOS SDK, set `mobile` as the `flowType` for the `Start()` function on the server.
Send a request to your back end server with the phone number and flow type.
```javascript JavaScript {1-13} theme={"dark"}
async function initialize(phoneNumber, flowType) {
const response = await fetch(backendUrl + "/initialize", {
method: "POST",
headers: {
Accept: "application/json",
"Content-Type": "application/json",
},
body: JSON.stringify({
phoneNumber: phoneNumber
flowType: flowType,
}),
});
const rsp = await response.json();
const authToken = rsp.authToken;
return authToken;
}
```
```typescript TypeScript {1-17} theme={"dark"}
async function initialize(
phoneNumber: string,
flowType: string
): Promise {
const response = await fetch(backendUrl + "/initialize", {
method: "POST",
headers: {
Accept: "application/json",
"Content-Type": "application/json",
},
body: JSON.stringify({
phoneNumber: phoneNumber,
flowType: flowType,
}),
});
const rsp = await response.json();
const authToken = rsp.authToken;
return authToken;
}
```
```java Java theme={"dark"}
String initialize(String phoneNumber, String flowType) {
YourBackendClient backend = new YourBackendClient(); // Backend API client
// TODO: Build your InitializeRequest object
InitializeRequest initializeRequest = new InitializeRequest(phoneNumber, flowType);
// Send an initialize request to your backend server to get authToken
InitializeResponse response = backend.initialize(initializeRequest);
// TODO: define your own InitializeResponse object to parse authToken string
return response.getAuthToken();
}
```
```swift Swift theme={"dark"}
// The below example uses native iOS URLSession, but any other
// alternative networking approaches should also work
func initialize(phoneNumber: String, flowType: String, completion: @escaping (Result\) -> Void) {
guard let url = URL(string: "\(backendUrl)/initialize") else {
completion(.failure(URLError(.badURL)))
return
}
var request = URLRequest(url: url)
request.httpMethod = "POST"
request.addValue("application/json", forHTTPHeaderField: "Accept")
request.addValue("application/json", forHTTPHeaderField: "Content-Type")
// Set up the request body
let body: [String: Any] = [
"flowType": flowType,
"phoneNumber": phoneNumber,
]
do {
request.httpBody = try JSONSerialization.data(withJSONObject: body, options: \[])
} catch {
completion(.failure(error))
return
}
// Perform the request
let task = URLSession.shared.dataTask(with: request) { \_, response, error in
// Handle network or connection errors
if let error = error {
completion(.failure(error))
return
}
do {
if let json = try JSONSerialization.jsonObject(with: data, options: \[]) as? [String: Any],
let authToken = json["authToken"] as? String {
completion(.success(authToken))
} else {
let parsingError = NSError(domain: "", code: 0, userInfo: [NSLocalizedDescriptionKey : "Failed to parse JSON or authToken is missing"])
completion(.failure(parsingError))
}
} catch {
completion(.failure(error))
}
}
// Start the network call
task.resume()
}
```
Send a request to your back end server with the flow type.
```javascript JavaScript {1-11} theme={"dark"}
async function initialize(flowType) {
const response = await fetch(backendUrl + "/initialize", {
method: "POST",
headers: {
Accept: "application/json",
"Content-Type": "application/json",
},
body: JSON.stringify({
flowType: flowType,
}),
});
const rsp = await response.json();
const authToken = rsp.authToken;
return authToken;
}
```
```typescript TypeScript {1-13} theme={"dark"}
async function initialize(
flowType: string
): Promise {
const response = await fetch(backendUrl + "/initialize", {
method: "POST",
headers: {
Accept: "application/json",
"Content-Type": "application/json",
},
body: JSON.stringify({
flowType: flowType,
}),
});
const rsp = await response.json();
const authToken = rsp.authToken;
return authToken;
}
```
```java Java theme={"dark"}
String initialize(String flowType) {
YourBackendClient backend = new YourBackendClient(); // Backend API client
// TODO: Build your InitializeRequest object
InitializeRequest initializeRequest = new InitializeRequest(flowType);
// Send an initialize request to your backend server to get authToken
InitializeResponse response = backend.initialize(initializeRequest);
// TODO: define your own InitializeResponse object to parse authToken string
return response.getAuthToken();
}
```
```swift Swift theme={"dark"}
// The below example uses native iOS `URLSession`, but any other
// alternative networking approaches should also work
func initialize(flowType: String, completion: @escaping (Result\) -> Void) {
guard let url = URL(string: "\(backendUrl)/initialize") else {
completion(.failure(URLError(.badURL)))
return
}
var request = URLRequest(url: url)
request.httpMethod = "POST"
request.addValue("application/json", forHTTPHeaderField: "Accept")
request.addValue("application/json", forHTTPHeaderField: "Content-Type")
// Set up the request body
let body: [String: Any] = [
"flowType": flowType
]
do {
request.httpBody = try JSONSerialization.data(withJSONObject: body, options: \[])
} catch {
completion(.failure(error))
return
}
// Perform the request
let task = URLSession.shared.dataTask(with: request) { \_, response, error in
// Handle network or connection errors
if let error = error {
completion(.failure(error))
return
}
do {
if let json = try JSONSerialization.jsonObject(with: data, options: \[]) as? [String: Any],
let authToken = json["authToken"] as? String
completion(.success(authToken))
} else {
let parsingError = NSError(domain: "", code: 0, userInfo: [NSLocalizedDescriptionKey : "Failed to parse JSON or authToken is missing"])
completion(.failure(parsingError))
}
} catch {
completion(.failure(error))
}
}
// Start the network call
task.resume()
}
```
Start a Prove flow with a call to the `Start()` function. This function takes these required parameters:
* `flowType`: either `desktop` or `mobile` to describe which type of device the customer is starting their flow on.
* `finalTargetURL`: required when `flowType=desktop`. This should be a URL you maintain. Once the customer clicks the Instant Link, they will be redirected to this URL. It should instruct the customer to continue the workflow. Maximum length is 128 characters.
These parameters are optional:
* `allowOTPRetry`: set to `true` to allow the customer to re-enter the OTP up to three times. Defaults to `false`.
For OTP retries, make sure to implement client SDK changes in the next step.
```go Go theme={"dark"}
// Send the start request.
rspStart, err := client.V3.V3StartRequest(context.TODO(), &components.V3StartRequest{
PhoneNumber: "2001004009"
FlowType: "desktop",
FinalTargetURL: provesdkservergo.String("https://www.example.com"),
Ssn: "565252770",
AllowOTPRetry: true,
})
if err != nil {
return fmt.Errorf("error on Start: %w", err)
}
```
```typescript TypeScript theme={"dark"}
let startReq = {
phoneNumber: '2001004009',
flowType: 'desktop',
finalTargetUrl: 'https://www.example.com',
ssn: '565252770',
allowOTPRetry: true,
}
// Send the start request.
const rspStart = await sdk.v3.v3StartRequest(startReq);
if (!rspStart) {
console.error("Start error.")
return
}
```
```java Java theme={"dark"}
// Send the start request.
V3StartRequest req = V3StartRequest.builder()
.phoneNumber("2001004009")
.flowType("desktop")
.finalTargetUrl("https://www.example.com")
.ssn("565252770")
.allowOTPRetry(true)
.build();
// You may want to use the .get() method when working with the response object.
```
```csharp .NET theme={"dark"}
using Prove.Proveapi;
using Prove.Proveapi.Models.Components;
var sdk = new ProveAPI(auth: "");
V3StartRequest req = new V3StartRequest() {
FinalTargetUrl = "https://www.example.com",
FlowType = "desktop",
PhoneNumber = "2001004009",
Ssn = "565252770",
AllowOTPRetry = true,
};
var res = await sdk.V3.V3StartRequestAsync(req);
```
```go Go theme={"dark"}
// Send the start request.
rspStart, err := client.V3.V3StartRequest(context.TODO(), &components.V3StartRequest{
FlowType: "desktop",
FinalTargetURL: provesdkservergo.String("https://www.example.com"),
AllowOTPRetry: true,
})
if err != nil {
return fmt.Errorf("error on Start: %w", err)
}
```
```typescript TypeScript theme={"dark"}
let startReq = {
flowType: 'desktop',
finalTargetUrl: 'https://www.example.com',
allowOTPRetry: true,
}
// Send the start request.
const rspStart = await sdk.v3.v3StartRequest(startReq);
if (!rspStart) {
console.error("Start error.")
return
}
```
```java Java theme={"dark"}
// Send the start request.
V3StartRequest req = V3StartRequest.builder()
.flowType("desktop")
.finalTargetUrl("https://www.example.com")
.allowOTPRetry(true)
.build();
// You may want to use the .get() method when working with the response object.
```
```csharp .NET theme={"dark"}
using Prove.Proveapi;
using Prove.Proveapi.Models.Components;
var sdk = new ProveAPI(auth: "");
V3StartRequest req = new V3StartRequest() {
FinalTargetUrl = "https://www.example.com",
FlowType = "desktop",
AllowOTPRetry = true,
};
var res = await sdk.V3.V3StartRequestAsync(req);
```
The function returns the following fields:
* `authToken`: send this to your client-side code through the `Authenticate()` function - it's a JSON Web Token (JWT) tied to the current flow and used for the possession checks. It expires after 15 minutes.
* `correlationId`: save this in your current session, then pass it in to each of the `Validate()`, `Challenge()`, and `Complete()` function calls of the same flow. The correlation ID ties together different system calls for the same Prove flow. The session expires in 15 minutes from when the correlation ID returns from the `Start()` call.
* `next`: map of the next API call you need to make.
Return the `authToken` in a response to the front end.
Once you have the `authToken`, build the authenticator for both the mobile and desktop flows.
```javascript JavaScript theme={"dark"}
async function authenticate(isMobileWeb, authToken) {
// Set up the authenticator for either mobile or desktop flow.
let builder = new proveAuth.AuthenticatorBuilder();
if (isMobileWeb) {
// Set up Mobile Auth and OTP.
builder = builder
.withAuthFinishStep((input) => verify(input.authId))
.withMobileAuthImplementation("fetch")
.withOtpFallback(otpStart, otpFinish);
} else {
// Set up Instant Link.
builder = builder
.withAuthFinishStep((input) => verify(input.authId))
.withInstantLinkFallback(instantLink)
.withRole("secondary");
}
const authenticator = builder.build();
// Authenticate with the authToken.
return authenticator.authenticate(authToken);
}
```
```typescript TypeScript theme={"dark"}
async function authenticate(isMobileWeb: boolean, authToken: string) {
// Set up the authenticator for either mobile or desktop flow.
let builder = new proveAuth.AuthenticatorBuilder();
if (isMobileWeb) {
// Set up Mobile Auth and OTP.
builder = builder
.withAuthFinishStep((input) => verify(input.authId))
.withMobileAuthImplementation("fetch")
.withOtpFallback(otpStart, otpFinish);
} else {
// Set up Instant Link.
builder = builder
.withAuthFinishStep((input) => verify(input.authId))
.withInstantLinkFallback(instantLink)
.withRole("secondary");
}
const authenticator = builder.build();
// Authenticate with the authToken.
return authenticator.authenticate(authToken);
}
```
## Configure OTP
To use the Resend/Retry/Phone Change features, you need to install the Web SDK version 2.15.1 or later.
To set the One-Time Password (OTP) handler, `withOtpFallback(startStep: OtpStartStep | OtpStartStepFn, finishStep: OtpFinishStep | OtpFinishStepFn)`, requires implementing the `OtpStartStep` and `OtpFinishStep`. When returning the phone number in the functions, ensure you return an object with the field `phoneNumber` to the `resolve()` function.
The OTP session has a two minute timeout from when it's sent through Short Message Service (SMS) to when the customer can enter in the OTP.
Follow these instructions if you are implementing OTP and you are passing in the phone number on the `/v3/start` endpoint. In this case, you've already prompted for a phone number so you don't need to prompt for it in the client SDK.
Since you passed the phone number in the `Start()` function, call `resolve(null)` to communicate to the SDK you have the customer's agreement to deliver the SMS message. Ensure you return an object to `resolve()` function.
```javascript JavaScript theme={"dark"}
function otpStartStep(phoneNumberNeeded, phoneValidationError) {
return new Promise((resolve, reject) => {
// Since no phone number is needed, don't prompt the user.
resolve(null);
});
}
```
```typescript TypeScript theme={"dark"}
const otpStartStep: OtpStartStep = {
execute: async (
phoneNumberNeeded: boolean,
phoneValidationError?: PhoneValidationError
): Promise => {
return new Promise((resolve, reject) => {
// Since no phone number is needed, don't prompt the user.
resolve(null);
});
},
};
```
Call the `reject('some error message')` method to communicate to the SDK any issues while trying to obtain the phone number or the OTP. Report an error if the customer cancels the SMS transaction or presses the back button to leave the screen.
In the finish step, call the `resolve(result: OtpFinishResult)` method to return the collected OTP value in which `result` variable has `OnSuccess` value for `OtpFinishResultType` and the OTP value wrapped in `OtpFinishInput`.
```javascript JavaScript theme={"dark"}
function otpFinishStep(otpError) {
return new Promise((resolve, reject) => {
// If error message is found, handle it.
if (otpError) {
// Set to a variable and display it in a field.
// In this example, we don't do anything with the error.
var someErrorMessage = otpError.message;
}
// Prompt the user for whether they received the SMS.
// Typically, this is a page that shows the OTP already. We are simplifying
// it by requiring an input.
var input = confirm('Did you receive a text message?');
if (!input) {
// Close the modal if a text message was not received.
return;
}
// Prompt the user for the OTP.
var otp = prompt('Enter OTP code:');
if (otp) {
// If the input is valid and the user clicked `OK`, return the OTP.
resolve({
input: { otp }, // OTP value
resultType: 0, // OnSuccess enum type = 0
});
} else {
// Else, exit the flow.
reject('phone invalid or user cancelled');
}
});
}
```
```typescript TypeScript theme={"dark"}
const otpFinishStep: OtpFinishStep = {
execute: async (otpError?: OtpError): Promise => {
return new Promise((resolve, reject) => {
// If error message is found, handle it.
if (otpError) {
// Set to a variable and display it in a field.
// In this example, we don't do anything with the error.
var someErrorMessage = otpError.message;
}
// Prompt the user for whether they received the SMS.
// Typically, this is a page that shows the OTP already. We are simplifying
// it by requiring an input.
var input = confirm('Did you receive a text message?');
if (!input) {
// Close the modal if a text message was not received.
return;
}
// Prompt the user for the OTP.
var otp = prompt('Enter OTP code:');
if (otp) {
// If the input is valid and the user clicked `OK`, return the OTP.
resolve({
input: { otp }, // OTP value
resultType: OtpFinishResultType.OnSuccess,
});
} else {
// Else, exit the flow.
reject('phone invalid or user cancelled');
}
});
},
};
```
Follow these instructions if implementing MobileAuth and collecting the phone number only if MobileAuth fails. This will implement OTP without allowing for SMS resends and phone number changes. If you do want those capabilities, please reference the subsequent tabs (Resend, Retry OTP, and Phone Number Change).
In the start step, call the `resolve(input: OtpStartInput)` method to return the collected phone number to the SDK.
```javascript JavaScript theme={"dark"}
function otpStartStep(phoneNumberNeeded, phoneValidationError) {
return new Promise((resolve, reject) => {
// If no phone number is needed, then don't prompt the user.
if (!phoneNumberNeeded) {
resolve(null);
return;
}
// If error message is found around phone number, handle it.
// The `phoneValidationError` is ONLY available when `phoneNumberNeeded`
// has a value.
if (phoneValidationError) {
// Set to a variable and display it in a field.
// In this example, we don't do anything with the error.
var someErrorMessage = phoneValidationError.message;
}
// Prompt the user for the phone number.
var input = prompt('Enter phone number:');
if (input) {
// If the input is valid and the user clicked `OK`, return the phone
// number.
resolve({
phoneNumber: input,
});
} else {
// Else, exit the flow.
reject('phone invalid or user cancelled');
}
});
}
```
```typescript TypeScript theme={"dark"}
const otpPromptStartStep: OtpStartStep = {
execute: async (
phoneNumberNeeded: boolean,
phoneValidationError?: PhoneValidationError
): Promise => {
return new Promise((resolve, reject) => {
// If no phone number is needed, then don't prompt the user.
if (!phoneNumberNeeded) {
resolve(null);
return;
}
// If error message is found around phone number, handle it.
// The `phoneValidationError` is ONLY available when `phoneNumberNeeded`
// has a value.
if (phoneValidationError) {
// Set to a variable and display it in a field.
// In this example, we don't do anything with the error.
var someErrorMessage = phoneValidationError.message;
}
// Prompt the user for the phone number.
var input = prompt('Enter phone number:');
if (input) {
// If the input is valid and the user clicked `OK`, return the phone
// number.
resolve({
phoneNumber: input,
});
} else {
// Else, exit the flow.
reject('phone invalid or user cancelled');
}
});
},
};
```
The finish step is implemented the same as the previous tab:
```javascript JavaScript theme={"dark"}
function otpFinishStep(otpError) {
return new Promise((resolve, reject) => {
// If error message is found, handle it.
if (otpError) {
// Set to a variable and display it in a field.
// In this example, we don't do anything with the error.
var someErrorMessage = otpError.message;
}
// Prompt the user for whether they received the SMS.
// Typically, this is a page that shows the OTP already. We are simplifying
// it by requiring an input.
var input = confirm('Did you receive a text message?');
if (!input) {
// Close the modal if a text message was not received.
return;
}
// Prompt the user for the OTP.
var otp = prompt('Enter OTP code:');
if (otp) {
// If the input is valid and the user clicked `OK`, return the OTP.
resolve({
input: { otp }, // OTP value
resultType: 0, // OnSuccess enum type = 0
});
} else {
// Else, exit the flow.
reject('phone invalid or user cancelled');
}
});
}
```
```typescript TypeScript theme={"dark"}
const otpFinishStep: OtpFinishStep = {
execute: async (otpError?: OtpError): Promise => {
return new Promise((resolve, reject) => {
// If error message is found, handle it.
if (otpError) {
// Set to a variable and display it in a field.
// In this example, we don't do anything with the error.
var someErrorMessage = otpError.message;
}
// Prompt the user for whether they received the SMS.
// Typically, this is a page that shows the OTP already. We are simplifying
// it by requiring an input.
var input = confirm('Did you receive a text message?');
if (!input) {
// Close the modal if a text message was not received.
return;
}
// Prompt the user for the OTP.
var otp = prompt('Enter OTP code:');
if (otp) {
// If the input is valid and the user clicked `OK`, return the OTP.
resolve({
input: { otp }, // OTP value
resultType: OtpFinishResultType.OnSuccess,
});
} else {
// Else, exit the flow.
reject('phone invalid or user cancelled');
}
});
},
};
```
Follow these instructions to allow the customer to request a new OTP via SMS using the same phone number. There is a max of three send attempts including the initial message.
The start step is implemented the same as the previous tab:
```javascript JavaScript theme={"dark"}
function otpStartStep(phoneNumberNeeded, phoneValidationError) {
return new Promise((resolve, reject) => {
// If no phone number is needed, then don't prompt the user.
if (!phoneNumberNeeded) {
resolve(null);
return;
}
// If error message is found around phone number, handle it.
// The `phoneValidationError` is ONLY available when `phoneNumberNeeded`
// has a value.
if (phoneValidationError) {
// Set to a variable and display it in a field.
// In this example, we don't do anything with the error.
var someErrorMessage = phoneValidationError.message;
}
// Prompt the user for the phone number.
var input = prompt('Enter phone number:');
if (input) {
// If the input is valid and the user clicked `OK`, return the phone
// number.
resolve({
phoneNumber: input,
});
} else {
// Else, exit the flow.
reject('phone invalid or user cancelled');
}
});
}
```
```typescript TypeScript theme={"dark"}
const otpPromptStartStep: OtpStartStep = {
execute: async (
phoneNumberNeeded: boolean,
phoneValidationError?: PhoneValidationError
): Promise => {
return new Promise((resolve, reject) => {
// If no phone number is needed, then don't prompt the user.
if (!phoneNumberNeeded) {
resolve(null);
return;
}
// If error message is found around phone number, handle it.
// The `phoneValidationError` is ONLY available when `phoneNumberNeeded`
// has a value.
if (phoneValidationError) {
// Set to a variable and display it in a field.
// In this example, we don't do anything with the error.
var someErrorMessage = phoneValidationError.message;
}
// Prompt the user for the phone number.
var input = prompt('Enter phone number:');
if (input) {
// If the input is valid and the user clicked `OK`, return the phone
// number.
resolve({
phoneNumber: input,
});
} else {
// Else, exit the flow.
reject('phone invalid or user cancelled');
}
});
},
};
```
You can then send a new OTP SMS to the same phone number by implementing the finish step like this:
```javascript JavaScript theme={"dark"}
function otpFinishStep(otpError) {
return new Promise((resolve, reject) => {
// If error message is found, handle it.
if (otpError) {
// Set to a variable and display it in a field.
// In this example, we don't do anything with the error.
var someErrorMessage = otpError.message;
}
// Prompt the user for whether they received the SMS.
// Typically, this is a page that shows the OTP already. We are simplifying
// it by requiring an input.
var input = confirm('Did you receive a text message?');
if (!input) {
// If `Cancel`, then resend to the same phone number.
resolve({
resultType: 1, // OnResendOtp enum type = 1
});
return;
}
// Prompt the user for the OTP.
var otp = prompt('Enter OTP code:');
if (otp) {
// If the input is valid and the user clicked `OK`, return the OTP.
resolve({
input: { otp }, // OTP value
resultType: 0, // OnSuccess enum type = 0
});
} else {
// Else, exit the flow.
reject('phone invalid or user cancelled');
}
});
}
```
```typescript TypeScript theme={"dark"}
const otpMultipleResendFinishStep: OtpFinishStep = {
execute: async (otpError?: OtpError): Promise => {
return new Promise((resolve, reject) => {
// If error message is found, handle it.
if (otpError) {
// Set to a variable and display it in a field.
// In this example, we don't do anything with the error.
var someErrorMessage = otpError.message;
}
// Prompt the user for whether they received the SMS.
// Typically, this is a page that shows the OTP already. We are simplifying
// it by requiring an input.
var input = confirm('Did you receive a text message?');
if (!input) {
// If `Cancel`, then resend to the same phone number.
resolve({
resultType: 1, // OnResendOtp enum type = 1
});
return;
}
// Prompt the user for the OTP.
var otp = prompt('Enter OTP code:');
if (otp) {
// If the input is valid and the user clicked `OK`, return the OTP.
resolve({
input: { otp }, // OTP value
resultType: OtpFinishResultType.OnSuccess,
});
} else {
// Else, exit the flow.
reject('phone invalid or user cancelled');
}
});
},
};
```
Follow these instructions to allow the customer to re-enter the OTP PIN if they type it wrong. There is a max of 3 attempts. To implement this functionality, you also need to pass in `allowOTPRetry=true` to the `/v3/start` endpoint.
The start step is implemented the same as either of the the previous tabs - no client side code changes necessary:
```javascript JavaScript theme={"dark"}
function otpStartStep(phoneNumberNeeded, phoneValidationError) {
return new Promise((resolve, reject) => {
// If no phone number is needed, then don't prompt the user.
if (!phoneNumberNeeded) {
resolve(null);
return;
}
// If error message is found around phone number, handle it.
// The `phoneValidationError` is ONLY available when `phoneNumberNeeded`
// has a value.
if (phoneValidationError) {
// Set to a variable and display it in a field.
// In this example, we don't do anything with the error.
var someErrorMessage = phoneValidationError.message;
}
// Prompt the user for the phone number.
var input = prompt('Enter phone number:');
if (input) {
// If the input is valid and the user clicked `OK`, return the phone
// number.
resolve({
phoneNumber: input,
});
} else {
// Else, exit the flow.
reject('phone invalid or user cancelled');
}
});
}
```
```typescript TypeScript theme={"dark"}
const otpPromptStartStep: OtpStartStep = {
execute: async (
phoneNumberNeeded: boolean,
phoneValidationError?: PhoneValidationError
): Promise => {
return new Promise((resolve, reject) => {
// If no phone number is needed, then don't prompt the user.
if (!phoneNumberNeeded) {
resolve(null);
return;
}
// If error message is found around phone number, handle it.
// The `phoneValidationError` is ONLY available when `phoneNumberNeeded`
// has a value.
if (phoneValidationError) {
// Set to a variable and display it in a field.
// In this example, we don't do anything with the error.
var someErrorMessage = phoneValidationError.message;
}
// Prompt the user for the phone number.
var input = prompt('Enter phone number:');
if (input) {
// If the input is valid and the user clicked `OK`, return the phone
// number.
resolve({
phoneNumber: input,
});
} else {
// Else, exit the flow.
reject('phone invalid or user cancelled');
}
});
},
};
```
The finish step is implemented the same as either of the the previous tabs - no client side code changes necessary. If the OTP is invalid, the finish step will be called again to prompt the user for a new input. Once the max attempts is reached, the `AuthFinish` function will be called.
```javascript JavaScript theme={"dark"}
function otpFinishStep(otpError) {
return new Promise((resolve, reject) => {
// If error message is found, handle it.
if (otpError) {
// Set to a variable and display it in a field.
// In this example, we don't do anything with the error.
var someErrorMessage = otpError.message;
}
// Prompt the user for whether they received the SMS.
// Typically, this is a page that shows the OTP already. We are simplifying
// it by requiring an input.
var input = confirm('Did you receive a text message?');
if (!input) {
// Close the modal if a text message was not received.
return;
}
// Prompt the user for the OTP.
var otp = prompt('Enter OTP code:');
if (otp) {
// If the input is valid and the user clicked `OK`, return the OTP.
resolve({
input: { otp }, // OTP value
resultType: 0, // OnSuccess enum type = 0
});
} else {
// Else, exit the flow.
reject('phone invalid or user cancelled');
}
});
}
```
```typescript TypeScript theme={"dark"}
const otpFinishStep: OtpFinishStep = {
execute: async (otpError?: OtpError): Promise => {
return new Promise((resolve, reject) => {
// If error message is found, handle it.
if (otpError) {
// Set to a variable and display it in a field.
// In this example, we don't do anything with the error.
var someErrorMessage = otpError.message;
}
// Prompt the user for whether they received the SMS.
// Typically, this is a page that shows the OTP already. We are simplifying
// it by requiring an input.
var input = confirm('Did you receive a text message?');
if (!input) {
// Close the modal if a text message was not received.
return;
}
// Prompt the user for the OTP.
var otp = prompt('Enter OTP code:');
if (otp) {
// If the input is valid and the user clicked `OK`, return the OTP.
resolve({
input: { otp }, // OTP value
resultType: OtpFinishResultType.OnSuccess,
});
} else {
// Else, exit the flow.
reject('phone invalid or user cancelled');
}
});
},
};
```
Follow these instructions to allow the customer to re-enter their phone number. There is a max of three entries/send attempts.
Manual Request Required
To enable phone number change capabilities on your credentials, contact your Prove representative.
The start step is implemented the same as the previous tab:
```javascript JavaScript theme={"dark"}
function otpStartStep(phoneNumberNeeded, phoneValidationError) {
return new Promise((resolve, reject) => {
// If no phone number is needed, then don't prompt the user.
if (!phoneNumberNeeded) {
resolve(null);
return;
}
// If error message is found around phone number, handle it.
// The `phoneValidationError` is ONLY available when `phoneNumberNeeded`
// has a value.
if (phoneValidationError) {
// Set to a variable and display it in a field.
// In this example, we don't do anything with the error.
var someErrorMessage = phoneValidationError.message;
}
// Prompt the user for the phone number.
var input = prompt('Enter phone number:');
if (input) {
// If the input is valid and the user clicked `OK`, return the phone
// number.
resolve({
phoneNumber: input,
});
} else {
// Else, exit the flow.
reject('phone invalid or user cancelled');
}
});
}
```
```typescript TypeScript theme={"dark"}
const otpPromptStartStep: OtpStartStep = {
execute: async (
phoneNumberNeeded: boolean,
phoneValidationError?: PhoneValidationError
): Promise => {
return new Promise((resolve, reject) => {
// If no phone number is needed, then don't prompt the user.
if (!phoneNumberNeeded) {
resolve(null);
return;
}
// If error message is found around phone number, handle it.
// The `phoneValidationError` is ONLY available when `phoneNumberNeeded`
// has a value.
if (phoneValidationError) {
// Set to a variable and display it in a field.
// In this example, we don't do anything with the error.
var someErrorMessage = phoneValidationError.message;
}
// Prompt the user for the phone number.
var input = prompt('Enter phone number:');
if (input) {
// If the input is valid and the user clicked `OK`, return the phone
// number.
resolve({
phoneNumber: input,
});
} else {
// Else, exit the flow.
reject('phone invalid or user cancelled');
}
});
},
};
```
You can prompt for a new phone numberby implementing the finish step like this:
```javascript JavaScript theme={"dark"}
function otpFinishStep(otpError) {
return new Promise((resolve, reject) => {
// If error message is found, handle it.
if (otpError) {
// Set to a variable and display it in a field.
// In this example, we don't do anything with the error.
var someErrorMessage = otpError.message;
}
// Prompt the user for whether they received the SMS.
// Typically, this is a page that shows the OTP already. We are simplifying
// it by requiring an input.
var input = confirm('Did you receive a text message?');
if (!input) {
// If `Cancel`, then trigger the otpStartStep to re-prompt for
// phone number.
resolve({
resultType: 2, // OnMobileNumberChange enum type = 2
});
return;
}
// Prompt the user for the OTP.
var otp = prompt('Enter OTP code:');
if (otp) {
// If the input is valid and the user clicked `OK`, return the OTP.
resolve({
input: { otp }, // OTP value
resultType: 0, // OnSuccess enum type = 0
});
} else {
// Else, exit the flow.
reject('phone invalid or user cancelled');
}
});
}
```
```typescript TypeScript theme={"dark"}
const otpPhoneChangeFinishStep: OtpFinishStep = {
execute: async (otpError?: OtpError): Promise => {
return new Promise((resolve, reject) => {
// If error message is found, handle it.
if (otpError) {
// Set to a variable and display it in a field.
// In this example, we don't do anything with the error.
var someErrorMessage = otpError.message;
}
// Prompt the user for whether they received the SMS.
// Typically, this is a page that shows the OTP already. We are simplifying
// it by requiring an input.
var input = confirm('Did you receive a text message?');
if (!input) {
// If `Cancel`, then trigger the otpStartStep to re-prompt for
// phone number.
resolve({
resultType: 2, // OnMobileNumberChange enum type = 2
});
return;
}
// Prompt the user for the OTP.
var otp = prompt('Enter OTP code:');
if (otp) {
// If the input is valid and the user clicked `OK`, return the OTP.
resolve({
input: { otp }, // OTP value
resultType: OtpFinishResultType.OnSuccess,
});
} else {
// Else, exit the flow.
reject('phone invalid or user cancelled');
}
});
},
};
```
## Configure Instant Link
To use the Resend/Retry/Phone Change features, you need to install the Web SDK version 2.15.1 or later.
To set the Instant Link handler, `withInstantLinkFallback(startStep: InstantLinkStartStep | InstantLinkStartStepFn, retryStep?: InstantLinkRetryStep | InstantLinkRetryStepFn)` requires implementing the `InstantLinkStartStep` interface and optionally the `InstantLinkRetryStep` interface if you wish for advanced capabilities. When returning the phone number in the functions, ensure you return an object with the field `phoneNumber` to the `resolve()` function.
The Instant Link session has a three minute timeout from when it's sent through Short Message Service (SMS) to when the customer can click the received link.
Follow these instructions if you are implementing Instant Link and you are passing in the phone number on the `/v3/start` endpoint. In this case, you've already prompted for a phone number so you don't need to prompt for it in the client SDK.
Since you passed the phone number in the `Start()` function, call `resolve(null)` to communicate to the SDK you have the customer's agreement to deliver the SMS message. Ensure you return an object to `resolve()` function.
```javascript JavaScript theme={"dark"}
function instantLinkStartStep(phoneNumberNeeded, phoneValidationError) {
return new Promise((resolve, reject) => {
// Since no phone number is needed, don't prompt the user.
resolve(null);
});
}
```
```typescript TypeScript theme={"dark"}
const instantLinkNoPromptStartStep: InstantLinkStartStep = {
execute: async (
phoneNumberNeeded: boolean,
phoneValidationError?: PhoneValidationError
): Promise => {
return new Promise((resolve, reject) => {
// Since no phone number is needed, don't prompt the user.
resolve(null);
});
},
};
```
Follow these instructions if implementing MobileAuth and collecting the phone number for desktop. This will implement Instant Link without allowing for SMS resends and phone number changes. If you do want those capabilities, please reference the subsequent tabs (Resend and Phone Number Change).
Call the `resolve(input: InstantStartInput)` method to return the collected phone number to the SDK.
Call the `reject('some error message')` method to communicate to the SDK any issues while trying to obtain the phone number. Report an error if the customer cancels the Instant Link transaction or presses the back button to leave the Instant Link start step dialog.
```javascript JavaScript theme={"dark"}
function instantLinkStartStep(phoneNumberNeeded, phoneValidationError) {
return new Promise((resolve, reject) => {
// If no phone number is needed, then don't prompt the user.
if (!phoneNumberNeeded) {
resolve(null);
return;
}
// If error message is found around phone number, handle it.
// The `phoneValidationError` is ONLY available when `phoneNumberNeeded`
// has a value.
if (phoneValidationError) {
// Set to a variable and display it in a field.
// In this example, we don't do anything with the error.
var someErrorMessage = phoneValidationError.message;
}
// Prompt the user for the phone number.
var input = prompt('Enter phone number:');
if (input) {
// If the input is valid and the user clicked `OK`, return the phone
// number.
resolve({
phoneNumber: input,
});
} else {
// Else, exit the flow.
reject('phone invalid or user cancelled');
}
});
}
```
```typescript TypeScript theme={"dark"}
const instantLinkStartStep: InstantLinkStartStep = {
execute: async (
phoneNumberNeeded: boolean,
phoneValidationError?: PhoneValidationError
): Promise => {
return new Promise((resolve, reject) => {
// If no phone number is needed, then don't prompt the user.
if (!phoneNumberNeeded) {
resolve(null);
return;
}
// If error message is found around phone number, handle it.
// The `phoneValidationError` is ONLY available when `phoneNumberNeeded`
// has a value.
if (phoneValidationError) {
// Set to a variable and display it in a field.
// In this example, we don't do anything with the error.
var someErrorMessage = phoneValidationError.message;
}
// Prompt the user for the phone number.
var input = prompt('Enter phone number:');
if (input) {
// If the input is valid and the user clicked `OK`, return the phone
// number.
resolve({
phoneNumber: input,
} as InstantLinkStartInput);
} else {
// Else, exit the flow.
reject('phone invalid or user cancelled');
}
});
},
};
```
Follow these instructions to allow the customer to request a new SMS using the same phone number. There is a max of three send attempts including the initial message.
The start step is implemented the same as the previous tab:
```javascript JavaScript theme={"dark"}
function instantLinkStartStep(phoneNumberNeeded, phoneValidationError) {
return new Promise((resolve, reject) => {
// If no phone number is needed, then don't prompt the user.
if (!phoneNumberNeeded) {
resolve(null);
return;
}
// If error message is found around phone number, handle it.
// The `phoneValidationError` is ONLY available when `phoneNumberNeeded`
// has a value.
if (phoneValidationError) {
// Set to a variable and display it in a field.
// In this example, we don't do anything with the error.
var someErrorMessage = phoneValidationError.message;
}
// Prompt the user for the phone number.
var input = prompt('Enter phone number:');
if (input) {
// If the input is valid and the user clicked `OK`, return the phone
// number.
resolve({
phoneNumber: input,
});
} else {
// Else, exit the flow.
reject('phone invalid or user cancelled');
}
});
}
```
```typescript TypeScript theme={"dark"}
const instantLinkStartStep: InstantLinkStartStep = {
execute: async (
phoneNumberNeeded: boolean,
phoneValidationError?: PhoneValidationError
): Promise => {
return new Promise((resolve, reject) => {
// If no phone number is needed, then don't prompt the user.
if (!phoneNumberNeeded) {
resolve(null);
return;
}
// If error message is found around phone number, handle it.
// The `phoneValidationError` is ONLY available when `phoneNumberNeeded`
// has a value.
if (phoneValidationError) {
// Set to a variable and display it in a field.
// In this example, we don't do anything with the error.
var someErrorMessage = phoneValidationError.message;
}
// Prompt the user for the phone number.
var input = prompt('Enter phone number:');
if (input) {
// If the input is valid and the user clicked `OK`, return the phone
// number.
resolve({
phoneNumber: input,
} as InstantLinkStartInput);
} else {
// Else, exit the flow.
reject('phone invalid or user cancelled');
}
});
},
};
```
You can then send a new Instant Link SMS to the same phone number by implementing the `InstantLinkRetryStep` interface, for example:
```javascript JavaScript theme={"dark"}
function instantLinkRetryStep() {
return new Promise((resolve, reject) => {
// There are multiple return options:
// - resolve(0): request resend to the same phone number
// - reject('user clicked cancel'): error out of the possession flow
// Prompt the user for the phone number.
// Typically, this is a page that is automatically closed or redirected
// once the `AuthFinish` function is called. We are simplifying it by
// requiring an input.
var input = confirm('Did you receive a text message?');
if (input) {
// If `OK`, close the modal.
return;
}
// Else `Cancel`, then resend to the same phone number.
resolve(0);
});
}
```
```typescript TypeScript theme={"dark"}
const instantLinkMultipleResendRetryStep: InstantLinkRetryStep = {
execute: async (): Promise => {
return new Promise((resolve, reject) => {
// There are multiple return options:
// - resolve(0): request resend to the same phone number
// - reject('user clicked cancel'): error out of the possession flow
// Prompt the user for the phone number.
// Typically, this is a page that is automatically closed or redirected
// once the `AuthFinish` function is called. We are simplifying it by
// requiring an input.
var input = confirm('Did you receive a text message?');
if (input) {
// If `OK`, close the modal.
return;
}
// Else `Cancel`, then resend to the same phone number.
resolve(InstantLinkResultType.OnResend);
});
},
};
```
Follow these instructions to allow the customer to re-enter their phone number. There is a max of three entries/send attempts.
Manual Request Required
To enable phone number change capabilities on your credentials, contact your Prove representative.
The start step is implemented the same as the previous tab:
```javascript JavaScript theme={"dark"}
function instantLinkStartStep(phoneNumberNeeded, phoneValidationError) {
return new Promise((resolve, reject) => {
// If no phone number is needed, then don't prompt the user.
if (!phoneNumberNeeded) {
resolve(null);
return;
}
// If error message is found around phone number, handle it.
// The `phoneValidationError` is ONLY available when `phoneNumberNeeded`
// has a value.
if (phoneValidationError) {
// Set to a variable and display it in a field.
// In this example, we don't do anything with the error.
var someErrorMessage = phoneValidationError.message;
}
// Prompt the user for the phone number.
var input = prompt('Enter phone number:');
if (input) {
// If the input is valid and the user clicked `OK`, return the phone
// number.
resolve({
phoneNumber: input,
});
} else {
// Else, exit the flow.
reject('phone invalid or user cancelled');
}
});
}
```
```typescript TypeScript theme={"dark"}
const instantLinkStartStep: InstantLinkStartStep = {
execute: async (
phoneNumberNeeded: boolean,
phoneValidationError?: PhoneValidationError
): Promise => {
return new Promise((resolve, reject) => {
// If no phone number is needed, then don't prompt the user.
if (!phoneNumberNeeded) {
resolve(null);
return;
}
// If error message is found around phone number, handle it.
// The `phoneValidationError` is ONLY available when `phoneNumberNeeded`
// has a value.
if (phoneValidationError) {
// Set to a variable and display it in a field.
// In this example, we don't do anything with the error.
var someErrorMessage = phoneValidationError.message;
}
// Prompt the user for the phone number.
var input = prompt('Enter phone number:');
if (input) {
// If the input is valid and the user clicked `OK`, return the phone
// number.
resolve({
phoneNumber: input,
} as InstantLinkStartInput);
} else {
// Else, exit the flow.
reject('phone invalid or user cancelled');
}
});
},
};
```
You can prompt for a new phone number by implementing the `InstantLinkRetryStep` interface, for example:
```javascript JavaScript theme={"dark"}
function instantLinkRetryStep() {
return new Promise((resolve, reject) => {
// There are multiple return options:
// - resolve(0): request resend to the same phone number
// - resolve(1): request phone number change/re-prompt
// - reject('user clicked cancel'): error out of the possession flow
// Prompt the user for the phone number.
// Typically, this is a page that is automatically closed or redirected
// once the `AuthFinish` function is called. We are simplifying it by
// requiring an input.
var input = confirm('Did you receive a text message?');
if (input) {
// If `OK`, close the modal.
return;
}
// Else `Cancel`, then trigger the instantLinkStartStep to re-prompt for
// phone number.
resolve(1);
});
}
```
```typescript TypeScript theme={"dark"}
const instantLinkPhoneChangeRetryStep: InstantLinkRetryStep = {
execute: async (): Promise => {
return new Promise((resolve, reject) => {
// There are multiple return options:
// - resolve(0): request resend to the same phone number
// - resolve(1): request phone number change/re-prompt
// - reject('user clicked cancel'): error out of the possession flow
// Prompt the user for the phone number.
// Typically, this is a page that is automatically closed or redirected
// once the `AuthFinish` function is called. We are simplifying it by
// requiring an input.
var input = confirm('Did you receive a text message?');
if (input) {
// If `OK`, close the modal.
return;
}
// Else `Cancel`, then trigger the instantLinkStartStep to re-prompt for
// phone number.
resolve(InstantLinkResultType.OnMobileNumberChange);
});
},
};
```
In the desktop flow, a WebSocket opens for three minutes on the desktop browser while waiting for the customer to select the link in the text message. Once clicked, the WebSocket closes and the `AuthFinishStep` function finishes.
If you're using [Content Security Policy headers](https://content-security-policy.com/), ensure you allow `wss: device.uat.prove-auth.proveapis.com` and `wss: device.prove-auth.proveapis.com`.
```java Java theme={"dark"}
// Object implementing AuthFinishStep interface
AuthFinishStep authFinishStep = new AuthFinishStep() {
...
};
// Objects implementing OtpStartStep/OtpFinishStep interfaces
OtpStartStep otpStartStep = new OtpStartStep() {
...
};
OtpFinishStep otpFinishStep = new OtpFinishStep() {
...
};
ProveAuth proveAuth = ProveAuth.builder()
.withAuthFinishStep(authId -> verify(authId)) // verify(authId) call defined in #Validate the Mobile Phone section
.withOtpFallback(otpStartStep, otpFinishStep)
.withContext(this)
.build();
```
The cellular data connection can sometimes be unavailable during testing. The `Builder` class offers a `withTestMode(boolean testMode)` method, which permits simulated successful session results while connected to a Wi-Fi network only (without a cellular data connection available). Testing using a Wi-Fi connection is useful in the Sandbox environment.
```java Java theme={"dark"}
ProveAuth proveAuth = ProveAuth.builder()
.withAuthFinishStep(authId -> verify(authId))
.withOtpFallback(otpStartStep, otpFinishStep)
.withContext(this)
.withTestMode(true) // Test mode flag
.build();
```
The app employs an executor service with a minimum of two threads to manage threads due to the SDK’s ability to process concurrent blocking requests.
```java Java theme={"dark"}
public class MyAuthenticator {
private final MyBackendClient backend = new MyBackendClient(); // Backend API client
private final AuthFinishStep authFinishStep = new AuthFinishStep() {
@Override
void execute(String authId) {
try {
AuthFinishResponse response = backend.authFinish("My App", authId);
... // Check the authentication status returned in the response
} catch (IOException e) {
String failureCause = e.getCause() != null ? e.getCause().getMessage() : "Failed to request authentication results";
// Authentication failed due to request failure
}
}
};
private ProveAuth proveAuth;
public MyAuthenticator(Context context) {
proveAuth = ProveAuth.builder()
.withAuthFinishStep(authFinishStep)
.withOtpFallback(otpStartStep, otpFinishStep)
.withContext(context)
.build();
}
public void authenticate() throws IOException, ProveAuthException {
AuthStartResponse response = backend.authStart("My Prove Auth App");
proveAuth.authenticate(response.getAuthToken());
}
}
```
## Configure OTP
To use the Resend/Retry/Phone Change features, you need to install the Android SDK version 6.5.0 or later.
To set the One-Time Password (OTP) handler, `withOtpFallback(otpStart: otpStartStep, otpFinish: otpFinishStep)`, requires implementing the `OtpStartStep` and `OtpFinishStep`.
The OTP session has a two minute timeout from when it's sent through SMS to when the customer can enter in the OTP.
Follow these instructions if you are implementing OTP and you are passing in the phone number on the `/v3/start` endpoint. In this case, you've already prompted for a phone number so you don't need to prompt for it in the client SDK.
Since you passed the phone number in the `Start()` function, call `OtpStartStepCallback.onSuccess(OtpStartInput);` to communicate to the SDK you have the customer's agreement to deliver the SMS message. Ensure you return an instance of `OtpStartInput` with empty string or `null` to `OtpStartStepCallback.onSuccess()` function.
```java Java theme={"dark"}
import com.prove.sdk.proveauth.OtpStartInput;
import com.prove.sdk.proveauth.OtpStartStep;
import com.prove.sdk.proveauth.OtpStartStepCallback;
import com.prove.sdk.proveauth.ProveAuthException;
public class NoPromptStart implements OtpStartStep {
@Override
public void execute(boolean phoneNumberNeeded, ProveAuthException otpException,
OtpStartStepCallback callback) {
// No phone number needed, no need to ask end user for input.
callback.onSuccess(new OtpStartInput(""));
}
}
```
Call the `OtpStartStepCallback.onError();` method to communicate to the SDK any issues while trying to obtain the phone number or the OTP. Report an error if the customer cancels the SMS transaction or presses the back button to leave the screen.
In the finish step, call the `OtpFinishStepCallback.onSuccess(OtpFinishInput);` method to return the collected OTP value wrapped in `OtpFinishInput`.
```java Java theme={"dark"}
import com.prove.sdk.proveauth.OtpFinishInput;
import com.prove.sdk.proveauth.OtpFinishStep;
import com.prove.sdk.proveauth.OtpFinishStepCallback;
import com.prove.sdk.proveauth.OtpValidationException;
import com.prove.sdk.proveauth.ProveAuthException;
public class NoPromptFinish implements OtpFinishStep {
@Override
public void execute(@Nullable ProveAuthException otpException,
OtpFinishStepCallback otpFinishStepCallback) {
// If error message is found, handle it.
if (otpException instanceof OtpValidationException) {
// Set to a variable and display it in a field.
// In this example, we don't do anything with the error.
String errorMsg = otpException.getMessage();
}
try {
// Prompt the user for OTP delivered by SMS. You can build UI to provide
// best UX based on your application and business logic, here we simplify to a
// generic function named promptForOtpCode which gives us the OTP code.
String otpCode = promptForOtpCode();
otpFinishStepCallback.onSuccess(new OtpFinishInput(otpCode));
} catch (Exception e) {
// if any issue with the OTP collection from the end user or the user wants to cancel
// then call onError to exit the flow. In this example we simplify it as catching
// an exception.
otpFinishStepCallback.onError();
}
}
}
```
Follow these instructions if implementing MobileAuth and collecting the phone number only if MobileAuth fails. This will implement OTP without allowing for SMS resends and phone number changes. If you do want those capabilities, please reference the subsequent tabs (Resend, Retry OTP, and Phone Number Change).
In the start step, call the `OtpStartStepCallback.onSuccess(OtpStartInput);` method to return the collected phone number to the SDK.
```java Java theme={"dark"}
import com.prove.sdk.proveauth.OtpStartInput;
import com.prove.sdk.proveauth.OtpStartStep;
import com.prove.sdk.proveauth.OtpStartStepCallback;
import com.prove.sdk.proveauth.PhoneNumberValidationException;
import com.prove.sdk.proveauth.ProveAuthException;
public class PromptStart implements OtpStartStep {
@Override
public void execute(boolean phoneNumberNeeded, @Nullable ProveAuthException otpException,
OtpStartStepCallback callback) {
// If phone number is needed, need to ask the end user for phone number input.
if (phoneNumberNeeded) {
// If error message is found around phone number, handle it.
// The `PhoneNumberValidationException` is ONLY available when `phoneNumberNeeded`
// has a value.
if (otpException instanceof PhoneNumberValidationException) {
// Set to a variable and display it in a field.
// In this example, we don't do anything with the error.
String errorMsg = otpException.getMessage();
}
try {
// Prompt the user for phone number to receive OTP SMS. You can build UI to provide
// best UX based on your application and business logic, here we simplify to a
// generic function named promptForPhoneNumber which gives us the collected
// phone number.
String phoneNumber = promptForPhoneNumber();
callback.onSuccess(new OtpStartInput(phoneNumber));
} catch (Exception e) {
// if any issue with the phone number collection from the end user or the user
// wants to cancel then call onError to exit the flow.
// In this example we simplify it as catching an exception.
callback.onError();
}
} else {
// No phone number needed, no need to ask end user for input.
callback.onSuccess(new OtpStartInput(""));
}
}
}
```
The finish step is implemented the same as the previous tab:
```java Java theme={"dark"}
import com.prove.sdk.proveauth.OtpFinishInput;
import com.prove.sdk.proveauth.OtpFinishStep;
import com.prove.sdk.proveauth.OtpFinishStepCallback;
import com.prove.sdk.proveauth.OtpValidationException;
import com.prove.sdk.proveauth.ProveAuthException;
public class NoPromptFinish implements OtpFinishStep {
@Override
public void execute(@Nullable ProveAuthException otpException,
OtpFinishStepCallback otpFinishStepCallback) {
// If error message is found, handle it.
if (otpException instanceof OtpValidationException) {
// Set to a variable and display it in a field.
// In this example, we don't do anything with the error.
String errorMsg = otpException.getMessage();
}
try {
// Prompt the user for OTP delivered by SMS. You can build UI to provide
// best UX based on your application and business logic, here we simplify to a
// generic function named promptForOtpCode which gives us the OTP code.
String otpCode = promptForOtpCode();
otpFinishStepCallback.onSuccess(new OtpFinishInput(otpCode));
} catch (Exception e) {
// if any issue with the OTP collection from the end user or the user wants to cancel
// then call onError to exit the flow. In this example we simplify it as catching
// an exception.
otpFinishStepCallback.onError();
}
}
}
```
Follow these instructions to allow the customer to request a new OTP via SMS using the same phone number. There is a max of three send attempts including the initial message.
The start step is implemented the same as the previous tab:
```java Java theme={"dark"}
import com.prove.sdk.proveauth.OtpStartInput;
import com.prove.sdk.proveauth.OtpStartStep;
import com.prove.sdk.proveauth.OtpStartStepCallback;
import com.prove.sdk.proveauth.PhoneNumberValidationException;
import com.prove.sdk.proveauth.ProveAuthException;
public class PromptStart implements OtpStartStep {
@Override
public void execute(boolean phoneNumberNeeded, @Nullable ProveAuthException otpException,
OtpStartStepCallback callback) {
// If phone number is needed, need to ask the end user for phone number input.
if (phoneNumberNeeded) {
// If error message is found around phone number, handle it.
// The `PhoneNumberValidationException` is ONLY available when `phoneNumberNeeded`
// has a value.
if (otpException instanceof PhoneNumberValidationException) {
// Set to a variable and display it in a field.
// In this example, we don't do anything with the error.
String errorMsg = otpException.getMessage();
}
try {
// Prompt the user for phone number to receive OTP SMS. You can build UI to provide
// best UX based on your application and business logic, here we simplify to a
// generic function named promptForPhoneNumber which gives us the collected
// phone number.
String phoneNumber = promptForPhoneNumber();
callback.onSuccess(new OtpStartInput(phoneNumber));
} catch (Exception e) {
// if any issue with the phone number collection from the end user or the user
// wants to cancel then call onError to exit the flow.
// In this example we simplify it as catching an exception.
callback.onError();
}
} else {
// No phone number needed, no need to ask end user for input.
callback.onSuccess(new OtpStartInput(""));
}
}
}
```
You can then send a new OTP SMS to the same phone number by implementing the finish step like this:
```java Java theme={"dark"}
import com.prove.sdk.proveauth.OtpFinishInput;
import com.prove.sdk.proveauth.OtpFinishStep;
import com.prove.sdk.proveauth.OtpFinishStepCallback;
import com.prove.sdk.proveauth.OtpValidationException;
import com.prove.sdk.proveauth.ProveAuthException;
public class MultipleResendFinish implements OtpFinishStep {
@Override
public void execute(@Nullable ProveAuthException otpException,
OtpFinishStepCallback otpFinishStepCallback) {
// If error message is found, handle it.
if (otpException instanceof OtpValidationException) {
// Set to a variable and display it in a field.
// In this example, we don't do anything with the error.
String errorMsg = otpException.getMessage();
}
// Prompt the user for whether they received the SMS.
if (promptForResend("Didn't receive the SMS OTP? Click resend button for a new one!")) {
// If the end user wants to send again to the same phone number call onOtpResend().
otpFinishStepCallback.onOtpResend();
return;
}
try {
// Prompt the user for OTP delivered by SMS. You can build UI to provide
// best UX based on your application and business logic, here we simplify to a
// generic function named promptForOtpCode which gives us the OTP code.
String otpCode = promptForOtpCode();
otpFinishStepCallback.onSuccess(new OtpFinishInput(otpCode));
} catch (Exception e) {
// if any issue with the OTP collection from the end user or the user wants to cancel
// then call onError to exit the flow. In this example we simplify it as catching
// an exception.
otpFinishStepCallback.onError();
}
}
}
```
Follow these instructions to allow the customer to re-enter the OTP PIN if they type it wrong. There is a max of 3 attempts. To implement this functionality, you also need to pass in `allowOTPRetry=true` to the `/v3/start` endpoint.
The start step is implemented the same as either of the the previous tabs - no client side code changes necessary:
```java Java theme={"dark"}
import com.prove.sdk.proveauth.OtpStartInput;
import com.prove.sdk.proveauth.OtpStartStep;
import com.prove.sdk.proveauth.OtpStartStepCallback;
import com.prove.sdk.proveauth.PhoneNumberValidationException;
import com.prove.sdk.proveauth.ProveAuthException;
public class PromptStart implements OtpStartStep {
@Override
public void execute(boolean phoneNumberNeeded, @Nullable ProveAuthException otpException,
OtpStartStepCallback callback) {
// If phone number is needed, need to ask the end user for phone number input.
if (phoneNumberNeeded) {
// If error message is found around phone number, handle it.
// The `PhoneNumberValidationException` is ONLY available when `phoneNumberNeeded`
// has a value.
if (otpException instanceof PhoneNumberValidationException) {
// Set to a variable and display it in a field.
// In this example, we don't do anything with the error.
String errorMsg = otpException.getMessage();
}
try {
// Prompt the user for phone number to receive OTP SMS. You can build UI to provide
// best UX based on your application and business logic, here we simplify to a
// generic function named promptForPhoneNumber which gives us the collected
// phone number.
String phoneNumber = promptForPhoneNumber();
callback.onSuccess(new OtpStartInput(phoneNumber));
} catch (Exception e) {
// if any issue with the phone number collection from the end user or the user
// wants to cancel then call onError to exit the flow.
// In this example we simplify it as catching an exception.
callback.onError();
}
} else {
// No phone number needed, no need to ask end user for input.
callback.onSuccess(new OtpStartInput(""));
}
}
}
```
The finish step is implemented the same as either of the the previous tabs - no client side code changes necessary. If the OTP is invalid, the finish step will be called again to prompt the user for a new input. Once the max attempts is reached, the `AuthFinish` function will be called.
```java Java theme={"dark"}
import com.prove.sdk.proveauth.OtpFinishInput;
import com.prove.sdk.proveauth.OtpFinishStep;
import com.prove.sdk.proveauth.OtpFinishStepCallback;
import com.prove.sdk.proveauth.OtpValidationException;
import com.prove.sdk.proveauth.ProveAuthException;
public class NoPromptFinish implements OtpFinishStep {
@Override
public void execute(@Nullable ProveAuthException otpException,
OtpFinishStepCallback otpFinishStepCallback) {
// If error message is found, handle it.
if (otpException instanceof OtpValidationException) {
// Set to a variable and display it in a field.
// In this example, we don't do anything with the error.
String errorMsg = otpException.getMessage();
}
try {
// Prompt the user for OTP delivered by SMS. You can build UI to provide
// best UX based on your application and business logic, here we simplify to a
// generic function named promptForOtpCode which gives us the OTP code.
String otpCode = promptForOtpCode();
otpFinishStepCallback.onSuccess(new OtpFinishInput(otpCode));
} catch (Exception e) {
// if any issue with the OTP collection from the end user or the user wants to cancel
// then call onError to exit the flow. In this example we simplify it as catching
// an exception.
otpFinishStepCallback.onError();
}
}
}
```
Follow these instructions to allow the customer to re-enter their phone number. There is a max of three entries/send attempts.
Manual Request Required
To enable phone number change capabilities on your credentials, contact your Prove representative.
The start step is implemented the same as the previous tab:
```java Java theme={"dark"}
import com.prove.sdk.proveauth.OtpStartInput;
import com.prove.sdk.proveauth.OtpStartStep;
import com.prove.sdk.proveauth.OtpStartStepCallback;
import com.prove.sdk.proveauth.PhoneNumberValidationException;
import com.prove.sdk.proveauth.ProveAuthException;
public class PromptStart implements OtpStartStep {
@Override
public void execute(boolean phoneNumberNeeded, @Nullable ProveAuthException otpException,
OtpStartStepCallback callback) {
// If phone number is needed, need to ask the end user for phone number input.
if (phoneNumberNeeded) {
// If error message is found around phone number, handle it.
// The `PhoneNumberValidationException` is ONLY available when `phoneNumberNeeded`
// has a value.
if (otpException instanceof PhoneNumberValidationException) {
// Set to a variable and display it in a field.
// In this example, we don't do anything with the error.
String errorMsg = otpException.getMessage();
}
try {
// Prompt the user for phone number to receive OTP SMS. You can build UI to provide
// best UX based on your application and business logic, here we simplify to a
// generic function named promptForPhoneNumber which gives us the collected
// phone number.
String phoneNumber = promptForPhoneNumber();
callback.onSuccess(new OtpStartInput(phoneNumber));
} catch (Exception e) {
// if any issue with the phone number collection from the end user or the user
// wants to cancel then call onError to exit the flow.
// In this example we simplify it as catching an exception.
callback.onError();
}
} else {
// No phone number needed, no need to ask end user for input.
callback.onSuccess(new OtpStartInput(""));
}
}
}
```
You can prompt for a new phone number by implementing the finish step like this:
```java Java theme={"dark"}
import com.prove.sdk.proveauth.OtpFinishInput;
import com.prove.sdk.proveauth.OtpFinishStep;
import com.prove.sdk.proveauth.OtpFinishStepCallback;
import com.prove.sdk.proveauth.OtpValidationException;
import com.prove.sdk.proveauth.ProveAuthException;
public class PhoneChangeFinish implements OtpFinishStep {
@Override
public void execute(@Nullable ProveAuthException otpException,
OtpFinishStepCallback otpFinishStepCallback) {
// If error message is found, handle it.
if (otpException instanceof OtpValidationException) {
// Set to a variable and display it in a field.
// In this example, we don't do anything with the error.
String errorMsg = otpException.getMessage();
}
// Prompt the user for whether they received the SMS.
if (promptForPhoneNumberChange("Didn't receive the SMS OTP? Try a different phone number.")) {
// If the end user wants to correct the phone number already in use, or changing to a
// different phone number to receive the future SMS OTP, call onMobileNumberChange(), and
// the otpStartStep will re-prompt for phone number input from the end user.
otpFinishStepCallback.onMobileNumberChange();
return;
}
try {
// Prompt the user for OTP delivered by SMS. You can build UI to provide
// best UX based on your application and business logic, here we simplify to a
// generic function named promptForOtpCode which gives us the OTP code.
String otpCode = promptForOtpCode();
otpFinishStepCallback.onSuccess(new OtpFinishInput(otpCode));
} catch (Exception e) {
// if any issue with the OTP collection from the end user or the user wants to cancel
// then call onError to exit the flow. In this example we simplify it as catching
// an exception.
otpFinishStepCallback.onError();
}
}
}
```
```swift Swift theme={"dark"}
// Object implementing ProveAuthFinishStep protocols
let finishStep = FinishAuthStep()
// Objects implementing OtpStartStep/OtpFinishStep protocols
let otpStartStep = MobileOtpStartStep()
let otpFinishStep = MobileOtpFinishStep()
let proveAuthSdk: ProveAuth
proveAuthSdk = ProveAuth.builder(authFinish: finishStep)
.withOtpFallback(otpStart: otpStartStep, otpFinish: otpFinishStep)
.build()
```
In the event a cellular data connection is unavailable during testing, use the Builder class. It permits simulated successful session results while connected to a Wi-Fi network. Testing using a Wi-Fi connection is useful in the Sandbox environment.
```swift Swift theme={"dark"}
proveAuthSdk = ProveAuth.builder(authFinish: finishStep)
.withMobileAuthTestMode() // Test mode flag
.build()
```
The app employs an executor service with a minimum of two threads to manage threads due to the SDK’s ability to process concurrent blocking requests.
```swift Swift theme={"dark"}
// authToken retrieved from your server via StartAuthRequest
proveAuthSdk.authenticate(authToken) { error in
DispatchQueue.main.async {
self.messages.finalResultMessage = "ProveAuth.authenticate returned error: \(error.localizedDescription)"
print(self.messages.finalResultMessage)
}
}
```
## Configure OTP
To use the Resend/Retry/Phone Change features, you need to install the iOS SDK version 6.5.1 or later.
To set the One-Time Password (OTP) handler, `withOtpFallback(otpStart: otpStartStep, otpFinish: otpFinishStep)`, requires implementing the `OtpStartStep` and `OtpFinishStep`.
The OTP session has a two minute timeout from when it's sent through SMS to when the customer can enter in the OTP.
Follow these instructions if you are implementing OTP and you are passing in the phone number on the `/v3/start` endpoint. In this case, you've already prompted for a phone number so you don't need to prompt for it in the client SDK.
Since you passed the phone number in the `Start()` function, call `callback.onSuccess(input: nil)` to communicate to the SDK you have the customer's agreement to deliver the SMS message.
```swift Swift theme={"dark"}
import Foundation
import ProveAuth
import SwiftUI
class MobileOtpStartStep: OtpStartStep {
@ObservedObject var sheetObservable: SheetObservable
var callback: OtpStartStepCallback?
init(sheetObservable: SheetObservable) {
self.sheetObservable = sheetObservable
}
// Implement this method to handle phone number collection for SMS OTP,
// or to obtain user confirmation for initiating an SMS message.
func execute(
phoneNumberNeeded: Bool, phoneValidationError: ProveAuthError?, callback: OtpStartStepCallback
) {
self.callback = callback
// Since no phone number is needed, don't prompt the user.
callback.onSuccess(input: nil)
}
}
```
Call the `callback.onError()` method to communicate to the SDK any issues while trying to obtain the phone number or the OTP. Report an error if the customer cancels the SMS transaction or presses the back button to leave the screen.
```swift Swift theme={"dark"}
import Foundation
import SwiftUI
import ProveAuth
class MobileOtpFinishStep: OtpFinishStep {
@ObservedObject var sheetObservable: SheetObservable
var callback: OtpFinishStepCallback?
init(sheetObservable: SheetObservable){
self.sheetObservable = sheetObservable
}
// Implement this method to collect the OTP value delivered via SMS.
func execute(otpError: ProveAuthError?, callback: OtpFinishStepCallback) {
self.callback = callback
// Handle the OTP validation error if present.
if case .otpValidationError = otpError {
print("found otpError: \(String(describing: otpError?.localizedDescription))")
// Signal to your UI components that the last provided OTP is invalid
self.sheetObservable.otpError = true
} else {
self.sheetObservable.otpError = false
}
// Signal to UI components to display OtpFinishView
DispatchQueue.main.async {
self.sheetObservable.isOtpFinishActive = true
}
}
// Provide the collected OTP value to the SDK for validation.
func handleOtp(_ otp: String) {
guard let callback = self.callback else {
print("Error: OtpFinishStepCallback is not set ")
return
}
let otpFinishInput = OtpFinishInput(otp: otp)
callback.onSuccess(input: otpFinishInput)
}
// Notify the SDK of any issues encountered while obtaining the OTP value or if the user cancels the OTP flow.
func handleOtpFinishError() {
guard let callback = self.callback else {
print("Error: OtpFinishStepCallback is not set ")
return
}
callback.onError()
}
}
```
Follow these instructions if implementing MobileAuth and collecting the phone number only if MobileAuth fails. This will implement OTP without allowing for SMS resends and phone number changes. If you do want those capabilities, please reference the subsequent tabs (Resend, Retry OTP, and Phone Number Change).
In the start step, call the `callback.onSuccess(input: otpStartInput)` method to return the collected phone number to the SDK.
```swift Swift theme={"dark"}
import Foundation
import ProveAuth
import SwiftUI
class MobileOtpStartStep: OtpStartStep {
@ObservedObject var sheetObservable: SheetObservable
var callback: OtpStartStepCallback?
init(sheetObservable: SheetObservable) {
self.sheetObservable = sheetObservable
}
func execute(
phoneNumberNeeded: Bool, phoneValidationError: ProveAuthError?, callback: OtpStartStepCallback
) {
self.callback = callback
if !phoneNumberNeeded {
// If no phone number is needed, then don't prompt the user.
callback.onSuccess(input: nil)
} else {
DispatchQueue.main.async {
// If a phone number validation error is detected, ensure it is handled to provide feedback to the user.
if case .phoneNumberValidationError = phoneValidationError {
print(
"found phoneValidationError: \(String(describing: phoneValidationError?.localizedDescription))"
)
// Update UI components to display OtpStartView with the phone number validation error.
self.sheetObservable.isPhoneValidationError = true
} else {
self.sheetObservable.isPhoneValidationError = false
}
// Update UI components to display OtpStartView if a phone number is needed.
self.sheetObservable.isOtpStartActive = true
}
}
}
// Return collected phone number to the SDK
func handlePhoneNumber(phoneNumber: String) {
guard let callback = self.callback else {
print("Error: OtpStartStepCallback is not set ")
return
}
let otpStartInput = OtpStartInput(phoneNumber: phoneNumber)
// This is how you pass collected phone number to SDK
callback.onSuccess(input: otpStartInput)
}
// Communicate any issues encountered while trying to obtain the phone number to the SDK.
// Error should be reported if the customer explicitly cancels the SMS OTP transaction
// or presses the back button to exit out the SMS OTP start step screen.
func handleOtpStartError() {
guard let callback = self.callback else {
print("Error: OtpStartStepCallback is not set ")
return
}
callback.onError()
}
}
```
The finish step is implemented the same as the previous tab:
```swift Swift theme={"dark"}
import Foundation
import SwiftUI
import ProveAuth
class MobileOtpFinishStep: OtpFinishStep {
@ObservedObject var sheetObservable: SheetObservable
var callback: OtpFinishStepCallback?
init(sheetObservable: SheetObservable){
self.sheetObservable = sheetObservable
}
// Implement this method to collect the OTP value delivered via SMS.
func execute(otpError: ProveAuthError?, callback: OtpFinishStepCallback) {
self.callback = callback
// Handle the OTP validation error if present.
if case .otpValidationError = otpError {
print("found otpError: \(String(describing: otpError?.localizedDescription))")
// Signal to your UI components that the last provided OTP is invalid
self.sheetObservable.otpError = true
} else {
self.sheetObservable.otpError = false
}
// Signal to UI components to display OtpFinishView
DispatchQueue.main.async {
self.sheetObservable.isOtpFinishActive = true
}
}
// Provide the collected OTP value to the SDK for validation.
func handleOtp(_ otp: String) {
guard let callback = self.callback else {
print("Error: OtpFinishStepCallback is not set ")
return
}
let otpFinishInput = OtpFinishInput(otp: otp)
callback.onSuccess(input: otpFinishInput)
}
// Notify the SDK of any issues encountered while obtaining the OTP value or if the user cancels the OTP flow.
func handleOtpFinishError() {
guard let callback = self.callback else {
print("Error: OtpFinishStepCallback is not set ")
return
}
callback.onError()
}
}
```
Follow these instructions to allow the customer to request a new OTP via SMS using the same phone number. There is a max of three send attempts including the initial message.
The start step is implemented the same as the previous tab:
```swift Swift theme={"dark"}
import Foundation
import ProveAuth
import SwiftUI
class MobileOtpStartStep: OtpStartStep {
@ObservedObject var sheetObservable: SheetObservable
var callback: OtpStartStepCallback?
init(sheetObservable: SheetObservable) {
self.sheetObservable = sheetObservable
}
func execute(
phoneNumberNeeded: Bool, phoneValidationError: ProveAuthError?, callback: OtpStartStepCallback
) {
self.callback = callback
if !phoneNumberNeeded {
// If no phone number is needed, then don't prompt the user.
callback.onSuccess(input: nil)
} else {
DispatchQueue.main.async {
// If a phone number validation error is detected, ensure it is handled to provide feedback to the user.
if case .phoneNumberValidationError = phoneValidationError {
print(
"found phoneValidationError: \(String(describing: phoneValidationError?.localizedDescription))"
)
// Update UI components to display OtpStartView with the phone number validation error.
self.sheetObservable.isPhoneValidationError = true
} else {
self.sheetObservable.isPhoneValidationError = false
}
// Update UI components to display OtpStartView if a phone number is needed.
self.sheetObservable.isOtpStartActive = true
}
}
}
// Return collected phone number to the SDK
func handlePhoneNumber(phoneNumber: String) {
guard let callback = self.callback else {
print("Error: OtpStartStepCallback is not set ")
return
}
let otpStartInput = OtpStartInput(phoneNumber: phoneNumber)
// This is how you pass collected phone number to SDK
callback.onSuccess(input: otpStartInput)
}
// Communicate any issues encountered while trying to obtain the phone number to the SDK.
// Error should be reported if the customer explicitly cancels the SMS OTP transaction
// or presses the back button to exit out the SMS OTP start step screen.
func handleOtpStartError() {
guard let callback = self.callback else {
print("Error: OtpStartStepCallback is not set ")
return
}
callback.onError()
}
}
```
You can then send a new OTP SMS to the same phone number by implementing the finish step like this:
```swift Swift theme={"dark"}
import Foundation
import SwiftUI
import ProveAuth
class MobileOtpFinishStep: OtpFinishStep {
@ObservedObject var sheetObservable: SheetObservable
var callback: OtpFinishStepCallback?
init(sheetObservable: SheetObservable){
self.sheetObservable = sheetObservable
}
// Implement this method to collect the OTP value delivered in the SMS message.
func execute(otpError: ProveAuthError?, callback: OtpFinishStepCallback) {
self.callback = callback
// Handle the OTP validation error if present.
if case .otpValidationError = otpError {
print("found otpError: \(String(describing: otpError?.localizedDescription))")
// Update your UI to indicate that the provided OTP is invalid
self.sheetObservable.otpError = true
} else {
self.sheetObservable.otpError = false
}
// Update your UI to display the OtpFinishView
DispatchQueue.main.async {
self.sheetObservable.isOtpFinishActive = true
}
}
// Return the OTP value to the SDK
func handleOtp(_ otp: String) {
guard let callback = self.callback else {
print("Error: OtpFinishStepCallback is not set ")
return
}
let otpFinishInput = OtpFinishInput(otp: otp)
callback.onSuccess(input: otpFinishInput)
}
// Communicate to the SDK any issues when host app trys to obtain the OTP value
// or when users cancel the OTP flow
func handleOtpFinishError() {
guard let callback = self.callback else {
print("Error: OtpFinishStepCallback is not set ")
return
}
callback.onError()
}
// Call this method to request a new OTP code for the same mobile number.
func sendNewOtp() {
guard let callback = self.callback else {
print("Error: OtpFinishStepCallback is not set ")
return
}
callback.onOtpResend()
}
}
```
Follow these instructions to allow the customer to re-enter the OTP PIN if they type it wrong. There is a max of 3 attempts. To implement this functionality, you also need to pass in `allowOTPRetry=true` to the `/v3/start` endpoint.
The start step is implemented the same as either of the the previous tabs - no client side code changes necessary:
```swift Swift theme={"dark"}
import Foundation
import ProveAuth
import SwiftUI
class MobileOtpStartStep: OtpStartStep {
@ObservedObject var sheetObservable: SheetObservable
var callback: OtpStartStepCallback?
init(sheetObservable: SheetObservable) {
self.sheetObservable = sheetObservable
}
func execute(
phoneNumberNeeded: Bool, phoneValidationError: ProveAuthError?, callback: OtpStartStepCallback
) {
self.callback = callback
if !phoneNumberNeeded {
// If no phone number is needed, then don't prompt the user.
callback.onSuccess(input: nil)
} else {
DispatchQueue.main.async {
// If a phone number validation error is detected, ensure it is handled to provide feedback to the user.
if case .phoneNumberValidationError = phoneValidationError {
print(
"found phoneValidationError: \(String(describing: phoneValidationError?.localizedDescription))"
)
// Update UI components to display OtpStartView with the phone number validation error.
self.sheetObservable.isPhoneValidationError = true
} else {
self.sheetObservable.isPhoneValidationError = false
}
// Update UI components to display OtpStartView if a phone number is needed.
self.sheetObservable.isOtpStartActive = true
}
}
}
// Return collected phone number to the SDK
func handlePhoneNumber(phoneNumber: String) {
guard let callback = self.callback else {
print("Error: OtpStartStepCallback is not set ")
return
}
let otpStartInput = OtpStartInput(phoneNumber: phoneNumber)
// This is how you pass collected phone number to SDK
callback.onSuccess(input: otpStartInput)
}
// Communicate any issues encountered while trying to obtain the phone number to the SDK.
// Error should be reported if the customer explicitly cancels the SMS OTP transaction
// or presses the back button to exit out the SMS OTP start step screen.
func handleOtpStartError() {
guard let callback = self.callback else {
print("Error: OtpStartStepCallback is not set ")
return
}
callback.onError()
}
}
```
The finish step is implemented the same as either of the the previous tabs - no client side code changes necessary. If the OTP is invalid, the finish step will be called again to prompt the user for a new input. Once the max attempts is reached, the `AuthFinish` function will be called.
```swift Swift theme={"dark"}
import Foundation
import SwiftUI
import ProveAuth
class MobileOtpFinishStep: OtpFinishStep {
@ObservedObject var sheetObservable: SheetObservable
var callback: OtpFinishStepCallback?
init(sheetObservable: SheetObservable){
self.sheetObservable = sheetObservable
}
// Implement this method to collect the OTP value delivered via SMS.
func execute(otpError: ProveAuthError?, callback: OtpFinishStepCallback) {
self.callback = callback
// Handle the OTP validation error if present.
if case .otpValidationError = otpError {
print("found otpError: \(String(describing: otpError?.localizedDescription))")
// Signal to your UI components that the last provided OTP is invalid
self.sheetObservable.otpError = true
} else {
self.sheetObservable.otpError = false
}
// Signal to UI components to display OtpFinishView
DispatchQueue.main.async {
self.sheetObservable.isOtpFinishActive = true
}
}
// Provide the collected OTP value to the SDK for validation.
func handleOtp(_ otp: String) {
guard let callback = self.callback else {
print("Error: OtpFinishStepCallback is not set ")
return
}
let otpFinishInput = OtpFinishInput(otp: otp)
callback.onSuccess(input: otpFinishInput)
}
// Notify the SDK of any issues encountered while obtaining the OTP value or if the user cancels the OTP flow.
func handleOtpFinishError() {
guard let callback = self.callback else {
print("Error: OtpFinishStepCallback is not set ")
return
}
callback.onError()
}
}
```
Follow these instructions to allow the customer to re-enter their phone number. There is a max of three entries/send attempts.
Manual Request Required
To enable phone number change capabilities on your credentials, contact your Prove representative.
The start step is implemented the same as the previous tab:
```swift Swift theme={"dark"}
import Foundation
import ProveAuth
import SwiftUI
class MobileOtpStartStep: OtpStartStep {
@ObservedObject var sheetObservable: SheetObservable
var callback: OtpStartStepCallback?
init(sheetObservable: SheetObservable) {
self.sheetObservable = sheetObservable
}
func execute(
phoneNumberNeeded: Bool, phoneValidationError: ProveAuthError?, callback: OtpStartStepCallback
) {
self.callback = callback
if !phoneNumberNeeded {
// If no phone number is needed, then don't prompt the user.
callback.onSuccess(input: nil)
} else {
DispatchQueue.main.async {
// If a phone number validation error is detected, ensure it is handled to provide feedback to the user.
if case .phoneNumberValidationError = phoneValidationError {
print(
"found phoneValidationError: \(String(describing: phoneValidationError?.localizedDescription))"
)
// Update UI components to display OtpStartView with the phone number validation error.
self.sheetObservable.isPhoneValidationError = true
} else {
self.sheetObservable.isPhoneValidationError = false
}
// Update UI components to display OtpStartView if a phone number is needed.
self.sheetObservable.isOtpStartActive = true
}
}
}
// Return collected phone number to the SDK
func handlePhoneNumber(phoneNumber: String) {
guard let callback = self.callback else {
print("Error: OtpStartStepCallback is not set ")
return
}
let otpStartInput = OtpStartInput(phoneNumber: phoneNumber)
// This is how you pass collected phone number to SDK
callback.onSuccess(input: otpStartInput)
}
// Communicate any issues encountered while trying to obtain the phone number to the SDK.
// Error should be reported if the customer explicitly cancels the SMS OTP transaction
// or presses the back button to exit out the SMS OTP start step screen.
func handleOtpStartError() {
guard let callback = self.callback else {
print("Error: OtpStartStepCallback is not set ")
return
}
callback.onError()
}
}
```
You can prompt for a new phone number by implementing the finish step like this:
```swift Swift theme={"dark"}
import Foundation
import SwiftUI
import ProveAuth
class MobileOtpFinishStep: OtpFinishStep {
@ObservedObject var sheetObservable: SheetObservable
var callback: OtpFinishStepCallback?
init(sheetObservable: SheetObservable){
self.sheetObservable = sheetObservable
}
// Implement this method to collect the OTP value delivered via SMS.
func execute(otpError: ProveAuthError?, callback: OtpFinishStepCallback) {
self.callback = callback
// Handle the OTP validation error if present.
if case .otpValidationError = otpError {
print("found otpError: \(String(describing: otpError?.localizedDescription))")
// Update your UI to indicate that the provided OTP is invalid.
self.sheetObservable.otpError = true
} else {
self.sheetObservable.otpError = false
}
// Update your UI to display the OTP finish view.
DispatchQueue.main.async {
self.sheetObservable.isOtpFinishActive = true
}
}
// Return the collected OTP value to the SDK.
func handleOtp(_ otp: String) {
guard let callback = self.callback else {
print("Error: OtpFinishStepCallback is not set ")
return
}
let otpFinishInput = OtpFinishInput(otp: otp)
callback.onSuccess(input: otpFinishInput)
}
// When callback.onMobileNumberChange() is evoked, OtpStartStep will be re-initiated
// so that end-users can enter a different phone number via OtpStartStep.
func handleMobileNumberChange() {
guard let callback = self.callback else {
print("Error: OtpFinishStepCallback is not set")
return
}
callback.onMobileNumberChange()
}
}
```
In the `AuthFinishStep`, you'll specify a function to call once the possession checks complete on the mobile phone. This endpoint on your back end server calls the `Validate()` function to validate the phone number. The `AuthFinishStep` then completes. In the event of cancellation, the server makes a call to the `Validate()` function and returns `success=false`.
Once the possession checks finish on the mobile device, the finish handler on the client-side SDK executes. You then make a request to your server such as `POST /verify` to make the next call in the flow to the `Validate()` function.
This function requires the Correlation ID which is returned by the `Start()` function.
```go Go theme={"dark"}
rspValidate, err := client.V3.V3ValidateRequest(context.TODO(), &components.V3ValidateRequest{
CorrelationID: rspStart.V3StartResponse.CorrelationID,
})
if err != nil {
return fmt.Errorf("error on Validate(): %w", err)
}
```
```typescript TypeScript theme={"dark"}
const rspValidate = await sdk.v3.v3ValidateRequest({
correlationId: rspStart.v3StartResponse?.correlationId || '',
})
if (!rspValidate) {
console.error('Validate error.')
return
}
```
```java Java theme={"dark"}
V3ValidateRequest req = V3ValidateRequest.builder()
.correlationId("713189b8-5555-4b08-83ba-75d08780aebd")
.build();
V3ValidateRequestResponse res = sdk.v3().v3ValidateRequest()
.request(req)
.call();
// You may want to use the .get() method when working with the response object.
```
The function returns the following fields:
* `success`: either `true` if the mobile number validation was successful, or `false` if it failed.
* `challengeMissing`: `false` since challenge data isn't needed.
* `phoneNumber`: the validated phone number.
* `next`: map of the next API call you need to make.
Prompt the customer for PII entry into your form or gather from your CRM. Then submit that information to the back end server so the `Complete()` call can then verify the customer information.
Additionally, specific to the KYC add-on use case, you need to pass in first name, last name, DOB, and SSN (or address) to ensure you receive back the KYC elements and correct CIP values.
```javascript JavaScript theme={"dark"}
// Send request to the backend to verify customer information.
async function sendInfo(firstName, lastName) {
const response = await fetch(backendUrl + "/finish", {
method: "POST",
headers: {
Accept: "application/json",
"Content-Type": "application/json",
},
body: JSON.stringify({
firstName: firstName,
lastName: lastName,
}),
});
const results = await response.json();
const rsp = JSON.stringify(results);
return rsp;
}
```
```typescript TypeScript theme={"dark"}
// Send request to the backend to verify customer information.
async function sendInfo(firstName: string, lastName: string) {
const response = await fetch(backendUrl + "/finish", {
method: "POST",
headers: {
Accept: "application/json",
"Content-Type": "application/json",
},
body: JSON.stringify({
firstName: firstName,
lastName: lastName,
}),
});
const results = await response.json();
const rsp = JSON.stringify(results);
return rsp;
}
```
```java Java theme={"dark"}
// Send request to the backend to verify customer information.
SendInfoResponse sendInfo(String firstName, String lastName) {
YourBackendClient backend = new YourBackendClient(); // Backend API client
// TODO: Build your SendInfoRequest object
SendInfoRequest sendInfoRequest = new SendInfoRequest(firstName, lastName, ...);
// Send a sendInfoRequest to your backend server to get return customer information.
SendInfoResponse response = backend.verify(sendInfoRequest);
// TODO: define your own SendInfoResponse object to parse the response
return response;
}
```
```swift Swift theme={"dark"}
// Send request to the backend to verify customer information.
// The below example uses native iOS URLSession, but any other
// alternative networking approaches should also work
func sendInfo(firstName: String, lastName: String, completion: @escaping (Result<[String:Any], Error>) -> Void) {
guard let url = URL(string: "\(backendUrl)/finish") else {
completion(.failure(URLError(.badURL)))
return
}
var request = URLRequest(url: url)
request.httpMethod = "POST"
request.addValue("application/json", forHTTPHeaderField: "Accept")
request.addValue("application/json", forHTTPHeaderField: "Content-Type")
// Set up the request body
let body: [String: Any] = [
"firstName": firstName
"lastName": lastName
]
do {
request.httpBody = try JSONSerialization.data(withJSONObject: body, options: \[])
} catch {
completion(.failure(error))
return
}
let task = URLSession.shared.dataTask(with: request) { \_, response, error in
// Handle network or connection errors
if let error = error {
completion(.failure(error))
return
}
do {
if let results = try JSONSerialization.jsonObject(with: data, options: \[]) as? [String: Any] {
completion(.success(results))
} else {
let parsingError = NSError(domain: "", code: 0, userInfo: [NSLocalizedDescriptionKey : "Failed to parse JSON or auth token is missing"])
completion(.failure(parsingError))
}
} catch {
completion(.failure(error))
}
}
// Start the network call
task.resume()
}
```
This function is the final call in the flow that verifies the customer information.
This function takes these required parameters:
* Correlation ID: this is the ID returned by the `Start()` function.
* Individual: customer information in a map.
When implementing the KYC add-on, you need to pass in first name, last name, DOB, and SSN (or address) to ensure you receive back the KYC and CIP fields. If applicable, the following reason codes will return in Production:
* DI - this identity is associated with a death indicator.
* CF - The address matches the address of a U.S. correctional facility.
* PO - The address was classified as a PO Box.
Refer to the [Complete API reference](https://developer.prove.com/reference/complete-request) and select "Response with KYC - 0 hits" for an example response.
```go Go theme={"dark"}
rspComplete, err := client.V3.V3CompleteRequest(context.TODO(), &components.V3CompleteRequest{
CorrelationID: rspStart.V3StartResponse.CorrelationID,
Individual: components.Individual{
FirstName: provesdkservergo.String("Tod"),
LastName: provesdkservergo.String("Weedall"),
Addresses: []components.AddressEntry{
{
Address: provesdkservergo.String("39 South Trail"),
City: provesdkservergo.String("San Antonio"),
Region: provesdkservergo.String("TX"),
PostalCode: provesdkservergo.String("78285"),
},
},
Ssn: provesdkservergo.String("565228370"),
Dob: provesdkservergo.String("1984-12-10"),
EmailAddresses: []string{
"[email protected]",
},
},
})
if err != nil {
return fmt.Errorf("error on Complete(): %w", err)
}
```
```typescript TypeScript theme={"dark"}
const rspComplete = await sdk.v3.v3CompleteRequest({
correlationId: rspStart.v3StartResponse?.correlationId || '',
individual: {
firstName: 'Tod',
lastName: 'Weedall',
addresses: [{
address: '39 South Trail',
city: 'San Antonio',
region: 'TX',
postalCode: '78285',
}],
dob: '1984-12-10',
emailAddresses: [
'[email protected]',
],
ssn: '565228370',
},
});
if (!rspComplete) {
console.error("Complete error.")
return
}
```
```java Java theme={"dark"}
V3CompleteRequest req = V3CompleteRequest.builder()
.correlationId("713189b8-5555-4b08-83ba-75d08780aebd")
.individual(V3CompleteIndividualRequest.builder()
.addresses(java.util.List.of(
V3CompleteAddressEntryRequest.builder()
.address("39 South Trail")
.city("San Antonio")
.extendedAddress("Apt 23")
.postalCode("78285")
.region("TX")
.build()))
.dob("2024-05-02T00:00:00Z")
.emailAddresses(java.util.List.of(
"[email protected]",
"[email protected]"))
.firstName("Tod")
.lastName("Weedall")
.ssn("265228370")
.build())
.build();
V3CompleteRequestResponse res = sdk.v3().v3CompleteRequest()
.request(req)
.call();
// You may want to use the .get() method when working with the response object.
```
The function returns the following fields:
* Success: `true` if the customer’s identity information is associated with the mobile number.
* Next: map of the next API call you need to make, in this case, `Done`.
You can then respond to the front end with the results of the customer verification.
## Test your Prove implementation
Next, reference the Sandbox test scenarios to test users and simulate different behaviors encountered in production.
Production Launch
To launch in Production, please contact your Prove representative.
# Prove Identity Sandbox Testing
Source: https://developer.prove.com/docs/prove-identity-sandbox-testing
Learn more about simulating the Prove Identity flow using the Sandbox environment
export const product_0 = "Prove Identity"
When you interact with the Sandbox environment, use test users to simulate different behaviors. Simulate the possession checks using the client-side SDK.
The testing environment doesn't send text messages or validate real customer information.
If the system returns an unexpected code, reference the [Error and Status Codes page](https://developer.prove.com/reference/status-and-error-codes).
{product_0} sandbox test users can only be used with {product_0} project credentials. Attempting to use these test users with different project credentials will result in an unauthorized access error.
## Test users list
### Short-term test user
Use this test user when performing initial testing with cURL or Postman. This test user skips the client-side SDK authentication to walk you through the sequence of API calls.
| Phone Number | First Name | Last Name | Address | City | State | Zip | Date of Birth | Social Security Number | Email |
| :----------- | :--------- | :-------- | :------------------- | :---------- | :---- | :---- | :------------ | :--------------------- | :------------------- |
| `2001004000` | Martina | Goodram | 28965 Homewood Plaza | Little Rock | AR | 72204 | 7/26/1995 | 490959347 | `mgoodram0@nasa.gov` |
After initial short-term testing, implement the client-side SDK and use the remaining test users to test your implementation.
### Prove Identity test users
Use the following list of test users to test Prove Identity. For expected behavior per step, review [Testing Steps](#testing-steps).
| Phone Number | First Name | Last Name | Address | City | State | Zip | Date of Birth | Social Security Number | Email |
| :----------- | :---------------- | :-------- | :------------------ | :---------- | :---- | :--------- | :------------ | :--------------------- | :------------------------ |
| `2001004009` | [Benji](#benji) | Harper | 27 Financial Place | Bakersfield | CA | 93301-2425 | 09/02/1994 | 565252770 | `bharperd@superstars.com` |
| `2001001698` | [Enid](#enid) | Wildt | 861 Karstens Circle | Washington | DC | 20409 | 6/18/1996 | 212285822 | `ewildtp@eepurl.com` |
| `2001001699` | [Carney](#carney) | Reinisch | 582 Coleman Point | San Antonio | TX | 78230 | 3/3/2000 | 166521601 | `creinischq@php.net` |
### Mobile Auth test users
Use the following list of test users to test Identity with the Mobile Auth add-on. For expected behavior per step, review [Testing Steps](#testing-steps).
| Phone Number | First Name | Last Name | Address | City | State | Zip | Date of Birth | Social Security Number | Email |
| :----------- | :------------ | :--------- | :---------------- | :----------- | :---- | :---- | :------------ | :--------------------- | :-------------------------------------------------------- |
| `5551111111` | [Lena](#lena) | Lansberry | 663 Stephen Drive | Grand Rapids | MI | 49518 | 3/4/1999 | 657766672 | [llansberryk@nbcnews.com](mailto:llansberryk@nbcnews.com) |
| `5552222222` | [Axe](#axe) | Summersett | 1823 School Park | Phoenix | AZ | 85025 | 9/24/1963 | 670752404 | [asummersettl@boston.com](mailto:asummersettl@boston.com) |
### Know Your Customer test users
Use the following test users to test the Know Your Customer (KYC) and Customer Identification Program (CIP) feature. This applies if you purchased the KYC add-on. For expected behavior per step, review the [Testing Steps](#testing-steps). When implementing the KYC add-on, pass in first name, last name, date of birth (DOB), and social security number (SSN) or address. This ensures you receive back the KYC and CIP fields in the /complete response.
| Phone Number | First Name | Last Name | Address | City | State | Zip | Date of Birth | Social Security Number | Email |
| :----------- | :---------------- | :-------- | :----------------- | :----------- | :---- | :---- | :------------ | :--------------------- | :---------------------- |
| `2001004008` | [Maegan](#maegan) | Bertl | 003 Reinke Avenue | Omaha | NE | 68124 | 1/11/1998 | 217174600 | `mbertl8@google.com.br` |
| `2001004005` | [Carrie](#carrie) | Wilding | 8 Helena Street | Milwaukee | WI | 53234 | 8/15/1990 | 657220663 | `cwilding5@prweb.com` |
| `2001004007` | [Nora](#nora) | Riddich | 160 Daystar Avenue | Philadelphia | PA | 19093 | 08/24/2000 | 760591291 | `nriddich7@sina.com.cn` |
## Testing steps
Now that you’ve done client-side, server-side, and CX implementation, follow the step-by-step instructions to test each test user and ensure your implementation follows expected behavior.
Follow the steps below to test the Prove Identity flow with Benji Harper. This user will pass the Identity flow.
Start the onboarding flow on the initial screen and enter the phone number for Benji Harper.
Your front end will send this data to the back end. Your back end will then send the phone number and flow type to the /start endpoint. The response will provide an auth token, correlation ID, and the next endpoint to call.
The final target URL must be sent if performing a desktop flow.
Your back end will send the authToken to the front end SDK to do the possession handling.
The front end will run OTP handling. Use 1234 to simulate a successful OTP.
The front end will simulate Instant Link handling.
Once the front end finishes the possession check, the back end calls the /validate endpoint with the correlation ID to authenticate the trustworthiness of the phone number.
The response provides:
* `success=true`
* `phoneNumber` that was initially passed.
* `evaluation`: object containing the results of the authentication and risk evaluations. Refer to the [Global Fraud Policy](https://developer.prove.com/docs/global-fraud-policy) for more details.
* `/v3/complete` as the next endpoint to call.
Enter the PII for Benji Harper in the form.
Confirm the PII in the form. The back end will then call the /complete endpoint with the correlation ID and you will have a successful flow.
Follow the steps below to test the Prove Identity flow with Enid Wildt. This user will pass the Identity flow.
Start the onboarding flow on the initial screen and enter the phone number for Enid.
Your front end will send this data to the back end. Your back end will then send the phone number and flow type to the /start endpoint. The response will provide an auth token, correlation ID, and the next endpoint to call.
The final target URL must be sent if performing a desktop flow.
Your back end will send the authToken to the front end SDK to do the possession handling.
The front end will run OTP handling. Use 1234 to simulate a successful OTP.
The front end will simulate Instant Link handling.
Once the front end finishes the possession check, the back end calls the /validate endpoint with the correlation ID to authenticate the trustworthiness of the phone number.
The response provides:
* `success=true`
* `phoneNumber` that was initially passed.
* `evaluation`: object containing the results of the authentication and risk evaluations. Refer to the [Global Fraud Policy](https://developer.prove.com/docs/global-fraud-policy) for more details.
* `/v3/complete` as the next endpoint to call.
Enter the PII for Enid Wildt in the form.
Confirm the PII in the form. The back end will then call the /complete endpoint with the correlation ID and you will have a successful flow.
Follow the steps below to test the Prove Identity flow with Carney Reinisch. This user falls out of the Identity flow at the Validate step and returns `success=false` in the /validate response.
Start the onboarding flow on the initial screen and enter the phone number for Carney.
Your front end will send this data to the back end. Your back end will then send the phone number and flow type to the /start endpoint. The response will provide an auth token, correlation ID, and the next endpoint to call.
The final target URL must be sent if performing a desktop flow.
Your back end will send the authToken to the front end SDK to do the possession handling.
The front end will run OTP handling. Use 1234 to simulate a successful OTP.
The front end will simulate Instant Link handling.
Once the front end finishes the possession check, the back end calls the /validate endpoint with the correlation ID to authenticate the trustworthiness of the phone number.
This user fails /validate.
```json Response theme={"dark"}
{
"next": {
"done": "done"
},
"success": false
}
```
The Prove flow is terminated. The front end should proceed to an alternative authentication method.
Follow the steps below to test the Prove Identity flow with Mobile Auth add-on for Lena Lansberry. This user will pass the Identity flow using Mobile Auth.
Start the onboarding flow on the initial screen and prompt to accept MNO consent.
Your front end will send this data to the back end. Your back end will then send the phone number and flow type to the /start endpoint. The response will provide an auth token, correlation ID, and the next endpoint to call.
For this workflow, the SDK collects the phone number rather than passing in the phone number into the /start endpoint. Refer to the Web, Android, or iOS SDK documentation to configure your implementation to handle phone number collection when prompted.
The final target URL must be sent if performing a desktop flow.
Your back end will send the authToken to the front end SDK to do the possession handling.
This user passes Mobile Auth.
If on desktop, the system fails Mobile Auth and the client-side SDK prompts for the phone number. The front end will then run Instant Link handling.
Once the front end finishes the possession check, the back end calls the /validate endpoint with the correlation ID to authenticate the trustworthiness of the phone number.
The response provides:
* `success=true`
* `phoneNumber` that was initially passed.
* `evaluation`: object containing the results of the authentication and risk evaluations. Refer to the [Global Fraud Policy](https://developer.prove.com/docs/global-fraud-policy) for more details.
* `/v3/complete` as the next endpoint to call.
Enter the PII for Lena Lansberry in the form.
Confirm the PII in the form. The back end will then call the /complete endpoint with the correlation ID and you will have a successful flow.
Follow the steps below to test the Prove Identity flow with Mobile Auth add-on for Axe Summersett. This user will pass fail MobileAuth but waterfall to OTP and pass the overall Prove Identity flow.
Start the onboarding flow on the initial screen and prompt to accept MNO consent.
Your front end will send this data to the back end. Your back end will then send the phone number and flow type to the /start endpoint. The response will provide an auth token, correlation ID, and the next endpoint to call.
Axe's phone number needs to be passed into Start() due to Sandbox limitations. However, in Production the customers phone number does not need to be passed into Start() when Mobile Auth is enabled. The client-side SDK will prompt for phone number only if Mobile Auth fails. Refer to the Web, Android, or iOS SDK documentation to configure your implementation to handle phone number collection when prompted.
The final target URL must be sent if performing a desktop flow.
Your back end will send the authToken to the front end SDK to do the possession handling.
The system fails Mobile Auth and the client-side SDK prompts for the phone number. The front end will then run OTP handling. Use 1234 to simulate a successful OTP.
If on desktop, the system fails Mobile Auth and the client-side SDK prompts for the phone number. The front end will then run Instant Link handling.
Once the front end finishes the possession check, the back end calls the /validate endpoint with the correlation ID to authenticate the trustworthiness of the phone number.
The response provides:
* `success=true`
* `phoneNumber` that was initially passed.
* `evaluation`: object containing the results of the authentication and risk evaluations. Refer to the [Global Fraud Policy](https://developer.prove.com/docs/global-fraud-policy) for more details.
* `/v3/complete` as the next endpoint to call.
Enter the PII for Axe Summersett in the form.
Confirm the PII in the form. The back end will then call the /complete endpoint with the correlation ID and you will have a successful flow.
Follow the steps below to test the Prove Identity flow with KYC add-on for Maegan Bertl. This user will pass the Identity flow with high multiCIP KYC/CIP data.
Start the onboarding flow on the initial screen and enter the phone number for Maegan Bertl.
Your front end will send this data to the back end. Your back end will then send the phone number and flow type to the /start endpoint. The response will provide an auth token, correlation ID, and the next endpoint to call.
The final target URL must be sent if performing a desktop flow.
Your back end will send the authToken to the front end SDK to do the possession handling.
The front end will run OTP handling. Use 1234 to simulate a successful OTP.
The front end will simulate Instant Link handling.
Once the front end finishes the possession check, the back end calls the /validate endpoint with the correlation ID to authenticate the trustworthiness of the phone number.
The response provides:
* `success=true`
* `phoneNumber` that was initially passed.
* `/v3/complete` as the next endpoint to call.
Enter the PII for Maegan Bertl in the form.
Confirm the PII in the form. The back end will then call the /complete endpoint with the correlation ID and you will have a successful flow. You will receive simulated KYC and CIP results in the response. This user passes both checks.
Follow the steps below to test the Prove Identity flow with KYC add-on for Carrie Wilding. This user will pass the Identity flow but also returns 4 simulated hits against KYC watchlists.
Start the onboarding flow on the initial screen and enter the phone number for Carrie Wilding.
Your front end will send this data to the back end. Your back end will then send the phone number and flow type to the /start endpoint. The response will provide an auth token, correlation ID, and the next endpoint to call.
The final target URL must be sent if performing a desktop flow.
Your back end will send the authToken to the front end SDK to do the possession handling.
The front end will run OTP handling. Use 1234 to simulate a successful OTP.
The front end will simulate Instant Link handling.
Once the front end finishes the possession check, the back end calls the /validate endpoint with the correlation ID to authenticate the trustworthiness of the phone number.
The response provides:
* `success=true`
* `phoneNumber` that was initially passed.
* `/v3/complete` as the next endpoint to call.
Enter the PII for Carrie Wilding in the form.
Confirm the PII in the form. The back end will then call the /complete endpoint with the correlation ID and you will have a successful flow. You will receive KYC and IDV data in the /complete response. This user fails the KYC check. Send the user through your exception process.
Follow the steps below to test the Prove Identity flow with KYC add-on for Nora Riddich. This user will fail the Identity flow at the Complete step and return `multiCIPConfidence=low`.
Start the onboarding flow on the initial screen and enter the phone number for Nora Riddich.
Your front end will send this data to the back end. Your back end will then send the phone number and flow type to the /start endpoint. The response will provide an auth token, correlation ID, and the next endpoint to call.
The final target URL must be sent if performing a desktop flow.
Your back end will send the authToken to the front end SDK to do the possession handling.
The front end will run OTP handling. Use 1234 to simulate a successful OTP.
The front end will simulate Instant Link handling.
Once the front end finishes the possession check, the back end calls the /validate endpoint with the correlation ID to authenticate the trustworthiness of the phone number.
The response provides:
* `success=true`
* `phoneNumber` that was initially passed.
* `/v3/complete` as the next endpoint to call.
Enter the PII for Nora Riddich in the form.
Confirm the PII in the form. The back end will then call the /complete endpoint with the correlation ID. You will receive KYC and IDV data in the /complete response. This user fails the Complete step indicating Prove was unable to validate their identity. In addition, this user fails the CIP check. Send the user through a step-up authentication method.
Follow the steps below to test the Prove Identity flow with Benji, Carney, Enid, Axe, Maegan, Carrie, or Nora. This will introduce failures into the flow and return `success=false` at various points.
Your back end will send the authToken to the front end SDK to do the possession handling. During the mobile flow, use 1111 to simulate a failed OTP when presented with the OTP page. Once the front end finishes the possession check, the back end calls the /validate endpoint with the correlation ID to authenticate the trustworthiness of the phone number.
The test user then fails /validate.
```json Response theme={"dark"}
{
"next": {
"done": "done"
},
"success": false
}
```
The Prove flow is terminated and the front end proceeds to another authentication method.
When viewing the PII page, change the last name.
The back end will then call the /complete endpoint with the correlation ID and the edited information. The user will fail /complete. Send the user through the exception process.
```json Response theme={"dark"}
{
"next": {
"v3-complete": "/v3/complete"
},
"success": false
}
```
# Challenge Page Requirements
Source: https://developer.prove.com/docs/prove-pre-fill-challenge-page-requirements
Learn how to design the frontend for your Challenge Page when implementing without MobileAuth℠
Once the command line setup is complete, you only need to enter the package name (e.g., `swift.proveauth`) in Xcode - no need to enter the full registry URL to Xcode.
#### Method 2: Using Package.swift
Add dependencies to your `Package.swift` file:
```swift Swift theme={"dark"}
// swift-tools-version: 5.9
import PackageDescription
let package = Package(
name: "YourApp",
platforms: [.iOS(.v12)],
dependencies: [
.package(id: "swift.proveauth", from: "6.9.1"),
],
targets: [
.target(
name: "YourApp",
dependencies: [
.product(name: "ProveAuth", package: "swift.proveauth"),
]
)
]
)
```
Then run the following command to resolve and fetch the dependencies:
```bash theme={"dark"}
swift package resolve
```
## Implement Prove Identity
Create or update your first screen to gather customer data.
Create or update your first screen to prompt the customer to accept the terms and conditions. This allows Mobile Auth to verify the customer.
In order for Mobile Auth to succeed:
* Disable VPN.
* Disable Private Relay on iOS.
When testing, you can ignore any Chrome error messages that mention `ERR_TUNNEL_CONNECTION_FAILED` - this is due to the VPN, but the SDK fallbacks to OTP.
Determine if the customer is on a mobile or desktop browser using this example. If the `isMobile` is true, set `mobile` as the `flowType` for the `Start()` function on the server, otherwise you can set `desktop`:
```javascript JavaScript theme={"dark"}
// Check if the customer is on a mobile or desktop browser.
const authCheck = new proveAuth.AuthenticatorBuilder().build();
let isMobile = authCheck.isMobileWeb()
```
```typescript TypeScript theme={"dark"}
// Check if the customer is on a mobile or desktop browser.
const authCheck = new proveAuth.AuthenticatorBuilder().build();
let isMobile = authCheck.isMobileWeb()
```
When using the Android SDK, set `mobile` as the `flowType` for the `Start()` function on the server.
When using the iOS SDK, set `mobile` as the `flowType` for the `Start()` function on the server.
Send a request to your back end server with the phone number and flow type.
```javascript JavaScript {1-13} theme={"dark"}
async function initialize(phoneNumber, flowType) {
const response = await fetch(backendUrl + "/initialize", {
method: "POST",
headers: {
Accept: "application/json",
"Content-Type": "application/json",
},
body: JSON.stringify({
phoneNumber: phoneNumber
flowType: flowType,
}),
});
const rsp = await response.json();
const authToken = rsp.authToken;
return authToken;
}
```
```typescript TypeScript {1-17} theme={"dark"}
async function initialize(
phoneNumber: string,
flowType: string
): Promise {
const response = await fetch(backendUrl + "/initialize", {
method: "POST",
headers: {
Accept: "application/json",
"Content-Type": "application/json",
},
body: JSON.stringify({
phoneNumber: phoneNumber,
flowType: flowType,
}),
});
const rsp = await response.json();
const authToken = rsp.authToken;
return authToken;
}
```
```java Java theme={"dark"}
String initialize(String phoneNumber, String flowType) {
YourBackendClient backend = new YourBackendClient(); // Backend API client
// TODO: Build your InitializeRequest object
InitializeRequest initializeRequest = new InitializeRequest(phoneNumber, flowType);
// Send an initialize request to your backend server to get authToken
InitializeResponse response = backend.initialize(initializeRequest);
// TODO: define your own InitializeResponse object to parse authToken string
return response.getAuthToken();
}
```
```swift Swift theme={"dark"}
// The below example uses native iOS URLSession, but any other
// alternative networking approaches should also work
func initialize(phoneNumber: String, flowType: String, completion: @escaping (Result\) -> Void) {
guard let url = URL(string: "\(backendUrl)/initialize") else {
completion(.failure(URLError(.badURL)))
return
}
var request = URLRequest(url: url)
request.httpMethod = "POST"
request.addValue("application/json", forHTTPHeaderField: "Accept")
request.addValue("application/json", forHTTPHeaderField: "Content-Type")
// Set up the request body
let body: [String: Any] = [
"flowType": flowType,
"phoneNumber": phoneNumber,
]
do {
request.httpBody = try JSONSerialization.data(withJSONObject: body, options: \[])
} catch {
completion(.failure(error))
return
}
// Perform the request
let task = URLSession.shared.dataTask(with: request) { \_, response, error in
// Handle network or connection errors
if let error = error {
completion(.failure(error))
return
}
do {
if let json = try JSONSerialization.jsonObject(with: data, options: \[]) as? [String: Any],
let authToken = json["authToken"] as? String {
completion(.success(authToken))
} else {
let parsingError = NSError(domain: "", code: 0, userInfo: [NSLocalizedDescriptionKey : "Failed to parse JSON or authToken is missing"])
completion(.failure(parsingError))
}
} catch {
completion(.failure(error))
}
}
// Start the network call
task.resume()
}
```
Send a request to your back end server with the flow type.
```javascript JavaScript {1-11} theme={"dark"}
async function initialize(flowType) {
const response = await fetch(backendUrl + "/initialize", {
method: "POST",
headers: {
Accept: "application/json",
"Content-Type": "application/json",
},
body: JSON.stringify({
flowType: flowType,
}),
});
const rsp = await response.json();
const authToken = rsp.authToken;
return authToken;
}
```
```typescript TypeScript {1-13} theme={"dark"}
async function initialize(
flowType: string
): Promise {
const response = await fetch(backendUrl + "/initialize", {
method: "POST",
headers: {
Accept: "application/json",
"Content-Type": "application/json",
},
body: JSON.stringify({
flowType: flowType,
}),
});
const rsp = await response.json();
const authToken = rsp.authToken;
return authToken;
}
```
```java Java theme={"dark"}
String initialize(String flowType) {
YourBackendClient backend = new YourBackendClient(); // Backend API client
// TODO: Build your InitializeRequest object
InitializeRequest initializeRequest = new InitializeRequest(flowType);
// Send an initialize request to your backend server to get authToken
InitializeResponse response = backend.initialize(initializeRequest);
// TODO: define your own InitializeResponse object to parse authToken string
return response.getAuthToken();
}
```
```swift Swift theme={"dark"}
// The below example uses native iOS `URLSession`, but any other
// alternative networking approaches should also work
func initialize(flowType: String, completion: @escaping (Result\) -> Void) {
guard let url = URL(string: "\(backendUrl)/initialize") else {
completion(.failure(URLError(.badURL)))
return
}
var request = URLRequest(url: url)
request.httpMethod = "POST"
request.addValue("application/json", forHTTPHeaderField: "Accept")
request.addValue("application/json", forHTTPHeaderField: "Content-Type")
// Set up the request body
let body: [String: Any] = [
"flowType": flowType
]
do {
request.httpBody = try JSONSerialization.data(withJSONObject: body, options: \[])
} catch {
completion(.failure(error))
return
}
// Perform the request
let task = URLSession.shared.dataTask(with: request) { \_, response, error in
// Handle network or connection errors
if let error = error {
completion(.failure(error))
return
}
do {
if let json = try JSONSerialization.jsonObject(with: data, options: \[]) as? [String: Any],
let authToken = json["authToken"] as? String
completion(.success(authToken))
} else {
let parsingError = NSError(domain: "", code: 0, userInfo: [NSLocalizedDescriptionKey : "Failed to parse JSON or authToken is missing"])
completion(.failure(parsingError))
}
} catch {
completion(.failure(error))
}
}
// Start the network call
task.resume()
}
```
Start a Prove flow with a call to the `Start()` function. This function takes these required parameters:
* `flowType`: either `desktop` or `mobile` to describe which type of device the customer is starting their flow on.
* `finalTargetURL`: required when `flowType=desktop`. This should be a URL you maintain. Once the customer clicks the Instant Link, they will be redirected to this URL. It should instruct the customer to continue the workflow. Maximum length is 128 characters.
These parameters are optional:
* `allowOTPRetry`: set to `true` to allow the customer to re-enter the OTP up to three times. Defaults to `false`.
For OTP retries, make sure to implement client SDK changes in the next step.
```go Go theme={"dark"}
// Send the start request.
rspStart, err := client.V3.V3StartRequest(context.TODO(), &components.V3StartRequest{
PhoneNumber: "2001004009"
FlowType: "desktop",
FinalTargetURL: provesdkservergo.String("https://www.example.com"),
Ssn: "565252770",
AllowOTPRetry: true,
})
if err != nil {
return fmt.Errorf("error on Start: %w", err)
}
```
```typescript TypeScript theme={"dark"}
let startReq = {
phoneNumber: '2001004009',
flowType: 'desktop',
finalTargetUrl: 'https://www.example.com',
ssn: '565252770',
allowOTPRetry: true,
}
// Send the start request.
const rspStart = await sdk.v3.v3StartRequest(startReq);
if (!rspStart) {
console.error("Start error.")
return
}
```
```java Java theme={"dark"}
// Send the start request.
V3StartRequest req = V3StartRequest.builder()
.phoneNumber("2001004009")
.flowType("desktop")
.finalTargetUrl("https://www.example.com")
.ssn("565252770")
.allowOTPRetry(true)
.build();
// You may want to use the .get() method when working with the response object.
```
```csharp .NET theme={"dark"}
using Prove.Proveapi;
using Prove.Proveapi.Models.Components;
var sdk = new ProveAPI(auth: "");
V3StartRequest req = new V3StartRequest() {
FinalTargetUrl = "https://www.example.com",
FlowType = "desktop",
PhoneNumber = "2001004009",
Ssn = "565252770",
AllowOTPRetry = true,
};
var res = await sdk.V3.V3StartRequestAsync(req);
```
```go Go theme={"dark"}
// Send the start request.
rspStart, err := client.V3.V3StartRequest(context.TODO(), &components.V3StartRequest{
FlowType: "desktop",
FinalTargetURL: provesdkservergo.String("https://www.example.com"),
AllowOTPRetry: true,
})
if err != nil {
return fmt.Errorf("error on Start: %w", err)
}
```
```typescript TypeScript theme={"dark"}
let startReq = {
flowType: 'desktop',
finalTargetUrl: 'https://www.example.com',
allowOTPRetry: true,
}
// Send the start request.
const rspStart = await sdk.v3.v3StartRequest(startReq);
if (!rspStart) {
console.error("Start error.")
return
}
```
```java Java theme={"dark"}
// Send the start request.
V3StartRequest req = V3StartRequest.builder()
.flowType("desktop")
.finalTargetUrl("https://www.example.com")
.allowOTPRetry(true)
.build();
// You may want to use the .get() method when working with the response object.
```
```csharp .NET theme={"dark"}
using Prove.Proveapi;
using Prove.Proveapi.Models.Components;
var sdk = new ProveAPI(auth: "");
V3StartRequest req = new V3StartRequest() {
FinalTargetUrl = "https://www.example.com",
FlowType = "desktop",
AllowOTPRetry = true,
};
var res = await sdk.V3.V3StartRequestAsync(req);
```
The function returns the following fields:
* `authToken`: send this to your client-side code through the `Authenticate()` function - it's a JSON Web Token (JWT) tied to the current flow and used for the possession checks. It expires after 15 minutes.
* `correlationId`: save this in your current session, then pass it in to each of the `Validate()`, `Challenge()`, and `Complete()` function calls of the same flow. The correlation ID ties together different system calls for the same Prove flow. The session expires in 15 minutes from when the correlation ID returns from the `Start()` call.
* `next`: map of the next API call you need to make.
Return the `authToken` in a response to the front end.
Once you have the `authToken`, build the authenticator for both the mobile and desktop flows.
```javascript JavaScript theme={"dark"}
async function authenticate(isMobileWeb, authToken) {
// Set up the authenticator for either mobile or desktop flow.
let builder = new proveAuth.AuthenticatorBuilder();
if (isMobileWeb) {
// Set up Mobile Auth and OTP.
builder = builder
.withAuthFinishStep((input) => verify(input.authId))
.withMobileAuthImplementation("fetch")
.withOtpFallback(otpStart, otpFinish);
} else {
// Set up Instant Link.
builder = builder
.withAuthFinishStep((input) => verify(input.authId))
.withInstantLinkFallback(instantLink)
.withRole("secondary");
}
const authenticator = builder.build();
// Authenticate with the authToken.
return authenticator.authenticate(authToken);
}
```
```typescript TypeScript theme={"dark"}
async function authenticate(isMobileWeb: boolean, authToken: string) {
// Set up the authenticator for either mobile or desktop flow.
let builder = new proveAuth.AuthenticatorBuilder();
if (isMobileWeb) {
// Set up Mobile Auth and OTP.
builder = builder
.withAuthFinishStep((input) => verify(input.authId))
.withMobileAuthImplementation("fetch")
.withOtpFallback(otpStart, otpFinish);
} else {
// Set up Instant Link.
builder = builder
.withAuthFinishStep((input) => verify(input.authId))
.withInstantLinkFallback(instantLink)
.withRole("secondary");
}
const authenticator = builder.build();
// Authenticate with the authToken.
return authenticator.authenticate(authToken);
}
```
## Configure OTP
To use the Resend/Retry/Phone Change features, you need to install the Web SDK version 2.15.1 or later.
To set the One-Time Password (OTP) handler, `withOtpFallback(startStep: OtpStartStep | OtpStartStepFn, finishStep: OtpFinishStep | OtpFinishStepFn)`, requires implementing the `OtpStartStep` and `OtpFinishStep`. When returning the phone number in the functions, ensure you return an object with the field `phoneNumber` to the `resolve()` function.
The OTP session has a two minute timeout from when it's sent through Short Message Service (SMS) to when the customer can enter in the OTP.
Follow these instructions if you are implementing OTP and you are passing in the phone number on the `/v3/start` endpoint. In this case, you've already prompted for a phone number so you don't need to prompt for it in the client SDK.
Since you passed the phone number in the `Start()` function, call `resolve(null)` to communicate to the SDK you have the customer's agreement to deliver the SMS message. Ensure you return an object to `resolve()` function.
```javascript JavaScript theme={"dark"}
function otpStartStep(phoneNumberNeeded, phoneValidationError) {
return new Promise((resolve, reject) => {
// Since no phone number is needed, don't prompt the user.
resolve(null);
});
}
```
```typescript TypeScript theme={"dark"}
const otpStartStep: OtpStartStep = {
execute: async (
phoneNumberNeeded: boolean,
phoneValidationError?: PhoneValidationError
): Promise => {
return new Promise((resolve, reject) => {
// Since no phone number is needed, don't prompt the user.
resolve(null);
});
},
};
```
Call the `reject('some error message')` method to communicate to the SDK any issues while trying to obtain the phone number or the OTP. Report an error if the customer cancels the SMS transaction or presses the back button to leave the screen.
In the finish step, call the `resolve(result: OtpFinishResult)` method to return the collected OTP value in which `result` variable has `OnSuccess` value for `OtpFinishResultType` and the OTP value wrapped in `OtpFinishInput`.
```javascript JavaScript theme={"dark"}
function otpFinishStep(otpError) {
return new Promise((resolve, reject) => {
// If error message is found, handle it.
if (otpError) {
// Set to a variable and display it in a field.
// In this example, we don't do anything with the error.
var someErrorMessage = otpError.message;
}
// Prompt the user for whether they received the SMS.
// Typically, this is a page that shows the OTP already. We are simplifying
// it by requiring an input.
var input = confirm('Did you receive a text message?');
if (!input) {
// Close the modal if a text message was not received.
return;
}
// Prompt the user for the OTP.
var otp = prompt('Enter OTP code:');
if (otp) {
// If the input is valid and the user clicked `OK`, return the OTP.
resolve({
input: { otp }, // OTP value
resultType: 0, // OnSuccess enum type = 0
});
} else {
// Else, exit the flow.
reject('phone invalid or user cancelled');
}
});
}
```
```typescript TypeScript theme={"dark"}
const otpFinishStep: OtpFinishStep = {
execute: async (otpError?: OtpError): Promise => {
return new Promise((resolve, reject) => {
// If error message is found, handle it.
if (otpError) {
// Set to a variable and display it in a field.
// In this example, we don't do anything with the error.
var someErrorMessage = otpError.message;
}
// Prompt the user for whether they received the SMS.
// Typically, this is a page that shows the OTP already. We are simplifying
// it by requiring an input.
var input = confirm('Did you receive a text message?');
if (!input) {
// Close the modal if a text message was not received.
return;
}
// Prompt the user for the OTP.
var otp = prompt('Enter OTP code:');
if (otp) {
// If the input is valid and the user clicked `OK`, return the OTP.
resolve({
input: { otp }, // OTP value
resultType: OtpFinishResultType.OnSuccess,
});
} else {
// Else, exit the flow.
reject('phone invalid or user cancelled');
}
});
},
};
```
Follow these instructions if implementing MobileAuth and collecting the phone number only if MobileAuth fails. This will implement OTP without allowing for SMS resends and phone number changes. If you do want those capabilities, please reference the subsequent tabs (Resend, Retry OTP, and Phone Number Change).
In the start step, call the `resolve(input: OtpStartInput)` method to return the collected phone number to the SDK.
```javascript JavaScript theme={"dark"}
function otpStartStep(phoneNumberNeeded, phoneValidationError) {
return new Promise((resolve, reject) => {
// If no phone number is needed, then don't prompt the user.
if (!phoneNumberNeeded) {
resolve(null);
return;
}
// If error message is found around phone number, handle it.
// The `phoneValidationError` is ONLY available when `phoneNumberNeeded`
// has a value.
if (phoneValidationError) {
// Set to a variable and display it in a field.
// In this example, we don't do anything with the error.
var someErrorMessage = phoneValidationError.message;
}
// Prompt the user for the phone number.
var input = prompt('Enter phone number:');
if (input) {
// If the input is valid and the user clicked `OK`, return the phone
// number.
resolve({
phoneNumber: input,
});
} else {
// Else, exit the flow.
reject('phone invalid or user cancelled');
}
});
}
```
```typescript TypeScript theme={"dark"}
const otpPromptStartStep: OtpStartStep = {
execute: async (
phoneNumberNeeded: boolean,
phoneValidationError?: PhoneValidationError
): Promise => {
return new Promise((resolve, reject) => {
// If no phone number is needed, then don't prompt the user.
if (!phoneNumberNeeded) {
resolve(null);
return;
}
// If error message is found around phone number, handle it.
// The `phoneValidationError` is ONLY available when `phoneNumberNeeded`
// has a value.
if (phoneValidationError) {
// Set to a variable and display it in a field.
// In this example, we don't do anything with the error.
var someErrorMessage = phoneValidationError.message;
}
// Prompt the user for the phone number.
var input = prompt('Enter phone number:');
if (input) {
// If the input is valid and the user clicked `OK`, return the phone
// number.
resolve({
phoneNumber: input,
});
} else {
// Else, exit the flow.
reject('phone invalid or user cancelled');
}
});
},
};
```
The finish step is implemented the same as the previous tab:
```javascript JavaScript theme={"dark"}
function otpFinishStep(otpError) {
return new Promise((resolve, reject) => {
// If error message is found, handle it.
if (otpError) {
// Set to a variable and display it in a field.
// In this example, we don't do anything with the error.
var someErrorMessage = otpError.message;
}
// Prompt the user for whether they received the SMS.
// Typically, this is a page that shows the OTP already. We are simplifying
// it by requiring an input.
var input = confirm('Did you receive a text message?');
if (!input) {
// Close the modal if a text message was not received.
return;
}
// Prompt the user for the OTP.
var otp = prompt('Enter OTP code:');
if (otp) {
// If the input is valid and the user clicked `OK`, return the OTP.
resolve({
input: { otp }, // OTP value
resultType: 0, // OnSuccess enum type = 0
});
} else {
// Else, exit the flow.
reject('phone invalid or user cancelled');
}
});
}
```
```typescript TypeScript theme={"dark"}
const otpFinishStep: OtpFinishStep = {
execute: async (otpError?: OtpError): Promise => {
return new Promise((resolve, reject) => {
// If error message is found, handle it.
if (otpError) {
// Set to a variable and display it in a field.
// In this example, we don't do anything with the error.
var someErrorMessage = otpError.message;
}
// Prompt the user for whether they received the SMS.
// Typically, this is a page that shows the OTP already. We are simplifying
// it by requiring an input.
var input = confirm('Did you receive a text message?');
if (!input) {
// Close the modal if a text message was not received.
return;
}
// Prompt the user for the OTP.
var otp = prompt('Enter OTP code:');
if (otp) {
// If the input is valid and the user clicked `OK`, return the OTP.
resolve({
input: { otp }, // OTP value
resultType: OtpFinishResultType.OnSuccess,
});
} else {
// Else, exit the flow.
reject('phone invalid or user cancelled');
}
});
},
};
```
Follow these instructions to allow the customer to request a new OTP via SMS using the same phone number. There is a max of three send attempts including the initial message.
The start step is implemented the same as the previous tab:
```javascript JavaScript theme={"dark"}
function otpStartStep(phoneNumberNeeded, phoneValidationError) {
return new Promise((resolve, reject) => {
// If no phone number is needed, then don't prompt the user.
if (!phoneNumberNeeded) {
resolve(null);
return;
}
// If error message is found around phone number, handle it.
// The `phoneValidationError` is ONLY available when `phoneNumberNeeded`
// has a value.
if (phoneValidationError) {
// Set to a variable and display it in a field.
// In this example, we don't do anything with the error.
var someErrorMessage = phoneValidationError.message;
}
// Prompt the user for the phone number.
var input = prompt('Enter phone number:');
if (input) {
// If the input is valid and the user clicked `OK`, return the phone
// number.
resolve({
phoneNumber: input,
});
} else {
// Else, exit the flow.
reject('phone invalid or user cancelled');
}
});
}
```
```typescript TypeScript theme={"dark"}
const otpPromptStartStep: OtpStartStep = {
execute: async (
phoneNumberNeeded: boolean,
phoneValidationError?: PhoneValidationError
): Promise => {
return new Promise((resolve, reject) => {
// If no phone number is needed, then don't prompt the user.
if (!phoneNumberNeeded) {
resolve(null);
return;
}
// If error message is found around phone number, handle it.
// The `phoneValidationError` is ONLY available when `phoneNumberNeeded`
// has a value.
if (phoneValidationError) {
// Set to a variable and display it in a field.
// In this example, we don't do anything with the error.
var someErrorMessage = phoneValidationError.message;
}
// Prompt the user for the phone number.
var input = prompt('Enter phone number:');
if (input) {
// If the input is valid and the user clicked `OK`, return the phone
// number.
resolve({
phoneNumber: input,
});
} else {
// Else, exit the flow.
reject('phone invalid or user cancelled');
}
});
},
};
```
You can then send a new OTP SMS to the same phone number by implementing the finish step like this:
```javascript JavaScript theme={"dark"}
function otpFinishStep(otpError) {
return new Promise((resolve, reject) => {
// If error message is found, handle it.
if (otpError) {
// Set to a variable and display it in a field.
// In this example, we don't do anything with the error.
var someErrorMessage = otpError.message;
}
// Prompt the user for whether they received the SMS.
// Typically, this is a page that shows the OTP already. We are simplifying
// it by requiring an input.
var input = confirm('Did you receive a text message?');
if (!input) {
// If `Cancel`, then resend to the same phone number.
resolve({
resultType: 1, // OnResendOtp enum type = 1
});
return;
}
// Prompt the user for the OTP.
var otp = prompt('Enter OTP code:');
if (otp) {
// If the input is valid and the user clicked `OK`, return the OTP.
resolve({
input: { otp }, // OTP value
resultType: 0, // OnSuccess enum type = 0
});
} else {
// Else, exit the flow.
reject('phone invalid or user cancelled');
}
});
}
```
```typescript TypeScript theme={"dark"}
const otpMultipleResendFinishStep: OtpFinishStep = {
execute: async (otpError?: OtpError): Promise => {
return new Promise((resolve, reject) => {
// If error message is found, handle it.
if (otpError) {
// Set to a variable and display it in a field.
// In this example, we don't do anything with the error.
var someErrorMessage = otpError.message;
}
// Prompt the user for whether they received the SMS.
// Typically, this is a page that shows the OTP already. We are simplifying
// it by requiring an input.
var input = confirm('Did you receive a text message?');
if (!input) {
// If `Cancel`, then resend to the same phone number.
resolve({
resultType: 1, // OnResendOtp enum type = 1
});
return;
}
// Prompt the user for the OTP.
var otp = prompt('Enter OTP code:');
if (otp) {
// If the input is valid and the user clicked `OK`, return the OTP.
resolve({
input: { otp }, // OTP value
resultType: OtpFinishResultType.OnSuccess,
});
} else {
// Else, exit the flow.
reject('phone invalid or user cancelled');
}
});
},
};
```
Follow these instructions to allow the customer to re-enter the OTP PIN if they type it wrong. There is a max of 3 attempts. To implement this functionality, you also need to pass in `allowOTPRetry=true` to the `/v3/start` endpoint.
The start step is implemented the same as either of the the previous tabs - no client side code changes necessary:
```javascript JavaScript theme={"dark"}
function otpStartStep(phoneNumberNeeded, phoneValidationError) {
return new Promise((resolve, reject) => {
// If no phone number is needed, then don't prompt the user.
if (!phoneNumberNeeded) {
resolve(null);
return;
}
// If error message is found around phone number, handle it.
// The `phoneValidationError` is ONLY available when `phoneNumberNeeded`
// has a value.
if (phoneValidationError) {
// Set to a variable and display it in a field.
// In this example, we don't do anything with the error.
var someErrorMessage = phoneValidationError.message;
}
// Prompt the user for the phone number.
var input = prompt('Enter phone number:');
if (input) {
// If the input is valid and the user clicked `OK`, return the phone
// number.
resolve({
phoneNumber: input,
});
} else {
// Else, exit the flow.
reject('phone invalid or user cancelled');
}
});
}
```
```typescript TypeScript theme={"dark"}
const otpPromptStartStep: OtpStartStep = {
execute: async (
phoneNumberNeeded: boolean,
phoneValidationError?: PhoneValidationError
): Promise => {
return new Promise((resolve, reject) => {
// If no phone number is needed, then don't prompt the user.
if (!phoneNumberNeeded) {
resolve(null);
return;
}
// If error message is found around phone number, handle it.
// The `phoneValidationError` is ONLY available when `phoneNumberNeeded`
// has a value.
if (phoneValidationError) {
// Set to a variable and display it in a field.
// In this example, we don't do anything with the error.
var someErrorMessage = phoneValidationError.message;
}
// Prompt the user for the phone number.
var input = prompt('Enter phone number:');
if (input) {
// If the input is valid and the user clicked `OK`, return the phone
// number.
resolve({
phoneNumber: input,
});
} else {
// Else, exit the flow.
reject('phone invalid or user cancelled');
}
});
},
};
```
The finish step is implemented the same as either of the the previous tabs - no client side code changes necessary. If the OTP is invalid, the finish step will be called again to prompt the user for a new input. Once the max attempts is reached, the `AuthFinish` function will be called.
```javascript JavaScript theme={"dark"}
function otpFinishStep(otpError) {
return new Promise((resolve, reject) => {
// If error message is found, handle it.
if (otpError) {
// Set to a variable and display it in a field.
// In this example, we don't do anything with the error.
var someErrorMessage = otpError.message;
}
// Prompt the user for whether they received the SMS.
// Typically, this is a page that shows the OTP already. We are simplifying
// it by requiring an input.
var input = confirm('Did you receive a text message?');
if (!input) {
// Close the modal if a text message was not received.
return;
}
// Prompt the user for the OTP.
var otp = prompt('Enter OTP code:');
if (otp) {
// If the input is valid and the user clicked `OK`, return the OTP.
resolve({
input: { otp }, // OTP value
resultType: 0, // OnSuccess enum type = 0
});
} else {
// Else, exit the flow.
reject('phone invalid or user cancelled');
}
});
}
```
```typescript TypeScript theme={"dark"}
const otpFinishStep: OtpFinishStep = {
execute: async (otpError?: OtpError): Promise => {
return new Promise((resolve, reject) => {
// If error message is found, handle it.
if (otpError) {
// Set to a variable and display it in a field.
// In this example, we don't do anything with the error.
var someErrorMessage = otpError.message;
}
// Prompt the user for whether they received the SMS.
// Typically, this is a page that shows the OTP already. We are simplifying
// it by requiring an input.
var input = confirm('Did you receive a text message?');
if (!input) {
// Close the modal if a text message was not received.
return;
}
// Prompt the user for the OTP.
var otp = prompt('Enter OTP code:');
if (otp) {
// If the input is valid and the user clicked `OK`, return the OTP.
resolve({
input: { otp }, // OTP value
resultType: OtpFinishResultType.OnSuccess,
});
} else {
// Else, exit the flow.
reject('phone invalid or user cancelled');
}
});
},
};
```
Follow these instructions to allow the customer to re-enter their phone number. There is a max of three entries/send attempts.
Manual Request Required
To enable phone number change capabilities on your credentials, contact your Prove representative.
The start step is implemented the same as the previous tab:
```javascript JavaScript theme={"dark"}
function otpStartStep(phoneNumberNeeded, phoneValidationError) {
return new Promise((resolve, reject) => {
// If no phone number is needed, then don't prompt the user.
if (!phoneNumberNeeded) {
resolve(null);
return;
}
// If error message is found around phone number, handle it.
// The `phoneValidationError` is ONLY available when `phoneNumberNeeded`
// has a value.
if (phoneValidationError) {
// Set to a variable and display it in a field.
// In this example, we don't do anything with the error.
var someErrorMessage = phoneValidationError.message;
}
// Prompt the user for the phone number.
var input = prompt('Enter phone number:');
if (input) {
// If the input is valid and the user clicked `OK`, return the phone
// number.
resolve({
phoneNumber: input,
});
} else {
// Else, exit the flow.
reject('phone invalid or user cancelled');
}
});
}
```
```typescript TypeScript theme={"dark"}
const otpPromptStartStep: OtpStartStep = {
execute: async (
phoneNumberNeeded: boolean,
phoneValidationError?: PhoneValidationError
): Promise => {
return new Promise((resolve, reject) => {
// If no phone number is needed, then don't prompt the user.
if (!phoneNumberNeeded) {
resolve(null);
return;
}
// If error message is found around phone number, handle it.
// The `phoneValidationError` is ONLY available when `phoneNumberNeeded`
// has a value.
if (phoneValidationError) {
// Set to a variable and display it in a field.
// In this example, we don't do anything with the error.
var someErrorMessage = phoneValidationError.message;
}
// Prompt the user for the phone number.
var input = prompt('Enter phone number:');
if (input) {
// If the input is valid and the user clicked `OK`, return the phone
// number.
resolve({
phoneNumber: input,
});
} else {
// Else, exit the flow.
reject('phone invalid or user cancelled');
}
});
},
};
```
You can prompt for a new phone numberby implementing the finish step like this:
```javascript JavaScript theme={"dark"}
function otpFinishStep(otpError) {
return new Promise((resolve, reject) => {
// If error message is found, handle it.
if (otpError) {
// Set to a variable and display it in a field.
// In this example, we don't do anything with the error.
var someErrorMessage = otpError.message;
}
// Prompt the user for whether they received the SMS.
// Typically, this is a page that shows the OTP already. We are simplifying
// it by requiring an input.
var input = confirm('Did you receive a text message?');
if (!input) {
// If `Cancel`, then trigger the otpStartStep to re-prompt for
// phone number.
resolve({
resultType: 2, // OnMobileNumberChange enum type = 2
});
return;
}
// Prompt the user for the OTP.
var otp = prompt('Enter OTP code:');
if (otp) {
// If the input is valid and the user clicked `OK`, return the OTP.
resolve({
input: { otp }, // OTP value
resultType: 0, // OnSuccess enum type = 0
});
} else {
// Else, exit the flow.
reject('phone invalid or user cancelled');
}
});
}
```
```typescript TypeScript theme={"dark"}
const otpPhoneChangeFinishStep: OtpFinishStep = {
execute: async (otpError?: OtpError): Promise => {
return new Promise((resolve, reject) => {
// If error message is found, handle it.
if (otpError) {
// Set to a variable and display it in a field.
// In this example, we don't do anything with the error.
var someErrorMessage = otpError.message;
}
// Prompt the user for whether they received the SMS.
// Typically, this is a page that shows the OTP already. We are simplifying
// it by requiring an input.
var input = confirm('Did you receive a text message?');
if (!input) {
// If `Cancel`, then trigger the otpStartStep to re-prompt for
// phone number.
resolve({
resultType: 2, // OnMobileNumberChange enum type = 2
});
return;
}
// Prompt the user for the OTP.
var otp = prompt('Enter OTP code:');
if (otp) {
// If the input is valid and the user clicked `OK`, return the OTP.
resolve({
input: { otp }, // OTP value
resultType: OtpFinishResultType.OnSuccess,
});
} else {
// Else, exit the flow.
reject('phone invalid or user cancelled');
}
});
},
};
```
## Configure Instant Link
To use the Resend/Retry/Phone Change features, you need to install the Web SDK version 2.15.1 or later.
To set the Instant Link handler, `withInstantLinkFallback(startStep: InstantLinkStartStep | InstantLinkStartStepFn, retryStep?: InstantLinkRetryStep | InstantLinkRetryStepFn)` requires implementing the `InstantLinkStartStep` interface and optionally the `InstantLinkRetryStep` interface if you wish for advanced capabilities. When returning the phone number in the functions, ensure you return an object with the field `phoneNumber` to the `resolve()` function.
The Instant Link session has a three minute timeout from when it's sent through Short Message Service (SMS) to when the customer can click the received link.
Follow these instructions if you are implementing Instant Link and you are passing in the phone number on the `/v3/start` endpoint. In this case, you've already prompted for a phone number so you don't need to prompt for it in the client SDK.
Since you passed the phone number in the `Start()` function, call `resolve(null)` to communicate to the SDK you have the customer's agreement to deliver the SMS message. Ensure you return an object to `resolve()` function.
```javascript JavaScript theme={"dark"}
function instantLinkStartStep(phoneNumberNeeded, phoneValidationError) {
return new Promise((resolve, reject) => {
// Since no phone number is needed, don't prompt the user.
resolve(null);
});
}
```
```typescript TypeScript theme={"dark"}
const instantLinkNoPromptStartStep: InstantLinkStartStep = {
execute: async (
phoneNumberNeeded: boolean,
phoneValidationError?: PhoneValidationError
): Promise => {
return new Promise((resolve, reject) => {
// Since no phone number is needed, don't prompt the user.
resolve(null);
});
},
};
```
Follow these instructions if implementing MobileAuth and collecting the phone number for desktop. This will implement Instant Link without allowing for SMS resends and phone number changes. If you do want those capabilities, please reference the subsequent tabs (Resend and Phone Number Change).
Call the `resolve(input: InstantStartInput)` method to return the collected phone number to the SDK.
Call the `reject('some error message')` method to communicate to the SDK any issues while trying to obtain the phone number. Report an error if the customer cancels the Instant Link transaction or presses the back button to leave the Instant Link start step dialog.
```javascript JavaScript theme={"dark"}
function instantLinkStartStep(phoneNumberNeeded, phoneValidationError) {
return new Promise((resolve, reject) => {
// If no phone number is needed, then don't prompt the user.
if (!phoneNumberNeeded) {
resolve(null);
return;
}
// If error message is found around phone number, handle it.
// The `phoneValidationError` is ONLY available when `phoneNumberNeeded`
// has a value.
if (phoneValidationError) {
// Set to a variable and display it in a field.
// In this example, we don't do anything with the error.
var someErrorMessage = phoneValidationError.message;
}
// Prompt the user for the phone number.
var input = prompt('Enter phone number:');
if (input) {
// If the input is valid and the user clicked `OK`, return the phone
// number.
resolve({
phoneNumber: input,
});
} else {
// Else, exit the flow.
reject('phone invalid or user cancelled');
}
});
}
```
```typescript TypeScript theme={"dark"}
const instantLinkStartStep: InstantLinkStartStep = {
execute: async (
phoneNumberNeeded: boolean,
phoneValidationError?: PhoneValidationError
): Promise => {
return new Promise((resolve, reject) => {
// If no phone number is needed, then don't prompt the user.
if (!phoneNumberNeeded) {
resolve(null);
return;
}
// If error message is found around phone number, handle it.
// The `phoneValidationError` is ONLY available when `phoneNumberNeeded`
// has a value.
if (phoneValidationError) {
// Set to a variable and display it in a field.
// In this example, we don't do anything with the error.
var someErrorMessage = phoneValidationError.message;
}
// Prompt the user for the phone number.
var input = prompt('Enter phone number:');
if (input) {
// If the input is valid and the user clicked `OK`, return the phone
// number.
resolve({
phoneNumber: input,
} as InstantLinkStartInput);
} else {
// Else, exit the flow.
reject('phone invalid or user cancelled');
}
});
},
};
```
Follow these instructions to allow the customer to request a new SMS using the same phone number. There is a max of three send attempts including the initial message.
The start step is implemented the same as the previous tab:
```javascript JavaScript theme={"dark"}
function instantLinkStartStep(phoneNumberNeeded, phoneValidationError) {
return new Promise((resolve, reject) => {
// If no phone number is needed, then don't prompt the user.
if (!phoneNumberNeeded) {
resolve(null);
return;
}
// If error message is found around phone number, handle it.
// The `phoneValidationError` is ONLY available when `phoneNumberNeeded`
// has a value.
if (phoneValidationError) {
// Set to a variable and display it in a field.
// In this example, we don't do anything with the error.
var someErrorMessage = phoneValidationError.message;
}
// Prompt the user for the phone number.
var input = prompt('Enter phone number:');
if (input) {
// If the input is valid and the user clicked `OK`, return the phone
// number.
resolve({
phoneNumber: input,
});
} else {
// Else, exit the flow.
reject('phone invalid or user cancelled');
}
});
}
```
```typescript TypeScript theme={"dark"}
const instantLinkStartStep: InstantLinkStartStep = {
execute: async (
phoneNumberNeeded: boolean,
phoneValidationError?: PhoneValidationError
): Promise => {
return new Promise((resolve, reject) => {
// If no phone number is needed, then don't prompt the user.
if (!phoneNumberNeeded) {
resolve(null);
return;
}
// If error message is found around phone number, handle it.
// The `phoneValidationError` is ONLY available when `phoneNumberNeeded`
// has a value.
if (phoneValidationError) {
// Set to a variable and display it in a field.
// In this example, we don't do anything with the error.
var someErrorMessage = phoneValidationError.message;
}
// Prompt the user for the phone number.
var input = prompt('Enter phone number:');
if (input) {
// If the input is valid and the user clicked `OK`, return the phone
// number.
resolve({
phoneNumber: input,
} as InstantLinkStartInput);
} else {
// Else, exit the flow.
reject('phone invalid or user cancelled');
}
});
},
};
```
You can then send a new Instant Link SMS to the same phone number by implementing the `InstantLinkRetryStep` interface, for example:
```javascript JavaScript theme={"dark"}
function instantLinkRetryStep() {
return new Promise((resolve, reject) => {
// There are multiple return options:
// - resolve(0): request resend to the same phone number
// - reject('user clicked cancel'): error out of the possession flow
// Prompt the user for the phone number.
// Typically, this is a page that is automatically closed or redirected
// once the `AuthFinish` function is called. We are simplifying it by
// requiring an input.
var input = confirm('Did you receive a text message?');
if (input) {
// If `OK`, close the modal.
return;
}
// Else `Cancel`, then resend to the same phone number.
resolve(0);
});
}
```
```typescript TypeScript theme={"dark"}
const instantLinkMultipleResendRetryStep: InstantLinkRetryStep = {
execute: async (): Promise => {
return new Promise((resolve, reject) => {
// There are multiple return options:
// - resolve(0): request resend to the same phone number
// - reject('user clicked cancel'): error out of the possession flow
// Prompt the user for the phone number.
// Typically, this is a page that is automatically closed or redirected
// once the `AuthFinish` function is called. We are simplifying it by
// requiring an input.
var input = confirm('Did you receive a text message?');
if (input) {
// If `OK`, close the modal.
return;
}
// Else `Cancel`, then resend to the same phone number.
resolve(InstantLinkResultType.OnResend);
});
},
};
```
Follow these instructions to allow the customer to re-enter their phone number. There is a max of three entries/send attempts.
Manual Request Required
To enable phone number change capabilities on your credentials, contact your Prove representative.
The start step is implemented the same as the previous tab:
```javascript JavaScript theme={"dark"}
function instantLinkStartStep(phoneNumberNeeded, phoneValidationError) {
return new Promise((resolve, reject) => {
// If no phone number is needed, then don't prompt the user.
if (!phoneNumberNeeded) {
resolve(null);
return;
}
// If error message is found around phone number, handle it.
// The `phoneValidationError` is ONLY available when `phoneNumberNeeded`
// has a value.
if (phoneValidationError) {
// Set to a variable and display it in a field.
// In this example, we don't do anything with the error.
var someErrorMessage = phoneValidationError.message;
}
// Prompt the user for the phone number.
var input = prompt('Enter phone number:');
if (input) {
// If the input is valid and the user clicked `OK`, return the phone
// number.
resolve({
phoneNumber: input,
});
} else {
// Else, exit the flow.
reject('phone invalid or user cancelled');
}
});
}
```
```typescript TypeScript theme={"dark"}
const instantLinkStartStep: InstantLinkStartStep = {
execute: async (
phoneNumberNeeded: boolean,
phoneValidationError?: PhoneValidationError
): Promise => {
return new Promise((resolve, reject) => {
// If no phone number is needed, then don't prompt the user.
if (!phoneNumberNeeded) {
resolve(null);
return;
}
// If error message is found around phone number, handle it.
// The `phoneValidationError` is ONLY available when `phoneNumberNeeded`
// has a value.
if (phoneValidationError) {
// Set to a variable and display it in a field.
// In this example, we don't do anything with the error.
var someErrorMessage = phoneValidationError.message;
}
// Prompt the user for the phone number.
var input = prompt('Enter phone number:');
if (input) {
// If the input is valid and the user clicked `OK`, return the phone
// number.
resolve({
phoneNumber: input,
} as InstantLinkStartInput);
} else {
// Else, exit the flow.
reject('phone invalid or user cancelled');
}
});
},
};
```
You can prompt for a new phone number by implementing the `InstantLinkRetryStep` interface, for example:
```javascript JavaScript theme={"dark"}
function instantLinkRetryStep() {
return new Promise((resolve, reject) => {
// There are multiple return options:
// - resolve(0): request resend to the same phone number
// - resolve(1): request phone number change/re-prompt
// - reject('user clicked cancel'): error out of the possession flow
// Prompt the user for the phone number.
// Typically, this is a page that is automatically closed or redirected
// once the `AuthFinish` function is called. We are simplifying it by
// requiring an input.
var input = confirm('Did you receive a text message?');
if (input) {
// If `OK`, close the modal.
return;
}
// Else `Cancel`, then trigger the instantLinkStartStep to re-prompt for
// phone number.
resolve(1);
});
}
```
```typescript TypeScript theme={"dark"}
const instantLinkPhoneChangeRetryStep: InstantLinkRetryStep = {
execute: async (): Promise => {
return new Promise((resolve, reject) => {
// There are multiple return options:
// - resolve(0): request resend to the same phone number
// - resolve(1): request phone number change/re-prompt
// - reject('user clicked cancel'): error out of the possession flow
// Prompt the user for the phone number.
// Typically, this is a page that is automatically closed or redirected
// once the `AuthFinish` function is called. We are simplifying it by
// requiring an input.
var input = confirm('Did you receive a text message?');
if (input) {
// If `OK`, close the modal.
return;
}
// Else `Cancel`, then trigger the instantLinkStartStep to re-prompt for
// phone number.
resolve(InstantLinkResultType.OnMobileNumberChange);
});
},
};
```
In the desktop flow, a WebSocket opens for three minutes on the desktop browser while waiting for the customer to select the link in the text message. Once clicked, the WebSocket closes and the `AuthFinishStep` function finishes.
If you're using [Content Security Policy headers](https://content-security-policy.com/), ensure you allow `wss: device.uat.prove-auth.proveapis.com` and `wss: device.prove-auth.proveapis.com`.
```java Java theme={"dark"}
// Object implementing AuthFinishStep interface
AuthFinishStep authFinishStep = new AuthFinishStep() {
...
};
// Objects implementing OtpStartStep/OtpFinishStep interfaces
OtpStartStep otpStartStep = new OtpStartStep() {
...
};
OtpFinishStep otpFinishStep = new OtpFinishStep() {
...
};
ProveAuth proveAuth = ProveAuth.builder()
.withAuthFinishStep(authId -> verify(authId)) // verify(authId) call defined in #Validate the Mobile Phone section
.withOtpFallback(otpStartStep, otpFinishStep)
.withContext(this)
.build();
```
The cellular data connection can sometimes be unavailable during testing. The `Builder` class offers a `withTestMode(boolean testMode)` method, which permits simulated successful session results while connected to a Wi-Fi network only (without a cellular data connection available). Testing using a Wi-Fi connection is useful in the Sandbox environment.
```java Java theme={"dark"}
ProveAuth proveAuth = ProveAuth.builder()
.withAuthFinishStep(authId -> verify(authId))
.withOtpFallback(otpStartStep, otpFinishStep)
.withContext(this)
.withTestMode(true) // Test mode flag
.build();
```
The app employs an executor service with a minimum of two threads to manage threads due to the SDK’s ability to process concurrent blocking requests.
```java Java theme={"dark"}
public class MyAuthenticator {
private final MyBackendClient backend = new MyBackendClient(); // Backend API client
private final AuthFinishStep authFinishStep = new AuthFinishStep() {
@Override
void execute(String authId) {
try {
AuthFinishResponse response = backend.authFinish("My App", authId);
... // Check the authentication status returned in the response
} catch (IOException e) {
String failureCause = e.getCause() != null ? e.getCause().getMessage() : "Failed to request authentication results";
// Authentication failed due to request failure
}
}
};
private ProveAuth proveAuth;
public MyAuthenticator(Context context) {
proveAuth = ProveAuth.builder()
.withAuthFinishStep(authFinishStep)
.withOtpFallback(otpStartStep, otpFinishStep)
.withContext(context)
.build();
}
public void authenticate() throws IOException, ProveAuthException {
AuthStartResponse response = backend.authStart("My Prove Auth App");
proveAuth.authenticate(response.getAuthToken());
}
}
```
## Configure OTP
To use the Resend/Retry/Phone Change features, you need to install the Android SDK version 6.5.0 or later.
To set the One-Time Password (OTP) handler, `withOtpFallback(otpStart: otpStartStep, otpFinish: otpFinishStep)`, requires implementing the `OtpStartStep` and `OtpFinishStep`.
The OTP session has a two minute timeout from when it's sent through SMS to when the customer can enter in the OTP.
Follow these instructions if you are implementing OTP and you are passing in the phone number on the `/v3/start` endpoint. In this case, you've already prompted for a phone number so you don't need to prompt for it in the client SDK.
Since you passed the phone number in the `Start()` function, call `OtpStartStepCallback.onSuccess(OtpStartInput);` to communicate to the SDK you have the customer's agreement to deliver the SMS message. Ensure you return an instance of `OtpStartInput` with empty string or `null` to `OtpStartStepCallback.onSuccess()` function.
```java Java theme={"dark"}
import com.prove.sdk.proveauth.OtpStartInput;
import com.prove.sdk.proveauth.OtpStartStep;
import com.prove.sdk.proveauth.OtpStartStepCallback;
import com.prove.sdk.proveauth.ProveAuthException;
public class NoPromptStart implements OtpStartStep {
@Override
public void execute(boolean phoneNumberNeeded, ProveAuthException otpException,
OtpStartStepCallback callback) {
// No phone number needed, no need to ask end user for input.
callback.onSuccess(new OtpStartInput(""));
}
}
```
Call the `OtpStartStepCallback.onError();` method to communicate to the SDK any issues while trying to obtain the phone number or the OTP. Report an error if the customer cancels the SMS transaction or presses the back button to leave the screen.
In the finish step, call the `OtpFinishStepCallback.onSuccess(OtpFinishInput);` method to return the collected OTP value wrapped in `OtpFinishInput`.
```java Java theme={"dark"}
import com.prove.sdk.proveauth.OtpFinishInput;
import com.prove.sdk.proveauth.OtpFinishStep;
import com.prove.sdk.proveauth.OtpFinishStepCallback;
import com.prove.sdk.proveauth.OtpValidationException;
import com.prove.sdk.proveauth.ProveAuthException;
public class NoPromptFinish implements OtpFinishStep {
@Override
public void execute(@Nullable ProveAuthException otpException,
OtpFinishStepCallback otpFinishStepCallback) {
// If error message is found, handle it.
if (otpException instanceof OtpValidationException) {
// Set to a variable and display it in a field.
// In this example, we don't do anything with the error.
String errorMsg = otpException.getMessage();
}
try {
// Prompt the user for OTP delivered by SMS. You can build UI to provide
// best UX based on your application and business logic, here we simplify to a
// generic function named promptForOtpCode which gives us the OTP code.
String otpCode = promptForOtpCode();
otpFinishStepCallback.onSuccess(new OtpFinishInput(otpCode));
} catch (Exception e) {
// if any issue with the OTP collection from the end user or the user wants to cancel
// then call onError to exit the flow. In this example we simplify it as catching
// an exception.
otpFinishStepCallback.onError();
}
}
}
```
Follow these instructions if implementing MobileAuth and collecting the phone number only if MobileAuth fails. This will implement OTP without allowing for SMS resends and phone number changes. If you do want those capabilities, please reference the subsequent tabs (Resend, Retry OTP, and Phone Number Change).
In the start step, call the `OtpStartStepCallback.onSuccess(OtpStartInput);` method to return the collected phone number to the SDK.
```java Java theme={"dark"}
import com.prove.sdk.proveauth.OtpStartInput;
import com.prove.sdk.proveauth.OtpStartStep;
import com.prove.sdk.proveauth.OtpStartStepCallback;
import com.prove.sdk.proveauth.PhoneNumberValidationException;
import com.prove.sdk.proveauth.ProveAuthException;
public class PromptStart implements OtpStartStep {
@Override
public void execute(boolean phoneNumberNeeded, @Nullable ProveAuthException otpException,
OtpStartStepCallback callback) {
// If phone number is needed, need to ask the end user for phone number input.
if (phoneNumberNeeded) {
// If error message is found around phone number, handle it.
// The `PhoneNumberValidationException` is ONLY available when `phoneNumberNeeded`
// has a value.
if (otpException instanceof PhoneNumberValidationException) {
// Set to a variable and display it in a field.
// In this example, we don't do anything with the error.
String errorMsg = otpException.getMessage();
}
try {
// Prompt the user for phone number to receive OTP SMS. You can build UI to provide
// best UX based on your application and business logic, here we simplify to a
// generic function named promptForPhoneNumber which gives us the collected
// phone number.
String phoneNumber = promptForPhoneNumber();
callback.onSuccess(new OtpStartInput(phoneNumber));
} catch (Exception e) {
// if any issue with the phone number collection from the end user or the user
// wants to cancel then call onError to exit the flow.
// In this example we simplify it as catching an exception.
callback.onError();
}
} else {
// No phone number needed, no need to ask end user for input.
callback.onSuccess(new OtpStartInput(""));
}
}
}
```
The finish step is implemented the same as the previous tab:
```java Java theme={"dark"}
import com.prove.sdk.proveauth.OtpFinishInput;
import com.prove.sdk.proveauth.OtpFinishStep;
import com.prove.sdk.proveauth.OtpFinishStepCallback;
import com.prove.sdk.proveauth.OtpValidationException;
import com.prove.sdk.proveauth.ProveAuthException;
public class NoPromptFinish implements OtpFinishStep {
@Override
public void execute(@Nullable ProveAuthException otpException,
OtpFinishStepCallback otpFinishStepCallback) {
// If error message is found, handle it.
if (otpException instanceof OtpValidationException) {
// Set to a variable and display it in a field.
// In this example, we don't do anything with the error.
String errorMsg = otpException.getMessage();
}
try {
// Prompt the user for OTP delivered by SMS. You can build UI to provide
// best UX based on your application and business logic, here we simplify to a
// generic function named promptForOtpCode which gives us the OTP code.
String otpCode = promptForOtpCode();
otpFinishStepCallback.onSuccess(new OtpFinishInput(otpCode));
} catch (Exception e) {
// if any issue with the OTP collection from the end user or the user wants to cancel
// then call onError to exit the flow. In this example we simplify it as catching
// an exception.
otpFinishStepCallback.onError();
}
}
}
```
Follow these instructions to allow the customer to request a new OTP via SMS using the same phone number. There is a max of three send attempts including the initial message.
The start step is implemented the same as the previous tab:
```java Java theme={"dark"}
import com.prove.sdk.proveauth.OtpStartInput;
import com.prove.sdk.proveauth.OtpStartStep;
import com.prove.sdk.proveauth.OtpStartStepCallback;
import com.prove.sdk.proveauth.PhoneNumberValidationException;
import com.prove.sdk.proveauth.ProveAuthException;
public class PromptStart implements OtpStartStep {
@Override
public void execute(boolean phoneNumberNeeded, @Nullable ProveAuthException otpException,
OtpStartStepCallback callback) {
// If phone number is needed, need to ask the end user for phone number input.
if (phoneNumberNeeded) {
// If error message is found around phone number, handle it.
// The `PhoneNumberValidationException` is ONLY available when `phoneNumberNeeded`
// has a value.
if (otpException instanceof PhoneNumberValidationException) {
// Set to a variable and display it in a field.
// In this example, we don't do anything with the error.
String errorMsg = otpException.getMessage();
}
try {
// Prompt the user for phone number to receive OTP SMS. You can build UI to provide
// best UX based on your application and business logic, here we simplify to a
// generic function named promptForPhoneNumber which gives us the collected
// phone number.
String phoneNumber = promptForPhoneNumber();
callback.onSuccess(new OtpStartInput(phoneNumber));
} catch (Exception e) {
// if any issue with the phone number collection from the end user or the user
// wants to cancel then call onError to exit the flow.
// In this example we simplify it as catching an exception.
callback.onError();
}
} else {
// No phone number needed, no need to ask end user for input.
callback.onSuccess(new OtpStartInput(""));
}
}
}
```
You can then send a new OTP SMS to the same phone number by implementing the finish step like this:
```java Java theme={"dark"}
import com.prove.sdk.proveauth.OtpFinishInput;
import com.prove.sdk.proveauth.OtpFinishStep;
import com.prove.sdk.proveauth.OtpFinishStepCallback;
import com.prove.sdk.proveauth.OtpValidationException;
import com.prove.sdk.proveauth.ProveAuthException;
public class MultipleResendFinish implements OtpFinishStep {
@Override
public void execute(@Nullable ProveAuthException otpException,
OtpFinishStepCallback otpFinishStepCallback) {
// If error message is found, handle it.
if (otpException instanceof OtpValidationException) {
// Set to a variable and display it in a field.
// In this example, we don't do anything with the error.
String errorMsg = otpException.getMessage();
}
// Prompt the user for whether they received the SMS.
if (promptForResend("Didn't receive the SMS OTP? Click resend button for a new one!")) {
// If the end user wants to send again to the same phone number call onOtpResend().
otpFinishStepCallback.onOtpResend();
return;
}
try {
// Prompt the user for OTP delivered by SMS. You can build UI to provide
// best UX based on your application and business logic, here we simplify to a
// generic function named promptForOtpCode which gives us the OTP code.
String otpCode = promptForOtpCode();
otpFinishStepCallback.onSuccess(new OtpFinishInput(otpCode));
} catch (Exception e) {
// if any issue with the OTP collection from the end user or the user wants to cancel
// then call onError to exit the flow. In this example we simplify it as catching
// an exception.
otpFinishStepCallback.onError();
}
}
}
```
Follow these instructions to allow the customer to re-enter the OTP PIN if they type it wrong. There is a max of 3 attempts. To implement this functionality, you also need to pass in `allowOTPRetry=true` to the `/v3/start` endpoint.
The start step is implemented the same as either of the the previous tabs - no client side code changes necessary:
```java Java theme={"dark"}
import com.prove.sdk.proveauth.OtpStartInput;
import com.prove.sdk.proveauth.OtpStartStep;
import com.prove.sdk.proveauth.OtpStartStepCallback;
import com.prove.sdk.proveauth.PhoneNumberValidationException;
import com.prove.sdk.proveauth.ProveAuthException;
public class PromptStart implements OtpStartStep {
@Override
public void execute(boolean phoneNumberNeeded, @Nullable ProveAuthException otpException,
OtpStartStepCallback callback) {
// If phone number is needed, need to ask the end user for phone number input.
if (phoneNumberNeeded) {
// If error message is found around phone number, handle it.
// The `PhoneNumberValidationException` is ONLY available when `phoneNumberNeeded`
// has a value.
if (otpException instanceof PhoneNumberValidationException) {
// Set to a variable and display it in a field.
// In this example, we don't do anything with the error.
String errorMsg = otpException.getMessage();
}
try {
// Prompt the user for phone number to receive OTP SMS. You can build UI to provide
// best UX based on your application and business logic, here we simplify to a
// generic function named promptForPhoneNumber which gives us the collected
// phone number.
String phoneNumber = promptForPhoneNumber();
callback.onSuccess(new OtpStartInput(phoneNumber));
} catch (Exception e) {
// if any issue with the phone number collection from the end user or the user
// wants to cancel then call onError to exit the flow.
// In this example we simplify it as catching an exception.
callback.onError();
}
} else {
// No phone number needed, no need to ask end user for input.
callback.onSuccess(new OtpStartInput(""));
}
}
}
```
The finish step is implemented the same as either of the the previous tabs - no client side code changes necessary. If the OTP is invalid, the finish step will be called again to prompt the user for a new input. Once the max attempts is reached, the `AuthFinish` function will be called.
```java Java theme={"dark"}
import com.prove.sdk.proveauth.OtpFinishInput;
import com.prove.sdk.proveauth.OtpFinishStep;
import com.prove.sdk.proveauth.OtpFinishStepCallback;
import com.prove.sdk.proveauth.OtpValidationException;
import com.prove.sdk.proveauth.ProveAuthException;
public class NoPromptFinish implements OtpFinishStep {
@Override
public void execute(@Nullable ProveAuthException otpException,
OtpFinishStepCallback otpFinishStepCallback) {
// If error message is found, handle it.
if (otpException instanceof OtpValidationException) {
// Set to a variable and display it in a field.
// In this example, we don't do anything with the error.
String errorMsg = otpException.getMessage();
}
try {
// Prompt the user for OTP delivered by SMS. You can build UI to provide
// best UX based on your application and business logic, here we simplify to a
// generic function named promptForOtpCode which gives us the OTP code.
String otpCode = promptForOtpCode();
otpFinishStepCallback.onSuccess(new OtpFinishInput(otpCode));
} catch (Exception e) {
// if any issue with the OTP collection from the end user or the user wants to cancel
// then call onError to exit the flow. In this example we simplify it as catching
// an exception.
otpFinishStepCallback.onError();
}
}
}
```
Follow these instructions to allow the customer to re-enter their phone number. There is a max of three entries/send attempts.
Manual Request Required
To enable phone number change capabilities on your credentials, contact your Prove representative.
The start step is implemented the same as the previous tab:
```java Java theme={"dark"}
import com.prove.sdk.proveauth.OtpStartInput;
import com.prove.sdk.proveauth.OtpStartStep;
import com.prove.sdk.proveauth.OtpStartStepCallback;
import com.prove.sdk.proveauth.PhoneNumberValidationException;
import com.prove.sdk.proveauth.ProveAuthException;
public class PromptStart implements OtpStartStep {
@Override
public void execute(boolean phoneNumberNeeded, @Nullable ProveAuthException otpException,
OtpStartStepCallback callback) {
// If phone number is needed, need to ask the end user for phone number input.
if (phoneNumberNeeded) {
// If error message is found around phone number, handle it.
// The `PhoneNumberValidationException` is ONLY available when `phoneNumberNeeded`
// has a value.
if (otpException instanceof PhoneNumberValidationException) {
// Set to a variable and display it in a field.
// In this example, we don't do anything with the error.
String errorMsg = otpException.getMessage();
}
try {
// Prompt the user for phone number to receive OTP SMS. You can build UI to provide
// best UX based on your application and business logic, here we simplify to a
// generic function named promptForPhoneNumber which gives us the collected
// phone number.
String phoneNumber = promptForPhoneNumber();
callback.onSuccess(new OtpStartInput(phoneNumber));
} catch (Exception e) {
// if any issue with the phone number collection from the end user or the user
// wants to cancel then call onError to exit the flow.
// In this example we simplify it as catching an exception.
callback.onError();
}
} else {
// No phone number needed, no need to ask end user for input.
callback.onSuccess(new OtpStartInput(""));
}
}
}
```
You can prompt for a new phone number by implementing the finish step like this:
```java Java theme={"dark"}
import com.prove.sdk.proveauth.OtpFinishInput;
import com.prove.sdk.proveauth.OtpFinishStep;
import com.prove.sdk.proveauth.OtpFinishStepCallback;
import com.prove.sdk.proveauth.OtpValidationException;
import com.prove.sdk.proveauth.ProveAuthException;
public class PhoneChangeFinish implements OtpFinishStep {
@Override
public void execute(@Nullable ProveAuthException otpException,
OtpFinishStepCallback otpFinishStepCallback) {
// If error message is found, handle it.
if (otpException instanceof OtpValidationException) {
// Set to a variable and display it in a field.
// In this example, we don't do anything with the error.
String errorMsg = otpException.getMessage();
}
// Prompt the user for whether they received the SMS.
if (promptForPhoneNumberChange("Didn't receive the SMS OTP? Try a different phone number.")) {
// If the end user wants to correct the phone number already in use, or changing to a
// different phone number to receive the future SMS OTP, call onMobileNumberChange(), and
// the otpStartStep will re-prompt for phone number input from the end user.
otpFinishStepCallback.onMobileNumberChange();
return;
}
try {
// Prompt the user for OTP delivered by SMS. You can build UI to provide
// best UX based on your application and business logic, here we simplify to a
// generic function named promptForOtpCode which gives us the OTP code.
String otpCode = promptForOtpCode();
otpFinishStepCallback.onSuccess(new OtpFinishInput(otpCode));
} catch (Exception e) {
// if any issue with the OTP collection from the end user or the user wants to cancel
// then call onError to exit the flow. In this example we simplify it as catching
// an exception.
otpFinishStepCallback.onError();
}
}
}
```
```swift Swift theme={"dark"}
// Object implementing ProveAuthFinishStep protocols
let finishStep = FinishAuthStep()
// Objects implementing OtpStartStep/OtpFinishStep protocols
let otpStartStep = MobileOtpStartStep()
let otpFinishStep = MobileOtpFinishStep()
let proveAuthSdk: ProveAuth
proveAuthSdk = ProveAuth.builder(authFinish: finishStep)
.withOtpFallback(otpStart: otpStartStep, otpFinish: otpFinishStep)
.build()
```
In the event a cellular data connection is unavailable during testing, use the Builder class. It permits simulated successful session results while connected to a Wi-Fi network. Testing using a Wi-Fi connection is useful in the Sandbox environment.
```swift Swift theme={"dark"}
proveAuthSdk = ProveAuth.builder(authFinish: finishStep)
.withMobileAuthTestMode() // Test mode flag
.build()
```
The app employs an executor service with a minimum of two threads to manage threads due to the SDK’s ability to process concurrent blocking requests.
```swift Swift theme={"dark"}
// authToken retrieved from your server via StartAuthRequest
proveAuthSdk.authenticate(authToken) { error in
DispatchQueue.main.async {
self.messages.finalResultMessage = "ProveAuth.authenticate returned error: \(error.localizedDescription)"
print(self.messages.finalResultMessage)
}
}
```
## Configure OTP
To use the Resend/Retry/Phone Change features, you need to install the iOS SDK version 6.5.1 or later.
To set the One-Time Password (OTP) handler, `withOtpFallback(otpStart: otpStartStep, otpFinish: otpFinishStep)`, requires implementing the `OtpStartStep` and `OtpFinishStep`.
The OTP session has a two minute timeout from when it's sent through SMS to when the customer can enter in the OTP.
Follow these instructions if you are implementing OTP and you are passing in the phone number on the `/v3/start` endpoint. In this case, you've already prompted for a phone number so you don't need to prompt for it in the client SDK.
Since you passed the phone number in the `Start()` function, call `callback.onSuccess(input: nil)` to communicate to the SDK you have the customer's agreement to deliver the SMS message.
```swift Swift theme={"dark"}
import Foundation
import ProveAuth
import SwiftUI
class MobileOtpStartStep: OtpStartStep {
@ObservedObject var sheetObservable: SheetObservable
var callback: OtpStartStepCallback?
init(sheetObservable: SheetObservable) {
self.sheetObservable = sheetObservable
}
// Implement this method to handle phone number collection for SMS OTP,
// or to obtain user confirmation for initiating an SMS message.
func execute(
phoneNumberNeeded: Bool, phoneValidationError: ProveAuthError?, callback: OtpStartStepCallback
) {
self.callback = callback
// Since no phone number is needed, don't prompt the user.
callback.onSuccess(input: nil)
}
}
```
Call the `callback.onError()` method to communicate to the SDK any issues while trying to obtain the phone number or the OTP. Report an error if the customer cancels the SMS transaction or presses the back button to leave the screen.
```swift Swift theme={"dark"}
import Foundation
import SwiftUI
import ProveAuth
class MobileOtpFinishStep: OtpFinishStep {
@ObservedObject var sheetObservable: SheetObservable
var callback: OtpFinishStepCallback?
init(sheetObservable: SheetObservable){
self.sheetObservable = sheetObservable
}
// Implement this method to collect the OTP value delivered via SMS.
func execute(otpError: ProveAuthError?, callback: OtpFinishStepCallback) {
self.callback = callback
// Handle the OTP validation error if present.
if case .otpValidationError = otpError {
print("found otpError: \(String(describing: otpError?.localizedDescription))")
// Signal to your UI components that the last provided OTP is invalid
self.sheetObservable.otpError = true
} else {
self.sheetObservable.otpError = false
}
// Signal to UI components to display OtpFinishView
DispatchQueue.main.async {
self.sheetObservable.isOtpFinishActive = true
}
}
// Provide the collected OTP value to the SDK for validation.
func handleOtp(_ otp: String) {
guard let callback = self.callback else {
print("Error: OtpFinishStepCallback is not set ")
return
}
let otpFinishInput = OtpFinishInput(otp: otp)
callback.onSuccess(input: otpFinishInput)
}
// Notify the SDK of any issues encountered while obtaining the OTP value or if the user cancels the OTP flow.
func handleOtpFinishError() {
guard let callback = self.callback else {
print("Error: OtpFinishStepCallback is not set ")
return
}
callback.onError()
}
}
```
Follow these instructions if implementing MobileAuth and collecting the phone number only if MobileAuth fails. This will implement OTP without allowing for SMS resends and phone number changes. If you do want those capabilities, please reference the subsequent tabs (Resend, Retry OTP, and Phone Number Change).
In the start step, call the `callback.onSuccess(input: otpStartInput)` method to return the collected phone number to the SDK.
```swift Swift theme={"dark"}
import Foundation
import ProveAuth
import SwiftUI
class MobileOtpStartStep: OtpStartStep {
@ObservedObject var sheetObservable: SheetObservable
var callback: OtpStartStepCallback?
init(sheetObservable: SheetObservable) {
self.sheetObservable = sheetObservable
}
func execute(
phoneNumberNeeded: Bool, phoneValidationError: ProveAuthError?, callback: OtpStartStepCallback
) {
self.callback = callback
if !phoneNumberNeeded {
// If no phone number is needed, then don't prompt the user.
callback.onSuccess(input: nil)
} else {
DispatchQueue.main.async {
// If a phone number validation error is detected, ensure it is handled to provide feedback to the user.
if case .phoneNumberValidationError = phoneValidationError {
print(
"found phoneValidationError: \(String(describing: phoneValidationError?.localizedDescription))"
)
// Update UI components to display OtpStartView with the phone number validation error.
self.sheetObservable.isPhoneValidationError = true
} else {
self.sheetObservable.isPhoneValidationError = false
}
// Update UI components to display OtpStartView if a phone number is needed.
self.sheetObservable.isOtpStartActive = true
}
}
}
// Return collected phone number to the SDK
func handlePhoneNumber(phoneNumber: String) {
guard let callback = self.callback else {
print("Error: OtpStartStepCallback is not set ")
return
}
let otpStartInput = OtpStartInput(phoneNumber: phoneNumber)
// This is how you pass collected phone number to SDK
callback.onSuccess(input: otpStartInput)
}
// Communicate any issues encountered while trying to obtain the phone number to the SDK.
// Error should be reported if the customer explicitly cancels the SMS OTP transaction
// or presses the back button to exit out the SMS OTP start step screen.
func handleOtpStartError() {
guard let callback = self.callback else {
print("Error: OtpStartStepCallback is not set ")
return
}
callback.onError()
}
}
```
The finish step is implemented the same as the previous tab:
```swift Swift theme={"dark"}
import Foundation
import SwiftUI
import ProveAuth
class MobileOtpFinishStep: OtpFinishStep {
@ObservedObject var sheetObservable: SheetObservable
var callback: OtpFinishStepCallback?
init(sheetObservable: SheetObservable){
self.sheetObservable = sheetObservable
}
// Implement this method to collect the OTP value delivered via SMS.
func execute(otpError: ProveAuthError?, callback: OtpFinishStepCallback) {
self.callback = callback
// Handle the OTP validation error if present.
if case .otpValidationError = otpError {
print("found otpError: \(String(describing: otpError?.localizedDescription))")
// Signal to your UI components that the last provided OTP is invalid
self.sheetObservable.otpError = true
} else {
self.sheetObservable.otpError = false
}
// Signal to UI components to display OtpFinishView
DispatchQueue.main.async {
self.sheetObservable.isOtpFinishActive = true
}
}
// Provide the collected OTP value to the SDK for validation.
func handleOtp(_ otp: String) {
guard let callback = self.callback else {
print("Error: OtpFinishStepCallback is not set ")
return
}
let otpFinishInput = OtpFinishInput(otp: otp)
callback.onSuccess(input: otpFinishInput)
}
// Notify the SDK of any issues encountered while obtaining the OTP value or if the user cancels the OTP flow.
func handleOtpFinishError() {
guard let callback = self.callback else {
print("Error: OtpFinishStepCallback is not set ")
return
}
callback.onError()
}
}
```
Follow these instructions to allow the customer to request a new OTP via SMS using the same phone number. There is a max of three send attempts including the initial message.
The start step is implemented the same as the previous tab:
```swift Swift theme={"dark"}
import Foundation
import ProveAuth
import SwiftUI
class MobileOtpStartStep: OtpStartStep {
@ObservedObject var sheetObservable: SheetObservable
var callback: OtpStartStepCallback?
init(sheetObservable: SheetObservable) {
self.sheetObservable = sheetObservable
}
func execute(
phoneNumberNeeded: Bool, phoneValidationError: ProveAuthError?, callback: OtpStartStepCallback
) {
self.callback = callback
if !phoneNumberNeeded {
// If no phone number is needed, then don't prompt the user.
callback.onSuccess(input: nil)
} else {
DispatchQueue.main.async {
// If a phone number validation error is detected, ensure it is handled to provide feedback to the user.
if case .phoneNumberValidationError = phoneValidationError {
print(
"found phoneValidationError: \(String(describing: phoneValidationError?.localizedDescription))"
)
// Update UI components to display OtpStartView with the phone number validation error.
self.sheetObservable.isPhoneValidationError = true
} else {
self.sheetObservable.isPhoneValidationError = false
}
// Update UI components to display OtpStartView if a phone number is needed.
self.sheetObservable.isOtpStartActive = true
}
}
}
// Return collected phone number to the SDK
func handlePhoneNumber(phoneNumber: String) {
guard let callback = self.callback else {
print("Error: OtpStartStepCallback is not set ")
return
}
let otpStartInput = OtpStartInput(phoneNumber: phoneNumber)
// This is how you pass collected phone number to SDK
callback.onSuccess(input: otpStartInput)
}
// Communicate any issues encountered while trying to obtain the phone number to the SDK.
// Error should be reported if the customer explicitly cancels the SMS OTP transaction
// or presses the back button to exit out the SMS OTP start step screen.
func handleOtpStartError() {
guard let callback = self.callback else {
print("Error: OtpStartStepCallback is not set ")
return
}
callback.onError()
}
}
```
You can then send a new OTP SMS to the same phone number by implementing the finish step like this:
```swift Swift theme={"dark"}
import Foundation
import SwiftUI
import ProveAuth
class MobileOtpFinishStep: OtpFinishStep {
@ObservedObject var sheetObservable: SheetObservable
var callback: OtpFinishStepCallback?
init(sheetObservable: SheetObservable){
self.sheetObservable = sheetObservable
}
// Implement this method to collect the OTP value delivered in the SMS message.
func execute(otpError: ProveAuthError?, callback: OtpFinishStepCallback) {
self.callback = callback
// Handle the OTP validation error if present.
if case .otpValidationError = otpError {
print("found otpError: \(String(describing: otpError?.localizedDescription))")
// Update your UI to indicate that the provided OTP is invalid
self.sheetObservable.otpError = true
} else {
self.sheetObservable.otpError = false
}
// Update your UI to display the OtpFinishView
DispatchQueue.main.async {
self.sheetObservable.isOtpFinishActive = true
}
}
// Return the OTP value to the SDK
func handleOtp(_ otp: String) {
guard let callback = self.callback else {
print("Error: OtpFinishStepCallback is not set ")
return
}
let otpFinishInput = OtpFinishInput(otp: otp)
callback.onSuccess(input: otpFinishInput)
}
// Communicate to the SDK any issues when host app trys to obtain the OTP value
// or when users cancel the OTP flow
func handleOtpFinishError() {
guard let callback = self.callback else {
print("Error: OtpFinishStepCallback is not set ")
return
}
callback.onError()
}
// Call this method to request a new OTP code for the same mobile number.
func sendNewOtp() {
guard let callback = self.callback else {
print("Error: OtpFinishStepCallback is not set ")
return
}
callback.onOtpResend()
}
}
```
Follow these instructions to allow the customer to re-enter the OTP PIN if they type it wrong. There is a max of 3 attempts. To implement this functionality, you also need to pass in `allowOTPRetry=true` to the `/v3/start` endpoint.
The start step is implemented the same as either of the the previous tabs - no client side code changes necessary:
```swift Swift theme={"dark"}
import Foundation
import ProveAuth
import SwiftUI
class MobileOtpStartStep: OtpStartStep {
@ObservedObject var sheetObservable: SheetObservable
var callback: OtpStartStepCallback?
init(sheetObservable: SheetObservable) {
self.sheetObservable = sheetObservable
}
func execute(
phoneNumberNeeded: Bool, phoneValidationError: ProveAuthError?, callback: OtpStartStepCallback
) {
self.callback = callback
if !phoneNumberNeeded {
// If no phone number is needed, then don't prompt the user.
callback.onSuccess(input: nil)
} else {
DispatchQueue.main.async {
// If a phone number validation error is detected, ensure it is handled to provide feedback to the user.
if case .phoneNumberValidationError = phoneValidationError {
print(
"found phoneValidationError: \(String(describing: phoneValidationError?.localizedDescription))"
)
// Update UI components to display OtpStartView with the phone number validation error.
self.sheetObservable.isPhoneValidationError = true
} else {
self.sheetObservable.isPhoneValidationError = false
}
// Update UI components to display OtpStartView if a phone number is needed.
self.sheetObservable.isOtpStartActive = true
}
}
}
// Return collected phone number to the SDK
func handlePhoneNumber(phoneNumber: String) {
guard let callback = self.callback else {
print("Error: OtpStartStepCallback is not set ")
return
}
let otpStartInput = OtpStartInput(phoneNumber: phoneNumber)
// This is how you pass collected phone number to SDK
callback.onSuccess(input: otpStartInput)
}
// Communicate any issues encountered while trying to obtain the phone number to the SDK.
// Error should be reported if the customer explicitly cancels the SMS OTP transaction
// or presses the back button to exit out the SMS OTP start step screen.
func handleOtpStartError() {
guard let callback = self.callback else {
print("Error: OtpStartStepCallback is not set ")
return
}
callback.onError()
}
}
```
The finish step is implemented the same as either of the the previous tabs - no client side code changes necessary. If the OTP is invalid, the finish step will be called again to prompt the user for a new input. Once the max attempts is reached, the `AuthFinish` function will be called.
```swift Swift theme={"dark"}
import Foundation
import SwiftUI
import ProveAuth
class MobileOtpFinishStep: OtpFinishStep {
@ObservedObject var sheetObservable: SheetObservable
var callback: OtpFinishStepCallback?
init(sheetObservable: SheetObservable){
self.sheetObservable = sheetObservable
}
// Implement this method to collect the OTP value delivered via SMS.
func execute(otpError: ProveAuthError?, callback: OtpFinishStepCallback) {
self.callback = callback
// Handle the OTP validation error if present.
if case .otpValidationError = otpError {
print("found otpError: \(String(describing: otpError?.localizedDescription))")
// Signal to your UI components that the last provided OTP is invalid
self.sheetObservable.otpError = true
} else {
self.sheetObservable.otpError = false
}
// Signal to UI components to display OtpFinishView
DispatchQueue.main.async {
self.sheetObservable.isOtpFinishActive = true
}
}
// Provide the collected OTP value to the SDK for validation.
func handleOtp(_ otp: String) {
guard let callback = self.callback else {
print("Error: OtpFinishStepCallback is not set ")
return
}
let otpFinishInput = OtpFinishInput(otp: otp)
callback.onSuccess(input: otpFinishInput)
}
// Notify the SDK of any issues encountered while obtaining the OTP value or if the user cancels the OTP flow.
func handleOtpFinishError() {
guard let callback = self.callback else {
print("Error: OtpFinishStepCallback is not set ")
return
}
callback.onError()
}
}
```
Follow these instructions to allow the customer to re-enter their phone number. There is a max of three entries/send attempts.
Manual Request Required
To enable phone number change capabilities on your credentials, contact your Prove representative.
The start step is implemented the same as the previous tab:
```swift Swift theme={"dark"}
import Foundation
import ProveAuth
import SwiftUI
class MobileOtpStartStep: OtpStartStep {
@ObservedObject var sheetObservable: SheetObservable
var callback: OtpStartStepCallback?
init(sheetObservable: SheetObservable) {
self.sheetObservable = sheetObservable
}
func execute(
phoneNumberNeeded: Bool, phoneValidationError: ProveAuthError?, callback: OtpStartStepCallback
) {
self.callback = callback
if !phoneNumberNeeded {
// If no phone number is needed, then don't prompt the user.
callback.onSuccess(input: nil)
} else {
DispatchQueue.main.async {
// If a phone number validation error is detected, ensure it is handled to provide feedback to the user.
if case .phoneNumberValidationError = phoneValidationError {
print(
"found phoneValidationError: \(String(describing: phoneValidationError?.localizedDescription))"
)
// Update UI components to display OtpStartView with the phone number validation error.
self.sheetObservable.isPhoneValidationError = true
} else {
self.sheetObservable.isPhoneValidationError = false
}
// Update UI components to display OtpStartView if a phone number is needed.
self.sheetObservable.isOtpStartActive = true
}
}
}
// Return collected phone number to the SDK
func handlePhoneNumber(phoneNumber: String) {
guard let callback = self.callback else {
print("Error: OtpStartStepCallback is not set ")
return
}
let otpStartInput = OtpStartInput(phoneNumber: phoneNumber)
// This is how you pass collected phone number to SDK
callback.onSuccess(input: otpStartInput)
}
// Communicate any issues encountered while trying to obtain the phone number to the SDK.
// Error should be reported if the customer explicitly cancels the SMS OTP transaction
// or presses the back button to exit out the SMS OTP start step screen.
func handleOtpStartError() {
guard let callback = self.callback else {
print("Error: OtpStartStepCallback is not set ")
return
}
callback.onError()
}
}
```
You can prompt for a new phone number by implementing the finish step like this:
```swift Swift theme={"dark"}
import Foundation
import SwiftUI
import ProveAuth
class MobileOtpFinishStep: OtpFinishStep {
@ObservedObject var sheetObservable: SheetObservable
var callback: OtpFinishStepCallback?
init(sheetObservable: SheetObservable){
self.sheetObservable = sheetObservable
}
// Implement this method to collect the OTP value delivered via SMS.
func execute(otpError: ProveAuthError?, callback: OtpFinishStepCallback) {
self.callback = callback
// Handle the OTP validation error if present.
if case .otpValidationError = otpError {
print("found otpError: \(String(describing: otpError?.localizedDescription))")
// Update your UI to indicate that the provided OTP is invalid.
self.sheetObservable.otpError = true
} else {
self.sheetObservable.otpError = false
}
// Update your UI to display the OTP finish view.
DispatchQueue.main.async {
self.sheetObservable.isOtpFinishActive = true
}
}
// Return the collected OTP value to the SDK.
func handleOtp(_ otp: String) {
guard let callback = self.callback else {
print("Error: OtpFinishStepCallback is not set ")
return
}
let otpFinishInput = OtpFinishInput(otp: otp)
callback.onSuccess(input: otpFinishInput)
}
// When callback.onMobileNumberChange() is evoked, OtpStartStep will be re-initiated
// so that end-users can enter a different phone number via OtpStartStep.
func handleMobileNumberChange() {
guard let callback = self.callback else {
print("Error: OtpFinishStepCallback is not set")
return
}
callback.onMobileNumberChange()
}
}
```
In the `AuthFinishStep`, you'll specify a function to call once the possession checks complete on the mobile phone. This endpoint on your back end server calls the `Validate()` function to validate the phone number. The `AuthFinishStep` then completes. In the event of cancellation, the server makes a call to the `Validate()` function and returns `success=false`.
Once the possession checks finish on the mobile device, the finish handler on the client-side SDK executes. You then make a request to your server such as `POST /verify` to make the next call in the flow to the `Validate()` function.
This function requires the Correlation ID which is returned by the `Start()` function.
```go Go theme={"dark"}
rspValidate, err := client.V3.V3ValidateRequest(context.TODO(), &components.V3ValidateRequest{
CorrelationID: rspStart.V3StartResponse.CorrelationID,
})
if err != nil {
return fmt.Errorf("error on Validate(): %w", err)
}
```
```typescript TypeScript theme={"dark"}
const rspValidate = await sdk.v3.v3ValidateRequest({
correlationId: rspStart.v3StartResponse?.correlationId || '',
})
if (!rspValidate) {
console.error('Validate error.')
return
}
```
```java Java theme={"dark"}
V3ValidateRequest req = V3ValidateRequest.builder()
.correlationId("713189b8-5555-4b08-83ba-75d08780aebd")
.build();
V3ValidateRequestResponse res = sdk.v3().v3ValidateRequest()
.request(req)
.call();
// You may want to use the .get() method when working with the response object.
```
The function returns the following fields:
* `success`: either `true` if the mobile number validation was successful, or `false` if it failed.
* `challengeMissing`: `false` since challenge data isn't needed.
* `phoneNumber`: the validated phone number.
* `next`: map of the next API call you need to make.
Prompt the customer for PII entry into your form or gather from your CRM. Then submit that information to the back end server so the `Complete()` call can then verify the customer information.
Additionally, specific to the KYC add-on use case, you need to pass in first name, last name, DOB, and SSN (or address) to ensure you receive back the KYC elements and correct CIP values.
```javascript JavaScript theme={"dark"}
// Send request to the backend to verify customer information.
async function sendInfo(firstName, lastName) {
const response = await fetch(backendUrl + "/finish", {
method: "POST",
headers: {
Accept: "application/json",
"Content-Type": "application/json",
},
body: JSON.stringify({
firstName: firstName,
lastName: lastName,
}),
});
const results = await response.json();
const rsp = JSON.stringify(results);
return rsp;
}
```
```typescript TypeScript theme={"dark"}
// Send request to the backend to verify customer information.
async function sendInfo(firstName: string, lastName: string) {
const response = await fetch(backendUrl + "/finish", {
method: "POST",
headers: {
Accept: "application/json",
"Content-Type": "application/json",
},
body: JSON.stringify({
firstName: firstName,
lastName: lastName,
}),
});
const results = await response.json();
const rsp = JSON.stringify(results);
return rsp;
}
```
```java Java theme={"dark"}
// Send request to the backend to verify customer information.
SendInfoResponse sendInfo(String firstName, String lastName) {
YourBackendClient backend = new YourBackendClient(); // Backend API client
// TODO: Build your SendInfoRequest object
SendInfoRequest sendInfoRequest = new SendInfoRequest(firstName, lastName, ...);
// Send a sendInfoRequest to your backend server to get return customer information.
SendInfoResponse response = backend.verify(sendInfoRequest);
// TODO: define your own SendInfoResponse object to parse the response
return response;
}
```
```swift Swift theme={"dark"}
// Send request to the backend to verify customer information.
// The below example uses native iOS URLSession, but any other
// alternative networking approaches should also work
func sendInfo(firstName: String, lastName: String, completion: @escaping (Result<[String:Any], Error>) -> Void) {
guard let url = URL(string: "\(backendUrl)/finish") else {
completion(.failure(URLError(.badURL)))
return
}
var request = URLRequest(url: url)
request.httpMethod = "POST"
request.addValue("application/json", forHTTPHeaderField: "Accept")
request.addValue("application/json", forHTTPHeaderField: "Content-Type")
// Set up the request body
let body: [String: Any] = [
"firstName": firstName
"lastName": lastName
]
do {
request.httpBody = try JSONSerialization.data(withJSONObject: body, options: \[])
} catch {
completion(.failure(error))
return
}
let task = URLSession.shared.dataTask(with: request) { \_, response, error in
// Handle network or connection errors
if let error = error {
completion(.failure(error))
return
}
do {
if let results = try JSONSerialization.jsonObject(with: data, options: \[]) as? [String: Any] {
completion(.success(results))
} else {
let parsingError = NSError(domain: "", code: 0, userInfo: [NSLocalizedDescriptionKey : "Failed to parse JSON or auth token is missing"])
completion(.failure(parsingError))
}
} catch {
completion(.failure(error))
}
}
// Start the network call
task.resume()
}
```
This function is the final call in the flow that verifies the customer information.
This function takes these required parameters:
* Correlation ID: this is the ID returned by the `Start()` function.
* Individual: customer information in a map.
When implementing the KYC add-on, you need to pass in first name, last name, DOB, and SSN (or address) to ensure you receive back the KYC and CIP fields. If applicable, the following reason codes will return in Production:
* DI - this identity is associated with a death indicator.
* CF - The address matches the address of a U.S. correctional facility.
* PO - The address was classified as a PO Box.
Refer to the [Complete API reference](https://developer.prove.com/reference/complete-request) and select "Response with KYC - 0 hits" for an example response.
```go Go theme={"dark"}
rspComplete, err := client.V3.V3CompleteRequest(context.TODO(), &components.V3CompleteRequest{
CorrelationID: rspStart.V3StartResponse.CorrelationID,
Individual: components.Individual{
FirstName: provesdkservergo.String("Tod"),
LastName: provesdkservergo.String("Weedall"),
Addresses: []components.AddressEntry{
{
Address: provesdkservergo.String("39 South Trail"),
City: provesdkservergo.String("San Antonio"),
Region: provesdkservergo.String("TX"),
PostalCode: provesdkservergo.String("78285"),
},
},
Ssn: provesdkservergo.String("565228370"),
Dob: provesdkservergo.String("1984-12-10"),
EmailAddresses: []string{
"[email protected]",
},
},
})
if err != nil {
return fmt.Errorf("error on Complete(): %w", err)
}
```
```typescript TypeScript theme={"dark"}
const rspComplete = await sdk.v3.v3CompleteRequest({
correlationId: rspStart.v3StartResponse?.correlationId || '',
individual: {
firstName: 'Tod',
lastName: 'Weedall',
addresses: [{
address: '39 South Trail',
city: 'San Antonio',
region: 'TX',
postalCode: '78285',
}],
dob: '1984-12-10',
emailAddresses: [
'[email protected]',
],
ssn: '565228370',
},
});
if (!rspComplete) {
console.error("Complete error.")
return
}
```
```java Java theme={"dark"}
V3CompleteRequest req = V3CompleteRequest.builder()
.correlationId("713189b8-5555-4b08-83ba-75d08780aebd")
.individual(V3CompleteIndividualRequest.builder()
.addresses(java.util.List.of(
V3CompleteAddressEntryRequest.builder()
.address("39 South Trail")
.city("San Antonio")
.extendedAddress("Apt 23")
.postalCode("78285")
.region("TX")
.build()))
.dob("2024-05-02T00:00:00Z")
.emailAddresses(java.util.List.of(
"[email protected]",
"[email protected]"))
.firstName("Tod")
.lastName("Weedall")
.ssn("265228370")
.build())
.build();
V3CompleteRequestResponse res = sdk.v3().v3CompleteRequest()
.request(req)
.call();
// You may want to use the .get() method when working with the response object.
```
The function returns the following fields:
* Success: `true` if the customer’s identity information is associated with the mobile number.
* Next: map of the next API call you need to make, in this case, `Done`.
You can then respond to the front end with the results of the customer verification.
## Test your Prove implementation
Next, reference the Sandbox test scenarios to test users and simulate different behaviors encountered in production.
Production Launch
To launch in Production, please contact your Prove representative.
# Prove Identity Sandbox Testing
Source: https://developer.prove.com/docs/prove-identity-sandbox-testing
Learn more about simulating the Prove Identity flow using the Sandbox environment
export const product_0 = "Prove Identity"
When you interact with the Sandbox environment, use test users to simulate different behaviors. Simulate the possession checks using the client-side SDK.
The testing environment doesn't send text messages or validate real customer information.
If the system returns an unexpected code, reference the [Error and Status Codes page](https://developer.prove.com/reference/status-and-error-codes).
{product_0} sandbox test users can only be used with {product_0} project credentials. Attempting to use these test users with different project credentials will result in an unauthorized access error.
## Test users list
### Short-term test user
Use this test user when performing initial testing with cURL or Postman. This test user skips the client-side SDK authentication to walk you through the sequence of API calls.
| Phone Number | First Name | Last Name | Address | City | State | Zip | Date of Birth | Social Security Number | Email |
| :----------- | :--------- | :-------- | :------------------- | :---------- | :---- | :---- | :------------ | :--------------------- | :------------------- |
| `2001004000` | Martina | Goodram | 28965 Homewood Plaza | Little Rock | AR | 72204 | 7/26/1995 | 490959347 | `mgoodram0@nasa.gov` |
After initial short-term testing, implement the client-side SDK and use the remaining test users to test your implementation.
### Prove Identity test users
Use the following list of test users to test Prove Identity. For expected behavior per step, review [Testing Steps](#testing-steps).
| Phone Number | First Name | Last Name | Address | City | State | Zip | Date of Birth | Social Security Number | Email |
| :----------- | :---------------- | :-------- | :------------------ | :---------- | :---- | :--------- | :------------ | :--------------------- | :------------------------ |
| `2001004009` | [Benji](#benji) | Harper | 27 Financial Place | Bakersfield | CA | 93301-2425 | 09/02/1994 | 565252770 | `bharperd@superstars.com` |
| `2001001698` | [Enid](#enid) | Wildt | 861 Karstens Circle | Washington | DC | 20409 | 6/18/1996 | 212285822 | `ewildtp@eepurl.com` |
| `2001001699` | [Carney](#carney) | Reinisch | 582 Coleman Point | San Antonio | TX | 78230 | 3/3/2000 | 166521601 | `creinischq@php.net` |
### Mobile Auth test users
Use the following list of test users to test Identity with the Mobile Auth add-on. For expected behavior per step, review [Testing Steps](#testing-steps).
| Phone Number | First Name | Last Name | Address | City | State | Zip | Date of Birth | Social Security Number | Email |
| :----------- | :------------ | :--------- | :---------------- | :----------- | :---- | :---- | :------------ | :--------------------- | :-------------------------------------------------------- |
| `5551111111` | [Lena](#lena) | Lansberry | 663 Stephen Drive | Grand Rapids | MI | 49518 | 3/4/1999 | 657766672 | [llansberryk@nbcnews.com](mailto:llansberryk@nbcnews.com) |
| `5552222222` | [Axe](#axe) | Summersett | 1823 School Park | Phoenix | AZ | 85025 | 9/24/1963 | 670752404 | [asummersettl@boston.com](mailto:asummersettl@boston.com) |
### Know Your Customer test users
Use the following test users to test the Know Your Customer (KYC) and Customer Identification Program (CIP) feature. This applies if you purchased the KYC add-on. For expected behavior per step, review the [Testing Steps](#testing-steps). When implementing the KYC add-on, pass in first name, last name, date of birth (DOB), and social security number (SSN) or address. This ensures you receive back the KYC and CIP fields in the /complete response.
| Phone Number | First Name | Last Name | Address | City | State | Zip | Date of Birth | Social Security Number | Email |
| :----------- | :---------------- | :-------- | :----------------- | :----------- | :---- | :---- | :------------ | :--------------------- | :---------------------- |
| `2001004008` | [Maegan](#maegan) | Bertl | 003 Reinke Avenue | Omaha | NE | 68124 | 1/11/1998 | 217174600 | `mbertl8@google.com.br` |
| `2001004005` | [Carrie](#carrie) | Wilding | 8 Helena Street | Milwaukee | WI | 53234 | 8/15/1990 | 657220663 | `cwilding5@prweb.com` |
| `2001004007` | [Nora](#nora) | Riddich | 160 Daystar Avenue | Philadelphia | PA | 19093 | 08/24/2000 | 760591291 | `nriddich7@sina.com.cn` |
## Testing steps
Now that you’ve done client-side, server-side, and CX implementation, follow the step-by-step instructions to test each test user and ensure your implementation follows expected behavior.
Follow the steps below to test the Prove Identity flow with Benji Harper. This user will pass the Identity flow.
Start the onboarding flow on the initial screen and enter the phone number for Benji Harper.
Your front end will send this data to the back end. Your back end will then send the phone number and flow type to the /start endpoint. The response will provide an auth token, correlation ID, and the next endpoint to call.
The final target URL must be sent if performing a desktop flow.
Your back end will send the authToken to the front end SDK to do the possession handling.
The front end will run OTP handling. Use 1234 to simulate a successful OTP.
The front end will simulate Instant Link handling.
Once the front end finishes the possession check, the back end calls the /validate endpoint with the correlation ID to authenticate the trustworthiness of the phone number.
The response provides:
* `success=true`
* `phoneNumber` that was initially passed.
* `evaluation`: object containing the results of the authentication and risk evaluations. Refer to the [Global Fraud Policy](https://developer.prove.com/docs/global-fraud-policy) for more details.
* `/v3/complete` as the next endpoint to call.
Enter the PII for Benji Harper in the form.
Confirm the PII in the form. The back end will then call the /complete endpoint with the correlation ID and you will have a successful flow.
Follow the steps below to test the Prove Identity flow with Enid Wildt. This user will pass the Identity flow.
Start the onboarding flow on the initial screen and enter the phone number for Enid.
Your front end will send this data to the back end. Your back end will then send the phone number and flow type to the /start endpoint. The response will provide an auth token, correlation ID, and the next endpoint to call.
The final target URL must be sent if performing a desktop flow.
Your back end will send the authToken to the front end SDK to do the possession handling.
The front end will run OTP handling. Use 1234 to simulate a successful OTP.
The front end will simulate Instant Link handling.
Once the front end finishes the possession check, the back end calls the /validate endpoint with the correlation ID to authenticate the trustworthiness of the phone number.
The response provides:
* `success=true`
* `phoneNumber` that was initially passed.
* `evaluation`: object containing the results of the authentication and risk evaluations. Refer to the [Global Fraud Policy](https://developer.prove.com/docs/global-fraud-policy) for more details.
* `/v3/complete` as the next endpoint to call.
Enter the PII for Enid Wildt in the form.
Confirm the PII in the form. The back end will then call the /complete endpoint with the correlation ID and you will have a successful flow.
Follow the steps below to test the Prove Identity flow with Carney Reinisch. This user falls out of the Identity flow at the Validate step and returns `success=false` in the /validate response.
Start the onboarding flow on the initial screen and enter the phone number for Carney.
Your front end will send this data to the back end. Your back end will then send the phone number and flow type to the /start endpoint. The response will provide an auth token, correlation ID, and the next endpoint to call.
The final target URL must be sent if performing a desktop flow.
Your back end will send the authToken to the front end SDK to do the possession handling.
The front end will run OTP handling. Use 1234 to simulate a successful OTP.
The front end will simulate Instant Link handling.
Once the front end finishes the possession check, the back end calls the /validate endpoint with the correlation ID to authenticate the trustworthiness of the phone number.
This user fails /validate.
```json Response theme={"dark"}
{
"next": {
"done": "done"
},
"success": false
}
```
The Prove flow is terminated. The front end should proceed to an alternative authentication method.
Follow the steps below to test the Prove Identity flow with Mobile Auth add-on for Lena Lansberry. This user will pass the Identity flow using Mobile Auth.
Start the onboarding flow on the initial screen and prompt to accept MNO consent.
Your front end will send this data to the back end. Your back end will then send the phone number and flow type to the /start endpoint. The response will provide an auth token, correlation ID, and the next endpoint to call.
For this workflow, the SDK collects the phone number rather than passing in the phone number into the /start endpoint. Refer to the Web, Android, or iOS SDK documentation to configure your implementation to handle phone number collection when prompted.
The final target URL must be sent if performing a desktop flow.
Your back end will send the authToken to the front end SDK to do the possession handling.
This user passes Mobile Auth.
If on desktop, the system fails Mobile Auth and the client-side SDK prompts for the phone number. The front end will then run Instant Link handling.
Once the front end finishes the possession check, the back end calls the /validate endpoint with the correlation ID to authenticate the trustworthiness of the phone number.
The response provides:
* `success=true`
* `phoneNumber` that was initially passed.
* `evaluation`: object containing the results of the authentication and risk evaluations. Refer to the [Global Fraud Policy](https://developer.prove.com/docs/global-fraud-policy) for more details.
* `/v3/complete` as the next endpoint to call.
Enter the PII for Lena Lansberry in the form.
Confirm the PII in the form. The back end will then call the /complete endpoint with the correlation ID and you will have a successful flow.
Follow the steps below to test the Prove Identity flow with Mobile Auth add-on for Axe Summersett. This user will pass fail MobileAuth but waterfall to OTP and pass the overall Prove Identity flow.
Start the onboarding flow on the initial screen and prompt to accept MNO consent.
Your front end will send this data to the back end. Your back end will then send the phone number and flow type to the /start endpoint. The response will provide an auth token, correlation ID, and the next endpoint to call.
Axe's phone number needs to be passed into Start() due to Sandbox limitations. However, in Production the customers phone number does not need to be passed into Start() when Mobile Auth is enabled. The client-side SDK will prompt for phone number only if Mobile Auth fails. Refer to the Web, Android, or iOS SDK documentation to configure your implementation to handle phone number collection when prompted.
The final target URL must be sent if performing a desktop flow.
Your back end will send the authToken to the front end SDK to do the possession handling.
The system fails Mobile Auth and the client-side SDK prompts for the phone number. The front end will then run OTP handling. Use 1234 to simulate a successful OTP.
If on desktop, the system fails Mobile Auth and the client-side SDK prompts for the phone number. The front end will then run Instant Link handling.
Once the front end finishes the possession check, the back end calls the /validate endpoint with the correlation ID to authenticate the trustworthiness of the phone number.
The response provides:
* `success=true`
* `phoneNumber` that was initially passed.
* `evaluation`: object containing the results of the authentication and risk evaluations. Refer to the [Global Fraud Policy](https://developer.prove.com/docs/global-fraud-policy) for more details.
* `/v3/complete` as the next endpoint to call.
Enter the PII for Axe Summersett in the form.
Confirm the PII in the form. The back end will then call the /complete endpoint with the correlation ID and you will have a successful flow.
Follow the steps below to test the Prove Identity flow with KYC add-on for Maegan Bertl. This user will pass the Identity flow with high multiCIP KYC/CIP data.
Start the onboarding flow on the initial screen and enter the phone number for Maegan Bertl.
Your front end will send this data to the back end. Your back end will then send the phone number and flow type to the /start endpoint. The response will provide an auth token, correlation ID, and the next endpoint to call.
The final target URL must be sent if performing a desktop flow.
Your back end will send the authToken to the front end SDK to do the possession handling.
The front end will run OTP handling. Use 1234 to simulate a successful OTP.
The front end will simulate Instant Link handling.
Once the front end finishes the possession check, the back end calls the /validate endpoint with the correlation ID to authenticate the trustworthiness of the phone number.
The response provides:
* `success=true`
* `phoneNumber` that was initially passed.
* `/v3/complete` as the next endpoint to call.
Enter the PII for Maegan Bertl in the form.
Confirm the PII in the form. The back end will then call the /complete endpoint with the correlation ID and you will have a successful flow. You will receive simulated KYC and CIP results in the response. This user passes both checks.
Follow the steps below to test the Prove Identity flow with KYC add-on for Carrie Wilding. This user will pass the Identity flow but also returns 4 simulated hits against KYC watchlists.
Start the onboarding flow on the initial screen and enter the phone number for Carrie Wilding.
Your front end will send this data to the back end. Your back end will then send the phone number and flow type to the /start endpoint. The response will provide an auth token, correlation ID, and the next endpoint to call.
The final target URL must be sent if performing a desktop flow.
Your back end will send the authToken to the front end SDK to do the possession handling.
The front end will run OTP handling. Use 1234 to simulate a successful OTP.
The front end will simulate Instant Link handling.
Once the front end finishes the possession check, the back end calls the /validate endpoint with the correlation ID to authenticate the trustworthiness of the phone number.
The response provides:
* `success=true`
* `phoneNumber` that was initially passed.
* `/v3/complete` as the next endpoint to call.
Enter the PII for Carrie Wilding in the form.
Confirm the PII in the form. The back end will then call the /complete endpoint with the correlation ID and you will have a successful flow. You will receive KYC and IDV data in the /complete response. This user fails the KYC check. Send the user through your exception process.
Follow the steps below to test the Prove Identity flow with KYC add-on for Nora Riddich. This user will fail the Identity flow at the Complete step and return `multiCIPConfidence=low`.
Start the onboarding flow on the initial screen and enter the phone number for Nora Riddich.
Your front end will send this data to the back end. Your back end will then send the phone number and flow type to the /start endpoint. The response will provide an auth token, correlation ID, and the next endpoint to call.
The final target URL must be sent if performing a desktop flow.
Your back end will send the authToken to the front end SDK to do the possession handling.
The front end will run OTP handling. Use 1234 to simulate a successful OTP.
The front end will simulate Instant Link handling.
Once the front end finishes the possession check, the back end calls the /validate endpoint with the correlation ID to authenticate the trustworthiness of the phone number.
The response provides:
* `success=true`
* `phoneNumber` that was initially passed.
* `/v3/complete` as the next endpoint to call.
Enter the PII for Nora Riddich in the form.
Confirm the PII in the form. The back end will then call the /complete endpoint with the correlation ID. You will receive KYC and IDV data in the /complete response. This user fails the Complete step indicating Prove was unable to validate their identity. In addition, this user fails the CIP check. Send the user through a step-up authentication method.
Follow the steps below to test the Prove Identity flow with Benji, Carney, Enid, Axe, Maegan, Carrie, or Nora. This will introduce failures into the flow and return `success=false` at various points.
Your back end will send the authToken to the front end SDK to do the possession handling. During the mobile flow, use 1111 to simulate a failed OTP when presented with the OTP page. Once the front end finishes the possession check, the back end calls the /validate endpoint with the correlation ID to authenticate the trustworthiness of the phone number.
The test user then fails /validate.
```json Response theme={"dark"}
{
"next": {
"done": "done"
},
"success": false
}
```
The Prove flow is terminated and the front end proceeds to another authentication method.
When viewing the PII page, change the last name.
The back end will then call the /complete endpoint with the correlation ID and the edited information. The user will fail /complete. Send the user through the exception process.
```json Response theme={"dark"}
{
"next": {
"v3-complete": "/v3/complete"
},
"success": false
}
```
# Challenge Page Requirements
Source: https://developer.prove.com/docs/prove-pre-fill-challenge-page-requirements
Learn how to design the frontend for your Challenge Page when implementing without MobileAuth℠
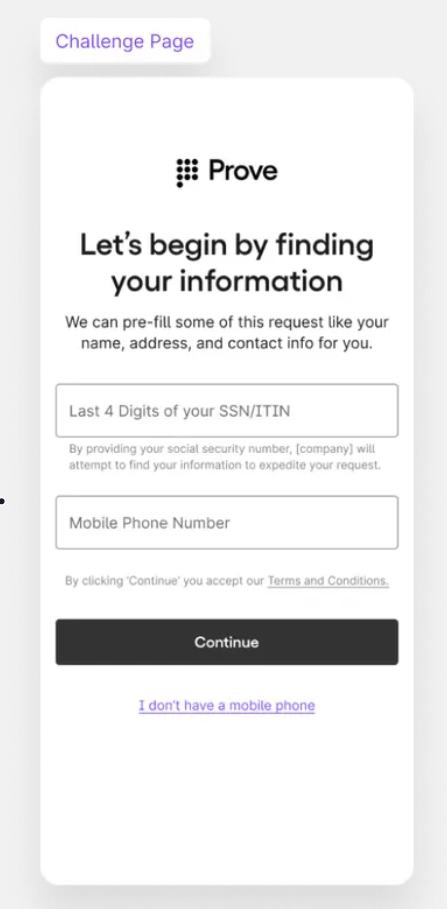 ## Page summary requirements
Page Summary Language: Let's Begin by Finding Your Information
## Page summary requirements
Page Summary Language: Let's Begin by Finding Your Information
Page Summary Description: We can prefill some of this request like your name, address, and contact info for you.
### Challenge Data and Phone Number Field
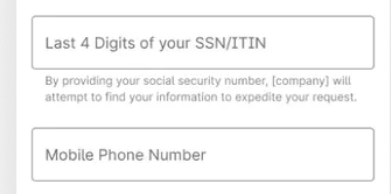 When prompting for the phone number, follow the image.
## Data entry requirements
The table outlines your options for prompting the challenge data.
| Contracted Solution | Customer Prompt Language Requirements | Required Challenge Data |
| :---------------------- | :-------------------------------------------------------------------------------------------------------------------------------------------- | :------------------------------------------------------------------------------------------------------------------------------------------------------------------------------------------------------------------------------------------------------------------------ |
| Prove Pre-Fill | Customer can choose one from the following prompts:
When prompting for the phone number, follow the image.
## Data entry requirements
The table outlines your options for prompting the challenge data.
| Contracted Solution | Customer Prompt Language Requirements | Required Challenge Data |
| :---------------------- | :-------------------------------------------------------------------------------------------------------------------------------------------- | :------------------------------------------------------------------------------------------------------------------------------------------------------------------------------------------------------------------------------------------------------------------------ |
| Prove Pre-Fill | Customer can choose one from the following prompts:
"Last 4 SSN/ITIN"
"SSN/ITIN"
"MM/DD/YYYY"
"MM/YYYY"
"MM/DD" | Last 4 SSN/ITIN
Full SSN\*
Full DOB
DOB - Month and Year
DOB - Month and Day
\*If the customer is applying to open a demand deposit account (DDA), the customer must enter their full social security number (SSN) for the challenge |
| Prove Pre-Fill with KYC | "Full SSN/ITIN" | Full SSN |
## Path for Customers Without Mobile Number
If the customer doesn't have a mobile number, exit the Prove flow and present a manual form. Customers without a mobile number still have a path forward to continue with their form.
# CX Requirements
Source: https://developer.prove.com/docs/prove-pre-fill-cx-requirements
Review the Prove Standard℠ frontend requirements for Pre-Fill when implementing without MobileAuth℠
## Getting started
The Prove Standard customer experience (CX) requirements maximizes your value with Prove Pre-Fill and takes guesswork out of key design decisions.
When building the experience, you must follow the CX requirements for several key reasons:
* Minimizes Friction: Clunky onboarding processes impact customer conversion rates and results in a negative experience.
* Drives CX Simplicity and Clarity: Keeps your onboarding process straightforward with concise language and visual design to avoid overwhelming customers with too much information or too many steps.
* Establishes Security and Trust: Highlights the security measures in place to protect customers’ personal information - clear terms and conditions, privacy policies, and explanations of data usage build customer trust and ensure informed consent.
* Meets Compliance and Regulatory Needs: Ensures that your onboarding process complies with relevant regulations and legal requirements.
# Prove Pre-Fill for Consumers
Source: https://developer.prove.com/docs/prove-pre-fill-flow
Prove Pre-Fill for Consumers returns and verifies identity information linked to an authenticated phone number.
## Prove Pre-Fill for Consumers solution
The Prove Pre-Fill for Consumers solution streamlines online account creation by automatically filling forms with bank-grade verified consumer data via phone number. This reduces friction, improves CX, increases completion rates, and enhances security against fraud.
# Implement Prove Pre-Fill
Source: https://developer.prove.com/docs/prove-pre-fill-implementation-guide
Review the steps for implementing Pre-Fill
## Implement Prove Pre-Fill
Create or update your first screen to prompt for phone number and challenge data.
Page Summary Language: Let's Begin by Finding Your Information
Page Summary Description: We can prefill some of this request like your name, address, and contact info for you.
When prompting for the phone number, follow the image.
The table outlines your options for prompting the challenge data.
| Contracted Solution | Customer Prompt Language Requirements | Required Challenge Data |
| :-------------------------------------------------------------------------------------------------------------------------------------------------------------------------------------------------- | :-------------------------------------------------------------------------------------------------------------------------------------------- | :------------------------------------------------------------------------------------------------------------------------------------------------------------------------------------------------------------------------------------------------------------------------ |
| Prove Pre-Fill | Customer can choose one from the following prompts:
"Last 4 SSN/ITIN"
"SSN/ITIN"
"MM/DD/YYYY"
"MM/YYYY"
"MM/DD" | Last 4 SSN/ITIN
Full SSN\*
Full DOB
DOB - Month and Year
DOB - Month and Day
\*If the customer is applying to open a demand deposit account (DDA), the customer must enter their full social security number (SSN) for the challenge |
| Prove Pre-Fill with KYC | "Full SSN/ITIN" | Full SSN |
| If the customer doesn't have a mobile number, exit the Prove flow and present a manual application. Customers without a mobile number still have a path forward to continue with their application. | | |
{ /* vale on */ }
Create or update your first screen to prompt the customer to accept the [terms and conditions](https://developer.prove.com/docs/us-carrier-mno-consent-requirements) to use Mobile Auth to verify a customer.
In order for Mobile Auth to succeed:
* Disable VPN.
* Disable Private Relay on iOS.
When testing, you can ignore any Chrome error messages that mention `ERR_TUNNEL_CONNECTION_FAILED` - this is due to the VPN, but the SDK fallbacks to OTP.
## Summary
The following mobile network operators (MNO) have set requirements for accessing their data for relevant Prove services. Reference your Master Service Agreement for full details on submitting the appropriate forms.
* Verizon
* T-Mobile
* AT\&T
AT\&T requires additional considerations. Talk to your sales representative for more info.
## Prerequisites
* Give the Production URLs where MNO Consent language lives once published in Production.
* Give the estimated timeline of when consent language goes live. Language must be live for T-Mobile approval.
* Give a mock-up of the page where the customer accepts these terms and conditions. The customer can proceed if you add terminology by clicking *Continue* you agree to our T\&C or the customer checks the consent box.
 ## Required consent language
"You authorize your wireless carrier to use or share information about your account and your wireless device, if available, to \{Enterprise Customer Name} or its service provider during your business relationship, to help identify you or your wireless device and to prevent fraud. See our Privacy Policy for how we treat your data."
## Required language placement
The MNOs require customers to accept carrier consent language in the customer flow before calling the endpoint in scope.
Place the MNO Terms and Conditions on either the Landing Page or the Challenge Page. Speak to your Prove representative for more detail.
If implementing Mobile Auth, place the MNO consent language on your Landing Page, referenced in Terms and Conditions.
You can determine if the customer is on a mobile or desktop browser using this example. If the `isMobile` is true, set `mobile` as the `flowType` for the `Start()` function on the server, otherwise you can set `desktop`:
```javascript JavaScript theme={"dark"}
// Check if the customer is on a mobile or desktop browser.
const authCheck = new proveAuth.AuthenticatorBuilder().build();
let isMobile = authCheck.isMobileWeb()
```
```typescript TypeScript theme={"dark"}
// Check if the customer is on a mobile or desktop browser.
const authCheck = new proveAuth.AuthenticatorBuilder().build();
let isMobile = authCheck.isMobileWeb()
```
When using the Android SDK, set `mobile` as the `flowType` for the `Start()` function on the server.
When using the iOS SDK, set `mobile` as the `flowType` for the `Start()` function on the server.
You need to send a request to your back end server with the phone number, flow type, and an optional challenge to start the flow. This can either be the date of birth or last four digits of the social security number.
```javascript JavaScript {1-13} theme={"dark"}
async function initialize(phoneNumber, ssn, flowType) {
const response = await fetch(backendUrl + "/initialize", {
method: "POST",
headers: {
Accept: "application/json",
"Content-Type": "application/json",
},
body: JSON.stringify({
phoneNumber: phoneNumber,
"Content-Type": "application/json",
ssn: ssn
}),
});
const rsp = await response.json();
const authToken = rsp.authToken;
return authToken;
}
```
```typescript TypeScript {1-17} theme={"dark"}
async function initialize(
phoneNumber: string,
ssn: string,
flowType: string
): Promise {
const response = await fetch(backendUrl + "/initialize", {
method: "POST",
headers: {
Accept: "application/json",
"Content-Type": "application/json",
},
body: JSON.stringify({
phoneNumber: phoneNumber,
flowType: flowType,
ssn: ssn,
}),
});
const rsp = await response.json();
const authToken = rsp.authToken;
return authToken;
}
```
```java Java theme={"dark"}
String initialize(String phoneNumber, String ssn, String flowType) {
YourBackendClient backend = new YourBackendClient(); // Backend API client
// TODO: Build your InitializeRequest object
InitializeRequest initializeRequest = new InitializeRequest(phoneNumber, ssn, flowType);
// Send an initialize request to your backend server to get authToken
InitializeResponse response = backend.initialize(initializeRequest);
// TODO: define your own InitializeResponse object to parse authToken string
return response.getAuthToken();
}
```
```swift Swift theme={"dark"}
// The below example uses native iOS URLSession, but any other
// alternative networking approaches should also work
func initialize(phoneNumber: String, ssn: String, flowType: String, completion: @escaping (Result) -> Void) {
guard let url = URL(string: "\(backendUrl)/initialize") else {
completion(.failure(URLError(.badURL)))
return
}
var request = URLRequest(url: url)
request.httpMethod = "POST"
request.addValue("application/json", forHTTPHeaderField: "Accept")
request.addValue("application/json", forHTTPHeaderField: "Content-Type")
// Set up the request body
let body: [String: Any] = [
"phoneNumber": phoneNumber,
"flowType": flowType,
"ssn": ssn
]
do {
request.httpBody = try JSONSerialization.data(withJSONObject: body, options: \[])
} catch {
completion(.failure(error))
return
}
// Perform the request
let task = URLSession.shared.dataTask(with: request) { \_, response, error in
// Handle network or connection errors
if let error = error {
completion(.failure(error))
return
}
do {
if let json = try JSONSerialization.jsonObject(with: data, options: \[]) as? [String: Any],
let auth_token = json["auth_token"] as? String {
completion(.success(authToken))
} else {
let parsingError = NSError(domain: "", code: 0, userInfo: [NSLocalizedDescriptionKey: "Failed to parse JSON or authToken is missing"])
completion(.failure(parsingError))
}
} catch {
completion(.failure(error))
}
}
// Start the network call
task.resume()
}
```
You need to send a request to your back end server with the flow type.
```javascript JavaScript {1-11} theme={"dark"}
async function initialise(flowType) {
const response = await fetch(backendUrl + "/initialize", {
method: "POST",
headers: {
Accept: "application/json",
"Content-Type": "application/json",
},
body: JSON.stringify({
flowTyp: flowType,
}),
});
const rsp = await response.json();
const authToken = rsp.authToken;
return authToken;
}
```
```typescript TypeScript {1-13} theme={"dark"}
async function initialize(
flowType: string
): Promise {
const response = await fetch(backendUrl + "/initialize", {
method: "POST",
headers: {
Accept: "application/json",
"Content-Type": "application/json",
},
body: JSON.stringify({
flowType: flowType,
}),
});
const rsp = await response.json();
const authToken = rsp.authToken;
return authToken;
}
```
```java Java theme={"dark"}
String initialize(String flowType) {
YourBackendClient backend = new YourBackendClient(); // Backend API client
// TODO: Build your InitializeRequest object
InitializeRequest initializeRequest = new InitializeRequest(flowType);
// Send an initialize request to your backend server to get authToken
InitializeResponse response = backend.initialize(initializeRequest);
// TODO: define your own InitializeResponse object to parse authToken string
return response.getAuthToken();
}
```
```swift Swift theme={"dark"}
// The below example uses native iOS `URLSession`, but any other
// alternative networking approaches should also work
func initialize(flowType: String, completion: @escaping (Result) -> Void) {
guard let url = URL(string: "\(backendUrl)/initialize") else {
completion(.failure(URLError(.badURL)))
return
}
var request = URLRequest(url: url)
request.httpMethod = "POST"
request.addValue("application/json", forHTTPHeaderField: "Accept")
request.addValue("application/json", forHTTPHeaderField: "Content-Type")
// Set up the request body
let body: [String: Any] = [
"flowType": flowType
]
do {
request.httpBody = try JSONSerialization.data(withJSONObject: body, options: \[])
} catch {
completion(.failure(error))
return
}
// Perform the request
let task = URLSession.shared.dataTask(with: request) { \_, response, error in
// Handle network or connection errors
if let error = error {
completion(.failure(error))
return
}
do {
if let json = try JSONSerialization.jsonObject(with: data, options: \[]) as? [String: Any],
let authToken = json["authToken"] as? String {
completion(.success(authToken))
} else {
let parsingError = NSError(domain: "", code: 0, userInfo: [NSLocalizedDescriptionKey : "Failed to parse JSON or authToken is missing"])
completion(.failure(parsingError))
}
} catch {
completion(.failure(error))
}
}
// Start the network call
task.resume()
}
```
On the back end, you'll start a Prove flow with a call to the `Start()` function. This function takes these required parameters:
* `flowType`: either `desktop` or `mobile` to describe which type of device the customer is starting their flow on.
* `finalTargetURL`: required when `flowType=desktop`. This should be a URL you maintain. Once the customer clicks the Instant Link, they will be redirected to this URL. It should instruct the customer to continue the workflow. Maximum length is 128 characters.
These parameters are optional:
* `ssn`: full or last four digits of the customer's social security number. You can pass it into `Start()` or `Challenge()`.
* `dob`: date of birth in one of these formats: `YYYY-MM-DD`, `YYYY-MM`, `MM-DD`. You can pass it into `Start()` or `Challenge()`.
* `allowOTPRetry`: set to `true` to allow the customer to re-enter the OTP up to three times. Defaults to `false`.
For OTP retries, make sure to implement client SDK changes in the next step.
```go Go theme={"dark"}
ctx := context.TODO()
rspStart, err := client.V3.V3StartRequest(ctx, &components.V3StartRequest{
FlowType: "desktop",
FinalTargetURL: provesdkservergo.String("https://prove.com"),
PhoneNumber: provesdkservergo.String("2001001686"),
Ssn: provesdkservergo.String("8370"),
})
if err != nil {
t.Fatal(err)
}
```
```typescript TypeScript theme={"dark"}
const startReq = {
flowType: 'desktop',
finalTargetUrl: 'https://prove.com',
phoneNumber: '2001001686',
ssn: '8370',
};
const rspStart = await sdk.v3.v3StartRequest(startReq);
```
```java Java theme={"dark"}
V3StartRequest req = V3StartRequest.builder()
.flowType("desktop")
.finalTargetUrl("https://prove.com")
.phoneNumber("2001001686")
.ssn("8370")
.build();
V3StartRequestResponse startReqResp = sdk.v3().v3StartRequest()
.request(req)
.call();
V3StartResponse startResponse = startReqResp.v3StartResponse().get();
```
```csharp .NET theme={"dark"}
using Prove.Proveapi;
using Prove.Proveapi.Models.Components;
var sdk = new ProveAPI(auth: "");
V3StartRequest req = new V3StartRequest() {
FinalTargetUrl = "https://www.example.com",
FlowType = "desktop",
PhoneNumber = "2001001693",
Ssn = "0596",
AllowOTPRetry = true,
};
var res = await sdk.V3.V3StartRequestAsync(req);
```
```go Go theme={"dark"}
// Send the start request.
rspStart, err := client.V3.V3StartRequest(context.TODO(), &components.V3StartRequest{
FlowType: "desktop",
FinalTargetURL: provesdkservergo.String("https://www.example.com"),
AllowOTPRetry: true,
})
if err != nil {
return fmt.Errorf("error on Start: %w", err)
}
```
```typescript TypeScript theme={"dark"}
let startReq = {
flowType: 'desktop',
finalTargetUrl: 'https://www.example.com',
allowOTPRetry: true,
}
// Send the start request.
const rspStart = await sdk.v3.v3StartRequest(startReq);
if (!rspStart) {
console.error("Start error.")
return
}
```
```java Java theme={"dark"}
// Send the start request.
V3StartRequest req = V3StartRequest.builder()
.flowType("desktop")
.finalTargetUrl("https://www.example.com")
.allowOTPRetry(true)
.build();
// You may want to use the .get() method when working with the response object.
```
```csharp .NET theme={"dark"}
using Prove.Proveapi;
using Prove.Proveapi.Models.Components;
var sdk = new ProveAPI(auth: "");
V3StartRequest req = new V3StartRequest() {
FinalTargetUrl = "https://www.example.com",
FlowType = "desktop",
AllowOTPRetry = true,
};
var res = await sdk.V3.V3StartRequestAsync(req);
```
The function returns the following fields:
* `authToken`: send this to your client-side code through the `Authenticate()` function - it's a JSON Web Token (JWT) tied to the current flow and used for the possession checks. It expires after 15 minutes.
* `correlationId`: save this in your current session, then pass it in to each of the `Validate()`, `Challenge()`, and `Complete()` function calls of the same flow. The correlation ID ties together different system calls for the same Prove flow. It can aids in troubleshooting. The session expires in 15 minutes from when the correlation ID returns from the `Start()` call.
* `next`: map of the next API call you need to make.
Return the `authToken` in a response to the front end.
Once you have the `authToken`, build the authenticator for both the mobile and desktop flows.
```javascript JavaScript theme={"dark"}
async function authenticate(isMobileWeb, authToken) {
// Set up the authenticator for either mobile or desktop flow.
let builder = new proveAuth.AuthenticatorBuilder();
if (isMobileWeb) {
// Set up Mobile Auth and OTP.
builder = builder
.withAuthFinishStep((input) => verify(input.authId))
.withMobileAuthImplementation("fetch")
.withOtpFallback(otpStart, otpFinish);
} else {
// Set up Instant Link.
builder = builder
.withAuthFinishStep((input) => verify(input.authId))
.withInstantLinkFallback(instantLink)
.withRole("secondary");
}
const authenticator = builder.build();
// Authenticate with the authToken.
return authenticator.authenticate(authToken);
}
```
```typescript TypeScript theme={"dark"}
async function authenticate(isMobileWeb: boolean, authToken: string) {
// Set up the authenticator for either mobile or desktop flow.
let builder = new proveAuth.AuthenticatorBuilder();
if (isMobileWeb) {
// Set up Mobile Auth and OTP.
builder = builder
.withAuthFinishStep((input) => verify(input.authId))
.withMobileAuthImplementation("fetch")
.withOtpFallback(otpStart, otpFinish);
} else {
// Set up Instant Link.
builder = builder
.withAuthFinishStep((input) => verify(input.authId))
.withInstantLinkFallback(instantLink)
.withRole("secondary");
}
const authenticator = builder.build();
// Authenticate with the authToken.
return authenticator.authenticate(authToken);
}
```
## Configure OTP
To use the Resend/Retry/Phone Change features, you need to install the Web SDK version 2.15.1 or later.
To set the One-Time Password (OTP) handler, `withOtpFallback(startStep: OtpStartStep | OtpStartStepFn, finishStep: OtpFinishStep | OtpFinishStepFn)`, requires implementing the `OtpStartStep` and `OtpFinishStep`. When returning the phone number in the functions, ensure you return an object with the field `phoneNumber` to the `resolve()` function.
The OTP session has a two minute timeout from when it's sent through Short Message Service (SMS) to when the customer can enter in the OTP.
Follow these instructions if you are implementing OTP and you are passing in the phone number on the `/v3/start` endpoint. In this case, you've already prompted for a phone number so you don't need to prompt for it in the client SDK.
Since you passed the phone number in the `Start()` function, call `resolve(null)` to communicate to the SDK you have the customer's agreement to deliver the SMS message. Ensure you return an object to `resolve()` function.
```javascript JavaScript theme={"dark"}
function otpStartStep(phoneNumberNeeded, phoneValidationError) {
return new Promise((resolve, reject) => {
// Since no phone number is needed, don't prompt the user.
resolve(null);
});
}
```
```typescript TypeScript theme={"dark"}
const otpStartStep: OtpStartStep = {
execute: async (
phoneNumberNeeded: boolean,
phoneValidationError?: PhoneValidationError
): Promise => {
return new Promise((resolve, reject) => {
// Since no phone number is needed, don't prompt the user.
resolve(null);
});
},
};
```
Call the `reject('some error message')` method to communicate to the SDK any issues while trying to obtain the phone number or the OTP. Report an error if the customer cancels the SMS transaction or presses the back button to leave the screen.
In the finish step, call the `resolve(result: OtpFinishResult)` method to return the collected OTP value in which `result` variable has `OnSuccess` value for `OtpFinishResultType` and the OTP value wrapped in `OtpFinishInput`.
```javascript JavaScript theme={"dark"}
function otpFinishStep(otpError) {
return new Promise((resolve, reject) => {
// If error message is found, handle it.
if (otpError) {
// Set to a variable and display it in a field.
// In this example, we don't do anything with the error.
var someErrorMessage = otpError.message;
}
// Prompt the user for whether they received the SMS.
// Typically, this is a page that shows the OTP already. We are simplifying
// it by requiring an input.
var input = confirm('Did you receive a text message?');
if (!input) {
// Close the modal if a text message was not received.
return;
}
// Prompt the user for the OTP.
var otp = prompt('Enter OTP code:');
if (otp) {
// If the input is valid and the user clicked `OK`, return the OTP.
resolve({
input: { otp }, // OTP value
resultType: 0, // OnSuccess enum type = 0
});
} else {
// Else, exit the flow.
reject('phone invalid or user cancelled');
}
});
}
```
```typescript TypeScript theme={"dark"}
const otpFinishStep: OtpFinishStep = {
execute: async (otpError?: OtpError): Promise => {
return new Promise((resolve, reject) => {
// If error message is found, handle it.
if (otpError) {
// Set to a variable and display it in a field.
// In this example, we don't do anything with the error.
var someErrorMessage = otpError.message;
}
// Prompt the user for whether they received the SMS.
// Typically, this is a page that shows the OTP already. We are simplifying
// it by requiring an input.
var input = confirm('Did you receive a text message?');
if (!input) {
// Close the modal if a text message was not received.
return;
}
// Prompt the user for the OTP.
var otp = prompt('Enter OTP code:');
if (otp) {
// If the input is valid and the user clicked `OK`, return the OTP.
resolve({
input: { otp }, // OTP value
resultType: OtpFinishResultType.OnSuccess,
});
} else {
// Else, exit the flow.
reject('phone invalid or user cancelled');
}
});
},
};
```
Follow these instructions if implementing MobileAuth and collecting the phone number only if MobileAuth fails. This will implement OTP without allowing for SMS resends and phone number changes. If you do want those capabilities, please reference the subsequent tabs (Resend, Retry OTP, and Phone Number Change).
In the start step, call the `resolve(input: OtpStartInput)` method to return the collected phone number to the SDK.
```javascript JavaScript theme={"dark"}
function otpStartStep(phoneNumberNeeded, phoneValidationError) {
return new Promise((resolve, reject) => {
// If no phone number is needed, then don't prompt the user.
if (!phoneNumberNeeded) {
resolve(null);
return;
}
// If error message is found around phone number, handle it.
// The `phoneValidationError` is ONLY available when `phoneNumberNeeded`
// has a value.
if (phoneValidationError) {
// Set to a variable and display it in a field.
// In this example, we don't do anything with the error.
var someErrorMessage = phoneValidationError.message;
}
// Prompt the user for the phone number.
var input = prompt('Enter phone number:');
if (input) {
// If the input is valid and the user clicked `OK`, return the phone
// number.
resolve({
phoneNumber: input,
});
} else {
// Else, exit the flow.
reject('phone invalid or user cancelled');
}
});
}
```
```typescript TypeScript theme={"dark"}
const otpPromptStartStep: OtpStartStep = {
execute: async (
phoneNumberNeeded: boolean,
phoneValidationError?: PhoneValidationError
): Promise => {
return new Promise((resolve, reject) => {
// If no phone number is needed, then don't prompt the user.
if (!phoneNumberNeeded) {
resolve(null);
return;
}
// If error message is found around phone number, handle it.
// The `phoneValidationError` is ONLY available when `phoneNumberNeeded`
// has a value.
if (phoneValidationError) {
// Set to a variable and display it in a field.
// In this example, we don't do anything with the error.
var someErrorMessage = phoneValidationError.message;
}
// Prompt the user for the phone number.
var input = prompt('Enter phone number:');
if (input) {
// If the input is valid and the user clicked `OK`, return the phone
// number.
resolve({
phoneNumber: input,
});
} else {
// Else, exit the flow.
reject('phone invalid or user cancelled');
}
});
},
};
```
The finish step is implemented the same as the previous tab:
```javascript JavaScript theme={"dark"}
function otpFinishStep(otpError) {
return new Promise((resolve, reject) => {
// If error message is found, handle it.
if (otpError) {
// Set to a variable and display it in a field.
// In this example, we don't do anything with the error.
var someErrorMessage = otpError.message;
}
// Prompt the user for whether they received the SMS.
// Typically, this is a page that shows the OTP already. We are simplifying
// it by requiring an input.
var input = confirm('Did you receive a text message?');
if (!input) {
// Close the modal if a text message was not received.
return;
}
// Prompt the user for the OTP.
var otp = prompt('Enter OTP code:');
if (otp) {
// If the input is valid and the user clicked `OK`, return the OTP.
resolve({
input: { otp }, // OTP value
resultType: 0, // OnSuccess enum type = 0
});
} else {
// Else, exit the flow.
reject('phone invalid or user cancelled');
}
});
}
```
```typescript TypeScript theme={"dark"}
const otpFinishStep: OtpFinishStep = {
execute: async (otpError?: OtpError): Promise => {
return new Promise((resolve, reject) => {
// If error message is found, handle it.
if (otpError) {
// Set to a variable and display it in a field.
// In this example, we don't do anything with the error.
var someErrorMessage = otpError.message;
}
// Prompt the user for whether they received the SMS.
// Typically, this is a page that shows the OTP already. We are simplifying
// it by requiring an input.
var input = confirm('Did you receive a text message?');
if (!input) {
// Close the modal if a text message was not received.
return;
}
// Prompt the user for the OTP.
var otp = prompt('Enter OTP code:');
if (otp) {
// If the input is valid and the user clicked `OK`, return the OTP.
resolve({
input: { otp }, // OTP value
resultType: OtpFinishResultType.OnSuccess,
});
} else {
// Else, exit the flow.
reject('phone invalid or user cancelled');
}
});
},
};
```
Follow these instructions to allow the customer to request a new OTP via SMS using the same phone number. There is a max of three send attempts including the initial message.
The start step is implemented the same as the previous tab:
```javascript JavaScript theme={"dark"}
function otpStartStep(phoneNumberNeeded, phoneValidationError) {
return new Promise((resolve, reject) => {
// If no phone number is needed, then don't prompt the user.
if (!phoneNumberNeeded) {
resolve(null);
return;
}
// If error message is found around phone number, handle it.
// The `phoneValidationError` is ONLY available when `phoneNumberNeeded`
// has a value.
if (phoneValidationError) {
// Set to a variable and display it in a field.
// In this example, we don't do anything with the error.
var someErrorMessage = phoneValidationError.message;
}
// Prompt the user for the phone number.
var input = prompt('Enter phone number:');
if (input) {
// If the input is valid and the user clicked `OK`, return the phone
// number.
resolve({
phoneNumber: input,
});
} else {
// Else, exit the flow.
reject('phone invalid or user cancelled');
}
});
}
```
```typescript TypeScript theme={"dark"}
const otpPromptStartStep: OtpStartStep = {
execute: async (
phoneNumberNeeded: boolean,
phoneValidationError?: PhoneValidationError
): Promise => {
return new Promise((resolve, reject) => {
// If no phone number is needed, then don't prompt the user.
if (!phoneNumberNeeded) {
resolve(null);
return;
}
// If error message is found around phone number, handle it.
// The `phoneValidationError` is ONLY available when `phoneNumberNeeded`
// has a value.
if (phoneValidationError) {
// Set to a variable and display it in a field.
// In this example, we don't do anything with the error.
var someErrorMessage = phoneValidationError.message;
}
// Prompt the user for the phone number.
var input = prompt('Enter phone number:');
if (input) {
// If the input is valid and the user clicked `OK`, return the phone
// number.
resolve({
phoneNumber: input,
});
} else {
// Else, exit the flow.
reject('phone invalid or user cancelled');
}
});
},
};
```
You can then send a new OTP SMS to the same phone number by implementing the finish step like this:
```javascript JavaScript theme={"dark"}
function otpFinishStep(otpError) {
return new Promise((resolve, reject) => {
// If error message is found, handle it.
if (otpError) {
// Set to a variable and display it in a field.
// In this example, we don't do anything with the error.
var someErrorMessage = otpError.message;
}
// Prompt the user for whether they received the SMS.
// Typically, this is a page that shows the OTP already. We are simplifying
// it by requiring an input.
var input = confirm('Did you receive a text message?');
if (!input) {
// If `Cancel`, then resend to the same phone number.
resolve({
resultType: 1, // OnResendOtp enum type = 1
});
return;
}
// Prompt the user for the OTP.
var otp = prompt('Enter OTP code:');
if (otp) {
// If the input is valid and the user clicked `OK`, return the OTP.
resolve({
input: { otp }, // OTP value
resultType: 0, // OnSuccess enum type = 0
});
} else {
// Else, exit the flow.
reject('phone invalid or user cancelled');
}
});
}
```
```typescript TypeScript theme={"dark"}
const otpMultipleResendFinishStep: OtpFinishStep = {
execute: async (otpError?: OtpError): Promise => {
return new Promise((resolve, reject) => {
// If error message is found, handle it.
if (otpError) {
// Set to a variable and display it in a field.
// In this example, we don't do anything with the error.
var someErrorMessage = otpError.message;
}
// Prompt the user for whether they received the SMS.
// Typically, this is a page that shows the OTP already. We are simplifying
// it by requiring an input.
var input = confirm('Did you receive a text message?');
if (!input) {
// If `Cancel`, then resend to the same phone number.
resolve({
resultType: 1, // OnResendOtp enum type = 1
});
return;
}
// Prompt the user for the OTP.
var otp = prompt('Enter OTP code:');
if (otp) {
// If the input is valid and the user clicked `OK`, return the OTP.
resolve({
input: { otp }, // OTP value
resultType: OtpFinishResultType.OnSuccess,
});
} else {
// Else, exit the flow.
reject('phone invalid or user cancelled');
}
});
},
};
```
Follow these instructions to allow the customer to re-enter the OTP PIN if they type it wrong. There is a max of 3 attempts. To implement this functionality, you also need to pass in `allowOTPRetry=true` to the `/v3/start` endpoint.
The start step is implemented the same as either of the the previous tabs - no client side code changes necessary:
```javascript JavaScript theme={"dark"}
function otpStartStep(phoneNumberNeeded, phoneValidationError) {
return new Promise((resolve, reject) => {
// If no phone number is needed, then don't prompt the user.
if (!phoneNumberNeeded) {
resolve(null);
return;
}
// If error message is found around phone number, handle it.
// The `phoneValidationError` is ONLY available when `phoneNumberNeeded`
// has a value.
if (phoneValidationError) {
// Set to a variable and display it in a field.
// In this example, we don't do anything with the error.
var someErrorMessage = phoneValidationError.message;
}
// Prompt the user for the phone number.
var input = prompt('Enter phone number:');
if (input) {
// If the input is valid and the user clicked `OK`, return the phone
// number.
resolve({
phoneNumber: input,
});
} else {
// Else, exit the flow.
reject('phone invalid or user cancelled');
}
});
}
```
```typescript TypeScript theme={"dark"}
const otpPromptStartStep: OtpStartStep = {
execute: async (
phoneNumberNeeded: boolean,
phoneValidationError?: PhoneValidationError
): Promise => {
return new Promise((resolve, reject) => {
// If no phone number is needed, then don't prompt the user.
if (!phoneNumberNeeded) {
resolve(null);
return;
}
// If error message is found around phone number, handle it.
// The `phoneValidationError` is ONLY available when `phoneNumberNeeded`
// has a value.
if (phoneValidationError) {
// Set to a variable and display it in a field.
// In this example, we don't do anything with the error.
var someErrorMessage = phoneValidationError.message;
}
// Prompt the user for the phone number.
var input = prompt('Enter phone number:');
if (input) {
// If the input is valid and the user clicked `OK`, return the phone
// number.
resolve({
phoneNumber: input,
});
} else {
// Else, exit the flow.
reject('phone invalid or user cancelled');
}
});
},
};
```
The finish step is implemented the same as either of the the previous tabs - no client side code changes necessary. If the OTP is invalid, the finish step will be called again to prompt the user for a new input. Once the max attempts is reached, the `AuthFinish` function will be called.
```javascript JavaScript theme={"dark"}
function otpFinishStep(otpError) {
return new Promise((resolve, reject) => {
// If error message is found, handle it.
if (otpError) {
// Set to a variable and display it in a field.
// In this example, we don't do anything with the error.
var someErrorMessage = otpError.message;
}
// Prompt the user for whether they received the SMS.
// Typically, this is a page that shows the OTP already. We are simplifying
// it by requiring an input.
var input = confirm('Did you receive a text message?');
if (!input) {
// Close the modal if a text message was not received.
return;
}
// Prompt the user for the OTP.
var otp = prompt('Enter OTP code:');
if (otp) {
// If the input is valid and the user clicked `OK`, return the OTP.
resolve({
input: { otp }, // OTP value
resultType: 0, // OnSuccess enum type = 0
});
} else {
// Else, exit the flow.
reject('phone invalid or user cancelled');
}
});
}
```
```typescript TypeScript theme={"dark"}
const otpFinishStep: OtpFinishStep = {
execute: async (otpError?: OtpError): Promise => {
return new Promise((resolve, reject) => {
// If error message is found, handle it.
if (otpError) {
// Set to a variable and display it in a field.
// In this example, we don't do anything with the error.
var someErrorMessage = otpError.message;
}
// Prompt the user for whether they received the SMS.
// Typically, this is a page that shows the OTP already. We are simplifying
// it by requiring an input.
var input = confirm('Did you receive a text message?');
if (!input) {
// Close the modal if a text message was not received.
return;
}
// Prompt the user for the OTP.
var otp = prompt('Enter OTP code:');
if (otp) {
// If the input is valid and the user clicked `OK`, return the OTP.
resolve({
input: { otp }, // OTP value
resultType: OtpFinishResultType.OnSuccess,
});
} else {
// Else, exit the flow.
reject('phone invalid or user cancelled');
}
});
},
};
```
Follow these instructions to allow the customer to re-enter their phone number. There is a max of three entries/send attempts.
Manual Request Required
To enable phone number change capabilities on your credentials, contact your Prove representative.
The start step is implemented the same as the previous tab:
```javascript JavaScript theme={"dark"}
function otpStartStep(phoneNumberNeeded, phoneValidationError) {
return new Promise((resolve, reject) => {
// If no phone number is needed, then don't prompt the user.
if (!phoneNumberNeeded) {
resolve(null);
return;
}
// If error message is found around phone number, handle it.
// The `phoneValidationError` is ONLY available when `phoneNumberNeeded`
// has a value.
if (phoneValidationError) {
// Set to a variable and display it in a field.
// In this example, we don't do anything with the error.
var someErrorMessage = phoneValidationError.message;
}
// Prompt the user for the phone number.
var input = prompt('Enter phone number:');
if (input) {
// If the input is valid and the user clicked `OK`, return the phone
// number.
resolve({
phoneNumber: input,
});
} else {
// Else, exit the flow.
reject('phone invalid or user cancelled');
}
});
}
```
```typescript TypeScript theme={"dark"}
const otpPromptStartStep: OtpStartStep = {
execute: async (
phoneNumberNeeded: boolean,
phoneValidationError?: PhoneValidationError
): Promise => {
return new Promise((resolve, reject) => {
// If no phone number is needed, then don't prompt the user.
if (!phoneNumberNeeded) {
resolve(null);
return;
}
// If error message is found around phone number, handle it.
// The `phoneValidationError` is ONLY available when `phoneNumberNeeded`
// has a value.
if (phoneValidationError) {
// Set to a variable and display it in a field.
// In this example, we don't do anything with the error.
var someErrorMessage = phoneValidationError.message;
}
// Prompt the user for the phone number.
var input = prompt('Enter phone number:');
if (input) {
// If the input is valid and the user clicked `OK`, return the phone
// number.
resolve({
phoneNumber: input,
});
} else {
// Else, exit the flow.
reject('phone invalid or user cancelled');
}
});
},
};
```
You can prompt for a new phone numberby implementing the finish step like this:
```javascript JavaScript theme={"dark"}
function otpFinishStep(otpError) {
return new Promise((resolve, reject) => {
// If error message is found, handle it.
if (otpError) {
// Set to a variable and display it in a field.
// In this example, we don't do anything with the error.
var someErrorMessage = otpError.message;
}
// Prompt the user for whether they received the SMS.
// Typically, this is a page that shows the OTP already. We are simplifying
// it by requiring an input.
var input = confirm('Did you receive a text message?');
if (!input) {
// If `Cancel`, then trigger the otpStartStep to re-prompt for
// phone number.
resolve({
resultType: 2, // OnMobileNumberChange enum type = 2
});
return;
}
// Prompt the user for the OTP.
var otp = prompt('Enter OTP code:');
if (otp) {
// If the input is valid and the user clicked `OK`, return the OTP.
resolve({
input: { otp }, // OTP value
resultType: 0, // OnSuccess enum type = 0
});
} else {
// Else, exit the flow.
reject('phone invalid or user cancelled');
}
});
}
```
```typescript TypeScript theme={"dark"}
const otpPhoneChangeFinishStep: OtpFinishStep = {
execute: async (otpError?: OtpError): Promise => {
return new Promise((resolve, reject) => {
// If error message is found, handle it.
if (otpError) {
// Set to a variable and display it in a field.
// In this example, we don't do anything with the error.
var someErrorMessage = otpError.message;
}
// Prompt the user for whether they received the SMS.
// Typically, this is a page that shows the OTP already. We are simplifying
// it by requiring an input.
var input = confirm('Did you receive a text message?');
if (!input) {
// If `Cancel`, then trigger the otpStartStep to re-prompt for
// phone number.
resolve({
resultType: 2, // OnMobileNumberChange enum type = 2
});
return;
}
// Prompt the user for the OTP.
var otp = prompt('Enter OTP code:');
if (otp) {
// If the input is valid and the user clicked `OK`, return the OTP.
resolve({
input: { otp }, // OTP value
resultType: OtpFinishResultType.OnSuccess,
});
} else {
// Else, exit the flow.
reject('phone invalid or user cancelled');
}
});
},
};
```
## Configure Instant Link
To use the Resend/Retry/Phone Change features, you need to install the Web SDK version 2.15.1 or later.
To set the Instant Link handler, `withInstantLinkFallback(startStep: InstantLinkStartStep | InstantLinkStartStepFn, retryStep?: InstantLinkRetryStep | InstantLinkRetryStepFn)` requires implementing the `InstantLinkStartStep` interface and optionally the `InstantLinkRetryStep` interface if you wish for advanced capabilities. When returning the phone number in the functions, ensure you return an object with the field `phoneNumber` to the `resolve()` function.
The Instant Link session has a three minute timeout from when it's sent through Short Message Service (SMS) to when the customer can click the received link.
Follow these instructions if you are implementing Instant Link and you are passing in the phone number on the `/v3/start` endpoint. In this case, you've already prompted for a phone number so you don't need to prompt for it in the client SDK.
Since you passed the phone number in the `Start()` function, call `resolve(null)` to communicate to the SDK you have the customer's agreement to deliver the SMS message. Ensure you return an object to `resolve()` function.
```javascript JavaScript theme={"dark"}
function instantLinkStartStep(phoneNumberNeeded, phoneValidationError) {
return new Promise((resolve, reject) => {
// Since no phone number is needed, don't prompt the user.
resolve(null);
});
}
```
```typescript TypeScript theme={"dark"}
const instantLinkNoPromptStartStep: InstantLinkStartStep = {
execute: async (
phoneNumberNeeded: boolean,
phoneValidationError?: PhoneValidationError
): Promise => {
return new Promise((resolve, reject) => {
// Since no phone number is needed, don't prompt the user.
resolve(null);
});
},
};
```
Follow these instructions if implementing MobileAuth and collecting the phone number for desktop. This will implement Instant Link without allowing for SMS resends and phone number changes. If you do want those capabilities, please reference the subsequent tabs (Resend and Phone Number Change).
Call the `resolve(input: InstantStartInput)` method to return the collected phone number to the SDK.
Call the `reject('some error message')` method to communicate to the SDK any issues while trying to obtain the phone number. Report an error if the customer cancels the Instant Link transaction or presses the back button to leave the Instant Link start step dialog.
```javascript JavaScript theme={"dark"}
function instantLinkStartStep(phoneNumberNeeded, phoneValidationError) {
return new Promise((resolve, reject) => {
// If no phone number is needed, then don't prompt the user.
if (!phoneNumberNeeded) {
resolve(null);
return;
}
// If error message is found around phone number, handle it.
// The `phoneValidationError` is ONLY available when `phoneNumberNeeded`
// has a value.
if (phoneValidationError) {
// Set to a variable and display it in a field.
// In this example, we don't do anything with the error.
var someErrorMessage = phoneValidationError.message;
}
// Prompt the user for the phone number.
var input = prompt('Enter phone number:');
if (input) {
// If the input is valid and the user clicked `OK`, return the phone
// number.
resolve({
phoneNumber: input,
});
} else {
// Else, exit the flow.
reject('phone invalid or user cancelled');
}
});
}
```
```typescript TypeScript theme={"dark"}
const instantLinkStartStep: InstantLinkStartStep = {
execute: async (
phoneNumberNeeded: boolean,
phoneValidationError?: PhoneValidationError
): Promise => {
return new Promise((resolve, reject) => {
// If no phone number is needed, then don't prompt the user.
if (!phoneNumberNeeded) {
resolve(null);
return;
}
// If error message is found around phone number, handle it.
// The `phoneValidationError` is ONLY available when `phoneNumberNeeded`
// has a value.
if (phoneValidationError) {
// Set to a variable and display it in a field.
// In this example, we don't do anything with the error.
var someErrorMessage = phoneValidationError.message;
}
// Prompt the user for the phone number.
var input = prompt('Enter phone number:');
if (input) {
// If the input is valid and the user clicked `OK`, return the phone
// number.
resolve({
phoneNumber: input,
} as InstantLinkStartInput);
} else {
// Else, exit the flow.
reject('phone invalid or user cancelled');
}
});
},
};
```
Follow these instructions to allow the customer to request a new SMS using the same phone number. There is a max of three send attempts including the initial message.
The start step is implemented the same as the previous tab:
```javascript JavaScript theme={"dark"}
function instantLinkStartStep(phoneNumberNeeded, phoneValidationError) {
return new Promise((resolve, reject) => {
// If no phone number is needed, then don't prompt the user.
if (!phoneNumberNeeded) {
resolve(null);
return;
}
// If error message is found around phone number, handle it.
// The `phoneValidationError` is ONLY available when `phoneNumberNeeded`
// has a value.
if (phoneValidationError) {
// Set to a variable and display it in a field.
// In this example, we don't do anything with the error.
var someErrorMessage = phoneValidationError.message;
}
// Prompt the user for the phone number.
var input = prompt('Enter phone number:');
if (input) {
// If the input is valid and the user clicked `OK`, return the phone
// number.
resolve({
phoneNumber: input,
});
} else {
// Else, exit the flow.
reject('phone invalid or user cancelled');
}
});
}
```
```typescript TypeScript theme={"dark"}
const instantLinkStartStep: InstantLinkStartStep = {
execute: async (
phoneNumberNeeded: boolean,
phoneValidationError?: PhoneValidationError
): Promise => {
return new Promise((resolve, reject) => {
// If no phone number is needed, then don't prompt the user.
if (!phoneNumberNeeded) {
resolve(null);
return;
}
// If error message is found around phone number, handle it.
// The `phoneValidationError` is ONLY available when `phoneNumberNeeded`
// has a value.
if (phoneValidationError) {
// Set to a variable and display it in a field.
// In this example, we don't do anything with the error.
var someErrorMessage = phoneValidationError.message;
}
// Prompt the user for the phone number.
var input = prompt('Enter phone number:');
if (input) {
// If the input is valid and the user clicked `OK`, return the phone
// number.
resolve({
phoneNumber: input,
} as InstantLinkStartInput);
} else {
// Else, exit the flow.
reject('phone invalid or user cancelled');
}
});
},
};
```
You can then send a new Instant Link SMS to the same phone number by implementing the `InstantLinkRetryStep` interface, for example:
```javascript JavaScript theme={"dark"}
function instantLinkRetryStep() {
return new Promise((resolve, reject) => {
// There are multiple return options:
// - resolve(0): request resend to the same phone number
// - reject('user clicked cancel'): error out of the possession flow
// Prompt the user for the phone number.
// Typically, this is a page that is automatically closed or redirected
// once the `AuthFinish` function is called. We are simplifying it by
// requiring an input.
var input = confirm('Did you receive a text message?');
if (input) {
// If `OK`, close the modal.
return;
}
// Else `Cancel`, then resend to the same phone number.
resolve(0);
});
}
```
```typescript TypeScript theme={"dark"}
const instantLinkMultipleResendRetryStep: InstantLinkRetryStep = {
execute: async (): Promise => {
return new Promise((resolve, reject) => {
// There are multiple return options:
// - resolve(0): request resend to the same phone number
// - reject('user clicked cancel'): error out of the possession flow
// Prompt the user for the phone number.
// Typically, this is a page that is automatically closed or redirected
// once the `AuthFinish` function is called. We are simplifying it by
// requiring an input.
var input = confirm('Did you receive a text message?');
if (input) {
// If `OK`, close the modal.
return;
}
// Else `Cancel`, then resend to the same phone number.
resolve(InstantLinkResultType.OnResend);
});
},
};
```
Follow these instructions to allow the customer to re-enter their phone number. There is a max of three entries/send attempts.
Manual Request Required
To enable phone number change capabilities on your credentials, contact your Prove representative.
The start step is implemented the same as the previous tab:
```javascript JavaScript theme={"dark"}
function instantLinkStartStep(phoneNumberNeeded, phoneValidationError) {
return new Promise((resolve, reject) => {
// If no phone number is needed, then don't prompt the user.
if (!phoneNumberNeeded) {
resolve(null);
return;
}
// If error message is found around phone number, handle it.
// The `phoneValidationError` is ONLY available when `phoneNumberNeeded`
// has a value.
if (phoneValidationError) {
// Set to a variable and display it in a field.
// In this example, we don't do anything with the error.
var someErrorMessage = phoneValidationError.message;
}
// Prompt the user for the phone number.
var input = prompt('Enter phone number:');
if (input) {
// If the input is valid and the user clicked `OK`, return the phone
// number.
resolve({
phoneNumber: input,
});
} else {
// Else, exit the flow.
reject('phone invalid or user cancelled');
}
});
}
```
```typescript TypeScript theme={"dark"}
const instantLinkStartStep: InstantLinkStartStep = {
execute: async (
phoneNumberNeeded: boolean,
phoneValidationError?: PhoneValidationError
): Promise => {
return new Promise((resolve, reject) => {
// If no phone number is needed, then don't prompt the user.
if (!phoneNumberNeeded) {
resolve(null);
return;
}
// If error message is found around phone number, handle it.
// The `phoneValidationError` is ONLY available when `phoneNumberNeeded`
// has a value.
if (phoneValidationError) {
// Set to a variable and display it in a field.
// In this example, we don't do anything with the error.
var someErrorMessage = phoneValidationError.message;
}
// Prompt the user for the phone number.
var input = prompt('Enter phone number:');
if (input) {
// If the input is valid and the user clicked `OK`, return the phone
// number.
resolve({
phoneNumber: input,
} as InstantLinkStartInput);
} else {
// Else, exit the flow.
reject('phone invalid or user cancelled');
}
});
},
};
```
You can prompt for a new phone number by implementing the `InstantLinkRetryStep` interface, for example:
```javascript JavaScript theme={"dark"}
function instantLinkRetryStep() {
return new Promise((resolve, reject) => {
// There are multiple return options:
// - resolve(0): request resend to the same phone number
// - resolve(1): request phone number change/re-prompt
// - reject('user clicked cancel'): error out of the possession flow
// Prompt the user for the phone number.
// Typically, this is a page that is automatically closed or redirected
// once the `AuthFinish` function is called. We are simplifying it by
// requiring an input.
var input = confirm('Did you receive a text message?');
if (input) {
// If `OK`, close the modal.
return;
}
// Else `Cancel`, then trigger the instantLinkStartStep to re-prompt for
// phone number.
resolve(1);
});
}
```
```typescript TypeScript theme={"dark"}
const instantLinkPhoneChangeRetryStep: InstantLinkRetryStep = {
execute: async (): Promise => {
return new Promise((resolve, reject) => {
// There are multiple return options:
// - resolve(0): request resend to the same phone number
// - resolve(1): request phone number change/re-prompt
// - reject('user clicked cancel'): error out of the possession flow
// Prompt the user for the phone number.
// Typically, this is a page that is automatically closed or redirected
// once the `AuthFinish` function is called. We are simplifying it by
// requiring an input.
var input = confirm('Did you receive a text message?');
if (input) {
// If `OK`, close the modal.
return;
}
// Else `Cancel`, then trigger the instantLinkStartStep to re-prompt for
// phone number.
resolve(InstantLinkResultType.OnMobileNumberChange);
});
},
};
```
## OTP
## Required consent language
"You authorize your wireless carrier to use or share information about your account and your wireless device, if available, to \{Enterprise Customer Name} or its service provider during your business relationship, to help identify you or your wireless device and to prevent fraud. See our Privacy Policy for how we treat your data."
## Required language placement
The MNOs require customers to accept carrier consent language in the customer flow before calling the endpoint in scope.
Place the MNO Terms and Conditions on either the Landing Page or the Challenge Page. Speak to your Prove representative for more detail.
If implementing Mobile Auth, place the MNO consent language on your Landing Page, referenced in Terms and Conditions.
You can determine if the customer is on a mobile or desktop browser using this example. If the `isMobile` is true, set `mobile` as the `flowType` for the `Start()` function on the server, otherwise you can set `desktop`:
```javascript JavaScript theme={"dark"}
// Check if the customer is on a mobile or desktop browser.
const authCheck = new proveAuth.AuthenticatorBuilder().build();
let isMobile = authCheck.isMobileWeb()
```
```typescript TypeScript theme={"dark"}
// Check if the customer is on a mobile or desktop browser.
const authCheck = new proveAuth.AuthenticatorBuilder().build();
let isMobile = authCheck.isMobileWeb()
```
When using the Android SDK, set `mobile` as the `flowType` for the `Start()` function on the server.
When using the iOS SDK, set `mobile` as the `flowType` for the `Start()` function on the server.
You need to send a request to your back end server with the phone number, flow type, and an optional challenge to start the flow. This can either be the date of birth or last four digits of the social security number.
```javascript JavaScript {1-13} theme={"dark"}
async function initialize(phoneNumber, ssn, flowType) {
const response = await fetch(backendUrl + "/initialize", {
method: "POST",
headers: {
Accept: "application/json",
"Content-Type": "application/json",
},
body: JSON.stringify({
phoneNumber: phoneNumber,
"Content-Type": "application/json",
ssn: ssn
}),
});
const rsp = await response.json();
const authToken = rsp.authToken;
return authToken;
}
```
```typescript TypeScript {1-17} theme={"dark"}
async function initialize(
phoneNumber: string,
ssn: string,
flowType: string
): Promise {
const response = await fetch(backendUrl + "/initialize", {
method: "POST",
headers: {
Accept: "application/json",
"Content-Type": "application/json",
},
body: JSON.stringify({
phoneNumber: phoneNumber,
flowType: flowType,
ssn: ssn,
}),
});
const rsp = await response.json();
const authToken = rsp.authToken;
return authToken;
}
```
```java Java theme={"dark"}
String initialize(String phoneNumber, String ssn, String flowType) {
YourBackendClient backend = new YourBackendClient(); // Backend API client
// TODO: Build your InitializeRequest object
InitializeRequest initializeRequest = new InitializeRequest(phoneNumber, ssn, flowType);
// Send an initialize request to your backend server to get authToken
InitializeResponse response = backend.initialize(initializeRequest);
// TODO: define your own InitializeResponse object to parse authToken string
return response.getAuthToken();
}
```
```swift Swift theme={"dark"}
// The below example uses native iOS URLSession, but any other
// alternative networking approaches should also work
func initialize(phoneNumber: String, ssn: String, flowType: String, completion: @escaping (Result) -> Void) {
guard let url = URL(string: "\(backendUrl)/initialize") else {
completion(.failure(URLError(.badURL)))
return
}
var request = URLRequest(url: url)
request.httpMethod = "POST"
request.addValue("application/json", forHTTPHeaderField: "Accept")
request.addValue("application/json", forHTTPHeaderField: "Content-Type")
// Set up the request body
let body: [String: Any] = [
"phoneNumber": phoneNumber,
"flowType": flowType,
"ssn": ssn
]
do {
request.httpBody = try JSONSerialization.data(withJSONObject: body, options: \[])
} catch {
completion(.failure(error))
return
}
// Perform the request
let task = URLSession.shared.dataTask(with: request) { \_, response, error in
// Handle network or connection errors
if let error = error {
completion(.failure(error))
return
}
do {
if let json = try JSONSerialization.jsonObject(with: data, options: \[]) as? [String: Any],
let auth_token = json["auth_token"] as? String {
completion(.success(authToken))
} else {
let parsingError = NSError(domain: "", code: 0, userInfo: [NSLocalizedDescriptionKey: "Failed to parse JSON or authToken is missing"])
completion(.failure(parsingError))
}
} catch {
completion(.failure(error))
}
}
// Start the network call
task.resume()
}
```
You need to send a request to your back end server with the flow type.
```javascript JavaScript {1-11} theme={"dark"}
async function initialise(flowType) {
const response = await fetch(backendUrl + "/initialize", {
method: "POST",
headers: {
Accept: "application/json",
"Content-Type": "application/json",
},
body: JSON.stringify({
flowTyp: flowType,
}),
});
const rsp = await response.json();
const authToken = rsp.authToken;
return authToken;
}
```
```typescript TypeScript {1-13} theme={"dark"}
async function initialize(
flowType: string
): Promise {
const response = await fetch(backendUrl + "/initialize", {
method: "POST",
headers: {
Accept: "application/json",
"Content-Type": "application/json",
},
body: JSON.stringify({
flowType: flowType,
}),
});
const rsp = await response.json();
const authToken = rsp.authToken;
return authToken;
}
```
```java Java theme={"dark"}
String initialize(String flowType) {
YourBackendClient backend = new YourBackendClient(); // Backend API client
// TODO: Build your InitializeRequest object
InitializeRequest initializeRequest = new InitializeRequest(flowType);
// Send an initialize request to your backend server to get authToken
InitializeResponse response = backend.initialize(initializeRequest);
// TODO: define your own InitializeResponse object to parse authToken string
return response.getAuthToken();
}
```
```swift Swift theme={"dark"}
// The below example uses native iOS `URLSession`, but any other
// alternative networking approaches should also work
func initialize(flowType: String, completion: @escaping (Result) -> Void) {
guard let url = URL(string: "\(backendUrl)/initialize") else {
completion(.failure(URLError(.badURL)))
return
}
var request = URLRequest(url: url)
request.httpMethod = "POST"
request.addValue("application/json", forHTTPHeaderField: "Accept")
request.addValue("application/json", forHTTPHeaderField: "Content-Type")
// Set up the request body
let body: [String: Any] = [
"flowType": flowType
]
do {
request.httpBody = try JSONSerialization.data(withJSONObject: body, options: \[])
} catch {
completion(.failure(error))
return
}
// Perform the request
let task = URLSession.shared.dataTask(with: request) { \_, response, error in
// Handle network or connection errors
if let error = error {
completion(.failure(error))
return
}
do {
if let json = try JSONSerialization.jsonObject(with: data, options: \[]) as? [String: Any],
let authToken = json["authToken"] as? String {
completion(.success(authToken))
} else {
let parsingError = NSError(domain: "", code: 0, userInfo: [NSLocalizedDescriptionKey : "Failed to parse JSON or authToken is missing"])
completion(.failure(parsingError))
}
} catch {
completion(.failure(error))
}
}
// Start the network call
task.resume()
}
```
On the back end, you'll start a Prove flow with a call to the `Start()` function. This function takes these required parameters:
* `flowType`: either `desktop` or `mobile` to describe which type of device the customer is starting their flow on.
* `finalTargetURL`: required when `flowType=desktop`. This should be a URL you maintain. Once the customer clicks the Instant Link, they will be redirected to this URL. It should instruct the customer to continue the workflow. Maximum length is 128 characters.
These parameters are optional:
* `ssn`: full or last four digits of the customer's social security number. You can pass it into `Start()` or `Challenge()`.
* `dob`: date of birth in one of these formats: `YYYY-MM-DD`, `YYYY-MM`, `MM-DD`. You can pass it into `Start()` or `Challenge()`.
* `allowOTPRetry`: set to `true` to allow the customer to re-enter the OTP up to three times. Defaults to `false`.
For OTP retries, make sure to implement client SDK changes in the next step.
```go Go theme={"dark"}
ctx := context.TODO()
rspStart, err := client.V3.V3StartRequest(ctx, &components.V3StartRequest{
FlowType: "desktop",
FinalTargetURL: provesdkservergo.String("https://prove.com"),
PhoneNumber: provesdkservergo.String("2001001686"),
Ssn: provesdkservergo.String("8370"),
})
if err != nil {
t.Fatal(err)
}
```
```typescript TypeScript theme={"dark"}
const startReq = {
flowType: 'desktop',
finalTargetUrl: 'https://prove.com',
phoneNumber: '2001001686',
ssn: '8370',
};
const rspStart = await sdk.v3.v3StartRequest(startReq);
```
```java Java theme={"dark"}
V3StartRequest req = V3StartRequest.builder()
.flowType("desktop")
.finalTargetUrl("https://prove.com")
.phoneNumber("2001001686")
.ssn("8370")
.build();
V3StartRequestResponse startReqResp = sdk.v3().v3StartRequest()
.request(req)
.call();
V3StartResponse startResponse = startReqResp.v3StartResponse().get();
```
```csharp .NET theme={"dark"}
using Prove.Proveapi;
using Prove.Proveapi.Models.Components;
var sdk = new ProveAPI(auth: "");
V3StartRequest req = new V3StartRequest() {
FinalTargetUrl = "https://www.example.com",
FlowType = "desktop",
PhoneNumber = "2001001693",
Ssn = "0596",
AllowOTPRetry = true,
};
var res = await sdk.V3.V3StartRequestAsync(req);
```
```go Go theme={"dark"}
// Send the start request.
rspStart, err := client.V3.V3StartRequest(context.TODO(), &components.V3StartRequest{
FlowType: "desktop",
FinalTargetURL: provesdkservergo.String("https://www.example.com"),
AllowOTPRetry: true,
})
if err != nil {
return fmt.Errorf("error on Start: %w", err)
}
```
```typescript TypeScript theme={"dark"}
let startReq = {
flowType: 'desktop',
finalTargetUrl: 'https://www.example.com',
allowOTPRetry: true,
}
// Send the start request.
const rspStart = await sdk.v3.v3StartRequest(startReq);
if (!rspStart) {
console.error("Start error.")
return
}
```
```java Java theme={"dark"}
// Send the start request.
V3StartRequest req = V3StartRequest.builder()
.flowType("desktop")
.finalTargetUrl("https://www.example.com")
.allowOTPRetry(true)
.build();
// You may want to use the .get() method when working with the response object.
```
```csharp .NET theme={"dark"}
using Prove.Proveapi;
using Prove.Proveapi.Models.Components;
var sdk = new ProveAPI(auth: "");
V3StartRequest req = new V3StartRequest() {
FinalTargetUrl = "https://www.example.com",
FlowType = "desktop",
AllowOTPRetry = true,
};
var res = await sdk.V3.V3StartRequestAsync(req);
```
The function returns the following fields:
* `authToken`: send this to your client-side code through the `Authenticate()` function - it's a JSON Web Token (JWT) tied to the current flow and used for the possession checks. It expires after 15 minutes.
* `correlationId`: save this in your current session, then pass it in to each of the `Validate()`, `Challenge()`, and `Complete()` function calls of the same flow. The correlation ID ties together different system calls for the same Prove flow. It can aids in troubleshooting. The session expires in 15 minutes from when the correlation ID returns from the `Start()` call.
* `next`: map of the next API call you need to make.
Return the `authToken` in a response to the front end.
Once you have the `authToken`, build the authenticator for both the mobile and desktop flows.
```javascript JavaScript theme={"dark"}
async function authenticate(isMobileWeb, authToken) {
// Set up the authenticator for either mobile or desktop flow.
let builder = new proveAuth.AuthenticatorBuilder();
if (isMobileWeb) {
// Set up Mobile Auth and OTP.
builder = builder
.withAuthFinishStep((input) => verify(input.authId))
.withMobileAuthImplementation("fetch")
.withOtpFallback(otpStart, otpFinish);
} else {
// Set up Instant Link.
builder = builder
.withAuthFinishStep((input) => verify(input.authId))
.withInstantLinkFallback(instantLink)
.withRole("secondary");
}
const authenticator = builder.build();
// Authenticate with the authToken.
return authenticator.authenticate(authToken);
}
```
```typescript TypeScript theme={"dark"}
async function authenticate(isMobileWeb: boolean, authToken: string) {
// Set up the authenticator for either mobile or desktop flow.
let builder = new proveAuth.AuthenticatorBuilder();
if (isMobileWeb) {
// Set up Mobile Auth and OTP.
builder = builder
.withAuthFinishStep((input) => verify(input.authId))
.withMobileAuthImplementation("fetch")
.withOtpFallback(otpStart, otpFinish);
} else {
// Set up Instant Link.
builder = builder
.withAuthFinishStep((input) => verify(input.authId))
.withInstantLinkFallback(instantLink)
.withRole("secondary");
}
const authenticator = builder.build();
// Authenticate with the authToken.
return authenticator.authenticate(authToken);
}
```
## Configure OTP
To use the Resend/Retry/Phone Change features, you need to install the Web SDK version 2.15.1 or later.
To set the One-Time Password (OTP) handler, `withOtpFallback(startStep: OtpStartStep | OtpStartStepFn, finishStep: OtpFinishStep | OtpFinishStepFn)`, requires implementing the `OtpStartStep` and `OtpFinishStep`. When returning the phone number in the functions, ensure you return an object with the field `phoneNumber` to the `resolve()` function.
The OTP session has a two minute timeout from when it's sent through Short Message Service (SMS) to when the customer can enter in the OTP.
Follow these instructions if you are implementing OTP and you are passing in the phone number on the `/v3/start` endpoint. In this case, you've already prompted for a phone number so you don't need to prompt for it in the client SDK.
Since you passed the phone number in the `Start()` function, call `resolve(null)` to communicate to the SDK you have the customer's agreement to deliver the SMS message. Ensure you return an object to `resolve()` function.
```javascript JavaScript theme={"dark"}
function otpStartStep(phoneNumberNeeded, phoneValidationError) {
return new Promise((resolve, reject) => {
// Since no phone number is needed, don't prompt the user.
resolve(null);
});
}
```
```typescript TypeScript theme={"dark"}
const otpStartStep: OtpStartStep = {
execute: async (
phoneNumberNeeded: boolean,
phoneValidationError?: PhoneValidationError
): Promise => {
return new Promise((resolve, reject) => {
// Since no phone number is needed, don't prompt the user.
resolve(null);
});
},
};
```
Call the `reject('some error message')` method to communicate to the SDK any issues while trying to obtain the phone number or the OTP. Report an error if the customer cancels the SMS transaction or presses the back button to leave the screen.
In the finish step, call the `resolve(result: OtpFinishResult)` method to return the collected OTP value in which `result` variable has `OnSuccess` value for `OtpFinishResultType` and the OTP value wrapped in `OtpFinishInput`.
```javascript JavaScript theme={"dark"}
function otpFinishStep(otpError) {
return new Promise((resolve, reject) => {
// If error message is found, handle it.
if (otpError) {
// Set to a variable and display it in a field.
// In this example, we don't do anything with the error.
var someErrorMessage = otpError.message;
}
// Prompt the user for whether they received the SMS.
// Typically, this is a page that shows the OTP already. We are simplifying
// it by requiring an input.
var input = confirm('Did you receive a text message?');
if (!input) {
// Close the modal if a text message was not received.
return;
}
// Prompt the user for the OTP.
var otp = prompt('Enter OTP code:');
if (otp) {
// If the input is valid and the user clicked `OK`, return the OTP.
resolve({
input: { otp }, // OTP value
resultType: 0, // OnSuccess enum type = 0
});
} else {
// Else, exit the flow.
reject('phone invalid or user cancelled');
}
});
}
```
```typescript TypeScript theme={"dark"}
const otpFinishStep: OtpFinishStep = {
execute: async (otpError?: OtpError): Promise => {
return new Promise((resolve, reject) => {
// If error message is found, handle it.
if (otpError) {
// Set to a variable and display it in a field.
// In this example, we don't do anything with the error.
var someErrorMessage = otpError.message;
}
// Prompt the user for whether they received the SMS.
// Typically, this is a page that shows the OTP already. We are simplifying
// it by requiring an input.
var input = confirm('Did you receive a text message?');
if (!input) {
// Close the modal if a text message was not received.
return;
}
// Prompt the user for the OTP.
var otp = prompt('Enter OTP code:');
if (otp) {
// If the input is valid and the user clicked `OK`, return the OTP.
resolve({
input: { otp }, // OTP value
resultType: OtpFinishResultType.OnSuccess,
});
} else {
// Else, exit the flow.
reject('phone invalid or user cancelled');
}
});
},
};
```
Follow these instructions if implementing MobileAuth and collecting the phone number only if MobileAuth fails. This will implement OTP without allowing for SMS resends and phone number changes. If you do want those capabilities, please reference the subsequent tabs (Resend, Retry OTP, and Phone Number Change).
In the start step, call the `resolve(input: OtpStartInput)` method to return the collected phone number to the SDK.
```javascript JavaScript theme={"dark"}
function otpStartStep(phoneNumberNeeded, phoneValidationError) {
return new Promise((resolve, reject) => {
// If no phone number is needed, then don't prompt the user.
if (!phoneNumberNeeded) {
resolve(null);
return;
}
// If error message is found around phone number, handle it.
// The `phoneValidationError` is ONLY available when `phoneNumberNeeded`
// has a value.
if (phoneValidationError) {
// Set to a variable and display it in a field.
// In this example, we don't do anything with the error.
var someErrorMessage = phoneValidationError.message;
}
// Prompt the user for the phone number.
var input = prompt('Enter phone number:');
if (input) {
// If the input is valid and the user clicked `OK`, return the phone
// number.
resolve({
phoneNumber: input,
});
} else {
// Else, exit the flow.
reject('phone invalid or user cancelled');
}
});
}
```
```typescript TypeScript theme={"dark"}
const otpPromptStartStep: OtpStartStep = {
execute: async (
phoneNumberNeeded: boolean,
phoneValidationError?: PhoneValidationError
): Promise => {
return new Promise((resolve, reject) => {
// If no phone number is needed, then don't prompt the user.
if (!phoneNumberNeeded) {
resolve(null);
return;
}
// If error message is found around phone number, handle it.
// The `phoneValidationError` is ONLY available when `phoneNumberNeeded`
// has a value.
if (phoneValidationError) {
// Set to a variable and display it in a field.
// In this example, we don't do anything with the error.
var someErrorMessage = phoneValidationError.message;
}
// Prompt the user for the phone number.
var input = prompt('Enter phone number:');
if (input) {
// If the input is valid and the user clicked `OK`, return the phone
// number.
resolve({
phoneNumber: input,
});
} else {
// Else, exit the flow.
reject('phone invalid or user cancelled');
}
});
},
};
```
The finish step is implemented the same as the previous tab:
```javascript JavaScript theme={"dark"}
function otpFinishStep(otpError) {
return new Promise((resolve, reject) => {
// If error message is found, handle it.
if (otpError) {
// Set to a variable and display it in a field.
// In this example, we don't do anything with the error.
var someErrorMessage = otpError.message;
}
// Prompt the user for whether they received the SMS.
// Typically, this is a page that shows the OTP already. We are simplifying
// it by requiring an input.
var input = confirm('Did you receive a text message?');
if (!input) {
// Close the modal if a text message was not received.
return;
}
// Prompt the user for the OTP.
var otp = prompt('Enter OTP code:');
if (otp) {
// If the input is valid and the user clicked `OK`, return the OTP.
resolve({
input: { otp }, // OTP value
resultType: 0, // OnSuccess enum type = 0
});
} else {
// Else, exit the flow.
reject('phone invalid or user cancelled');
}
});
}
```
```typescript TypeScript theme={"dark"}
const otpFinishStep: OtpFinishStep = {
execute: async (otpError?: OtpError): Promise => {
return new Promise((resolve, reject) => {
// If error message is found, handle it.
if (otpError) {
// Set to a variable and display it in a field.
// In this example, we don't do anything with the error.
var someErrorMessage = otpError.message;
}
// Prompt the user for whether they received the SMS.
// Typically, this is a page that shows the OTP already. We are simplifying
// it by requiring an input.
var input = confirm('Did you receive a text message?');
if (!input) {
// Close the modal if a text message was not received.
return;
}
// Prompt the user for the OTP.
var otp = prompt('Enter OTP code:');
if (otp) {
// If the input is valid and the user clicked `OK`, return the OTP.
resolve({
input: { otp }, // OTP value
resultType: OtpFinishResultType.OnSuccess,
});
} else {
// Else, exit the flow.
reject('phone invalid or user cancelled');
}
});
},
};
```
Follow these instructions to allow the customer to request a new OTP via SMS using the same phone number. There is a max of three send attempts including the initial message.
The start step is implemented the same as the previous tab:
```javascript JavaScript theme={"dark"}
function otpStartStep(phoneNumberNeeded, phoneValidationError) {
return new Promise((resolve, reject) => {
// If no phone number is needed, then don't prompt the user.
if (!phoneNumberNeeded) {
resolve(null);
return;
}
// If error message is found around phone number, handle it.
// The `phoneValidationError` is ONLY available when `phoneNumberNeeded`
// has a value.
if (phoneValidationError) {
// Set to a variable and display it in a field.
// In this example, we don't do anything with the error.
var someErrorMessage = phoneValidationError.message;
}
// Prompt the user for the phone number.
var input = prompt('Enter phone number:');
if (input) {
// If the input is valid and the user clicked `OK`, return the phone
// number.
resolve({
phoneNumber: input,
});
} else {
// Else, exit the flow.
reject('phone invalid or user cancelled');
}
});
}
```
```typescript TypeScript theme={"dark"}
const otpPromptStartStep: OtpStartStep = {
execute: async (
phoneNumberNeeded: boolean,
phoneValidationError?: PhoneValidationError
): Promise => {
return new Promise((resolve, reject) => {
// If no phone number is needed, then don't prompt the user.
if (!phoneNumberNeeded) {
resolve(null);
return;
}
// If error message is found around phone number, handle it.
// The `phoneValidationError` is ONLY available when `phoneNumberNeeded`
// has a value.
if (phoneValidationError) {
// Set to a variable and display it in a field.
// In this example, we don't do anything with the error.
var someErrorMessage = phoneValidationError.message;
}
// Prompt the user for the phone number.
var input = prompt('Enter phone number:');
if (input) {
// If the input is valid and the user clicked `OK`, return the phone
// number.
resolve({
phoneNumber: input,
});
} else {
// Else, exit the flow.
reject('phone invalid or user cancelled');
}
});
},
};
```
You can then send a new OTP SMS to the same phone number by implementing the finish step like this:
```javascript JavaScript theme={"dark"}
function otpFinishStep(otpError) {
return new Promise((resolve, reject) => {
// If error message is found, handle it.
if (otpError) {
// Set to a variable and display it in a field.
// In this example, we don't do anything with the error.
var someErrorMessage = otpError.message;
}
// Prompt the user for whether they received the SMS.
// Typically, this is a page that shows the OTP already. We are simplifying
// it by requiring an input.
var input = confirm('Did you receive a text message?');
if (!input) {
// If `Cancel`, then resend to the same phone number.
resolve({
resultType: 1, // OnResendOtp enum type = 1
});
return;
}
// Prompt the user for the OTP.
var otp = prompt('Enter OTP code:');
if (otp) {
// If the input is valid and the user clicked `OK`, return the OTP.
resolve({
input: { otp }, // OTP value
resultType: 0, // OnSuccess enum type = 0
});
} else {
// Else, exit the flow.
reject('phone invalid or user cancelled');
}
});
}
```
```typescript TypeScript theme={"dark"}
const otpMultipleResendFinishStep: OtpFinishStep = {
execute: async (otpError?: OtpError): Promise => {
return new Promise((resolve, reject) => {
// If error message is found, handle it.
if (otpError) {
// Set to a variable and display it in a field.
// In this example, we don't do anything with the error.
var someErrorMessage = otpError.message;
}
// Prompt the user for whether they received the SMS.
// Typically, this is a page that shows the OTP already. We are simplifying
// it by requiring an input.
var input = confirm('Did you receive a text message?');
if (!input) {
// If `Cancel`, then resend to the same phone number.
resolve({
resultType: 1, // OnResendOtp enum type = 1
});
return;
}
// Prompt the user for the OTP.
var otp = prompt('Enter OTP code:');
if (otp) {
// If the input is valid and the user clicked `OK`, return the OTP.
resolve({
input: { otp }, // OTP value
resultType: OtpFinishResultType.OnSuccess,
});
} else {
// Else, exit the flow.
reject('phone invalid or user cancelled');
}
});
},
};
```
Follow these instructions to allow the customer to re-enter the OTP PIN if they type it wrong. There is a max of 3 attempts. To implement this functionality, you also need to pass in `allowOTPRetry=true` to the `/v3/start` endpoint.
The start step is implemented the same as either of the the previous tabs - no client side code changes necessary:
```javascript JavaScript theme={"dark"}
function otpStartStep(phoneNumberNeeded, phoneValidationError) {
return new Promise((resolve, reject) => {
// If no phone number is needed, then don't prompt the user.
if (!phoneNumberNeeded) {
resolve(null);
return;
}
// If error message is found around phone number, handle it.
// The `phoneValidationError` is ONLY available when `phoneNumberNeeded`
// has a value.
if (phoneValidationError) {
// Set to a variable and display it in a field.
// In this example, we don't do anything with the error.
var someErrorMessage = phoneValidationError.message;
}
// Prompt the user for the phone number.
var input = prompt('Enter phone number:');
if (input) {
// If the input is valid and the user clicked `OK`, return the phone
// number.
resolve({
phoneNumber: input,
});
} else {
// Else, exit the flow.
reject('phone invalid or user cancelled');
}
});
}
```
```typescript TypeScript theme={"dark"}
const otpPromptStartStep: OtpStartStep = {
execute: async (
phoneNumberNeeded: boolean,
phoneValidationError?: PhoneValidationError
): Promise => {
return new Promise((resolve, reject) => {
// If no phone number is needed, then don't prompt the user.
if (!phoneNumberNeeded) {
resolve(null);
return;
}
// If error message is found around phone number, handle it.
// The `phoneValidationError` is ONLY available when `phoneNumberNeeded`
// has a value.
if (phoneValidationError) {
// Set to a variable and display it in a field.
// In this example, we don't do anything with the error.
var someErrorMessage = phoneValidationError.message;
}
// Prompt the user for the phone number.
var input = prompt('Enter phone number:');
if (input) {
// If the input is valid and the user clicked `OK`, return the phone
// number.
resolve({
phoneNumber: input,
});
} else {
// Else, exit the flow.
reject('phone invalid or user cancelled');
}
});
},
};
```
The finish step is implemented the same as either of the the previous tabs - no client side code changes necessary. If the OTP is invalid, the finish step will be called again to prompt the user for a new input. Once the max attempts is reached, the `AuthFinish` function will be called.
```javascript JavaScript theme={"dark"}
function otpFinishStep(otpError) {
return new Promise((resolve, reject) => {
// If error message is found, handle it.
if (otpError) {
// Set to a variable and display it in a field.
// In this example, we don't do anything with the error.
var someErrorMessage = otpError.message;
}
// Prompt the user for whether they received the SMS.
// Typically, this is a page that shows the OTP already. We are simplifying
// it by requiring an input.
var input = confirm('Did you receive a text message?');
if (!input) {
// Close the modal if a text message was not received.
return;
}
// Prompt the user for the OTP.
var otp = prompt('Enter OTP code:');
if (otp) {
// If the input is valid and the user clicked `OK`, return the OTP.
resolve({
input: { otp }, // OTP value
resultType: 0, // OnSuccess enum type = 0
});
} else {
// Else, exit the flow.
reject('phone invalid or user cancelled');
}
});
}
```
```typescript TypeScript theme={"dark"}
const otpFinishStep: OtpFinishStep = {
execute: async (otpError?: OtpError): Promise => {
return new Promise((resolve, reject) => {
// If error message is found, handle it.
if (otpError) {
// Set to a variable and display it in a field.
// In this example, we don't do anything with the error.
var someErrorMessage = otpError.message;
}
// Prompt the user for whether they received the SMS.
// Typically, this is a page that shows the OTP already. We are simplifying
// it by requiring an input.
var input = confirm('Did you receive a text message?');
if (!input) {
// Close the modal if a text message was not received.
return;
}
// Prompt the user for the OTP.
var otp = prompt('Enter OTP code:');
if (otp) {
// If the input is valid and the user clicked `OK`, return the OTP.
resolve({
input: { otp }, // OTP value
resultType: OtpFinishResultType.OnSuccess,
});
} else {
// Else, exit the flow.
reject('phone invalid or user cancelled');
}
});
},
};
```
Follow these instructions to allow the customer to re-enter their phone number. There is a max of three entries/send attempts.
Manual Request Required
To enable phone number change capabilities on your credentials, contact your Prove representative.
The start step is implemented the same as the previous tab:
```javascript JavaScript theme={"dark"}
function otpStartStep(phoneNumberNeeded, phoneValidationError) {
return new Promise((resolve, reject) => {
// If no phone number is needed, then don't prompt the user.
if (!phoneNumberNeeded) {
resolve(null);
return;
}
// If error message is found around phone number, handle it.
// The `phoneValidationError` is ONLY available when `phoneNumberNeeded`
// has a value.
if (phoneValidationError) {
// Set to a variable and display it in a field.
// In this example, we don't do anything with the error.
var someErrorMessage = phoneValidationError.message;
}
// Prompt the user for the phone number.
var input = prompt('Enter phone number:');
if (input) {
// If the input is valid and the user clicked `OK`, return the phone
// number.
resolve({
phoneNumber: input,
});
} else {
// Else, exit the flow.
reject('phone invalid or user cancelled');
}
});
}
```
```typescript TypeScript theme={"dark"}
const otpPromptStartStep: OtpStartStep = {
execute: async (
phoneNumberNeeded: boolean,
phoneValidationError?: PhoneValidationError
): Promise => {
return new Promise((resolve, reject) => {
// If no phone number is needed, then don't prompt the user.
if (!phoneNumberNeeded) {
resolve(null);
return;
}
// If error message is found around phone number, handle it.
// The `phoneValidationError` is ONLY available when `phoneNumberNeeded`
// has a value.
if (phoneValidationError) {
// Set to a variable and display it in a field.
// In this example, we don't do anything with the error.
var someErrorMessage = phoneValidationError.message;
}
// Prompt the user for the phone number.
var input = prompt('Enter phone number:');
if (input) {
// If the input is valid and the user clicked `OK`, return the phone
// number.
resolve({
phoneNumber: input,
});
} else {
// Else, exit the flow.
reject('phone invalid or user cancelled');
}
});
},
};
```
You can prompt for a new phone numberby implementing the finish step like this:
```javascript JavaScript theme={"dark"}
function otpFinishStep(otpError) {
return new Promise((resolve, reject) => {
// If error message is found, handle it.
if (otpError) {
// Set to a variable and display it in a field.
// In this example, we don't do anything with the error.
var someErrorMessage = otpError.message;
}
// Prompt the user for whether they received the SMS.
// Typically, this is a page that shows the OTP already. We are simplifying
// it by requiring an input.
var input = confirm('Did you receive a text message?');
if (!input) {
// If `Cancel`, then trigger the otpStartStep to re-prompt for
// phone number.
resolve({
resultType: 2, // OnMobileNumberChange enum type = 2
});
return;
}
// Prompt the user for the OTP.
var otp = prompt('Enter OTP code:');
if (otp) {
// If the input is valid and the user clicked `OK`, return the OTP.
resolve({
input: { otp }, // OTP value
resultType: 0, // OnSuccess enum type = 0
});
} else {
// Else, exit the flow.
reject('phone invalid or user cancelled');
}
});
}
```
```typescript TypeScript theme={"dark"}
const otpPhoneChangeFinishStep: OtpFinishStep = {
execute: async (otpError?: OtpError): Promise => {
return new Promise((resolve, reject) => {
// If error message is found, handle it.
if (otpError) {
// Set to a variable and display it in a field.
// In this example, we don't do anything with the error.
var someErrorMessage = otpError.message;
}
// Prompt the user for whether they received the SMS.
// Typically, this is a page that shows the OTP already. We are simplifying
// it by requiring an input.
var input = confirm('Did you receive a text message?');
if (!input) {
// If `Cancel`, then trigger the otpStartStep to re-prompt for
// phone number.
resolve({
resultType: 2, // OnMobileNumberChange enum type = 2
});
return;
}
// Prompt the user for the OTP.
var otp = prompt('Enter OTP code:');
if (otp) {
// If the input is valid and the user clicked `OK`, return the OTP.
resolve({
input: { otp }, // OTP value
resultType: OtpFinishResultType.OnSuccess,
});
} else {
// Else, exit the flow.
reject('phone invalid or user cancelled');
}
});
},
};
```
## Configure Instant Link
To use the Resend/Retry/Phone Change features, you need to install the Web SDK version 2.15.1 or later.
To set the Instant Link handler, `withInstantLinkFallback(startStep: InstantLinkStartStep | InstantLinkStartStepFn, retryStep?: InstantLinkRetryStep | InstantLinkRetryStepFn)` requires implementing the `InstantLinkStartStep` interface and optionally the `InstantLinkRetryStep` interface if you wish for advanced capabilities. When returning the phone number in the functions, ensure you return an object with the field `phoneNumber` to the `resolve()` function.
The Instant Link session has a three minute timeout from when it's sent through Short Message Service (SMS) to when the customer can click the received link.
Follow these instructions if you are implementing Instant Link and you are passing in the phone number on the `/v3/start` endpoint. In this case, you've already prompted for a phone number so you don't need to prompt for it in the client SDK.
Since you passed the phone number in the `Start()` function, call `resolve(null)` to communicate to the SDK you have the customer's agreement to deliver the SMS message. Ensure you return an object to `resolve()` function.
```javascript JavaScript theme={"dark"}
function instantLinkStartStep(phoneNumberNeeded, phoneValidationError) {
return new Promise((resolve, reject) => {
// Since no phone number is needed, don't prompt the user.
resolve(null);
});
}
```
```typescript TypeScript theme={"dark"}
const instantLinkNoPromptStartStep: InstantLinkStartStep = {
execute: async (
phoneNumberNeeded: boolean,
phoneValidationError?: PhoneValidationError
): Promise => {
return new Promise((resolve, reject) => {
// Since no phone number is needed, don't prompt the user.
resolve(null);
});
},
};
```
Follow these instructions if implementing MobileAuth and collecting the phone number for desktop. This will implement Instant Link without allowing for SMS resends and phone number changes. If you do want those capabilities, please reference the subsequent tabs (Resend and Phone Number Change).
Call the `resolve(input: InstantStartInput)` method to return the collected phone number to the SDK.
Call the `reject('some error message')` method to communicate to the SDK any issues while trying to obtain the phone number. Report an error if the customer cancels the Instant Link transaction or presses the back button to leave the Instant Link start step dialog.
```javascript JavaScript theme={"dark"}
function instantLinkStartStep(phoneNumberNeeded, phoneValidationError) {
return new Promise((resolve, reject) => {
// If no phone number is needed, then don't prompt the user.
if (!phoneNumberNeeded) {
resolve(null);
return;
}
// If error message is found around phone number, handle it.
// The `phoneValidationError` is ONLY available when `phoneNumberNeeded`
// has a value.
if (phoneValidationError) {
// Set to a variable and display it in a field.
// In this example, we don't do anything with the error.
var someErrorMessage = phoneValidationError.message;
}
// Prompt the user for the phone number.
var input = prompt('Enter phone number:');
if (input) {
// If the input is valid and the user clicked `OK`, return the phone
// number.
resolve({
phoneNumber: input,
});
} else {
// Else, exit the flow.
reject('phone invalid or user cancelled');
}
});
}
```
```typescript TypeScript theme={"dark"}
const instantLinkStartStep: InstantLinkStartStep = {
execute: async (
phoneNumberNeeded: boolean,
phoneValidationError?: PhoneValidationError
): Promise => {
return new Promise((resolve, reject) => {
// If no phone number is needed, then don't prompt the user.
if (!phoneNumberNeeded) {
resolve(null);
return;
}
// If error message is found around phone number, handle it.
// The `phoneValidationError` is ONLY available when `phoneNumberNeeded`
// has a value.
if (phoneValidationError) {
// Set to a variable and display it in a field.
// In this example, we don't do anything with the error.
var someErrorMessage = phoneValidationError.message;
}
// Prompt the user for the phone number.
var input = prompt('Enter phone number:');
if (input) {
// If the input is valid and the user clicked `OK`, return the phone
// number.
resolve({
phoneNumber: input,
} as InstantLinkStartInput);
} else {
// Else, exit the flow.
reject('phone invalid or user cancelled');
}
});
},
};
```
Follow these instructions to allow the customer to request a new SMS using the same phone number. There is a max of three send attempts including the initial message.
The start step is implemented the same as the previous tab:
```javascript JavaScript theme={"dark"}
function instantLinkStartStep(phoneNumberNeeded, phoneValidationError) {
return new Promise((resolve, reject) => {
// If no phone number is needed, then don't prompt the user.
if (!phoneNumberNeeded) {
resolve(null);
return;
}
// If error message is found around phone number, handle it.
// The `phoneValidationError` is ONLY available when `phoneNumberNeeded`
// has a value.
if (phoneValidationError) {
// Set to a variable and display it in a field.
// In this example, we don't do anything with the error.
var someErrorMessage = phoneValidationError.message;
}
// Prompt the user for the phone number.
var input = prompt('Enter phone number:');
if (input) {
// If the input is valid and the user clicked `OK`, return the phone
// number.
resolve({
phoneNumber: input,
});
} else {
// Else, exit the flow.
reject('phone invalid or user cancelled');
}
});
}
```
```typescript TypeScript theme={"dark"}
const instantLinkStartStep: InstantLinkStartStep = {
execute: async (
phoneNumberNeeded: boolean,
phoneValidationError?: PhoneValidationError
): Promise => {
return new Promise((resolve, reject) => {
// If no phone number is needed, then don't prompt the user.
if (!phoneNumberNeeded) {
resolve(null);
return;
}
// If error message is found around phone number, handle it.
// The `phoneValidationError` is ONLY available when `phoneNumberNeeded`
// has a value.
if (phoneValidationError) {
// Set to a variable and display it in a field.
// In this example, we don't do anything with the error.
var someErrorMessage = phoneValidationError.message;
}
// Prompt the user for the phone number.
var input = prompt('Enter phone number:');
if (input) {
// If the input is valid and the user clicked `OK`, return the phone
// number.
resolve({
phoneNumber: input,
} as InstantLinkStartInput);
} else {
// Else, exit the flow.
reject('phone invalid or user cancelled');
}
});
},
};
```
You can then send a new Instant Link SMS to the same phone number by implementing the `InstantLinkRetryStep` interface, for example:
```javascript JavaScript theme={"dark"}
function instantLinkRetryStep() {
return new Promise((resolve, reject) => {
// There are multiple return options:
// - resolve(0): request resend to the same phone number
// - reject('user clicked cancel'): error out of the possession flow
// Prompt the user for the phone number.
// Typically, this is a page that is automatically closed or redirected
// once the `AuthFinish` function is called. We are simplifying it by
// requiring an input.
var input = confirm('Did you receive a text message?');
if (input) {
// If `OK`, close the modal.
return;
}
// Else `Cancel`, then resend to the same phone number.
resolve(0);
});
}
```
```typescript TypeScript theme={"dark"}
const instantLinkMultipleResendRetryStep: InstantLinkRetryStep = {
execute: async (): Promise => {
return new Promise((resolve, reject) => {
// There are multiple return options:
// - resolve(0): request resend to the same phone number
// - reject('user clicked cancel'): error out of the possession flow
// Prompt the user for the phone number.
// Typically, this is a page that is automatically closed or redirected
// once the `AuthFinish` function is called. We are simplifying it by
// requiring an input.
var input = confirm('Did you receive a text message?');
if (input) {
// If `OK`, close the modal.
return;
}
// Else `Cancel`, then resend to the same phone number.
resolve(InstantLinkResultType.OnResend);
});
},
};
```
Follow these instructions to allow the customer to re-enter their phone number. There is a max of three entries/send attempts.
Manual Request Required
To enable phone number change capabilities on your credentials, contact your Prove representative.
The start step is implemented the same as the previous tab:
```javascript JavaScript theme={"dark"}
function instantLinkStartStep(phoneNumberNeeded, phoneValidationError) {
return new Promise((resolve, reject) => {
// If no phone number is needed, then don't prompt the user.
if (!phoneNumberNeeded) {
resolve(null);
return;
}
// If error message is found around phone number, handle it.
// The `phoneValidationError` is ONLY available when `phoneNumberNeeded`
// has a value.
if (phoneValidationError) {
// Set to a variable and display it in a field.
// In this example, we don't do anything with the error.
var someErrorMessage = phoneValidationError.message;
}
// Prompt the user for the phone number.
var input = prompt('Enter phone number:');
if (input) {
// If the input is valid and the user clicked `OK`, return the phone
// number.
resolve({
phoneNumber: input,
});
} else {
// Else, exit the flow.
reject('phone invalid or user cancelled');
}
});
}
```
```typescript TypeScript theme={"dark"}
const instantLinkStartStep: InstantLinkStartStep = {
execute: async (
phoneNumberNeeded: boolean,
phoneValidationError?: PhoneValidationError
): Promise => {
return new Promise((resolve, reject) => {
// If no phone number is needed, then don't prompt the user.
if (!phoneNumberNeeded) {
resolve(null);
return;
}
// If error message is found around phone number, handle it.
// The `phoneValidationError` is ONLY available when `phoneNumberNeeded`
// has a value.
if (phoneValidationError) {
// Set to a variable and display it in a field.
// In this example, we don't do anything with the error.
var someErrorMessage = phoneValidationError.message;
}
// Prompt the user for the phone number.
var input = prompt('Enter phone number:');
if (input) {
// If the input is valid and the user clicked `OK`, return the phone
// number.
resolve({
phoneNumber: input,
} as InstantLinkStartInput);
} else {
// Else, exit the flow.
reject('phone invalid or user cancelled');
}
});
},
};
```
You can prompt for a new phone number by implementing the `InstantLinkRetryStep` interface, for example:
```javascript JavaScript theme={"dark"}
function instantLinkRetryStep() {
return new Promise((resolve, reject) => {
// There are multiple return options:
// - resolve(0): request resend to the same phone number
// - resolve(1): request phone number change/re-prompt
// - reject('user clicked cancel'): error out of the possession flow
// Prompt the user for the phone number.
// Typically, this is a page that is automatically closed or redirected
// once the `AuthFinish` function is called. We are simplifying it by
// requiring an input.
var input = confirm('Did you receive a text message?');
if (input) {
// If `OK`, close the modal.
return;
}
// Else `Cancel`, then trigger the instantLinkStartStep to re-prompt for
// phone number.
resolve(1);
});
}
```
```typescript TypeScript theme={"dark"}
const instantLinkPhoneChangeRetryStep: InstantLinkRetryStep = {
execute: async (): Promise => {
return new Promise((resolve, reject) => {
// There are multiple return options:
// - resolve(0): request resend to the same phone number
// - resolve(1): request phone number change/re-prompt
// - reject('user clicked cancel'): error out of the possession flow
// Prompt the user for the phone number.
// Typically, this is a page that is automatically closed or redirected
// once the `AuthFinish` function is called. We are simplifying it by
// requiring an input.
var input = confirm('Did you receive a text message?');
if (input) {
// If `OK`, close the modal.
return;
}
// Else `Cancel`, then trigger the instantLinkStartStep to re-prompt for
// phone number.
resolve(InstantLinkResultType.OnMobileNumberChange);
});
},
};
```
## OTP
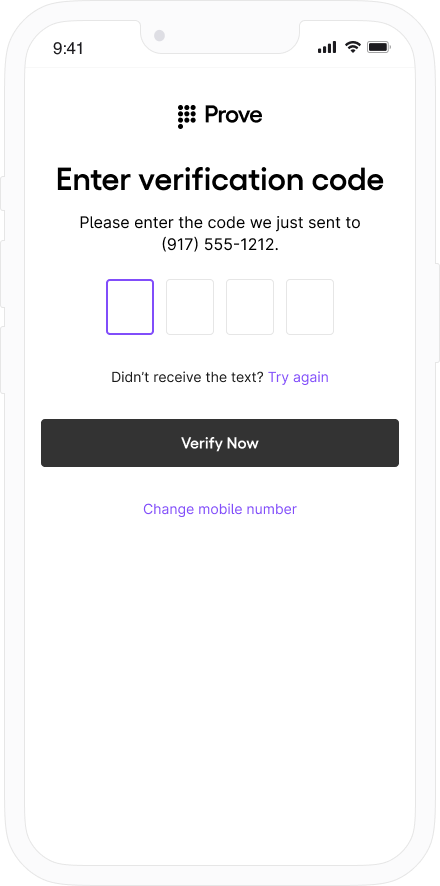 ### Page Summary
| Flow | Page Summary Language |
| :----- | :----------------------------------------------------------------------------- |
| Mobile | Enter verification code. Please enter the code we just sent to (XXX) XXX-XXXX. |
## Instant Link
### Page Summary
| Flow | Page Summary Language |
| :----- | :----------------------------------------------------------------------------- |
| Mobile | Enter verification code. Please enter the code we just sent to (XXX) XXX-XXXX. |
## Instant Link
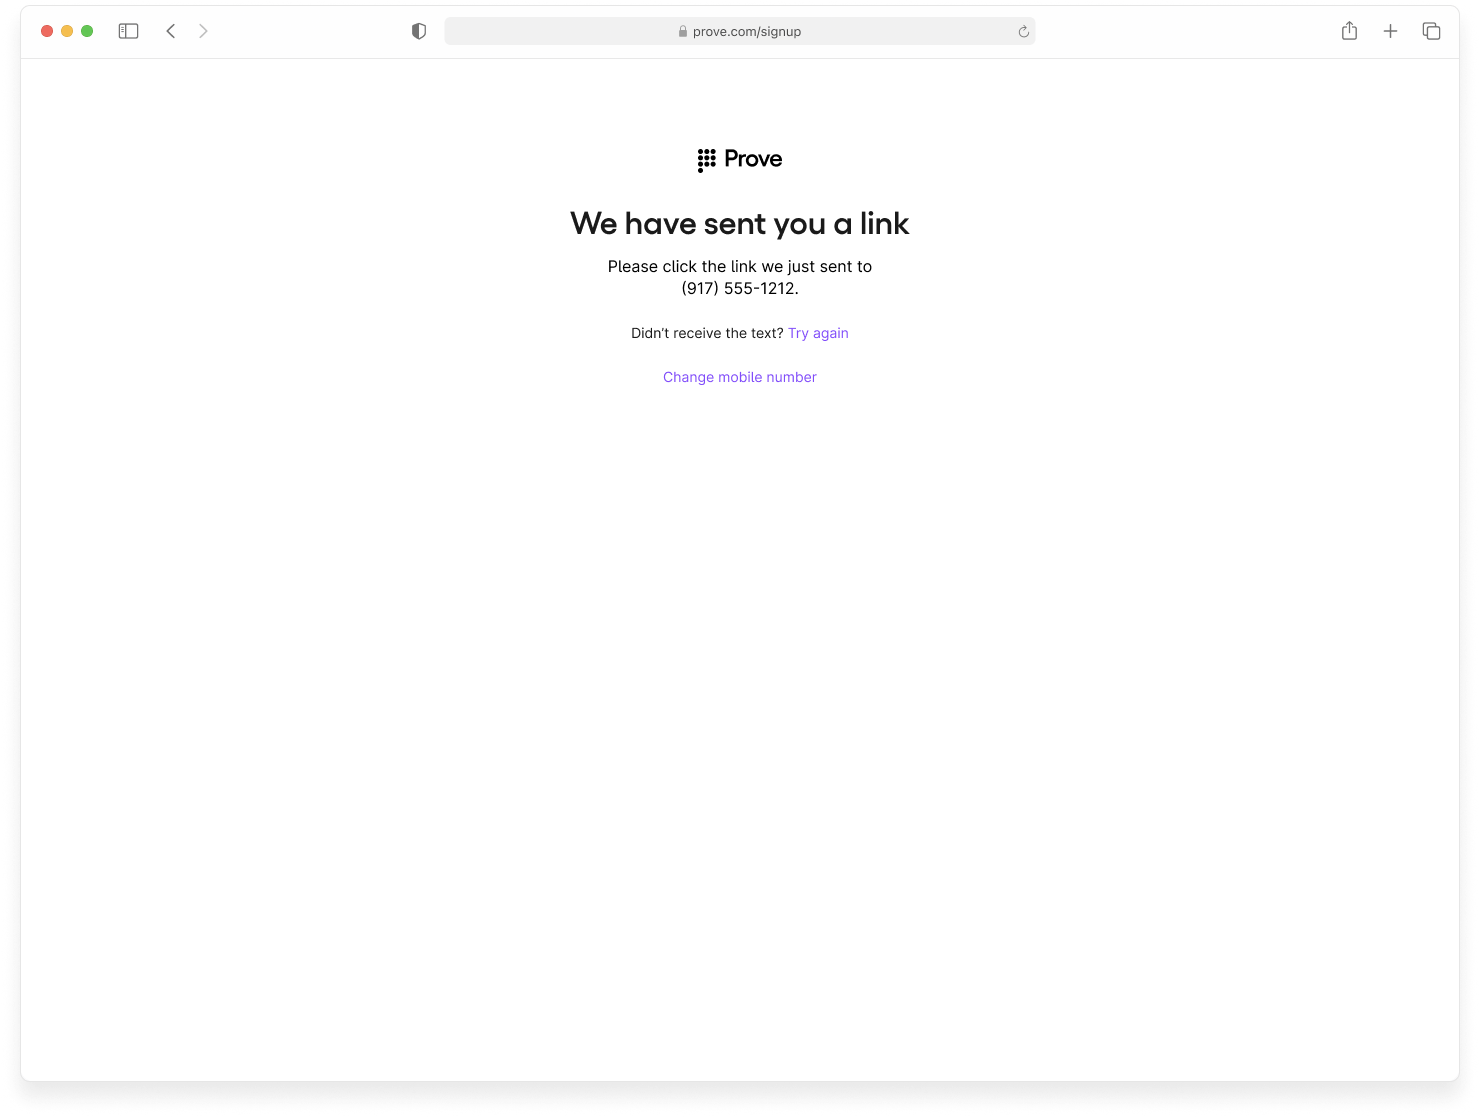 ### Page Summary
| Flow | Page Summary Language |
| :------ | :----------------------------------------------------------------------------------------------------------------------- |
| Desktop | Check your Phone. A text message with a link was just sent to the phone ending in XXXX (last 4 digits of mobile number). |
## Alternate path for customers
If the customer can't authenticate through Instant Link or SMS one-time password (OTP), customer exits the Prove flow. Present a manual application as an alternate method of verification.
In the desktop flow, a WebSocket opens for three minutes on the desktop browser while waiting for the customer to select the link in the text message. Once clicked, the WebSocket closes and the `AuthFinishStep` function finishes.
If you're using [Content Security Policy headers](https://content-security-policy.com/), ensure you allow `wss: device.uat.prove-auth.proveapis.com` and `wss: device.prove-auth.proveapis.com`.
```java Java theme={"dark"}
// Object implementing AuthFinishStep interface
AuthFinishStep authFinishStep = new AuthFinishStep() {
...
};
// Objects implementing OtpStartStep/OtpFinishStep interfaces
OtpStartStep otpStartStep = new OtpStartStep() {
...
};
OtpFinishStep otpFinishStep = new OtpFinishStep() {
...
};
ProveAuth proveAuth = ProveAuth.builder()
.withAuthFinishStep(authId -> verify(authId)) // verify(authId) call defined in #Validate the Mobile Phone section
.withOtpFallback(otpStartStep, otpFinishStep)
.withContext(this)
.build();
```
The cellular data connection can sometimes be unavailable during testing. The `Builder` class offers a `withTestMode(boolean testMode)` method, which permits simulated successful session results while connected to a Wi-Fi network only (without a cellular data connection available). Testing using a Wi-Fi connection is useful in the Sandbox environment.
```java Java theme={"dark"}
ProveAuth proveAuth = ProveAuth.builder()
.withAuthFinishStep(authId -> verify(authId))
.withOtpFallback(otpStartStep, otpFinishStep)
.withContext(this)
.withTestMode(true) // Test mode flag
.build();
```
The application employs an executor service with a minimum of two threads to manage threads due to the SDK’s ability to process concurrent blocking requests.
```java Java theme={"dark"}
public class MyAuthenticator {
private final MyBackendClient backend = new MyBackendClient(); // Backend API client
private final AuthFinishStep authFinishStep = new AuthFinishStep() {
@Override
void execute(String authId) {
try {
AuthFinishResponse response = backend.authFinish("My App", authId);
... // Check the authentication status returned in the response
} catch (IOException e) {
String failureCause = e.getCause() != null ? e.getCause().getMessage() : "Failed to request authentication results";
// Authentication failed due to request failure
}
}
};
private ProveAuth proveAuth;
public MyAuthenticator(Context context) {
proveAuth = ProveAuth.builder()
.withAuthFinishStep(authFinishStep)
.withOtpFallback(otpStartStep, otpFinishStep)
.withContext(context)
.build();
}
public void authenticate() throws IOException, ProveAuthException {
AuthStartResponse response = backend.authStart("My Prove Auth App");
proveAuth.authenticate(response.getAuthToken());
}
}
```
## Configure OTP
To use the Resend/Retry/Phone Change features, you need to install the Android SDK version 6.5.0 or later.
To set the One-Time Password (OTP) handler, `withOtpFallback(otpStart: otpStartStep, otpFinish: otpFinishStep)`, requires implementing the `OtpStartStep` and `OtpFinishStep`.
The OTP session has a two minute timeout from when it's sent through SMS to when the customer can enter in the OTP.
Follow these instructions if you are implementing OTP and you are passing in the phone number on the `/v3/start` endpoint. In this case, you've already prompted for a phone number so you don't need to prompt for it in the client SDK.
Since you passed the phone number in the `Start()` function, call `OtpStartStepCallback.onSuccess(OtpStartInput);` to communicate to the SDK you have the customer's agreement to deliver the SMS message. Ensure you return an instance of `OtpStartInput` with empty string or `null` to `OtpStartStepCallback.onSuccess()` function.
```java Java theme={"dark"}
import com.prove.sdk.proveauth.OtpStartInput;
import com.prove.sdk.proveauth.OtpStartStep;
import com.prove.sdk.proveauth.OtpStartStepCallback;
import com.prove.sdk.proveauth.ProveAuthException;
public class NoPromptStart implements OtpStartStep {
@Override
public void execute(boolean phoneNumberNeeded, ProveAuthException otpException,
OtpStartStepCallback callback) {
// No phone number needed, no need to ask end user for input.
callback.onSuccess(new OtpStartInput(""));
}
}
```
Call the `OtpStartStepCallback.onError();` method to communicate to the SDK any issues while trying to obtain the phone number or the OTP. Report an error if the customer cancels the SMS transaction or presses the back button to leave the screen.
In the finish step, call the `OtpFinishStepCallback.onSuccess(OtpFinishInput);` method to return the collected OTP value wrapped in `OtpFinishInput`.
```java Java theme={"dark"}
import com.prove.sdk.proveauth.OtpFinishInput;
import com.prove.sdk.proveauth.OtpFinishStep;
import com.prove.sdk.proveauth.OtpFinishStepCallback;
import com.prove.sdk.proveauth.OtpValidationException;
import com.prove.sdk.proveauth.ProveAuthException;
public class NoPromptFinish implements OtpFinishStep {
@Override
public void execute(@Nullable ProveAuthException otpException,
OtpFinishStepCallback otpFinishStepCallback) {
// If error message is found, handle it.
if (otpException instanceof OtpValidationException) {
// Set to a variable and display it in a field.
// In this example, we don't do anything with the error.
String errorMsg = otpException.getMessage();
}
try {
// Prompt the user for OTP delivered by SMS. You can build UI to provide
// best UX based on your application and business logic, here we simplify to a
// generic function named promptForOtpCode which gives us the OTP code.
String otpCode = promptForOtpCode();
otpFinishStepCallback.onSuccess(new OtpFinishInput(otpCode));
} catch (Exception e) {
// if any issue with the OTP collection from the end user or the user wants to cancel
// then call onError to exit the flow. In this example we simplify it as catching
// an exception.
otpFinishStepCallback.onError();
}
}
}
```
Follow these instructions if implementing MobileAuth and collecting the phone number only if MobileAuth fails. This will implement OTP without allowing for SMS resends and phone number changes. If you do want those capabilities, please reference the subsequent tabs (Resend, Retry OTP, and Phone Number Change).
In the start step, call the `OtpStartStepCallback.onSuccess(OtpStartInput);` method to return the collected phone number to the SDK.
```java Java theme={"dark"}
import com.prove.sdk.proveauth.OtpStartInput;
import com.prove.sdk.proveauth.OtpStartStep;
import com.prove.sdk.proveauth.OtpStartStepCallback;
import com.prove.sdk.proveauth.PhoneNumberValidationException;
import com.prove.sdk.proveauth.ProveAuthException;
public class PromptStart implements OtpStartStep {
@Override
public void execute(boolean phoneNumberNeeded, @Nullable ProveAuthException otpException,
OtpStartStepCallback callback) {
// If phone number is needed, need to ask the end user for phone number input.
if (phoneNumberNeeded) {
// If error message is found around phone number, handle it.
// The `PhoneNumberValidationException` is ONLY available when `phoneNumberNeeded`
// has a value.
if (otpException instanceof PhoneNumberValidationException) {
// Set to a variable and display it in a field.
// In this example, we don't do anything with the error.
String errorMsg = otpException.getMessage();
}
try {
// Prompt the user for phone number to receive OTP SMS. You can build UI to provide
// best UX based on your application and business logic, here we simplify to a
// generic function named promptForPhoneNumber which gives us the collected
// phone number.
String phoneNumber = promptForPhoneNumber();
callback.onSuccess(new OtpStartInput(phoneNumber));
} catch (Exception e) {
// if any issue with the phone number collection from the end user or the user
// wants to cancel then call onError to exit the flow.
// In this example we simplify it as catching an exception.
callback.onError();
}
} else {
// No phone number needed, no need to ask end user for input.
callback.onSuccess(new OtpStartInput(""));
}
}
}
```
The finish step is implemented the same as the previous tab:
```java Java theme={"dark"}
import com.prove.sdk.proveauth.OtpFinishInput;
import com.prove.sdk.proveauth.OtpFinishStep;
import com.prove.sdk.proveauth.OtpFinishStepCallback;
import com.prove.sdk.proveauth.OtpValidationException;
import com.prove.sdk.proveauth.ProveAuthException;
public class NoPromptFinish implements OtpFinishStep {
@Override
public void execute(@Nullable ProveAuthException otpException,
OtpFinishStepCallback otpFinishStepCallback) {
// If error message is found, handle it.
if (otpException instanceof OtpValidationException) {
// Set to a variable and display it in a field.
// In this example, we don't do anything with the error.
String errorMsg = otpException.getMessage();
}
try {
// Prompt the user for OTP delivered by SMS. You can build UI to provide
// best UX based on your application and business logic, here we simplify to a
// generic function named promptForOtpCode which gives us the OTP code.
String otpCode = promptForOtpCode();
otpFinishStepCallback.onSuccess(new OtpFinishInput(otpCode));
} catch (Exception e) {
// if any issue with the OTP collection from the end user or the user wants to cancel
// then call onError to exit the flow. In this example we simplify it as catching
// an exception.
otpFinishStepCallback.onError();
}
}
}
```
Follow these instructions to allow the customer to request a new OTP via SMS using the same phone number. There is a max of three send attempts including the initial message.
The start step is implemented the same as the previous tab:
```java Java theme={"dark"}
import com.prove.sdk.proveauth.OtpStartInput;
import com.prove.sdk.proveauth.OtpStartStep;
import com.prove.sdk.proveauth.OtpStartStepCallback;
import com.prove.sdk.proveauth.PhoneNumberValidationException;
import com.prove.sdk.proveauth.ProveAuthException;
public class PromptStart implements OtpStartStep {
@Override
public void execute(boolean phoneNumberNeeded, @Nullable ProveAuthException otpException,
OtpStartStepCallback callback) {
// If phone number is needed, need to ask the end user for phone number input.
if (phoneNumberNeeded) {
// If error message is found around phone number, handle it.
// The `PhoneNumberValidationException` is ONLY available when `phoneNumberNeeded`
// has a value.
if (otpException instanceof PhoneNumberValidationException) {
// Set to a variable and display it in a field.
// In this example, we don't do anything with the error.
String errorMsg = otpException.getMessage();
}
try {
// Prompt the user for phone number to receive OTP SMS. You can build UI to provide
// best UX based on your application and business logic, here we simplify to a
// generic function named promptForPhoneNumber which gives us the collected
// phone number.
String phoneNumber = promptForPhoneNumber();
callback.onSuccess(new OtpStartInput(phoneNumber));
} catch (Exception e) {
// if any issue with the phone number collection from the end user or the user
// wants to cancel then call onError to exit the flow.
// In this example we simplify it as catching an exception.
callback.onError();
}
} else {
// No phone number needed, no need to ask end user for input.
callback.onSuccess(new OtpStartInput(""));
}
}
}
```
You can then send a new OTP SMS to the same phone number by implementing the finish step like this:
```java Java theme={"dark"}
import com.prove.sdk.proveauth.OtpFinishInput;
import com.prove.sdk.proveauth.OtpFinishStep;
import com.prove.sdk.proveauth.OtpFinishStepCallback;
import com.prove.sdk.proveauth.OtpValidationException;
import com.prove.sdk.proveauth.ProveAuthException;
public class MultipleResendFinish implements OtpFinishStep {
@Override
public void execute(@Nullable ProveAuthException otpException,
OtpFinishStepCallback otpFinishStepCallback) {
// If error message is found, handle it.
if (otpException instanceof OtpValidationException) {
// Set to a variable and display it in a field.
// In this example, we don't do anything with the error.
String errorMsg = otpException.getMessage();
}
// Prompt the user for whether they received the SMS.
if (promptForResend("Didn't receive the SMS OTP? Click resend button for a new one!")) {
// If the end user wants to send again to the same phone number call onOtpResend().
otpFinishStepCallback.onOtpResend();
return;
}
try {
// Prompt the user for OTP delivered by SMS. You can build UI to provide
// best UX based on your application and business logic, here we simplify to a
// generic function named promptForOtpCode which gives us the OTP code.
String otpCode = promptForOtpCode();
otpFinishStepCallback.onSuccess(new OtpFinishInput(otpCode));
} catch (Exception e) {
// if any issue with the OTP collection from the end user or the user wants to cancel
// then call onError to exit the flow. In this example we simplify it as catching
// an exception.
otpFinishStepCallback.onError();
}
}
}
```
Follow these instructions to allow the customer to re-enter the OTP PIN if they type it wrong. There is a max of 3 attempts. To implement this functionality, you also need to pass in `allowOTPRetry=true` to the `/v3/start` endpoint.
The start step is implemented the same as either of the the previous tabs - no client side code changes necessary:
```java Java theme={"dark"}
import com.prove.sdk.proveauth.OtpStartInput;
import com.prove.sdk.proveauth.OtpStartStep;
import com.prove.sdk.proveauth.OtpStartStepCallback;
import com.prove.sdk.proveauth.PhoneNumberValidationException;
import com.prove.sdk.proveauth.ProveAuthException;
public class PromptStart implements OtpStartStep {
@Override
public void execute(boolean phoneNumberNeeded, @Nullable ProveAuthException otpException,
OtpStartStepCallback callback) {
// If phone number is needed, need to ask the end user for phone number input.
if (phoneNumberNeeded) {
// If error message is found around phone number, handle it.
// The `PhoneNumberValidationException` is ONLY available when `phoneNumberNeeded`
// has a value.
if (otpException instanceof PhoneNumberValidationException) {
// Set to a variable and display it in a field.
// In this example, we don't do anything with the error.
String errorMsg = otpException.getMessage();
}
try {
// Prompt the user for phone number to receive OTP SMS. You can build UI to provide
// best UX based on your application and business logic, here we simplify to a
// generic function named promptForPhoneNumber which gives us the collected
// phone number.
String phoneNumber = promptForPhoneNumber();
callback.onSuccess(new OtpStartInput(phoneNumber));
} catch (Exception e) {
// if any issue with the phone number collection from the end user or the user
// wants to cancel then call onError to exit the flow.
// In this example we simplify it as catching an exception.
callback.onError();
}
} else {
// No phone number needed, no need to ask end user for input.
callback.onSuccess(new OtpStartInput(""));
}
}
}
```
The finish step is implemented the same as either of the the previous tabs - no client side code changes necessary. If the OTP is invalid, the finish step will be called again to prompt the user for a new input. Once the max attempts is reached, the `AuthFinish` function will be called.
```java Java theme={"dark"}
import com.prove.sdk.proveauth.OtpFinishInput;
import com.prove.sdk.proveauth.OtpFinishStep;
import com.prove.sdk.proveauth.OtpFinishStepCallback;
import com.prove.sdk.proveauth.OtpValidationException;
import com.prove.sdk.proveauth.ProveAuthException;
public class NoPromptFinish implements OtpFinishStep {
@Override
public void execute(@Nullable ProveAuthException otpException,
OtpFinishStepCallback otpFinishStepCallback) {
// If error message is found, handle it.
if (otpException instanceof OtpValidationException) {
// Set to a variable and display it in a field.
// In this example, we don't do anything with the error.
String errorMsg = otpException.getMessage();
}
try {
// Prompt the user for OTP delivered by SMS. You can build UI to provide
// best UX based on your application and business logic, here we simplify to a
// generic function named promptForOtpCode which gives us the OTP code.
String otpCode = promptForOtpCode();
otpFinishStepCallback.onSuccess(new OtpFinishInput(otpCode));
} catch (Exception e) {
// if any issue with the OTP collection from the end user or the user wants to cancel
// then call onError to exit the flow. In this example we simplify it as catching
// an exception.
otpFinishStepCallback.onError();
}
}
}
```
Follow these instructions to allow the customer to re-enter their phone number. There is a max of three entries/send attempts.
Manual Request Required
To enable phone number change capabilities on your credentials, contact your Prove representative.
The start step is implemented the same as the previous tab:
```java Java theme={"dark"}
import com.prove.sdk.proveauth.OtpStartInput;
import com.prove.sdk.proveauth.OtpStartStep;
import com.prove.sdk.proveauth.OtpStartStepCallback;
import com.prove.sdk.proveauth.PhoneNumberValidationException;
import com.prove.sdk.proveauth.ProveAuthException;
public class PromptStart implements OtpStartStep {
@Override
public void execute(boolean phoneNumberNeeded, @Nullable ProveAuthException otpException,
OtpStartStepCallback callback) {
// If phone number is needed, need to ask the end user for phone number input.
if (phoneNumberNeeded) {
// If error message is found around phone number, handle it.
// The `PhoneNumberValidationException` is ONLY available when `phoneNumberNeeded`
// has a value.
if (otpException instanceof PhoneNumberValidationException) {
// Set to a variable and display it in a field.
// In this example, we don't do anything with the error.
String errorMsg = otpException.getMessage();
}
try {
// Prompt the user for phone number to receive OTP SMS. You can build UI to provide
// best UX based on your application and business logic, here we simplify to a
// generic function named promptForPhoneNumber which gives us the collected
// phone number.
String phoneNumber = promptForPhoneNumber();
callback.onSuccess(new OtpStartInput(phoneNumber));
} catch (Exception e) {
// if any issue with the phone number collection from the end user or the user
// wants to cancel then call onError to exit the flow.
// In this example we simplify it as catching an exception.
callback.onError();
}
} else {
// No phone number needed, no need to ask end user for input.
callback.onSuccess(new OtpStartInput(""));
}
}
}
```
You can prompt for a new phone number by implementing the finish step like this:
```java Java theme={"dark"}
import com.prove.sdk.proveauth.OtpFinishInput;
import com.prove.sdk.proveauth.OtpFinishStep;
import com.prove.sdk.proveauth.OtpFinishStepCallback;
import com.prove.sdk.proveauth.OtpValidationException;
import com.prove.sdk.proveauth.ProveAuthException;
public class PhoneChangeFinish implements OtpFinishStep {
@Override
public void execute(@Nullable ProveAuthException otpException,
OtpFinishStepCallback otpFinishStepCallback) {
// If error message is found, handle it.
if (otpException instanceof OtpValidationException) {
// Set to a variable and display it in a field.
// In this example, we don't do anything with the error.
String errorMsg = otpException.getMessage();
}
// Prompt the user for whether they received the SMS.
if (promptForPhoneNumberChange("Didn't receive the SMS OTP? Try a different phone number.")) {
// If the end user wants to correct the phone number already in use, or changing to a
// different phone number to receive the future SMS OTP, call onMobileNumberChange(), and
// the otpStartStep will re-prompt for phone number input from the end user.
otpFinishStepCallback.onMobileNumberChange();
return;
}
try {
// Prompt the user for OTP delivered by SMS. You can build UI to provide
// best UX based on your application and business logic, here we simplify to a
// generic function named promptForOtpCode which gives us the OTP code.
String otpCode = promptForOtpCode();
otpFinishStepCallback.onSuccess(new OtpFinishInput(otpCode));
} catch (Exception e) {
// if any issue with the OTP collection from the end user or the user wants to cancel
// then call onError to exit the flow. In this example we simplify it as catching
// an exception.
otpFinishStepCallback.onError();
}
}
}
```
```swift Swift theme={"dark"}
// Object implementing ProveAuthFinishStep protocols
let finishStep = FinishAuthStep()
// Objects implementing OtpStartStep/OtpFinishStep protocols
let otpStartStep = MobileOtpStartStep()
let otpFinishStep = MobileOtpFinishStep()
let proveAuthSdk: ProveAuth
proveAuthSdk = ProveAuth.builder(authFinish: finishStep)
.withOtpFallback(otpStart: otpStartStep, otpFinish: otpFinishStep)
.build()
```
In the event a cellular data connection is unavailable during testing, use the Builder class. It permits simulated successful session results while connected to a Wi-Fi network. Testing using a Wi-Fi connection is useful in the Sandbox environment.
```swift Swift theme={"dark"}
proveAuthSdk = ProveAuth.builder(authFinish: finishStep)
.withMobileAuthTestMode() // Test mode flag
.build()
```
The application employs an executor service with a minimum of two threads to manage threads due to the SDK’s ability to process concurrent blocking requests.
```swift Swift theme={"dark"}
// authToken retrieved from your server via StartAuthRequest
proveAuthSdk.authenticate(authToken) { error in
DispatchQueue.main.async {
self.messages.finalResultMessage = "ProveAuth.authenticate returned error: \(error.localizedDescription)"
print(self.messages.finalResultMessage)
}
}
```
## Configure OTP
To use the Resend/Retry/Phone Change features, you need to install the iOS SDK version 6.5.1 or later.
To set the One-Time Password (OTP) handler, `withOtpFallback(otpStart: otpStartStep, otpFinish: otpFinishStep)`, requires implementing the `OtpStartStep` and `OtpFinishStep`.
The OTP session has a two minute timeout from when it's sent through SMS to when the customer can enter in the OTP.
Follow these instructions if you are implementing OTP and you are passing in the phone number on the `/v3/start` endpoint. In this case, you've already prompted for a phone number so you don't need to prompt for it in the client SDK.
Since you passed the phone number in the `Start()` function, call `callback.onSuccess(input: nil)` to communicate to the SDK you have the customer's agreement to deliver the SMS message.
```swift Swift theme={"dark"}
import Foundation
import ProveAuth
import SwiftUI
class MobileOtpStartStep: OtpStartStep {
@ObservedObject var sheetObservable: SheetObservable
var callback: OtpStartStepCallback?
init(sheetObservable: SheetObservable) {
self.sheetObservable = sheetObservable
}
// Implement this method to handle phone number collection for SMS OTP,
// or to obtain user confirmation for initiating an SMS message.
func execute(
phoneNumberNeeded: Bool, phoneValidationError: ProveAuthError?, callback: OtpStartStepCallback
) {
self.callback = callback
// Since no phone number is needed, don't prompt the user.
callback.onSuccess(input: nil)
}
}
```
Call the `callback.onError()` method to communicate to the SDK any issues while trying to obtain the phone number or the OTP. Report an error if the customer cancels the SMS transaction or presses the back button to leave the screen.
```swift Swift theme={"dark"}
import Foundation
import SwiftUI
import ProveAuth
class MobileOtpFinishStep: OtpFinishStep {
@ObservedObject var sheetObservable: SheetObservable
var callback: OtpFinishStepCallback?
init(sheetObservable: SheetObservable){
self.sheetObservable = sheetObservable
}
// Implement this method to collect the OTP value delivered via SMS.
func execute(otpError: ProveAuthError?, callback: OtpFinishStepCallback) {
self.callback = callback
// Handle the OTP validation error if present.
if case .otpValidationError = otpError {
print("found otpError: \(String(describing: otpError?.localizedDescription))")
// Signal to your UI components that the last provided OTP is invalid
self.sheetObservable.otpError = true
} else {
self.sheetObservable.otpError = false
}
// Signal to UI components to display OtpFinishView
DispatchQueue.main.async {
self.sheetObservable.isOtpFinishActive = true
}
}
// Provide the collected OTP value to the SDK for validation.
func handleOtp(_ otp: String) {
guard let callback = self.callback else {
print("Error: OtpFinishStepCallback is not set ")
return
}
let otpFinishInput = OtpFinishInput(otp: otp)
callback.onSuccess(input: otpFinishInput)
}
// Notify the SDK of any issues encountered while obtaining the OTP value or if the user cancels the OTP flow.
func handleOtpFinishError() {
guard let callback = self.callback else {
print("Error: OtpFinishStepCallback is not set ")
return
}
callback.onError()
}
}
```
Follow these instructions if implementing MobileAuth and collecting the phone number only if MobileAuth fails. This will implement OTP without allowing for SMS resends and phone number changes. If you do want those capabilities, please reference the subsequent tabs (Resend, Retry OTP, and Phone Number Change).
In the start step, call the `callback.onSuccess(input: otpStartInput)` method to return the collected phone number to the SDK.
```swift Swift theme={"dark"}
import Foundation
import ProveAuth
import SwiftUI
class MobileOtpStartStep: OtpStartStep {
@ObservedObject var sheetObservable: SheetObservable
var callback: OtpStartStepCallback?
init(sheetObservable: SheetObservable) {
self.sheetObservable = sheetObservable
}
func execute(
phoneNumberNeeded: Bool, phoneValidationError: ProveAuthError?, callback: OtpStartStepCallback
) {
self.callback = callback
if !phoneNumberNeeded {
// If no phone number is needed, then don't prompt the user.
callback.onSuccess(input: nil)
} else {
DispatchQueue.main.async {
// If a phone number validation error is detected, ensure it is handled to provide feedback to the user.
if case .phoneNumberValidationError = phoneValidationError {
print(
"found phoneValidationError: \(String(describing: phoneValidationError?.localizedDescription))"
)
// Update UI components to display OtpStartView with the phone number validation error.
self.sheetObservable.isPhoneValidationError = true
} else {
self.sheetObservable.isPhoneValidationError = false
}
// Update UI components to display OtpStartView if a phone number is needed.
self.sheetObservable.isOtpStartActive = true
}
}
}
// Return collected phone number to the SDK
func handlePhoneNumber(phoneNumber: String) {
guard let callback = self.callback else {
print("Error: OtpStartStepCallback is not set ")
return
}
let otpStartInput = OtpStartInput(phoneNumber: phoneNumber)
// This is how you pass collected phone number to SDK
callback.onSuccess(input: otpStartInput)
}
// Communicate any issues encountered while trying to obtain the phone number to the SDK.
// Error should be reported if the customer explicitly cancels the SMS OTP transaction
// or presses the back button to exit out the SMS OTP start step screen.
func handleOtpStartError() {
guard let callback = self.callback else {
print("Error: OtpStartStepCallback is not set ")
return
}
callback.onError()
}
}
```
The finish step is implemented the same as the previous tab:
```swift Swift theme={"dark"}
import Foundation
import SwiftUI
import ProveAuth
class MobileOtpFinishStep: OtpFinishStep {
@ObservedObject var sheetObservable: SheetObservable
var callback: OtpFinishStepCallback?
init(sheetObservable: SheetObservable){
self.sheetObservable = sheetObservable
}
// Implement this method to collect the OTP value delivered via SMS.
func execute(otpError: ProveAuthError?, callback: OtpFinishStepCallback) {
self.callback = callback
// Handle the OTP validation error if present.
if case .otpValidationError = otpError {
print("found otpError: \(String(describing: otpError?.localizedDescription))")
// Signal to your UI components that the last provided OTP is invalid
self.sheetObservable.otpError = true
} else {
self.sheetObservable.otpError = false
}
// Signal to UI components to display OtpFinishView
DispatchQueue.main.async {
self.sheetObservable.isOtpFinishActive = true
}
}
// Provide the collected OTP value to the SDK for validation.
func handleOtp(_ otp: String) {
guard let callback = self.callback else {
print("Error: OtpFinishStepCallback is not set ")
return
}
let otpFinishInput = OtpFinishInput(otp: otp)
callback.onSuccess(input: otpFinishInput)
}
// Notify the SDK of any issues encountered while obtaining the OTP value or if the user cancels the OTP flow.
func handleOtpFinishError() {
guard let callback = self.callback else {
print("Error: OtpFinishStepCallback is not set ")
return
}
callback.onError()
}
}
```
Follow these instructions to allow the customer to request a new OTP via SMS using the same phone number. There is a max of three send attempts including the initial message.
The start step is implemented the same as the previous tab:
```swift Swift theme={"dark"}
import Foundation
import ProveAuth
import SwiftUI
class MobileOtpStartStep: OtpStartStep {
@ObservedObject var sheetObservable: SheetObservable
var callback: OtpStartStepCallback?
init(sheetObservable: SheetObservable) {
self.sheetObservable = sheetObservable
}
func execute(
phoneNumberNeeded: Bool, phoneValidationError: ProveAuthError?, callback: OtpStartStepCallback
) {
self.callback = callback
if !phoneNumberNeeded {
// If no phone number is needed, then don't prompt the user.
callback.onSuccess(input: nil)
} else {
DispatchQueue.main.async {
// If a phone number validation error is detected, ensure it is handled to provide feedback to the user.
if case .phoneNumberValidationError = phoneValidationError {
print(
"found phoneValidationError: \(String(describing: phoneValidationError?.localizedDescription))"
)
// Update UI components to display OtpStartView with the phone number validation error.
self.sheetObservable.isPhoneValidationError = true
} else {
self.sheetObservable.isPhoneValidationError = false
}
// Update UI components to display OtpStartView if a phone number is needed.
self.sheetObservable.isOtpStartActive = true
}
}
}
// Return collected phone number to the SDK
func handlePhoneNumber(phoneNumber: String) {
guard let callback = self.callback else {
print("Error: OtpStartStepCallback is not set ")
return
}
let otpStartInput = OtpStartInput(phoneNumber: phoneNumber)
// This is how you pass collected phone number to SDK
callback.onSuccess(input: otpStartInput)
}
// Communicate any issues encountered while trying to obtain the phone number to the SDK.
// Error should be reported if the customer explicitly cancels the SMS OTP transaction
// or presses the back button to exit out the SMS OTP start step screen.
func handleOtpStartError() {
guard let callback = self.callback else {
print("Error: OtpStartStepCallback is not set ")
return
}
callback.onError()
}
}
```
You can then send a new OTP SMS to the same phone number by implementing the finish step like this:
```swift Swift theme={"dark"}
import Foundation
import SwiftUI
import ProveAuth
class MobileOtpFinishStep: OtpFinishStep {
@ObservedObject var sheetObservable: SheetObservable
var callback: OtpFinishStepCallback?
init(sheetObservable: SheetObservable){
self.sheetObservable = sheetObservable
}
// Implement this method to collect the OTP value delivered in the SMS message.
func execute(otpError: ProveAuthError?, callback: OtpFinishStepCallback) {
self.callback = callback
// Handle the OTP validation error if present.
if case .otpValidationError = otpError {
print("found otpError: \(String(describing: otpError?.localizedDescription))")
// Update your UI to indicate that the provided OTP is invalid
self.sheetObservable.otpError = true
} else {
self.sheetObservable.otpError = false
}
// Update your UI to display the OtpFinishView
DispatchQueue.main.async {
self.sheetObservable.isOtpFinishActive = true
}
}
// Return the OTP value to the SDK
func handleOtp(_ otp: String) {
guard let callback = self.callback else {
print("Error: OtpFinishStepCallback is not set ")
return
}
let otpFinishInput = OtpFinishInput(otp: otp)
callback.onSuccess(input: otpFinishInput)
}
// Communicate to the SDK any issues when host app trys to obtain the OTP value
// or when users cancel the OTP flow
func handleOtpFinishError() {
guard let callback = self.callback else {
print("Error: OtpFinishStepCallback is not set ")
return
}
callback.onError()
}
// Call this method to request a new OTP code for the same mobile number.
func sendNewOtp() {
guard let callback = self.callback else {
print("Error: OtpFinishStepCallback is not set ")
return
}
callback.onOtpResend()
}
}
```
Follow these instructions to allow the customer to re-enter the OTP PIN if they type it wrong. There is a max of 3 attempts. To implement this functionality, you also need to pass in `allowOTPRetry=true` to the `/v3/start` endpoint.
The start step is implemented the same as either of the the previous tabs - no client side code changes necessary:
```swift Swift theme={"dark"}
import Foundation
import ProveAuth
import SwiftUI
class MobileOtpStartStep: OtpStartStep {
@ObservedObject var sheetObservable: SheetObservable
var callback: OtpStartStepCallback?
init(sheetObservable: SheetObservable) {
self.sheetObservable = sheetObservable
}
func execute(
phoneNumberNeeded: Bool, phoneValidationError: ProveAuthError?, callback: OtpStartStepCallback
) {
self.callback = callback
if !phoneNumberNeeded {
// If no phone number is needed, then don't prompt the user.
callback.onSuccess(input: nil)
} else {
DispatchQueue.main.async {
// If a phone number validation error is detected, ensure it is handled to provide feedback to the user.
if case .phoneNumberValidationError = phoneValidationError {
print(
"found phoneValidationError: \(String(describing: phoneValidationError?.localizedDescription))"
)
// Update UI components to display OtpStartView with the phone number validation error.
self.sheetObservable.isPhoneValidationError = true
} else {
self.sheetObservable.isPhoneValidationError = false
}
// Update UI components to display OtpStartView if a phone number is needed.
self.sheetObservable.isOtpStartActive = true
}
}
}
// Return collected phone number to the SDK
func handlePhoneNumber(phoneNumber: String) {
guard let callback = self.callback else {
print("Error: OtpStartStepCallback is not set ")
return
}
let otpStartInput = OtpStartInput(phoneNumber: phoneNumber)
// This is how you pass collected phone number to SDK
callback.onSuccess(input: otpStartInput)
}
// Communicate any issues encountered while trying to obtain the phone number to the SDK.
// Error should be reported if the customer explicitly cancels the SMS OTP transaction
// or presses the back button to exit out the SMS OTP start step screen.
func handleOtpStartError() {
guard let callback = self.callback else {
print("Error: OtpStartStepCallback is not set ")
return
}
callback.onError()
}
}
```
The finish step is implemented the same as either of the the previous tabs - no client side code changes necessary. If the OTP is invalid, the finish step will be called again to prompt the user for a new input. Once the max attempts is reached, the `AuthFinish` function will be called.
```swift Swift theme={"dark"}
import Foundation
import SwiftUI
import ProveAuth
class MobileOtpFinishStep: OtpFinishStep {
@ObservedObject var sheetObservable: SheetObservable
var callback: OtpFinishStepCallback?
init(sheetObservable: SheetObservable){
self.sheetObservable = sheetObservable
}
// Implement this method to collect the OTP value delivered via SMS.
func execute(otpError: ProveAuthError?, callback: OtpFinishStepCallback) {
self.callback = callback
// Handle the OTP validation error if present.
if case .otpValidationError = otpError {
print("found otpError: \(String(describing: otpError?.localizedDescription))")
// Signal to your UI components that the last provided OTP is invalid
self.sheetObservable.otpError = true
} else {
self.sheetObservable.otpError = false
}
// Signal to UI components to display OtpFinishView
DispatchQueue.main.async {
self.sheetObservable.isOtpFinishActive = true
}
}
// Provide the collected OTP value to the SDK for validation.
func handleOtp(_ otp: String) {
guard let callback = self.callback else {
print("Error: OtpFinishStepCallback is not set ")
return
}
let otpFinishInput = OtpFinishInput(otp: otp)
callback.onSuccess(input: otpFinishInput)
}
// Notify the SDK of any issues encountered while obtaining the OTP value or if the user cancels the OTP flow.
func handleOtpFinishError() {
guard let callback = self.callback else {
print("Error: OtpFinishStepCallback is not set ")
return
}
callback.onError()
}
}
```
Follow these instructions to allow the customer to re-enter their phone number. There is a max of three entries/send attempts.
Manual Request Required
To enable phone number change capabilities on your credentials, contact your Prove representative.
The start step is implemented the same as the previous tab:
```swift Swift theme={"dark"}
import Foundation
import ProveAuth
import SwiftUI
class MobileOtpStartStep: OtpStartStep {
@ObservedObject var sheetObservable: SheetObservable
var callback: OtpStartStepCallback?
init(sheetObservable: SheetObservable) {
self.sheetObservable = sheetObservable
}
func execute(
phoneNumberNeeded: Bool, phoneValidationError: ProveAuthError?, callback: OtpStartStepCallback
) {
self.callback = callback
if !phoneNumberNeeded {
// If no phone number is needed, then don't prompt the user.
callback.onSuccess(input: nil)
} else {
DispatchQueue.main.async {
// If a phone number validation error is detected, ensure it is handled to provide feedback to the user.
if case .phoneNumberValidationError = phoneValidationError {
print(
"found phoneValidationError: \(String(describing: phoneValidationError?.localizedDescription))"
)
// Update UI components to display OtpStartView with the phone number validation error.
self.sheetObservable.isPhoneValidationError = true
} else {
self.sheetObservable.isPhoneValidationError = false
}
// Update UI components to display OtpStartView if a phone number is needed.
self.sheetObservable.isOtpStartActive = true
}
}
}
// Return collected phone number to the SDK
func handlePhoneNumber(phoneNumber: String) {
guard let callback = self.callback else {
print("Error: OtpStartStepCallback is not set ")
return
}
let otpStartInput = OtpStartInput(phoneNumber: phoneNumber)
// This is how you pass collected phone number to SDK
callback.onSuccess(input: otpStartInput)
}
// Communicate any issues encountered while trying to obtain the phone number to the SDK.
// Error should be reported if the customer explicitly cancels the SMS OTP transaction
// or presses the back button to exit out the SMS OTP start step screen.
func handleOtpStartError() {
guard let callback = self.callback else {
print("Error: OtpStartStepCallback is not set ")
return
}
callback.onError()
}
}
```
You can prompt for a new phone number by implementing the finish step like this:
```swift Swift theme={"dark"}
import Foundation
import SwiftUI
import ProveAuth
class MobileOtpFinishStep: OtpFinishStep {
@ObservedObject var sheetObservable: SheetObservable
var callback: OtpFinishStepCallback?
init(sheetObservable: SheetObservable){
self.sheetObservable = sheetObservable
}
// Implement this method to collect the OTP value delivered via SMS.
func execute(otpError: ProveAuthError?, callback: OtpFinishStepCallback) {
self.callback = callback
// Handle the OTP validation error if present.
if case .otpValidationError = otpError {
print("found otpError: \(String(describing: otpError?.localizedDescription))")
// Update your UI to indicate that the provided OTP is invalid.
self.sheetObservable.otpError = true
} else {
self.sheetObservable.otpError = false
}
// Update your UI to display the OTP finish view.
DispatchQueue.main.async {
self.sheetObservable.isOtpFinishActive = true
}
}
// Return the collected OTP value to the SDK.
func handleOtp(_ otp: String) {
guard let callback = self.callback else {
print("Error: OtpFinishStepCallback is not set ")
return
}
let otpFinishInput = OtpFinishInput(otp: otp)
callback.onSuccess(input: otpFinishInput)
}
// When callback.onMobileNumberChange() is evoked, OtpStartStep will be re-initiated
// so that end-users can enter a different phone number via OtpStartStep.
func handleMobileNumberChange() {
guard let callback = self.callback else {
print("Error: OtpFinishStepCallback is not set")
return
}
callback.onMobileNumberChange()
}
}
```
In the `AuthFinishStep`, you'll specify a function to call once the possession checks complete on the mobile phone. This endpoint on your back end server calls the `Validate()` function to validate the phone number. If it was successful, the server returns the results from the `Challenge()` function including customer information. Refer to the following example fields that return and then prefill on a form for the customer to verify. The `AuthFinishStep` then completes. In the event of cancellation, the server makes a call to the `Validate()` function and returns `success=false`.
```javascript JavaScript theme={"dark"}
// Send a verify request to get return customer information.
async function verify() {
const response = await fetch(backendUrl + "/verify", {
method: "POST",
headers: {
Accept: "application/json",
"Content-Type": "application/json",
},
body: JSON.stringify({}),
});
const results = await response.json();
const rsp = JSON.stringify(results);
const firstName = document.getElementById("firstNameInput");
const lastName = document.getElementById("lastNameInput");
firstName.value = rsp.firstName;
lastName.value = rsp.lastName;
return null;
}
```
```typescript TypeScript theme={"dark"}
// Send a verify request to get return customer information.
async function verify() {
const response = await fetch(backendUrl + "/verify", {
method: "POST",
headers: {
Accept: "application/json",
"Content-Type": "application/json",
},
body: JSON.stringify({}),
});
const results = await response.json();
const rsp = JSON.stringify(results);
const firstName = document.getElementById("firstNameInput");
const lastName = document.getElementById("lastNameInput");
firstName.value = rsp.firstName;
lastName.value = rsp.lastName;
return null;
}
```
```java Java theme={"dark"}
// Send a verify request to get return customer information.
void verify(String: authId) {
YourBackendClient backend = new YourBackendClient(); // Backend API client
// Build your VerifyRequest object
VerifyRequest verifyRequest = new VerifyRequest(authId, ...);
// Send a verify request to your backend server to get return customer information.
VerifyResponse response = backend.verify(verifyRequest);
// TODO: define your VerifyResponse object to parse customer information from the response
String firstName = response.getFirstName();
String lastName = response.getLastName();
// Pre-fill customer information to your Android App UI, for example:
firstNameEditText.setText(firstName);
lastNameEditText.setText(lastName);
}
```
```swift Swift theme={"dark"}
// Send a verify request to get return customer information.
// The below example uses native iOS URLSession, but any other
// alternative networking approaches should also work
func verify(String: authID, completion: @escaping (Error?) -> Void)
guard let url = URL(string: "\(backendUrl)/verify") else {
completion(URLError(.badURL))
return
}
// Create the request
var request = URLRequest(url: url)
request.httpMethod = "POST"
request.addValue("application/json", forHTTPHeaderField: "Accept")
request.addValue("application/json", forHTTPHeaderField: "Content-Type")
// Set up the request body (empty JSON object) - authID is not needed so you can ignore.
let body: [String: Any] = ["authID": authId]
do {
request.httpBody = try JSONSerialization.data(withJSONObject: body, options: \[])
} catch {
completion(error)
return
}
// Perform the request
let task = URLSession.shared.dataTask(with: request) { \_, response, error in
if let error = error {
completion(error)
return
}
// Parse the response
do {
if let json = try JSONSerialization.jsonObject(with: data, options: \[]) as? [String: Any],
let firstName = json["firstName"] as? String,
let lastName = json["lastname"] as? String {
// Update the UI on the main thread
DispatchQueue.main.async {
// Update your UI with the pre-fill customer information
// For example, assuming you have `IBOutlet` references for your text fields
self.firstNameInput.text = firstName
self.lastNameInput.text = lastName
}
completion(nil)
} else {
let parsingError = NSError(domain: "", code: 0, userInfo: [NSLocalizedDescriptionKey: "Failed to parse JSON"])
completion(parsingError)
}
} catch {
completion(error)
}
}
// Start the network call
task.resume()
}
```
Once the possession checks finish on the mobile device, the finish handler on the client-side SDK executes. You then make a request to your server such as `POST /verify` to make the next call in the flow to the `Validate()` function.
### Page Summary
| Flow | Page Summary Language |
| :------ | :----------------------------------------------------------------------------------------------------------------------- |
| Desktop | Check your Phone. A text message with a link was just sent to the phone ending in XXXX (last 4 digits of mobile number). |
## Alternate path for customers
If the customer can't authenticate through Instant Link or SMS one-time password (OTP), customer exits the Prove flow. Present a manual application as an alternate method of verification.
In the desktop flow, a WebSocket opens for three minutes on the desktop browser while waiting for the customer to select the link in the text message. Once clicked, the WebSocket closes and the `AuthFinishStep` function finishes.
If you're using [Content Security Policy headers](https://content-security-policy.com/), ensure you allow `wss: device.uat.prove-auth.proveapis.com` and `wss: device.prove-auth.proveapis.com`.
```java Java theme={"dark"}
// Object implementing AuthFinishStep interface
AuthFinishStep authFinishStep = new AuthFinishStep() {
...
};
// Objects implementing OtpStartStep/OtpFinishStep interfaces
OtpStartStep otpStartStep = new OtpStartStep() {
...
};
OtpFinishStep otpFinishStep = new OtpFinishStep() {
...
};
ProveAuth proveAuth = ProveAuth.builder()
.withAuthFinishStep(authId -> verify(authId)) // verify(authId) call defined in #Validate the Mobile Phone section
.withOtpFallback(otpStartStep, otpFinishStep)
.withContext(this)
.build();
```
The cellular data connection can sometimes be unavailable during testing. The `Builder` class offers a `withTestMode(boolean testMode)` method, which permits simulated successful session results while connected to a Wi-Fi network only (without a cellular data connection available). Testing using a Wi-Fi connection is useful in the Sandbox environment.
```java Java theme={"dark"}
ProveAuth proveAuth = ProveAuth.builder()
.withAuthFinishStep(authId -> verify(authId))
.withOtpFallback(otpStartStep, otpFinishStep)
.withContext(this)
.withTestMode(true) // Test mode flag
.build();
```
The application employs an executor service with a minimum of two threads to manage threads due to the SDK’s ability to process concurrent blocking requests.
```java Java theme={"dark"}
public class MyAuthenticator {
private final MyBackendClient backend = new MyBackendClient(); // Backend API client
private final AuthFinishStep authFinishStep = new AuthFinishStep() {
@Override
void execute(String authId) {
try {
AuthFinishResponse response = backend.authFinish("My App", authId);
... // Check the authentication status returned in the response
} catch (IOException e) {
String failureCause = e.getCause() != null ? e.getCause().getMessage() : "Failed to request authentication results";
// Authentication failed due to request failure
}
}
};
private ProveAuth proveAuth;
public MyAuthenticator(Context context) {
proveAuth = ProveAuth.builder()
.withAuthFinishStep(authFinishStep)
.withOtpFallback(otpStartStep, otpFinishStep)
.withContext(context)
.build();
}
public void authenticate() throws IOException, ProveAuthException {
AuthStartResponse response = backend.authStart("My Prove Auth App");
proveAuth.authenticate(response.getAuthToken());
}
}
```
## Configure OTP
To use the Resend/Retry/Phone Change features, you need to install the Android SDK version 6.5.0 or later.
To set the One-Time Password (OTP) handler, `withOtpFallback(otpStart: otpStartStep, otpFinish: otpFinishStep)`, requires implementing the `OtpStartStep` and `OtpFinishStep`.
The OTP session has a two minute timeout from when it's sent through SMS to when the customer can enter in the OTP.
Follow these instructions if you are implementing OTP and you are passing in the phone number on the `/v3/start` endpoint. In this case, you've already prompted for a phone number so you don't need to prompt for it in the client SDK.
Since you passed the phone number in the `Start()` function, call `OtpStartStepCallback.onSuccess(OtpStartInput);` to communicate to the SDK you have the customer's agreement to deliver the SMS message. Ensure you return an instance of `OtpStartInput` with empty string or `null` to `OtpStartStepCallback.onSuccess()` function.
```java Java theme={"dark"}
import com.prove.sdk.proveauth.OtpStartInput;
import com.prove.sdk.proveauth.OtpStartStep;
import com.prove.sdk.proveauth.OtpStartStepCallback;
import com.prove.sdk.proveauth.ProveAuthException;
public class NoPromptStart implements OtpStartStep {
@Override
public void execute(boolean phoneNumberNeeded, ProveAuthException otpException,
OtpStartStepCallback callback) {
// No phone number needed, no need to ask end user for input.
callback.onSuccess(new OtpStartInput(""));
}
}
```
Call the `OtpStartStepCallback.onError();` method to communicate to the SDK any issues while trying to obtain the phone number or the OTP. Report an error if the customer cancels the SMS transaction or presses the back button to leave the screen.
In the finish step, call the `OtpFinishStepCallback.onSuccess(OtpFinishInput);` method to return the collected OTP value wrapped in `OtpFinishInput`.
```java Java theme={"dark"}
import com.prove.sdk.proveauth.OtpFinishInput;
import com.prove.sdk.proveauth.OtpFinishStep;
import com.prove.sdk.proveauth.OtpFinishStepCallback;
import com.prove.sdk.proveauth.OtpValidationException;
import com.prove.sdk.proveauth.ProveAuthException;
public class NoPromptFinish implements OtpFinishStep {
@Override
public void execute(@Nullable ProveAuthException otpException,
OtpFinishStepCallback otpFinishStepCallback) {
// If error message is found, handle it.
if (otpException instanceof OtpValidationException) {
// Set to a variable and display it in a field.
// In this example, we don't do anything with the error.
String errorMsg = otpException.getMessage();
}
try {
// Prompt the user for OTP delivered by SMS. You can build UI to provide
// best UX based on your application and business logic, here we simplify to a
// generic function named promptForOtpCode which gives us the OTP code.
String otpCode = promptForOtpCode();
otpFinishStepCallback.onSuccess(new OtpFinishInput(otpCode));
} catch (Exception e) {
// if any issue with the OTP collection from the end user or the user wants to cancel
// then call onError to exit the flow. In this example we simplify it as catching
// an exception.
otpFinishStepCallback.onError();
}
}
}
```
Follow these instructions if implementing MobileAuth and collecting the phone number only if MobileAuth fails. This will implement OTP without allowing for SMS resends and phone number changes. If you do want those capabilities, please reference the subsequent tabs (Resend, Retry OTP, and Phone Number Change).
In the start step, call the `OtpStartStepCallback.onSuccess(OtpStartInput);` method to return the collected phone number to the SDK.
```java Java theme={"dark"}
import com.prove.sdk.proveauth.OtpStartInput;
import com.prove.sdk.proveauth.OtpStartStep;
import com.prove.sdk.proveauth.OtpStartStepCallback;
import com.prove.sdk.proveauth.PhoneNumberValidationException;
import com.prove.sdk.proveauth.ProveAuthException;
public class PromptStart implements OtpStartStep {
@Override
public void execute(boolean phoneNumberNeeded, @Nullable ProveAuthException otpException,
OtpStartStepCallback callback) {
// If phone number is needed, need to ask the end user for phone number input.
if (phoneNumberNeeded) {
// If error message is found around phone number, handle it.
// The `PhoneNumberValidationException` is ONLY available when `phoneNumberNeeded`
// has a value.
if (otpException instanceof PhoneNumberValidationException) {
// Set to a variable and display it in a field.
// In this example, we don't do anything with the error.
String errorMsg = otpException.getMessage();
}
try {
// Prompt the user for phone number to receive OTP SMS. You can build UI to provide
// best UX based on your application and business logic, here we simplify to a
// generic function named promptForPhoneNumber which gives us the collected
// phone number.
String phoneNumber = promptForPhoneNumber();
callback.onSuccess(new OtpStartInput(phoneNumber));
} catch (Exception e) {
// if any issue with the phone number collection from the end user or the user
// wants to cancel then call onError to exit the flow.
// In this example we simplify it as catching an exception.
callback.onError();
}
} else {
// No phone number needed, no need to ask end user for input.
callback.onSuccess(new OtpStartInput(""));
}
}
}
```
The finish step is implemented the same as the previous tab:
```java Java theme={"dark"}
import com.prove.sdk.proveauth.OtpFinishInput;
import com.prove.sdk.proveauth.OtpFinishStep;
import com.prove.sdk.proveauth.OtpFinishStepCallback;
import com.prove.sdk.proveauth.OtpValidationException;
import com.prove.sdk.proveauth.ProveAuthException;
public class NoPromptFinish implements OtpFinishStep {
@Override
public void execute(@Nullable ProveAuthException otpException,
OtpFinishStepCallback otpFinishStepCallback) {
// If error message is found, handle it.
if (otpException instanceof OtpValidationException) {
// Set to a variable and display it in a field.
// In this example, we don't do anything with the error.
String errorMsg = otpException.getMessage();
}
try {
// Prompt the user for OTP delivered by SMS. You can build UI to provide
// best UX based on your application and business logic, here we simplify to a
// generic function named promptForOtpCode which gives us the OTP code.
String otpCode = promptForOtpCode();
otpFinishStepCallback.onSuccess(new OtpFinishInput(otpCode));
} catch (Exception e) {
// if any issue with the OTP collection from the end user or the user wants to cancel
// then call onError to exit the flow. In this example we simplify it as catching
// an exception.
otpFinishStepCallback.onError();
}
}
}
```
Follow these instructions to allow the customer to request a new OTP via SMS using the same phone number. There is a max of three send attempts including the initial message.
The start step is implemented the same as the previous tab:
```java Java theme={"dark"}
import com.prove.sdk.proveauth.OtpStartInput;
import com.prove.sdk.proveauth.OtpStartStep;
import com.prove.sdk.proveauth.OtpStartStepCallback;
import com.prove.sdk.proveauth.PhoneNumberValidationException;
import com.prove.sdk.proveauth.ProveAuthException;
public class PromptStart implements OtpStartStep {
@Override
public void execute(boolean phoneNumberNeeded, @Nullable ProveAuthException otpException,
OtpStartStepCallback callback) {
// If phone number is needed, need to ask the end user for phone number input.
if (phoneNumberNeeded) {
// If error message is found around phone number, handle it.
// The `PhoneNumberValidationException` is ONLY available when `phoneNumberNeeded`
// has a value.
if (otpException instanceof PhoneNumberValidationException) {
// Set to a variable and display it in a field.
// In this example, we don't do anything with the error.
String errorMsg = otpException.getMessage();
}
try {
// Prompt the user for phone number to receive OTP SMS. You can build UI to provide
// best UX based on your application and business logic, here we simplify to a
// generic function named promptForPhoneNumber which gives us the collected
// phone number.
String phoneNumber = promptForPhoneNumber();
callback.onSuccess(new OtpStartInput(phoneNumber));
} catch (Exception e) {
// if any issue with the phone number collection from the end user or the user
// wants to cancel then call onError to exit the flow.
// In this example we simplify it as catching an exception.
callback.onError();
}
} else {
// No phone number needed, no need to ask end user for input.
callback.onSuccess(new OtpStartInput(""));
}
}
}
```
You can then send a new OTP SMS to the same phone number by implementing the finish step like this:
```java Java theme={"dark"}
import com.prove.sdk.proveauth.OtpFinishInput;
import com.prove.sdk.proveauth.OtpFinishStep;
import com.prove.sdk.proveauth.OtpFinishStepCallback;
import com.prove.sdk.proveauth.OtpValidationException;
import com.prove.sdk.proveauth.ProveAuthException;
public class MultipleResendFinish implements OtpFinishStep {
@Override
public void execute(@Nullable ProveAuthException otpException,
OtpFinishStepCallback otpFinishStepCallback) {
// If error message is found, handle it.
if (otpException instanceof OtpValidationException) {
// Set to a variable and display it in a field.
// In this example, we don't do anything with the error.
String errorMsg = otpException.getMessage();
}
// Prompt the user for whether they received the SMS.
if (promptForResend("Didn't receive the SMS OTP? Click resend button for a new one!")) {
// If the end user wants to send again to the same phone number call onOtpResend().
otpFinishStepCallback.onOtpResend();
return;
}
try {
// Prompt the user for OTP delivered by SMS. You can build UI to provide
// best UX based on your application and business logic, here we simplify to a
// generic function named promptForOtpCode which gives us the OTP code.
String otpCode = promptForOtpCode();
otpFinishStepCallback.onSuccess(new OtpFinishInput(otpCode));
} catch (Exception e) {
// if any issue with the OTP collection from the end user or the user wants to cancel
// then call onError to exit the flow. In this example we simplify it as catching
// an exception.
otpFinishStepCallback.onError();
}
}
}
```
Follow these instructions to allow the customer to re-enter the OTP PIN if they type it wrong. There is a max of 3 attempts. To implement this functionality, you also need to pass in `allowOTPRetry=true` to the `/v3/start` endpoint.
The start step is implemented the same as either of the the previous tabs - no client side code changes necessary:
```java Java theme={"dark"}
import com.prove.sdk.proveauth.OtpStartInput;
import com.prove.sdk.proveauth.OtpStartStep;
import com.prove.sdk.proveauth.OtpStartStepCallback;
import com.prove.sdk.proveauth.PhoneNumberValidationException;
import com.prove.sdk.proveauth.ProveAuthException;
public class PromptStart implements OtpStartStep {
@Override
public void execute(boolean phoneNumberNeeded, @Nullable ProveAuthException otpException,
OtpStartStepCallback callback) {
// If phone number is needed, need to ask the end user for phone number input.
if (phoneNumberNeeded) {
// If error message is found around phone number, handle it.
// The `PhoneNumberValidationException` is ONLY available when `phoneNumberNeeded`
// has a value.
if (otpException instanceof PhoneNumberValidationException) {
// Set to a variable and display it in a field.
// In this example, we don't do anything with the error.
String errorMsg = otpException.getMessage();
}
try {
// Prompt the user for phone number to receive OTP SMS. You can build UI to provide
// best UX based on your application and business logic, here we simplify to a
// generic function named promptForPhoneNumber which gives us the collected
// phone number.
String phoneNumber = promptForPhoneNumber();
callback.onSuccess(new OtpStartInput(phoneNumber));
} catch (Exception e) {
// if any issue with the phone number collection from the end user or the user
// wants to cancel then call onError to exit the flow.
// In this example we simplify it as catching an exception.
callback.onError();
}
} else {
// No phone number needed, no need to ask end user for input.
callback.onSuccess(new OtpStartInput(""));
}
}
}
```
The finish step is implemented the same as either of the the previous tabs - no client side code changes necessary. If the OTP is invalid, the finish step will be called again to prompt the user for a new input. Once the max attempts is reached, the `AuthFinish` function will be called.
```java Java theme={"dark"}
import com.prove.sdk.proveauth.OtpFinishInput;
import com.prove.sdk.proveauth.OtpFinishStep;
import com.prove.sdk.proveauth.OtpFinishStepCallback;
import com.prove.sdk.proveauth.OtpValidationException;
import com.prove.sdk.proveauth.ProveAuthException;
public class NoPromptFinish implements OtpFinishStep {
@Override
public void execute(@Nullable ProveAuthException otpException,
OtpFinishStepCallback otpFinishStepCallback) {
// If error message is found, handle it.
if (otpException instanceof OtpValidationException) {
// Set to a variable and display it in a field.
// In this example, we don't do anything with the error.
String errorMsg = otpException.getMessage();
}
try {
// Prompt the user for OTP delivered by SMS. You can build UI to provide
// best UX based on your application and business logic, here we simplify to a
// generic function named promptForOtpCode which gives us the OTP code.
String otpCode = promptForOtpCode();
otpFinishStepCallback.onSuccess(new OtpFinishInput(otpCode));
} catch (Exception e) {
// if any issue with the OTP collection from the end user or the user wants to cancel
// then call onError to exit the flow. In this example we simplify it as catching
// an exception.
otpFinishStepCallback.onError();
}
}
}
```
Follow these instructions to allow the customer to re-enter their phone number. There is a max of three entries/send attempts.
Manual Request Required
To enable phone number change capabilities on your credentials, contact your Prove representative.
The start step is implemented the same as the previous tab:
```java Java theme={"dark"}
import com.prove.sdk.proveauth.OtpStartInput;
import com.prove.sdk.proveauth.OtpStartStep;
import com.prove.sdk.proveauth.OtpStartStepCallback;
import com.prove.sdk.proveauth.PhoneNumberValidationException;
import com.prove.sdk.proveauth.ProveAuthException;
public class PromptStart implements OtpStartStep {
@Override
public void execute(boolean phoneNumberNeeded, @Nullable ProveAuthException otpException,
OtpStartStepCallback callback) {
// If phone number is needed, need to ask the end user for phone number input.
if (phoneNumberNeeded) {
// If error message is found around phone number, handle it.
// The `PhoneNumberValidationException` is ONLY available when `phoneNumberNeeded`
// has a value.
if (otpException instanceof PhoneNumberValidationException) {
// Set to a variable and display it in a field.
// In this example, we don't do anything with the error.
String errorMsg = otpException.getMessage();
}
try {
// Prompt the user for phone number to receive OTP SMS. You can build UI to provide
// best UX based on your application and business logic, here we simplify to a
// generic function named promptForPhoneNumber which gives us the collected
// phone number.
String phoneNumber = promptForPhoneNumber();
callback.onSuccess(new OtpStartInput(phoneNumber));
} catch (Exception e) {
// if any issue with the phone number collection from the end user or the user
// wants to cancel then call onError to exit the flow.
// In this example we simplify it as catching an exception.
callback.onError();
}
} else {
// No phone number needed, no need to ask end user for input.
callback.onSuccess(new OtpStartInput(""));
}
}
}
```
You can prompt for a new phone number by implementing the finish step like this:
```java Java theme={"dark"}
import com.prove.sdk.proveauth.OtpFinishInput;
import com.prove.sdk.proveauth.OtpFinishStep;
import com.prove.sdk.proveauth.OtpFinishStepCallback;
import com.prove.sdk.proveauth.OtpValidationException;
import com.prove.sdk.proveauth.ProveAuthException;
public class PhoneChangeFinish implements OtpFinishStep {
@Override
public void execute(@Nullable ProveAuthException otpException,
OtpFinishStepCallback otpFinishStepCallback) {
// If error message is found, handle it.
if (otpException instanceof OtpValidationException) {
// Set to a variable and display it in a field.
// In this example, we don't do anything with the error.
String errorMsg = otpException.getMessage();
}
// Prompt the user for whether they received the SMS.
if (promptForPhoneNumberChange("Didn't receive the SMS OTP? Try a different phone number.")) {
// If the end user wants to correct the phone number already in use, or changing to a
// different phone number to receive the future SMS OTP, call onMobileNumberChange(), and
// the otpStartStep will re-prompt for phone number input from the end user.
otpFinishStepCallback.onMobileNumberChange();
return;
}
try {
// Prompt the user for OTP delivered by SMS. You can build UI to provide
// best UX based on your application and business logic, here we simplify to a
// generic function named promptForOtpCode which gives us the OTP code.
String otpCode = promptForOtpCode();
otpFinishStepCallback.onSuccess(new OtpFinishInput(otpCode));
} catch (Exception e) {
// if any issue with the OTP collection from the end user or the user wants to cancel
// then call onError to exit the flow. In this example we simplify it as catching
// an exception.
otpFinishStepCallback.onError();
}
}
}
```
```swift Swift theme={"dark"}
// Object implementing ProveAuthFinishStep protocols
let finishStep = FinishAuthStep()
// Objects implementing OtpStartStep/OtpFinishStep protocols
let otpStartStep = MobileOtpStartStep()
let otpFinishStep = MobileOtpFinishStep()
let proveAuthSdk: ProveAuth
proveAuthSdk = ProveAuth.builder(authFinish: finishStep)
.withOtpFallback(otpStart: otpStartStep, otpFinish: otpFinishStep)
.build()
```
In the event a cellular data connection is unavailable during testing, use the Builder class. It permits simulated successful session results while connected to a Wi-Fi network. Testing using a Wi-Fi connection is useful in the Sandbox environment.
```swift Swift theme={"dark"}
proveAuthSdk = ProveAuth.builder(authFinish: finishStep)
.withMobileAuthTestMode() // Test mode flag
.build()
```
The application employs an executor service with a minimum of two threads to manage threads due to the SDK’s ability to process concurrent blocking requests.
```swift Swift theme={"dark"}
// authToken retrieved from your server via StartAuthRequest
proveAuthSdk.authenticate(authToken) { error in
DispatchQueue.main.async {
self.messages.finalResultMessage = "ProveAuth.authenticate returned error: \(error.localizedDescription)"
print(self.messages.finalResultMessage)
}
}
```
## Configure OTP
To use the Resend/Retry/Phone Change features, you need to install the iOS SDK version 6.5.1 or later.
To set the One-Time Password (OTP) handler, `withOtpFallback(otpStart: otpStartStep, otpFinish: otpFinishStep)`, requires implementing the `OtpStartStep` and `OtpFinishStep`.
The OTP session has a two minute timeout from when it's sent through SMS to when the customer can enter in the OTP.
Follow these instructions if you are implementing OTP and you are passing in the phone number on the `/v3/start` endpoint. In this case, you've already prompted for a phone number so you don't need to prompt for it in the client SDK.
Since you passed the phone number in the `Start()` function, call `callback.onSuccess(input: nil)` to communicate to the SDK you have the customer's agreement to deliver the SMS message.
```swift Swift theme={"dark"}
import Foundation
import ProveAuth
import SwiftUI
class MobileOtpStartStep: OtpStartStep {
@ObservedObject var sheetObservable: SheetObservable
var callback: OtpStartStepCallback?
init(sheetObservable: SheetObservable) {
self.sheetObservable = sheetObservable
}
// Implement this method to handle phone number collection for SMS OTP,
// or to obtain user confirmation for initiating an SMS message.
func execute(
phoneNumberNeeded: Bool, phoneValidationError: ProveAuthError?, callback: OtpStartStepCallback
) {
self.callback = callback
// Since no phone number is needed, don't prompt the user.
callback.onSuccess(input: nil)
}
}
```
Call the `callback.onError()` method to communicate to the SDK any issues while trying to obtain the phone number or the OTP. Report an error if the customer cancels the SMS transaction or presses the back button to leave the screen.
```swift Swift theme={"dark"}
import Foundation
import SwiftUI
import ProveAuth
class MobileOtpFinishStep: OtpFinishStep {
@ObservedObject var sheetObservable: SheetObservable
var callback: OtpFinishStepCallback?
init(sheetObservable: SheetObservable){
self.sheetObservable = sheetObservable
}
// Implement this method to collect the OTP value delivered via SMS.
func execute(otpError: ProveAuthError?, callback: OtpFinishStepCallback) {
self.callback = callback
// Handle the OTP validation error if present.
if case .otpValidationError = otpError {
print("found otpError: \(String(describing: otpError?.localizedDescription))")
// Signal to your UI components that the last provided OTP is invalid
self.sheetObservable.otpError = true
} else {
self.sheetObservable.otpError = false
}
// Signal to UI components to display OtpFinishView
DispatchQueue.main.async {
self.sheetObservable.isOtpFinishActive = true
}
}
// Provide the collected OTP value to the SDK for validation.
func handleOtp(_ otp: String) {
guard let callback = self.callback else {
print("Error: OtpFinishStepCallback is not set ")
return
}
let otpFinishInput = OtpFinishInput(otp: otp)
callback.onSuccess(input: otpFinishInput)
}
// Notify the SDK of any issues encountered while obtaining the OTP value or if the user cancels the OTP flow.
func handleOtpFinishError() {
guard let callback = self.callback else {
print("Error: OtpFinishStepCallback is not set ")
return
}
callback.onError()
}
}
```
Follow these instructions if implementing MobileAuth and collecting the phone number only if MobileAuth fails. This will implement OTP without allowing for SMS resends and phone number changes. If you do want those capabilities, please reference the subsequent tabs (Resend, Retry OTP, and Phone Number Change).
In the start step, call the `callback.onSuccess(input: otpStartInput)` method to return the collected phone number to the SDK.
```swift Swift theme={"dark"}
import Foundation
import ProveAuth
import SwiftUI
class MobileOtpStartStep: OtpStartStep {
@ObservedObject var sheetObservable: SheetObservable
var callback: OtpStartStepCallback?
init(sheetObservable: SheetObservable) {
self.sheetObservable = sheetObservable
}
func execute(
phoneNumberNeeded: Bool, phoneValidationError: ProveAuthError?, callback: OtpStartStepCallback
) {
self.callback = callback
if !phoneNumberNeeded {
// If no phone number is needed, then don't prompt the user.
callback.onSuccess(input: nil)
} else {
DispatchQueue.main.async {
// If a phone number validation error is detected, ensure it is handled to provide feedback to the user.
if case .phoneNumberValidationError = phoneValidationError {
print(
"found phoneValidationError: \(String(describing: phoneValidationError?.localizedDescription))"
)
// Update UI components to display OtpStartView with the phone number validation error.
self.sheetObservable.isPhoneValidationError = true
} else {
self.sheetObservable.isPhoneValidationError = false
}
// Update UI components to display OtpStartView if a phone number is needed.
self.sheetObservable.isOtpStartActive = true
}
}
}
// Return collected phone number to the SDK
func handlePhoneNumber(phoneNumber: String) {
guard let callback = self.callback else {
print("Error: OtpStartStepCallback is not set ")
return
}
let otpStartInput = OtpStartInput(phoneNumber: phoneNumber)
// This is how you pass collected phone number to SDK
callback.onSuccess(input: otpStartInput)
}
// Communicate any issues encountered while trying to obtain the phone number to the SDK.
// Error should be reported if the customer explicitly cancels the SMS OTP transaction
// or presses the back button to exit out the SMS OTP start step screen.
func handleOtpStartError() {
guard let callback = self.callback else {
print("Error: OtpStartStepCallback is not set ")
return
}
callback.onError()
}
}
```
The finish step is implemented the same as the previous tab:
```swift Swift theme={"dark"}
import Foundation
import SwiftUI
import ProveAuth
class MobileOtpFinishStep: OtpFinishStep {
@ObservedObject var sheetObservable: SheetObservable
var callback: OtpFinishStepCallback?
init(sheetObservable: SheetObservable){
self.sheetObservable = sheetObservable
}
// Implement this method to collect the OTP value delivered via SMS.
func execute(otpError: ProveAuthError?, callback: OtpFinishStepCallback) {
self.callback = callback
// Handle the OTP validation error if present.
if case .otpValidationError = otpError {
print("found otpError: \(String(describing: otpError?.localizedDescription))")
// Signal to your UI components that the last provided OTP is invalid
self.sheetObservable.otpError = true
} else {
self.sheetObservable.otpError = false
}
// Signal to UI components to display OtpFinishView
DispatchQueue.main.async {
self.sheetObservable.isOtpFinishActive = true
}
}
// Provide the collected OTP value to the SDK for validation.
func handleOtp(_ otp: String) {
guard let callback = self.callback else {
print("Error: OtpFinishStepCallback is not set ")
return
}
let otpFinishInput = OtpFinishInput(otp: otp)
callback.onSuccess(input: otpFinishInput)
}
// Notify the SDK of any issues encountered while obtaining the OTP value or if the user cancels the OTP flow.
func handleOtpFinishError() {
guard let callback = self.callback else {
print("Error: OtpFinishStepCallback is not set ")
return
}
callback.onError()
}
}
```
Follow these instructions to allow the customer to request a new OTP via SMS using the same phone number. There is a max of three send attempts including the initial message.
The start step is implemented the same as the previous tab:
```swift Swift theme={"dark"}
import Foundation
import ProveAuth
import SwiftUI
class MobileOtpStartStep: OtpStartStep {
@ObservedObject var sheetObservable: SheetObservable
var callback: OtpStartStepCallback?
init(sheetObservable: SheetObservable) {
self.sheetObservable = sheetObservable
}
func execute(
phoneNumberNeeded: Bool, phoneValidationError: ProveAuthError?, callback: OtpStartStepCallback
) {
self.callback = callback
if !phoneNumberNeeded {
// If no phone number is needed, then don't prompt the user.
callback.onSuccess(input: nil)
} else {
DispatchQueue.main.async {
// If a phone number validation error is detected, ensure it is handled to provide feedback to the user.
if case .phoneNumberValidationError = phoneValidationError {
print(
"found phoneValidationError: \(String(describing: phoneValidationError?.localizedDescription))"
)
// Update UI components to display OtpStartView with the phone number validation error.
self.sheetObservable.isPhoneValidationError = true
} else {
self.sheetObservable.isPhoneValidationError = false
}
// Update UI components to display OtpStartView if a phone number is needed.
self.sheetObservable.isOtpStartActive = true
}
}
}
// Return collected phone number to the SDK
func handlePhoneNumber(phoneNumber: String) {
guard let callback = self.callback else {
print("Error: OtpStartStepCallback is not set ")
return
}
let otpStartInput = OtpStartInput(phoneNumber: phoneNumber)
// This is how you pass collected phone number to SDK
callback.onSuccess(input: otpStartInput)
}
// Communicate any issues encountered while trying to obtain the phone number to the SDK.
// Error should be reported if the customer explicitly cancels the SMS OTP transaction
// or presses the back button to exit out the SMS OTP start step screen.
func handleOtpStartError() {
guard let callback = self.callback else {
print("Error: OtpStartStepCallback is not set ")
return
}
callback.onError()
}
}
```
You can then send a new OTP SMS to the same phone number by implementing the finish step like this:
```swift Swift theme={"dark"}
import Foundation
import SwiftUI
import ProveAuth
class MobileOtpFinishStep: OtpFinishStep {
@ObservedObject var sheetObservable: SheetObservable
var callback: OtpFinishStepCallback?
init(sheetObservable: SheetObservable){
self.sheetObservable = sheetObservable
}
// Implement this method to collect the OTP value delivered in the SMS message.
func execute(otpError: ProveAuthError?, callback: OtpFinishStepCallback) {
self.callback = callback
// Handle the OTP validation error if present.
if case .otpValidationError = otpError {
print("found otpError: \(String(describing: otpError?.localizedDescription))")
// Update your UI to indicate that the provided OTP is invalid
self.sheetObservable.otpError = true
} else {
self.sheetObservable.otpError = false
}
// Update your UI to display the OtpFinishView
DispatchQueue.main.async {
self.sheetObservable.isOtpFinishActive = true
}
}
// Return the OTP value to the SDK
func handleOtp(_ otp: String) {
guard let callback = self.callback else {
print("Error: OtpFinishStepCallback is not set ")
return
}
let otpFinishInput = OtpFinishInput(otp: otp)
callback.onSuccess(input: otpFinishInput)
}
// Communicate to the SDK any issues when host app trys to obtain the OTP value
// or when users cancel the OTP flow
func handleOtpFinishError() {
guard let callback = self.callback else {
print("Error: OtpFinishStepCallback is not set ")
return
}
callback.onError()
}
// Call this method to request a new OTP code for the same mobile number.
func sendNewOtp() {
guard let callback = self.callback else {
print("Error: OtpFinishStepCallback is not set ")
return
}
callback.onOtpResend()
}
}
```
Follow these instructions to allow the customer to re-enter the OTP PIN if they type it wrong. There is a max of 3 attempts. To implement this functionality, you also need to pass in `allowOTPRetry=true` to the `/v3/start` endpoint.
The start step is implemented the same as either of the the previous tabs - no client side code changes necessary:
```swift Swift theme={"dark"}
import Foundation
import ProveAuth
import SwiftUI
class MobileOtpStartStep: OtpStartStep {
@ObservedObject var sheetObservable: SheetObservable
var callback: OtpStartStepCallback?
init(sheetObservable: SheetObservable) {
self.sheetObservable = sheetObservable
}
func execute(
phoneNumberNeeded: Bool, phoneValidationError: ProveAuthError?, callback: OtpStartStepCallback
) {
self.callback = callback
if !phoneNumberNeeded {
// If no phone number is needed, then don't prompt the user.
callback.onSuccess(input: nil)
} else {
DispatchQueue.main.async {
// If a phone number validation error is detected, ensure it is handled to provide feedback to the user.
if case .phoneNumberValidationError = phoneValidationError {
print(
"found phoneValidationError: \(String(describing: phoneValidationError?.localizedDescription))"
)
// Update UI components to display OtpStartView with the phone number validation error.
self.sheetObservable.isPhoneValidationError = true
} else {
self.sheetObservable.isPhoneValidationError = false
}
// Update UI components to display OtpStartView if a phone number is needed.
self.sheetObservable.isOtpStartActive = true
}
}
}
// Return collected phone number to the SDK
func handlePhoneNumber(phoneNumber: String) {
guard let callback = self.callback else {
print("Error: OtpStartStepCallback is not set ")
return
}
let otpStartInput = OtpStartInput(phoneNumber: phoneNumber)
// This is how you pass collected phone number to SDK
callback.onSuccess(input: otpStartInput)
}
// Communicate any issues encountered while trying to obtain the phone number to the SDK.
// Error should be reported if the customer explicitly cancels the SMS OTP transaction
// or presses the back button to exit out the SMS OTP start step screen.
func handleOtpStartError() {
guard let callback = self.callback else {
print("Error: OtpStartStepCallback is not set ")
return
}
callback.onError()
}
}
```
The finish step is implemented the same as either of the the previous tabs - no client side code changes necessary. If the OTP is invalid, the finish step will be called again to prompt the user for a new input. Once the max attempts is reached, the `AuthFinish` function will be called.
```swift Swift theme={"dark"}
import Foundation
import SwiftUI
import ProveAuth
class MobileOtpFinishStep: OtpFinishStep {
@ObservedObject var sheetObservable: SheetObservable
var callback: OtpFinishStepCallback?
init(sheetObservable: SheetObservable){
self.sheetObservable = sheetObservable
}
// Implement this method to collect the OTP value delivered via SMS.
func execute(otpError: ProveAuthError?, callback: OtpFinishStepCallback) {
self.callback = callback
// Handle the OTP validation error if present.
if case .otpValidationError = otpError {
print("found otpError: \(String(describing: otpError?.localizedDescription))")
// Signal to your UI components that the last provided OTP is invalid
self.sheetObservable.otpError = true
} else {
self.sheetObservable.otpError = false
}
// Signal to UI components to display OtpFinishView
DispatchQueue.main.async {
self.sheetObservable.isOtpFinishActive = true
}
}
// Provide the collected OTP value to the SDK for validation.
func handleOtp(_ otp: String) {
guard let callback = self.callback else {
print("Error: OtpFinishStepCallback is not set ")
return
}
let otpFinishInput = OtpFinishInput(otp: otp)
callback.onSuccess(input: otpFinishInput)
}
// Notify the SDK of any issues encountered while obtaining the OTP value or if the user cancels the OTP flow.
func handleOtpFinishError() {
guard let callback = self.callback else {
print("Error: OtpFinishStepCallback is not set ")
return
}
callback.onError()
}
}
```
Follow these instructions to allow the customer to re-enter their phone number. There is a max of three entries/send attempts.
Manual Request Required
To enable phone number change capabilities on your credentials, contact your Prove representative.
The start step is implemented the same as the previous tab:
```swift Swift theme={"dark"}
import Foundation
import ProveAuth
import SwiftUI
class MobileOtpStartStep: OtpStartStep {
@ObservedObject var sheetObservable: SheetObservable
var callback: OtpStartStepCallback?
init(sheetObservable: SheetObservable) {
self.sheetObservable = sheetObservable
}
func execute(
phoneNumberNeeded: Bool, phoneValidationError: ProveAuthError?, callback: OtpStartStepCallback
) {
self.callback = callback
if !phoneNumberNeeded {
// If no phone number is needed, then don't prompt the user.
callback.onSuccess(input: nil)
} else {
DispatchQueue.main.async {
// If a phone number validation error is detected, ensure it is handled to provide feedback to the user.
if case .phoneNumberValidationError = phoneValidationError {
print(
"found phoneValidationError: \(String(describing: phoneValidationError?.localizedDescription))"
)
// Update UI components to display OtpStartView with the phone number validation error.
self.sheetObservable.isPhoneValidationError = true
} else {
self.sheetObservable.isPhoneValidationError = false
}
// Update UI components to display OtpStartView if a phone number is needed.
self.sheetObservable.isOtpStartActive = true
}
}
}
// Return collected phone number to the SDK
func handlePhoneNumber(phoneNumber: String) {
guard let callback = self.callback else {
print("Error: OtpStartStepCallback is not set ")
return
}
let otpStartInput = OtpStartInput(phoneNumber: phoneNumber)
// This is how you pass collected phone number to SDK
callback.onSuccess(input: otpStartInput)
}
// Communicate any issues encountered while trying to obtain the phone number to the SDK.
// Error should be reported if the customer explicitly cancels the SMS OTP transaction
// or presses the back button to exit out the SMS OTP start step screen.
func handleOtpStartError() {
guard let callback = self.callback else {
print("Error: OtpStartStepCallback is not set ")
return
}
callback.onError()
}
}
```
You can prompt for a new phone number by implementing the finish step like this:
```swift Swift theme={"dark"}
import Foundation
import SwiftUI
import ProveAuth
class MobileOtpFinishStep: OtpFinishStep {
@ObservedObject var sheetObservable: SheetObservable
var callback: OtpFinishStepCallback?
init(sheetObservable: SheetObservable){
self.sheetObservable = sheetObservable
}
// Implement this method to collect the OTP value delivered via SMS.
func execute(otpError: ProveAuthError?, callback: OtpFinishStepCallback) {
self.callback = callback
// Handle the OTP validation error if present.
if case .otpValidationError = otpError {
print("found otpError: \(String(describing: otpError?.localizedDescription))")
// Update your UI to indicate that the provided OTP is invalid.
self.sheetObservable.otpError = true
} else {
self.sheetObservable.otpError = false
}
// Update your UI to display the OTP finish view.
DispatchQueue.main.async {
self.sheetObservable.isOtpFinishActive = true
}
}
// Return the collected OTP value to the SDK.
func handleOtp(_ otp: String) {
guard let callback = self.callback else {
print("Error: OtpFinishStepCallback is not set ")
return
}
let otpFinishInput = OtpFinishInput(otp: otp)
callback.onSuccess(input: otpFinishInput)
}
// When callback.onMobileNumberChange() is evoked, OtpStartStep will be re-initiated
// so that end-users can enter a different phone number via OtpStartStep.
func handleMobileNumberChange() {
guard let callback = self.callback else {
print("Error: OtpFinishStepCallback is not set")
return
}
callback.onMobileNumberChange()
}
}
```
In the `AuthFinishStep`, you'll specify a function to call once the possession checks complete on the mobile phone. This endpoint on your back end server calls the `Validate()` function to validate the phone number. If it was successful, the server returns the results from the `Challenge()` function including customer information. Refer to the following example fields that return and then prefill on a form for the customer to verify. The `AuthFinishStep` then completes. In the event of cancellation, the server makes a call to the `Validate()` function and returns `success=false`.
```javascript JavaScript theme={"dark"}
// Send a verify request to get return customer information.
async function verify() {
const response = await fetch(backendUrl + "/verify", {
method: "POST",
headers: {
Accept: "application/json",
"Content-Type": "application/json",
},
body: JSON.stringify({}),
});
const results = await response.json();
const rsp = JSON.stringify(results);
const firstName = document.getElementById("firstNameInput");
const lastName = document.getElementById("lastNameInput");
firstName.value = rsp.firstName;
lastName.value = rsp.lastName;
return null;
}
```
```typescript TypeScript theme={"dark"}
// Send a verify request to get return customer information.
async function verify() {
const response = await fetch(backendUrl + "/verify", {
method: "POST",
headers: {
Accept: "application/json",
"Content-Type": "application/json",
},
body: JSON.stringify({}),
});
const results = await response.json();
const rsp = JSON.stringify(results);
const firstName = document.getElementById("firstNameInput");
const lastName = document.getElementById("lastNameInput");
firstName.value = rsp.firstName;
lastName.value = rsp.lastName;
return null;
}
```
```java Java theme={"dark"}
// Send a verify request to get return customer information.
void verify(String: authId) {
YourBackendClient backend = new YourBackendClient(); // Backend API client
// Build your VerifyRequest object
VerifyRequest verifyRequest = new VerifyRequest(authId, ...);
// Send a verify request to your backend server to get return customer information.
VerifyResponse response = backend.verify(verifyRequest);
// TODO: define your VerifyResponse object to parse customer information from the response
String firstName = response.getFirstName();
String lastName = response.getLastName();
// Pre-fill customer information to your Android App UI, for example:
firstNameEditText.setText(firstName);
lastNameEditText.setText(lastName);
}
```
```swift Swift theme={"dark"}
// Send a verify request to get return customer information.
// The below example uses native iOS URLSession, but any other
// alternative networking approaches should also work
func verify(String: authID, completion: @escaping (Error?) -> Void)
guard let url = URL(string: "\(backendUrl)/verify") else {
completion(URLError(.badURL))
return
}
// Create the request
var request = URLRequest(url: url)
request.httpMethod = "POST"
request.addValue("application/json", forHTTPHeaderField: "Accept")
request.addValue("application/json", forHTTPHeaderField: "Content-Type")
// Set up the request body (empty JSON object) - authID is not needed so you can ignore.
let body: [String: Any] = ["authID": authId]
do {
request.httpBody = try JSONSerialization.data(withJSONObject: body, options: \[])
} catch {
completion(error)
return
}
// Perform the request
let task = URLSession.shared.dataTask(with: request) { \_, response, error in
if let error = error {
completion(error)
return
}
// Parse the response
do {
if let json = try JSONSerialization.jsonObject(with: data, options: \[]) as? [String: Any],
let firstName = json["firstName"] as? String,
let lastName = json["lastname"] as? String {
// Update the UI on the main thread
DispatchQueue.main.async {
// Update your UI with the pre-fill customer information
// For example, assuming you have `IBOutlet` references for your text fields
self.firstNameInput.text = firstName
self.lastNameInput.text = lastName
}
completion(nil)
} else {
let parsingError = NSError(domain: "", code: 0, userInfo: [NSLocalizedDescriptionKey: "Failed to parse JSON"])
completion(parsingError)
}
} catch {
completion(error)
}
}
// Start the network call
task.resume()
}
```
Once the possession checks finish on the mobile device, the finish handler on the client-side SDK executes. You then make a request to your server such as `POST /verify` to make the next call in the flow to the `Validate()` function.
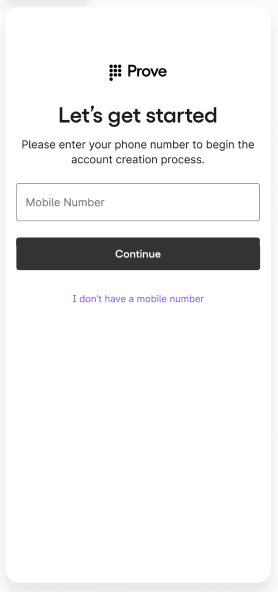 ## Page Summary Requirements
Page Summary Language: Let's Get Started
## Page Summary Requirements
Page Summary Language: Let's Get Started
Page Summary Description: Please enter your phone number to begin the account creation process.
## Data entry prompt requirements
Prompt for the mobile number within the input field.
## Opt out
Allow customers to select "I don't have a mobile number" which sends the customer to a manual form to allow customers without mobile numbers to still apply.
This function requires the Correlation ID which is returned by the `Start()` function.
```go Go theme={"dark"}
rspValidate, err := client.V3.V3ValidateRequest(context.TODO(), &components.V3ValidateRequest{
CorrelationID: rspStart.V3StartResponse.CorrelationID,
})
if err != nil {
return fmt.Errorf("error on Validate(): %w", err)
}
```
```typescript TypeScript theme={"dark"}
const rspValidate = await sdk.v3.v3ValidateRequest({
correlationId: rspStart.v3StartResponse?.correlationId || '',
})
if (!rspValidate) {
console.error('Validate error.')
return
}
```
```java Java theme={"dark"}
V3ValidateRequest req = V3ValidateRequest.builder()
.correlationId("713189b8-5555-4b08-83ba-75d08780aebd")
.build();
V3ValidateRequestResponse res = sdk.v3().v3ValidateRequest()
.request(req)
.call();
// You may want to use the .get() method when working with the response object.
```
````csharp .NET theme={"dark"}
using Prove.Proveapi;
using Prove.Proveapi.Models.Components;
var sdk = new ProveAPI(auth: "");
V3ValidateRequest req = new V3ValidateRequest() {
CorrelationId = "713189b8-5555-4b08-83ba-75d08780aebd",
};
var res = await sdk.V3.V3ValidateRequestAsync(req);
```
The function returns the following fields:
* `success`: either `true` if the mobile number validation was successful, or `false` if it failed.
* `challengeMissing`: `true` if you need to pass the challenge into the `Challenge()` function.
* `phoneNumber`: either the validated phone number or no field.
* `next`: map of the next API you need to call you need to make.
The challenge missing field determines if you need to return to the front end and request either the last four of their social security number or date of birth. If the challenge was already passed into the `Start()` call, the back end can then make a call to the `Challenge()` function and return the results to the front end.
If the `Validate()` function returns `v3-challenge` as one of the keys in the `Next` field map, call the `Challenge()` function to return the customer information matching the mobile number and challenge.
This function requires the Correlation ID which is returned by the `Start()` function.
If the `Validate()` function returned `challengeMissing=true`, send one of these parameters in the request:
* `ssn`: full or last four digits of the customer's social security number.
* `dob`: date of birth in one of these formats: `YYYY-MM-DD`, `YYYY-MM`, `MM-DD`.
```go Go
rspChallenge, err := client.V3.V3ChallengeRequest(context.TODO(), &components.V3ChallengeRequest{
CorrelationID: rspStart.V3StartResponse.CorrelationID,
Dob: provesdkservergo.String("1980-03-15"),
})
if err != nil {
return fmt.Errorf("error on Challenge(): %w", err)
}
````
```typescript TypeScript theme={"dark"}
const rspChallenge = await sdk.v3.v3ChallengeRequest({
correlationId: rspStart.v3StartResponse?.correlationId || '',
dob: '1980-03-15',
})
if (!rspValidate) {
console.error("Challenge error.")
return
}
```
```java Java theme={"dark"}
V3ChallengeRequest req = V3ChallengeRequest.builder()
.correlationId("713189b8-5555-4b08-83ba-75d08780aebd")
.dob("2024-05-02")
.build();
V3ChallengeRequestResponse res = sdk.v3().v3ChallengeRequest()
.request(req)
.call();
// You may want to use the .get() method when working with the response object.
```
```csharp .NET theme={"dark"}
using Prove.Proveapi;
using Prove.Proveapi.Models.Components;
var sdk = new ProveAPI(auth: "");
V3ChallengeRequest req = new V3ChallengeRequest() {
CorrelationId = "713189b8-5555-4b08-83ba-75d08780aebd",
Dob = "2024-05-02",
};
var res = await sdk.V3.V3ChallengeRequestAsync(req);
```
The function returns the following fields:
* `success`: `true` if customer info returned.
* `individual`: customer information in a map.
* `next`: map of the next API you need to call you need to make.
If `success=true`, return the customer information in a response to the front end to prefill the form.
## Display fields and requirements
| Required Display Field | Display Requirements | Editable Field |
| :---------------------------------------------------------------------------------- | :--------------------------------- | :------------- |
| First Name | Yes - unmasked | Yes |
| Last Name | Yes - unmasked | Yes |
| Address | Yes - unmasked | Yes |
| Extended Address | Yes - unmasked | Yes |
| City | Yes - unmasked | Yes |
| State | Yes - unmasked | Yes |
| Postal Code | Yes - unmasked | Yes |
| Phone Number | Yes - unmasked | No |
| Social Security Number (SSN) | Mask first five, display last four | Yes\* |
| Date of Birth | Yes - MM/DD/YYYY | Yes\*\* |
| \* Upon edit, clear data and require customer to enter full SSN. | | |
| \*\*Upon edit, clear the data and require customer to enter the full date of birth. | | |
| Required Display Field | Display Requirements | Editable Field |
| :--------------------------------------------------------------------------------- | :--------------------------------- | :-------------------------------------------- |
| First Name | Yes - unmasked | Yes |
| Last Name | Yes - unmasked | Yes |
| Address | Yes - unmasked | Yes |
| Extended Address | Yes - unmasked | Yes |
| City | Yes - unmasked | Yes |
| State | Yes - unmasked | Yes |
| Postal Code | Yes - unmasked | Yes |
| Phone Number | Yes - unmasked | No |
| Social Security Number | Mask first five, display last four | No, full SSN entered at beginning of process. |
| Date of Birth | Yes - MM/DD/YYYY | Yes\* |
| \* Upon edit, clear the data and require customer to enter the full date of birth. | | |
Know Your Customer (KYC) Required Customer Confirmation
Include this statement before the submit button. You can include an optional check box.
"I have reviewed the information provided and confirm it's accurate."
Once the customer has made any edits to their prefill information, submit that information to the back end server so the `Complete()` call can then verify the customer information.
```javascript JavaScript theme={"dark"}
// Send request to the backend to verify customer information.
async function sendInfo(firstName, lastName) {
const response = await fetch(backendUrl + "/finish", {
method: "POST",
headers: {
Accept: "application/json",
"Content-Type": "application/json",
},
body: JSON.stringify({
firstName: firstName,
lastName: lastName,
}),
});
const results = await response.json();
const rsp = JSON.stringify(results);
return rsp;
}
```
```typescript TypeScript theme={"dark"}
// Send request to the backend to verify customer information.
async function sendInfo(firstName: string, lastName: string) {
const response = await fetch(backendUrl + "/finish", {
method: "POST",
headers: {
Accept: "application/json",
"Content-Type": "application/json",
},
body: JSON.stringify({
firstName: firstName,
lastName: lastName,
}),
});
const results = await response.json();
const rsp = JSON.stringify(results);
return rsp;
}
```
```java Java theme={"dark"}
// Send request to the backend to verify customer information.
SendInfoResponse sendInfo(String firstName, String lastName) {
YourBackendClient backend = new YourBackendClient(); // Backend API client
// TODO: Build your SendInfoRequest object
SendInfoRequest sendInfoRequest = new SendInfoRequest(firstName, lastName, ...);
// Send a sendInfoRequest to your backend server to get return customer information.
SendInfoResponse response = backend.verify(sendInfoRequest);
// TODO: define your own SendInfoResponse object to parse the response
return response;
}
```
```swift Swift theme={"dark"}
// The below example uses native iOS `URLSession`, but any other
// alternative networking approaches should also work
func sendInfo(firstName: String, lastName: String, completion: @escaping (Result<[String:Any], Error>) -> Void) {
guard let url = URL(string: "\(backendUrl)/finish") else {
completion(.failure(URLError(.badURL)))
return
}
var request = URLRequest(url: url)
request.httpMethod = "POST"
request.addValue("application/json", forHTTPHeaderField: "Accept")
request.addValue("application/json", forHTTPHeaderField: "Content-Type")
// Set up the request body
let body: [String: Any] = [
"firstName": firstName,
"lastName": lastName
]
do {
request.httpBody = try JSONSerialization.data(withJSONObject: body, options: \[])
} catch {
completion(.failure(error))
return
}
let task = URLSession.shared.dataTask(with: request) { \_, response, error in
// Handle network or connection errors
if let error = error {
completion(.failure(error))
return
}
do {
if let results = try JSONSerialization.jsonObject(with: data, options: \[]) as? [String: Any] {
completion(.success(results))
} else {
let parsingError = NSError(domain: "", code: 0, userInfo: [NSLocalizedDescriptionKey : "Failed to parse JSON or auth token is missing"])
completion(.failure(parsingError))
}
} catch {
completion(.failure(error))
}
}
// Start the network call
task.resume()
}
```
This function is the final call in the flow that verifies the customer information.
This function takes these required parameters:
* Correlation ID: this is the ID returned by the `Start()` function.
* Individual: customer information in a map.
When implementing the KYC add-on, you need to pass in first name, last name, DOB, and SSN (or address) to ensure you receive back the KYC and CIP fields. If applicable, the following reason codes will return in Production:
* DI - this identity is associated with a death indicator.
* CF - The address matches the address of a U.S. correctional facility.
* PO - The address was classified as a PO Box.
Refer to the [Complete API reference](https://developer.prove.com/reference/complete-request) and select "Response with KYC - 0 hits" for an example response.
```go Go theme={"dark"}
rspComplete, err := client.V3.V3CompleteRequest(context.TODO(), &components.V3CompleteRequest{
CorrelationID: rspStart.V3StartResponse.CorrelationID,
Individual: components.Individual{
FirstName: provesdkservergo.String("Tod"),
LastName: provesdkservergo.String("Weedall"),
Addresses: []components.AddressEntry{
{
Address: provesdkservergo.String("39 South Trail"),
City: provesdkservergo.String("San Antonio"),
Region: provesdkservergo.String("TX"),
PostalCode: provesdkservergo.String("78285"),
},
},
Ssn: provesdkservergo.String("565228370"),
Dob: provesdkservergo.String("1984-12-10"),
EmailAddresses: []string{
"[email protected]",
},
},
})
if err != nil {
return fmt.Errorf("error on Complete(): %w", err)
}
```
```typescript TypeScript theme={"dark"}
const rspComplete = await sdk.v3.v3CompleteRequest({
correlationId: rspStart.v3StartResponse?.correlationId || '',
individual: {
firstName: 'Tod',
lastName: 'Weedall',
addresses: [{
address: '39 South Trail',
city: 'San Antonio',
region: 'TX',
postalCode: '78285',
}],
dob: '1984-12-10',
emailAddresses: [
'[email protected]',
],
ssn: '565228370',
},
});
if (!rspComplete) {
console.error("Complete error.")
return
}
```
```java Java theme={"dark"}
V3CompleteRequest req = V3CompleteRequest.builder()
.correlationId("713189b8-5555-4b08-83ba-75d08780aebd")
.individual(V3CompleteIndividualRequest.builder()
.addresses(java.util.List.of(
V3CompleteAddressEntryRequest.builder()
.address("39 South Trail")
.city("San Antonio")
.extendedAddress("Apt 23")
.postalCode("78285")
.region("TX")
.build()))
.dob("2024-05-02T00:00:00Z")
.emailAddresses(java.util.List.of(
"[email protected]"))
.firstName("Tod")
.lastName("Weedall")
.ssn("265228370")
.build())
.build();
V3CompleteRequestResponse res = sdk.v3().v3CompleteRequest()
.request(req)
.call();
// You may want to use the .get() method when working with the response object.
```
```csharp .NET theme={"dark"}
using Prove.Proveapi;
using Prove.Proveapi.Models.Components;
using System.Collections.Generic;
var sdk = new ProveAPI(auth: "");
V3CompleteRequest req = new V3CompleteRequest() {
CorrelationId = "713189b8-5555-4b08-83ba-75d08780aebd",
Individual = new V3CompleteIndividualRequest() {
Addresses = new List() {
new V3CompleteAddressEntryRequest() {
Address = "39 South Trail",
City = "San Antonio",
ExtendedAddress = "Apt 23",
PostalCode = "78285",
Region = "TX",
},
},
Dob = "1981-01",
EmailAddresses = new List() {
"jdoe@example.com",
},
FirstName = "Tod",
LastName = "Weedall",
Ssn = "265228370",
},
};
var res = await sdk.V3.V3CompleteRequestAsync(req);
```
The function returns the following fields:
* Success: `true` if customer information returned.
* Next: map of the next API call you need to make, in this case, `Done`.
You can then respond to the front end with the results of the customer verification.
## Test your Prove implementation
Next, reference the Sandbox test scenarios to test users and simulate different behaviors encountered in production.
Production Launch
To launch in Production, please contact your Prove representative.
# Pre-Filled Customer Review Page Requirements
Source: https://developer.prove.com/docs/prove-pre-fill-pre-filled-consumer-review-page-requirements
Learn how to design the frontend for your Customer Review Page when implementing without Mobile Auth
## Display fields and requirements
| Required Display Field | Display Requirements | Editable Field |
| :---------------------------------------------------------------------------------- | :--------------------------------- | :------------- |
| First Name | Yes - unmasked | Yes |
| Last Name | Yes - unmasked | Yes |
| Address | Yes - unmasked | Yes |
| Extended Address | Yes - unmasked | Yes |
| City | Yes - unmasked | Yes |
| State | Yes - unmasked | Yes |
| Postal Code | Yes - unmasked | Yes |
| Phone Number | Yes - unmasked | No |
| Social Security Number (SSN) | Mask first five, display last four | Yes\* |
| Date of Birth | Yes - MM/DD/YYYY | Yes\*\* |
| \* Upon edit, clear data and require customer to enter full SSN. | | |
| \*\*Upon edit, clear the data and require customer to enter the full date of birth. | | |
| Required Display Field | Display Requirements | Editable Field |
| :--------------------------------------------------------------------------------- | :--------------------------------- | :-------------------------------------------- |
| First Name | Yes - unmasked | Yes |
| Last Name | Yes - unmasked | Yes |
| Address | Yes - unmasked | Yes |
| Extended Address | Yes - unmasked | Yes |
| City | Yes - unmasked | Yes |
| State | Yes - unmasked | Yes |
| Postal Code | Yes - unmasked | Yes |
| Phone Number | Yes - unmasked | No |
| Social Security Number | Mask first five, display last four | No, full SSN entered at beginning of process. |
| Date of Birth | Yes - MM/DD/YYYY | Yes\* |
| \* Upon edit, clear the data and require customer to enter the full date of birth. | | |
Know Your Customer (KYC) Required Customer Confirmation
Include this statement before the submit button. You can include an optional check box.
"I have reviewed the information provided and confirm it's accurate."
# Test Your Implementation
Source: https://developer.prove.com/docs/prove-pre-fill-sandbox-testing
Learn more about testing your Prove Pre-Fill implementation using the Sandbox environment
export const product_0 = "Prove Pre-Fill"
When you interact with the Sandbox environment, use test users to simulate different behaviors. Simulate the possession checks using the client-side SDK.
The testing environment doesn't send text messages or validate real customer information.
If the system returns an unexpected code, reference the [Error and Status Codes page](https://developer.prove.com/reference/status-and-error-codes).
{product_0} sandbox test users can only be used with {product_0} project credentials. Attempting to use these test users with different project credentials will result in an unauthorized access error.
## Test users list
### Short-term test user
Use this test user when performing initial testing with cURL or Postman. This test user skips the client-side SDK authentication to walk you through the sequence of API calls.
| Phone Number | First Name | Last Name | Address | City | State | Zip | Date of Birth | Social Security Number | Email |
| :----------- | :--------- | :-------- | :------------------ | :-------- | :---- | :--------- | :------------ | :--------------------- | :-------------------- |
| `2001001695` | Milo | Pinson | 6377 Birchwood Hill | Littleton | CO | 80161-2001 | 1/17/1981 | 847350596 | `mpinsonm@dyndns.org` |
After initial short-term testing, implement the client-side SDK and use the remaining test users to test your implementation.
### Prove Pre-Fill test users
Use the following list of test users to test Pre-Fill. Review the Testing Steps for expected behavior per step.
| Phone Number | First Name | Last Name | Address | City | State | Zip | Date of Birth | Social Security Number | Email |
| :----------- | :------------------ | :-------- | :----------------------------------------- | :----------------------------------------- | :--------------------------- | :--------------------------------- | :------------ | :--------------------- | :-------------------------- |
| `2001001693` | [Marcia](#marcia) | Longo | 00 Mallard Park
71 Walton Trail | New Orleans
Memphis | LA
TN | 70165
38150 | 7/19/1982 | 470806227 | `mlongok@amazonaws.com` |
| `2001001688` | [Nevin](#nevin) | Chattey | 9398 Scott Plaza | Austin | TX | 78744 | 3/20/1980 | 542742985 | `nchatteyf@techcrunch.com` |
| `2001001687` | [Agretha](#agretha) | Chene | 4861 Jay Junction | Boston | MS | 02208 | 12/29/1994 | 369956933 | `achenee@printfriendly.com` |
### Mobile Auth test users
Use the following list of test users to test Pre-Fill with the Mobile Auth add-on. Review the Testing Steps for expected behavior per step.
| Phone Number | First Name | Last Name | Address | City | State | Zip | Date of Birth | Social Security Number | Email |
| :----------- | :---------------- | :-------- | :------------------- | :------- | :---- | :---- | :------------ | :--------------------- | :----------------------- |
| `5550000000` | [Cathee](#cathee) | Simmonett | 49 Moulton Plaza | Athens | GA | 30610 | 10/6/1962 | 771240999 | `csimmonettj@toplist.cz` |
| `5555555555` | [Van](#van) | Moors | 9 Prairie Rose Court | Columbus | MS | 39705 | 1/7/1976 | 409890062 | `vmoorsd@rakuten.co.jp` |
### Know Your Customer test users
You can test Know Your Customer (KYC) and Customer Identification Program (CIP) with the following test users. Review the Testing Steps for expected behavior per step.
| Phone Number | First Name | Last Name | Address | City | State | Zip | Date of Birth | Social Security Number | Email |
| :----------- | :---------------------- | :-------- | :--------------------- | :----------- | :---- | :---- | :------------ | :--------------------- | :------------------------ |
| `2001004004` | [Johnnie](#johnnie) | Lammiman | 0571 Gale Court | White Plains | NY | 10633 | 12/08/1977 | 111258802 | `jlammiman4@xinhuanet.co` |
| `2001004001` | [Sebastian](#sebastian) | Limmer | 2302 Ronald Regan Park | Dayton | OH | 45470 | 12/23/1977 | 347465324 | `slimmer1@canalblog.com` |
| `2001004002` | [Leena](#leena) | Tomashov | 4984 Sage Hill | Saint Louis | MO | 63104 | 5/13/1965 | 115925498 | `ltomashov2@joomla.org` |
## Testing steps
Now that you’ve done client-side, server-side, and CX implementation, follow the step-by-step instructions to test each test user and ensure your implementation follows expected behavior.
Follow the steps below to test the Prove Pre-Fill flow with Marcia Longo. This user will pass the entire Pre-Fill flow and return `success=true` in the /complete response.
Start the onboarding flow on the initial screen and enter the PII for Marcia Longo.
Your front end will send this data to the back end. Your back end will then send the phone number, flow type, and challenge to the /start endpoint. The response will provide an auth token, correlation ID, and the next endpoint to call.
The final target URL must be sent if performing a desktop flow.
Your back end will send the authToken to the front end SDK to do the possession handling.
The front end will run OTP handling. Use 1234 to simulate a successful OTP.
The front end will run Instant Link handling. You will see the following page until the authentication is simulated.
Once the front end finishes the possession check, the back end calls the /validate endpoint with the correlation ID to authenticate the trustworthiness of the phone number.\
The response provides:
* `challengeMissing=false` due to passing the challenge into the /start call.
* `success=true`
* `phoneNumber` that was initially passed.
* `/v3/challenge` as the next endpoint to call.
The back end will then call the /challenge endpoint with the correlation ID. The response will provide PII for Marcia, `"success": true`, and the next endpoint to call.
The form will be prefilled with the PII returned from the /challenge endpoint. Confirm the provided information without editing it. The back end will then call the /complete endpoint with the correlation ID and you will have a successful flow. Send the user on through your onboarding flow.
Follow the steps below to test the Prove Pre-Fill flow with Agretha Chene. This user falls out of the Pre-Fill flow at the Validate step and returns `success=false` in the /validate response.
Start the onboarding flow on the initial screen and enter the PII for Agretha Chene.
Your front end will send this data to the back end. Your back end will then send the phone number, flow type, and challenge to the /start endpoint. The response will provide an auth token, correlation ID, and the next endpoint to call.
The final target URL must be sent if performing a desktop flow.
Your back end will send the authToken to the front end SDK to do the possession handling.
The front end will run OTP handling. Use 1234 to simulate a succesful OTP. Agretha will fail the authentication due to risk - results are returned in the next step.
The front end will run Instant Link handling. You will see the following page until the authentication is simulated.
Once the front end finishes the possession check, the back end calls the /validate endpoint with the correlation ID to authenticate the trustworthiness of the phone number.
This user fails /validate.
```json Response theme={"dark"}
{
"next": {
"done": "done"
},
"success": false,
"challengeMissing": false
}
```
The Prove flow is terminated. The front end should proceed to an alternative authentication method.
Follow the steps below to test the Prove Pre-Fill flow with Nevin Chattey. This user falls out of the Pre-Fill flow at the Validate step and returns `success=false` in the /validate response.
Start the onboarding flow on the initial screen and enter the PII for Nevin Chattey.
Your front end will send this data to the back end. Your back end will then send the phone number, flow type, and challenge to the /start endpoint. The response will provide an auth token, correlation ID, and the next endpoint to call.
The final target URL must be sent if performing a desktop flow.
Your back end will send the authToken to the front end SDK to do the possession handling.
The front end runs OTP (One-Time Password) handling. Enter any number in the front end. Nevin fails the authentication regardless of the number entered, and you see the results in the next step.
The front end will run Instant Link handling. You will see the following page until the authentication is simulated.
Once the front end finishes the possession check, the back end calls the /validate endpoint with the correlation ID to authenticate the trustworthiness of the phone number.
This user fails /validate.
```json Response theme={"dark"}
{
"next": {
"done": "done"
},
"success": false,
"challengeMissing": false
}
```
The Prove flow is terminated. The front end should proceed to an alternative authentication method.
Follow the steps below to test the Prove Pre-Fill flow with Mobile Auth add-on for Cathee Simmonett. This user will fail Mobile Auth on mobile but pass the OTP. This user will pass the entire Pre-Fill flow and return `success=true` in the /complete response.
Start the onboarding flow on the initial screen. The customer will be prompted to accept the [terms and conditions](https://developer.prove.com/docs/us-carrier-mno-consent-requirements).
Cathee's phone number needs to be passed into `Start()` due to Sandbox limitations. However, in Production the customers phone number does not need to be passed into `Start()` when Mobile Auth is enabled. The client-side SDK will prompt for phone number only if Mobile Auth fails.
Your front end will send data to the back end. Your back end will then send the phone number and flow type to the /start endpoint. The response will provide an auth token, correlation ID, and the next endpoint to call.
The final target URL must be sent if performing a desktop flow.
Your back end will send the authToken to the front end SDK to do the possession handling.
The system fails Mobile Auth and the client-side SDK prompts for the phone number.
The front end will then run OTP handling. Use 1234 to simulate a successful OTP.
The front end will run Instant Link handling. You will see the following page until the authentication is simulated.
Once the front end finishes the possession check, the back end calls the /validate endpoint with the correlation ID to authenticate the trustworthiness of the phone number.
The response provides:
* `challengeMissing=true` since you did not enter challenge data into the /start call.
* `success=true`
* `phoneNumber` that was initially passed.
* `/v3/challenge` as the next endpoint to call.
The front end will prompt the user with this screen. Enter the PII for Cathee Simmonett. This screen will look different depending on what challenge data you want to receive.
The back end will then call the /challenge endpoint with the correlation ID and challenge data. The response will provide PII for Cathee, `"success": true`, and the next endpoint to call.
The form will be prefilled with the PII returned from the /challenge endpoint. Confirm the provided information. The back end will then call the /complete endpoint with the correlation ID and you will have a successful flow.
Follow the steps below to test the Prove Pre-Fill flow with Mobile Auth add-on for Van Moors. This user will pass Mobile Auth on mobile. He will pass the entire Pre-Fill flow and return `success=true` in the /complete response.
Start the onboarding flow on the initial screen. The customer will be prompted to accept the [terms and conditions](https://developer.prove.com/docs/us-carrier-mno-consent-requirements).
Your front end will send data to the back end. Your back end will send an empty phone number and the flow type to the /start endpoint. The response will provide an auth token, correlation ID, and the next endpoint to call.
For this workflow, the SDK collects the phone number rather than passing in the phone number into the /start endpoint. Refer to the [Web](https://developer.prove.com/reference/web-sdk#instant-link-configuration), [Android](https://developer.prove.com/reference/android-sdk#otp-configuration), or [iOS](https://developer.prove.com/reference/ios-sdk#otp-configuration) SDK documentation to configure your implementation to handle phone number collection when prompted.
The final target URL must be sent if performing a desktop flow.
Your back end will send the authToken to the front end SDK to do the possession handling.
This user passes Mobile Auth.
If on desktop, the system fails Mobile Auth and the client-side SDK prompts for the phone number.
The front end will then run Instant Link handling. You will see the following page until the authentication is simulated.
Once the front end finishes the possession check, the back end calls the /validate endpoint with the correlation ID to authenticate the trustworthiness of the phone number.
The response provides:
* `challengeMissing=true` since you did not enter challenge data into the /start call.
* `success=true`
* `phoneNumber` that was initially passed.
* `/v3/challenge` as the next endpoint to call.
The front end will prompt the user with this screen. Enter the PII for Van Moors. This screen will look different depending on what challenge data you want to receive.
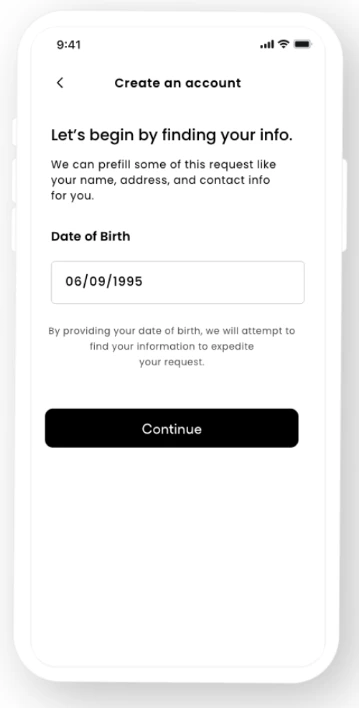 The back end will then call the /challenge endpoint with the correlation ID and challenge data. The response will provide PII for Van, `"success": true`, and the next endpoint to call.
The form will be prefilled with the PII returned from the /challenge endpoint. Confirm the provided information. The back end will then call the /complete endpoint with the correlation ID and you will have a successful flow.
Follow the steps below to test the Prove Pre-Fill flow with KYC add-on for Johnnie Lammiman. This user will pass the entire Pre-Fill flow and return `success=true` in the /complete response as well as return high MultiCIP and no hits against mock-configured KYC watchlists.
Start the onboarding flow on the initial screen and enter the PII for Johnnie Lammiman.
The back end will then call the /challenge endpoint with the correlation ID and challenge data. The response will provide PII for Van, `"success": true`, and the next endpoint to call.
The form will be prefilled with the PII returned from the /challenge endpoint. Confirm the provided information. The back end will then call the /complete endpoint with the correlation ID and you will have a successful flow.
Follow the steps below to test the Prove Pre-Fill flow with KYC add-on for Johnnie Lammiman. This user will pass the entire Pre-Fill flow and return `success=true` in the /complete response as well as return high MultiCIP and no hits against mock-configured KYC watchlists.
Start the onboarding flow on the initial screen and enter the PII for Johnnie Lammiman.
Your front end will send this data to the back end. Your back end will then send the phone number, flow type, and challenge to the /start endpoint. The response will provide an auth token, correlation ID, and the next endpoint to call.
The final target URL must be sent if performing a desktop flow.
Your back end will send the authToken to the front end SDK to do the possession handling.
The front end will run OTP handling. Use 1234 to simulate a successful OTP.
The front end will run Instant Link handling. You will see the following page until the authentication is simulated.
Once the front end finishes the possession check, the back end calls the /validate endpoint with the correlation ID to authenticate the trustworthiness of the phone number.
The response provides:
* `challengeMissing=false` due to passing the challenge into the /start call.
* `success=true`
* `phoneNumber` that was initially passed.
* `/v3/challenge` as the next endpoint to call.
The back end will then call the /challenge endpoint with the correlation ID. The response will provide PII for Johnnie, `"success": true`, and the next endpoint to call.
The form will be prefilled with the PII returned from the /challenge endpoint. Confirm the provided information. The back end will then call the /complete endpoint with the correlation ID and you will have a successful flow. You will receive simulated KYC and CIP results in the response. This user passes both checks.
Follow the steps below to test the Prove Pre-Fill flow with KYC add-on for Sebastian Limmer. This user will proceeed through the entire Pre-Fill flow. The /complete response will return `success=true` but also returns 4 simulated hits against KYC watchlists.
Start the onboarding flow on the initial screen and enter the PII for Sebastian Limmer.
Your front end will send this data to the back end. Your back end will then send the phone number, flow type, and challenge to the /start endpoint. The response will provide an auth token, correlation ID, and the next endpoint to call.
The final target URL must be sent if performing a desktop flow.
Your back end will send the authToken to the front end SDK to do the possession handling.
The front end runs OTP handling. Use 1234 to simulate a successful OTP.
The front end will run Instant Link handling. You will see the following page until the authentication is simulated.
Once the front end finishes the possession check, the back end calls the /validate endpoint with the correlation ID to authenticate the trustworthiness of the phone number.
The response provides:
* `challengeMissing=false` due to passing the challenge into the /start call.
* `success=true`
* `phoneNumber` that was initially passed.
* `/v3/challenge` as the next endpoint to call.
The back end will then call the /challenge endpoint with the correlation ID. The response will provide PII for Sebastian, `"success": true`, and the next endpoint to call.
The form will be prefilled with the PII returned from the /challenge endpoint. Confirm the provided information. The back end will then call the /complete endpoint with the correlation ID and you will have a successful flow. You will receive KYC and IDV data in the /complete response. This user fails the KYC check. Send the user through your exception process.
Follow the steps below to test the Prove Pre-Fill flow with KYC add-on for Leena Tomashov. This user will fail the Pre-Fill flow at the Complete step and return `multiCIPConfidence=low`.
Start the onboarding flow on the initial screen and enter the PII for Leena Tomashov.
Your front end will send this data to the back end. Your back end will then send the phone number, flow type, and challenge to the /start endpoint. The response will provide an auth token, correlation ID, and the next endpoint to call.
The final target URL must be sent if performing a desktop flow.
Your back end will send the authToken to the front end SDK to do the possession handling.
The front end runs OTP handling. Use 1234 to simulate a successful OTP.
The front end will run Instant Link handling. You will see the following page until the authentication is simulated.
Once the front end finishes the possession check, the back end calls the /validate endpoint with the correlation ID to authenticate the trustworthiness of the phone number.
The response provides:
* `challengeMissing=false` due to passing the challenge into the /start call.
* `success=true`
* `phoneNumber` that was initially passed.
* `/v3/challenge` as the next endpoint to call.
The back end will then call the /challenge endpoint with the correlation ID. The response will provide PII for Leena, `"success": true`, and the next endpoint to call.
The form will be prefilled with the PII returned from the /challenge endpoint. Confirm the provided information. The back end will then call the /complete endpoint with the correlation ID. You will receive KYC and IDV data in the /complete response. This user fails the Complete step indicating Prove was unable to validate their identity. In addition, this user fails the CIP check. Send the user through a step-up authentication method.
Follow the steps below to test the Prove Pre-Fill flow with Marcia, Cathee, Van, Johnnie, Sebastian or Leena. This will introduce failures into the flow and return `success=false` at various points.
Your back end will send the authToken to the front end SDK to do the possession handling. During the mobile flow, use 1111 to simulate a failed OTP when presented with the following OTP page.
Once the front end finishes the possession check, the back end calls the /validate endpoint with the correlation ID to authenticate the trustworthiness of the phone number.
The test user then fails /validate.
```json Response theme={"dark"}
{
"next": {
"done": "done"
},
"success": false,
"challengeMissing": false
}
```
The Prove flow is terminated and the front end proceeds to another authentication method.
Start the onboarding flow on the initial screen and enter the wrong SSN or DOB for the user.
Once the front end finishes the possession check, the back end calls the /validate endpoint with the correlation ID to authenticate the trustworthiness of the phone number.
The response provides:
* `challengeMissing=false` due to passing the challenge into the /start call.
* `success=true`
* `phoneNumber` that was initially passed.
* `/v3/challenge` as the next endpoint to call.
The back end will then call the /challenge endpoint with the correlation ID. The user then fails /challenge. Send the user through the exception process.
```json Response theme={"dark"}
{
"next": {
"v3-complete": "/v3/complete"
},
"success": false
}
```
When viewing the following page, prefilled with the user's PII, change the last name.
The back end will then call the /complete endpoint with the correlation ID and the edited information. The user will fail /complete. Send the user through the exception process.
```json Response theme={"dark"}
{
"next": {
"v3-complete": "/v3/complete"
},
"success": false
}
```
# Verify Your Mobile Page Requirements
Source: https://developer.prove.com/docs/prove-pre-fill-verify-your-mobile-page-requirements
Learn how to design the frontend for your one-time password (OTP) or Instant Link page
## OTP
### Page summary
| Flow | Page Summary Language |
| :----- | :----------------------------------------------------------------------------- |
| Mobile | Enter verification code. Please enter the code we just sent to (XXX) XXX-XXXX. |
## Instant Link
### Page summary
| Flow | Page Summary Language |
| :------ | :----------------------------------------------------------------------------------------------------------------------- |
| Desktop | Check your Phone. A text message with a link was just sent to the phone ending in XXXX (last 4 digits of mobile number). |
## Alternate path for customers
If the customer can't authenticate through Instant Link or SMS one-time password (OTP), customer exits the Prove flow. Present a manual form as an alternate method of verification.
# Sandbox Testing
Source: https://developer.prove.com/docs/sandbox-testing
# Sandbox Testing
Source: https://developer.prove.com/docs/sandbox-testing-authentication
# Start Page Requirements - When Mobile Auth℠ Fails
Source: https://developer.prove.com/docs/start-page-requirements-when-mobile-authsm-fails
Learn how to design the frontend for the Start Page when Mobile Auth fails or if using the Desktop flow
## Page summary requirements
Page Summary Language: Let's Get Started
Page Summary Description: Please enter your phone number to begin the account creation process.
## Data entry prompt requirements
Prompt for the mobile number within the input field.
## Opt out
Allow customers to select "I don't have a mobile number" which sends the customer to a manual form to allow customers without mobile numbers to still apply.
# Prove Unified Authentication Overview
Source: https://developer.prove.com/docs/unify-flow
Prove Unified Authentication is a secure authentication solution that automatically chooses the right authenticator based on trusted device recognition and authentication availability.
# Unified Authentication Implementation Guide
Source: https://developer.prove.com/docs/unify-implementation-guide
## How to implement
To integrate Prove authentication, you must use the client-side SDK.
Determine if the customer is on a mobile or desktop browser using this example. If the `isMobile` is true, set `mobile` as the `flowType` for the `Start()` function on the server, otherwise you can set `desktop`:
```javascript JavaScript theme={"dark"}
// Check if the customer is on a mobile or desktop browser.
const authCheck = new proveAuth.AuthenticatorBuilder().build();
let isMobile = authCheck.isMobileWeb()
```
```typescript TypeScript theme={"dark"}
// Check if the customer is on a mobile or desktop browser.
const authCheck = new proveAuth.AuthenticatorBuilder().build();
let isMobile = authCheck.isMobileWeb()
```
When using the Android SDK, set `mobile` as the `flowType` for the `Start()` function on the server.
When using the iOS SDK, set `mobile` as the `flowType` for the `Start()` function on the server.
Send a request to your back end server with the phone number and possession type to start the flow.
Additional parameters:
* `finalTargetURL`: required when `flowType=desktop`. This should be a URL you maintain. Once the customer clicks the Instant Link, they will be redirected to this URL. It should instruct the customer to continue the workflow. Maximum length is 128 characters.
* `checkReputation`: if true, TrustScore verification will be performed.
* `clientHumanId`: a client-generated unique ID to identify a specific customer across business lines.
* `clientRequestId`: a client-generated unique ID for a specific session. This can be used to identify specific requests.
* `smsMessage`: optional field to customize the message body sent in the Instant Link or OTP SMS message. Otherwise, you can use Prove defaults.
* `clientCustomerId`: a client-generated unique ID for a specific customer. You can link calls related to the same customer, across different requests or sessions. The client defines the format of this ID.
* `deviceId`: the unique identifier for the Prove Key on the device.
* `emailAddress`: the email address of the customer.
* `ipAddress`: the IP address of the customer.
* `proveId`: a unique ID to identify a specific customer obtained from a previous successful authentication.
For OTP retries, make sure to implement client SDK changes in the next step.
```go Go theme={"dark"}
// Send the Unify request.
rspUnify, err := client.V3.V3UnifyRequest(ctx, &components.V3UnifyRequest{
PhoneNumber: "2001004014",
PossessionType: "mobile",
ClientRequestID: provesdkservergo.String("client-abc-123"),
AllowOTPRetry: true,
})
if err != nil {
t.Fatal(err)
}
```
```typescript TypeScript theme={"dark"}
let unifyReq = {
phoneNumber: '2001004014',
possessionType: 'mobile',
clientRequestId: 'client-abc-123',
allowOTPRetry: true,
}
// Send the Unify request.
const rspUnify = await sdk.v3.v3UnifyRequest(unifyReq);
if (!rspUnify) {
console.error("Unify error.")
return
}
```
```java Java theme={"dark"}
// Send the Unify request.
V3UnifyRequest req = V3UnifyRequest.builder()
.phoneNumber("2001004014")
.possessionType("mobile")
.clientRequestId("client-abc-123")
.allowOTPRetry(true)
.build();
// You may want to use the .get() method when working with the response object.
```
```csharp .NET theme={"dark"}
using Prove.Proveapi;
using Prove.Proveapi.Models.Components;
var sdk = new ProveAPI(auth: "");
V3StartRequest req = new V3UnifyRequest() {
PhoneNumber = "2001004014",
PossessionType = "mobile",
ClientRequestID = "client-abc-123",
AllowOTPRetry = true,
};
var res = await sdk.V3.V3StartRequestAsync(req);
```
Send a request to your back end server with the possession type to start the flow.
Additional parameters:
* `finalTargetURL`: required when `flowType=desktop`. This should be a URL you maintain. Once the customer clicks the Instant Link, they will be redirected to this URL. It should instruct the customer to continue the workflow. Maximum length is 128 characters.
* `smsMessage`: optional field to customize the message body sent in the Instant Link or OTP SMS message. Otherwise, you can use Prove defaults.
* `clientCustomerId`: a client-generated unique ID for a specific customer. You can link calls related to the same customer, across different requests or sessions. The client defines the format of this ID.
* `clientRequestId`: a client-generated unique ID for a specific session. You can identify specific requests using this field. You determine the format of this ID.
* `allowOTPRetry`: set to `true` to allow the customer to re-enter the OTP up to three times. Defaults to `false`.
For OTP retries, make sure to implement client SDK changes in the next step.
```go Go theme={"dark"}
// Send the Unify request.
rspUnify, err := client.V3.V3UnifyRequest(ctx, &components.V3UnifyRequest{
PossessionType: "mobile",
ClientRequestID: provesdkservergo.String("client-abc-123"),
AllowOTPRetry: true,
})
if err != nil {
t.Fatal(err)
}
```
```typescript TypeScript theme={"dark"}
let unifyReq = {
possessionType: 'mobile',
clientRequestId: 'client-abc-123',
allowOTPRetry: true,
}
// Send the Unify request.
const rspUnify = await sdk.v3.v3UnifyRequest(unifyReq);
if (!rspUnify) {
console.error("Unify error.")
return
}
```
```java Java theme={"dark"}
// Send the Unify request.
V3UnifyRequest req = V3UnifyRequest.builder()
.possessionType("mobile")
.clientRequestId("client-abc-123")
.allowOTPRetry(true)
.build();
// You may want to use the .get() method when working with the response object.
```
```csharp .NET theme={"dark"}
using Prove.Proveapi;
using Prove.Proveapi.Models.Components;
var sdk = new ProveAPI(auth: "");
V3StartRequest req = new V3UnifyRequest() {
PossessionType = "mobile",
ClientRequestID = "client-abc-123",
AllowOTPRetry = true,
};
var res = await sdk.V3.V3StartRequestAsync(req);
```
The function returns the following fields:
* `authToken`: send this to your client-side code to pass into the `Authenticate()` function - it’s a short lived JSON Web Token (JWT) tied to the current flow and used for the possession checks.
* `correlationId`: save this in your current session, then pass it in to the `UnifyStatus()` function call of the same flow. The correlation ID ties together different system calls for the same Prove flow. It also aids in troubleshooting. The session expires in 15 minutes from when the correlation ID returns from the `Unify()` call.
* `success`: will return `pending` for this initial call.
Return the `authToken` in a response to the front end.
Once you have the `authToken`, build the authenticator for both the mobile and desktop flows.
```javascript JavaScript theme={"dark"}
async function authenticate(isMobileWeb, authToken) {
// Set up the authenticator for either mobile or desktop flow.
let builder = new proveAuth.AuthenticatorBuilder();
if (isMobileWeb) {
// Set up Mobile Auth and OTP.
builder = builder
.withAuthFinishStep((input) => verify(input.authId))
.withMobileAuthImplementation("fetch")
.withOtpFallback(otpStart, otpFinish);
} else {
// Set up Instant Link.
builder = builder
.withAuthFinishStep((input) => verify(input.authId))
.withInstantLinkFallback(instantLink)
.withRole("secondary");
}
const authenticator = builder.build();
// Authenticate with the authToken.
return authenticator.authenticate(authToken);
}
```
```typescript TypeScript theme={"dark"}
async function authenticate(isMobileWeb: boolean, authToken: string) {
// Set up the authenticator for either mobile or desktop flow.
let builder = new proveAuth.AuthenticatorBuilder();
if (isMobileWeb) {
// Set up Mobile Auth and OTP.
builder = builder
.withAuthFinishStep((input) => verify(input.authId))
.withMobileAuthImplementation("fetch")
.withOtpFallback(otpStart, otpFinish);
} else {
// Set up Instant Link.
builder = builder
.withAuthFinishStep((input) => verify(input.authId))
.withInstantLinkFallback(instantLink)
.withRole("secondary");
}
const authenticator = builder.build();
// Authenticate with the authToken.
return authenticator.authenticate(authToken);
}
```
In the desktop flow, a WebSocket opens for three minutes on the desktop browser while waiting for the customer to select the link in the text message. Once clicked, the WebSocket closes and the `AuthFinishStep` function finishes.
If you're using [Content Security Policy headers](https://content-security-policy.com/), ensure you allow `wss: device.uat.proveapis.com` and `wss: device.proveapis.com`.
```java Java theme={"dark"}
// Object implementing AuthFinishStep interface
AuthFinishStep authFinishStep = new AuthFinishStep() {
...
};
// Objects implementing OtpStartStep/OtpFinishStep interfaces
OtpStartStep otpStartStep = new OtpStartStep() {
...
};
OtpFinishStep otpFinishStep = new OtpFinishStep() {
...
};
ProveAuth proveAuth = ProveAuth.builder()
.withAuthFinishStep(authId -> verify(authId)) // verify(authId) call defined in #Validate the Mobile Phone section
.withOtpFallback(otpStartStep, otpFinishStep)
.withContext(this)
.build();
```
The cellular data connection can sometimes be unavailable during testing. The `Builder` class offers a `withTestMode(boolean testMode)` method, which permits simulated successful session results while connected to a Wi-Fi network only (without a cellular data connection available). Testing using a Wi-Fi connection is useful in the Sandbox environment.
```java Java theme={"dark"}
ProveAuth proveAuth = ProveAuth.builder()
.withAuthFinishStep(authId -> verify(authId))
.withOtpFallback(otpStartStep, otpFinishStep)
.withContext(this)
.withTestMode(true) // Test mode flag
.build();
```
The `ProveAuth` object is thread safe. You can use it as a singleton. Most Prove Auth methods are blocking and therefore can't execute in the main application thread. The application employs an executor service with a minimum of two threads to manage threads due to the SDK's ability to process concurrent blocking requests.
```java Java theme={"dark"}
public class MyAuthenticator {
private final MyBackendClient backend = new MyBackendClient(); // Backend API client
private final AuthFinishStep authFinishStep = new AuthFinishStep() {
@Override
void execute(String authId) {
try {
AuthFinishResponse response = backend.authFinish("My App", authId);
... // Check the authentication status returned in the response
} catch (IOException e) {
String failureCause = e.getCause() != null ? e.getCause().getMessage() : "Failed to request authentication results";
// Authentication failed due to request failure
}
}
};
private ProveAuth proveAuth;
public MyAuthenticator(Context context) {
proveAuth = ProveAuth.builder()
.withAuthFinishStep(authFinishStep)
.withOtpFallback(otpStartStep, otpFinishStep)
.withContext(context)
.build();
}
public void authenticate() throws IOException, ProveAuthException {
AuthStartResponse response = backend.authStart("My Prove Auth App");
proveAuth.authenticate(response.getAuthToken());
}
}
```
```swift Swift theme={"dark"}
// Object implementing ProveAuthFinishStep protocols
let finishStep = FinishAuthStep()
// Objects implementing OtpStartStep/OtpFinishStep protocols
let otpStartStep = MobileOtpStartStep()
let otpFinishStep = MobileOtpFinishStep()
let proveAuthSdk: ProveAuth
proveAuthSdk = ProveAuth.builder(authFinish: finishStep)
.withOtpFallback(otpStart: otpStartStep, otpFinish: otpFinishStep)
.build()
```
In the event a cellular data connection is unavailable during testing, use the Builder class. It permits simulated successful session results while connected to a Wi-Fi network. Testing using a Wi-Fi connection is useful in the Sandbox environment.
```swift Swift theme={"dark"}
proveAuthSdk = ProveAuth.builder(authFinish: finishStep)
.withMobileAuthTestMode() // Test mode flag
.build()
```
The Prove Auth object is thread safe and used as a singleton. Most Prove Auth methods are blocking and therefore can't execute in the main application thread. The application employs an executor service with a minimum of two threads to manage threads due to the SDK's ability to process concurrent blocking requests.
```swift Swift theme={"dark"}
// authToken retrieved from your server via StartAuthRequest
proveAuthSdk.authenticate(authToken) { error in
DispatchQueue.main.async {
self.messages.finalResultMessage = "ProveAuth.authenticate returned error: \(error.localizedDescription)"
print(self.messages.finalResultMessage)
}
}
```
In the `AuthFinishStep`, you'll specify a function to call once the possession checks complete on the mobile phone. This endpoint on your back end server calls the `UnifyStatus()` function to validate the phone number. The `AuthFinishStep` then completes.
```go Go theme={"dark"}
rspUnifyStatus, err := client.V3.V3UnifyStatusRequest(context.TODO(), &components.V3UnifyStatusRequest{
CorrelationID: rspUnify.V3UnifyResponse.CorrelationID,
})
if err != nil {
return fmt.Errorf("error on UnifyStatus(): %w", err)
}
```
```typescript TypeScript theme={"dark"}
const rspUnifyStatus = await sdk.v3.v3UnifyStatusRequest({
correlationId: rspUnify.v3UnifyResponse?.correlationId || '',
},
});
if (!rspUnifyStatus) {
console.error("Unify Status error.")
return
}
```
```java Java theme={"dark"}
V3UnifyStatusRequest req = V3UnifyStatusRequest.builder()
.correlationId("713189b8-5555-4b08-83ba-75d08780aebd")
.build();
V3UnifyStatusResponse res = sdk.v3().v3UnifyStatusRequest()
.request(req)
.call();
// You may want to use the .get() method when working with the response object.
```
The function returns the following fields:
* `success`: either `true` if the mobile number validation was successful, or `false` if it failed.
* `phoneNumber`: the phone number associated with the possession check.
* `clientHumanId`: if provided in the request.
* `clientRequestId`: if provided in the request.
* `deviceId`: the unique identifier for the Prove Key on the device.
* `evaluation`: the evaluation result for the Global Fraud Policy.
* `proveId`: a unique ID to identify a specific customer obtained from a successful possession check.
You can then respond to the front end with the results of the authentication.
Only mobile channels are supported for this flow.
You need to send a request to your back end server with the phone number and `possessionType=none` to start the flow.
Additional parameters:
* `checkReputation`: if true, TrustScore verification will be performed.
* `clientHumanId`: a client-generated unique ID to identify a specific customer across business lines.
* `clientCustomerId`: a client-generated unique ID for a specific customer. You can link calls related to the same customer, across different requests or sessions. The client defines the format of this ID.
* `deviceId`: the unique identifier for the Prove Key on the device.
* `emailAddress`: the email address of the customer.
* `ipAddress`: the IP address of the customer.
* `proveId`: a unique ID to identify a specific customer obtained from a previous successful authentication.
* `rebind`: if `true`, rebinds the Prove Key with the newly verified phone number.
```go Go theme={"dark"}
// Send the Unify request.
rspUnify, err := client.V3.V3UnifyRequest(ctx, &components.V3UnifyRequest{
PhoneNumber: "2001004014",
PossessionType: "mobile",
})
if err != nil {
t.Fatal(err)
}
```
```typescript TypeScript theme={"dark"}
let unifyReq = {
phoneNumber: '2001004014',
possessionType: 'mobile'
}
// Send the Unify request.
const rspUnify = await sdk.v3.v3UnifyRequest(unifyReq);
if (!rspUnify) {
console.error("Unify error.")
return
}
```
```java Java theme={"dark"}
// Send the Unify request.
V3UnifyRequest req = V3UnifyRequest.builder()
.phoneNumber("2001004014")
.possessionType("mobile")
.build();
// You may want to use the .get() method when working with the response object.
```
```csharp .NET theme={"dark"}
using Prove.Proveapi;
using Prove.Proveapi.Models.Components;
var sdk = new ProveAPI(auth: "");
V3StartRequest req = new V3UnifyRequest() {
PhoneNumber = "2001004014",
PossessionType = "mobile",
};
var res = await sdk.V3.V3StartRequestAsync(req);
```
The function returns the following fields:
* `authToken`: send this to your client-side code to pass into the `Authenticate()` function - it’s a short lived JSON Web Token (JWT) tied to the current flow and used for the possession checks.
* `correlationId`: save this in your current session, then pass it in to the `UnifyStatus()` function call of the same flow. The correlation ID ties together different system calls for the same Prove flow. It also aids in troubleshooting. The session expires in 15 minutes from when the correlation ID returns from the `Unify()` call.
* `success`: will return `pending` for this initial call.
Return the `authToken` in a response to the front end.
Initialize the client-side SDK to place a Prove key on the device or to check if a Prove key is bound.
```javascript JavaScript theme={"dark"}
async function authenticate(isMobileWeb, authToken) {
// Set up the authenticator for the mobile flow.
let builder = new proveAuth.AuthenticatorBuilder();
builder = builder
.withAuthFinishStep((input) => verify(input.authId));
const authenticator = builder.build();
// Authenticate with the authToken.
return authenticator.authenticate(authToken);
}
```
```typescript TypeScript theme={"dark"}
async function authenticate(isMobileWeb: boolean, authToken: string) {
// Set up the authenticator for the mobile flow.
let builder = new proveAuth.AuthenticatorBuilder();
builder = builder
.withAuthFinishStep((input) => verify(input.authId));
const authenticator = builder.build();
// Authenticate with the authToken.
return authenticator.authenticate(authToken);
}
```
In the `AuthFinishStep` of the client SDK, you'll need to have the function make a call to an endpoint on your back end server. Your backend server should then call the `UnifyStatus()` function to validate the phone number. The `AuthFinishStep` then completes.
```go Go theme={"dark"}
rspUnifyStatus, err := client.V3.V3UnifyStatusRequest(context.TODO(), &components.V3UnifyStatusRequest{
CorrelationID: rspUnify.V3UnifyResponse.CorrelationID,
})
if err != nil {
return fmt.Errorf("error on UnifyStatus(): %w", err)
}
```
```typescript TypeScript theme={"dark"}
const rspUnifyStatus = await sdk.v3.v3UnifyStatusRequest({
correlationId: rspUnify.v3UnifyResponse?.correlationId || '',
},
});
if (!rspUnifyStatus) {
console.error("Unify Status error.")
return
}
```
```java Java theme={"dark"}
V3UnifyStatusRequest req = V3UnifyStatusRequest.builder()
.correlationId("713189b8-5555-4b08-83ba-75d08780aebd")
.build();
V3UnifyStatusResponse res = sdk.v3().v3UnifyStatusRequest()
.request(req)
.call();
// You may want to use the .get() method when working with the response object.
```
The function returns the following fields:
* `success`: either `possession_required` if the reputation check was successful, or `false` if it failed.
* `phoneNumber`: the phone number associated with the possession check.
* `clientHumanId`: if provided in the request.
* `clientRequestId`: if provided in the request.
* `deviceId`: the unique identifier for the Prove Key on the device.
* `evaluation`: the evaluation result for the Global Fraud Policy.
* `proveId`: a unique ID to identify a specific customer obtained from a successful possession check.
You can then respond to the front end with the results of the authentication.
If possession is required, your application needs to perform a customer-supplied possession check such as SMS OTP. ONLY proceed to the next step if the posession check passes.
Call `UnifyBind()` after `UnifyStatus()` returns `success=possession_required`. Call this endpoint if and only if the possession check has passed. This binds the phone number to the Prove Key for future authentications.
This function takes these required parameters:
* `correlationId`: the ID returned by the `Unify()` function.
* `phoneNumber`: the phone number to bind to the Prove Key.
* `clientRequestId`: a client-generated unique ID for a specific session. This can be used to identify specific requests.
```go Go theme={"dark"}
rspUnifyBind, err := client.V3.V3UnifyBindRequest(context.TODO(), &components.V3UnifyBindRequest{
CorrelationID: rspUnify.V3UnifyResponse.CorrelationID,
PhoneNumber: "2001004018",
})
if err != nil {
return fmt.Errorf("error on UnifyBind(): %w", err)
}
```
```typescript TypeScript theme={"dark"}
const rspUnifyBind = await sdk.v3.v3UnifyBindRequest({
correlationId: rspUnify.v3UnifyResponse?.correlationId || '',
phoneNumber: '2001004018',
},
});
if (!rspUnifyBind) {
console.error("Unify Bind error.")
return
}
```
```java Java theme={"dark"}
V3UnifyBindRequest req = V3UnifyBindRequest.builder()
.correlationId("713189b8-5555-4b08-83ba-75d08780aebd")
.phoneNumber("2001004018")
.build();
V3UnifyBindResponse res = sdk.v3().v3UnifyBindRequest()
.request(req)
.call();
// You may want to use the .get() method when working with the response object.
```
The function returns the following fields:
* `success`: `true` if the binding succeeded, `false` if it failed.
* `phoneNumber`: the phone number that was bound to the Prove Key.
* `clientHumanId`: if provided in the request.
* `clientRequestId`: if provided in the request.
* `deviceId`: the unique identifier for the Prove Key on the device.
* `evaluation`: the evaluation result for the Global Fraud Policy.
Prove Key Behavior
The following are things to be aware of when using the Prove Key:
The Prove Key is ignored and Instant Link is performed.
If you send a different phone number to /unify than the one registered to the Prove key, you will receive `success=false` when calling /unify-status. This is because the Prove Key is bound to a different number. Run the flow again with `rebind=true` in the /unify endpoint. This will force a full possession check and then, if valid, will rebind the Prove Key to the new phone number.
If you send a different phone number to /unify than the one registered to the Prove key, the customer will receive `possession_required` on the /unify-status call. You will need to call /unify-bind to rebind the Prove Key to the new number. Once it's rebound, the previous number will ask for `possession_required`. The Prove key only supports one phone number.
# Unified Authentication Sandbox Testing
Source: https://developer.prove.com/docs/unify-sandbox-testing
## Test users list
### Short-term test users
Use this test user when performing initial testing with cURL or Postman. This test user skips the client-side SDK authentication to walk you through the sequence of API calls.
| Phone Number | First Name | Last Name |
| :----------- | :---------- | :-------- |
| 2001004018 | Barbaraanne | Canet |
| Phone Number | First Name | Last Name |
| :----------- | :--------- | :-------- |
| +2001004029 | Janos | Martina |
After initial short-term testing, implement the client-side SDK and use the remaining test users to test your implementation.
### Unified Auth test users
Follow the [Testing Steps](#testing-steps) for expected behavior per step.
| Phone Number | First Name | Last Name |
| :----------- | :--------- | :-------- |
| 2001004014 | Lorant | Nerger |
| Phone Number | First Name | Last Name |
| :----------- | :--------- | :-------- |
| +2001004025 | Bertie | Fremont |
### Mobile Auth test users
Follow the [Testing Steps](#testing-steps) for expected behavior per step.
| Phone Number | First Name | Last Name |
| :----------- | :--------- | :-------- |
| 2001004016 | Inge | Galier |
| 2001004017 | Jesse | Mashro |
| Phone Number | First Name | Last Name |
| :----------- | :--------- | :-------- |
| +2001004027 | Allissa | Zoren |
| +2001004028 | Wendy | Strover |
## Testing steps
Now that you’ve done client-side, server-side, and CX implementation, test using the test users.
Follow the steps below to test the Prove Unified Authentication flow with Lorant Nerger on desktop. This user will pass the entire Unified Authentication flow using Prove's possession and return `success=true` in the /unify-status response.
Start the onboarding flow on the initial screen and enter the phone number for Lorant Nerger.
Your front end will send the phone number, possession type, and final target URL to the back end. Your back end will then send the phone number to the /unify endpoint. The response will provide an auth token, correlation ID, and `success=pending` because possession still needs to be performed.
Your back end will send the `authToken` to the front end. The front end will run Instant Link handling.
Once the front end finishes the possession check, the back end calls the /unify-status endpoint with the correlation ID to validate the phone number.
The response provides:
* `proveId` that is tied to this user.
* `success=true`
* `phoneNumber` that was initially passed.
You have a successful flow but no Prove Key is placed as it only applies to mobile devices. Send the user on through your authenticated flow.
Follow the steps below to test the Prove Unified Authentication flow with Lorant Nerger on mobile. This user will pass Prove's possession and return `success=true` in the /unify-status response. The user can then be sent through the Prove Unified Authentication flow again using the same phone number with a Prove Key.
Start the onboarding flow on the initial screen and enter the phone number for Lorant Nerger.
Your front end will send the phone number and possession type to the back end. Your back end will then send the phone number to the /unify endpoint. The response will provide an auth token, correlation ID, and `success=pending` because possession still needs to be performed.
Your back end will send the `authToken` to the front end. The front end will run OTP handling. You will see the following page. Enter 1234 to simulate a successful OTP.
Once the front end finishes the possession check, the back end calls the /unify-status endpoint with the correlation ID to validate the phone number.
The response provides:
* `deviceId` that's an external identifier of the Prove ID.
* `proveId` that is tied to this user.
* `success=true`
* `phoneNumber` that was initially passed.
You have a successful flow and a Prove key has been assigned to this phone number. Sending this user through again will bypass the possession check due to the Prove key. Send the user on through your authenticated flow.
Follow the steps below to test the Prove Unified Authentication flow with Lorant Nerger using customer-supplied possession. This user will pass the entire Unified Authentication flow using the customer's possession and return `success=true` in the /unify-bind response. The user can then be sent through the Prove Unified Authentication flow again using the same phone number with a Prove Key.
Start the onboarding flow on the initial screen and enter the phone number for Lorant Nerger.
Your front end will send the phone number and possession type to the back end. Your back end will then send the phone number to the /unify endpoint. The response will provide an auth token, correlation ID, and `success=pending` because possession still needs to be performed.
The back end then calls the /unify-status endpoint with the correlation ID to validate the phone number.
The response provides:
* `success=possession_required` since Prove is not performing the possession check.
Perform your own possession check outside of Prove's system. If the consumer fails, end the flow. If the consumer passes, then proceed to Bind Prove Key.
The back end will then call the /unify-bind endpoint with the correlation ID.
The response provides:
* `proveId` that is tied to this user.
* `success=true`
* `phoneNumber` that was initially passed.
You have a successful flow and a Prove key has been assigned to this phone number. Sending this user through again will bypass the possession check due to the Prove key. Send the user on through your authenticated flow.
Follow the steps below to test the Prove Unified Authentication flow with Inge Galier on desktop. This user will pass the entire Unified Authentication flow using Prove's possession and return `success=true` in the /unify-status response.
Start the onboarding flow on the initial screen and enter the phone number for Inge Galier.
Your front end will send the phone number, possession type, and final target URL to the back end. Your back end will then send the phone number to the /unify endpoint. The response will provide an auth token, correlation ID, and `success=pending` because possession still needs to be performed.
Your back end will send the `authToken` to the front end. The front end will run Instant Link handling.
Once the front end finishes the possession check, the back end calls the /unify-status endpoint with the correlation ID to validate the phone number.
The response provides:
* `correlationId` that is tied to this flow.
* `success=true`
* `phoneNumber` that was initially passed.
You have a successful flow but no Prove key is placed as the Prove key only applies to mobile devices. Send the user on through your authenticated flow.
Follow the steps below to test the Prove Unified Authentication flow with Inge Galier on mobile. This user will pass Mobile Auth and return `success=true` in the /unify-status response. The user can then be sent through the Prove Unified Authentication flow again using the same phone number with a Prove Key.
Start the onboarding flow on the initial screen and enter the phone number for Inge Galier.
Your front end will send the possession type to the back end. Your back end will then call the /unify endpoint. The response will provide an auth token, correlation ID, and `success=pending` because possession still needs to be performed.
Your back end will send the `authToken` to the front end. The front end will run Mobile Auth.
Once the front end finishes the possession check, the back end calls the /unify-status endpoint with the correlation ID to validate the phone number.
The response provides:
* `deviceId` that's tied to the mobile device.
* `proveId` that's tied to this customer.
* `phoneNumber` that was discovered by Mobile Auth.
* `success=true`
* `phoneNumber` that was initially passed.
You have a successful flow and a Prove key has been assigned to this phone number. Sending this user through again will bypass the possession check due to the Prove key. Send the user on through your authenticated flow.
Follow the steps below to test the Prove Unified Authentication flow with Inge Galier using customer-supplied possession. This user will pass the entire Unified Authentication flow using the customer's possession and return `success=true` in the /unify-bind response. The user can then be sent through the Prove Unified Authentication flow again using the same phone number with a Prove Key.
Start the onboarding flow on the initial screen and enter the phone number for Inge Galier.
Your front end will send the phone number and possession type to the back end. Your back end will then send the phone number to the /unify endpoint. The response will provide an auth token, correlation ID, and `success=pending` because possession still needs to be performed.
The back end then calls the /unify-status endpoint with the correlation ID to validate the phone number.
The response provides:
* `correlationId` that's tied to this flow.
* `success=possession_required` since Prove is not performing the possession check.
* `phoneNumber` that was initially passed.
Perform your own possession check outside of Prove's system. If the consumer fails, end the flow. If the consumer passes, then proceed to Bind Prove Key.
The back end will then call the /unify-bind endpoint with the correlation ID and phone number.
The response provides:
* `correlationId` that's tied to this flow.
* `success=true`
* `phoneNumber` that was initially passed.
You have a successful flow and a Prove key has been assigned to this phone number. Sending this user through again will bypass the possession check due to the Prove key. Send the user on through your authenticated flow.
Follow the steps below to test the Prove Unified Authentication flow with Jesse Mashiro on desktop. This user will fail the Unified Authentication flow using Prove's possession and return `success=false` in the /unify-status response.
Start the onboarding flow on the initial screen and enter the phone number for Jesse Mashru.
Your front end will send the phone number, possession type, and final target URL to the back end. Your back end will then send the phone number to the /unify endpoint. The response will provide an auth token, correlation ID, and `success=pending` because possession still needs to be performed.
Your back end will send the `authToken` to the front end. The front end will run Instant Link handling. This user fails Instant Link.
Once the front end finishes the possession check, the back end calls the /unify-status endpoint with the correlation ID to validate the phone number.
The response provides:
* `success=false`
* `phoneNumber` that was initially passed.
The test user failed. Send the user through your exception process.
Follow the steps below to test the Prove Unified Authentication flow with Jesse Mashro on mobile. This user will fail the Unified Authentication flow using Mobile Auth and return `success=false` in the /unify-status response.
Start the onboarding flow on the initial screen and enter the phone number for Jesse Mashro.
Your front end will send the phone number and possession type to the back end. Your back end will then send the phone number to the /unify endpoint. The response will provide an auth token, correlation ID, and `success=pending` because possession still needs to be performed.
Your back end will send the `authToken` to the front end. The front end will fail Mobile Auth and OTP without prompting.
Once the front end finishes the possession check, the back end calls the /unify-status endpoint with the correlation ID to validate the phone number.
The response provides:
* `success=false`
* `phoneNumber` that was initially passed.
The test user failed. Send the user through your exception process.
Follow the steps below to test the Prove Unified Authentication flow with Jesse Mashro using customer-supplied possession. This user will encounter a server error in the /unify-bind response, simulating an error when creating the Prove key.
Start the onboarding flow on the initial screen and enter the phone number for Jesse Mashro.
Your front end will send the phone number and possession type to the back end. Your back end will then send the phone number to the /unify endpoint. The response will provide an auth token, correlation ID, and `success=pending` because possession still needs to be performed.
The back end then calls the /unify-status endpoint with the correlation ID to validate the phone number.
The response provides:
* `correlationId` that's tied to this flow.
* `success=possession_required` since Prove is not performing the possession check.
* `phoneNumber` that was initially passed.
Perform your own possession check outside of Prove's system. If the consumer fails, end the flow. If the consumer passes, then proceed to Bind Prove Key.
The back end will then call the /unify-bind endpoint with the correlation ID and phone number.
You will receive a server error in the response.
```json Response theme={"dark"}
{
"code": 8000,
"message": "error at prove, try again later"
}
```
The user has failed to generate a Prove key. Send the user through your exception process.
Follow the steps below to test the Prove Unified Authentication flow with Bertie Fermont on desktop. This user will pass the entire Unified Authentication flow using Prove's possession and return `success=true` in the /unify-status response.
Start the onboarding flow on the initial screen and enter the phone number for Bertie Fremont.
Your front end will send the phone number, possession type, and final target URL to the back end. Your back end will then send the phone number to the /unify endpoint. The response will provide an auth token, correlation ID, and `success=pending` because possession still needs to be performed.
Your back end will send the `authToken` to the front end. The front end will run Instant Link handling. You will see the following page.
Once the front end finishes the possession check, the back end calls the /unify-status endpoint with the correlation ID to validate the phone number.
The response provides:
* `proveId` that is tied to this user.
* `success=true`
* `phoneNumber` that was initially passed.
You have a successful flow but no Prove key is placed as the Prove key only applies to mobile devices. Send the user on through your authenticated flow.
Follow the steps below to test the Prove Unified Authentication flow with Bertie Fremont on mobile. This user will pass Prove's possession and return `success=true` in the /unify-status response. The user can then be sent through the Prove Unified Authentication flow again using the same phone number with a Prove Key.
Start the onboarding flow on the initial screen and enter the phone number for Bertie Fremont.
Your front end will send the phone number and possession type to the back end. Your back end will then send the phone number to the /unify endpoint. The response will provide an auth token, correlation ID, and `success=pending` because possession still needs to be performed.
Your back end will send the `authToken` to the front end. The front end will run OTP handling. You will see the following page. Enter 1234 to simulate a successful OTP.
Once the front end finishes the possession check, the back end calls the /unify-status endpoint with the correlation ID to validate the phone number.
The response provides:
* `deviceId` that's an external identifier of the Prove ID.
* `proveId` that is tied to this user.
* `success=true`
* `phoneNumber` that was initially passed.
You have a successful flow and a Prove key has been assigned to this phone number. Send the user on through your authenticated flow.
Follow the steps below to test the Prove Unified Authentication flow with Bertie Fremont using customer-supplied possession. This user will pass the entire Unified Authentication flow using the customer's possession and return `success=true` in the /unify-bind response. The user can then be sent through the Prove Unified Authentication flow again using the same phone number with a Prove Key.
Start the onboarding flow on the initial screen and enter the phone number for Bertie Fremont.
Your front end will send the phone number and possession type to the back end. Your back end will then send the phone number to the /unify endpoint. The response will provide an auth token, correlation ID, and `success=pending` because possession still needs to be performed.
The back end then calls the /unify-status endpoint with the correlation ID to validate the phone number.
The response provides:
* `correlationId` that's tied to this flow.
* `success=possession_required` since Prove is not performing the possession check.
* `phoneNumber` that was initially passed.
Perform your own possession check outside of Prove's system. If the consumer fails, end the flow. If the consumer passes, then proceed to Bind Prove Key.
The back end will then call the /unify-bind endpoint with the correlation ID and phone number.
The response provides:
* `correlationId` that's tied to this flow.
* `success=true`
* `phoneNumber` that was initially passed.
You have a successful flow and a Prove key has been assigned to this phone number. Send the user on through your authenticated flow.
Follow the steps below to test the Prove Unified Authentication flow with Allissa Zoren on desktop. This user will pass the entire Unified Authentication flow using Prove's possession and return `success=true` in the /unify-status response.
Start the onboarding flow on the initial screen and enter the phone number for Allissa Zoren.
Your front end will send the phone number, possession type, and final target URL to the back end. Your back end will then send the phone number to the /unify endpoint. The response will provide an auth token, correlation ID, and `success=pending` because possession still needs to be performed.
Your back end will send the `authToken` to the front end. The front end will run Instant Link handling.
Once the front end finishes the possession check, the back end calls the /unify-status endpoint with the correlation ID to validate the phone number.
The response provides:
* `correlationId` that is tied to this flow.
* `success=true`
* `phoneNumber` that was initially passed.
You have a successful flow but no Prove key is placed as the Prove key only applies to mobile devices. Send the user on through your authenticated flow.
Follow the steps below to test the Prove Unified Authentication flow with Allissa Zoren on mobile. This user will pass Mobile Auth and return `success=true` in the /unify-status response. The user can then be sent through the Prove Unified Authentication flow again using the same phone number with a Prove Key.
Start the onboarding flow on the initial screen and enter the phone number, `+15551111111`, for Allissa Zoren.
Your front end will send the possession type to the back end. Your back end will then call the /unify endpoint. The response will provide an auth token, correlation ID, and `success=pending` because possession still needs to be performed.
Your back end will send the `authToken` to the front end. The front end will run Mobile Auth.
Once the front end finishes the possession check, the back end calls the /unify-status endpoint with the correlation ID to validate the phone number.
The response provides:
* `deviceId` that's tied to the mobile device.
* `proveId` that's tied to this customer.
* `phoneNumber` that was discovered by Mobile Auth.
* `success=true`
* `phoneNumber` that was initially passed.
You have a successful flow and a Prove key has been assigned to this phone number. Sending this user through again will bypass the possession check due to the Prove key. Send the user on through your authenticated flow.
Follow the steps below to test the Prove Unified Authentication flow with Allissa Zoren using customer-supplied possession. This user will pass the entire Unified Authentication flow using the customer's possession and return `success=true` in the /unify-bind response. The user can then be sent through the Prove Unified Authentication flow again using the same phone number with a Prove Key.
Start the onboarding flow on the initial screen and enter the phone number for Allissa Zoren.
Your front end will send the phone number and possession type to the back end. Your back end will then send the phone number to the /unify endpoint. The response will provide an auth token, correlation ID, and `success=pending` because possession still needs to be performed.
The back end then calls the /unify-status endpoint with the correlation ID to validate the phone number.
The response provides:
* `correlationId` that's tied to this flow.
* `success=possession_required` since Prove is not performing the possession check.
* `phoneNumber` that was initially passed.
Perform your own possession check outside of Prove's system. If the consumer fails, end the flow. If the consumer passes, then proceed to Bind Prove Key.
The back end will then call the /unify-bind endpoint with the correlation ID and phone number.
The response provides:
* `correlationId` that's tied to this flow.
* `success=true`
* `phoneNumber` that was initially passed.
You have a successful flow and a Prove key has been assigned to this phone number. Sending this user through again will bypass the possession check due to the Prove key. Send the user on through your authenticated flow.
Follow the steps below to test the Prove Unified Authentication flow with Wendy Stover on desktop. This user will fail the Unified Authentication flow using Mobile Auth and return `success=false` in the /unify-status response.
Start the onboarding flow on the initial screen and enter the phone number for Wendy Strover.
Your front end will send the phone number, possession type, and final target URL to the back end. Your back end will then send the phone number to the /unify endpoint. The response will provide an auth token, correlation ID, and `success=pending` because possession still needs to be performed.
Your back end will send the `authToken` to the front end. The front end will run Instant Link handling. You will see the following page.
Once the front end finishes the possession check, the back end calls the /unify-status endpoint with the correlation ID to validate the phone number.
The response provides:
* `correlationId` that is tied to this flow.
* `success=false`
* `phoneNumber` that was initially passed.
The test user failed. Send the user through your exception process.
Follow the steps below to test the Prove Unified Authentication flow with Wendy Strover on mobile. This user will fail Mobile Auth and return `success=false` in the /unify-status response.
Start the onboarding flow on the initial screen and enter the phone number for Wendie Strover.
Your front end will send the phone number and possession type to the back end. Your back end will then send the phone number to the /unify endpoint. The response will provide an auth token, correlation ID, and `success=pending` because possession still needs to be performed.
Your back end will send the `authToken` to the front end. The front end will fail Mobile Auth.
Once the front end finishes the possession check, the back end calls the /unify-status endpoint with the correlation ID to validate the phone number.
The response provides:
* `correlationId` that is tied to this flow.
* `success=false`
* `phoneNumber` that was initially passed.
Follow the steps below to test the Prove Unified Authentication flow with Wendie Strover using customer-supplied possession. This user will encounter a server error in the /unify-bind response, simulating an error when creating the Prove key.
Start the onboarding flow on the initial screen and enter the phone number for Wendie Strover.
Your front end will send the phone number and possession type to the back end. Your back end will then send the phone number to the /unify endpoint. The response will provide an auth token, correlation ID, and `success=pending` because possession still needs to be performed.
The back end then calls the /unify-status endpoint with the correlation ID to validate the phone number.
The response provides:
* `correlationId` that is tied to this flow.
* `success=possession_required` since Prove is not performing the possession check.
* `phoneNumber` that was initially passed.
Perform your own possession check outside of Prove's system. If the consumer fails, end the flow. If the consumer passes, then proceed to Bind Prove Key.
The back end will then call the /unify-bind endpoint with the correlation ID and phone number.
You will receive a server error in the response.
```json Response theme={"dark"}
{
"code": 8000,
"message": "error at prove, try again later"
}
```
The user has failed to generate a Prove key. Send the user through your exception process.
Follow the steps below to test the Prove Unified Authentication flow with Laurent, Jesse, Bertie, or Wendie. This will introduce failures into the flow and return `success=false` at various points.
During the mobile flow, use 1111 to simulate a failed OTP when presented with the following OTP page.
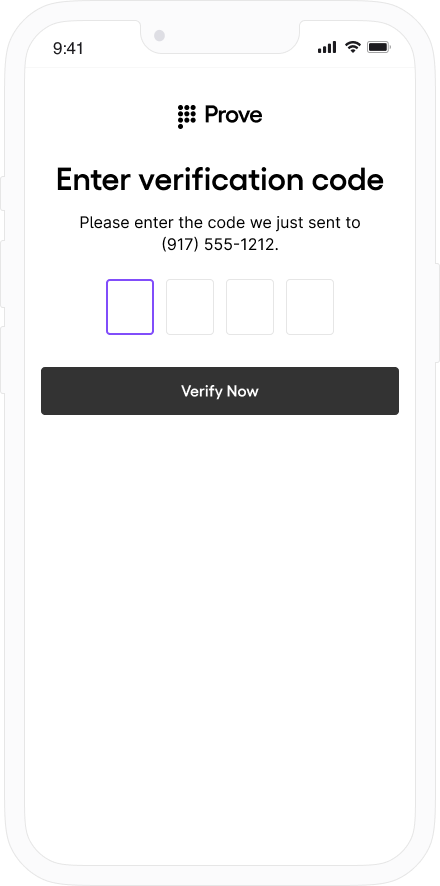 Once the front end finishes the possession check, the back end calls the /unify-status endpoint with the correlation ID to validate the phone number.
The user then fails /unify-status.
```json Response theme={"dark"}
{
"phoneNumber": "2001004017",
"success": "false"
}
```
The Prove flow is terminated and the front end proceeds to another authentication method.
# US Carrier (MNO) Consent Requirements
Source: https://developer.prove.com/docs/us-carrier-mno-consent-requirements
Learn more about the requirements for consent
## Summary
The following mobile network operators (MNO) have set requirements for accessing their data for relevant Prove services. Reference your MSA for full details on submitting the appropriate forms.
* Verizon
* T-Mobile
* AT\&T
AT\&T requires additional considerations. Talk to your sales representative for more info.
## Prerequisites
* Give the Production URLs where MNO Consent language lives once published in Production.
* Give the estimated timeline of when consent language goes live. Language must be live for T-Mobile approval.
* Give a mock-up of the page where the customer accepts these terms and conditions. The customer can proceed if you add terminology by clicking *Continue* you agree to our T\&C or the customer checks the consent box.
## Required consent language
"You authorize your wireless carrier to use or share information about your account and your wireless device, if available, to \{Enterprise Customer Name} or its service provider during your business relationship, to help identify you or your wireless device and to prevent fraud. See our Privacy Policy for how we treat your data."
## Required language placement
The MNOs require customers to accept carrier consent language in the customer flow before calling the endpoint in scope.
Place the MNO Terms and Conditions on either the Landing Page or the Challenge Page. Speak to your Prove representative for more detail.
If implementing Mobile Auth, place the MNO consent language on your Landing Page, referenced in Terms and Conditions.
# Implementing Prove Verified Users
Source: https://developer.prove.com/docs/verified-users-flow
Prove Verified Users returns identity information linked to an authenticated phone number for use on existing consumers
Begin by implementing [Step 2: Authentication](/docs/check-for-prove-key) to authenticate the user's device. This step is crucial as it establishes a trusted connection between the user and their phone number, which is the foundation for the Verified Users solution.
Once the front end finishes the possession check, the back end calls the /unify-status endpoint with the correlation ID to validate the phone number.
The user then fails /unify-status.
```json Response theme={"dark"}
{
"phoneNumber": "2001004017",
"success": "false"
}
```
The Prove flow is terminated and the front end proceeds to another authentication method.
# US Carrier (MNO) Consent Requirements
Source: https://developer.prove.com/docs/us-carrier-mno-consent-requirements
Learn more about the requirements for consent
## Summary
The following mobile network operators (MNO) have set requirements for accessing their data for relevant Prove services. Reference your MSA for full details on submitting the appropriate forms.
* Verizon
* T-Mobile
* AT\&T
AT\&T requires additional considerations. Talk to your sales representative for more info.
## Prerequisites
* Give the Production URLs where MNO Consent language lives once published in Production.
* Give the estimated timeline of when consent language goes live. Language must be live for T-Mobile approval.
* Give a mock-up of the page where the customer accepts these terms and conditions. The customer can proceed if you add terminology by clicking *Continue* you agree to our T\&C or the customer checks the consent box.
## Required consent language
"You authorize your wireless carrier to use or share information about your account and your wireless device, if available, to \{Enterprise Customer Name} or its service provider during your business relationship, to help identify you or your wireless device and to prevent fraud. See our Privacy Policy for how we treat your data."
## Required language placement
The MNOs require customers to accept carrier consent language in the customer flow before calling the endpoint in scope.
Place the MNO Terms and Conditions on either the Landing Page or the Challenge Page. Speak to your Prove representative for more detail.
If implementing Mobile Auth, place the MNO consent language on your Landing Page, referenced in Terms and Conditions.
# Implementing Prove Verified Users
Source: https://developer.prove.com/docs/verified-users-flow
Prove Verified Users returns identity information linked to an authenticated phone number for use on existing consumers
Begin by implementing [Step 2: Authentication](/docs/check-for-prove-key) to authenticate the user's device. This step is crucial as it establishes a trusted connection between the user and their phone number, which is the foundation for the Verified Users solution.
 This step must be complete before proceeding with Verified Users.
Collect the required customer information from your CRM or database:
* Phone number
* First name
* Last name
Make a request to the [`/v3/verify endpoint`](https://developer.prove.com/reference/verify) including the Authorization header. Generate a bearer token as outlined on the [Authentication page](https://developer.prove.com/reference/authentication). Include the following required parameters:
* `phoneNumber`: the phone number of the customer.
* `firstName`: the first name of the customer.
* `lastName`: the last name of the customer.
* `verificationType`: the type of verification to be performed. Set this value to `verifiedUser`.
* `clientRequestId`: client-generated unique ID for a specific session. This can be used to identify specific requests.
Always provide unique `clientRequestId` values for each request to enable proper tracking and troubleshooting.
The optional parameters:
* `emailAddress`: the email address of the customer.
* `ipAddress`: the IP address of the customer's device.
* `userAgent`: the user agent of the customer.
* `clientCustomerId`: the client-generated unique ID for a specific customer. This can be used by clients to link calls related to the same customer, across different requests or sessions.
* `clientHumanId`: a client-generated unique ID for a consumer across business lines.
* `proveId`: the Prove ID associated with the customer, if known.
```bash cURL theme={"dark"}
curl -X POST "https://platform.uat.proveapis.com/v3/verify" \
-H "Authorization: Bearer YOUR_ACCESS_TOKEN" \
-H "Content-Type: application/json" \
-d '{
"verificationType": "verifiedUser",
"firstName": "Elena",
"lastName": "Coldman",
"phoneNumber": "2001004053",
"clientRequestId": "test-request-001",
"clientCustomerId": "test-customer-001"
}'
```
You will test this example in the Sandbox environment using the test users provided in the [Sandbox Testing guide](https://developer.prove.com/docs/verified-users-flow#sandbox-testing).
The response includes comprehensive identity information and verification results:
* `success`: the result of the verification.
* `correlationId`: the unique ID that Prove generates for the flow.
* `clientRequestId`: the client-generated unique ID for a specific session, provided in the request.
* `phoneNumber`: the phone number provided in the request.
* `assuranceLevel`: the [`confidence level (AL-1, AL0, AL1, AL2, AL3)`](https://developer.prove.com/docs/assurance-levels).
* `clientCustomerId`: the client-generated unique ID for a specific customer, provided in the request.
* `proveId`: the unique Prove-assigned ID tied to the consumer.
* `provePhoneAlias`: the unique Prove-assigned ID tied to the phone number.
* `identity`: the verified identity information. This object contains:
* `firstName`: the first name provided in the request.
* `lastName`: the last name provided in the request.
* `additionalIdentities`: object containing any additional identities found for the phone number.
* `evaluation`: object containing the results of the authentication and risk evaluations. Refer to the [Global Fraud Policy](https://developer.prove.com/docs/global-fraud-policy) for more details.
```json Example JSON Response theme={"dark"}
{
"success": "true",
"correlationId": "12e5bf83-f2e5-4354-83a5-ed811c8aeb49",
"clientRequestId": "12e5bf83-f2e5-4354-83a5-ed811c8aeb49",
"phoneNumber": "2001004053",
"assuranceLevel": "AL2",
"clientCustomerId": "test-customer-001",
"proveId": "b7e54823-0068-4e23-9e07-60d382518bcf",
"provePhoneAlias": "4B2C41FC4VKDEO100F960011D0AD4A8050MEK19P4SF9PD23EFE27CD2C76A6FAA8375E60AC0550604F6G32D9ED60E06262CCC570F3C15F2D16900184E",
"identity": {
"firstName": "Elena",
"lastName": "Coldman"
},
"additionalIdentities": [
{
"firstName": "Eric",
"lastName": "Coldman"
}
],
"evaluation": {
"authentication": {
"result": "pass"
},
"risk": {
"result": "pass"
}
}
}
```
**Best Practices**
* Check the `success` field to handle different verification outcomes appropriately.
* Save the `proveId` and `correlationId` for future reference and to enable cross-domain linking if needed.
* Use assurance levels to implement adaptive security policies based on transaction risk.
***
## Sandbox testing
### Test users
The following test users are available for testing Verified Users using the `/v3/verify` endpoint in the Sandbox environment. Use these test users to simulate different verification scenarios and outcomes.
| Phone Number | First Name | Last Name | Verification Type | Expected Outcome |
| ------------ | --------------- | --------- | ----------------- | ---------------- |
| `2001004053` | [Elena](#elena) | Coldman | `verifiedUser` | Success |
| `2001004054` | [Alf](#alf) | Novotni | `verifiedUser` | Failed |
Use these test phone numbers exactly as shown. The sandbox environment doesn't validate real customer information.
### Testing steps
Use test user Elena Coldman to verify a successful verification:
```bash cURL theme={"dark"}
curl -X POST "https://platform.uat.proveapis.com/v3/verify" \
-H "Authorization: Bearer YOUR_ACCESS_TOKEN" \
-H "Content-Type: application/json" \
-d '{
"verificationType": "verifiedUser",
"firstName": "Elena",
"lastName": "Coldman",
"phoneNumber": "2001004053",
"clientRequestId": "test-request-001",
"clientCustomerId": "test-customer-001"
}'
```
Expected response:
```json JSON theme={"dark"}
{
"success": "true",
"correlationId": "a1fb77c4-b5a6-44bc-bc78-b5939dd7c35a",
"clientRequestId": "test-request-001",
"phoneNumber": "2001004053",
"identity": {
"firstName": "Elena",
"lastName": "Coldman",
"assuranceLevel": "AL2",
"reasons": [
"AL2a"
],
"clientCustomerId": "test-customer-001",
"proveId": "b7e54823-0068-4e23-9e07-60d382518bcf",
"provePhoneAlias": "09717e90-997d-448b-a1d6-9ef0431b3472",
"clientHumanId": ""
},
"evaluation": {
"authentication": {
"result": "pass"
},
"risk": {
"result": "pass"
}
}
}
```
Use test user Alf Novotni to simulate a failed verification:
```bash cURL theme={"dark"}
curl -X POST "https://platform.uat.proveapis.com/v3/verify" \
-H "Authorization: Bearer YOUR_ACCESS_TOKEN" \
-H "Content-Type: application/json" \
-d '{
"verificationType": "verifiedUser",
"firstName": "Alf",
"lastName": "Novotni",
"phoneNumber": "2001004054",
"clientRequestId": "test-request-002",
"clientCustomerId": "test-customer-002"
}'
```
Expected response:
```json JSON theme={"dark"}
{
"success": "false",
"correlationId": "c1cd3908-8a25-4e9f-9a15-e4af62a221e1",
"clientRequestId": "test-request-002",
"phoneNumber": "2001004054",
"identity": {
"firstName": "Alf",
"lastName": "Novotni",
"assuranceLevel": "AL0",
"reasons": [
"AL0b"
],
"clientCustomerId": "test-customer-002",
"proveId": "",
"provePhoneAlias": "",
"clientHumanId": ""
},
"evaluation": {
"authentication": {
"failureReasons": {
"9175": "No active identity can be associated with the phone number.",
"9177": "No information can be found for the identity or phone number."
},
"result": "fail"
},
"risk": {
"result": "pass"
}
}
}
```
# Prove Verified Users Overview
Source: https://developer.prove.com/docs/verified-users-overview
Prove Verified Users returns identity information linked to an authenticated phone number for use on existing Consumers.
This step must be complete before proceeding with Verified Users.
Collect the required customer information from your CRM or database:
* Phone number
* First name
* Last name
Make a request to the [`/v3/verify endpoint`](https://developer.prove.com/reference/verify) including the Authorization header. Generate a bearer token as outlined on the [Authentication page](https://developer.prove.com/reference/authentication). Include the following required parameters:
* `phoneNumber`: the phone number of the customer.
* `firstName`: the first name of the customer.
* `lastName`: the last name of the customer.
* `verificationType`: the type of verification to be performed. Set this value to `verifiedUser`.
* `clientRequestId`: client-generated unique ID for a specific session. This can be used to identify specific requests.
Always provide unique `clientRequestId` values for each request to enable proper tracking and troubleshooting.
The optional parameters:
* `emailAddress`: the email address of the customer.
* `ipAddress`: the IP address of the customer's device.
* `userAgent`: the user agent of the customer.
* `clientCustomerId`: the client-generated unique ID for a specific customer. This can be used by clients to link calls related to the same customer, across different requests or sessions.
* `clientHumanId`: a client-generated unique ID for a consumer across business lines.
* `proveId`: the Prove ID associated with the customer, if known.
```bash cURL theme={"dark"}
curl -X POST "https://platform.uat.proveapis.com/v3/verify" \
-H "Authorization: Bearer YOUR_ACCESS_TOKEN" \
-H "Content-Type: application/json" \
-d '{
"verificationType": "verifiedUser",
"firstName": "Elena",
"lastName": "Coldman",
"phoneNumber": "2001004053",
"clientRequestId": "test-request-001",
"clientCustomerId": "test-customer-001"
}'
```
You will test this example in the Sandbox environment using the test users provided in the [Sandbox Testing guide](https://developer.prove.com/docs/verified-users-flow#sandbox-testing).
The response includes comprehensive identity information and verification results:
* `success`: the result of the verification.
* `correlationId`: the unique ID that Prove generates for the flow.
* `clientRequestId`: the client-generated unique ID for a specific session, provided in the request.
* `phoneNumber`: the phone number provided in the request.
* `assuranceLevel`: the [`confidence level (AL-1, AL0, AL1, AL2, AL3)`](https://developer.prove.com/docs/assurance-levels).
* `clientCustomerId`: the client-generated unique ID for a specific customer, provided in the request.
* `proveId`: the unique Prove-assigned ID tied to the consumer.
* `provePhoneAlias`: the unique Prove-assigned ID tied to the phone number.
* `identity`: the verified identity information. This object contains:
* `firstName`: the first name provided in the request.
* `lastName`: the last name provided in the request.
* `additionalIdentities`: object containing any additional identities found for the phone number.
* `evaluation`: object containing the results of the authentication and risk evaluations. Refer to the [Global Fraud Policy](https://developer.prove.com/docs/global-fraud-policy) for more details.
```json Example JSON Response theme={"dark"}
{
"success": "true",
"correlationId": "12e5bf83-f2e5-4354-83a5-ed811c8aeb49",
"clientRequestId": "12e5bf83-f2e5-4354-83a5-ed811c8aeb49",
"phoneNumber": "2001004053",
"assuranceLevel": "AL2",
"clientCustomerId": "test-customer-001",
"proveId": "b7e54823-0068-4e23-9e07-60d382518bcf",
"provePhoneAlias": "4B2C41FC4VKDEO100F960011D0AD4A8050MEK19P4SF9PD23EFE27CD2C76A6FAA8375E60AC0550604F6G32D9ED60E06262CCC570F3C15F2D16900184E",
"identity": {
"firstName": "Elena",
"lastName": "Coldman"
},
"additionalIdentities": [
{
"firstName": "Eric",
"lastName": "Coldman"
}
],
"evaluation": {
"authentication": {
"result": "pass"
},
"risk": {
"result": "pass"
}
}
}
```
**Best Practices**
* Check the `success` field to handle different verification outcomes appropriately.
* Save the `proveId` and `correlationId` for future reference and to enable cross-domain linking if needed.
* Use assurance levels to implement adaptive security policies based on transaction risk.
***
## Sandbox testing
### Test users
The following test users are available for testing Verified Users using the `/v3/verify` endpoint in the Sandbox environment. Use these test users to simulate different verification scenarios and outcomes.
| Phone Number | First Name | Last Name | Verification Type | Expected Outcome |
| ------------ | --------------- | --------- | ----------------- | ---------------- |
| `2001004053` | [Elena](#elena) | Coldman | `verifiedUser` | Success |
| `2001004054` | [Alf](#alf) | Novotni | `verifiedUser` | Failed |
Use these test phone numbers exactly as shown. The sandbox environment doesn't validate real customer information.
### Testing steps
Use test user Elena Coldman to verify a successful verification:
```bash cURL theme={"dark"}
curl -X POST "https://platform.uat.proveapis.com/v3/verify" \
-H "Authorization: Bearer YOUR_ACCESS_TOKEN" \
-H "Content-Type: application/json" \
-d '{
"verificationType": "verifiedUser",
"firstName": "Elena",
"lastName": "Coldman",
"phoneNumber": "2001004053",
"clientRequestId": "test-request-001",
"clientCustomerId": "test-customer-001"
}'
```
Expected response:
```json JSON theme={"dark"}
{
"success": "true",
"correlationId": "a1fb77c4-b5a6-44bc-bc78-b5939dd7c35a",
"clientRequestId": "test-request-001",
"phoneNumber": "2001004053",
"identity": {
"firstName": "Elena",
"lastName": "Coldman",
"assuranceLevel": "AL2",
"reasons": [
"AL2a"
],
"clientCustomerId": "test-customer-001",
"proveId": "b7e54823-0068-4e23-9e07-60d382518bcf",
"provePhoneAlias": "09717e90-997d-448b-a1d6-9ef0431b3472",
"clientHumanId": ""
},
"evaluation": {
"authentication": {
"result": "pass"
},
"risk": {
"result": "pass"
}
}
}
```
Use test user Alf Novotni to simulate a failed verification:
```bash cURL theme={"dark"}
curl -X POST "https://platform.uat.proveapis.com/v3/verify" \
-H "Authorization: Bearer YOUR_ACCESS_TOKEN" \
-H "Content-Type: application/json" \
-d '{
"verificationType": "verifiedUser",
"firstName": "Alf",
"lastName": "Novotni",
"phoneNumber": "2001004054",
"clientRequestId": "test-request-002",
"clientCustomerId": "test-customer-002"
}'
```
Expected response:
```json JSON theme={"dark"}
{
"success": "false",
"correlationId": "c1cd3908-8a25-4e9f-9a15-e4af62a221e1",
"clientRequestId": "test-request-002",
"phoneNumber": "2001004054",
"identity": {
"firstName": "Alf",
"lastName": "Novotni",
"assuranceLevel": "AL0",
"reasons": [
"AL0b"
],
"clientCustomerId": "test-customer-002",
"proveId": "",
"provePhoneAlias": "",
"clientHumanId": ""
},
"evaluation": {
"authentication": {
"failureReasons": {
"9175": "No active identity can be associated with the phone number.",
"9177": "No information can be found for the identity or phone number."
},
"result": "fail"
},
"risk": {
"result": "pass"
}
}
}
```
# Prove Verified Users Overview
Source: https://developer.prove.com/docs/verified-users-overview
Prove Verified Users returns identity information linked to an authenticated phone number for use on existing Consumers.
 ## Prove Verified Users solution
The Prove Verified Users solution helps protect against fraudsters, enhances trust and engagement on digital platforms, and enables smoother digital experiences by balancing strong security with a seamless user experience.
You can use Verified Users to verify existing users in your CRM, validate new users before they complete an action on your platform, or at any other moment to protect against risk.
Ready to start implementing Verified Users? Check out the [Verified Users Implementation Guide](https://developer.prove.com/docs/verified-users-flow).
# Verify Your Mobile Page Requirements - Mobile Auth℠
Source: https://developer.prove.com/docs/verify-your-mobile-page-requirements-mobile-authsm
Learn how to design the front end for your Instant Link or one-time password (OTP) page
## OTP
### Page summary
| Flow | Page Summary Language |
| :----- | :----------------------------------------------------------------------------- |
| Mobile | Enter verification code. Please enter the code we just sent to (XXX) XXX-XXXX. |
## Instant Link
### Page summary
| Flow | Page Summary Language |
| :------ | :----------------------------------------------------------------------------------------------------------------------- |
| Desktop | Check your Phone. A text message with a link was just sent to the phone ending in XXXX (last 4 digits of mobile number). |
## Alternate path for customers
If the customer can't authenticate through Instant Link or SMS one-time password (OTP), customer exits the Prove flow. Present a manual form as an alternate method of verification.
# Welcome Overview
Source: https://developer.prove.com/docs/welcome-overview
Get started with Prove and explore our solutions
## What's 'Welcome'?
The Welcome solutions from Prove are a suite of verification solutions that combine Prove’s authentication and verification engines to streamline digital interactions while combating fraud. These solutions leverage phone-centric identity technology to verify users and automate manual processes, creating a more secure and frictionless experience for both consumers and businesses.
The **Prove Identity Graph** is the core engine of the Prove platform, establishing the future of digital trust. It serves as a persistent, deterministic network that unifies tokenized identities with their associated devices, credentials, and authenticators, enabling seamless authentication, identity resolution, and comprehensive risk management.
At the heart of the Identity Graph is the Prove ID. The Prove ID is a persistent anchor—a standardized digital key that securely binds all of a user's common language identifiers (e.g., phone numbers, emails, SSNs) into a single, trusted, and unified identity. This standardized anchor ensures that an identity verified in one context is recognizable across multiple platforms—privately and securely—without requiring repeated re-verification.
Identity Resolution is the process of consistently and deterministically linking a client's customer account ID to a Prove ID. What makes the Identity Graph powerful is its methodology. It achieves this unified view of identity using privacy-preserving techniques, such as a clean room technique.
For offline batch enrollment, clients can select from three verification options that help resolve the identity:
* Assurance Level 1 (Bot Detection)
* Assurance Level 2 (Verified Users)
* Cross-Domain Identity Resolution
Talk to your Prove implementation manager to integrate with the Identity Graph.
The Prove SDK simplifies and strengthens your authentication security by automatically choosing the right authenticator (possession) based on trusted device recognition and authenticator availability (reputation) - reducing friction while protecting against fraud.
User **has never** interacted with Prove before or no ProveKey found.
## Prove Verified Users solution
The Prove Verified Users solution helps protect against fraudsters, enhances trust and engagement on digital platforms, and enables smoother digital experiences by balancing strong security with a seamless user experience.
You can use Verified Users to verify existing users in your CRM, validate new users before they complete an action on your platform, or at any other moment to protect against risk.
Ready to start implementing Verified Users? Check out the [Verified Users Implementation Guide](https://developer.prove.com/docs/verified-users-flow).
# Verify Your Mobile Page Requirements - Mobile Auth℠
Source: https://developer.prove.com/docs/verify-your-mobile-page-requirements-mobile-authsm
Learn how to design the front end for your Instant Link or one-time password (OTP) page
## OTP
### Page summary
| Flow | Page Summary Language |
| :----- | :----------------------------------------------------------------------------- |
| Mobile | Enter verification code. Please enter the code we just sent to (XXX) XXX-XXXX. |
## Instant Link
### Page summary
| Flow | Page Summary Language |
| :------ | :----------------------------------------------------------------------------------------------------------------------- |
| Desktop | Check your Phone. A text message with a link was just sent to the phone ending in XXXX (last 4 digits of mobile number). |
## Alternate path for customers
If the customer can't authenticate through Instant Link or SMS one-time password (OTP), customer exits the Prove flow. Present a manual form as an alternate method of verification.
# Welcome Overview
Source: https://developer.prove.com/docs/welcome-overview
Get started with Prove and explore our solutions
## What's 'Welcome'?
The Welcome solutions from Prove are a suite of verification solutions that combine Prove’s authentication and verification engines to streamline digital interactions while combating fraud. These solutions leverage phone-centric identity technology to verify users and automate manual processes, creating a more secure and frictionless experience for both consumers and businesses.
The **Prove Identity Graph** is the core engine of the Prove platform, establishing the future of digital trust. It serves as a persistent, deterministic network that unifies tokenized identities with their associated devices, credentials, and authenticators, enabling seamless authentication, identity resolution, and comprehensive risk management.
At the heart of the Identity Graph is the Prove ID. The Prove ID is a persistent anchor—a standardized digital key that securely binds all of a user's common language identifiers (e.g., phone numbers, emails, SSNs) into a single, trusted, and unified identity. This standardized anchor ensures that an identity verified in one context is recognizable across multiple platforms—privately and securely—without requiring repeated re-verification.
Identity Resolution is the process of consistently and deterministically linking a client's customer account ID to a Prove ID. What makes the Identity Graph powerful is its methodology. It achieves this unified view of identity using privacy-preserving techniques, such as a clean room technique.
For offline batch enrollment, clients can select from three verification options that help resolve the identity:
* Assurance Level 1 (Bot Detection)
* Assurance Level 2 (Verified Users)
* Cross-Domain Identity Resolution
Talk to your Prove implementation manager to integrate with the Identity Graph.
The Prove SDK simplifies and strengthens your authentication security by automatically choosing the right authenticator (possession) based on trusted device recognition and authenticator availability (reputation) - reducing friction while protecting against fraud.
User **has never** interacted with Prove before or no ProveKey found.
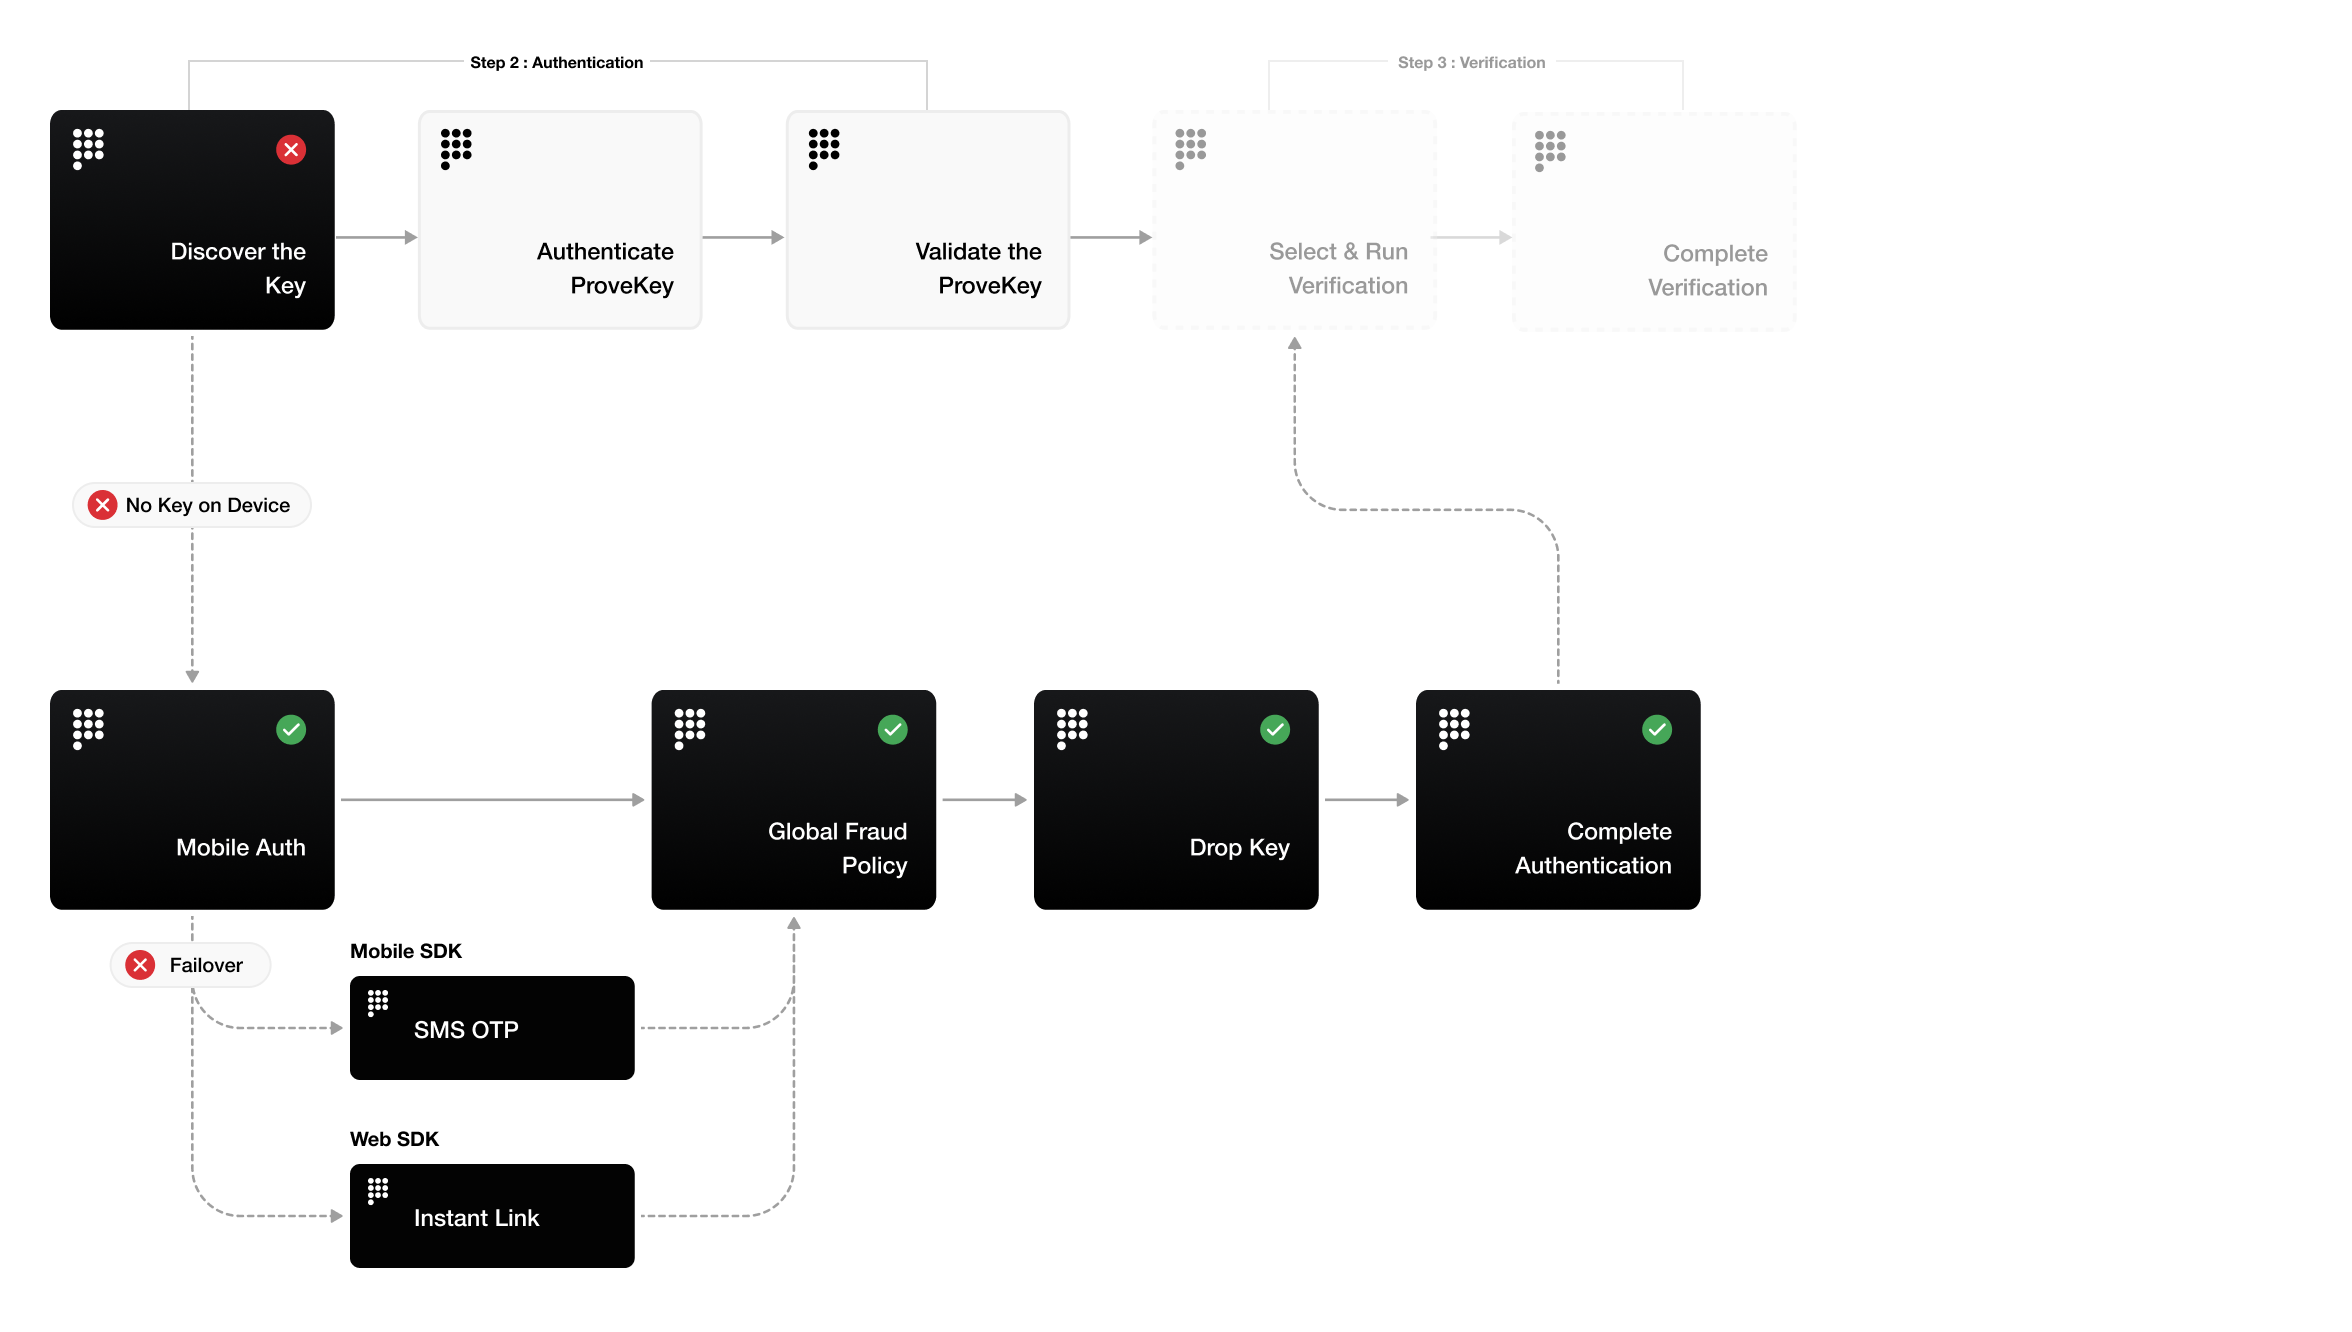
User **has** interacted with Prove before on this device.
[Jump to Authentication Overview](/docs/check-for-prove-key)
Prove offers a suite of verification solutions that leverage phone-centric identity technology to verify users and automate manual processes, creating a more secure and frictionless experience for both consumers and businesses.
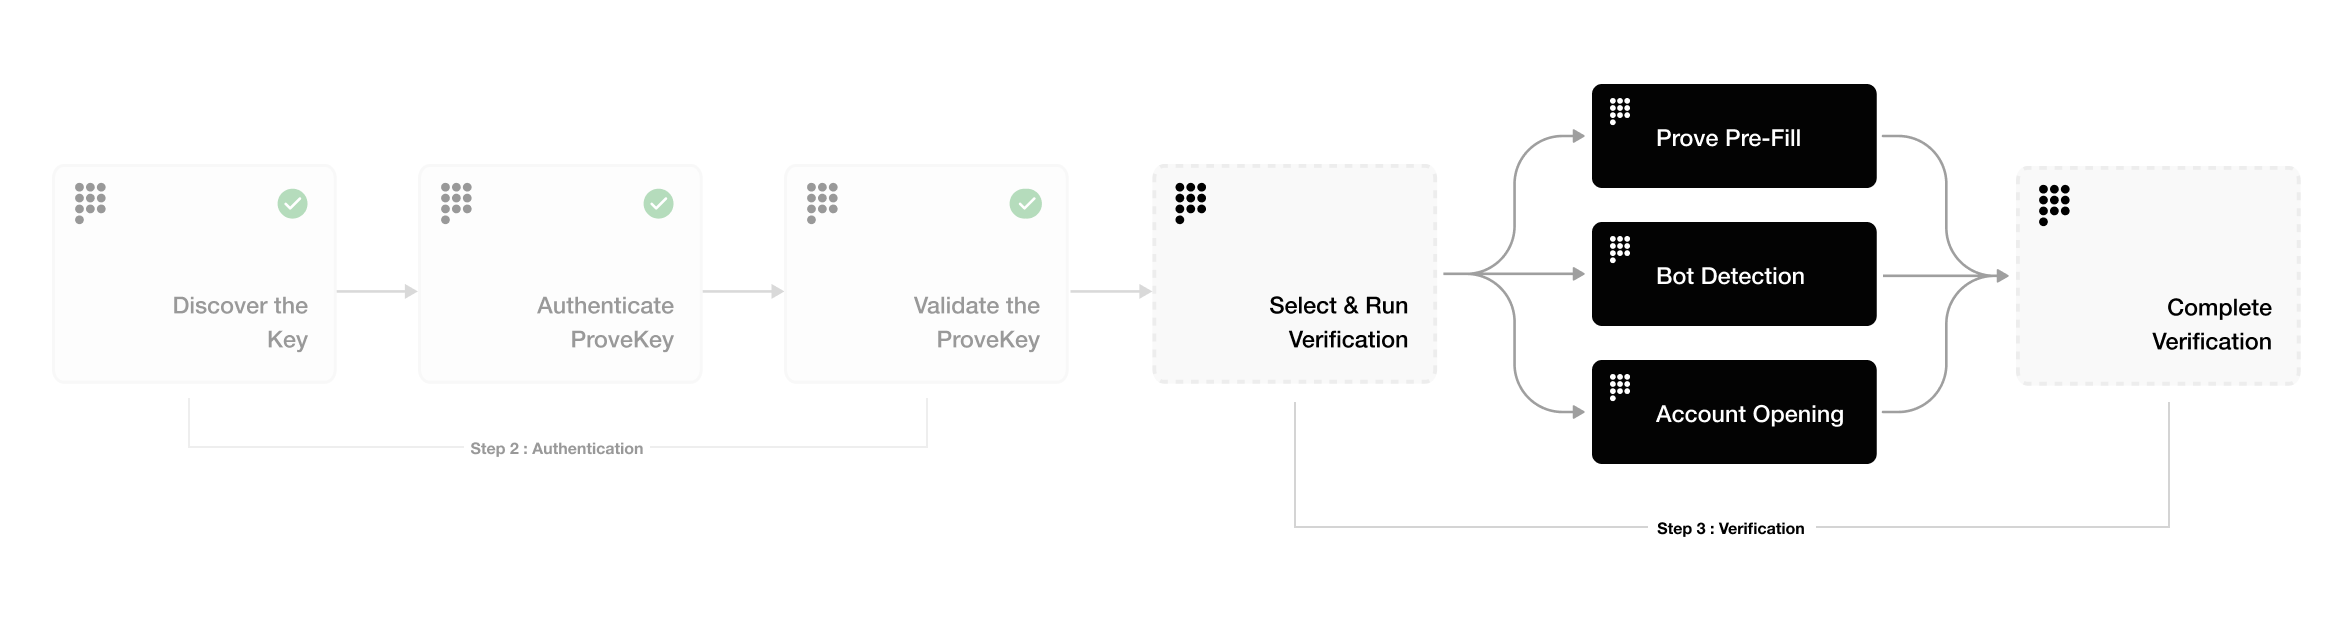
[Jump to Verification Overview](/docs/verification-overview)
Identity management helps businesses proactively manage consumers' phone numbers and other vital identity attributes as they change throughout their lifecycle, providing continuous monitoring and alerts about identity changes.
Once a user's information is mapped to a Prove ID and enrolled in identity management, their information is accessible by the client to support ongoing operations, including:
* **Cross-Domain Identity:** Seeing where the same human user exists across different client domains.
* **Marketplace Integration:** Connecting the user base to other Prove products and services available in the marketplace.
# Meet Prove
Source: https://developer.prove.com/docs/welcome-to-prove
Our mission is to make every digital interaction trusted
## Prove
Prove helps the world’s leading enterprises turn identity into a growth engine, making it easier to welcome new customers, know them every time they return, and build trusted relationships that last.
## The Prove Platform
Our solutions leverage a powerful foundation, the Prove Platform, that ties together data sources, our identity graph, and key platform services. These include our Global Fraud Policy for always on fraud protection, Identity Manager for lifecycle change monitoring, and key management to manage your user’s secure digital keys.
# Verification Overview
Source: https://developer.prove.com/docs/welcome-verification-overview
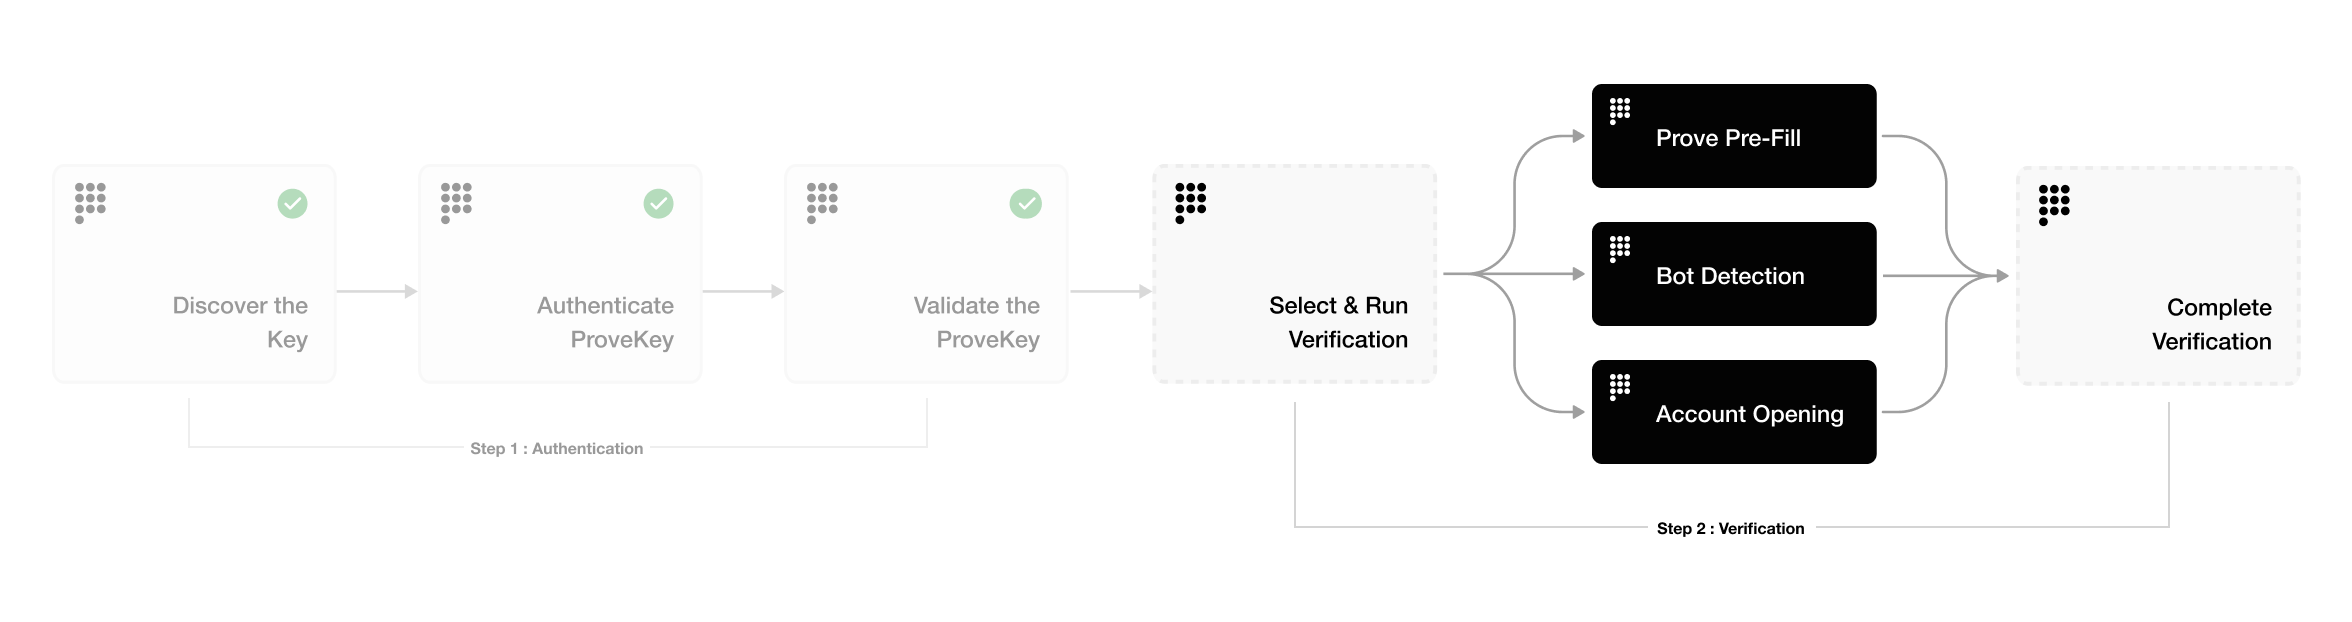 The Prove Welcome Solutions offer a tiered approach to verification, combining authentication with various verification methods to balance security and user experience. These methods include:
* [**Bot Detection:**](/docs/bot-detection-flow) This is a high-speed defense that analyzes phone number activity and behavior to differentiate between human users and malicious bots, preventing unnecessary downstream verification costs. It returns an [Assurance Level (AL)](/docs/assurance-levels) up to AL1.
* **Pre-Fill for Consumer/Business:** This bank-grade verification streamlines onboarding by automating data entry and enhancing security. It delivers field-level data matching for First Name, Last Name, Address, Date of Birth, and National ID, achieving an AL up to AL3 for high-risk actions like account opening or wire transfers.
* [**Account Opening:**](/docs/account-opening-flow) This comprehensive verification method returns identity information linked to an authenticated phone number.
The Global Fraud Policy (GFP) screens all these solutions through a consistent, globally deployed framework that continuously updates to protect against defined fraud vectors.
# Client-Side Android SDK
Source: https://developer.prove.com/reference/android-sdk
Learn how to integrate the client-side Android SDK into your native app
## Installation
The Android SDK is a set of lightweight libraries. The libraries deliver as Android Archive Repository, `.aar`, files. The minimum supported version of Android is v7, level 24.
Prove manages a maven repository with Android binaries to enable integration with Gradle.
Update the dependencies object in the `build.gradle` file:
```java Java theme={"dark"}
dependencies {
// Existing dependencies are here.
// Add the Prove Link dependencies:
implementation 'com.prove.sdk:proveauth:6.9.0'
}
```
Point to the repository by updating your `settings.gradle` file with the Maven repository:
```java Java theme={"dark"}
dependencyResolutionManagement {
// Existing repository settings are here.
repositories {
// Existing repositories are here.
// Add the Prove Link Maven repository:
maven {
url = "https://prove.jfrog.io/artifactory/libs-public-maven/"
}
}
}
```
The following needs added to the `build.gradle` file to also download dependency libraries:
```java Java theme={"dark"}
dependencies {
implementation fileTree('libs')
}
```
If you receive an error message on the `application@fullBackupContent` value, you can resolve it by adding this line of code to your application `AndroidManifest.xml` file inside the `...` node. Add it as an attribute to the opening `application` tag:
```xml XML theme={"dark"}
```
## Permissions
The Prove Auth SDK and its children SDKs merge the following permissions into the main app:
```xml XML theme={"dark"}
```
## Send the type of flow: mobile
Unlike the Web SDK, when using the Android SDK, use the mobile flow. Pass `mobile` to the `Start()` function on the server. In a mobile flow, Mobile Auth℠ executes first and if that fails, performs OTP validation on the mobile phone.
In the mobile flow, once either Mobile Auth or the OTP validation is complete, the AuthFinishStep function executes.
Mobile Auth
Mobile Auth requires the customer to disable any VPN.
## Authenticate()
The SDK requires an `authToken` as a parameter for the `Authenticate()` function. This token returns from the `Start()` call of the server SDK. The token is session specific, limiting it to a single flow. It also expires after 15 minutes.
## Retrieve `authToken`
Send a request to your backend server with the phone number, flow type, and an optional challenge of either the date of birth or social security number.
```java Java theme={"dark"}
String initialize(String phoneNumber, String ssn, String flowType) {
YourBackendClient backend = new YourBackendClient(); // Backend API client
// TODO: Build your InitializeRequest object
InitializeRequest initializeRequest = new InitializeRequest(phoneNumber, ssn, flowType);
// Send an initialize request to your backend server to get authToken
InitializeResponse response = backend.initialize(initializeRequest);
// TODO: define your own InitializeResponse object to parse authToken string
return response.getAuthToken();
}
```
## Setup authenticator
Once you have the `authToken`, build the authenticator for the mobile flow.
```java Java theme={"dark"}
// Object implementing AuthFinishStep interface
AuthFinishStep authFinishStep = new AuthFinishStep() {
...
};
// Objects implementing OtpStartStep/OtpFinishStep interfaces
OtpStartStep otpStartStep = new OtpStartStep() {
...
};
OtpFinishStep otpFinishStep = new OtpFinishStep() {
...
};
ProveAuth proveAuth = ProveAuth.builder()
.withAuthFinishStep(authId -> verify(authId)) // verify(authId) call defined in #Validate the Mobile Phone section
.withOtpFallback(otpStartStep, otpFinishStep)
.withContext(this)
.build();
```
The mobile data connection can sometimes be unavailable during testing. The `Builder` class offers a `withTestMode(boolean testMode)` method, which permits simulated successful session results while connected to a Wi-Fi network only. Testing using a Wi-Fi connection is useful in the Sandbox environment.
```java Java theme={"dark"}
ProveAuth proveAuth = ProveAuth.builder()
.withAuthFinishStep(authId -> verify(authId))
.withOtpFallback(otpStartStep, otpFinishStep)
.withContext(this)
.withTestMode(true) // Test mode flag
.build();
```
## Performing the authentication
The `ProveAuth` object is thread safe. You can use it as a singleton. Most Prove Auth methods are blocking and therefore can't execute in the main app thread. The app employs an executor service with a minimum of two threads to manage threads due to the ability to process concurrent blocking requests.
```java Java theme={"dark"}
public class MyAuthenticator {
private final MyBackendClient backend = new MyBackendClient(); // Backend API client
private ExecutorService executor = Executors.newCachedThreadPool();
private final AuthFinishStep authFinishStep = new AuthFinishStep() {
@Override
void execute(String authId) {
try {
AuthFinishResponse response = backend.authFinish("My App", authId);
... // Check the authentication status returned in the response
} catch (IOException e) {
String failureCause = e.getCause() != null ? e.getCause().getMessage() : "Failed to request authentication results";
// Authentication failed due to request failure
}
}
};
private ProveAuth proveAuth;
public MyAuthenticator(Context context) {
proveAuth = ProveAuth.builder()
.withAuthFinishStep(authFinishStep)
.withOtpFallback(otpStartStep, otpFinishStep)
.withContext(context)
.build();
}
public void authenticate() throws IOException, ProveAuthException {
AuthStartResponse response = backend.authStart("My Prove Auth App");
proveAuth.authenticate(response.getAuthToken());
}
}
public void authenticate() throws IOException, ProveAuthException {
// NOTE: blocking method proveAuth.authenticate() should be run in background thread
executor.submit(() -> {
AuthStartResponse response = backend.authStart("My Prove Auth App");
proveAuth.authenticate(response.getAuthToken());
}
}
```
## Validate the mobile phone
In the AuthFinishStep, specify a function to call once the possession checks are complete on the mobile phone. This endpoint on your back end server calls the `Validate()` function to check phone number validation. If it was successful, the server returns the results from the `Challenge()` function, including customer information.
```java Java theme={"dark"}
// Send a verify request to get return customer information.
void verify(String: authId) {
YourBackendClient backend = new YourBackendClient(); // Backend API client
// Build your VerifyRequest object
VerifyRequest verifyRequest = new VerifyRequest(authId, ...);
// Send a verify request to your backend server to get return customer information.
VerifyResponse response = backend.verify(verifyRequest);
// TODO: define your VerifyResponse object to parse customer information from the response
String firstName = response.getFirstName();
String lastName = response.getLastName();
// Pre-fill customer information to your Android App UI, for example:
firstNameEditText.setText(firstName);
lastNameEditText.setText(lastName);
}
```
## Configure OTP
To use the Resend/Retry/Phone Change features, you need to install the Android SDK version 6.5.0 or later.
To set the One-Time Password (OTP) handler, `withOtpFallback(otpStart: otpStartStep, otpFinish: otpFinishStep)`, requires implementing the `OtpStartStep` and `OtpFinishStep`.
The OTP session has a two minute timeout from when it's sent through SMS to when the customer can enter in the OTP.
Follow these instructions if you are implementing OTP and you are passing in the phone number on the `/v3/start` endpoint. In this case, you've already prompted for a phone number so you don't need to prompt for it in the client SDK.
Since you passed the phone number in the `Start()` function, call `OtpStartStepCallback.onSuccess(OtpStartInput);` to communicate to the SDK you have the customer's agreement to deliver the SMS message. Ensure you return an instance of `OtpStartInput` with empty string or `null` to `OtpStartStepCallback.onSuccess()` function.
```java Java theme={"dark"}
import com.prove.sdk.proveauth.OtpStartInput;
import com.prove.sdk.proveauth.OtpStartStep;
import com.prove.sdk.proveauth.OtpStartStepCallback;
import com.prove.sdk.proveauth.ProveAuthException;
public class NoPromptStart implements OtpStartStep {
@Override
public void execute(boolean phoneNumberNeeded, ProveAuthException otpException,
OtpStartStepCallback callback) {
// No phone number needed, no need to ask end user for input.
callback.onSuccess(new OtpStartInput(""));
}
}
```
Call the `OtpStartStepCallback.onError();` method to communicate to the SDK any issues while trying to obtain the phone number or the OTP. Report an error if the customer cancels the SMS transaction or presses the back button to leave the screen.
In the finish step, call the `OtpFinishStepCallback.onSuccess(OtpFinishInput);` method to return the collected OTP value wrapped in `OtpFinishInput`.
```java Java theme={"dark"}
import com.prove.sdk.proveauth.OtpFinishInput;
import com.prove.sdk.proveauth.OtpFinishStep;
import com.prove.sdk.proveauth.OtpFinishStepCallback;
import com.prove.sdk.proveauth.OtpValidationException;
import com.prove.sdk.proveauth.ProveAuthException;
public class NoPromptFinish implements OtpFinishStep {
@Override
public void execute(@Nullable ProveAuthException otpException,
OtpFinishStepCallback otpFinishStepCallback) {
// If error message is found, handle it.
if (otpException instanceof OtpValidationException) {
// Set to a variable and display it in a field.
// In this example, we don't do anything with the error.
String errorMsg = otpException.getMessage();
}
try {
// Prompt the user for OTP delivered by SMS. You can build UI to provide
// best UX based on your application and business logic, here we simplify to a
// generic function named promptForOtpCode which gives us the OTP code.
String otpCode = promptForOtpCode();
otpFinishStepCallback.onSuccess(new OtpFinishInput(otpCode));
} catch (Exception e) {
// if any issue with the OTP collection from the end user or the user wants to cancel
// then call onError to exit the flow. In this example we simplify it as catching
// an exception.
otpFinishStepCallback.onError();
}
}
}
```
Follow these instructions if implementing MobileAuth and collecting the phone number only if MobileAuth fails. This will implement OTP without allowing for SMS resends and phone number changes. If you do want those capabilities, please reference the subsequent tabs (Resend, Retry OTP, and Phone Number Change).
In the start step, call the `OtpStartStepCallback.onSuccess(OtpStartInput);` method to return the collected phone number to the SDK.
```java Java theme={"dark"}
import com.prove.sdk.proveauth.OtpStartInput;
import com.prove.sdk.proveauth.OtpStartStep;
import com.prove.sdk.proveauth.OtpStartStepCallback;
import com.prove.sdk.proveauth.PhoneNumberValidationException;
import com.prove.sdk.proveauth.ProveAuthException;
public class PromptStart implements OtpStartStep {
@Override
public void execute(boolean phoneNumberNeeded, @Nullable ProveAuthException otpException,
OtpStartStepCallback callback) {
// If phone number is needed, need to ask the end user for phone number input.
if (phoneNumberNeeded) {
// If error message is found around phone number, handle it.
// The `PhoneNumberValidationException` is ONLY available when `phoneNumberNeeded`
// has a value.
if (otpException instanceof PhoneNumberValidationException) {
// Set to a variable and display it in a field.
// In this example, we don't do anything with the error.
String errorMsg = otpException.getMessage();
}
try {
// Prompt the user for phone number to receive OTP SMS. You can build UI to provide
// best UX based on your application and business logic, here we simplify to a
// generic function named promptForPhoneNumber which gives us the collected
// phone number.
String phoneNumber = promptForPhoneNumber();
callback.onSuccess(new OtpStartInput(phoneNumber));
} catch (Exception e) {
// if any issue with the phone number collection from the end user or the user
// wants to cancel then call onError to exit the flow.
// In this example we simplify it as catching an exception.
callback.onError();
}
} else {
// No phone number needed, no need to ask end user for input.
callback.onSuccess(new OtpStartInput(""));
}
}
}
```
The finish step is implemented the same as the previous tab:
```java Java theme={"dark"}
import com.prove.sdk.proveauth.OtpFinishInput;
import com.prove.sdk.proveauth.OtpFinishStep;
import com.prove.sdk.proveauth.OtpFinishStepCallback;
import com.prove.sdk.proveauth.OtpValidationException;
import com.prove.sdk.proveauth.ProveAuthException;
public class NoPromptFinish implements OtpFinishStep {
@Override
public void execute(@Nullable ProveAuthException otpException,
OtpFinishStepCallback otpFinishStepCallback) {
// If error message is found, handle it.
if (otpException instanceof OtpValidationException) {
// Set to a variable and display it in a field.
// In this example, we don't do anything with the error.
String errorMsg = otpException.getMessage();
}
try {
// Prompt the user for OTP delivered by SMS. You can build UI to provide
// best UX based on your application and business logic, here we simplify to a
// generic function named promptForOtpCode which gives us the OTP code.
String otpCode = promptForOtpCode();
otpFinishStepCallback.onSuccess(new OtpFinishInput(otpCode));
} catch (Exception e) {
// if any issue with the OTP collection from the end user or the user wants to cancel
// then call onError to exit the flow. In this example we simplify it as catching
// an exception.
otpFinishStepCallback.onError();
}
}
}
```
Follow these instructions to allow the customer to request a new OTP via SMS using the same phone number. There is a max of three send attempts including the initial message.
The start step is implemented the same as the previous tab:
```java Java theme={"dark"}
import com.prove.sdk.proveauth.OtpStartInput;
import com.prove.sdk.proveauth.OtpStartStep;
import com.prove.sdk.proveauth.OtpStartStepCallback;
import com.prove.sdk.proveauth.PhoneNumberValidationException;
import com.prove.sdk.proveauth.ProveAuthException;
public class PromptStart implements OtpStartStep {
@Override
public void execute(boolean phoneNumberNeeded, @Nullable ProveAuthException otpException,
OtpStartStepCallback callback) {
// If phone number is needed, need to ask the end user for phone number input.
if (phoneNumberNeeded) {
// If error message is found around phone number, handle it.
// The `PhoneNumberValidationException` is ONLY available when `phoneNumberNeeded`
// has a value.
if (otpException instanceof PhoneNumberValidationException) {
// Set to a variable and display it in a field.
// In this example, we don't do anything with the error.
String errorMsg = otpException.getMessage();
}
try {
// Prompt the user for phone number to receive OTP SMS. You can build UI to provide
// best UX based on your application and business logic, here we simplify to a
// generic function named promptForPhoneNumber which gives us the collected
// phone number.
String phoneNumber = promptForPhoneNumber();
callback.onSuccess(new OtpStartInput(phoneNumber));
} catch (Exception e) {
// if any issue with the phone number collection from the end user or the user
// wants to cancel then call onError to exit the flow.
// In this example we simplify it as catching an exception.
callback.onError();
}
} else {
// No phone number needed, no need to ask end user for input.
callback.onSuccess(new OtpStartInput(""));
}
}
}
```
You can then send a new OTP SMS to the same phone number by implementing the finish step like this:
```java Java theme={"dark"}
import com.prove.sdk.proveauth.OtpFinishInput;
import com.prove.sdk.proveauth.OtpFinishStep;
import com.prove.sdk.proveauth.OtpFinishStepCallback;
import com.prove.sdk.proveauth.OtpValidationException;
import com.prove.sdk.proveauth.ProveAuthException;
public class MultipleResendFinish implements OtpFinishStep {
@Override
public void execute(@Nullable ProveAuthException otpException,
OtpFinishStepCallback otpFinishStepCallback) {
// If error message is found, handle it.
if (otpException instanceof OtpValidationException) {
// Set to a variable and display it in a field.
// In this example, we don't do anything with the error.
String errorMsg = otpException.getMessage();
}
// Prompt the user for whether they received the SMS.
if (promptForResend("Didn't receive the SMS OTP? Click resend button for a new one!")) {
// If the end user wants to send again to the same phone number call onOtpResend().
otpFinishStepCallback.onOtpResend();
return;
}
try {
// Prompt the user for OTP delivered by SMS. You can build UI to provide
// best UX based on your application and business logic, here we simplify to a
// generic function named promptForOtpCode which gives us the OTP code.
String otpCode = promptForOtpCode();
otpFinishStepCallback.onSuccess(new OtpFinishInput(otpCode));
} catch (Exception e) {
// if any issue with the OTP collection from the end user or the user wants to cancel
// then call onError to exit the flow. In this example we simplify it as catching
// an exception.
otpFinishStepCallback.onError();
}
}
}
```
Follow these instructions to allow the customer to re-enter the OTP PIN if they type it wrong. There is a max of 3 attempts. To implement this functionality, you also need to pass in `allowOTPRetry=true` to the `/v3/start` endpoint.
The start step is implemented the same as either of the the previous tabs - no client side code changes necessary:
```java Java theme={"dark"}
import com.prove.sdk.proveauth.OtpStartInput;
import com.prove.sdk.proveauth.OtpStartStep;
import com.prove.sdk.proveauth.OtpStartStepCallback;
import com.prove.sdk.proveauth.PhoneNumberValidationException;
import com.prove.sdk.proveauth.ProveAuthException;
public class PromptStart implements OtpStartStep {
@Override
public void execute(boolean phoneNumberNeeded, @Nullable ProveAuthException otpException,
OtpStartStepCallback callback) {
// If phone number is needed, need to ask the end user for phone number input.
if (phoneNumberNeeded) {
// If error message is found around phone number, handle it.
// The `PhoneNumberValidationException` is ONLY available when `phoneNumberNeeded`
// has a value.
if (otpException instanceof PhoneNumberValidationException) {
// Set to a variable and display it in a field.
// In this example, we don't do anything with the error.
String errorMsg = otpException.getMessage();
}
try {
// Prompt the user for phone number to receive OTP SMS. You can build UI to provide
// best UX based on your application and business logic, here we simplify to a
// generic function named promptForPhoneNumber which gives us the collected
// phone number.
String phoneNumber = promptForPhoneNumber();
callback.onSuccess(new OtpStartInput(phoneNumber));
} catch (Exception e) {
// if any issue with the phone number collection from the end user or the user
// wants to cancel then call onError to exit the flow.
// In this example we simplify it as catching an exception.
callback.onError();
}
} else {
// No phone number needed, no need to ask end user for input.
callback.onSuccess(new OtpStartInput(""));
}
}
}
```
The finish step is implemented the same as either of the the previous tabs - no client side code changes necessary. If the OTP is invalid, the finish step will be called again to prompt the user for a new input. Once the max attempts is reached, the `AuthFinish` function will be called.
```java Java theme={"dark"}
import com.prove.sdk.proveauth.OtpFinishInput;
import com.prove.sdk.proveauth.OtpFinishStep;
import com.prove.sdk.proveauth.OtpFinishStepCallback;
import com.prove.sdk.proveauth.OtpValidationException;
import com.prove.sdk.proveauth.ProveAuthException;
public class NoPromptFinish implements OtpFinishStep {
@Override
public void execute(@Nullable ProveAuthException otpException,
OtpFinishStepCallback otpFinishStepCallback) {
// If error message is found, handle it.
if (otpException instanceof OtpValidationException) {
// Set to a variable and display it in a field.
// In this example, we don't do anything with the error.
String errorMsg = otpException.getMessage();
}
try {
// Prompt the user for OTP delivered by SMS. You can build UI to provide
// best UX based on your application and business logic, here we simplify to a
// generic function named promptForOtpCode which gives us the OTP code.
String otpCode = promptForOtpCode();
otpFinishStepCallback.onSuccess(new OtpFinishInput(otpCode));
} catch (Exception e) {
// if any issue with the OTP collection from the end user or the user wants to cancel
// then call onError to exit the flow. In this example we simplify it as catching
// an exception.
otpFinishStepCallback.onError();
}
}
}
```
Follow these instructions to allow the customer to re-enter their phone number. There is a max of three entries/send attempts.
Manual Request Required
To enable phone number change capabilities on your credentials, contact your Prove representative.
The start step is implemented the same as the previous tab:
```java Java theme={"dark"}
import com.prove.sdk.proveauth.OtpStartInput;
import com.prove.sdk.proveauth.OtpStartStep;
import com.prove.sdk.proveauth.OtpStartStepCallback;
import com.prove.sdk.proveauth.PhoneNumberValidationException;
import com.prove.sdk.proveauth.ProveAuthException;
public class PromptStart implements OtpStartStep {
@Override
public void execute(boolean phoneNumberNeeded, @Nullable ProveAuthException otpException,
OtpStartStepCallback callback) {
// If phone number is needed, need to ask the end user for phone number input.
if (phoneNumberNeeded) {
// If error message is found around phone number, handle it.
// The `PhoneNumberValidationException` is ONLY available when `phoneNumberNeeded`
// has a value.
if (otpException instanceof PhoneNumberValidationException) {
// Set to a variable and display it in a field.
// In this example, we don't do anything with the error.
String errorMsg = otpException.getMessage();
}
try {
// Prompt the user for phone number to receive OTP SMS. You can build UI to provide
// best UX based on your application and business logic, here we simplify to a
// generic function named promptForPhoneNumber which gives us the collected
// phone number.
String phoneNumber = promptForPhoneNumber();
callback.onSuccess(new OtpStartInput(phoneNumber));
} catch (Exception e) {
// if any issue with the phone number collection from the end user or the user
// wants to cancel then call onError to exit the flow.
// In this example we simplify it as catching an exception.
callback.onError();
}
} else {
// No phone number needed, no need to ask end user for input.
callback.onSuccess(new OtpStartInput(""));
}
}
}
```
You can prompt for a new phone number by implementing the finish step like this:
```java Java theme={"dark"}
import com.prove.sdk.proveauth.OtpFinishInput;
import com.prove.sdk.proveauth.OtpFinishStep;
import com.prove.sdk.proveauth.OtpFinishStepCallback;
import com.prove.sdk.proveauth.OtpValidationException;
import com.prove.sdk.proveauth.ProveAuthException;
public class PhoneChangeFinish implements OtpFinishStep {
@Override
public void execute(@Nullable ProveAuthException otpException,
OtpFinishStepCallback otpFinishStepCallback) {
// If error message is found, handle it.
if (otpException instanceof OtpValidationException) {
// Set to a variable and display it in a field.
// In this example, we don't do anything with the error.
String errorMsg = otpException.getMessage();
}
// Prompt the user for whether they received the SMS.
if (promptForPhoneNumberChange("Didn't receive the SMS OTP? Try a different phone number.")) {
// If the end user wants to correct the phone number already in use, or changing to a
// different phone number to receive the future SMS OTP, call onMobileNumberChange(), and
// the otpStartStep will re-prompt for phone number input from the end user.
otpFinishStepCallback.onMobileNumberChange();
return;
}
try {
// Prompt the user for OTP delivered by SMS. You can build UI to provide
// best UX based on your application and business logic, here we simplify to a
// generic function named promptForOtpCode which gives us the OTP code.
String otpCode = promptForOtpCode();
otpFinishStepCallback.onSuccess(new OtpFinishInput(otpCode));
} catch (Exception e) {
// if any issue with the OTP collection from the end user or the user wants to cancel
// then call onError to exit the flow. In this example we simplify it as catching
// an exception.
otpFinishStepCallback.onError();
}
}
}
```
## Verify the Customer Information
Once the customer has made any edits to their pre-fill information, you should submit that information to the backend server so the `Complete()` call can then verify the customer information.
```java Java theme={"dark"}
// Send request to the backend to verify customer information.
SendInfoResponse sendInfo(String firstName, String lastName) {
YourBackendClient backend = new YourBackendClient(); // Backend API client
// TODO: Build your SendInfoRequest object
SendInfoRequest sendInfoRequest = new SendInfoRequest(firstName, lastName, ...);
// Send a sendInfoRequest to your backend server to get return customer information.
SendInfoResponse response = backend.verify(sendInfoRequest);
// TODO: define your own SendInfoResponse object to parse the response
return response;
}
```
# Access API Keys
Source: https://developer.prove.com/reference/authentication
Follow these steps to find your API keys to gain access to Prove's endpoints
## Retrieve your API keys
Gain access to Prove endpoints using an OAuth 2.0 bearer token. To generate a bearer token for the Sandbox environment, follow these steps:
Login to the [Developer Portal](https://portal.prove.com/en/login).
Navigate to Projects from the side bar.
Create a new project, then select the appropriate solution, give your project a name, and then select Create Project.
Select your project and navigate to the Credentials tab to access your credentials.
Use the following example cURL request for the /token endpoint to generate a bearer token. Replace the placeholders with your actual credentials.
If you are testing Prove's APIs outside of North America, make sure to:
* use the EU token endpoint, `https://platform.uat.eu.proveapis.com/token`
* use the credentials listed for the International region
```bash Request Bearer Token (US) theme={"dark"}
curl -X POST https://platform.uat.proveapis.com/token \
-H "Content-Type: application/x-www-form-urlencoded" \
-d "grant_type=client_credentials&client_id=YOUR_CLIENT_ID&client_secret=YOUR_CLIENT_SECRET"
```
```bash Request Bearer Token (EU) theme={"dark"}
curl -X POST https://platform.uat.eu.proveapis.com/token \
-H "Content-Type: application/x-www-form-urlencoded" \
-d "grant_type=client_credentials&client_id=YOUR_CLIENT_ID&client_secret=YOUR_CLIENT_SECRET"
```
```json Response theme={"dark"}
{
"access_token": "eyJ...",
"refresh_token": "eyJ...",
"refresh_expires_in": 3600,
"token_type": "Bearer",
"expires_in": 3600
}
```
Use the bearer token in the Authorization header of your requests, replacing the placeholder with your bearer token:
```bash Example Request focus={2} theme={"dark"}
curl -X POST https://platform.uat.proveapis.com/v3/start \
-H 'Authorization: Bearer YOUR_BEARER_TOKEN' \
-H 'Content-Type: application/json' \
-d "phoneNumber=2001001695&flowType=mobile"
```
Prefer Postman? Check out [Prove's API collection](https://www.postman.com/prove-eng/prove-link-api-testing/collection/93r30p4/prove-api) to try out different endpoints with preconfigured test data.
## Best practices for managing API keys
Secret API keys are a form of account credentials, like a username and password. If bad actors obtain a secret key, they can use it to harm your business.
Prove users own the responsibility of keeping secret API keys safe. Here are some best practices for how to do that.
### Protect against compromised secret API keys
Take the following actions to protect against compromised secret keys:
* **Use secure key management systems (KMS) to store secret keys:** When you create a live production secret key, immediately copy the key to a KMS, which handles sensitive information with encryption and access controls. Make sure you don’t leave a copy of the key in a local file.
* **Grant access only to those who need it:** Define a clear policy about which users have permission to create, update, or read keys. Limit the access only to those who need it. Audit the access periodically to avoid excess privilege on keys.
* **Don’t share secret keys insecurely:** Don’t share keys in emails, chat messages, or customer support messages.
* **Don’t store keys in source code repositories, such as GitHub:** Fraudulent actors might scan public source repositories for API keys. Even if the source repository is private, team members might share it from their development environments.
* **Don’t embed secret keys in applications:** Fraudulent actors can exploit secret keys by matching a certain string pattern. Avoid embedding keys in applications such as client tools, SDKs, and mobile apps.
* **Audit API request logs to check suspicious activities:** We recommend that you audit or check API request logs to proactively identify misused API keys. Make sure your developers aren’t using Production keys when a Sandbox key is appropriate.
* **Regular training and updating documentation.** Keep up-to-date documentation about how to handle secret API keys within your organization and host regular training sessions to ensure your team follows best practices.
# Submit Challenge
Source: https://developer.prove.com/reference/challenge-request
post /v3/challenge
This endpoint allows you to submit challenge information.
Use the following base URLs when integrating:
`https://platform.uat.proveapis.com` - North America Sandbox Environment
`https://platform.proveapis.com` - North America Production Environment
# Complete Flow
Source: https://developer.prove.com/reference/complete-request
post /v3/complete
This endpoint allows you to verify the user and complete the flow.
Use the following base URLs when integrating:
`https://platform.uat.proveapis.com` - North America Sandbox Environment
`https://platform.proveapis.com` - North America Production Environment
When implementing the KYC add-on, you need to pass in first name, last name, DOB, and SSN (or address) to ensure you receive back the KYC and CIP fields.
# Client-Side Android SDK
Source: https://developer.prove.com/reference/identity-android-sdk
Learn how to integrate the client-side Android SDK into your native app
## Installation
The Android SDK is a set of lightweight libraries. The libraries deliver as Android Archive Repository, `.aar`, files. The minimum supported version of Android is v7, level 24.
Prove manages a maven repository with Android binaries to enable integration with Gradle.
Update the dependencies object in the `build.gradle` file:
```java Java theme={"dark"}
dependencies {
// Existing dependencies are here.
// Add the Prove Link dependencies:
implementation 'com.prove.sdk:proveauth:6.9.0'
}
```
Point to the repository by updating your `settings.gradle` file with the Maven repository:
```java Java theme={"dark"}
dependencyResolutionManagement {
// Existing repository settings are here.
repositories {
// Existing repositories are here.
// Add the Prove Link Maven repository:
maven {
url = "https://prove.jfrog.io/artifactory/libs-public-maven/"
}
}
}
```
The following needs added to the `build.gradle` file to also download dependency libraries:
```java Java theme={"dark"}
dependencies {
implementation fileTree('libs')
}
```
If you receive an error message on the `application@fullBackupContent` value, you can resolve it by adding this line of code to your application `AndroidManifest.xml` file inside the `...` node. Add it as an attribute to the opening `application` tag:
```xml XML theme={"dark"}
```
## Permissions
The Prove Auth SDK and its children SDKs merge the following permissions into the main app:
```xml XML theme={"dark"}
```
## Send the type of flow: mobile
Unlike the Web SDK, when using the Android SDK, use the mobile flow. Pass `mobile` to the `Start()` function on the server. In a mobile flow, Mobile Auth℠ executes first and if that fails, performs OTP validation on the mobile phone.
In the mobile flow, once either Mobile Auth or the OTP validation is complete, the AuthFinishStep function executes.
Mobile Auth
Mobile Auth requires the customer to disable any VPN.
## Authenticate()
The SDK requires an `authToken` as a parameter for the `Authenticate()` function. This token returns from the `Start()` call of the server SDK. The token is session specific, limiting it to a single flow. It also expires after 15 minutes.
## Retrieve `authToken`
Send a request to your backend server with the phone number, flow type, and an optional challenge of either the date of birth or social security number.
```java Java theme={"dark"}
String initialize(String phoneNumber, String ssn, String flowType) {
YourBackendClient backend = new YourBackendClient(); // Backend API client
// TODO: Build your InitializeRequest object
InitializeRequest initializeRequest = new InitializeRequest(phoneNumber, ssn, flowType);
// Send an initialize request to your backend server to get authToken
InitializeResponse response = backend.initialize(initializeRequest);
// TODO: define your own InitializeResponse object to parse authToken string
return response.getAuthToken();
}
```
## Setup authenticator
Once you have the `authToken`, build the authenticator for the mobile flow.
```java Java theme={"dark"}
// Object implementing AuthFinishStep interface
AuthFinishStep authFinishStep = new AuthFinishStep() {
...
};
// Objects implementing OtpStartStep/OtpFinishStep interfaces
OtpStartStep otpStartStep = new OtpStartStep() {
...
};
OtpFinishStep otpFinishStep = new OtpFinishStep() {
...
};
ProveAuth proveAuth = ProveAuth.builder()
.withAuthFinishStep(authId -> verify(authId)) // verify(authId) call defined in #Validate the Mobile Phone section
.withOtpFallback(otpStartStep, otpFinishStep)
.withContext(this)
.build();
```
The mobile data connection can sometimes be unavailable during testing. The `Builder` class offers a `withTestMode(boolean testMode)` method, which permits simulated successful session results while connected to a Wi-Fi network only. Testing using a Wi-Fi connection is useful in the Sandbox environment.
```java Java theme={"dark"}
ProveAuth proveAuth = ProveAuth.builder()
.withAuthFinishStep(authId -> verify(authId))
.withOtpFallback(otpStartStep, otpFinishStep)
.withContext(this)
.withTestMode(true) // Test mode flag
.build();
```
## Performing the authentication
The `ProveAuth` object is thread safe. You can use it as a singleton. Most Prove Auth methods are blocking and therefore can't execute in the main app thread. The app employs an executor service with a minimum of two threads to manage threads due to the ability to process concurrent blocking requests.
```java Java theme={"dark"}
public class MyAuthenticator {
private final MyBackendClient backend = new MyBackendClient(); // Backend API client
private ExecutorService executor = Executors.newCachedThreadPool();
private final AuthFinishStep authFinishStep = new AuthFinishStep() {
@Override
void execute(String authId) {
try {
AuthFinishResponse response = backend.authFinish("My App", authId);
... // Check the authentication status returned in the response
} catch (IOException e) {
String failureCause = e.getCause() != null ? e.getCause().getMessage() : "Failed to request authentication results";
// Authentication failed due to request failure
}
}
};
private ProveAuth proveAuth;
public MyAuthenticator(Context context) {
proveAuth = ProveAuth.builder()
.withAuthFinishStep(authFinishStep)
.withOtpFallback(otpStartStep, otpFinishStep)
.withContext(context)
.build();
}
public void authenticate() throws IOException, ProveAuthException {
AuthStartResponse response = backend.authStart("My Prove Auth App");
proveAuth.authenticate(response.getAuthToken());
}
}
public void authenticate() throws IOException, ProveAuthException {
// NOTE: blocking method proveAuth.authenticate() should be run in background thread
executor.submit(() -> {
AuthStartResponse response = backend.authStart("My Prove Auth App");
proveAuth.authenticate(response.getAuthToken());
}
}
```
## Validate the mobile phone
In the AuthFinishStep, specify a function to call once the possession checks are complete on the mobile phone. This endpoint on your back end server calls the `Validate()` function to check phone number validation. If it was successful, the server returns the results from the `Challenge()` function, including customer information.
```java Java theme={"dark"}
// Send a verify request to get return customer information.
void verify(String: authId) {
YourBackendClient backend = new YourBackendClient(); // Backend API client
// Build your VerifyRequest object
VerifyRequest verifyRequest = new VerifyRequest(authId, ...);
// Send a verify request to your backend server to get return customer information.
VerifyResponse response = backend.verify(verifyRequest);
// TODO: define your VerifyResponse object to parse customer information from the response
String firstName = response.getFirstName();
String lastName = response.getLastName();
// Pre-fill customer information to your Android App UI, for example:
firstNameEditText.setText(firstName);
lastNameEditText.setText(lastName);
}
```
## Configure OTP
To use the Resend/Retry/Phone Change features, you need to install the Android SDK version 6.5.0 or later.
To set the One-Time Password (OTP) handler, `withOtpFallback(otpStart: otpStartStep, otpFinish: otpFinishStep)`, requires implementing the `OtpStartStep` and `OtpFinishStep`.
The OTP session has a two minute timeout from when it's sent through SMS to when the customer can enter in the OTP.
Follow these instructions if you are implementing OTP and you are passing in the phone number on the `/v3/start` endpoint. In this case, you've already prompted for a phone number so you don't need to prompt for it in the client SDK.
Since you passed the phone number in the `Start()` function, call `OtpStartStepCallback.onSuccess(OtpStartInput);` to communicate to the SDK you have the customer's agreement to deliver the SMS message. Ensure you return an instance of `OtpStartInput` with empty string or `null` to `OtpStartStepCallback.onSuccess()` function.
```java Java theme={"dark"}
import com.prove.sdk.proveauth.OtpStartInput;
import com.prove.sdk.proveauth.OtpStartStep;
import com.prove.sdk.proveauth.OtpStartStepCallback;
import com.prove.sdk.proveauth.ProveAuthException;
public class NoPromptStart implements OtpStartStep {
@Override
public void execute(boolean phoneNumberNeeded, ProveAuthException otpException,
OtpStartStepCallback callback) {
// No phone number needed, no need to ask end user for input.
callback.onSuccess(new OtpStartInput(""));
}
}
```
Call the `OtpStartStepCallback.onError();` method to communicate to the SDK any issues while trying to obtain the phone number or the OTP. Report an error if the customer cancels the SMS transaction or presses the back button to leave the screen.
In the finish step, call the `OtpFinishStepCallback.onSuccess(OtpFinishInput);` method to return the collected OTP value wrapped in `OtpFinishInput`.
```java Java theme={"dark"}
import com.prove.sdk.proveauth.OtpFinishInput;
import com.prove.sdk.proveauth.OtpFinishStep;
import com.prove.sdk.proveauth.OtpFinishStepCallback;
import com.prove.sdk.proveauth.OtpValidationException;
import com.prove.sdk.proveauth.ProveAuthException;
public class NoPromptFinish implements OtpFinishStep {
@Override
public void execute(@Nullable ProveAuthException otpException,
OtpFinishStepCallback otpFinishStepCallback) {
// If error message is found, handle it.
if (otpException instanceof OtpValidationException) {
// Set to a variable and display it in a field.
// In this example, we don't do anything with the error.
String errorMsg = otpException.getMessage();
}
try {
// Prompt the user for OTP delivered by SMS. You can build UI to provide
// best UX based on your application and business logic, here we simplify to a
// generic function named promptForOtpCode which gives us the OTP code.
String otpCode = promptForOtpCode();
otpFinishStepCallback.onSuccess(new OtpFinishInput(otpCode));
} catch (Exception e) {
// if any issue with the OTP collection from the end user or the user wants to cancel
// then call onError to exit the flow. In this example we simplify it as catching
// an exception.
otpFinishStepCallback.onError();
}
}
}
```
Follow these instructions if implementing MobileAuth and collecting the phone number only if MobileAuth fails. This will implement OTP without allowing for SMS resends and phone number changes. If you do want those capabilities, please reference the subsequent tabs (Resend, Retry OTP, and Phone Number Change).
In the start step, call the `OtpStartStepCallback.onSuccess(OtpStartInput);` method to return the collected phone number to the SDK.
```java Java theme={"dark"}
import com.prove.sdk.proveauth.OtpStartInput;
import com.prove.sdk.proveauth.OtpStartStep;
import com.prove.sdk.proveauth.OtpStartStepCallback;
import com.prove.sdk.proveauth.PhoneNumberValidationException;
import com.prove.sdk.proveauth.ProveAuthException;
public class PromptStart implements OtpStartStep {
@Override
public void execute(boolean phoneNumberNeeded, @Nullable ProveAuthException otpException,
OtpStartStepCallback callback) {
// If phone number is needed, need to ask the end user for phone number input.
if (phoneNumberNeeded) {
// If error message is found around phone number, handle it.
// The `PhoneNumberValidationException` is ONLY available when `phoneNumberNeeded`
// has a value.
if (otpException instanceof PhoneNumberValidationException) {
// Set to a variable and display it in a field.
// In this example, we don't do anything with the error.
String errorMsg = otpException.getMessage();
}
try {
// Prompt the user for phone number to receive OTP SMS. You can build UI to provide
// best UX based on your application and business logic, here we simplify to a
// generic function named promptForPhoneNumber which gives us the collected
// phone number.
String phoneNumber = promptForPhoneNumber();
callback.onSuccess(new OtpStartInput(phoneNumber));
} catch (Exception e) {
// if any issue with the phone number collection from the end user or the user
// wants to cancel then call onError to exit the flow.
// In this example we simplify it as catching an exception.
callback.onError();
}
} else {
// No phone number needed, no need to ask end user for input.
callback.onSuccess(new OtpStartInput(""));
}
}
}
```
The finish step is implemented the same as the previous tab:
```java Java theme={"dark"}
import com.prove.sdk.proveauth.OtpFinishInput;
import com.prove.sdk.proveauth.OtpFinishStep;
import com.prove.sdk.proveauth.OtpFinishStepCallback;
import com.prove.sdk.proveauth.OtpValidationException;
import com.prove.sdk.proveauth.ProveAuthException;
public class NoPromptFinish implements OtpFinishStep {
@Override
public void execute(@Nullable ProveAuthException otpException,
OtpFinishStepCallback otpFinishStepCallback) {
// If error message is found, handle it.
if (otpException instanceof OtpValidationException) {
// Set to a variable and display it in a field.
// In this example, we don't do anything with the error.
String errorMsg = otpException.getMessage();
}
try {
// Prompt the user for OTP delivered by SMS. You can build UI to provide
// best UX based on your application and business logic, here we simplify to a
// generic function named promptForOtpCode which gives us the OTP code.
String otpCode = promptForOtpCode();
otpFinishStepCallback.onSuccess(new OtpFinishInput(otpCode));
} catch (Exception e) {
// if any issue with the OTP collection from the end user or the user wants to cancel
// then call onError to exit the flow. In this example we simplify it as catching
// an exception.
otpFinishStepCallback.onError();
}
}
}
```
Follow these instructions to allow the customer to request a new OTP via SMS using the same phone number. There is a max of three send attempts including the initial message.
The start step is implemented the same as the previous tab:
```java Java theme={"dark"}
import com.prove.sdk.proveauth.OtpStartInput;
import com.prove.sdk.proveauth.OtpStartStep;
import com.prove.sdk.proveauth.OtpStartStepCallback;
import com.prove.sdk.proveauth.PhoneNumberValidationException;
import com.prove.sdk.proveauth.ProveAuthException;
public class PromptStart implements OtpStartStep {
@Override
public void execute(boolean phoneNumberNeeded, @Nullable ProveAuthException otpException,
OtpStartStepCallback callback) {
// If phone number is needed, need to ask the end user for phone number input.
if (phoneNumberNeeded) {
// If error message is found around phone number, handle it.
// The `PhoneNumberValidationException` is ONLY available when `phoneNumberNeeded`
// has a value.
if (otpException instanceof PhoneNumberValidationException) {
// Set to a variable and display it in a field.
// In this example, we don't do anything with the error.
String errorMsg = otpException.getMessage();
}
try {
// Prompt the user for phone number to receive OTP SMS. You can build UI to provide
// best UX based on your application and business logic, here we simplify to a
// generic function named promptForPhoneNumber which gives us the collected
// phone number.
String phoneNumber = promptForPhoneNumber();
callback.onSuccess(new OtpStartInput(phoneNumber));
} catch (Exception e) {
// if any issue with the phone number collection from the end user or the user
// wants to cancel then call onError to exit the flow.
// In this example we simplify it as catching an exception.
callback.onError();
}
} else {
// No phone number needed, no need to ask end user for input.
callback.onSuccess(new OtpStartInput(""));
}
}
}
```
You can then send a new OTP SMS to the same phone number by implementing the finish step like this:
```java Java theme={"dark"}
import com.prove.sdk.proveauth.OtpFinishInput;
import com.prove.sdk.proveauth.OtpFinishStep;
import com.prove.sdk.proveauth.OtpFinishStepCallback;
import com.prove.sdk.proveauth.OtpValidationException;
import com.prove.sdk.proveauth.ProveAuthException;
public class MultipleResendFinish implements OtpFinishStep {
@Override
public void execute(@Nullable ProveAuthException otpException,
OtpFinishStepCallback otpFinishStepCallback) {
// If error message is found, handle it.
if (otpException instanceof OtpValidationException) {
// Set to a variable and display it in a field.
// In this example, we don't do anything with the error.
String errorMsg = otpException.getMessage();
}
// Prompt the user for whether they received the SMS.
if (promptForResend("Didn't receive the SMS OTP? Click resend button for a new one!")) {
// If the end user wants to send again to the same phone number call onOtpResend().
otpFinishStepCallback.onOtpResend();
return;
}
try {
// Prompt the user for OTP delivered by SMS. You can build UI to provide
// best UX based on your application and business logic, here we simplify to a
// generic function named promptForOtpCode which gives us the OTP code.
String otpCode = promptForOtpCode();
otpFinishStepCallback.onSuccess(new OtpFinishInput(otpCode));
} catch (Exception e) {
// if any issue with the OTP collection from the end user or the user wants to cancel
// then call onError to exit the flow. In this example we simplify it as catching
// an exception.
otpFinishStepCallback.onError();
}
}
}
```
Follow these instructions to allow the customer to re-enter the OTP PIN if they type it wrong. There is a max of 3 attempts. To implement this functionality, you also need to pass in `allowOTPRetry=true` to the `/v3/start` endpoint.
The start step is implemented the same as either of the the previous tabs - no client side code changes necessary:
```java Java theme={"dark"}
import com.prove.sdk.proveauth.OtpStartInput;
import com.prove.sdk.proveauth.OtpStartStep;
import com.prove.sdk.proveauth.OtpStartStepCallback;
import com.prove.sdk.proveauth.PhoneNumberValidationException;
import com.prove.sdk.proveauth.ProveAuthException;
public class PromptStart implements OtpStartStep {
@Override
public void execute(boolean phoneNumberNeeded, @Nullable ProveAuthException otpException,
OtpStartStepCallback callback) {
// If phone number is needed, need to ask the end user for phone number input.
if (phoneNumberNeeded) {
// If error message is found around phone number, handle it.
// The `PhoneNumberValidationException` is ONLY available when `phoneNumberNeeded`
// has a value.
if (otpException instanceof PhoneNumberValidationException) {
// Set to a variable and display it in a field.
// In this example, we don't do anything with the error.
String errorMsg = otpException.getMessage();
}
try {
// Prompt the user for phone number to receive OTP SMS. You can build UI to provide
// best UX based on your application and business logic, here we simplify to a
// generic function named promptForPhoneNumber which gives us the collected
// phone number.
String phoneNumber = promptForPhoneNumber();
callback.onSuccess(new OtpStartInput(phoneNumber));
} catch (Exception e) {
// if any issue with the phone number collection from the end user or the user
// wants to cancel then call onError to exit the flow.
// In this example we simplify it as catching an exception.
callback.onError();
}
} else {
// No phone number needed, no need to ask end user for input.
callback.onSuccess(new OtpStartInput(""));
}
}
}
```
The finish step is implemented the same as either of the the previous tabs - no client side code changes necessary. If the OTP is invalid, the finish step will be called again to prompt the user for a new input. Once the max attempts is reached, the `AuthFinish` function will be called.
```java Java theme={"dark"}
import com.prove.sdk.proveauth.OtpFinishInput;
import com.prove.sdk.proveauth.OtpFinishStep;
import com.prove.sdk.proveauth.OtpFinishStepCallback;
import com.prove.sdk.proveauth.OtpValidationException;
import com.prove.sdk.proveauth.ProveAuthException;
public class NoPromptFinish implements OtpFinishStep {
@Override
public void execute(@Nullable ProveAuthException otpException,
OtpFinishStepCallback otpFinishStepCallback) {
// If error message is found, handle it.
if (otpException instanceof OtpValidationException) {
// Set to a variable and display it in a field.
// In this example, we don't do anything with the error.
String errorMsg = otpException.getMessage();
}
try {
// Prompt the user for OTP delivered by SMS. You can build UI to provide
// best UX based on your application and business logic, here we simplify to a
// generic function named promptForOtpCode which gives us the OTP code.
String otpCode = promptForOtpCode();
otpFinishStepCallback.onSuccess(new OtpFinishInput(otpCode));
} catch (Exception e) {
// if any issue with the OTP collection from the end user or the user wants to cancel
// then call onError to exit the flow. In this example we simplify it as catching
// an exception.
otpFinishStepCallback.onError();
}
}
}
```
Follow these instructions to allow the customer to re-enter their phone number. There is a max of three entries/send attempts.
Manual Request Required
To enable phone number change capabilities on your credentials, contact your Prove representative.
The start step is implemented the same as the previous tab:
```java Java theme={"dark"}
import com.prove.sdk.proveauth.OtpStartInput;
import com.prove.sdk.proveauth.OtpStartStep;
import com.prove.sdk.proveauth.OtpStartStepCallback;
import com.prove.sdk.proveauth.PhoneNumberValidationException;
import com.prove.sdk.proveauth.ProveAuthException;
public class PromptStart implements OtpStartStep {
@Override
public void execute(boolean phoneNumberNeeded, @Nullable ProveAuthException otpException,
OtpStartStepCallback callback) {
// If phone number is needed, need to ask the end user for phone number input.
if (phoneNumberNeeded) {
// If error message is found around phone number, handle it.
// The `PhoneNumberValidationException` is ONLY available when `phoneNumberNeeded`
// has a value.
if (otpException instanceof PhoneNumberValidationException) {
// Set to a variable and display it in a field.
// In this example, we don't do anything with the error.
String errorMsg = otpException.getMessage();
}
try {
// Prompt the user for phone number to receive OTP SMS. You can build UI to provide
// best UX based on your application and business logic, here we simplify to a
// generic function named promptForPhoneNumber which gives us the collected
// phone number.
String phoneNumber = promptForPhoneNumber();
callback.onSuccess(new OtpStartInput(phoneNumber));
} catch (Exception e) {
// if any issue with the phone number collection from the end user or the user
// wants to cancel then call onError to exit the flow.
// In this example we simplify it as catching an exception.
callback.onError();
}
} else {
// No phone number needed, no need to ask end user for input.
callback.onSuccess(new OtpStartInput(""));
}
}
}
```
You can prompt for a new phone number by implementing the finish step like this:
```java Java theme={"dark"}
import com.prove.sdk.proveauth.OtpFinishInput;
import com.prove.sdk.proveauth.OtpFinishStep;
import com.prove.sdk.proveauth.OtpFinishStepCallback;
import com.prove.sdk.proveauth.OtpValidationException;
import com.prove.sdk.proveauth.ProveAuthException;
public class PhoneChangeFinish implements OtpFinishStep {
@Override
public void execute(@Nullable ProveAuthException otpException,
OtpFinishStepCallback otpFinishStepCallback) {
// If error message is found, handle it.
if (otpException instanceof OtpValidationException) {
// Set to a variable and display it in a field.
// In this example, we don't do anything with the error.
String errorMsg = otpException.getMessage();
}
// Prompt the user for whether they received the SMS.
if (promptForPhoneNumberChange("Didn't receive the SMS OTP? Try a different phone number.")) {
// If the end user wants to correct the phone number already in use, or changing to a
// different phone number to receive the future SMS OTP, call onMobileNumberChange(), and
// the otpStartStep will re-prompt for phone number input from the end user.
otpFinishStepCallback.onMobileNumberChange();
return;
}
try {
// Prompt the user for OTP delivered by SMS. You can build UI to provide
// best UX based on your application and business logic, here we simplify to a
// generic function named promptForOtpCode which gives us the OTP code.
String otpCode = promptForOtpCode();
otpFinishStepCallback.onSuccess(new OtpFinishInput(otpCode));
} catch (Exception e) {
// if any issue with the OTP collection from the end user or the user wants to cancel
// then call onError to exit the flow. In this example we simplify it as catching
// an exception.
otpFinishStepCallback.onError();
}
}
}
```
## Verify the Customer Information
Once the customer has made any edits to their pre-fill information, you should submit that information to the backend server so the `Complete()` call can then verify the customer information.
```java Java theme={"dark"}
// Send request to the backend to verify customer information.
SendInfoResponse sendInfo(String firstName, String lastName) {
YourBackendClient backend = new YourBackendClient(); // Backend API client
// TODO: Build your SendInfoRequest object
SendInfoRequest sendInfoRequest = new SendInfoRequest(firstName, lastName, ...);
// Send a sendInfoRequest to your backend server to get return customer information.
SendInfoResponse response = backend.verify(sendInfoRequest);
// TODO: define your own SendInfoResponse object to parse the response
return response;
}
```
# Client-Side iOS SDK
Source: https://developer.prove.com/reference/identity-ios-sdk
Learn how to integrate the client-side iOS SDK into your native new app
## Installation
Prove provides the iOS SDK in Swift. It has a download size of 2.5 MB and an install size of 1.5 MB for the minimum required components. It relies on iOS native APIs. The iOS SDK supports the earlier three major versions. Prove has seen successful transactions with iOS v11.
Xcode Requirement
To integrate with our iOS SDKs, Apps must be built with Xcode 16.0 or later.
Prove manages a repository with the libraries to enable integration. You can install the SDK using either CocoaPods or Swift Package Manager.
Execute the following to import CocoaPod from the Prove pod repository:
```shell shell theme={"dark"}
# Run this command to install the cocoapods-art plugin (authored by Artifactory)
gem install cocoapods-art
# Run this command to add the Prove pod repository
pod repo-art add prove.jfrog.io https://prove.jfrog.io/artifactory/api/pods/libs-public-cocoapods
# In your Podfile, paste in the Prove pod repository as a source
plugin 'cocoapods-art', :sources => [
'prove.jfrog.io'
]
# In your Podfile, paste in the SDK pods
pod 'ProveAuth', '6.9.1'
# Run this command to install the SDK pods
pod install
```
### Step 1: Connect to JFrog Registry
Set up the registry globally (required for both Xcode UI and Package.swift):
```bash theme={"dark"}
swift package-registry set --global "https://prove.jfrog.io/artifactory/api/swift/libs-public-swift"
swift package-registry login "https://prove.jfrog.io/artifactory/api/swift/libs-public-swift"
# Press Enter when prompted for access token
```
Public Registry
This is a publicly accessible registry - no password or access token is needed. Simply press Enter when prompted for an access token.
The registry connection is configured via command line only. Once this setup is complete, you can add packages using either Xcode UI or Package.swift.
### Step 2: Adding Dependencies
#### Method 1: Using Xcode UI
1. In Xcode, go to **File** → **Add Package Dependencies**
2. Search for the package you want (e.g., `swift.proveauth`)
3. Select the version and add to your target
The latest stable version is 6.9.1. Select "Exact Version" for production applications to ensure consistent builds.
Once the command line setup is complete, you only need to enter the package name (e.g., `swift.proveauth`) in Xcode - no need to enter the full registry URL to Xcode.
#### Method 2: Using Package.swift
Add dependencies to your `Package.swift` file:
```swift Swift theme={"dark"}
// swift-tools-version: 5.9
import PackageDescription
let package = Package(
name: "YourApp",
platforms: [.iOS(.v12)],
dependencies: [
.package(id: "swift.proveauth", from: "6.9.1"),
],
targets: [
.target(
name: "YourApp",
dependencies: [
.product(name: "ProveAuth", package: "swift.proveauth"),
]
)
]
)
```
Then run the following command to resolve and fetch the dependencies:
```bash theme={"dark"}
swift package resolve
```
## Send the type of flow: mobile
Unlike the Web SDK, when using the iOS SDK, use the mobile flow. Pass mobile to the `Start()` function on the server. In a mobile flow, Mobile Auth executes first and if that fails, performs one-time password (OTP) validation on the mobile phone.
In the mobile flow, once either Mobile Auth or the OTP validation is complete, the `AuthFinishStep` function executes.
Mobile Auth
In order for Mobile Auth to succeed, the customer needs to disable the VPN and Private Relay on iOS.
## `Authenticate()`
The SDK requires an `authToken` as a parameter for the `Authenticate()` function. This token returns from the `Start()` call of the server-side SDK. The token is session specific so it's used for a single flow. It also expires after 15 minutes.
## Retrieve `authToken`
To start the flow, send a request to your back end server with the phone number, flow type, and an optional challenge. Use either the date of birth, `YYYY-MM-DD`, or the last four digits of the social security number.
```swift Swift theme={"dark"}
// The below example uses native iOS URLSession, but any other
// alternative networking approaches should also work
func initialize(phoneNumber: String, ssn: String, flowType: String, completion: @escaping (Result\) -> Void) {
guard let url = URL(string: "\(backendUrl)/initialize") else {
completion(.failure(URLError(.badURL)))
return
}
var request = URLRequest(url: url)
request.httpMethod = "POST"
request.addValue("application/json", forHTTPHeaderField: "Accept")
request.addValue("application/json", forHTTPHeaderField: "Content-Type")
// Set up the request body
let body: [String: Any] = [
"phoneNumber": phoneNumber,
"flowType": flowType,
"ssn": ssn
]
do {
request.httpBody = try JSONSerialization.data(withJSONObject: body, options: \[])
} catch {
completion(.failure(error))
return
}
// Perform the request
let task = URLSession.shared.dataTask(with: request) { \_, response, error in
// Handle network or connection errors
if let error = error {
completion(.failure(error))
return
}
do {
if let json = try JSONSerialization.jsonObject(with: data, options: \[]) as? [String: Any],
let authToken = json["authToken"] as? String {
completion(.success(authToken))
} else {
let parsingError = NSError(domain: "", code: 0, userInfo: [NSLocalizedDescriptionKey : "Failed to parse JSON or authToken is missing"])
completion(.failure(parsingError))
}
} catch {
completion(.failure(error))
}
}
// Start the network call
task.resume()
}
```
## Setup authenticator
Once you have the `authToken`, build the authenticator for the mobile flow.
```swift Swift theme={"dark"}
// Object implementing ProveAuthFinishStep protocols
let finishStep = FinishAuthStep()
// Objects implementing OtpStartStep/OtpFinishStep protocols
let otpStartStep = MobileOtpStartStep()
let otpFinishStep = MobileOtpFinishStep()
let proveAuthSdk: ProveAuth
proveAuthSdk = ProveAuth.builder(authFinish: finishStep)
.withOtpFallback(otpStart: otpStartStep, otpFinish: otpFinishStep)
.build()
```
If a mobile data connection is unavailable during testing, use the Builder class. It permits simulated successful session results while connected to a Wi-Fi network. Testing using a Wi-Fi connection is useful in the Sandbox environment.
```swift Swift theme={"dark"}
proveAuthSdk = ProveAuth.builder(authFinish: finishStep)
.withMobileAuthTestMode() // Test mode flag
.build()
```
## Performing the authentication
The Prove Auth object is thread safe and used as a singleton. Most Prove Auth methods are blocking and therefore can't execute in the main app thread. The app employs an executor service with a minimum of two threads to manage threads due to the ability to process concurrent blocking requests.
```swift Swift theme={"dark"}
// authToken retrieved from your server via StartAuthRequest
proveAuthSdk.authenticate(authToken) { error in
DispatchQueue.main.async {
self.messages.finalResultMessage = "ProveAuth.authenticate returned error: \(error.localizedDescription)"
print(self.messages.finalResultMessage)
}
}
```
## Validate the mobile phone
In the `AuthFinishStep`, specify a function to call once the possession checks complete on the mobile phone. In the following code, notice an endpoint called `/verify`. This endpoint on your back end server calls the `Validate()` function to validate the phone number. If unsuccessful, the server calls the `Challenge()` function and then returns the results, including customer information. Refer to the following example fields that return and then prefill on a form for the customer to verify.
```swift Swift theme={"dark"}
// Send a verify request to get return customer information.
// The below example uses native iOS URLSession, but any other
// alternative networking approaches should also work
func verify(String: authId, completion: @escaping (Error?) -> Void) {
guard let url = URL(string: "\(backendUrl)/verify") else {
completion(URLError(.badURL))
return
}
// Create the request
var request = URLRequest(url: url)
request.httpMethod = "POST"
request.addValue("application/json", forHTTPHeaderField: "Accept")
request.addValue("application/json", forHTTPHeaderField: "Content-Type")
// Set up the request body (empty JSON object) - authId is not needed so you can ignore.
let body: [String: Any] = ["authId": authId]
do {
request.httpBody = try JSONSerialization.data(withJSONObject: body, options: \[])
} catch {
completion(error)
return
}
// Perform the request
let task = URLSession.shared.dataTask(with: request) { \_, response, error in
if let error = error {
completion(error)
return
}
// Parse the response
do {
if let json = try JSONSerialization.jsonObject(with: data, options: \[]) as? [String: Any],
let firstName = json["firstName"] as? String,
let lastName = json["lastName"] as? String {
// Update the UI on the main thread
DispatchQueue.main.async {
// Update your UI with the pre-fill customer information
// For example, assuming you have IBOutlet references for your text fields
self.firstNameInput.text = firstName
self.lastNameInput.text = lastName
}
completion(nil)
} else {
let parsingError = NSError(domain: "", code: 0, userInfo: [NSLocalizedDescriptionKey: "Failed to parse JSON"])
completion(parsingError)
}
} catch {
completion(error)
}
}
// Start the network call
task.resume()
}
```
## Configure OTP
To use the Resend/Retry/Phone Change features, you need to install the iOS SDK version 6.5.1 or later.
To set the One-Time Password (OTP) handler, `withOtpFallback(otpStart: otpStartStep, otpFinish: otpFinishStep)`, requires implementing the `OtpStartStep` and `OtpFinishStep`.
The OTP session has a two minute timeout from when it's sent through SMS to when the customer can enter in the OTP.
Follow these instructions if you are implementing OTP and you are passing in the phone number on the `/v3/start` endpoint. In this case, you've already prompted for a phone number so you don't need to prompt for it in the client SDK.
Since you passed the phone number in the `Start()` function, call `callback.onSuccess(input: nil)` to communicate to the SDK you have the customer's agreement to deliver the SMS message.
```swift Swift theme={"dark"}
import Foundation
import ProveAuth
import SwiftUI
class MobileOtpStartStep: OtpStartStep {
@ObservedObject var sheetObservable: SheetObservable
var callback: OtpStartStepCallback?
init(sheetObservable: SheetObservable) {
self.sheetObservable = sheetObservable
}
// Implement this method to handle phone number collection for SMS OTP,
// or to obtain user confirmation for initiating an SMS message.
func execute(
phoneNumberNeeded: Bool, phoneValidationError: ProveAuthError?, callback: OtpStartStepCallback
) {
self.callback = callback
// Since no phone number is needed, don't prompt the user.
callback.onSuccess(input: nil)
}
}
```
Call the `callback.onError()` method to communicate to the SDK any issues while trying to obtain the phone number or the OTP. Report an error if the customer cancels the SMS transaction or presses the back button to leave the screen.
```swift Swift theme={"dark"}
import Foundation
import SwiftUI
import ProveAuth
class MobileOtpFinishStep: OtpFinishStep {
@ObservedObject var sheetObservable: SheetObservable
var callback: OtpFinishStepCallback?
init(sheetObservable: SheetObservable){
self.sheetObservable = sheetObservable
}
// Implement this method to collect the OTP value delivered via SMS.
func execute(otpError: ProveAuthError?, callback: OtpFinishStepCallback) {
self.callback = callback
// Handle the OTP validation error if present.
if case .otpValidationError = otpError {
print("found otpError: \(String(describing: otpError?.localizedDescription))")
// Signal to your UI components that the last provided OTP is invalid
self.sheetObservable.otpError = true
} else {
self.sheetObservable.otpError = false
}
// Signal to UI components to display OtpFinishView
DispatchQueue.main.async {
self.sheetObservable.isOtpFinishActive = true
}
}
// Provide the collected OTP value to the SDK for validation.
func handleOtp(_ otp: String) {
guard let callback = self.callback else {
print("Error: OtpFinishStepCallback is not set ")
return
}
let otpFinishInput = OtpFinishInput(otp: otp)
callback.onSuccess(input: otpFinishInput)
}
// Notify the SDK of any issues encountered while obtaining the OTP value or if the user cancels the OTP flow.
func handleOtpFinishError() {
guard let callback = self.callback else {
print("Error: OtpFinishStepCallback is not set ")
return
}
callback.onError()
}
}
```
Follow these instructions if implementing MobileAuth and collecting the phone number only if MobileAuth fails. This will implement OTP without allowing for SMS resends and phone number changes. If you do want those capabilities, please reference the subsequent tabs (Resend, Retry OTP, and Phone Number Change).
In the start step, call the `callback.onSuccess(input: otpStartInput)` method to return the collected phone number to the SDK.
```swift Swift theme={"dark"}
import Foundation
import ProveAuth
import SwiftUI
class MobileOtpStartStep: OtpStartStep {
@ObservedObject var sheetObservable: SheetObservable
var callback: OtpStartStepCallback?
init(sheetObservable: SheetObservable) {
self.sheetObservable = sheetObservable
}
func execute(
phoneNumberNeeded: Bool, phoneValidationError: ProveAuthError?, callback: OtpStartStepCallback
) {
self.callback = callback
if !phoneNumberNeeded {
// If no phone number is needed, then don't prompt the user.
callback.onSuccess(input: nil)
} else {
DispatchQueue.main.async {
// If a phone number validation error is detected, ensure it is handled to provide feedback to the user.
if case .phoneNumberValidationError = phoneValidationError {
print(
"found phoneValidationError: \(String(describing: phoneValidationError?.localizedDescription))"
)
// Update UI components to display OtpStartView with the phone number validation error.
self.sheetObservable.isPhoneValidationError = true
} else {
self.sheetObservable.isPhoneValidationError = false
}
// Update UI components to display OtpStartView if a phone number is needed.
self.sheetObservable.isOtpStartActive = true
}
}
}
// Return collected phone number to the SDK
func handlePhoneNumber(phoneNumber: String) {
guard let callback = self.callback else {
print("Error: OtpStartStepCallback is not set ")
return
}
let otpStartInput = OtpStartInput(phoneNumber: phoneNumber)
// This is how you pass collected phone number to SDK
callback.onSuccess(input: otpStartInput)
}
// Communicate any issues encountered while trying to obtain the phone number to the SDK.
// Error should be reported if the customer explicitly cancels the SMS OTP transaction
// or presses the back button to exit out the SMS OTP start step screen.
func handleOtpStartError() {
guard let callback = self.callback else {
print("Error: OtpStartStepCallback is not set ")
return
}
callback.onError()
}
}
```
The finish step is implemented the same as the previous tab:
```swift Swift theme={"dark"}
import Foundation
import SwiftUI
import ProveAuth
class MobileOtpFinishStep: OtpFinishStep {
@ObservedObject var sheetObservable: SheetObservable
var callback: OtpFinishStepCallback?
init(sheetObservable: SheetObservable){
self.sheetObservable = sheetObservable
}
// Implement this method to collect the OTP value delivered via SMS.
func execute(otpError: ProveAuthError?, callback: OtpFinishStepCallback) {
self.callback = callback
// Handle the OTP validation error if present.
if case .otpValidationError = otpError {
print("found otpError: \(String(describing: otpError?.localizedDescription))")
// Signal to your UI components that the last provided OTP is invalid
self.sheetObservable.otpError = true
} else {
self.sheetObservable.otpError = false
}
// Signal to UI components to display OtpFinishView
DispatchQueue.main.async {
self.sheetObservable.isOtpFinishActive = true
}
}
// Provide the collected OTP value to the SDK for validation.
func handleOtp(_ otp: String) {
guard let callback = self.callback else {
print("Error: OtpFinishStepCallback is not set ")
return
}
let otpFinishInput = OtpFinishInput(otp: otp)
callback.onSuccess(input: otpFinishInput)
}
// Notify the SDK of any issues encountered while obtaining the OTP value or if the user cancels the OTP flow.
func handleOtpFinishError() {
guard let callback = self.callback else {
print("Error: OtpFinishStepCallback is not set ")
return
}
callback.onError()
}
}
```
Follow these instructions to allow the customer to request a new OTP via SMS using the same phone number. There is a max of three send attempts including the initial message.
The start step is implemented the same as the previous tab:
```swift Swift theme={"dark"}
import Foundation
import ProveAuth
import SwiftUI
class MobileOtpStartStep: OtpStartStep {
@ObservedObject var sheetObservable: SheetObservable
var callback: OtpStartStepCallback?
init(sheetObservable: SheetObservable) {
self.sheetObservable = sheetObservable
}
func execute(
phoneNumberNeeded: Bool, phoneValidationError: ProveAuthError?, callback: OtpStartStepCallback
) {
self.callback = callback
if !phoneNumberNeeded {
// If no phone number is needed, then don't prompt the user.
callback.onSuccess(input: nil)
} else {
DispatchQueue.main.async {
// If a phone number validation error is detected, ensure it is handled to provide feedback to the user.
if case .phoneNumberValidationError = phoneValidationError {
print(
"found phoneValidationError: \(String(describing: phoneValidationError?.localizedDescription))"
)
// Update UI components to display OtpStartView with the phone number validation error.
self.sheetObservable.isPhoneValidationError = true
} else {
self.sheetObservable.isPhoneValidationError = false
}
// Update UI components to display OtpStartView if a phone number is needed.
self.sheetObservable.isOtpStartActive = true
}
}
}
// Return collected phone number to the SDK
func handlePhoneNumber(phoneNumber: String) {
guard let callback = self.callback else {
print("Error: OtpStartStepCallback is not set ")
return
}
let otpStartInput = OtpStartInput(phoneNumber: phoneNumber)
// This is how you pass collected phone number to SDK
callback.onSuccess(input: otpStartInput)
}
// Communicate any issues encountered while trying to obtain the phone number to the SDK.
// Error should be reported if the customer explicitly cancels the SMS OTP transaction
// or presses the back button to exit out the SMS OTP start step screen.
func handleOtpStartError() {
guard let callback = self.callback else {
print("Error: OtpStartStepCallback is not set ")
return
}
callback.onError()
}
}
```
You can then send a new OTP SMS to the same phone number by implementing the finish step like this:
```swift Swift theme={"dark"}
import Foundation
import SwiftUI
import ProveAuth
class MobileOtpFinishStep: OtpFinishStep {
@ObservedObject var sheetObservable: SheetObservable
var callback: OtpFinishStepCallback?
init(sheetObservable: SheetObservable){
self.sheetObservable = sheetObservable
}
// Implement this method to collect the OTP value delivered in the SMS message.
func execute(otpError: ProveAuthError?, callback: OtpFinishStepCallback) {
self.callback = callback
// Handle the OTP validation error if present.
if case .otpValidationError = otpError {
print("found otpError: \(String(describing: otpError?.localizedDescription))")
// Update your UI to indicate that the provided OTP is invalid
self.sheetObservable.otpError = true
} else {
self.sheetObservable.otpError = false
}
// Update your UI to display the OtpFinishView
DispatchQueue.main.async {
self.sheetObservable.isOtpFinishActive = true
}
}
// Return the OTP value to the SDK
func handleOtp(_ otp: String) {
guard let callback = self.callback else {
print("Error: OtpFinishStepCallback is not set ")
return
}
let otpFinishInput = OtpFinishInput(otp: otp)
callback.onSuccess(input: otpFinishInput)
}
// Communicate to the SDK any issues when host app trys to obtain the OTP value
// or when users cancel the OTP flow
func handleOtpFinishError() {
guard let callback = self.callback else {
print("Error: OtpFinishStepCallback is not set ")
return
}
callback.onError()
}
// Call this method to request a new OTP code for the same mobile number.
func sendNewOtp() {
guard let callback = self.callback else {
print("Error: OtpFinishStepCallback is not set ")
return
}
callback.onOtpResend()
}
}
```
Follow these instructions to allow the customer to re-enter the OTP PIN if they type it wrong. There is a max of 3 attempts. To implement this functionality, you also need to pass in `allowOTPRetry=true` to the `/v3/start` endpoint.
The start step is implemented the same as either of the the previous tabs - no client side code changes necessary:
```swift Swift theme={"dark"}
import Foundation
import ProveAuth
import SwiftUI
class MobileOtpStartStep: OtpStartStep {
@ObservedObject var sheetObservable: SheetObservable
var callback: OtpStartStepCallback?
init(sheetObservable: SheetObservable) {
self.sheetObservable = sheetObservable
}
func execute(
phoneNumberNeeded: Bool, phoneValidationError: ProveAuthError?, callback: OtpStartStepCallback
) {
self.callback = callback
if !phoneNumberNeeded {
// If no phone number is needed, then don't prompt the user.
callback.onSuccess(input: nil)
} else {
DispatchQueue.main.async {
// If a phone number validation error is detected, ensure it is handled to provide feedback to the user.
if case .phoneNumberValidationError = phoneValidationError {
print(
"found phoneValidationError: \(String(describing: phoneValidationError?.localizedDescription))"
)
// Update UI components to display OtpStartView with the phone number validation error.
self.sheetObservable.isPhoneValidationError = true
} else {
self.sheetObservable.isPhoneValidationError = false
}
// Update UI components to display OtpStartView if a phone number is needed.
self.sheetObservable.isOtpStartActive = true
}
}
}
// Return collected phone number to the SDK
func handlePhoneNumber(phoneNumber: String) {
guard let callback = self.callback else {
print("Error: OtpStartStepCallback is not set ")
return
}
let otpStartInput = OtpStartInput(phoneNumber: phoneNumber)
// This is how you pass collected phone number to SDK
callback.onSuccess(input: otpStartInput)
}
// Communicate any issues encountered while trying to obtain the phone number to the SDK.
// Error should be reported if the customer explicitly cancels the SMS OTP transaction
// or presses the back button to exit out the SMS OTP start step screen.
func handleOtpStartError() {
guard let callback = self.callback else {
print("Error: OtpStartStepCallback is not set ")
return
}
callback.onError()
}
}
```
The finish step is implemented the same as either of the the previous tabs - no client side code changes necessary. If the OTP is invalid, the finish step will be called again to prompt the user for a new input. Once the max attempts is reached, the `AuthFinish` function will be called.
```swift Swift theme={"dark"}
import Foundation
import SwiftUI
import ProveAuth
class MobileOtpFinishStep: OtpFinishStep {
@ObservedObject var sheetObservable: SheetObservable
var callback: OtpFinishStepCallback?
init(sheetObservable: SheetObservable){
self.sheetObservable = sheetObservable
}
// Implement this method to collect the OTP value delivered via SMS.
func execute(otpError: ProveAuthError?, callback: OtpFinishStepCallback) {
self.callback = callback
// Handle the OTP validation error if present.
if case .otpValidationError = otpError {
print("found otpError: \(String(describing: otpError?.localizedDescription))")
// Signal to your UI components that the last provided OTP is invalid
self.sheetObservable.otpError = true
} else {
self.sheetObservable.otpError = false
}
// Signal to UI components to display OtpFinishView
DispatchQueue.main.async {
self.sheetObservable.isOtpFinishActive = true
}
}
// Provide the collected OTP value to the SDK for validation.
func handleOtp(_ otp: String) {
guard let callback = self.callback else {
print("Error: OtpFinishStepCallback is not set ")
return
}
let otpFinishInput = OtpFinishInput(otp: otp)
callback.onSuccess(input: otpFinishInput)
}
// Notify the SDK of any issues encountered while obtaining the OTP value or if the user cancels the OTP flow.
func handleOtpFinishError() {
guard let callback = self.callback else {
print("Error: OtpFinishStepCallback is not set ")
return
}
callback.onError()
}
}
```
Follow these instructions to allow the customer to re-enter their phone number. There is a max of three entries/send attempts.
Manual Request Required
To enable phone number change capabilities on your credentials, contact your Prove representative.
The start step is implemented the same as the previous tab:
```swift Swift theme={"dark"}
import Foundation
import ProveAuth
import SwiftUI
class MobileOtpStartStep: OtpStartStep {
@ObservedObject var sheetObservable: SheetObservable
var callback: OtpStartStepCallback?
init(sheetObservable: SheetObservable) {
self.sheetObservable = sheetObservable
}
func execute(
phoneNumberNeeded: Bool, phoneValidationError: ProveAuthError?, callback: OtpStartStepCallback
) {
self.callback = callback
if !phoneNumberNeeded {
// If no phone number is needed, then don't prompt the user.
callback.onSuccess(input: nil)
} else {
DispatchQueue.main.async {
// If a phone number validation error is detected, ensure it is handled to provide feedback to the user.
if case .phoneNumberValidationError = phoneValidationError {
print(
"found phoneValidationError: \(String(describing: phoneValidationError?.localizedDescription))"
)
// Update UI components to display OtpStartView with the phone number validation error.
self.sheetObservable.isPhoneValidationError = true
} else {
self.sheetObservable.isPhoneValidationError = false
}
// Update UI components to display OtpStartView if a phone number is needed.
self.sheetObservable.isOtpStartActive = true
}
}
}
// Return collected phone number to the SDK
func handlePhoneNumber(phoneNumber: String) {
guard let callback = self.callback else {
print("Error: OtpStartStepCallback is not set ")
return
}
let otpStartInput = OtpStartInput(phoneNumber: phoneNumber)
// This is how you pass collected phone number to SDK
callback.onSuccess(input: otpStartInput)
}
// Communicate any issues encountered while trying to obtain the phone number to the SDK.
// Error should be reported if the customer explicitly cancels the SMS OTP transaction
// or presses the back button to exit out the SMS OTP start step screen.
func handleOtpStartError() {
guard let callback = self.callback else {
print("Error: OtpStartStepCallback is not set ")
return
}
callback.onError()
}
}
```
You can prompt for a new phone number by implementing the finish step like this:
```swift Swift theme={"dark"}
import Foundation
import SwiftUI
import ProveAuth
class MobileOtpFinishStep: OtpFinishStep {
@ObservedObject var sheetObservable: SheetObservable
var callback: OtpFinishStepCallback?
init(sheetObservable: SheetObservable){
self.sheetObservable = sheetObservable
}
// Implement this method to collect the OTP value delivered via SMS.
func execute(otpError: ProveAuthError?, callback: OtpFinishStepCallback) {
self.callback = callback
// Handle the OTP validation error if present.
if case .otpValidationError = otpError {
print("found otpError: \(String(describing: otpError?.localizedDescription))")
// Update your UI to indicate that the provided OTP is invalid.
self.sheetObservable.otpError = true
} else {
self.sheetObservable.otpError = false
}
// Update your UI to display the OTP finish view.
DispatchQueue.main.async {
self.sheetObservable.isOtpFinishActive = true
}
}
// Return the collected OTP value to the SDK.
func handleOtp(_ otp: String) {
guard let callback = self.callback else {
print("Error: OtpFinishStepCallback is not set ")
return
}
let otpFinishInput = OtpFinishInput(otp: otp)
callback.onSuccess(input: otpFinishInput)
}
// When callback.onMobileNumberChange() is evoked, OtpStartStep will be re-initiated
// so that end-users can enter a different phone number via OtpStartStep.
func handleMobileNumberChange() {
guard let callback = self.callback else {
print("Error: OtpFinishStepCallback is not set")
return
}
callback.onMobileNumberChange()
}
}
```
## Verify the Customer Information
Once the customer has made any edits to their prefill information, submit that information to the back end server so the `Complete()` call can then verify the customer information.
```swift Swift theme={"dark"}
// Send request to the backend to verify customer information.
// The below example uses native iOS URLSession, but any other
// alternative networking approaches should also work
func sendInfo(firstName: String, lastName: String, completion: @escaping (Result\<[String:Any], Error>) -> Void) {
guard let url = URL(string: "\(backendUrl)/finish") else {
completion(.failure(URLError(.badURL)))
return
}
var request = URLRequest(url: url)
request.httpMethod = "POST"
request.addValue("application/json", forHTTPHeaderField: "Accept")
request.addValue("application/json", forHTTPHeaderField: "Content-Type")
// Set up the request body
let body: [String: Any] = [
"firstName": firstName,
"lastName": lastName
]
do {
request.httpBody = try JSONSerialization.data(withJSONObject: body, options: \[])
} catch {
completion(.failure(error))
return
}
let task = URLSession.shared.dataTask(with: request) { \_, response, error in
// Handle network or connection errors
if let error = error {
completion(.failure(error))
return
}
do {
if let results = try JSONSerialization.jsonObject(with: data, options: \[]) as? [String: Any] {
completion(.success(results))
} else {
let parsingError = NSError(domain: "", code: 0, userInfo: [NSLocalizedDescriptionKey : "Failed to parse JSON or authToken is missing"])
completion(.failure(parsingError))
}
} catch {
completion(.failure(error))
}
}
// Start the network call
task.resume()
}
```
# Activate Identity
Source: https://developer.prove.com/reference/identity-manager-activate-identity
post /v3/identity/{identityId}/activate
Sets an identity as active for monitoring.
# Batch Enroll Identities
Source: https://developer.prove.com/reference/identity-manager-batch-create-identity
post /v3/identity/batch
Enrolls multiple customers in a single request for efficient bulk operations (up to 100).
# Enroll Identity
Source: https://developer.prove.com/reference/identity-manager-create-identity
post /v3/identity
Enrolls a single customer for monitoring using their phone number and unique identifier.
# Deactivate Identity
Source: https://developer.prove.com/reference/identity-manager-deactivate-identity
post /v3/identity/{identityId}/deactivate
Stops webhook notifications without disenrolling the identity.
# Disenroll Identity
Source: https://developer.prove.com/reference/identity-manager-delete-identity
delete /v3/identity/{identityId}
Disenrolls an identity from Identity Manager. If you wish to monitor in future, re-enrollment of that identity is required.
# Batch Get Identities
Source: https://developer.prove.com/reference/identity-manager-get-identities
get /v3/identity
Return a list of all identities you have enrolled in Identity Manager.
# Get Identity
Source: https://developer.prove.com/reference/identity-manager-get-identity
get /v3/identity/{identityId}
Return details of an identity given the identity ID.
# Get Identities By Phone Number
Source: https://developer.prove.com/reference/identity-manager-lookup-identity
get /v3/identity/{mobileNumber}/lookup
Return list of all identities you have enrolled that are associated with this phone number.
# Server-Side SDK Guide
Source: https://developer.prove.com/reference/identity-manager-server
Learn more about the details of the server-side SDK for Identity Manager
## Installation
Install the server-side SDK of your choice by running a command in your terminal, or by using a dependency management tool specific to your project.
```go Go theme={"dark"}
# The Go library is hosted on GitHub so you can use this command to import it
# to your Go application.
go get github.com/prove-identity/prove-sdk-server-go
# Ensure you import the SDK in your code like this:
import (
provesdkservergo "github.com/prove-identity/prove-sdk-server-go"
"github.com/prove-identity/prove-sdk-server-go/models/components"
)
```
```typescript TypeScript theme={"dark"}
# Run this command to install package from GitHub and save as a dependency
npm install -S @prove-identity/prove-api
# Import the SDK in your code like this:
import { Proveapi } from "@prove-identity/prove-api";
import { OAuthClient, WithAuthorization } from "@prove-identity/prove-api/sdk/oauth"
```
```java Java theme={"dark"}
# See the latest version number here: https://central.sonatype.com/artifact/com.prove/proveapi
Gradle:
implementation 'com.prove:proveapi:0.10.0'
Maven:
com.prove
proveapi
0.10.0
```
```csharp .NET theme={"dark"}
# Install the NuGet package
dotnet add package Prove.Proveapi
# Or using Package Manager Console
Install-Package Prove.Proveapi
```
## Authentication
Identity Manager uses OAuth 2.0 client credentials authentication. Obtain an access token before making API calls.
```go Go theme={"dark"}
clientID := os.Getenv("PROVE_CLIENT_ID")
clientSecret := os.Getenv("PROVE_CLIENT_SECRET")
proveEnv := "uat-us" // Use UAT in US region.
client := provesdkservergo.New(
provesdkservergo.WithServer(proveEnv),
provesdkservergo.WithSecurity(components.Security{
ClientID: provesdkservergo.String(clientID),
ClientSecret: provesdkservergo.String(clientSecret),
}),
)
```
```typescript TypeScript theme={"dark"}
export const DEVICE_API_BASE_URL = process.env.DEVICE_API_BASE_URL || '';
export const PROVE_CLIENT_ID = process.env.PROVE_CLIENT_ID;
export const PROVE_CLIENT_SECRET = process.env.PROVE_CLIENT_SECRET;
export function getProveSdk(): Proveapi {
return new Proveapi({
server: 'uat-us',
security: {
clientID: PROVE_CLIENT_ID,
clientSecret: PROVE_CLIENT_SECRET,
},
});
}
```
```java Java theme={"dark"}
String clientId = System.getenv("PROVE_CLIENT_ID");
String clientSecret = System.getenv("PROVE_CLIENT_SECRET");
Proveapi sdk = Proveapi.builder()
.security(Security.builder()
.clientID(clientId)
.clientSecret(clientSecret)
.build())
.build();
```
```csharp .NET theme={"dark"}
var clientId = Environment.GetEnvironmentVariable("PROVE_CLIENT_ID");
var clientSecret = Environment.GetEnvironmentVariable("PROVE_CLIENT_SECRET");
var sdk = new ProveAPI(serverUrl: "https://platform.uat.proveapis.com");
var tokenRequest = new V3TokenRequest
{
ClientId = clientId,
ClientSecret = clientSecret,
GrantType = "client_credentials"
};
var tokenResponse = await sdk.V3.V3TokenRequestAsync(tokenRequest);
var accessToken = tokenResponse.V3TokenResponse?.AccessToken;
_sdk = new ProveAPI(auth: accessToken, serverUrl: "https://platform.uat.proveapis.com");
```
Token Expiration
The OAuth token expires after 60 minutes, requiring you to get another token. The SDK handles token refresh automatically.
## API functions
Identity Manager provides eight core functions for comprehensive identity management. Refer to the [API reference documentation](https://developer.prove.com/reference/identity-manager-create-identity) for detailed information on each endpoint.
### Enroll Identity
Enrolls a single identity for monitoring.
```go Go theme={"dark"}
rspEnrollIdentity, err := client.IdentityManager.V3EnrollIdentity(ctx &components.V3EnrollIdentityRequest{
PhoneNumber: "2001004031",
ClientCustomerId: provesdkservergo.String("customer-123"),
ClientRequestId: provesdkservergo.String("request-456"),
})
if err != nil {
return fmt.Errorf("error creating identity: %w", err)
}
// Access response fields
identityId := rspEnrollIdentity.V3EnrollIdentityResponse.IdentityId
success := rspEnrollIdentity.V3EnrollIdentityResponse.Success
```
```typescript TypeScript theme={"dark"}
const enrollIdentityReq = {
phoneNumber: '2001004031',
clientCustomerId: 'customer-123',
clientRequestId: 'request-456'
};
const rspEnrollIdentity = await sdk.identityManager.v3EnrollIdentity(enrollIdentityReq);
// Access response fields
const identityId = rspEnrollIdentity.v3EnrollIdentityResponse?.identityId;
const success = rspEnrollIdentity.v3EnrollIdentityResponse?.success;
```
```java Java theme={"dark"}
EnrollIdentityRequest req = V3EnrollIdentityRequest.builder()
.phoneNumber("2001004031")
.clientCustomerId("customer-123")
.clientRequestId("request-456")
.build();
EnrollIdentityResponse res = sdk.identityManager().enrollIdentity()
.request(req)
.call();
// Access response fields
String identityId = res.enrollIdentityResponse().identityId();
String success = res.enrollIdentityResponse().success();
```
**Parameters:**
* `phoneNumber` : The number of the consumer you want to enroll.
**Optional Parameters:**
* `clientCustomerId` : A client-generated unique ID for a specific customer.
* `clientRequestId` : A client-generated unique ID for a specific session.
* `deviceId` : A string that's the unique identifier for the Prove Key on the device. Only applicable if you are leveraging Prove Unified Authentication.
**Returns:**
* `identityId`: A unique Prove-generated identifier for the enrolled identity.
* `success`: If true, the request succeeded and the system created the identity.
### Batch enroll identities
Enrolls several customers in a single request for efficient bulk operations.
```go Go theme={"dark"}
identities := []components.IdentityData{
{
PhoneNumber: "2001004031",
ClientCustomerId: provesdkservergo.String("customer-123"),
},
{
PhoneNumber: "2001004035",
ClientCustomerId: provesdkservergo.String("customer-124"),
},
}
rspBatchEnroll, err := client.IdentityManager.V3BatchEnrollIdentities(ctx, &components.V3BatchEnrollIdentitiesRequest{
Identities: identities,
})
```
```typescript TypeScript theme={"dark"}
const batchEnrollReq = {
identities: [
{
phoneNumber: '2001004031',
clientCustomerId: 'customer-123'
},
{
phoneNumber: '2001004035',
clientCustomerId: 'customer-124'
}
]
};
const rspBatchEnroll = await sdk.identityManager.v3BatchEnrollIdentities(batchEnrollReq);
```
```java Java theme={"dark"}
List identities = Arrays.asList(
IdentityData.builder()
.phoneNumber("2001004031")
.clientCustomerId("customer-123")
.build(),
IdentityData.builder()
.phoneNumber("2001004035")
.clientCustomerId("customer-124")
.build()
);
V3BatchEnrollIdentitiesRequest req = V3BatchEnrollIdentitiesRequest.builder()
.identities(identities)
.build();
V3BatchEnrollIdentitiesResponse res = sdk.identityManager().v3BatchEnrollIdentities()
.request(req)
.call();
```
**Parameters:**
* `clientRequestId` : A client-generated unique ID for a specific session.
* `items`: Represents a list of identities that you wish to enroll.
**Returns:**
* `results`: Represents a list of identities that were either successfully enrolled or an error message.
### Batch get identities
Return a list of all identities you have enrolled in Identity Manager with pagination support.
```go Go theme={"dark"}
rspGetIdentities, err := client.IdentityManager.V3BatchGetIdentities(ctx, &components.GetIdentitiesRequest{
Limit: provesdkservergo.Int(50),
})
```
```typescript TypeScript theme={"dark"}
const rspGetIdentities = await sdk.identityManager.getIdentities({
limit: 50
});
```
```java Java theme={"dark"}
GetIdentitiesRequest req = GetIdentitiesRequest.builder()
.limit(50)
.build();
GetIdentitiesResponse res = sdk.identityManager().getIdentities()
.request(req)
.call();
```
**Parameters:**
* `limit` : The maximum number of identities to return per call.
**Returns:**
* `lastKey`: A pagination token for callers that have more identities to return.
* `results`: The list of identity IDs associated with the client.
### Get Identity
Return details of an identity given the identity ID.
```go Go theme={"dark"}
rspGetIdentity, err := client.IdentityManager.V3GetIdentity(ctx, "identity-id-123")
```
```typescript TypeScript theme={"dark"}
const rspGetIdentity = await sdk.identityManager.v3GetIdentity("identity-id-123");
```
```java Java theme={"dark"}
GetIdentityResponse res = sdk.identityManager().v3GetIdentity("identity-id-123").call();
```
**Parameters:**
* `identityId` : A unique Prove-generated identifier for the enrolled identity.
**Returns:**
* Complete identity object with all associated data.
### Get identities by phone number
Return a list of all identities you have enrolled with this phone number.
```go Go theme={"dark"}
rspLookup, err := client.IdentityManager.V3GetIdentitiesByPhoneNumber(ctx, &components.LookupIdentityRequest{
PhoneNumber: "2001004031",
})
```
```typescript TypeScript theme={"dark"}
const rspLookup = await sdk.identityManager.v3GetIdentitiesByPhoneNumber({
phoneNumber: '2001004031'
});
```
```java Java theme={"dark"}
LookupIdentityRequest req = LookupIdentityRequest.builder()
.phoneNumber("2001004031")
.build();
LookupIdentityResponse res = sdk.identityManager().v3GetIdentitiesByPhoneNumber()
.request(req)
.call();
```
**Parameters:**
* `mobileNumber` : The phone number to retrieve identities for.
**Returns:**
* `items`: The list of identities associated with the given phone number.
### Activate Identity
Sets an identity as active for monitoring.
```go Go theme={"dark"}
rspActivate, err := client.IdentityManager.V3ActivateIdentity(ctx, "identity-id-123")
```
```typescript TypeScript theme={"dark"}
const rspActivate = await sdk.identityManager.v3ActivateIdentity("identity-id-123");
```
```java Java theme={"dark"}
ActivateIdentityResponse res = sdk.identityManager().v3ActivateIdentity("identity-id-123").call();
```
**Parameters:**
* `identityId` : A Prove-generated unique ID for a specific identity.
**Returns:**
* `success`: Boolean indicating if activation was successful.
### Deactivate Identity
Sets an identity as inactive, stopping webhook notifications.
```go Go theme={"dark"}
rspDeactivate, err := client.IdentityManager.V3DeactivateIdentity(ctx, "identity-id-123")
```
```typescript TypeScript theme={"dark"}
const rspDeactivate = await sdk.identityManager.v3DeactivateIdentity("identity-id-123");
```
```java Java theme={"dark"}
DeactivateIdentityResponse res = sdk.identityManager().v3DeactivateIdentity("identity-id-123").call();
```
**Parameters:**
* `identityId`: The unique identifier of the identity.
**Returns:**
* `success`: If true, the deactivate operation was successful.
Deactivated identities remain in the system and can be reactivated later. Use this instead of disenroll for temporary monitoring suspension.
### Disenroll identity
Disenrolls an identity from Identity Manager. If you wish to watch it in the future, you must re-enroll that identity.
```go Go theme={"dark"}
rspDelete, err := client.IdentityManager.V3DisenrollIdentity(ctx, "identity-id-123")
```
```typescript TypeScript theme={"dark"}
const rspDelete = await sdk.identityManager.v3DisenrollIdentity("identity-id-123");
```
```java Java theme={"dark"}
DisenrollIdentityResponse res = sdk.identityManager().v3DisenrollIdentity("identity-id-123").call();
```
**Parameters:**
* `identityId`: The unique identifier of the identity.
**Returns:**
* `success`: If true, the disenroll operation was successful.
Disenrolled identities can't be recovered through the API. Consider using deactivation instead for temporary suspension.
Always test your implementation in the sandbox environment before moving to production.
# Server-Side SDK Guide
Source: https://developer.prove.com/reference/identity-server
Learn more about the details of the server-side SDK
Prove provides server-side SDKs in the following languages: Go, Java, .NET, TypeScript, and JavaScript. If you use a different back end language, you can interact with the API endpoints.
## Installation
Install the server-side SDK of your choice by running a command in your terminal, or by using a dependency management tool specific to your project.
```go Go theme={"dark"}
# The Go library is hosted on GitHub so you can use this command to import it
# to your Go application.
go get github.com/prove-identity/prove-sdk-server-go
# Ensure you import the SDK in your code like this:
import (
provesdkservergo "github.com/prove-identity/prove-sdk-server-go"
"github.com/prove-identity/prove-sdk-server-go/models/components"
)
```
```typescript TypeScript theme={"dark"}
# Run this command to install package from GitHub and save as a dependency
npm install -S @prove-identity/prove-api
# Import the SDK in your code like this:
import { Proveapi } from "@prove-identity/prove-api";
import { OAuthClient, WithAuthorization } from "@prove-identity/prove-api/sdk/oauth"
```
```java Java theme={"dark"}
# See the latest version number here: https://central.sonatype.com/artifact/com.prove/proveapi
Gradle:
implementation 'com.prove:proveapi:0.10.0'
Maven:
com.prove
proveapi
0.10.0
```
```csharp .NET theme={"dark"}
// Run this command to install package from Nuget and save as a dependency
dotnet add package Prove.Proveapi --version 1.0.1
// Ensure you import the SDK in your code like this:
using Prove.Proveapi;
using Prove.Proveapi.Models.Components;
```
Prove provides code samples for how to interact with the API endpoints in many different languages. Browse the API Reference page and select your language.
## Authentication
To access the Prove API, use your OAuth 2.0 client ID and client secret.
You can load these from environment variables or another method:
```go Go theme={"dark"}
clientID := os.Getenv("PROVE_CLIENT_ID")
clientSecret := os.Getenv("PROVE_CLIENT_SECRET")
proveEnv := "uat-us" // Use UAT in US region.
client := provesdkservergo.New(
provesdkservergo.WithServer(proveEnv),
provesdkservergo.WithSecurity(components.Security{
ClientID: provesdkservergo.String(clientID),
ClientSecret: provesdkservergo.String(clientSecret),
}),
)
```
```typescript TypeScript theme={"dark"}
export const DEVICE_API_BASE_URL = process.env.DEVICE_API_BASE_URL || '';
export const PROVE_CLIENT_ID = process.env.PROVE_CLIENT_ID;
export const PROVE_CLIENT_SECRET = process.env.PROVE_CLIENT_SECRET;
export function getProveSdk(): Proveapi {
return new Proveapi({
server: 'uat-us',
security: {
clientID: PROVE_CLIENT_ID,
clientSecret: PROVE_CLIENT_SECRET,
},
});
}
```
```java Java theme={"dark"}
String clientId = System.getenv("PROVE_CLIENT_ID");
String clientSecret = System.getenv("PROVE_CLIENT_SECRET");
Proveapi sdk = Proveapi.builder()
.security(Security.builder()
.clientID(clientId)
.clientSecret(clientSecret)
.build())
.build();
```
```csharp .NET theme={"dark"}
var clientId = Environment.GetEnvironmentVariable("PROVE_CLIENT_ID");
var clientSecret = Environment.GetEnvironmentVariable("PROVE_CLIENT_SECRET");
var sdk = new ProveAPI(serverUrl: "https://platform.uat.proveapis.com");
var tokenRequest = new V3TokenRequest
{
ClientId = clientId,
ClientSecret = clientSecret,
GrantType = "client_credentials"
};
var tokenResponse = await sdk.V3.V3TokenRequestAsync(tokenRequest);
var accessToken = tokenResponse.V3TokenResponse?.AccessToken;
_sdk = new ProveAPI(auth: accessToken, serverUrl: "https://platform.uat.proveapis.com");
```
Token Expiration
The OAuth token expires after 60 minutes, requiring you to get another token.
## Next field
Each of the functions return a `Next` field. This field signals which function you call next.
## `Start()`
Add an endpoint to your server such as `POST /initiate` so the front end can submit the flow type, phone number, and the challenge. On the back end, start a Prove flow with a call to the `Start()` function. This function takes these required parameters:
* Flow Type: either `desktop` or `mobile` to describe which type of device the customer is starting their flow on.
Possession Timeouts
When flow type is `desktop`, Instant Link performs the possession check. When flow type is `mobile`, first Mobile Auth, if enabled, and then one-time password (OTP) as a fallback. The Instant Link session has a three minute timeout from when it's sent through SMS to when the customer can selects it. The OTP session has a two minute timeout from when it's sent through SMS to when the customer can enter in the OTP.
* Final Target URL: required when `flowType=desktop`. This should be a URL you support. When the customer clicks the Instant Link, the workflow sends the customer to this URL, which instructs them to continue the process. Maximum length is 128 characters.
These parameters are optional:
* `ssn`: full or last four digits of the customer's social security number. You can pass it into `Start()` or `Challenge()`.
* `dob`: date of birth in one of these formats: `YYYY-MM-DD`, `YYYY-MM`, `MM-DD`. You can pass it into `Start()` or `Challenge()`.
* `allowOTPRetry`: set to `true` to allow the customer to re-enter the OTP up to three times. Defaults to `false`.
For OTP retries, make sure to implement client SDK changes as detailed in the [Implementation Guide](https://developer.prove.com/docs/prove-pre-fill-implementation-guide#request-new-otp-code).
```go Go theme={"dark"}
ctx := context.TODO()
rspStart, err := client.V3.V3StartRequest(ctx, &components.V3StartRequest{
FlowType: "desktop",
FinalTargetURL: provesdkservergo.String("https://prove.com"),
PhoneNumber: provesdkservergo.String("2001001686"),
Ssn: provesdkservergo.String("8370"),
})
if err != nil {
t.Fatal(err)
}
```
```typescript TypeScript theme={"dark"}
const startReq = {
flowType: 'desktop',
finalTargetUrl: 'https://prove.com',
phoneNumber: '2001001686',
ssn: '8370',
};
const rspStart = await sdk.v3.v3StartRequest(startReq);
```
```java Java theme={"dark"}
V3StartRequest req = V3StartRequest.builder()
.flowType("desktop")
.finalTargetUrl("https://prove.com")
.phoneNumber("2001001686")
.ssn("8370")
.build();
V3StartRequestResponse startReqResp = sdk.v3().v3StartRequest()
.request(req)
.call();
V3StartResponse startResponse = startReqResp.v3StartResponse().get();
```
```csharp .NET theme={"dark"}
var startReq = new V3StartRequest
{
FlowType = "desktop",
FinalTargetUrl = "https://prove.com",
PhoneNumber = "2001001686",
Ssn = "8370"
};
var rspStart = await _sdk.V3.V3StartRequestAsync(startReq);
```
The function returns the following fields:
* Auth Token: send this to your client-side code through the `Authenticate()` function - it's a short lived JSON Web Token (JWT) tied to the current flow and used for the possession checks.
* Correlation ID: save this in your current session, then pass it in to each of the `Validate()`, `Challenge()`, and `Complete()` function calls of the same flow. The correlation ID ties together different system calls for the same Prove flow. It can aids in troubleshooting. The session expires in 15 minutes from when the correlation ID returns from the `Start()` call.
* Next: map of the next API call you make.
Return the auth token in a response to the front end.
The phone number field is also required in Sandbox to determine which scenario you're testing. Neglecting to pass in the phone number of a valid test user returns a "no test user found matching the phone number" error.
## `Validate()`
Once the possession checks finish on the mobile device, the finish handler on the client-side SDK executes. You then make a request to your server such as `POST /verify` to make the next call in the flow to the `Validate()` function.
This function requires the Correlation ID: the ID returned by the `Start()` function.
```go Go theme={"dark"}
rspValidate, err := client.V3.V3ValidateRequest(ctx, &components.V3ValidateRequest{
CorrelationID: rspStart.V3StartResponse.CorrelationID,
})
if err != nil {
t.Fatal(err)
}
```
```typescript TypeScript theme={"dark"}
const rspValidate = await sdk.v3.v3ValidateRequest({
correlationId: rspStart.v3StartResponse?.correlationId || '',
});
```
```java Java theme={"dark"}
V3ValidateRequest validateReq = V3ValidateRequest.builder()
.correlationId(startResponse.correlationId())
.build();
V3ValidateRequestResponse validateReqResp = sdk.v3().v3ValidateRequest()
.request(validateReq)
.call();
V3ValidateResponse validateResp = validateReqResp.v3ValidateResponse().get();
```
```csharp .NET theme={"dark"}
var rspValidate = await _sdk.V3.V3ValidateRequestAsync(new V3ValidateRequest
{
CorrelationId = rspStart.V3StartResponse?.CorrelationId
});
```
The function returns the following fields:
* Success: either `true` if the mobile number validation was successful, or `false` if it failed.
* Challenge Missing: when `true`, pass the challenge into the `Challenge()` function.
* Phone Number: either the validated phone number or no field.
* Next: map of the next API call.
The challenge missing field determines if you must return to the front end and request either the last four of their social security number or date of birth. If the challenge was already passed into the `Start()` call, the back end can then make a call to the `Challenge()` function and return the results to the front end.
## `Complete()`
Once the customer reviews their information and makes any edits, submit the customer information to the back end for verification.
This function is the final call in the flow that verifies the customer information.
This function takes these required parameters:
* Correlation ID: this is the ID returned by the `Start()` function. It validates against this regular expression: `^[0-9a-f]{8}-[0-9a-f]{4}-[0-9a-f]{4}-[0-9a-f]{4}-[0-9a-f]{12}$`.
* Individual: customer information in a map.
```go Go theme={"dark"}
rspComplete, err := client.V3.V3CompleteRequest(ctx, &components.V3CompleteRequest{
CorrelationID: rspStart.V3StartResponse.CorrelationID,
Individual: components.V3CompleteIndividualRequest{
FirstName: provesdkservergo.String("Tod"),
LastName: provesdkservergo.String("Weedall"),
Addresses: []components.V3CompleteAddressEntryRequest{
{
Address: provesdkservergo.String("39 South Trail"),
City: provesdkservergo.String("San Antonio"),
Region: provesdkservergo.String("TX"),
PostalCode: provesdkservergo.String("78285"),
},
},
Ssn: provesdkservergo.String("565228370"),
Dob: provesdkservergo.String("1984-12-10"),
EmailAddresses: []string{
"tweedalld@ehow.com",
},
},
})
if err != nil {
t.Fatal(err)
}
```
```typescript TypeScript theme={"dark"}
const rspComplete = await sdk.v3.v3CompleteRequest({
correlationId: rspStart.v3StartResponse?.correlationId || '',
individual: {
addresses: [
{
address: '39 South Trail',
city: 'San Antonio',
postalCode: '78285-2622',
region: 'TX',
},
],
dob: '1984-12-10',
emailAddresses: ['tweedalld@ehow.com'],
firstName: 'Tod',
lastName: 'Weedall',
ssn: '565228370',
},
});
```
```java Java theme={"dark"}
List addresses = new ArrayList<>(
Arrays.asList(V3CompleteAddressEntryRequest.builder().address("39 South Trail").city("San Antonio")
.postalCode("78285-2622").region("TX").build()));
V3CompleteRequest completeReq = V3CompleteRequest.builder()
.correlationId(startResponse.correlationId())
.individual(V3CompleteIndividualRequest.builder()
.ssn("565228370")
.firstName("Tod")
.lastName("Weedall")
.emailAddresses(new ArrayList<>(Arrays.asList("tweedalld@ehow.com")))
.dob("1984-12-10")
.addresses(addresses)
.build())
.build();
V3CompleteRequestResponse completeReqResp = sdk.v3().v3CompleteRequest()
.request(completeReq)
.call();
V3CompleteResponse completeResp = completeReqResp.v3CompleteResponse().get();
```
```csharp .NET theme={"dark"}
var rspComplete = await _sdk.V3.V3CompleteRequestAsync(new V3CompleteRequest
{
CorrelationId = rspStart.V3StartResponse?.CorrelationId,
Individual = new V3CompleteIndividualRequest
{
FirstName = rspChallenge.V3ChallengeResponse?.Individual?.FirstName,
LastName = rspChallenge.V3ChallengeResponse?.Individual?.LastName,
Ssn = rspChallenge.V3ChallengeResponse?.Individual?.Ssn,
Dob = rspChallenge.V3ChallengeResponse?.Individual?.Dob,
EmailAddresses = rspChallenge.V3ChallengeResponse?.Individual?.EmailAddresses,
Addresses = rspChallenge.V3ChallengeResponse?.Individual?.Addresses?.Select(addr => new V3CompleteAddressEntryRequest
{
Address = addr.Address,
City = addr.City,
Region = addr.Region,
PostalCode = addr.PostalCode
}).ToList()
}
});
```
The function returns the following fields:
* Success: `true` if customer information returned.
* Next: map of the next API call you need to make, in this case, `Done`.
You can then respond to the front end with the results of the customer verification.
SDK Updates
Prove hosts the server-side SDKs on [GitHub](https://github.com/prove-identity). Once you create a free GitHub account, you can Watch any of the projects to receive notifications.
# Client-Side Web SDK
Source: https://developer.prove.com/reference/identity-web-sdk
Learn how to integrate the client-side web SDK into your web app
## Supported languages
Prove provides client web SDKs in the following languages: TypeScript and JavaScript.
## Installation
The Prove Platform Web SDK has an unpacked size of 171 KB, and a single dependency: `@prove-identity/mobile-auth`. Install the client-side SDK of your choice by running a command in your terminal, or by using a dependency management tool specific to your project.
```shell NPM theme={"dark"}
# Run this command to install the package (ensure you have the latest version).
npm install @prove-identity/prove-auth@3.1.1
```
```html No Package Manager theme={"dark"}
# You can include this file in your web application from jsDelivr (update with the latest version).
# You can also download the JavaScript file from https://cdn.jsdelivr.net/npm/@prove-identity/prove-auth@3.1.1/build/bundle/release/prove-auth.js and store it locally.
```
**Angular TypeScript Compilation Error**
Some Angular projects may experience TypeScript compilation errors when building with the Prove Web SDK. This is a known issue that affects various Angular versions.
To correct this, add or update the `skipLibCheck` setting in your `tsconfig.json` file:
```json tsconfig.json theme={"dark"}
{
"compilerOptions": {
"skipLibCheck": true,
// ... other options
}
}
```
This setting tells TypeScript to skip type checking of declaration files (`.d.ts` files) from external libraries, which resolves the compilation issues while maintaining type safety for your own code.
**Affected Versions:**
* Angular 17.x (confirmed with Angular 17.3.3)
* Other Angular versions may also be affected
## Find the type of flow: mobile or desktop
You can find if the customer is on a mobile or desktop browser using this example. If the `isMobile` is true, pass `mobile` to the `Start()` function on the server, otherwise you can pass `desktop`:
```javascript JavaScript theme={"dark"}
// Check if the customer is on a mobile or desktop browser.
const authCheck = new proveAuth.AuthenticatorBuilder().build();
let isMobile = authCheck.isMobileWeb()
```
```typescript TypeScript theme={"dark"}
// Check if the customer is on a mobile or desktop browser.
const authCheck = new proveAuth.AuthenticatorBuilder().build();
let isMobile = authCheck.isMobileWeb()
```
In a mobile flow, Mobile Auth executes first and if that fails, performs one-time password (OTP) validation on the mobile phone. In a desktop flow, Instant Link sends a text message to the mobile phone for verification.
In the mobile flow, once either Mobile Auth or the OTP validation completes, the `AuthFinishStep` function finishes.
Mobile Auth
In order for Mobile Auth to succeed:
* Disable VPN.
* Disable Private Relay on iOS.
When testing, you can ignore any Chrome error messages that mention `ERR_TUNNEL_CONNECTION_FAILED` - this is due to the VPN, but the SDK fallbacks to OTP.
In the desktop flow, a WebSocket opens for 3 minutes on the desktop browser while waiting for the customer to select the link in the text message. Once clicked, the WebSocket closes and the `AuthFinishStep` function finishes.
## `Authenticate()`
The SDK requires an `authToken` as a parameter for the `Authenticate()` function. This token returns from the `Start()` call of the server-side SDK. The token is session specific, limiting it to a single flow. It also expires after 15 minutes.
## Retrieve `authToken`
Send a request to your back end server with the phone number, flow type, and an optional challenge to start the flow. This can either be the date of birth or last four digits of the social security number.
```javascript JavaScript theme={"dark"}
async function initialize(phoneNumber, ssn, flowType) {
const response = await fetch(backendUrl + "/initialize", {
method: "POST",
headers: {
Accept: "application/json",
"Content-Type": "application/json",
},
body: JSON.stringify({
phoneNumber: phoneNumber,
flowType: flowType,
ssn: ssn,
}),
});
const rsp = await response.json();
const authToken = rsp.authToken;
return authToken;
}
```
```typescript TypeScript theme={"dark"}
async function initialize(
phoneNumber: string,
ssn: string,
flowType: string
): Promise {
const response = await fetch(backendUrl + "/initialize", {
method: "POST",
headers: {
Accept: "application/json",
"Content-Type": "application/json",
},
body: JSON.stringify({
phoneNumber: phoneNumber,
flowType: flowType,
ssn: ssn,
}),
});
const rsp = await response.json();
const authToken = rsp.authToken;
return authToken;
}
```
## Setup authenticator
Once you have the `authToken`, build the authenticator for both the mobile and desktop flows.
Mobile Auth Implementations Only
If your application uses [Content Security Policy headers](https://content-security-policy.com/), you must configure them to allow WebSocket connections to Prove's authentication services:
Sandbox Environment
* `https://device.uat.proveapis.com:4443`
* `https://device.uat.proveapis.com`
* `http://device.uat.proveapis.com:4443`
* `http://device.uat.proveapis.com`
Production Environment
* `https://device.proveapis.com:4443`
* `https://device.proveapis.com`
* `http://device.proveapis.com:4443`
* `http://device.proveapis.com`
* `https://auth.svcs.verizon.com:22790`
Failure to configure these properly will prevent Mobile Auth functionality from working correctly in web flows.
```javascript JavaScript theme={"dark"}
async function authenticate(isMobileWeb, authToken) {
// Set up the authenticator for either mobile or desktop flow.
let builder = new proveAuth.AuthenticatorBuilder();
if (isMobileWeb) {
// Set up Mobile Auth and OTP.
builder = builder
.withAuthFinishStep((input) => verify(input.authId))
.withOtpFallback(otpStart, otpFinish);
} else {
// Set up Instant Link.
builder = builder
.withAuthFinishStep((input) => verify(input.authId))
.withInstantLinkFallback(instantLink)
.withRole("secondary");
}
const authenticator = builder.build();
// Authenticate with the authToken.
return authenticator.authenticate(authToken);
}
```
```typescript TypeScript theme={"dark"}
async function authenticate(isMobileWeb: boolean, authToken: string) {
// Set up the authenticator for either mobile or desktop flow.
let builder = new proveAuth.AuthenticatorBuilder();
if (isMobileWeb) {
// Set up Mobile Auth and OTP.
builder = builder
.withAuthFinishStep((input) => verify(input.authId))
.withOtpFallback(otpStart, otpFinish);
} else {
// Set up Instant Link.
builder = builder
.withAuthFinishStep((input) => verify(input.authId))
.withInstantLinkFallback(instantLink)
.withRole("secondary");
}
const authenticator = builder.build();
// Authenticate with the authToken.
return authenticator.authenticate(authToken);
}
```
## Validate the mobile phone
In the `AuthFinishStep`, specify a function to call once the possession checks complete on the mobile phone. This endpoint on your back end server calls the `Validate()` function to validate the phone number. If it was successful, the server returns the results from the `Challenge()` function including customer information. Refer to the following example fields that return and then prefill on a form for the customer to verify. The `AuthFinishStep` then completes. If a user cancels, the server makes a call to the `Validate()` function and returns `success=false`.
```javascript JavaScript theme={"dark"}
// Send a verify request to get return customer information.
async function verify() {
const response = await fetch(backendUrl + "/verify", {
method: "POST",
headers: {
Accept: "application/json",
"Content-Type": "application/json",
},
body: JSON.stringify({}),
});
const results = await response.json();
const rsp = JSON.stringify(results);
const firstName = document.getElementById("firstNameInput");
const lastName = document.getElementById("lastNameInput");
firstName.value = rsp.firstName;
lastName.value = rsp.lastName;
return null;
}
```
```typescript TypeScript theme={"dark"}
// Send a verify request to get return customer information.
async function verify() {
const response = await fetch(backendUrl + "/verify", {
method: "POST",
headers: {
Accept: "application/json",
"Content-Type": "application/json",
},
body: JSON.stringify({}),
});
const results = await response.json();
const rsp = JSON.stringify(results);
const firstName = document.getElementById("firstNameInput");
const lastName = document.getElementById("lastNameInput");
firstName.value = rsp.firstName;
lastName.value = rsp.lastName;
return null;
}
```
## Configure OTP
To use the Resend/Retry/Phone Change features, you need to install the Web SDK version 2.15.1 or later.
To set the One-Time Password (OTP) handler, `withOtpFallback(startStep: OtpStartStep | OtpStartStepFn, finishStep: OtpFinishStep | OtpFinishStepFn)`, requires implementing the `OtpStartStep` and `OtpFinishStep`. When returning the phone number in the functions, ensure you return an object with the field `phoneNumber` to the `resolve()` function.
The OTP session has a two minute timeout from when it's sent through Short Message Service (SMS) to when the customer can enter in the OTP.
Follow these instructions if you are implementing OTP and you are passing in the phone number on the `/v3/start` endpoint. In this case, you've already prompted for a phone number so you don't need to prompt for it in the client SDK.
Since you passed the phone number in the `Start()` function, call `resolve(null)` to communicate to the SDK you have the customer's agreement to deliver the SMS message. Ensure you return an object to `resolve()` function.
```javascript JavaScript theme={"dark"}
function otpStartStep(phoneNumberNeeded, phoneValidationError) {
return new Promise((resolve, reject) => {
// Since no phone number is needed, don't prompt the user.
resolve(null);
});
}
```
```typescript TypeScript theme={"dark"}
const otpStartStep: OtpStartStep = {
execute: async (
phoneNumberNeeded: boolean,
phoneValidationError?: PhoneValidationError
): Promise => {
return new Promise((resolve, reject) => {
// Since no phone number is needed, don't prompt the user.
resolve(null);
});
},
};
```
Call the `reject('some error message')` method to communicate to the SDK any issues while trying to obtain the phone number or the OTP. Report an error if the customer cancels the SMS transaction or presses the back button to leave the screen.
In the finish step, call the `resolve(result: OtpFinishResult)` method to return the collected OTP value in which `result` variable has `OnSuccess` value for `OtpFinishResultType` and the OTP value wrapped in `OtpFinishInput`.
```javascript JavaScript theme={"dark"}
function otpFinishStep(otpError) {
return new Promise((resolve, reject) => {
// If error message is found, handle it.
if (otpError) {
// Set to a variable and display it in a field.
// In this example, we don't do anything with the error.
var someErrorMessage = otpError.message;
}
// Prompt the user for whether they received the SMS.
// Typically, this is a page that shows the OTP already. We are simplifying
// it by requiring an input.
var input = confirm('Did you receive a text message?');
if (!input) {
// Close the modal if a text message was not received.
return;
}
// Prompt the user for the OTP.
var otp = prompt('Enter OTP code:');
if (otp) {
// If the input is valid and the user clicked `OK`, return the OTP.
resolve({
input: { otp }, // OTP value
resultType: 0, // OnSuccess enum type = 0
});
} else {
// Else, exit the flow.
reject('phone invalid or user cancelled');
}
});
}
```
```typescript TypeScript theme={"dark"}
const otpFinishStep: OtpFinishStep = {
execute: async (otpError?: OtpError): Promise => {
return new Promise((resolve, reject) => {
// If error message is found, handle it.
if (otpError) {
// Set to a variable and display it in a field.
// In this example, we don't do anything with the error.
var someErrorMessage = otpError.message;
}
// Prompt the user for whether they received the SMS.
// Typically, this is a page that shows the OTP already. We are simplifying
// it by requiring an input.
var input = confirm('Did you receive a text message?');
if (!input) {
// Close the modal if a text message was not received.
return;
}
// Prompt the user for the OTP.
var otp = prompt('Enter OTP code:');
if (otp) {
// If the input is valid and the user clicked `OK`, return the OTP.
resolve({
input: { otp }, // OTP value
resultType: OtpFinishResultType.OnSuccess,
});
} else {
// Else, exit the flow.
reject('phone invalid or user cancelled');
}
});
},
};
```
Follow these instructions if implementing MobileAuth and collecting the phone number only if MobileAuth fails. This will implement OTP without allowing for SMS resends and phone number changes. If you do want those capabilities, please reference the subsequent tabs (Resend, Retry OTP, and Phone Number Change).
In the start step, call the `resolve(input: OtpStartInput)` method to return the collected phone number to the SDK.
```javascript JavaScript theme={"dark"}
function otpStartStep(phoneNumberNeeded, phoneValidationError) {
return new Promise((resolve, reject) => {
// If no phone number is needed, then don't prompt the user.
if (!phoneNumberNeeded) {
resolve(null);
return;
}
// If error message is found around phone number, handle it.
// The `phoneValidationError` is ONLY available when `phoneNumberNeeded`
// has a value.
if (phoneValidationError) {
// Set to a variable and display it in a field.
// In this example, we don't do anything with the error.
var someErrorMessage = phoneValidationError.message;
}
// Prompt the user for the phone number.
var input = prompt('Enter phone number:');
if (input) {
// If the input is valid and the user clicked `OK`, return the phone
// number.
resolve({
phoneNumber: input,
});
} else {
// Else, exit the flow.
reject('phone invalid or user cancelled');
}
});
}
```
```typescript TypeScript theme={"dark"}
const otpPromptStartStep: OtpStartStep = {
execute: async (
phoneNumberNeeded: boolean,
phoneValidationError?: PhoneValidationError
): Promise => {
return new Promise((resolve, reject) => {
// If no phone number is needed, then don't prompt the user.
if (!phoneNumberNeeded) {
resolve(null);
return;
}
// If error message is found around phone number, handle it.
// The `phoneValidationError` is ONLY available when `phoneNumberNeeded`
// has a value.
if (phoneValidationError) {
// Set to a variable and display it in a field.
// In this example, we don't do anything with the error.
var someErrorMessage = phoneValidationError.message;
}
// Prompt the user for the phone number.
var input = prompt('Enter phone number:');
if (input) {
// If the input is valid and the user clicked `OK`, return the phone
// number.
resolve({
phoneNumber: input,
});
} else {
// Else, exit the flow.
reject('phone invalid or user cancelled');
}
});
},
};
```
The finish step is implemented the same as the previous tab:
```javascript JavaScript theme={"dark"}
function otpFinishStep(otpError) {
return new Promise((resolve, reject) => {
// If error message is found, handle it.
if (otpError) {
// Set to a variable and display it in a field.
// In this example, we don't do anything with the error.
var someErrorMessage = otpError.message;
}
// Prompt the user for whether they received the SMS.
// Typically, this is a page that shows the OTP already. We are simplifying
// it by requiring an input.
var input = confirm('Did you receive a text message?');
if (!input) {
// Close the modal if a text message was not received.
return;
}
// Prompt the user for the OTP.
var otp = prompt('Enter OTP code:');
if (otp) {
// If the input is valid and the user clicked `OK`, return the OTP.
resolve({
input: { otp }, // OTP value
resultType: 0, // OnSuccess enum type = 0
});
} else {
// Else, exit the flow.
reject('phone invalid or user cancelled');
}
});
}
```
```typescript TypeScript theme={"dark"}
const otpFinishStep: OtpFinishStep = {
execute: async (otpError?: OtpError): Promise => {
return new Promise((resolve, reject) => {
// If error message is found, handle it.
if (otpError) {
// Set to a variable and display it in a field.
// In this example, we don't do anything with the error.
var someErrorMessage = otpError.message;
}
// Prompt the user for whether they received the SMS.
// Typically, this is a page that shows the OTP already. We are simplifying
// it by requiring an input.
var input = confirm('Did you receive a text message?');
if (!input) {
// Close the modal if a text message was not received.
return;
}
// Prompt the user for the OTP.
var otp = prompt('Enter OTP code:');
if (otp) {
// If the input is valid and the user clicked `OK`, return the OTP.
resolve({
input: { otp }, // OTP value
resultType: OtpFinishResultType.OnSuccess,
});
} else {
// Else, exit the flow.
reject('phone invalid or user cancelled');
}
});
},
};
```
Follow these instructions to allow the customer to request a new OTP via SMS using the same phone number. There is a max of three send attempts including the initial message.
The start step is implemented the same as the previous tab:
```javascript JavaScript theme={"dark"}
function otpStartStep(phoneNumberNeeded, phoneValidationError) {
return new Promise((resolve, reject) => {
// If no phone number is needed, then don't prompt the user.
if (!phoneNumberNeeded) {
resolve(null);
return;
}
// If error message is found around phone number, handle it.
// The `phoneValidationError` is ONLY available when `phoneNumberNeeded`
// has a value.
if (phoneValidationError) {
// Set to a variable and display it in a field.
// In this example, we don't do anything with the error.
var someErrorMessage = phoneValidationError.message;
}
// Prompt the user for the phone number.
var input = prompt('Enter phone number:');
if (input) {
// If the input is valid and the user clicked `OK`, return the phone
// number.
resolve({
phoneNumber: input,
});
} else {
// Else, exit the flow.
reject('phone invalid or user cancelled');
}
});
}
```
```typescript TypeScript theme={"dark"}
const otpPromptStartStep: OtpStartStep = {
execute: async (
phoneNumberNeeded: boolean,
phoneValidationError?: PhoneValidationError
): Promise => {
return new Promise((resolve, reject) => {
// If no phone number is needed, then don't prompt the user.
if (!phoneNumberNeeded) {
resolve(null);
return;
}
// If error message is found around phone number, handle it.
// The `phoneValidationError` is ONLY available when `phoneNumberNeeded`
// has a value.
if (phoneValidationError) {
// Set to a variable and display it in a field.
// In this example, we don't do anything with the error.
var someErrorMessage = phoneValidationError.message;
}
// Prompt the user for the phone number.
var input = prompt('Enter phone number:');
if (input) {
// If the input is valid and the user clicked `OK`, return the phone
// number.
resolve({
phoneNumber: input,
});
} else {
// Else, exit the flow.
reject('phone invalid or user cancelled');
}
});
},
};
```
You can then send a new OTP SMS to the same phone number by implementing the finish step like this:
```javascript JavaScript theme={"dark"}
function otpFinishStep(otpError) {
return new Promise((resolve, reject) => {
// If error message is found, handle it.
if (otpError) {
// Set to a variable and display it in a field.
// In this example, we don't do anything with the error.
var someErrorMessage = otpError.message;
}
// Prompt the user for whether they received the SMS.
// Typically, this is a page that shows the OTP already. We are simplifying
// it by requiring an input.
var input = confirm('Did you receive a text message?');
if (!input) {
// If `Cancel`, then resend to the same phone number.
resolve({
resultType: 1, // OnResendOtp enum type = 1
});
return;
}
// Prompt the user for the OTP.
var otp = prompt('Enter OTP code:');
if (otp) {
// If the input is valid and the user clicked `OK`, return the OTP.
resolve({
input: { otp }, // OTP value
resultType: 0, // OnSuccess enum type = 0
});
} else {
// Else, exit the flow.
reject('phone invalid or user cancelled');
}
});
}
```
```typescript TypeScript theme={"dark"}
const otpMultipleResendFinishStep: OtpFinishStep = {
execute: async (otpError?: OtpError): Promise => {
return new Promise((resolve, reject) => {
// If error message is found, handle it.
if (otpError) {
// Set to a variable and display it in a field.
// In this example, we don't do anything with the error.
var someErrorMessage = otpError.message;
}
// Prompt the user for whether they received the SMS.
// Typically, this is a page that shows the OTP already. We are simplifying
// it by requiring an input.
var input = confirm('Did you receive a text message?');
if (!input) {
// If `Cancel`, then resend to the same phone number.
resolve({
resultType: 1, // OnResendOtp enum type = 1
});
return;
}
// Prompt the user for the OTP.
var otp = prompt('Enter OTP code:');
if (otp) {
// If the input is valid and the user clicked `OK`, return the OTP.
resolve({
input: { otp }, // OTP value
resultType: OtpFinishResultType.OnSuccess,
});
} else {
// Else, exit the flow.
reject('phone invalid or user cancelled');
}
});
},
};
```
Follow these instructions to allow the customer to re-enter the OTP PIN if they type it wrong. There is a max of 3 attempts. To implement this functionality, you also need to pass in `allowOTPRetry=true` to the `/v3/start` endpoint.
The start step is implemented the same as either of the the previous tabs - no client side code changes necessary:
```javascript JavaScript theme={"dark"}
function otpStartStep(phoneNumberNeeded, phoneValidationError) {
return new Promise((resolve, reject) => {
// If no phone number is needed, then don't prompt the user.
if (!phoneNumberNeeded) {
resolve(null);
return;
}
// If error message is found around phone number, handle it.
// The `phoneValidationError` is ONLY available when `phoneNumberNeeded`
// has a value.
if (phoneValidationError) {
// Set to a variable and display it in a field.
// In this example, we don't do anything with the error.
var someErrorMessage = phoneValidationError.message;
}
// Prompt the user for the phone number.
var input = prompt('Enter phone number:');
if (input) {
// If the input is valid and the user clicked `OK`, return the phone
// number.
resolve({
phoneNumber: input,
});
} else {
// Else, exit the flow.
reject('phone invalid or user cancelled');
}
});
}
```
```typescript TypeScript theme={"dark"}
const otpPromptStartStep: OtpStartStep = {
execute: async (
phoneNumberNeeded: boolean,
phoneValidationError?: PhoneValidationError
): Promise => {
return new Promise((resolve, reject) => {
// If no phone number is needed, then don't prompt the user.
if (!phoneNumberNeeded) {
resolve(null);
return;
}
// If error message is found around phone number, handle it.
// The `phoneValidationError` is ONLY available when `phoneNumberNeeded`
// has a value.
if (phoneValidationError) {
// Set to a variable and display it in a field.
// In this example, we don't do anything with the error.
var someErrorMessage = phoneValidationError.message;
}
// Prompt the user for the phone number.
var input = prompt('Enter phone number:');
if (input) {
// If the input is valid and the user clicked `OK`, return the phone
// number.
resolve({
phoneNumber: input,
});
} else {
// Else, exit the flow.
reject('phone invalid or user cancelled');
}
});
},
};
```
The finish step is implemented the same as either of the the previous tabs - no client side code changes necessary. If the OTP is invalid, the finish step will be called again to prompt the user for a new input. Once the max attempts is reached, the `AuthFinish` function will be called.
```javascript JavaScript theme={"dark"}
function otpFinishStep(otpError) {
return new Promise((resolve, reject) => {
// If error message is found, handle it.
if (otpError) {
// Set to a variable and display it in a field.
// In this example, we don't do anything with the error.
var someErrorMessage = otpError.message;
}
// Prompt the user for whether they received the SMS.
// Typically, this is a page that shows the OTP already. We are simplifying
// it by requiring an input.
var input = confirm('Did you receive a text message?');
if (!input) {
// Close the modal if a text message was not received.
return;
}
// Prompt the user for the OTP.
var otp = prompt('Enter OTP code:');
if (otp) {
// If the input is valid and the user clicked `OK`, return the OTP.
resolve({
input: { otp }, // OTP value
resultType: 0, // OnSuccess enum type = 0
});
} else {
// Else, exit the flow.
reject('phone invalid or user cancelled');
}
});
}
```
```typescript TypeScript theme={"dark"}
const otpFinishStep: OtpFinishStep = {
execute: async (otpError?: OtpError): Promise => {
return new Promise((resolve, reject) => {
// If error message is found, handle it.
if (otpError) {
// Set to a variable and display it in a field.
// In this example, we don't do anything with the error.
var someErrorMessage = otpError.message;
}
// Prompt the user for whether they received the SMS.
// Typically, this is a page that shows the OTP already. We are simplifying
// it by requiring an input.
var input = confirm('Did you receive a text message?');
if (!input) {
// Close the modal if a text message was not received.
return;
}
// Prompt the user for the OTP.
var otp = prompt('Enter OTP code:');
if (otp) {
// If the input is valid and the user clicked `OK`, return the OTP.
resolve({
input: { otp }, // OTP value
resultType: OtpFinishResultType.OnSuccess,
});
} else {
// Else, exit the flow.
reject('phone invalid or user cancelled');
}
});
},
};
```
Follow these instructions to allow the customer to re-enter their phone number. There is a max of three entries/send attempts.
Manual Request Required
To enable phone number change capabilities on your credentials, contact your Prove representative.
The start step is implemented the same as the previous tab:
```javascript JavaScript theme={"dark"}
function otpStartStep(phoneNumberNeeded, phoneValidationError) {
return new Promise((resolve, reject) => {
// If no phone number is needed, then don't prompt the user.
if (!phoneNumberNeeded) {
resolve(null);
return;
}
// If error message is found around phone number, handle it.
// The `phoneValidationError` is ONLY available when `phoneNumberNeeded`
// has a value.
if (phoneValidationError) {
// Set to a variable and display it in a field.
// In this example, we don't do anything with the error.
var someErrorMessage = phoneValidationError.message;
}
// Prompt the user for the phone number.
var input = prompt('Enter phone number:');
if (input) {
// If the input is valid and the user clicked `OK`, return the phone
// number.
resolve({
phoneNumber: input,
});
} else {
// Else, exit the flow.
reject('phone invalid or user cancelled');
}
});
}
```
```typescript TypeScript theme={"dark"}
const otpPromptStartStep: OtpStartStep = {
execute: async (
phoneNumberNeeded: boolean,
phoneValidationError?: PhoneValidationError
): Promise => {
return new Promise((resolve, reject) => {
// If no phone number is needed, then don't prompt the user.
if (!phoneNumberNeeded) {
resolve(null);
return;
}
// If error message is found around phone number, handle it.
// The `phoneValidationError` is ONLY available when `phoneNumberNeeded`
// has a value.
if (phoneValidationError) {
// Set to a variable and display it in a field.
// In this example, we don't do anything with the error.
var someErrorMessage = phoneValidationError.message;
}
// Prompt the user for the phone number.
var input = prompt('Enter phone number:');
if (input) {
// If the input is valid and the user clicked `OK`, return the phone
// number.
resolve({
phoneNumber: input,
});
} else {
// Else, exit the flow.
reject('phone invalid or user cancelled');
}
});
},
};
```
You can prompt for a new phone numberby implementing the finish step like this:
```javascript JavaScript theme={"dark"}
function otpFinishStep(otpError) {
return new Promise((resolve, reject) => {
// If error message is found, handle it.
if (otpError) {
// Set to a variable and display it in a field.
// In this example, we don't do anything with the error.
var someErrorMessage = otpError.message;
}
// Prompt the user for whether they received the SMS.
// Typically, this is a page that shows the OTP already. We are simplifying
// it by requiring an input.
var input = confirm('Did you receive a text message?');
if (!input) {
// If `Cancel`, then trigger the otpStartStep to re-prompt for
// phone number.
resolve({
resultType: 2, // OnMobileNumberChange enum type = 2
});
return;
}
// Prompt the user for the OTP.
var otp = prompt('Enter OTP code:');
if (otp) {
// If the input is valid and the user clicked `OK`, return the OTP.
resolve({
input: { otp }, // OTP value
resultType: 0, // OnSuccess enum type = 0
});
} else {
// Else, exit the flow.
reject('phone invalid or user cancelled');
}
});
}
```
```typescript TypeScript theme={"dark"}
const otpPhoneChangeFinishStep: OtpFinishStep = {
execute: async (otpError?: OtpError): Promise => {
return new Promise((resolve, reject) => {
// If error message is found, handle it.
if (otpError) {
// Set to a variable and display it in a field.
// In this example, we don't do anything with the error.
var someErrorMessage = otpError.message;
}
// Prompt the user for whether they received the SMS.
// Typically, this is a page that shows the OTP already. We are simplifying
// it by requiring an input.
var input = confirm('Did you receive a text message?');
if (!input) {
// If `Cancel`, then trigger the otpStartStep to re-prompt for
// phone number.
resolve({
resultType: 2, // OnMobileNumberChange enum type = 2
});
return;
}
// Prompt the user for the OTP.
var otp = prompt('Enter OTP code:');
if (otp) {
// If the input is valid and the user clicked `OK`, return the OTP.
resolve({
input: { otp }, // OTP value
resultType: OtpFinishResultType.OnSuccess,
});
} else {
// Else, exit the flow.
reject('phone invalid or user cancelled');
}
});
},
};
```
## Configure Instant Link
To use the Resend/Retry/Phone Change features, you need to install the Web SDK version 2.15.1 or later.
To set the Instant Link handler, `withInstantLinkFallback(startStep: InstantLinkStartStep | InstantLinkStartStepFn, retryStep?: InstantLinkRetryStep | InstantLinkRetryStepFn)` requires implementing the `InstantLinkStartStep` interface and optionally the `InstantLinkRetryStep` interface if you wish for advanced capabilities. When returning the phone number in the functions, ensure you return an object with the field `phoneNumber` to the `resolve()` function.
The Instant Link session has a three minute timeout from when it's sent through Short Message Service (SMS) to when the customer can click the received link.
Follow these instructions if you are implementing Instant Link and you are passing in the phone number on the `/v3/start` endpoint. In this case, you've already prompted for a phone number so you don't need to prompt for it in the client SDK.
Since you passed the phone number in the `Start()` function, call `resolve(null)` to communicate to the SDK you have the customer's agreement to deliver the SMS message. Ensure you return an object to `resolve()` function.
```javascript JavaScript theme={"dark"}
function instantLinkStartStep(phoneNumberNeeded, phoneValidationError) {
return new Promise((resolve, reject) => {
// Since no phone number is needed, don't prompt the user.
resolve(null);
});
}
```
```typescript TypeScript theme={"dark"}
const instantLinkNoPromptStartStep: InstantLinkStartStep = {
execute: async (
phoneNumberNeeded: boolean,
phoneValidationError?: PhoneValidationError
): Promise => {
return new Promise((resolve, reject) => {
// Since no phone number is needed, don't prompt the user.
resolve(null);
});
},
};
```
Follow these instructions if implementing MobileAuth and collecting the phone number for desktop. This will implement Instant Link without allowing for SMS resends and phone number changes. If you do want those capabilities, please reference the subsequent tabs (Resend and Phone Number Change).
Call the `resolve(input: InstantStartInput)` method to return the collected phone number to the SDK.
Call the `reject('some error message')` method to communicate to the SDK any issues while trying to obtain the phone number. Report an error if the customer cancels the Instant Link transaction or presses the back button to leave the Instant Link start step dialog.
```javascript JavaScript theme={"dark"}
function instantLinkStartStep(phoneNumberNeeded, phoneValidationError) {
return new Promise((resolve, reject) => {
// If no phone number is needed, then don't prompt the user.
if (!phoneNumberNeeded) {
resolve(null);
return;
}
// If error message is found around phone number, handle it.
// The `phoneValidationError` is ONLY available when `phoneNumberNeeded`
// has a value.
if (phoneValidationError) {
// Set to a variable and display it in a field.
// In this example, we don't do anything with the error.
var someErrorMessage = phoneValidationError.message;
}
// Prompt the user for the phone number.
var input = prompt('Enter phone number:');
if (input) {
// If the input is valid and the user clicked `OK`, return the phone
// number.
resolve({
phoneNumber: input,
});
} else {
// Else, exit the flow.
reject('phone invalid or user cancelled');
}
});
}
```
```typescript TypeScript theme={"dark"}
const instantLinkStartStep: InstantLinkStartStep = {
execute: async (
phoneNumberNeeded: boolean,
phoneValidationError?: PhoneValidationError
): Promise => {
return new Promise((resolve, reject) => {
// If no phone number is needed, then don't prompt the user.
if (!phoneNumberNeeded) {
resolve(null);
return;
}
// If error message is found around phone number, handle it.
// The `phoneValidationError` is ONLY available when `phoneNumberNeeded`
// has a value.
if (phoneValidationError) {
// Set to a variable and display it in a field.
// In this example, we don't do anything with the error.
var someErrorMessage = phoneValidationError.message;
}
// Prompt the user for the phone number.
var input = prompt('Enter phone number:');
if (input) {
// If the input is valid and the user clicked `OK`, return the phone
// number.
resolve({
phoneNumber: input,
} as InstantLinkStartInput);
} else {
// Else, exit the flow.
reject('phone invalid or user cancelled');
}
});
},
};
```
Follow these instructions to allow the customer to request a new SMS using the same phone number. There is a max of three send attempts including the initial message.
The start step is implemented the same as the previous tab:
```javascript JavaScript theme={"dark"}
function instantLinkStartStep(phoneNumberNeeded, phoneValidationError) {
return new Promise((resolve, reject) => {
// If no phone number is needed, then don't prompt the user.
if (!phoneNumberNeeded) {
resolve(null);
return;
}
// If error message is found around phone number, handle it.
// The `phoneValidationError` is ONLY available when `phoneNumberNeeded`
// has a value.
if (phoneValidationError) {
// Set to a variable and display it in a field.
// In this example, we don't do anything with the error.
var someErrorMessage = phoneValidationError.message;
}
// Prompt the user for the phone number.
var input = prompt('Enter phone number:');
if (input) {
// If the input is valid and the user clicked `OK`, return the phone
// number.
resolve({
phoneNumber: input,
});
} else {
// Else, exit the flow.
reject('phone invalid or user cancelled');
}
});
}
```
```typescript TypeScript theme={"dark"}
const instantLinkStartStep: InstantLinkStartStep = {
execute: async (
phoneNumberNeeded: boolean,
phoneValidationError?: PhoneValidationError
): Promise => {
return new Promise((resolve, reject) => {
// If no phone number is needed, then don't prompt the user.
if (!phoneNumberNeeded) {
resolve(null);
return;
}
// If error message is found around phone number, handle it.
// The `phoneValidationError` is ONLY available when `phoneNumberNeeded`
// has a value.
if (phoneValidationError) {
// Set to a variable and display it in a field.
// In this example, we don't do anything with the error.
var someErrorMessage = phoneValidationError.message;
}
// Prompt the user for the phone number.
var input = prompt('Enter phone number:');
if (input) {
// If the input is valid and the user clicked `OK`, return the phone
// number.
resolve({
phoneNumber: input,
} as InstantLinkStartInput);
} else {
// Else, exit the flow.
reject('phone invalid or user cancelled');
}
});
},
};
```
You can then send a new Instant Link SMS to the same phone number by implementing the `InstantLinkRetryStep` interface, for example:
```javascript JavaScript theme={"dark"}
function instantLinkRetryStep() {
return new Promise((resolve, reject) => {
// There are multiple return options:
// - resolve(0): request resend to the same phone number
// - reject('user clicked cancel'): error out of the possession flow
// Prompt the user for the phone number.
// Typically, this is a page that is automatically closed or redirected
// once the `AuthFinish` function is called. We are simplifying it by
// requiring an input.
var input = confirm('Did you receive a text message?');
if (input) {
// If `OK`, close the modal.
return;
}
// Else `Cancel`, then resend to the same phone number.
resolve(0);
});
}
```
```typescript TypeScript theme={"dark"}
const instantLinkMultipleResendRetryStep: InstantLinkRetryStep = {
execute: async (): Promise => {
return new Promise((resolve, reject) => {
// There are multiple return options:
// - resolve(0): request resend to the same phone number
// - reject('user clicked cancel'): error out of the possession flow
// Prompt the user for the phone number.
// Typically, this is a page that is automatically closed or redirected
// once the `AuthFinish` function is called. We are simplifying it by
// requiring an input.
var input = confirm('Did you receive a text message?');
if (input) {
// If `OK`, close the modal.
return;
}
// Else `Cancel`, then resend to the same phone number.
resolve(InstantLinkResultType.OnResend);
});
},
};
```
Follow these instructions to allow the customer to re-enter their phone number. There is a max of three entries/send attempts.
Manual Request Required
To enable phone number change capabilities on your credentials, contact your Prove representative.
The start step is implemented the same as the previous tab:
```javascript JavaScript theme={"dark"}
function instantLinkStartStep(phoneNumberNeeded, phoneValidationError) {
return new Promise((resolve, reject) => {
// If no phone number is needed, then don't prompt the user.
if (!phoneNumberNeeded) {
resolve(null);
return;
}
// If error message is found around phone number, handle it.
// The `phoneValidationError` is ONLY available when `phoneNumberNeeded`
// has a value.
if (phoneValidationError) {
// Set to a variable and display it in a field.
// In this example, we don't do anything with the error.
var someErrorMessage = phoneValidationError.message;
}
// Prompt the user for the phone number.
var input = prompt('Enter phone number:');
if (input) {
// If the input is valid and the user clicked `OK`, return the phone
// number.
resolve({
phoneNumber: input,
});
} else {
// Else, exit the flow.
reject('phone invalid or user cancelled');
}
});
}
```
```typescript TypeScript theme={"dark"}
const instantLinkStartStep: InstantLinkStartStep = {
execute: async (
phoneNumberNeeded: boolean,
phoneValidationError?: PhoneValidationError
): Promise => {
return new Promise((resolve, reject) => {
// If no phone number is needed, then don't prompt the user.
if (!phoneNumberNeeded) {
resolve(null);
return;
}
// If error message is found around phone number, handle it.
// The `phoneValidationError` is ONLY available when `phoneNumberNeeded`
// has a value.
if (phoneValidationError) {
// Set to a variable and display it in a field.
// In this example, we don't do anything with the error.
var someErrorMessage = phoneValidationError.message;
}
// Prompt the user for the phone number.
var input = prompt('Enter phone number:');
if (input) {
// If the input is valid and the user clicked `OK`, return the phone
// number.
resolve({
phoneNumber: input,
} as InstantLinkStartInput);
} else {
// Else, exit the flow.
reject('phone invalid or user cancelled');
}
});
},
};
```
You can prompt for a new phone number by implementing the `InstantLinkRetryStep` interface, for example:
```javascript JavaScript theme={"dark"}
function instantLinkRetryStep() {
return new Promise((resolve, reject) => {
// There are multiple return options:
// - resolve(0): request resend to the same phone number
// - resolve(1): request phone number change/re-prompt
// - reject('user clicked cancel'): error out of the possession flow
// Prompt the user for the phone number.
// Typically, this is a page that is automatically closed or redirected
// once the `AuthFinish` function is called. We are simplifying it by
// requiring an input.
var input = confirm('Did you receive a text message?');
if (input) {
// If `OK`, close the modal.
return;
}
// Else `Cancel`, then trigger the instantLinkStartStep to re-prompt for
// phone number.
resolve(1);
});
}
```
```typescript TypeScript theme={"dark"}
const instantLinkPhoneChangeRetryStep: InstantLinkRetryStep = {
execute: async (): Promise => {
return new Promise((resolve, reject) => {
// There are multiple return options:
// - resolve(0): request resend to the same phone number
// - resolve(1): request phone number change/re-prompt
// - reject('user clicked cancel'): error out of the possession flow
// Prompt the user for the phone number.
// Typically, this is a page that is automatically closed or redirected
// once the `AuthFinish` function is called. We are simplifying it by
// requiring an input.
var input = confirm('Did you receive a text message?');
if (input) {
// If `OK`, close the modal.
return;
}
// Else `Cancel`, then trigger the instantLinkStartStep to re-prompt for
// phone number.
resolve(InstantLinkResultType.OnMobileNumberChange);
});
},
};
```
## Verify the Customer Information
Once the customer has made any edits to their prefill information, submit that information to the back end server so the `Complete()` call can then verify the customer information.
```javascript JavaScript theme={"dark"}
// Send request to the backend to verify customer information.
async function sendInfo(firstName, lastName) {
const response = await fetch(backendUrl + "/finish", {
method: "POST",
headers: {
Accept: "application/json",
"Content-Type": "application/json",
},
body: JSON.stringify({
firstName: firstName,
lastName: lastName,
}),
});
const results = await response.json();
const rsp = JSON.stringify(results);
return rsp;
}
```
```typescript TypeScript theme={"dark"}
// Send request to the backend to verify customer information.
async function sendInfo(firstName: string, lastName: string) {
const response = await fetch(backendUrl + "/finish", {
method: "POST",
headers: {
Accept: "application/json",
"Content-Type": "application/json",
},
body: JSON.stringify({
firstName: firstName,
lastName: lastName,
}),
});
const results = await response.json();
const rsp = JSON.stringify(results);
return rsp;
}
```
## Function reference
Start the flow with `Authenticator.authenticate()`, while creating an instance of Authenticator using `AuthenticatorBuilder.build()`.
Use the following methods to configure `Authenticator` before instantiating. All methods return the same instance of `AuthenticatorBuilder` to allow chaining of the configuration methods.
`withAuthFinishStep(step: AuthFinishStep | AuthFinishStepFn): AuthenticatorBuilder`
This step customizes the handling of the authentication finish call. The implementation calls the customer's back end to retrieve authentication results. The customer defines the format of the response to suit the needs of the app.
`withRole(role: DeviceRole): AuthenticatorBuilder`
Sets the authentication role for this device. It can be either `Primary` or `Secondary`. The `Primary` value sets when the customer is on a mobile device web browser that registers with the Prove system and later authenticated by verifying this registration. On other hand, the `Secondary` value sets when the customer is on a desktop web browser, which authenticates after receiving customer feedback on their `Primary` device.
`withMobileAuthImplementation(implementation: MobileAuthImplementation): AuthenticatorBuilder`
Sets the implementation type for Mobile Auth authenticator. Possible values are `Fetch` or `Pixel` with `Fetch` set by default.
`withDeviceIpAddress(deviceIp: string | (() => string | null) | null): AuthenticatorBuilder`
Sets the public IP address for this device to report during device registration. If you neglect to call this method, or the IP address value is `null`, the system attempts to autodetect the IP address using an external service. If the service is inaccessible, the system uses the client's IP address of the HTTP connection. Successful Mobile Auth authentication requires the client's public IP address.
`withOtpFallback(startStep: OtpStartStep | OtpStartStepFn, finishStep: OtpFinishStep | OtpFinishStepFn): AuthenticatorBuilder`
Configure start and finish handlers for SMS OTP authenticator. Collecting customer input requires using these handlers to enter the phone number for delivery of OTP codes, and to enter received OTP codes.
`withInstantLinkFallback(instantLinkStartStep: InstantLinkStartStep | InstantLinkStartStepFn, instantLinkRetryStep?: InstantLinkRetryStep | InstantLinkRetryStepFn): AuthenticatorBuilder`
Configure handler for Instant Link authenticator. This handler collects customer input to enter the phone number for Instant Link.
`build(): Authenticator`
Finalizes the configuration and returns an instance of the `Authenticator`.
# Client-Side iOS SDK
Source: https://developer.prove.com/reference/ios-sdk
Learn how to integrate the client-side iOS SDK into your native app
## Installation
Prove provides the iOS SDK in Swift. It has a download size of 2.5 MB and an install size of 1.5 MB for the minimum required components. It relies on iOS native APIs. The iOS SDK supports the earlier three major versions. Prove has seen successful transactions with iOS v11.
Xcode Requirement
To integrate with our iOS SDKs, Apps must be built with Xcode 16.0 or later.
Prove manages a repository with the libraries to enable integration. You can install the SDK using either CocoaPods or Swift Package Manager.
Execute the following to import CocoaPod from the Prove pod repository:
```shell shell theme={"dark"}
# Run this command to install the cocoapods-art plugin (authored by Artifactory)
gem install cocoapods-art
# Run this command to add the Prove pod repository
pod repo-art add prove.jfrog.io https://prove.jfrog.io/artifactory/api/pods/libs-public-cocoapods
# In your Podfile, paste in the Prove pod repository as a source
plugin 'cocoapods-art', :sources => [
'prove.jfrog.io'
]
# In your Podfile, paste in the SDK pods
pod 'ProveAuth', '6.9.1'
# Run this command to install the SDK pods
pod install
```
### Step 1: Connect to JFrog Registry
Set up the registry globally (required for both Xcode UI and Package.swift):
```bash theme={"dark"}
swift package-registry set --global "https://prove.jfrog.io/artifactory/api/swift/libs-public-swift"
swift package-registry login "https://prove.jfrog.io/artifactory/api/swift/libs-public-swift"
# Press Enter when prompted for access token
```
Public Registry
This is a publicly accessible registry - no password or access token is needed. Simply press Enter when prompted for an access token.
The registry connection is configured via command line only. Once this setup is complete, you can add packages using either Xcode UI or Package.swift.
### Step 2: Adding Dependencies
#### Method 1: Using Xcode UI
1. In Xcode, go to **File** → **Add Package Dependencies**
2. Search for the package you want (e.g., `swift.proveauth`)
3. Select the version and add to your target
The latest stable version is 6.9.1. Select "Exact Version" for production applications to ensure consistent builds.
Once the command line setup is complete, you only need to enter the package name (e.g., `swift.proveauth`) in Xcode - no need to enter the full registry URL to Xcode.
#### Method 2: Using Package.swift
Add dependencies to your `Package.swift` file:
```swift Swift theme={"dark"}
// swift-tools-version: 5.9
import PackageDescription
let package = Package(
name: "YourApp",
platforms: [.iOS(.v12)],
dependencies: [
.package(id: "swift.proveauth", from: "6.9.1"),
],
targets: [
.target(
name: "YourApp",
dependencies: [
.product(name: "ProveAuth", package: "swift.proveauth"),
]
)
]
)
```
Then run the following command to resolve and fetch the dependencies:
```bash theme={"dark"}
swift package resolve
```
## Send the type of flow: mobile
Unlike the Web SDK, when using the iOS SDK, use the mobile flow. Pass mobile to the `Start()` function on the server. In a mobile flow, Mobile Auth executes first and if that fails, performs one-time password (OTP) validation on the mobile phone.
In the mobile flow, once either Mobile Auth or the OTP validation is complete, the `AuthFinishStep` function executes.
Mobile Auth
In order for Mobile Auth to succeed, the customer needs to disable the VPN and Private Relay on iOS.
## `Authenticate()`
The SDK requires an `authToken` as a parameter for the `Authenticate()` function. This token returns from the `Start()` call of the server-side SDK. The token is session specific so it's used for a single flow. It also expires after 15 minutes.
## Retrieve `authToken`
To start the flow, send a request to your back end server with the phone number, flow type, and an optional challenge. Use either the date of birth, `YYYY-MM-DD`, or the last four digits of the social security number.
```swift Swift theme={"dark"}
// The below example uses native iOS URLSession, but any other
// alternative networking approaches should also work
func initialize(phoneNumber: String, ssn: String, flowType: String, completion: @escaping (Result\) -> Void) {
guard let url = URL(string: "\(backendUrl)/initialize") else {
completion(.failure(URLError(.badURL)))
return
}
var request = URLRequest(url: url)
request.httpMethod = "POST"
request.addValue("application/json", forHTTPHeaderField: "Accept")
request.addValue("application/json", forHTTPHeaderField: "Content-Type")
// Set up the request body
let body: [String: Any] = [
"phoneNumber": phoneNumber,
"flowType": flowType,
"ssn": ssn
]
do {
request.httpBody = try JSONSerialization.data(withJSONObject: body, options: \[])
} catch {
completion(.failure(error))
return
}
// Perform the request
let task = URLSession.shared.dataTask(with: request) { \_, response, error in
// Handle network or connection errors
if let error = error {
completion(.failure(error))
return
}
do {
if let json = try JSONSerialization.jsonObject(with: data, options: \[]) as? [String: Any],
let authToken = json["authToken"] as? String {
completion(.success(authToken))
} else {
let parsingError = NSError(domain: "", code: 0, userInfo: [NSLocalizedDescriptionKey : "Failed to parse JSON or authToken is missing"])
completion(.failure(parsingError))
}
} catch {
completion(.failure(error))
}
}
// Start the network call
task.resume()
}
```
## Setup authenticator
Once you have the `authToken`, build the authenticator for the mobile flow.
```swift Swift theme={"dark"}
// Object implementing ProveAuthFinishStep protocols
let finishStep = FinishAuthStep()
// Objects implementing OtpStartStep/OtpFinishStep protocols
let otpStartStep = MobileOtpStartStep()
let otpFinishStep = MobileOtpFinishStep()
let proveAuthSdk: ProveAuth
proveAuthSdk = ProveAuth.builder(authFinish: finishStep)
.withOtpFallback(otpStart: otpStartStep, otpFinish: otpFinishStep)
.build()
```
If a mobile data connection is unavailable during testing, use the Builder class. It permits simulated successful session results while connected to a Wi-Fi network. Testing using a Wi-Fi connection is useful in the Sandbox environment.
```swift Swift theme={"dark"}
proveAuthSdk = ProveAuth.builder(authFinish: finishStep)
.withMobileAuthTestMode() // Test mode flag
.build()
```
## Performing the authentication
The Prove Auth object is thread safe and used as a singleton. Most Prove Auth methods are blocking and therefore can't execute in the main app thread. The app employs an executor service with a minimum of two threads to manage threads due to the ability to process concurrent blocking requests.
```swift Swift theme={"dark"}
// authToken retrieved from your server via StartAuthRequest
proveAuthSdk.authenticate(authToken) { error in
DispatchQueue.main.async {
self.messages.finalResultMessage = "ProveAuth.authenticate returned error: \(error.localizedDescription)"
print(self.messages.finalResultMessage)
}
}
```
## Validate the mobile phone
In the `AuthFinishStep`, specify a function to call once the possession checks complete on the mobile phone. In the following code, notice an endpoint called `/verify`. This endpoint on your back end server calls the `Validate()` function to validate the phone number. If unsuccessful, the server calls the `Challenge()` function and then returns the results, including customer information. Refer to the following example fields that return and then prefill on a form for the customer to verify.
```swift Swift theme={"dark"}
// Send a verify request to get return customer information.
// The below example uses native iOS URLSession, but any other
// alternative networking approaches should also work
func verify(String: authId, completion: @escaping (Error?) -> Void) {
guard let url = URL(string: "\(backendUrl)/verify") else {
completion(URLError(.badURL))
return
}
// Create the request
var request = URLRequest(url: url)
request.httpMethod = "POST"
request.addValue("application/json", forHTTPHeaderField: "Accept")
request.addValue("application/json", forHTTPHeaderField: "Content-Type")
// Set up the request body (empty JSON object) - authId is not needed so you can ignore.
let body: [String: Any] = ["authId": authId]
do {
request.httpBody = try JSONSerialization.data(withJSONObject: body, options: \[])
} catch {
completion(error)
return
}
// Perform the request
let task = URLSession.shared.dataTask(with: request) { \_, response, error in
if let error = error {
completion(error)
return
}
// Parse the response
do {
if let json = try JSONSerialization.jsonObject(with: data, options: \[]) as? [String: Any],
let firstName = json["firstName"] as? String,
let lastName = json["lastName"] as? String {
// Update the UI on the main thread
DispatchQueue.main.async {
// Update your UI with the pre-fill customer information
// For example, assuming you have IBOutlet references for your text fields
self.firstNameInput.text = firstName
self.lastNameInput.text = lastName
}
completion(nil)
} else {
let parsingError = NSError(domain: "", code: 0, userInfo: [NSLocalizedDescriptionKey: "Failed to parse JSON"])
completion(parsingError)
}
} catch {
completion(error)
}
}
// Start the network call
task.resume()
}
```
## Configure OTP
To use the Resend/Retry/Phone Change features, you need to install the iOS SDK version 6.5.1 or later.
To set the One-Time Password (OTP) handler, `withOtpFallback(otpStart: otpStartStep, otpFinish: otpFinishStep)`, requires implementing the `OtpStartStep` and `OtpFinishStep`.
The OTP session has a two minute timeout from when it's sent through SMS to when the customer can enter in the OTP.
Follow these instructions if you are implementing OTP and you are passing in the phone number on the `/v3/start` endpoint. In this case, you've already prompted for a phone number so you don't need to prompt for it in the client SDK.
Since you passed the phone number in the `Start()` function, call `callback.onSuccess(input: nil)` to communicate to the SDK you have the customer's agreement to deliver the SMS message.
```swift Swift theme={"dark"}
import Foundation
import ProveAuth
import SwiftUI
class MobileOtpStartStep: OtpStartStep {
@ObservedObject var sheetObservable: SheetObservable
var callback: OtpStartStepCallback?
init(sheetObservable: SheetObservable) {
self.sheetObservable = sheetObservable
}
// Implement this method to handle phone number collection for SMS OTP,
// or to obtain user confirmation for initiating an SMS message.
func execute(
phoneNumberNeeded: Bool, phoneValidationError: ProveAuthError?, callback: OtpStartStepCallback
) {
self.callback = callback
// Since no phone number is needed, don't prompt the user.
callback.onSuccess(input: nil)
}
}
```
Call the `callback.onError()` method to communicate to the SDK any issues while trying to obtain the phone number or the OTP. Report an error if the customer cancels the SMS transaction or presses the back button to leave the screen.
```swift Swift theme={"dark"}
import Foundation
import SwiftUI
import ProveAuth
class MobileOtpFinishStep: OtpFinishStep {
@ObservedObject var sheetObservable: SheetObservable
var callback: OtpFinishStepCallback?
init(sheetObservable: SheetObservable){
self.sheetObservable = sheetObservable
}
// Implement this method to collect the OTP value delivered via SMS.
func execute(otpError: ProveAuthError?, callback: OtpFinishStepCallback) {
self.callback = callback
// Handle the OTP validation error if present.
if case .otpValidationError = otpError {
print("found otpError: \(String(describing: otpError?.localizedDescription))")
// Signal to your UI components that the last provided OTP is invalid
self.sheetObservable.otpError = true
} else {
self.sheetObservable.otpError = false
}
// Signal to UI components to display OtpFinishView
DispatchQueue.main.async {
self.sheetObservable.isOtpFinishActive = true
}
}
// Provide the collected OTP value to the SDK for validation.
func handleOtp(_ otp: String) {
guard let callback = self.callback else {
print("Error: OtpFinishStepCallback is not set ")
return
}
let otpFinishInput = OtpFinishInput(otp: otp)
callback.onSuccess(input: otpFinishInput)
}
// Notify the SDK of any issues encountered while obtaining the OTP value or if the user cancels the OTP flow.
func handleOtpFinishError() {
guard let callback = self.callback else {
print("Error: OtpFinishStepCallback is not set ")
return
}
callback.onError()
}
}
```
Follow these instructions if implementing MobileAuth and collecting the phone number only if MobileAuth fails. This will implement OTP without allowing for SMS resends and phone number changes. If you do want those capabilities, please reference the subsequent tabs (Resend, Retry OTP, and Phone Number Change).
In the start step, call the `callback.onSuccess(input: otpStartInput)` method to return the collected phone number to the SDK.
```swift Swift theme={"dark"}
import Foundation
import ProveAuth
import SwiftUI
class MobileOtpStartStep: OtpStartStep {
@ObservedObject var sheetObservable: SheetObservable
var callback: OtpStartStepCallback?
init(sheetObservable: SheetObservable) {
self.sheetObservable = sheetObservable
}
func execute(
phoneNumberNeeded: Bool, phoneValidationError: ProveAuthError?, callback: OtpStartStepCallback
) {
self.callback = callback
if !phoneNumberNeeded {
// If no phone number is needed, then don't prompt the user.
callback.onSuccess(input: nil)
} else {
DispatchQueue.main.async {
// If a phone number validation error is detected, ensure it is handled to provide feedback to the user.
if case .phoneNumberValidationError = phoneValidationError {
print(
"found phoneValidationError: \(String(describing: phoneValidationError?.localizedDescription))"
)
// Update UI components to display OtpStartView with the phone number validation error.
self.sheetObservable.isPhoneValidationError = true
} else {
self.sheetObservable.isPhoneValidationError = false
}
// Update UI components to display OtpStartView if a phone number is needed.
self.sheetObservable.isOtpStartActive = true
}
}
}
// Return collected phone number to the SDK
func handlePhoneNumber(phoneNumber: String) {
guard let callback = self.callback else {
print("Error: OtpStartStepCallback is not set ")
return
}
let otpStartInput = OtpStartInput(phoneNumber: phoneNumber)
// This is how you pass collected phone number to SDK
callback.onSuccess(input: otpStartInput)
}
// Communicate any issues encountered while trying to obtain the phone number to the SDK.
// Error should be reported if the customer explicitly cancels the SMS OTP transaction
// or presses the back button to exit out the SMS OTP start step screen.
func handleOtpStartError() {
guard let callback = self.callback else {
print("Error: OtpStartStepCallback is not set ")
return
}
callback.onError()
}
}
```
The finish step is implemented the same as the previous tab:
```swift Swift theme={"dark"}
import Foundation
import SwiftUI
import ProveAuth
class MobileOtpFinishStep: OtpFinishStep {
@ObservedObject var sheetObservable: SheetObservable
var callback: OtpFinishStepCallback?
init(sheetObservable: SheetObservable){
self.sheetObservable = sheetObservable
}
// Implement this method to collect the OTP value delivered via SMS.
func execute(otpError: ProveAuthError?, callback: OtpFinishStepCallback) {
self.callback = callback
// Handle the OTP validation error if present.
if case .otpValidationError = otpError {
print("found otpError: \(String(describing: otpError?.localizedDescription))")
// Signal to your UI components that the last provided OTP is invalid
self.sheetObservable.otpError = true
} else {
self.sheetObservable.otpError = false
}
// Signal to UI components to display OtpFinishView
DispatchQueue.main.async {
self.sheetObservable.isOtpFinishActive = true
}
}
// Provide the collected OTP value to the SDK for validation.
func handleOtp(_ otp: String) {
guard let callback = self.callback else {
print("Error: OtpFinishStepCallback is not set ")
return
}
let otpFinishInput = OtpFinishInput(otp: otp)
callback.onSuccess(input: otpFinishInput)
}
// Notify the SDK of any issues encountered while obtaining the OTP value or if the user cancels the OTP flow.
func handleOtpFinishError() {
guard let callback = self.callback else {
print("Error: OtpFinishStepCallback is not set ")
return
}
callback.onError()
}
}
```
Follow these instructions to allow the customer to request a new OTP via SMS using the same phone number. There is a max of three send attempts including the initial message.
The start step is implemented the same as the previous tab:
```swift Swift theme={"dark"}
import Foundation
import ProveAuth
import SwiftUI
class MobileOtpStartStep: OtpStartStep {
@ObservedObject var sheetObservable: SheetObservable
var callback: OtpStartStepCallback?
init(sheetObservable: SheetObservable) {
self.sheetObservable = sheetObservable
}
func execute(
phoneNumberNeeded: Bool, phoneValidationError: ProveAuthError?, callback: OtpStartStepCallback
) {
self.callback = callback
if !phoneNumberNeeded {
// If no phone number is needed, then don't prompt the user.
callback.onSuccess(input: nil)
} else {
DispatchQueue.main.async {
// If a phone number validation error is detected, ensure it is handled to provide feedback to the user.
if case .phoneNumberValidationError = phoneValidationError {
print(
"found phoneValidationError: \(String(describing: phoneValidationError?.localizedDescription))"
)
// Update UI components to display OtpStartView with the phone number validation error.
self.sheetObservable.isPhoneValidationError = true
} else {
self.sheetObservable.isPhoneValidationError = false
}
// Update UI components to display OtpStartView if a phone number is needed.
self.sheetObservable.isOtpStartActive = true
}
}
}
// Return collected phone number to the SDK
func handlePhoneNumber(phoneNumber: String) {
guard let callback = self.callback else {
print("Error: OtpStartStepCallback is not set ")
return
}
let otpStartInput = OtpStartInput(phoneNumber: phoneNumber)
// This is how you pass collected phone number to SDK
callback.onSuccess(input: otpStartInput)
}
// Communicate any issues encountered while trying to obtain the phone number to the SDK.
// Error should be reported if the customer explicitly cancels the SMS OTP transaction
// or presses the back button to exit out the SMS OTP start step screen.
func handleOtpStartError() {
guard let callback = self.callback else {
print("Error: OtpStartStepCallback is not set ")
return
}
callback.onError()
}
}
```
You can then send a new OTP SMS to the same phone number by implementing the finish step like this:
```swift Swift theme={"dark"}
import Foundation
import SwiftUI
import ProveAuth
class MobileOtpFinishStep: OtpFinishStep {
@ObservedObject var sheetObservable: SheetObservable
var callback: OtpFinishStepCallback?
init(sheetObservable: SheetObservable){
self.sheetObservable = sheetObservable
}
// Implement this method to collect the OTP value delivered in the SMS message.
func execute(otpError: ProveAuthError?, callback: OtpFinishStepCallback) {
self.callback = callback
// Handle the OTP validation error if present.
if case .otpValidationError = otpError {
print("found otpError: \(String(describing: otpError?.localizedDescription))")
// Update your UI to indicate that the provided OTP is invalid
self.sheetObservable.otpError = true
} else {
self.sheetObservable.otpError = false
}
// Update your UI to display the OtpFinishView
DispatchQueue.main.async {
self.sheetObservable.isOtpFinishActive = true
}
}
// Return the OTP value to the SDK
func handleOtp(_ otp: String) {
guard let callback = self.callback else {
print("Error: OtpFinishStepCallback is not set ")
return
}
let otpFinishInput = OtpFinishInput(otp: otp)
callback.onSuccess(input: otpFinishInput)
}
// Communicate to the SDK any issues when host app trys to obtain the OTP value
// or when users cancel the OTP flow
func handleOtpFinishError() {
guard let callback = self.callback else {
print("Error: OtpFinishStepCallback is not set ")
return
}
callback.onError()
}
// Call this method to request a new OTP code for the same mobile number.
func sendNewOtp() {
guard let callback = self.callback else {
print("Error: OtpFinishStepCallback is not set ")
return
}
callback.onOtpResend()
}
}
```
Follow these instructions to allow the customer to re-enter the OTP PIN if they type it wrong. There is a max of 3 attempts. To implement this functionality, you also need to pass in `allowOTPRetry=true` to the `/v3/start` endpoint.
The start step is implemented the same as either of the the previous tabs - no client side code changes necessary:
```swift Swift theme={"dark"}
import Foundation
import ProveAuth
import SwiftUI
class MobileOtpStartStep: OtpStartStep {
@ObservedObject var sheetObservable: SheetObservable
var callback: OtpStartStepCallback?
init(sheetObservable: SheetObservable) {
self.sheetObservable = sheetObservable
}
func execute(
phoneNumberNeeded: Bool, phoneValidationError: ProveAuthError?, callback: OtpStartStepCallback
) {
self.callback = callback
if !phoneNumberNeeded {
// If no phone number is needed, then don't prompt the user.
callback.onSuccess(input: nil)
} else {
DispatchQueue.main.async {
// If a phone number validation error is detected, ensure it is handled to provide feedback to the user.
if case .phoneNumberValidationError = phoneValidationError {
print(
"found phoneValidationError: \(String(describing: phoneValidationError?.localizedDescription))"
)
// Update UI components to display OtpStartView with the phone number validation error.
self.sheetObservable.isPhoneValidationError = true
} else {
self.sheetObservable.isPhoneValidationError = false
}
// Update UI components to display OtpStartView if a phone number is needed.
self.sheetObservable.isOtpStartActive = true
}
}
}
// Return collected phone number to the SDK
func handlePhoneNumber(phoneNumber: String) {
guard let callback = self.callback else {
print("Error: OtpStartStepCallback is not set ")
return
}
let otpStartInput = OtpStartInput(phoneNumber: phoneNumber)
// This is how you pass collected phone number to SDK
callback.onSuccess(input: otpStartInput)
}
// Communicate any issues encountered while trying to obtain the phone number to the SDK.
// Error should be reported if the customer explicitly cancels the SMS OTP transaction
// or presses the back button to exit out the SMS OTP start step screen.
func handleOtpStartError() {
guard let callback = self.callback else {
print("Error: OtpStartStepCallback is not set ")
return
}
callback.onError()
}
}
```
The finish step is implemented the same as either of the the previous tabs - no client side code changes necessary. If the OTP is invalid, the finish step will be called again to prompt the user for a new input. Once the max attempts is reached, the `AuthFinish` function will be called.
```swift Swift theme={"dark"}
import Foundation
import SwiftUI
import ProveAuth
class MobileOtpFinishStep: OtpFinishStep {
@ObservedObject var sheetObservable: SheetObservable
var callback: OtpFinishStepCallback?
init(sheetObservable: SheetObservable){
self.sheetObservable = sheetObservable
}
// Implement this method to collect the OTP value delivered via SMS.
func execute(otpError: ProveAuthError?, callback: OtpFinishStepCallback) {
self.callback = callback
// Handle the OTP validation error if present.
if case .otpValidationError = otpError {
print("found otpError: \(String(describing: otpError?.localizedDescription))")
// Signal to your UI components that the last provided OTP is invalid
self.sheetObservable.otpError = true
} else {
self.sheetObservable.otpError = false
}
// Signal to UI components to display OtpFinishView
DispatchQueue.main.async {
self.sheetObservable.isOtpFinishActive = true
}
}
// Provide the collected OTP value to the SDK for validation.
func handleOtp(_ otp: String) {
guard let callback = self.callback else {
print("Error: OtpFinishStepCallback is not set ")
return
}
let otpFinishInput = OtpFinishInput(otp: otp)
callback.onSuccess(input: otpFinishInput)
}
// Notify the SDK of any issues encountered while obtaining the OTP value or if the user cancels the OTP flow.
func handleOtpFinishError() {
guard let callback = self.callback else {
print("Error: OtpFinishStepCallback is not set ")
return
}
callback.onError()
}
}
```
Follow these instructions to allow the customer to re-enter their phone number. There is a max of three entries/send attempts.
Manual Request Required
To enable phone number change capabilities on your credentials, contact your Prove representative.
The start step is implemented the same as the previous tab:
```swift Swift theme={"dark"}
import Foundation
import ProveAuth
import SwiftUI
class MobileOtpStartStep: OtpStartStep {
@ObservedObject var sheetObservable: SheetObservable
var callback: OtpStartStepCallback?
init(sheetObservable: SheetObservable) {
self.sheetObservable = sheetObservable
}
func execute(
phoneNumberNeeded: Bool, phoneValidationError: ProveAuthError?, callback: OtpStartStepCallback
) {
self.callback = callback
if !phoneNumberNeeded {
// If no phone number is needed, then don't prompt the user.
callback.onSuccess(input: nil)
} else {
DispatchQueue.main.async {
// If a phone number validation error is detected, ensure it is handled to provide feedback to the user.
if case .phoneNumberValidationError = phoneValidationError {
print(
"found phoneValidationError: \(String(describing: phoneValidationError?.localizedDescription))"
)
// Update UI components to display OtpStartView with the phone number validation error.
self.sheetObservable.isPhoneValidationError = true
} else {
self.sheetObservable.isPhoneValidationError = false
}
// Update UI components to display OtpStartView if a phone number is needed.
self.sheetObservable.isOtpStartActive = true
}
}
}
// Return collected phone number to the SDK
func handlePhoneNumber(phoneNumber: String) {
guard let callback = self.callback else {
print("Error: OtpStartStepCallback is not set ")
return
}
let otpStartInput = OtpStartInput(phoneNumber: phoneNumber)
// This is how you pass collected phone number to SDK
callback.onSuccess(input: otpStartInput)
}
// Communicate any issues encountered while trying to obtain the phone number to the SDK.
// Error should be reported if the customer explicitly cancels the SMS OTP transaction
// or presses the back button to exit out the SMS OTP start step screen.
func handleOtpStartError() {
guard let callback = self.callback else {
print("Error: OtpStartStepCallback is not set ")
return
}
callback.onError()
}
}
```
You can prompt for a new phone number by implementing the finish step like this:
```swift Swift theme={"dark"}
import Foundation
import SwiftUI
import ProveAuth
class MobileOtpFinishStep: OtpFinishStep {
@ObservedObject var sheetObservable: SheetObservable
var callback: OtpFinishStepCallback?
init(sheetObservable: SheetObservable){
self.sheetObservable = sheetObservable
}
// Implement this method to collect the OTP value delivered via SMS.
func execute(otpError: ProveAuthError?, callback: OtpFinishStepCallback) {
self.callback = callback
// Handle the OTP validation error if present.
if case .otpValidationError = otpError {
print("found otpError: \(String(describing: otpError?.localizedDescription))")
// Update your UI to indicate that the provided OTP is invalid.
self.sheetObservable.otpError = true
} else {
self.sheetObservable.otpError = false
}
// Update your UI to display the OTP finish view.
DispatchQueue.main.async {
self.sheetObservable.isOtpFinishActive = true
}
}
// Return the collected OTP value to the SDK.
func handleOtp(_ otp: String) {
guard let callback = self.callback else {
print("Error: OtpFinishStepCallback is not set ")
return
}
let otpFinishInput = OtpFinishInput(otp: otp)
callback.onSuccess(input: otpFinishInput)
}
// When callback.onMobileNumberChange() is evoked, OtpStartStep will be re-initiated
// so that end-users can enter a different phone number via OtpStartStep.
func handleMobileNumberChange() {
guard let callback = self.callback else {
print("Error: OtpFinishStepCallback is not set")
return
}
callback.onMobileNumberChange()
}
}
```
## Verify the Customer Information
Once the customer has made any edits to their prefill information, submit that information to the back end server so the `Complete()` call can then verify the customer information.
```swift Swift theme={"dark"}
// Send request to the backend to verify customer information.
// The below example uses native iOS URLSession, but any other
// alternative networking approaches should also work
func sendInfo(firstName: String, lastName: String, completion: @escaping (Result\<[String:Any], Error>) -> Void) {
guard let url = URL(string: "\(backendUrl)/finish") else {
completion(.failure(URLError(.badURL)))
return
}
var request = URLRequest(url: url)
request.httpMethod = "POST"
request.addValue("application/json", forHTTPHeaderField: "Accept")
request.addValue("application/json", forHTTPHeaderField: "Content-Type")
// Set up the request body
let body: [String: Any] = [
"firstName": firstName,
"lastName": lastName
]
do {
request.httpBody = try JSONSerialization.data(withJSONObject: body, options: \[])
} catch {
completion(.failure(error))
return
}
let task = URLSession.shared.dataTask(with: request) { \_, response, error in
// Handle network or connection errors
if let error = error {
completion(.failure(error))
return
}
do {
if let results = try JSONSerialization.jsonObject(with: data, options: \[]) as? [String: Any] {
completion(.success(results))
} else {
let parsingError = NSError(domain: "", code: 0, userInfo: [NSLocalizedDescriptionKey : "Failed to parse JSON or authToken is missing"])
completion(.failure(parsingError))
}
} catch {
completion(.failure(error))
}
}
// Start the network call
task.resume()
}
```
# Server-Side SDK Guide
Source: https://developer.prove.com/reference/prefill-identity-server
Learn more about the details of the server-side SDK
Prove provides server-side SDKs in the following languages: Go, Java, .NET, TypeScript, and JavaScript. If you use a different back end language, you can interact with the API endpoints.
## Installation
Install the server-side SDK of your choice by running a command in your terminal, or by using a dependency management tool specific to your project.
```go Go theme={"dark"}
# The Go library is hosted on GitHub so you can use this command to import it
# to your Go application.
go get github.com/prove-identity/prove-sdk-server-go
# Ensure you import the SDK in your code like this:
import (
provesdkservergo "github.com/prove-identity/prove-sdk-server-go"
"github.com/prove-identity/prove-sdk-server-go/models/components"
)
```
```typescript TypeScript theme={"dark"}
# Run this command to install package from GitHub and save as a dependency
npm install -S @prove-identity/prove-api
# Import the SDK in your code like this:
import { Proveapi } from "@prove-identity/prove-api";
import { OAuthClient, WithAuthorization } from "@prove-identity/prove-api/sdk/oauth"
```
```java Java theme={"dark"}
# See the latest version number here: https://central.sonatype.com/artifact/com.prove/proveapi
Gradle:
implementation 'com.prove:proveapi:0.10.0'
Maven:
com.prove
proveapi
0.10.0
```
```csharp .NET theme={"dark"}
// Run this command to install package from Nuget and save as a dependency
dotnet add package Prove.Proveapi --version 1.0.1
// Ensure you import the SDK in your code like this:
using Prove.Proveapi;
using Prove.Proveapi.Models.Components;
```
Prove provides code samples for how to interact with the API endpoints in many different languages. Browse the API Reference page and select your language.
## Authentication
To access the Prove API, use your OAuth 2.0 client ID and client secret.
You can load these from environment variables or another method:
```go Go theme={"dark"}
clientID := os.Getenv("PROVE_CLIENT_ID")
clientSecret := os.Getenv("PROVE_CLIENT_SECRET")
proveEnv := "uat-us" // Use UAT in US region.
client := provesdkservergo.New(
provesdkservergo.WithServer(proveEnv),
provesdkservergo.WithSecurity(components.Security{
ClientID: provesdkservergo.String(clientID),
ClientSecret: provesdkservergo.String(clientSecret),
}),
)
```
```typescript TypeScript theme={"dark"}
export const DEVICE_API_BASE_URL = process.env.DEVICE_API_BASE_URL || '';
export const PROVE_CLIENT_ID = process.env.PROVE_CLIENT_ID;
export const PROVE_CLIENT_SECRET = process.env.PROVE_CLIENT_SECRET;
export function getProveSdk(): Proveapi {
return new Proveapi({
server: 'uat-us',
security: {
clientID: PROVE_CLIENT_ID,
clientSecret: PROVE_CLIENT_SECRET,
},
});
}
```
```java Java theme={"dark"}
String clientId = System.getenv("PROVE_CLIENT_ID");
String clientSecret = System.getenv("PROVE_CLIENT_SECRET");
Proveapi sdk = Proveapi.builder()
.security(Security.builder()
.clientID(clientId)
.clientSecret(clientSecret)
.build())
.build();
```
```csharp .NET theme={"dark"}
var clientId = Environment.GetEnvironmentVariable("PROVE_CLIENT_ID");
var clientSecret = Environment.GetEnvironmentVariable("PROVE_CLIENT_SECRET");
var sdk = new ProveAPI(serverUrl: "https://platform.uat.proveapis.com");
var tokenRequest = new V3TokenRequest
{
ClientId = clientId,
ClientSecret = clientSecret,
GrantType = "client_credentials"
};
var tokenResponse = await sdk.V3.V3TokenRequestAsync(tokenRequest);
var accessToken = tokenResponse.V3TokenResponse?.AccessToken;
_sdk = new ProveAPI(auth: accessToken, serverUrl: "https://platform.uat.proveapis.com");
```
Token Expiration
The OAuth token expires after 60 minutes, requiring you to get another token.
## Next field
Each of the functions return a `Next` field. This field signals which function you call next.
## `Start()`
Add an endpoint to your server such as `POST /initiate` so the front end can submit the flow type, phone number, and the challenge. On the back end, start a Prove flow with a call to the `Start()` function. This function takes these required parameters:
* Flow Type: either `desktop` or `mobile` to describe which type of device the customer is starting their flow on.
Possession Timeouts
When flow type is `desktop`, Instant Link performs the possession check. When flow type is `mobile`, first Mobile Auth, if enabled, and then one-time password (OTP) as a fallback. The Instant Link session has a three minute timeout from when it's sent through SMS to when the customer can selects it. The OTP session has a two minute timeout from when it's sent through SMS to when the customer can enter in the OTP.
* Final Target URL: required when `flowType=desktop`. This should be a URL you support. When the customer clicks the Instant Link, the workflow sends the customer to this URL, which instructs them to continue the process. Maximum length is 128 characters.
These parameters are optional:
* `ssn`: full or last four digits of the customer's social security number. You can pass it into `Start()` or `Challenge()`.
* `dob`: date of birth in one of these formats: `YYYY-MM-DD`, `YYYY-MM`, `MM-DD`. You can pass it into `Start()` or `Challenge()`.
* `allowOTPRetry`: set to `true` to allow the customer to re-enter the OTP up to three times. Defaults to `false`.
For OTP retries, make sure to implement client SDK changes as detailed in the [Implementation Guide](https://developer.prove.com/docs/prove-pre-fill-implementation-guide#request-new-otp-code).
```go Go theme={"dark"}
ctx := context.TODO()
rspStart, err := client.V3.V3StartRequest(ctx, &components.V3StartRequest{
FlowType: "desktop",
FinalTargetURL: provesdkservergo.String("https://prove.com"),
PhoneNumber: provesdkservergo.String("2001001686"),
Ssn: provesdkservergo.String("8370"),
})
if err != nil {
t.Fatal(err)
}
```
```typescript TypeScript theme={"dark"}
const startReq = {
flowType: 'desktop',
finalTargetUrl: 'https://prove.com',
phoneNumber: '2001001686',
ssn: '8370',
};
const rspStart = await sdk.v3.v3StartRequest(startReq);
```
```java Java theme={"dark"}
V3StartRequest req = V3StartRequest.builder()
.flowType("desktop")
.finalTargetUrl("https://prove.com")
.phoneNumber("2001001686")
.ssn("8370")
.build();
V3StartRequestResponse startReqResp = sdk.v3().v3StartRequest()
.request(req)
.call();
V3StartResponse startResponse = startReqResp.v3StartResponse().get();
```
```csharp .NET theme={"dark"}
var startReq = new V3StartRequest
{
FlowType = "desktop",
FinalTargetUrl = "https://prove.com",
PhoneNumber = "2001001686",
Ssn = "8370"
};
var rspStart = await _sdk.V3.V3StartRequestAsync(startReq);
```
The function returns the following fields:
* Auth Token: send this to your client-side code through the `Authenticate()` function - it's a short lived JSON Web Token (JWT) tied to the current flow and used for the possession checks.
* Correlation ID: save this in your current session, then pass it in to each of the `Validate()`, `Challenge()`, and `Complete()` function calls of the same flow. The correlation ID ties together different system calls for the same Prove flow. It can aids in troubleshooting. The session expires in 15 minutes from when the correlation ID returns from the `Start()` call.
* Next: map of the next API call you make.
Return the auth token in a response to the front end.
The phone number field is also required in Sandbox to determine which scenario you're testing. Neglecting to pass in the phone number of a valid test user returns a "no test user found matching the phone number" error.
## `Validate()`
Once the possession checks finish on the mobile device, the finish handler on the client-side SDK executes. You then make a request to your server such as `POST /verify` to make the next call in the flow to the `Validate()` function.
This function requires the Correlation ID: the ID returned by the `Start()` function.
```go Go theme={"dark"}
rspValidate, err := client.V3.V3ValidateRequest(ctx, &components.V3ValidateRequest{
CorrelationID: rspStart.V3StartResponse.CorrelationID,
})
if err != nil {
t.Fatal(err)
}
```
```typescript TypeScript theme={"dark"}
const rspValidate = await sdk.v3.v3ValidateRequest({
correlationId: rspStart.v3StartResponse?.correlationId || '',
});
```
```java Java theme={"dark"}
V3ValidateRequest validateReq = V3ValidateRequest.builder()
.correlationId(startResponse.correlationId())
.build();
V3ValidateRequestResponse validateReqResp = sdk.v3().v3ValidateRequest()
.request(validateReq)
.call();
V3ValidateResponse validateResp = validateReqResp.v3ValidateResponse().get();
```
```csharp .NET theme={"dark"}
var rspValidate = await _sdk.V3.V3ValidateRequestAsync(new V3ValidateRequest
{
CorrelationId = rspStart.V3StartResponse?.CorrelationId
});
```
The function returns the following fields:
* Success: either `true` if the mobile number validation was successful, or `false` if it failed.
* Challenge Missing: when `true`, pass the challenge into the `Challenge()` function.
* Phone Number: either the validated phone number or no field.
* Next: map of the next API call.
The challenge missing field determines if you must return to the front end and request either the last four of their social security number or date of birth. If the challenge was already passed into the `Start()` call, the back end can then make a call to the `Challenge()` function and return the results to the front end.
## `Challenge()`
If the `Validate()` function returns `v3-challenge` as one of the keys in the `Next` field map, call the `Challenge()` function to return the customer information matching the mobile number and challenge. The `Challenge()` capability is available in Prove Pre-Fill. When using Prove Identity, if `Validate()` is successful, it returns `v3-complete` as one of the keys in the `Next` field map instead of `v3-challenge`.
This function takes has one required parameter:
* Correlation ID: the ID returned by the `Start()` function.
If the `Validate()` function returned `Challenge Missing=true`, send one of these parameters in the request:
* `ssn`: full or last four digits of the customer's social security number.
* `dob`: date of birth in one of these formats: `YYYY-MM-DD`, `YYYY-MM`, `MM-DD`.
```go Go theme={"dark"}
rspChallenge, err := client.V3.V3ChallengeRequest(ctx, &components.V3ChallengeRequest{
CorrelationID: rspStart.V3StartResponse.CorrelationID,
Ssn: provesdkservergo.String("565228370"),
})
if err != nil {
t.Fatal(err)
}
```
```typescript TypeScript theme={"dark"}
const rspChallenge = await sdk.v3.v3ChallengeRequest({
correlationId: rspStart.v3StartResponse?.correlationId || '',
ssn: '565228370',
});
```
```java Java theme={"dark"}
V3ChallengeRequest challengeReq = V3ChallengeRequest.builder()
.correlationId(startResponse.correlationId())
.ssn("565228370")
.build();
V3ChallengeRequestResponse challengeReqResp = sdk.v3().v3ChallengeRequest()
.request(challengeReq)
.call();
V3ChallengeResponse challengeResp = challengeReqResp.v3ChallengeResponse().get();
```
```csharp .NET theme={"dark"}
var rspChallenge = await _sdk.V3.V3ChallengeRequestAsync(new V3ChallengeRequest
{
CorrelationId = rspStart.V3StartResponse?.CorrelationId,
Ssn = "565228370"
});
```
The function returns the following fields:
* Success: `true` if customer info returned.
* Individual: customer information in a map.
* Next: map of the next API call.
If the `success=true`, return the customer information in a response to the front end to prefill the form.
## `Complete()`
Once the customer reviews their information and makes any edits, submit the customer information to the back end for verification.
This function is the final call in the flow that verifies the customer information.
This function takes these required parameters:
* Correlation ID: this is the ID returned by the `Start()` function. It validates against this regular expression: `^[0-9a-f]{8}-[0-9a-f]{4}-[0-9a-f]{4}-[0-9a-f]{4}-[0-9a-f]{12}$`.
* Individual: customer information in a map.
```go Go theme={"dark"}
rspComplete, err := client.V3.V3CompleteRequest(ctx, &components.V3CompleteRequest{
CorrelationID: rspStart.V3StartResponse.CorrelationID,
Individual: components.V3CompleteIndividualRequest{
FirstName: provesdkservergo.String("Tod"),
LastName: provesdkservergo.String("Weedall"),
Addresses: []components.V3CompleteAddressEntryRequest{
{
Address: provesdkservergo.String("39 South Trail"),
City: provesdkservergo.String("San Antonio"),
Region: provesdkservergo.String("TX"),
PostalCode: provesdkservergo.String("78285"),
},
},
Ssn: provesdkservergo.String("565228370"),
Dob: provesdkservergo.String("1984-12-10"),
EmailAddresses: []string{
"tweedalld@ehow.com",
},
},
})
if err != nil {
t.Fatal(err)
}
```
```typescript TypeScript theme={"dark"}
const rspComplete = await sdk.v3.v3CompleteRequest({
correlationId: rspStart.v3StartResponse?.correlationId || '',
individual: {
addresses: [
{
address: '39 South Trail',
city: 'San Antonio',
postalCode: '78285-2622',
region: 'TX',
},
],
dob: '1984-12-10',
emailAddresses: ['tweedalld@ehow.com'],
firstName: 'Tod',
lastName: 'Weedall',
ssn: '565228370',
},
});
```
```java Java theme={"dark"}
List addresses = new ArrayList<>(
Arrays.asList(V3CompleteAddressEntryRequest.builder().address("39 South Trail").city("San Antonio")
.postalCode("78285-2622").region("TX").build()));
V3CompleteRequest completeReq = V3CompleteRequest.builder()
.correlationId(startResponse.correlationId())
.individual(V3CompleteIndividualRequest.builder()
.ssn("565228370")
.firstName("Tod")
.lastName("Weedall")
.emailAddresses(new ArrayList<>(Arrays.asList("tweedalld@ehow.com")))
.dob("1984-12-10")
.addresses(addresses)
.build())
.build();
V3CompleteRequestResponse completeReqResp = sdk.v3().v3CompleteRequest()
.request(completeReq)
.call();
V3CompleteResponse completeResp = completeReqResp.v3CompleteResponse().get();
```
```csharp .NET theme={"dark"}
var rspComplete = await _sdk.V3.V3CompleteRequestAsync(new V3CompleteRequest
{
CorrelationId = rspStart.V3StartResponse?.CorrelationId,
Individual = new V3CompleteIndividualRequest
{
FirstName = rspChallenge.V3ChallengeResponse?.Individual?.FirstName,
LastName = rspChallenge.V3ChallengeResponse?.Individual?.LastName,
Ssn = rspChallenge.V3ChallengeResponse?.Individual?.Ssn,
Dob = rspChallenge.V3ChallengeResponse?.Individual?.Dob,
EmailAddresses = rspChallenge.V3ChallengeResponse?.Individual?.EmailAddresses,
Addresses = rspChallenge.V3ChallengeResponse?.Individual?.Addresses?.Select(addr => new V3CompleteAddressEntryRequest
{
Address = addr.Address,
City = addr.City,
Region = addr.Region,
PostalCode = addr.PostalCode
}).ToList()
}
});
```
The function returns the following fields:
* Success: `true` if customer information returned.
* Next: map of the next API call you need to make, in this case, `Done`.
You can then respond to the front end with the results of the customer verification.
SDK Updates
Prove hosts the server-side SDKs on [GitHub](https://github.com/prove-identity). Once you create a free GitHub account, you can Watch any of the projects to receive notifications.
# Start Flow
Source: https://developer.prove.com/reference/start-request
post /v3/start
This endpoint allows you to start the solution flow.
Use the following base URLs when integrating:
`https://platform.uat.proveapis.com` - North America Sandbox Environment
`https://platform.proveapis.com` - North America Production Environment
# Errors and Status Codes
Source: https://developer.prove.com/reference/status-and-error-codes
Discover the various error and status codes generated by Prove APIs
## API conventions
Prove Platform APIs follow consistent API conventions. The API responses follow these conventions:
* Optional fields that have no values aren't returned.
* JSON maps that have no values aren't returned.
* JSON arrays that have no values aren't returned.
## HTTP status codes
The following table has a list of the HTTP status codes returned by the Prove services:
| Code | Definition | Description |
| :--- | :-------------------- | :---------------------------------------------------------------------------------------------------------------------------------------------------------------------------------------------------------------------- |
| 200 | OK | The request completed successfully. |
| 400 | Bad Request | There was a problem with the submitted request. |
| 401 | Unauthorized | The request lacks valid authentication credentials for the target resource. Check for no missing chars or whitespace. Validate that you are calling the correct environment such as US or EU and Production or Sandbox. |
| 403 | Forbidden | The client doesn't have permission to access the target resource. |
| 404 | Not Found | The server didn't find anything matching the Request-URI. |
| 429 | Too Many Requests | The rate limit of 25 requests per second has been exceeded. Wait for the time specified in the `Retry-After` header before making additional requests. |
| 500 | Internal Server Error | The server encountered an unexpected condition preventing it from fulfilling the request. Retry the request, and if the problem persists, contact Prove support. |
## API error codes
When a Prove API encounters a request error, the JSON response object includes a `code` field and a `message` field to give further context.
This table has a list of the API error codes:
| Error Code | Description | Resolution Path |
| :--------- | :------------------------------ | :----------------------------------------------------------------------------------------------------------------------------------------------------------------------------------------------------------------------------------------------------------------------------------------------- |
| 8000 | Internal Error | The server encountered an unexpected condition preventing it from fulfilling the request. Retry the request, and if the problem persists, contact Prove support. |
| 8001 | Malformed Request | Ensure the request is valid JSON, is under 4 KB in size, and correct any invalid parameters. The API specifies invalid parameters and includes the reason in the `message` field. |
| 8002 | Unauthorized Request | The request lacks valid authentication credentials for the target resource. Ensure you used the correct credentials. |
| 8003 | Step Called Out of Order | The request called an endpoint out of order. Check the `next` field for the proper endpoint to call. |
| 8007 | Sandbox User Not Found | Only use test user information as input for requests unless otherwise specified in the test cases. |
| 8008 | Invalid Correlation ID | Check the Correlation ID for errors. The Correlation ID is unique per session. |
| 8009 | Sandbox Test User Access Denied | Your current product credentials can't access the test user. Ensure you're using test users with the matching Prove solution credentials. |
| 8010 | Unauthorized for Country | This can mean one of two things:
The Prove Welcome Solutions offer a tiered approach to verification, combining authentication with various verification methods to balance security and user experience. These methods include:
* [**Bot Detection:**](/docs/bot-detection-flow) This is a high-speed defense that analyzes phone number activity and behavior to differentiate between human users and malicious bots, preventing unnecessary downstream verification costs. It returns an [Assurance Level (AL)](/docs/assurance-levels) up to AL1.
* **Pre-Fill for Consumer/Business:** This bank-grade verification streamlines onboarding by automating data entry and enhancing security. It delivers field-level data matching for First Name, Last Name, Address, Date of Birth, and National ID, achieving an AL up to AL3 for high-risk actions like account opening or wire transfers.
* [**Account Opening:**](/docs/account-opening-flow) This comprehensive verification method returns identity information linked to an authenticated phone number.
The Global Fraud Policy (GFP) screens all these solutions through a consistent, globally deployed framework that continuously updates to protect against defined fraud vectors.
# Client-Side Android SDK
Source: https://developer.prove.com/reference/android-sdk
Learn how to integrate the client-side Android SDK into your native app
## Installation
The Android SDK is a set of lightweight libraries. The libraries deliver as Android Archive Repository, `.aar`, files. The minimum supported version of Android is v7, level 24.
Prove manages a maven repository with Android binaries to enable integration with Gradle.
Update the dependencies object in the `build.gradle` file:
```java Java theme={"dark"}
dependencies {
// Existing dependencies are here.
// Add the Prove Link dependencies:
implementation 'com.prove.sdk:proveauth:6.9.0'
}
```
Point to the repository by updating your `settings.gradle` file with the Maven repository:
```java Java theme={"dark"}
dependencyResolutionManagement {
// Existing repository settings are here.
repositories {
// Existing repositories are here.
// Add the Prove Link Maven repository:
maven {
url = "https://prove.jfrog.io/artifactory/libs-public-maven/"
}
}
}
```
The following needs added to the `build.gradle` file to also download dependency libraries:
```java Java theme={"dark"}
dependencies {
implementation fileTree('libs')
}
```
If you receive an error message on the `application@fullBackupContent` value, you can resolve it by adding this line of code to your application `AndroidManifest.xml` file inside the `...` node. Add it as an attribute to the opening `application` tag:
```xml XML theme={"dark"}
```
## Permissions
The Prove Auth SDK and its children SDKs merge the following permissions into the main app:
```xml XML theme={"dark"}
```
## Send the type of flow: mobile
Unlike the Web SDK, when using the Android SDK, use the mobile flow. Pass `mobile` to the `Start()` function on the server. In a mobile flow, Mobile Auth℠ executes first and if that fails, performs OTP validation on the mobile phone.
In the mobile flow, once either Mobile Auth or the OTP validation is complete, the AuthFinishStep function executes.
Mobile Auth
Mobile Auth requires the customer to disable any VPN.
## Authenticate()
The SDK requires an `authToken` as a parameter for the `Authenticate()` function. This token returns from the `Start()` call of the server SDK. The token is session specific, limiting it to a single flow. It also expires after 15 minutes.
## Retrieve `authToken`
Send a request to your backend server with the phone number, flow type, and an optional challenge of either the date of birth or social security number.
```java Java theme={"dark"}
String initialize(String phoneNumber, String ssn, String flowType) {
YourBackendClient backend = new YourBackendClient(); // Backend API client
// TODO: Build your InitializeRequest object
InitializeRequest initializeRequest = new InitializeRequest(phoneNumber, ssn, flowType);
// Send an initialize request to your backend server to get authToken
InitializeResponse response = backend.initialize(initializeRequest);
// TODO: define your own InitializeResponse object to parse authToken string
return response.getAuthToken();
}
```
## Setup authenticator
Once you have the `authToken`, build the authenticator for the mobile flow.
```java Java theme={"dark"}
// Object implementing AuthFinishStep interface
AuthFinishStep authFinishStep = new AuthFinishStep() {
...
};
// Objects implementing OtpStartStep/OtpFinishStep interfaces
OtpStartStep otpStartStep = new OtpStartStep() {
...
};
OtpFinishStep otpFinishStep = new OtpFinishStep() {
...
};
ProveAuth proveAuth = ProveAuth.builder()
.withAuthFinishStep(authId -> verify(authId)) // verify(authId) call defined in #Validate the Mobile Phone section
.withOtpFallback(otpStartStep, otpFinishStep)
.withContext(this)
.build();
```
The mobile data connection can sometimes be unavailable during testing. The `Builder` class offers a `withTestMode(boolean testMode)` method, which permits simulated successful session results while connected to a Wi-Fi network only. Testing using a Wi-Fi connection is useful in the Sandbox environment.
```java Java theme={"dark"}
ProveAuth proveAuth = ProveAuth.builder()
.withAuthFinishStep(authId -> verify(authId))
.withOtpFallback(otpStartStep, otpFinishStep)
.withContext(this)
.withTestMode(true) // Test mode flag
.build();
```
## Performing the authentication
The `ProveAuth` object is thread safe. You can use it as a singleton. Most Prove Auth methods are blocking and therefore can't execute in the main app thread. The app employs an executor service with a minimum of two threads to manage threads due to the ability to process concurrent blocking requests.
```java Java theme={"dark"}
public class MyAuthenticator {
private final MyBackendClient backend = new MyBackendClient(); // Backend API client
private ExecutorService executor = Executors.newCachedThreadPool();
private final AuthFinishStep authFinishStep = new AuthFinishStep() {
@Override
void execute(String authId) {
try {
AuthFinishResponse response = backend.authFinish("My App", authId);
... // Check the authentication status returned in the response
} catch (IOException e) {
String failureCause = e.getCause() != null ? e.getCause().getMessage() : "Failed to request authentication results";
// Authentication failed due to request failure
}
}
};
private ProveAuth proveAuth;
public MyAuthenticator(Context context) {
proveAuth = ProveAuth.builder()
.withAuthFinishStep(authFinishStep)
.withOtpFallback(otpStartStep, otpFinishStep)
.withContext(context)
.build();
}
public void authenticate() throws IOException, ProveAuthException {
AuthStartResponse response = backend.authStart("My Prove Auth App");
proveAuth.authenticate(response.getAuthToken());
}
}
public void authenticate() throws IOException, ProveAuthException {
// NOTE: blocking method proveAuth.authenticate() should be run in background thread
executor.submit(() -> {
AuthStartResponse response = backend.authStart("My Prove Auth App");
proveAuth.authenticate(response.getAuthToken());
}
}
```
## Validate the mobile phone
In the AuthFinishStep, specify a function to call once the possession checks are complete on the mobile phone. This endpoint on your back end server calls the `Validate()` function to check phone number validation. If it was successful, the server returns the results from the `Challenge()` function, including customer information.
```java Java theme={"dark"}
// Send a verify request to get return customer information.
void verify(String: authId) {
YourBackendClient backend = new YourBackendClient(); // Backend API client
// Build your VerifyRequest object
VerifyRequest verifyRequest = new VerifyRequest(authId, ...);
// Send a verify request to your backend server to get return customer information.
VerifyResponse response = backend.verify(verifyRequest);
// TODO: define your VerifyResponse object to parse customer information from the response
String firstName = response.getFirstName();
String lastName = response.getLastName();
// Pre-fill customer information to your Android App UI, for example:
firstNameEditText.setText(firstName);
lastNameEditText.setText(lastName);
}
```
## Configure OTP
To use the Resend/Retry/Phone Change features, you need to install the Android SDK version 6.5.0 or later.
To set the One-Time Password (OTP) handler, `withOtpFallback(otpStart: otpStartStep, otpFinish: otpFinishStep)`, requires implementing the `OtpStartStep` and `OtpFinishStep`.
The OTP session has a two minute timeout from when it's sent through SMS to when the customer can enter in the OTP.
Follow these instructions if you are implementing OTP and you are passing in the phone number on the `/v3/start` endpoint. In this case, you've already prompted for a phone number so you don't need to prompt for it in the client SDK.
Since you passed the phone number in the `Start()` function, call `OtpStartStepCallback.onSuccess(OtpStartInput);` to communicate to the SDK you have the customer's agreement to deliver the SMS message. Ensure you return an instance of `OtpStartInput` with empty string or `null` to `OtpStartStepCallback.onSuccess()` function.
```java Java theme={"dark"}
import com.prove.sdk.proveauth.OtpStartInput;
import com.prove.sdk.proveauth.OtpStartStep;
import com.prove.sdk.proveauth.OtpStartStepCallback;
import com.prove.sdk.proveauth.ProveAuthException;
public class NoPromptStart implements OtpStartStep {
@Override
public void execute(boolean phoneNumberNeeded, ProveAuthException otpException,
OtpStartStepCallback callback) {
// No phone number needed, no need to ask end user for input.
callback.onSuccess(new OtpStartInput(""));
}
}
```
Call the `OtpStartStepCallback.onError();` method to communicate to the SDK any issues while trying to obtain the phone number or the OTP. Report an error if the customer cancels the SMS transaction or presses the back button to leave the screen.
In the finish step, call the `OtpFinishStepCallback.onSuccess(OtpFinishInput);` method to return the collected OTP value wrapped in `OtpFinishInput`.
```java Java theme={"dark"}
import com.prove.sdk.proveauth.OtpFinishInput;
import com.prove.sdk.proveauth.OtpFinishStep;
import com.prove.sdk.proveauth.OtpFinishStepCallback;
import com.prove.sdk.proveauth.OtpValidationException;
import com.prove.sdk.proveauth.ProveAuthException;
public class NoPromptFinish implements OtpFinishStep {
@Override
public void execute(@Nullable ProveAuthException otpException,
OtpFinishStepCallback otpFinishStepCallback) {
// If error message is found, handle it.
if (otpException instanceof OtpValidationException) {
// Set to a variable and display it in a field.
// In this example, we don't do anything with the error.
String errorMsg = otpException.getMessage();
}
try {
// Prompt the user for OTP delivered by SMS. You can build UI to provide
// best UX based on your application and business logic, here we simplify to a
// generic function named promptForOtpCode which gives us the OTP code.
String otpCode = promptForOtpCode();
otpFinishStepCallback.onSuccess(new OtpFinishInput(otpCode));
} catch (Exception e) {
// if any issue with the OTP collection from the end user or the user wants to cancel
// then call onError to exit the flow. In this example we simplify it as catching
// an exception.
otpFinishStepCallback.onError();
}
}
}
```
Follow these instructions if implementing MobileAuth and collecting the phone number only if MobileAuth fails. This will implement OTP without allowing for SMS resends and phone number changes. If you do want those capabilities, please reference the subsequent tabs (Resend, Retry OTP, and Phone Number Change).
In the start step, call the `OtpStartStepCallback.onSuccess(OtpStartInput);` method to return the collected phone number to the SDK.
```java Java theme={"dark"}
import com.prove.sdk.proveauth.OtpStartInput;
import com.prove.sdk.proveauth.OtpStartStep;
import com.prove.sdk.proveauth.OtpStartStepCallback;
import com.prove.sdk.proveauth.PhoneNumberValidationException;
import com.prove.sdk.proveauth.ProveAuthException;
public class PromptStart implements OtpStartStep {
@Override
public void execute(boolean phoneNumberNeeded, @Nullable ProveAuthException otpException,
OtpStartStepCallback callback) {
// If phone number is needed, need to ask the end user for phone number input.
if (phoneNumberNeeded) {
// If error message is found around phone number, handle it.
// The `PhoneNumberValidationException` is ONLY available when `phoneNumberNeeded`
// has a value.
if (otpException instanceof PhoneNumberValidationException) {
// Set to a variable and display it in a field.
// In this example, we don't do anything with the error.
String errorMsg = otpException.getMessage();
}
try {
// Prompt the user for phone number to receive OTP SMS. You can build UI to provide
// best UX based on your application and business logic, here we simplify to a
// generic function named promptForPhoneNumber which gives us the collected
// phone number.
String phoneNumber = promptForPhoneNumber();
callback.onSuccess(new OtpStartInput(phoneNumber));
} catch (Exception e) {
// if any issue with the phone number collection from the end user or the user
// wants to cancel then call onError to exit the flow.
// In this example we simplify it as catching an exception.
callback.onError();
}
} else {
// No phone number needed, no need to ask end user for input.
callback.onSuccess(new OtpStartInput(""));
}
}
}
```
The finish step is implemented the same as the previous tab:
```java Java theme={"dark"}
import com.prove.sdk.proveauth.OtpFinishInput;
import com.prove.sdk.proveauth.OtpFinishStep;
import com.prove.sdk.proveauth.OtpFinishStepCallback;
import com.prove.sdk.proveauth.OtpValidationException;
import com.prove.sdk.proveauth.ProveAuthException;
public class NoPromptFinish implements OtpFinishStep {
@Override
public void execute(@Nullable ProveAuthException otpException,
OtpFinishStepCallback otpFinishStepCallback) {
// If error message is found, handle it.
if (otpException instanceof OtpValidationException) {
// Set to a variable and display it in a field.
// In this example, we don't do anything with the error.
String errorMsg = otpException.getMessage();
}
try {
// Prompt the user for OTP delivered by SMS. You can build UI to provide
// best UX based on your application and business logic, here we simplify to a
// generic function named promptForOtpCode which gives us the OTP code.
String otpCode = promptForOtpCode();
otpFinishStepCallback.onSuccess(new OtpFinishInput(otpCode));
} catch (Exception e) {
// if any issue with the OTP collection from the end user or the user wants to cancel
// then call onError to exit the flow. In this example we simplify it as catching
// an exception.
otpFinishStepCallback.onError();
}
}
}
```
Follow these instructions to allow the customer to request a new OTP via SMS using the same phone number. There is a max of three send attempts including the initial message.
The start step is implemented the same as the previous tab:
```java Java theme={"dark"}
import com.prove.sdk.proveauth.OtpStartInput;
import com.prove.sdk.proveauth.OtpStartStep;
import com.prove.sdk.proveauth.OtpStartStepCallback;
import com.prove.sdk.proveauth.PhoneNumberValidationException;
import com.prove.sdk.proveauth.ProveAuthException;
public class PromptStart implements OtpStartStep {
@Override
public void execute(boolean phoneNumberNeeded, @Nullable ProveAuthException otpException,
OtpStartStepCallback callback) {
// If phone number is needed, need to ask the end user for phone number input.
if (phoneNumberNeeded) {
// If error message is found around phone number, handle it.
// The `PhoneNumberValidationException` is ONLY available when `phoneNumberNeeded`
// has a value.
if (otpException instanceof PhoneNumberValidationException) {
// Set to a variable and display it in a field.
// In this example, we don't do anything with the error.
String errorMsg = otpException.getMessage();
}
try {
// Prompt the user for phone number to receive OTP SMS. You can build UI to provide
// best UX based on your application and business logic, here we simplify to a
// generic function named promptForPhoneNumber which gives us the collected
// phone number.
String phoneNumber = promptForPhoneNumber();
callback.onSuccess(new OtpStartInput(phoneNumber));
} catch (Exception e) {
// if any issue with the phone number collection from the end user or the user
// wants to cancel then call onError to exit the flow.
// In this example we simplify it as catching an exception.
callback.onError();
}
} else {
// No phone number needed, no need to ask end user for input.
callback.onSuccess(new OtpStartInput(""));
}
}
}
```
You can then send a new OTP SMS to the same phone number by implementing the finish step like this:
```java Java theme={"dark"}
import com.prove.sdk.proveauth.OtpFinishInput;
import com.prove.sdk.proveauth.OtpFinishStep;
import com.prove.sdk.proveauth.OtpFinishStepCallback;
import com.prove.sdk.proveauth.OtpValidationException;
import com.prove.sdk.proveauth.ProveAuthException;
public class MultipleResendFinish implements OtpFinishStep {
@Override
public void execute(@Nullable ProveAuthException otpException,
OtpFinishStepCallback otpFinishStepCallback) {
// If error message is found, handle it.
if (otpException instanceof OtpValidationException) {
// Set to a variable and display it in a field.
// In this example, we don't do anything with the error.
String errorMsg = otpException.getMessage();
}
// Prompt the user for whether they received the SMS.
if (promptForResend("Didn't receive the SMS OTP? Click resend button for a new one!")) {
// If the end user wants to send again to the same phone number call onOtpResend().
otpFinishStepCallback.onOtpResend();
return;
}
try {
// Prompt the user for OTP delivered by SMS. You can build UI to provide
// best UX based on your application and business logic, here we simplify to a
// generic function named promptForOtpCode which gives us the OTP code.
String otpCode = promptForOtpCode();
otpFinishStepCallback.onSuccess(new OtpFinishInput(otpCode));
} catch (Exception e) {
// if any issue with the OTP collection from the end user or the user wants to cancel
// then call onError to exit the flow. In this example we simplify it as catching
// an exception.
otpFinishStepCallback.onError();
}
}
}
```
Follow these instructions to allow the customer to re-enter the OTP PIN if they type it wrong. There is a max of 3 attempts. To implement this functionality, you also need to pass in `allowOTPRetry=true` to the `/v3/start` endpoint.
The start step is implemented the same as either of the the previous tabs - no client side code changes necessary:
```java Java theme={"dark"}
import com.prove.sdk.proveauth.OtpStartInput;
import com.prove.sdk.proveauth.OtpStartStep;
import com.prove.sdk.proveauth.OtpStartStepCallback;
import com.prove.sdk.proveauth.PhoneNumberValidationException;
import com.prove.sdk.proveauth.ProveAuthException;
public class PromptStart implements OtpStartStep {
@Override
public void execute(boolean phoneNumberNeeded, @Nullable ProveAuthException otpException,
OtpStartStepCallback callback) {
// If phone number is needed, need to ask the end user for phone number input.
if (phoneNumberNeeded) {
// If error message is found around phone number, handle it.
// The `PhoneNumberValidationException` is ONLY available when `phoneNumberNeeded`
// has a value.
if (otpException instanceof PhoneNumberValidationException) {
// Set to a variable and display it in a field.
// In this example, we don't do anything with the error.
String errorMsg = otpException.getMessage();
}
try {
// Prompt the user for phone number to receive OTP SMS. You can build UI to provide
// best UX based on your application and business logic, here we simplify to a
// generic function named promptForPhoneNumber which gives us the collected
// phone number.
String phoneNumber = promptForPhoneNumber();
callback.onSuccess(new OtpStartInput(phoneNumber));
} catch (Exception e) {
// if any issue with the phone number collection from the end user or the user
// wants to cancel then call onError to exit the flow.
// In this example we simplify it as catching an exception.
callback.onError();
}
} else {
// No phone number needed, no need to ask end user for input.
callback.onSuccess(new OtpStartInput(""));
}
}
}
```
The finish step is implemented the same as either of the the previous tabs - no client side code changes necessary. If the OTP is invalid, the finish step will be called again to prompt the user for a new input. Once the max attempts is reached, the `AuthFinish` function will be called.
```java Java theme={"dark"}
import com.prove.sdk.proveauth.OtpFinishInput;
import com.prove.sdk.proveauth.OtpFinishStep;
import com.prove.sdk.proveauth.OtpFinishStepCallback;
import com.prove.sdk.proveauth.OtpValidationException;
import com.prove.sdk.proveauth.ProveAuthException;
public class NoPromptFinish implements OtpFinishStep {
@Override
public void execute(@Nullable ProveAuthException otpException,
OtpFinishStepCallback otpFinishStepCallback) {
// If error message is found, handle it.
if (otpException instanceof OtpValidationException) {
// Set to a variable and display it in a field.
// In this example, we don't do anything with the error.
String errorMsg = otpException.getMessage();
}
try {
// Prompt the user for OTP delivered by SMS. You can build UI to provide
// best UX based on your application and business logic, here we simplify to a
// generic function named promptForOtpCode which gives us the OTP code.
String otpCode = promptForOtpCode();
otpFinishStepCallback.onSuccess(new OtpFinishInput(otpCode));
} catch (Exception e) {
// if any issue with the OTP collection from the end user or the user wants to cancel
// then call onError to exit the flow. In this example we simplify it as catching
// an exception.
otpFinishStepCallback.onError();
}
}
}
```
Follow these instructions to allow the customer to re-enter their phone number. There is a max of three entries/send attempts.
Manual Request Required
To enable phone number change capabilities on your credentials, contact your Prove representative.
The start step is implemented the same as the previous tab:
```java Java theme={"dark"}
import com.prove.sdk.proveauth.OtpStartInput;
import com.prove.sdk.proveauth.OtpStartStep;
import com.prove.sdk.proveauth.OtpStartStepCallback;
import com.prove.sdk.proveauth.PhoneNumberValidationException;
import com.prove.sdk.proveauth.ProveAuthException;
public class PromptStart implements OtpStartStep {
@Override
public void execute(boolean phoneNumberNeeded, @Nullable ProveAuthException otpException,
OtpStartStepCallback callback) {
// If phone number is needed, need to ask the end user for phone number input.
if (phoneNumberNeeded) {
// If error message is found around phone number, handle it.
// The `PhoneNumberValidationException` is ONLY available when `phoneNumberNeeded`
// has a value.
if (otpException instanceof PhoneNumberValidationException) {
// Set to a variable and display it in a field.
// In this example, we don't do anything with the error.
String errorMsg = otpException.getMessage();
}
try {
// Prompt the user for phone number to receive OTP SMS. You can build UI to provide
// best UX based on your application and business logic, here we simplify to a
// generic function named promptForPhoneNumber which gives us the collected
// phone number.
String phoneNumber = promptForPhoneNumber();
callback.onSuccess(new OtpStartInput(phoneNumber));
} catch (Exception e) {
// if any issue with the phone number collection from the end user or the user
// wants to cancel then call onError to exit the flow.
// In this example we simplify it as catching an exception.
callback.onError();
}
} else {
// No phone number needed, no need to ask end user for input.
callback.onSuccess(new OtpStartInput(""));
}
}
}
```
You can prompt for a new phone number by implementing the finish step like this:
```java Java theme={"dark"}
import com.prove.sdk.proveauth.OtpFinishInput;
import com.prove.sdk.proveauth.OtpFinishStep;
import com.prove.sdk.proveauth.OtpFinishStepCallback;
import com.prove.sdk.proveauth.OtpValidationException;
import com.prove.sdk.proveauth.ProveAuthException;
public class PhoneChangeFinish implements OtpFinishStep {
@Override
public void execute(@Nullable ProveAuthException otpException,
OtpFinishStepCallback otpFinishStepCallback) {
// If error message is found, handle it.
if (otpException instanceof OtpValidationException) {
// Set to a variable and display it in a field.
// In this example, we don't do anything with the error.
String errorMsg = otpException.getMessage();
}
// Prompt the user for whether they received the SMS.
if (promptForPhoneNumberChange("Didn't receive the SMS OTP? Try a different phone number.")) {
// If the end user wants to correct the phone number already in use, or changing to a
// different phone number to receive the future SMS OTP, call onMobileNumberChange(), and
// the otpStartStep will re-prompt for phone number input from the end user.
otpFinishStepCallback.onMobileNumberChange();
return;
}
try {
// Prompt the user for OTP delivered by SMS. You can build UI to provide
// best UX based on your application and business logic, here we simplify to a
// generic function named promptForOtpCode which gives us the OTP code.
String otpCode = promptForOtpCode();
otpFinishStepCallback.onSuccess(new OtpFinishInput(otpCode));
} catch (Exception e) {
// if any issue with the OTP collection from the end user or the user wants to cancel
// then call onError to exit the flow. In this example we simplify it as catching
// an exception.
otpFinishStepCallback.onError();
}
}
}
```
## Verify the Customer Information
Once the customer has made any edits to their pre-fill information, you should submit that information to the backend server so the `Complete()` call can then verify the customer information.
```java Java theme={"dark"}
// Send request to the backend to verify customer information.
SendInfoResponse sendInfo(String firstName, String lastName) {
YourBackendClient backend = new YourBackendClient(); // Backend API client
// TODO: Build your SendInfoRequest object
SendInfoRequest sendInfoRequest = new SendInfoRequest(firstName, lastName, ...);
// Send a sendInfoRequest to your backend server to get return customer information.
SendInfoResponse response = backend.verify(sendInfoRequest);
// TODO: define your own SendInfoResponse object to parse the response
return response;
}
```
# Access API Keys
Source: https://developer.prove.com/reference/authentication
Follow these steps to find your API keys to gain access to Prove's endpoints
## Retrieve your API keys
Gain access to Prove endpoints using an OAuth 2.0 bearer token. To generate a bearer token for the Sandbox environment, follow these steps:
Login to the [Developer Portal](https://portal.prove.com/en/login).
Navigate to Projects from the side bar.
Create a new project, then select the appropriate solution, give your project a name, and then select Create Project.
Select your project and navigate to the Credentials tab to access your credentials.
Use the following example cURL request for the /token endpoint to generate a bearer token. Replace the placeholders with your actual credentials.
If you are testing Prove's APIs outside of North America, make sure to:
* use the EU token endpoint, `https://platform.uat.eu.proveapis.com/token`
* use the credentials listed for the International region
```bash Request Bearer Token (US) theme={"dark"}
curl -X POST https://platform.uat.proveapis.com/token \
-H "Content-Type: application/x-www-form-urlencoded" \
-d "grant_type=client_credentials&client_id=YOUR_CLIENT_ID&client_secret=YOUR_CLIENT_SECRET"
```
```bash Request Bearer Token (EU) theme={"dark"}
curl -X POST https://platform.uat.eu.proveapis.com/token \
-H "Content-Type: application/x-www-form-urlencoded" \
-d "grant_type=client_credentials&client_id=YOUR_CLIENT_ID&client_secret=YOUR_CLIENT_SECRET"
```
```json Response theme={"dark"}
{
"access_token": "eyJ...",
"refresh_token": "eyJ...",
"refresh_expires_in": 3600,
"token_type": "Bearer",
"expires_in": 3600
}
```
Use the bearer token in the Authorization header of your requests, replacing the placeholder with your bearer token:
```bash Example Request focus={2} theme={"dark"}
curl -X POST https://platform.uat.proveapis.com/v3/start \
-H 'Authorization: Bearer YOUR_BEARER_TOKEN' \
-H 'Content-Type: application/json' \
-d "phoneNumber=2001001695&flowType=mobile"
```
Prefer Postman? Check out [Prove's API collection](https://www.postman.com/prove-eng/prove-link-api-testing/collection/93r30p4/prove-api) to try out different endpoints with preconfigured test data.
## Best practices for managing API keys
Secret API keys are a form of account credentials, like a username and password. If bad actors obtain a secret key, they can use it to harm your business.
Prove users own the responsibility of keeping secret API keys safe. Here are some best practices for how to do that.
### Protect against compromised secret API keys
Take the following actions to protect against compromised secret keys:
* **Use secure key management systems (KMS) to store secret keys:** When you create a live production secret key, immediately copy the key to a KMS, which handles sensitive information with encryption and access controls. Make sure you don’t leave a copy of the key in a local file.
* **Grant access only to those who need it:** Define a clear policy about which users have permission to create, update, or read keys. Limit the access only to those who need it. Audit the access periodically to avoid excess privilege on keys.
* **Don’t share secret keys insecurely:** Don’t share keys in emails, chat messages, or customer support messages.
* **Don’t store keys in source code repositories, such as GitHub:** Fraudulent actors might scan public source repositories for API keys. Even if the source repository is private, team members might share it from their development environments.
* **Don’t embed secret keys in applications:** Fraudulent actors can exploit secret keys by matching a certain string pattern. Avoid embedding keys in applications such as client tools, SDKs, and mobile apps.
* **Audit API request logs to check suspicious activities:** We recommend that you audit or check API request logs to proactively identify misused API keys. Make sure your developers aren’t using Production keys when a Sandbox key is appropriate.
* **Regular training and updating documentation.** Keep up-to-date documentation about how to handle secret API keys within your organization and host regular training sessions to ensure your team follows best practices.
# Submit Challenge
Source: https://developer.prove.com/reference/challenge-request
post /v3/challenge
This endpoint allows you to submit challenge information.
Use the following base URLs when integrating:
`https://platform.uat.proveapis.com` - North America Sandbox Environment
`https://platform.proveapis.com` - North America Production Environment
# Complete Flow
Source: https://developer.prove.com/reference/complete-request
post /v3/complete
This endpoint allows you to verify the user and complete the flow.
Use the following base URLs when integrating:
`https://platform.uat.proveapis.com` - North America Sandbox Environment
`https://platform.proveapis.com` - North America Production Environment
When implementing the KYC add-on, you need to pass in first name, last name, DOB, and SSN (or address) to ensure you receive back the KYC and CIP fields.
# Client-Side Android SDK
Source: https://developer.prove.com/reference/identity-android-sdk
Learn how to integrate the client-side Android SDK into your native app
## Installation
The Android SDK is a set of lightweight libraries. The libraries deliver as Android Archive Repository, `.aar`, files. The minimum supported version of Android is v7, level 24.
Prove manages a maven repository with Android binaries to enable integration with Gradle.
Update the dependencies object in the `build.gradle` file:
```java Java theme={"dark"}
dependencies {
// Existing dependencies are here.
// Add the Prove Link dependencies:
implementation 'com.prove.sdk:proveauth:6.9.0'
}
```
Point to the repository by updating your `settings.gradle` file with the Maven repository:
```java Java theme={"dark"}
dependencyResolutionManagement {
// Existing repository settings are here.
repositories {
// Existing repositories are here.
// Add the Prove Link Maven repository:
maven {
url = "https://prove.jfrog.io/artifactory/libs-public-maven/"
}
}
}
```
The following needs added to the `build.gradle` file to also download dependency libraries:
```java Java theme={"dark"}
dependencies {
implementation fileTree('libs')
}
```
If you receive an error message on the `application@fullBackupContent` value, you can resolve it by adding this line of code to your application `AndroidManifest.xml` file inside the `...` node. Add it as an attribute to the opening `application` tag:
```xml XML theme={"dark"}
```
## Permissions
The Prove Auth SDK and its children SDKs merge the following permissions into the main app:
```xml XML theme={"dark"}
```
## Send the type of flow: mobile
Unlike the Web SDK, when using the Android SDK, use the mobile flow. Pass `mobile` to the `Start()` function on the server. In a mobile flow, Mobile Auth℠ executes first and if that fails, performs OTP validation on the mobile phone.
In the mobile flow, once either Mobile Auth or the OTP validation is complete, the AuthFinishStep function executes.
Mobile Auth
Mobile Auth requires the customer to disable any VPN.
## Authenticate()
The SDK requires an `authToken` as a parameter for the `Authenticate()` function. This token returns from the `Start()` call of the server SDK. The token is session specific, limiting it to a single flow. It also expires after 15 minutes.
## Retrieve `authToken`
Send a request to your backend server with the phone number, flow type, and an optional challenge of either the date of birth or social security number.
```java Java theme={"dark"}
String initialize(String phoneNumber, String ssn, String flowType) {
YourBackendClient backend = new YourBackendClient(); // Backend API client
// TODO: Build your InitializeRequest object
InitializeRequest initializeRequest = new InitializeRequest(phoneNumber, ssn, flowType);
// Send an initialize request to your backend server to get authToken
InitializeResponse response = backend.initialize(initializeRequest);
// TODO: define your own InitializeResponse object to parse authToken string
return response.getAuthToken();
}
```
## Setup authenticator
Once you have the `authToken`, build the authenticator for the mobile flow.
```java Java theme={"dark"}
// Object implementing AuthFinishStep interface
AuthFinishStep authFinishStep = new AuthFinishStep() {
...
};
// Objects implementing OtpStartStep/OtpFinishStep interfaces
OtpStartStep otpStartStep = new OtpStartStep() {
...
};
OtpFinishStep otpFinishStep = new OtpFinishStep() {
...
};
ProveAuth proveAuth = ProveAuth.builder()
.withAuthFinishStep(authId -> verify(authId)) // verify(authId) call defined in #Validate the Mobile Phone section
.withOtpFallback(otpStartStep, otpFinishStep)
.withContext(this)
.build();
```
The mobile data connection can sometimes be unavailable during testing. The `Builder` class offers a `withTestMode(boolean testMode)` method, which permits simulated successful session results while connected to a Wi-Fi network only. Testing using a Wi-Fi connection is useful in the Sandbox environment.
```java Java theme={"dark"}
ProveAuth proveAuth = ProveAuth.builder()
.withAuthFinishStep(authId -> verify(authId))
.withOtpFallback(otpStartStep, otpFinishStep)
.withContext(this)
.withTestMode(true) // Test mode flag
.build();
```
## Performing the authentication
The `ProveAuth` object is thread safe. You can use it as a singleton. Most Prove Auth methods are blocking and therefore can't execute in the main app thread. The app employs an executor service with a minimum of two threads to manage threads due to the ability to process concurrent blocking requests.
```java Java theme={"dark"}
public class MyAuthenticator {
private final MyBackendClient backend = new MyBackendClient(); // Backend API client
private ExecutorService executor = Executors.newCachedThreadPool();
private final AuthFinishStep authFinishStep = new AuthFinishStep() {
@Override
void execute(String authId) {
try {
AuthFinishResponse response = backend.authFinish("My App", authId);
... // Check the authentication status returned in the response
} catch (IOException e) {
String failureCause = e.getCause() != null ? e.getCause().getMessage() : "Failed to request authentication results";
// Authentication failed due to request failure
}
}
};
private ProveAuth proveAuth;
public MyAuthenticator(Context context) {
proveAuth = ProveAuth.builder()
.withAuthFinishStep(authFinishStep)
.withOtpFallback(otpStartStep, otpFinishStep)
.withContext(context)
.build();
}
public void authenticate() throws IOException, ProveAuthException {
AuthStartResponse response = backend.authStart("My Prove Auth App");
proveAuth.authenticate(response.getAuthToken());
}
}
public void authenticate() throws IOException, ProveAuthException {
// NOTE: blocking method proveAuth.authenticate() should be run in background thread
executor.submit(() -> {
AuthStartResponse response = backend.authStart("My Prove Auth App");
proveAuth.authenticate(response.getAuthToken());
}
}
```
## Validate the mobile phone
In the AuthFinishStep, specify a function to call once the possession checks are complete on the mobile phone. This endpoint on your back end server calls the `Validate()` function to check phone number validation. If it was successful, the server returns the results from the `Challenge()` function, including customer information.
```java Java theme={"dark"}
// Send a verify request to get return customer information.
void verify(String: authId) {
YourBackendClient backend = new YourBackendClient(); // Backend API client
// Build your VerifyRequest object
VerifyRequest verifyRequest = new VerifyRequest(authId, ...);
// Send a verify request to your backend server to get return customer information.
VerifyResponse response = backend.verify(verifyRequest);
// TODO: define your VerifyResponse object to parse customer information from the response
String firstName = response.getFirstName();
String lastName = response.getLastName();
// Pre-fill customer information to your Android App UI, for example:
firstNameEditText.setText(firstName);
lastNameEditText.setText(lastName);
}
```
## Configure OTP
To use the Resend/Retry/Phone Change features, you need to install the Android SDK version 6.5.0 or later.
To set the One-Time Password (OTP) handler, `withOtpFallback(otpStart: otpStartStep, otpFinish: otpFinishStep)`, requires implementing the `OtpStartStep` and `OtpFinishStep`.
The OTP session has a two minute timeout from when it's sent through SMS to when the customer can enter in the OTP.
Follow these instructions if you are implementing OTP and you are passing in the phone number on the `/v3/start` endpoint. In this case, you've already prompted for a phone number so you don't need to prompt for it in the client SDK.
Since you passed the phone number in the `Start()` function, call `OtpStartStepCallback.onSuccess(OtpStartInput);` to communicate to the SDK you have the customer's agreement to deliver the SMS message. Ensure you return an instance of `OtpStartInput` with empty string or `null` to `OtpStartStepCallback.onSuccess()` function.
```java Java theme={"dark"}
import com.prove.sdk.proveauth.OtpStartInput;
import com.prove.sdk.proveauth.OtpStartStep;
import com.prove.sdk.proveauth.OtpStartStepCallback;
import com.prove.sdk.proveauth.ProveAuthException;
public class NoPromptStart implements OtpStartStep {
@Override
public void execute(boolean phoneNumberNeeded, ProveAuthException otpException,
OtpStartStepCallback callback) {
// No phone number needed, no need to ask end user for input.
callback.onSuccess(new OtpStartInput(""));
}
}
```
Call the `OtpStartStepCallback.onError();` method to communicate to the SDK any issues while trying to obtain the phone number or the OTP. Report an error if the customer cancels the SMS transaction or presses the back button to leave the screen.
In the finish step, call the `OtpFinishStepCallback.onSuccess(OtpFinishInput);` method to return the collected OTP value wrapped in `OtpFinishInput`.
```java Java theme={"dark"}
import com.prove.sdk.proveauth.OtpFinishInput;
import com.prove.sdk.proveauth.OtpFinishStep;
import com.prove.sdk.proveauth.OtpFinishStepCallback;
import com.prove.sdk.proveauth.OtpValidationException;
import com.prove.sdk.proveauth.ProveAuthException;
public class NoPromptFinish implements OtpFinishStep {
@Override
public void execute(@Nullable ProveAuthException otpException,
OtpFinishStepCallback otpFinishStepCallback) {
// If error message is found, handle it.
if (otpException instanceof OtpValidationException) {
// Set to a variable and display it in a field.
// In this example, we don't do anything with the error.
String errorMsg = otpException.getMessage();
}
try {
// Prompt the user for OTP delivered by SMS. You can build UI to provide
// best UX based on your application and business logic, here we simplify to a
// generic function named promptForOtpCode which gives us the OTP code.
String otpCode = promptForOtpCode();
otpFinishStepCallback.onSuccess(new OtpFinishInput(otpCode));
} catch (Exception e) {
// if any issue with the OTP collection from the end user or the user wants to cancel
// then call onError to exit the flow. In this example we simplify it as catching
// an exception.
otpFinishStepCallback.onError();
}
}
}
```
Follow these instructions if implementing MobileAuth and collecting the phone number only if MobileAuth fails. This will implement OTP without allowing for SMS resends and phone number changes. If you do want those capabilities, please reference the subsequent tabs (Resend, Retry OTP, and Phone Number Change).
In the start step, call the `OtpStartStepCallback.onSuccess(OtpStartInput);` method to return the collected phone number to the SDK.
```java Java theme={"dark"}
import com.prove.sdk.proveauth.OtpStartInput;
import com.prove.sdk.proveauth.OtpStartStep;
import com.prove.sdk.proveauth.OtpStartStepCallback;
import com.prove.sdk.proveauth.PhoneNumberValidationException;
import com.prove.sdk.proveauth.ProveAuthException;
public class PromptStart implements OtpStartStep {
@Override
public void execute(boolean phoneNumberNeeded, @Nullable ProveAuthException otpException,
OtpStartStepCallback callback) {
// If phone number is needed, need to ask the end user for phone number input.
if (phoneNumberNeeded) {
// If error message is found around phone number, handle it.
// The `PhoneNumberValidationException` is ONLY available when `phoneNumberNeeded`
// has a value.
if (otpException instanceof PhoneNumberValidationException) {
// Set to a variable and display it in a field.
// In this example, we don't do anything with the error.
String errorMsg = otpException.getMessage();
}
try {
// Prompt the user for phone number to receive OTP SMS. You can build UI to provide
// best UX based on your application and business logic, here we simplify to a
// generic function named promptForPhoneNumber which gives us the collected
// phone number.
String phoneNumber = promptForPhoneNumber();
callback.onSuccess(new OtpStartInput(phoneNumber));
} catch (Exception e) {
// if any issue with the phone number collection from the end user or the user
// wants to cancel then call onError to exit the flow.
// In this example we simplify it as catching an exception.
callback.onError();
}
} else {
// No phone number needed, no need to ask end user for input.
callback.onSuccess(new OtpStartInput(""));
}
}
}
```
The finish step is implemented the same as the previous tab:
```java Java theme={"dark"}
import com.prove.sdk.proveauth.OtpFinishInput;
import com.prove.sdk.proveauth.OtpFinishStep;
import com.prove.sdk.proveauth.OtpFinishStepCallback;
import com.prove.sdk.proveauth.OtpValidationException;
import com.prove.sdk.proveauth.ProveAuthException;
public class NoPromptFinish implements OtpFinishStep {
@Override
public void execute(@Nullable ProveAuthException otpException,
OtpFinishStepCallback otpFinishStepCallback) {
// If error message is found, handle it.
if (otpException instanceof OtpValidationException) {
// Set to a variable and display it in a field.
// In this example, we don't do anything with the error.
String errorMsg = otpException.getMessage();
}
try {
// Prompt the user for OTP delivered by SMS. You can build UI to provide
// best UX based on your application and business logic, here we simplify to a
// generic function named promptForOtpCode which gives us the OTP code.
String otpCode = promptForOtpCode();
otpFinishStepCallback.onSuccess(new OtpFinishInput(otpCode));
} catch (Exception e) {
// if any issue with the OTP collection from the end user or the user wants to cancel
// then call onError to exit the flow. In this example we simplify it as catching
// an exception.
otpFinishStepCallback.onError();
}
}
}
```
Follow these instructions to allow the customer to request a new OTP via SMS using the same phone number. There is a max of three send attempts including the initial message.
The start step is implemented the same as the previous tab:
```java Java theme={"dark"}
import com.prove.sdk.proveauth.OtpStartInput;
import com.prove.sdk.proveauth.OtpStartStep;
import com.prove.sdk.proveauth.OtpStartStepCallback;
import com.prove.sdk.proveauth.PhoneNumberValidationException;
import com.prove.sdk.proveauth.ProveAuthException;
public class PromptStart implements OtpStartStep {
@Override
public void execute(boolean phoneNumberNeeded, @Nullable ProveAuthException otpException,
OtpStartStepCallback callback) {
// If phone number is needed, need to ask the end user for phone number input.
if (phoneNumberNeeded) {
// If error message is found around phone number, handle it.
// The `PhoneNumberValidationException` is ONLY available when `phoneNumberNeeded`
// has a value.
if (otpException instanceof PhoneNumberValidationException) {
// Set to a variable and display it in a field.
// In this example, we don't do anything with the error.
String errorMsg = otpException.getMessage();
}
try {
// Prompt the user for phone number to receive OTP SMS. You can build UI to provide
// best UX based on your application and business logic, here we simplify to a
// generic function named promptForPhoneNumber which gives us the collected
// phone number.
String phoneNumber = promptForPhoneNumber();
callback.onSuccess(new OtpStartInput(phoneNumber));
} catch (Exception e) {
// if any issue with the phone number collection from the end user or the user
// wants to cancel then call onError to exit the flow.
// In this example we simplify it as catching an exception.
callback.onError();
}
} else {
// No phone number needed, no need to ask end user for input.
callback.onSuccess(new OtpStartInput(""));
}
}
}
```
You can then send a new OTP SMS to the same phone number by implementing the finish step like this:
```java Java theme={"dark"}
import com.prove.sdk.proveauth.OtpFinishInput;
import com.prove.sdk.proveauth.OtpFinishStep;
import com.prove.sdk.proveauth.OtpFinishStepCallback;
import com.prove.sdk.proveauth.OtpValidationException;
import com.prove.sdk.proveauth.ProveAuthException;
public class MultipleResendFinish implements OtpFinishStep {
@Override
public void execute(@Nullable ProveAuthException otpException,
OtpFinishStepCallback otpFinishStepCallback) {
// If error message is found, handle it.
if (otpException instanceof OtpValidationException) {
// Set to a variable and display it in a field.
// In this example, we don't do anything with the error.
String errorMsg = otpException.getMessage();
}
// Prompt the user for whether they received the SMS.
if (promptForResend("Didn't receive the SMS OTP? Click resend button for a new one!")) {
// If the end user wants to send again to the same phone number call onOtpResend().
otpFinishStepCallback.onOtpResend();
return;
}
try {
// Prompt the user for OTP delivered by SMS. You can build UI to provide
// best UX based on your application and business logic, here we simplify to a
// generic function named promptForOtpCode which gives us the OTP code.
String otpCode = promptForOtpCode();
otpFinishStepCallback.onSuccess(new OtpFinishInput(otpCode));
} catch (Exception e) {
// if any issue with the OTP collection from the end user or the user wants to cancel
// then call onError to exit the flow. In this example we simplify it as catching
// an exception.
otpFinishStepCallback.onError();
}
}
}
```
Follow these instructions to allow the customer to re-enter the OTP PIN if they type it wrong. There is a max of 3 attempts. To implement this functionality, you also need to pass in `allowOTPRetry=true` to the `/v3/start` endpoint.
The start step is implemented the same as either of the the previous tabs - no client side code changes necessary:
```java Java theme={"dark"}
import com.prove.sdk.proveauth.OtpStartInput;
import com.prove.sdk.proveauth.OtpStartStep;
import com.prove.sdk.proveauth.OtpStartStepCallback;
import com.prove.sdk.proveauth.PhoneNumberValidationException;
import com.prove.sdk.proveauth.ProveAuthException;
public class PromptStart implements OtpStartStep {
@Override
public void execute(boolean phoneNumberNeeded, @Nullable ProveAuthException otpException,
OtpStartStepCallback callback) {
// If phone number is needed, need to ask the end user for phone number input.
if (phoneNumberNeeded) {
// If error message is found around phone number, handle it.
// The `PhoneNumberValidationException` is ONLY available when `phoneNumberNeeded`
// has a value.
if (otpException instanceof PhoneNumberValidationException) {
// Set to a variable and display it in a field.
// In this example, we don't do anything with the error.
String errorMsg = otpException.getMessage();
}
try {
// Prompt the user for phone number to receive OTP SMS. You can build UI to provide
// best UX based on your application and business logic, here we simplify to a
// generic function named promptForPhoneNumber which gives us the collected
// phone number.
String phoneNumber = promptForPhoneNumber();
callback.onSuccess(new OtpStartInput(phoneNumber));
} catch (Exception e) {
// if any issue with the phone number collection from the end user or the user
// wants to cancel then call onError to exit the flow.
// In this example we simplify it as catching an exception.
callback.onError();
}
} else {
// No phone number needed, no need to ask end user for input.
callback.onSuccess(new OtpStartInput(""));
}
}
}
```
The finish step is implemented the same as either of the the previous tabs - no client side code changes necessary. If the OTP is invalid, the finish step will be called again to prompt the user for a new input. Once the max attempts is reached, the `AuthFinish` function will be called.
```java Java theme={"dark"}
import com.prove.sdk.proveauth.OtpFinishInput;
import com.prove.sdk.proveauth.OtpFinishStep;
import com.prove.sdk.proveauth.OtpFinishStepCallback;
import com.prove.sdk.proveauth.OtpValidationException;
import com.prove.sdk.proveauth.ProveAuthException;
public class NoPromptFinish implements OtpFinishStep {
@Override
public void execute(@Nullable ProveAuthException otpException,
OtpFinishStepCallback otpFinishStepCallback) {
// If error message is found, handle it.
if (otpException instanceof OtpValidationException) {
// Set to a variable and display it in a field.
// In this example, we don't do anything with the error.
String errorMsg = otpException.getMessage();
}
try {
// Prompt the user for OTP delivered by SMS. You can build UI to provide
// best UX based on your application and business logic, here we simplify to a
// generic function named promptForOtpCode which gives us the OTP code.
String otpCode = promptForOtpCode();
otpFinishStepCallback.onSuccess(new OtpFinishInput(otpCode));
} catch (Exception e) {
// if any issue with the OTP collection from the end user or the user wants to cancel
// then call onError to exit the flow. In this example we simplify it as catching
// an exception.
otpFinishStepCallback.onError();
}
}
}
```
Follow these instructions to allow the customer to re-enter their phone number. There is a max of three entries/send attempts.
Manual Request Required
To enable phone number change capabilities on your credentials, contact your Prove representative.
The start step is implemented the same as the previous tab:
```java Java theme={"dark"}
import com.prove.sdk.proveauth.OtpStartInput;
import com.prove.sdk.proveauth.OtpStartStep;
import com.prove.sdk.proveauth.OtpStartStepCallback;
import com.prove.sdk.proveauth.PhoneNumberValidationException;
import com.prove.sdk.proveauth.ProveAuthException;
public class PromptStart implements OtpStartStep {
@Override
public void execute(boolean phoneNumberNeeded, @Nullable ProveAuthException otpException,
OtpStartStepCallback callback) {
// If phone number is needed, need to ask the end user for phone number input.
if (phoneNumberNeeded) {
// If error message is found around phone number, handle it.
// The `PhoneNumberValidationException` is ONLY available when `phoneNumberNeeded`
// has a value.
if (otpException instanceof PhoneNumberValidationException) {
// Set to a variable and display it in a field.
// In this example, we don't do anything with the error.
String errorMsg = otpException.getMessage();
}
try {
// Prompt the user for phone number to receive OTP SMS. You can build UI to provide
// best UX based on your application and business logic, here we simplify to a
// generic function named promptForPhoneNumber which gives us the collected
// phone number.
String phoneNumber = promptForPhoneNumber();
callback.onSuccess(new OtpStartInput(phoneNumber));
} catch (Exception e) {
// if any issue with the phone number collection from the end user or the user
// wants to cancel then call onError to exit the flow.
// In this example we simplify it as catching an exception.
callback.onError();
}
} else {
// No phone number needed, no need to ask end user for input.
callback.onSuccess(new OtpStartInput(""));
}
}
}
```
You can prompt for a new phone number by implementing the finish step like this:
```java Java theme={"dark"}
import com.prove.sdk.proveauth.OtpFinishInput;
import com.prove.sdk.proveauth.OtpFinishStep;
import com.prove.sdk.proveauth.OtpFinishStepCallback;
import com.prove.sdk.proveauth.OtpValidationException;
import com.prove.sdk.proveauth.ProveAuthException;
public class PhoneChangeFinish implements OtpFinishStep {
@Override
public void execute(@Nullable ProveAuthException otpException,
OtpFinishStepCallback otpFinishStepCallback) {
// If error message is found, handle it.
if (otpException instanceof OtpValidationException) {
// Set to a variable and display it in a field.
// In this example, we don't do anything with the error.
String errorMsg = otpException.getMessage();
}
// Prompt the user for whether they received the SMS.
if (promptForPhoneNumberChange("Didn't receive the SMS OTP? Try a different phone number.")) {
// If the end user wants to correct the phone number already in use, or changing to a
// different phone number to receive the future SMS OTP, call onMobileNumberChange(), and
// the otpStartStep will re-prompt for phone number input from the end user.
otpFinishStepCallback.onMobileNumberChange();
return;
}
try {
// Prompt the user for OTP delivered by SMS. You can build UI to provide
// best UX based on your application and business logic, here we simplify to a
// generic function named promptForOtpCode which gives us the OTP code.
String otpCode = promptForOtpCode();
otpFinishStepCallback.onSuccess(new OtpFinishInput(otpCode));
} catch (Exception e) {
// if any issue with the OTP collection from the end user or the user wants to cancel
// then call onError to exit the flow. In this example we simplify it as catching
// an exception.
otpFinishStepCallback.onError();
}
}
}
```
## Verify the Customer Information
Once the customer has made any edits to their pre-fill information, you should submit that information to the backend server so the `Complete()` call can then verify the customer information.
```java Java theme={"dark"}
// Send request to the backend to verify customer information.
SendInfoResponse sendInfo(String firstName, String lastName) {
YourBackendClient backend = new YourBackendClient(); // Backend API client
// TODO: Build your SendInfoRequest object
SendInfoRequest sendInfoRequest = new SendInfoRequest(firstName, lastName, ...);
// Send a sendInfoRequest to your backend server to get return customer information.
SendInfoResponse response = backend.verify(sendInfoRequest);
// TODO: define your own SendInfoResponse object to parse the response
return response;
}
```
# Client-Side iOS SDK
Source: https://developer.prove.com/reference/identity-ios-sdk
Learn how to integrate the client-side iOS SDK into your native new app
## Installation
Prove provides the iOS SDK in Swift. It has a download size of 2.5 MB and an install size of 1.5 MB for the minimum required components. It relies on iOS native APIs. The iOS SDK supports the earlier three major versions. Prove has seen successful transactions with iOS v11.
Xcode Requirement
To integrate with our iOS SDKs, Apps must be built with Xcode 16.0 or later.
Prove manages a repository with the libraries to enable integration. You can install the SDK using either CocoaPods or Swift Package Manager.
Execute the following to import CocoaPod from the Prove pod repository:
```shell shell theme={"dark"}
# Run this command to install the cocoapods-art plugin (authored by Artifactory)
gem install cocoapods-art
# Run this command to add the Prove pod repository
pod repo-art add prove.jfrog.io https://prove.jfrog.io/artifactory/api/pods/libs-public-cocoapods
# In your Podfile, paste in the Prove pod repository as a source
plugin 'cocoapods-art', :sources => [
'prove.jfrog.io'
]
# In your Podfile, paste in the SDK pods
pod 'ProveAuth', '6.9.1'
# Run this command to install the SDK pods
pod install
```
### Step 1: Connect to JFrog Registry
Set up the registry globally (required for both Xcode UI and Package.swift):
```bash theme={"dark"}
swift package-registry set --global "https://prove.jfrog.io/artifactory/api/swift/libs-public-swift"
swift package-registry login "https://prove.jfrog.io/artifactory/api/swift/libs-public-swift"
# Press Enter when prompted for access token
```
Public Registry
This is a publicly accessible registry - no password or access token is needed. Simply press Enter when prompted for an access token.
The registry connection is configured via command line only. Once this setup is complete, you can add packages using either Xcode UI or Package.swift.
### Step 2: Adding Dependencies
#### Method 1: Using Xcode UI
1. In Xcode, go to **File** → **Add Package Dependencies**
2. Search for the package you want (e.g., `swift.proveauth`)
3. Select the version and add to your target
The latest stable version is 6.9.1. Select "Exact Version" for production applications to ensure consistent builds.
Once the command line setup is complete, you only need to enter the package name (e.g., `swift.proveauth`) in Xcode - no need to enter the full registry URL to Xcode.
#### Method 2: Using Package.swift
Add dependencies to your `Package.swift` file:
```swift Swift theme={"dark"}
// swift-tools-version: 5.9
import PackageDescription
let package = Package(
name: "YourApp",
platforms: [.iOS(.v12)],
dependencies: [
.package(id: "swift.proveauth", from: "6.9.1"),
],
targets: [
.target(
name: "YourApp",
dependencies: [
.product(name: "ProveAuth", package: "swift.proveauth"),
]
)
]
)
```
Then run the following command to resolve and fetch the dependencies:
```bash theme={"dark"}
swift package resolve
```
## Send the type of flow: mobile
Unlike the Web SDK, when using the iOS SDK, use the mobile flow. Pass mobile to the `Start()` function on the server. In a mobile flow, Mobile Auth executes first and if that fails, performs one-time password (OTP) validation on the mobile phone.
In the mobile flow, once either Mobile Auth or the OTP validation is complete, the `AuthFinishStep` function executes.
Mobile Auth
In order for Mobile Auth to succeed, the customer needs to disable the VPN and Private Relay on iOS.
## `Authenticate()`
The SDK requires an `authToken` as a parameter for the `Authenticate()` function. This token returns from the `Start()` call of the server-side SDK. The token is session specific so it's used for a single flow. It also expires after 15 minutes.
## Retrieve `authToken`
To start the flow, send a request to your back end server with the phone number, flow type, and an optional challenge. Use either the date of birth, `YYYY-MM-DD`, or the last four digits of the social security number.
```swift Swift theme={"dark"}
// The below example uses native iOS URLSession, but any other
// alternative networking approaches should also work
func initialize(phoneNumber: String, ssn: String, flowType: String, completion: @escaping (Result\) -> Void) {
guard let url = URL(string: "\(backendUrl)/initialize") else {
completion(.failure(URLError(.badURL)))
return
}
var request = URLRequest(url: url)
request.httpMethod = "POST"
request.addValue("application/json", forHTTPHeaderField: "Accept")
request.addValue("application/json", forHTTPHeaderField: "Content-Type")
// Set up the request body
let body: [String: Any] = [
"phoneNumber": phoneNumber,
"flowType": flowType,
"ssn": ssn
]
do {
request.httpBody = try JSONSerialization.data(withJSONObject: body, options: \[])
} catch {
completion(.failure(error))
return
}
// Perform the request
let task = URLSession.shared.dataTask(with: request) { \_, response, error in
// Handle network or connection errors
if let error = error {
completion(.failure(error))
return
}
do {
if let json = try JSONSerialization.jsonObject(with: data, options: \[]) as? [String: Any],
let authToken = json["authToken"] as? String {
completion(.success(authToken))
} else {
let parsingError = NSError(domain: "", code: 0, userInfo: [NSLocalizedDescriptionKey : "Failed to parse JSON or authToken is missing"])
completion(.failure(parsingError))
}
} catch {
completion(.failure(error))
}
}
// Start the network call
task.resume()
}
```
## Setup authenticator
Once you have the `authToken`, build the authenticator for the mobile flow.
```swift Swift theme={"dark"}
// Object implementing ProveAuthFinishStep protocols
let finishStep = FinishAuthStep()
// Objects implementing OtpStartStep/OtpFinishStep protocols
let otpStartStep = MobileOtpStartStep()
let otpFinishStep = MobileOtpFinishStep()
let proveAuthSdk: ProveAuth
proveAuthSdk = ProveAuth.builder(authFinish: finishStep)
.withOtpFallback(otpStart: otpStartStep, otpFinish: otpFinishStep)
.build()
```
If a mobile data connection is unavailable during testing, use the Builder class. It permits simulated successful session results while connected to a Wi-Fi network. Testing using a Wi-Fi connection is useful in the Sandbox environment.
```swift Swift theme={"dark"}
proveAuthSdk = ProveAuth.builder(authFinish: finishStep)
.withMobileAuthTestMode() // Test mode flag
.build()
```
## Performing the authentication
The Prove Auth object is thread safe and used as a singleton. Most Prove Auth methods are blocking and therefore can't execute in the main app thread. The app employs an executor service with a minimum of two threads to manage threads due to the ability to process concurrent blocking requests.
```swift Swift theme={"dark"}
// authToken retrieved from your server via StartAuthRequest
proveAuthSdk.authenticate(authToken) { error in
DispatchQueue.main.async {
self.messages.finalResultMessage = "ProveAuth.authenticate returned error: \(error.localizedDescription)"
print(self.messages.finalResultMessage)
}
}
```
## Validate the mobile phone
In the `AuthFinishStep`, specify a function to call once the possession checks complete on the mobile phone. In the following code, notice an endpoint called `/verify`. This endpoint on your back end server calls the `Validate()` function to validate the phone number. If unsuccessful, the server calls the `Challenge()` function and then returns the results, including customer information. Refer to the following example fields that return and then prefill on a form for the customer to verify.
```swift Swift theme={"dark"}
// Send a verify request to get return customer information.
// The below example uses native iOS URLSession, but any other
// alternative networking approaches should also work
func verify(String: authId, completion: @escaping (Error?) -> Void) {
guard let url = URL(string: "\(backendUrl)/verify") else {
completion(URLError(.badURL))
return
}
// Create the request
var request = URLRequest(url: url)
request.httpMethod = "POST"
request.addValue("application/json", forHTTPHeaderField: "Accept")
request.addValue("application/json", forHTTPHeaderField: "Content-Type")
// Set up the request body (empty JSON object) - authId is not needed so you can ignore.
let body: [String: Any] = ["authId": authId]
do {
request.httpBody = try JSONSerialization.data(withJSONObject: body, options: \[])
} catch {
completion(error)
return
}
// Perform the request
let task = URLSession.shared.dataTask(with: request) { \_, response, error in
if let error = error {
completion(error)
return
}
// Parse the response
do {
if let json = try JSONSerialization.jsonObject(with: data, options: \[]) as? [String: Any],
let firstName = json["firstName"] as? String,
let lastName = json["lastName"] as? String {
// Update the UI on the main thread
DispatchQueue.main.async {
// Update your UI with the pre-fill customer information
// For example, assuming you have IBOutlet references for your text fields
self.firstNameInput.text = firstName
self.lastNameInput.text = lastName
}
completion(nil)
} else {
let parsingError = NSError(domain: "", code: 0, userInfo: [NSLocalizedDescriptionKey: "Failed to parse JSON"])
completion(parsingError)
}
} catch {
completion(error)
}
}
// Start the network call
task.resume()
}
```
## Configure OTP
To use the Resend/Retry/Phone Change features, you need to install the iOS SDK version 6.5.1 or later.
To set the One-Time Password (OTP) handler, `withOtpFallback(otpStart: otpStartStep, otpFinish: otpFinishStep)`, requires implementing the `OtpStartStep` and `OtpFinishStep`.
The OTP session has a two minute timeout from when it's sent through SMS to when the customer can enter in the OTP.
Follow these instructions if you are implementing OTP and you are passing in the phone number on the `/v3/start` endpoint. In this case, you've already prompted for a phone number so you don't need to prompt for it in the client SDK.
Since you passed the phone number in the `Start()` function, call `callback.onSuccess(input: nil)` to communicate to the SDK you have the customer's agreement to deliver the SMS message.
```swift Swift theme={"dark"}
import Foundation
import ProveAuth
import SwiftUI
class MobileOtpStartStep: OtpStartStep {
@ObservedObject var sheetObservable: SheetObservable
var callback: OtpStartStepCallback?
init(sheetObservable: SheetObservable) {
self.sheetObservable = sheetObservable
}
// Implement this method to handle phone number collection for SMS OTP,
// or to obtain user confirmation for initiating an SMS message.
func execute(
phoneNumberNeeded: Bool, phoneValidationError: ProveAuthError?, callback: OtpStartStepCallback
) {
self.callback = callback
// Since no phone number is needed, don't prompt the user.
callback.onSuccess(input: nil)
}
}
```
Call the `callback.onError()` method to communicate to the SDK any issues while trying to obtain the phone number or the OTP. Report an error if the customer cancels the SMS transaction or presses the back button to leave the screen.
```swift Swift theme={"dark"}
import Foundation
import SwiftUI
import ProveAuth
class MobileOtpFinishStep: OtpFinishStep {
@ObservedObject var sheetObservable: SheetObservable
var callback: OtpFinishStepCallback?
init(sheetObservable: SheetObservable){
self.sheetObservable = sheetObservable
}
// Implement this method to collect the OTP value delivered via SMS.
func execute(otpError: ProveAuthError?, callback: OtpFinishStepCallback) {
self.callback = callback
// Handle the OTP validation error if present.
if case .otpValidationError = otpError {
print("found otpError: \(String(describing: otpError?.localizedDescription))")
// Signal to your UI components that the last provided OTP is invalid
self.sheetObservable.otpError = true
} else {
self.sheetObservable.otpError = false
}
// Signal to UI components to display OtpFinishView
DispatchQueue.main.async {
self.sheetObservable.isOtpFinishActive = true
}
}
// Provide the collected OTP value to the SDK for validation.
func handleOtp(_ otp: String) {
guard let callback = self.callback else {
print("Error: OtpFinishStepCallback is not set ")
return
}
let otpFinishInput = OtpFinishInput(otp: otp)
callback.onSuccess(input: otpFinishInput)
}
// Notify the SDK of any issues encountered while obtaining the OTP value or if the user cancels the OTP flow.
func handleOtpFinishError() {
guard let callback = self.callback else {
print("Error: OtpFinishStepCallback is not set ")
return
}
callback.onError()
}
}
```
Follow these instructions if implementing MobileAuth and collecting the phone number only if MobileAuth fails. This will implement OTP without allowing for SMS resends and phone number changes. If you do want those capabilities, please reference the subsequent tabs (Resend, Retry OTP, and Phone Number Change).
In the start step, call the `callback.onSuccess(input: otpStartInput)` method to return the collected phone number to the SDK.
```swift Swift theme={"dark"}
import Foundation
import ProveAuth
import SwiftUI
class MobileOtpStartStep: OtpStartStep {
@ObservedObject var sheetObservable: SheetObservable
var callback: OtpStartStepCallback?
init(sheetObservable: SheetObservable) {
self.sheetObservable = sheetObservable
}
func execute(
phoneNumberNeeded: Bool, phoneValidationError: ProveAuthError?, callback: OtpStartStepCallback
) {
self.callback = callback
if !phoneNumberNeeded {
// If no phone number is needed, then don't prompt the user.
callback.onSuccess(input: nil)
} else {
DispatchQueue.main.async {
// If a phone number validation error is detected, ensure it is handled to provide feedback to the user.
if case .phoneNumberValidationError = phoneValidationError {
print(
"found phoneValidationError: \(String(describing: phoneValidationError?.localizedDescription))"
)
// Update UI components to display OtpStartView with the phone number validation error.
self.sheetObservable.isPhoneValidationError = true
} else {
self.sheetObservable.isPhoneValidationError = false
}
// Update UI components to display OtpStartView if a phone number is needed.
self.sheetObservable.isOtpStartActive = true
}
}
}
// Return collected phone number to the SDK
func handlePhoneNumber(phoneNumber: String) {
guard let callback = self.callback else {
print("Error: OtpStartStepCallback is not set ")
return
}
let otpStartInput = OtpStartInput(phoneNumber: phoneNumber)
// This is how you pass collected phone number to SDK
callback.onSuccess(input: otpStartInput)
}
// Communicate any issues encountered while trying to obtain the phone number to the SDK.
// Error should be reported if the customer explicitly cancels the SMS OTP transaction
// or presses the back button to exit out the SMS OTP start step screen.
func handleOtpStartError() {
guard let callback = self.callback else {
print("Error: OtpStartStepCallback is not set ")
return
}
callback.onError()
}
}
```
The finish step is implemented the same as the previous tab:
```swift Swift theme={"dark"}
import Foundation
import SwiftUI
import ProveAuth
class MobileOtpFinishStep: OtpFinishStep {
@ObservedObject var sheetObservable: SheetObservable
var callback: OtpFinishStepCallback?
init(sheetObservable: SheetObservable){
self.sheetObservable = sheetObservable
}
// Implement this method to collect the OTP value delivered via SMS.
func execute(otpError: ProveAuthError?, callback: OtpFinishStepCallback) {
self.callback = callback
// Handle the OTP validation error if present.
if case .otpValidationError = otpError {
print("found otpError: \(String(describing: otpError?.localizedDescription))")
// Signal to your UI components that the last provided OTP is invalid
self.sheetObservable.otpError = true
} else {
self.sheetObservable.otpError = false
}
// Signal to UI components to display OtpFinishView
DispatchQueue.main.async {
self.sheetObservable.isOtpFinishActive = true
}
}
// Provide the collected OTP value to the SDK for validation.
func handleOtp(_ otp: String) {
guard let callback = self.callback else {
print("Error: OtpFinishStepCallback is not set ")
return
}
let otpFinishInput = OtpFinishInput(otp: otp)
callback.onSuccess(input: otpFinishInput)
}
// Notify the SDK of any issues encountered while obtaining the OTP value or if the user cancels the OTP flow.
func handleOtpFinishError() {
guard let callback = self.callback else {
print("Error: OtpFinishStepCallback is not set ")
return
}
callback.onError()
}
}
```
Follow these instructions to allow the customer to request a new OTP via SMS using the same phone number. There is a max of three send attempts including the initial message.
The start step is implemented the same as the previous tab:
```swift Swift theme={"dark"}
import Foundation
import ProveAuth
import SwiftUI
class MobileOtpStartStep: OtpStartStep {
@ObservedObject var sheetObservable: SheetObservable
var callback: OtpStartStepCallback?
init(sheetObservable: SheetObservable) {
self.sheetObservable = sheetObservable
}
func execute(
phoneNumberNeeded: Bool, phoneValidationError: ProveAuthError?, callback: OtpStartStepCallback
) {
self.callback = callback
if !phoneNumberNeeded {
// If no phone number is needed, then don't prompt the user.
callback.onSuccess(input: nil)
} else {
DispatchQueue.main.async {
// If a phone number validation error is detected, ensure it is handled to provide feedback to the user.
if case .phoneNumberValidationError = phoneValidationError {
print(
"found phoneValidationError: \(String(describing: phoneValidationError?.localizedDescription))"
)
// Update UI components to display OtpStartView with the phone number validation error.
self.sheetObservable.isPhoneValidationError = true
} else {
self.sheetObservable.isPhoneValidationError = false
}
// Update UI components to display OtpStartView if a phone number is needed.
self.sheetObservable.isOtpStartActive = true
}
}
}
// Return collected phone number to the SDK
func handlePhoneNumber(phoneNumber: String) {
guard let callback = self.callback else {
print("Error: OtpStartStepCallback is not set ")
return
}
let otpStartInput = OtpStartInput(phoneNumber: phoneNumber)
// This is how you pass collected phone number to SDK
callback.onSuccess(input: otpStartInput)
}
// Communicate any issues encountered while trying to obtain the phone number to the SDK.
// Error should be reported if the customer explicitly cancels the SMS OTP transaction
// or presses the back button to exit out the SMS OTP start step screen.
func handleOtpStartError() {
guard let callback = self.callback else {
print("Error: OtpStartStepCallback is not set ")
return
}
callback.onError()
}
}
```
You can then send a new OTP SMS to the same phone number by implementing the finish step like this:
```swift Swift theme={"dark"}
import Foundation
import SwiftUI
import ProveAuth
class MobileOtpFinishStep: OtpFinishStep {
@ObservedObject var sheetObservable: SheetObservable
var callback: OtpFinishStepCallback?
init(sheetObservable: SheetObservable){
self.sheetObservable = sheetObservable
}
// Implement this method to collect the OTP value delivered in the SMS message.
func execute(otpError: ProveAuthError?, callback: OtpFinishStepCallback) {
self.callback = callback
// Handle the OTP validation error if present.
if case .otpValidationError = otpError {
print("found otpError: \(String(describing: otpError?.localizedDescription))")
// Update your UI to indicate that the provided OTP is invalid
self.sheetObservable.otpError = true
} else {
self.sheetObservable.otpError = false
}
// Update your UI to display the OtpFinishView
DispatchQueue.main.async {
self.sheetObservable.isOtpFinishActive = true
}
}
// Return the OTP value to the SDK
func handleOtp(_ otp: String) {
guard let callback = self.callback else {
print("Error: OtpFinishStepCallback is not set ")
return
}
let otpFinishInput = OtpFinishInput(otp: otp)
callback.onSuccess(input: otpFinishInput)
}
// Communicate to the SDK any issues when host app trys to obtain the OTP value
// or when users cancel the OTP flow
func handleOtpFinishError() {
guard let callback = self.callback else {
print("Error: OtpFinishStepCallback is not set ")
return
}
callback.onError()
}
// Call this method to request a new OTP code for the same mobile number.
func sendNewOtp() {
guard let callback = self.callback else {
print("Error: OtpFinishStepCallback is not set ")
return
}
callback.onOtpResend()
}
}
```
Follow these instructions to allow the customer to re-enter the OTP PIN if they type it wrong. There is a max of 3 attempts. To implement this functionality, you also need to pass in `allowOTPRetry=true` to the `/v3/start` endpoint.
The start step is implemented the same as either of the the previous tabs - no client side code changes necessary:
```swift Swift theme={"dark"}
import Foundation
import ProveAuth
import SwiftUI
class MobileOtpStartStep: OtpStartStep {
@ObservedObject var sheetObservable: SheetObservable
var callback: OtpStartStepCallback?
init(sheetObservable: SheetObservable) {
self.sheetObservable = sheetObservable
}
func execute(
phoneNumberNeeded: Bool, phoneValidationError: ProveAuthError?, callback: OtpStartStepCallback
) {
self.callback = callback
if !phoneNumberNeeded {
// If no phone number is needed, then don't prompt the user.
callback.onSuccess(input: nil)
} else {
DispatchQueue.main.async {
// If a phone number validation error is detected, ensure it is handled to provide feedback to the user.
if case .phoneNumberValidationError = phoneValidationError {
print(
"found phoneValidationError: \(String(describing: phoneValidationError?.localizedDescription))"
)
// Update UI components to display OtpStartView with the phone number validation error.
self.sheetObservable.isPhoneValidationError = true
} else {
self.sheetObservable.isPhoneValidationError = false
}
// Update UI components to display OtpStartView if a phone number is needed.
self.sheetObservable.isOtpStartActive = true
}
}
}
// Return collected phone number to the SDK
func handlePhoneNumber(phoneNumber: String) {
guard let callback = self.callback else {
print("Error: OtpStartStepCallback is not set ")
return
}
let otpStartInput = OtpStartInput(phoneNumber: phoneNumber)
// This is how you pass collected phone number to SDK
callback.onSuccess(input: otpStartInput)
}
// Communicate any issues encountered while trying to obtain the phone number to the SDK.
// Error should be reported if the customer explicitly cancels the SMS OTP transaction
// or presses the back button to exit out the SMS OTP start step screen.
func handleOtpStartError() {
guard let callback = self.callback else {
print("Error: OtpStartStepCallback is not set ")
return
}
callback.onError()
}
}
```
The finish step is implemented the same as either of the the previous tabs - no client side code changes necessary. If the OTP is invalid, the finish step will be called again to prompt the user for a new input. Once the max attempts is reached, the `AuthFinish` function will be called.
```swift Swift theme={"dark"}
import Foundation
import SwiftUI
import ProveAuth
class MobileOtpFinishStep: OtpFinishStep {
@ObservedObject var sheetObservable: SheetObservable
var callback: OtpFinishStepCallback?
init(sheetObservable: SheetObservable){
self.sheetObservable = sheetObservable
}
// Implement this method to collect the OTP value delivered via SMS.
func execute(otpError: ProveAuthError?, callback: OtpFinishStepCallback) {
self.callback = callback
// Handle the OTP validation error if present.
if case .otpValidationError = otpError {
print("found otpError: \(String(describing: otpError?.localizedDescription))")
// Signal to your UI components that the last provided OTP is invalid
self.sheetObservable.otpError = true
} else {
self.sheetObservable.otpError = false
}
// Signal to UI components to display OtpFinishView
DispatchQueue.main.async {
self.sheetObservable.isOtpFinishActive = true
}
}
// Provide the collected OTP value to the SDK for validation.
func handleOtp(_ otp: String) {
guard let callback = self.callback else {
print("Error: OtpFinishStepCallback is not set ")
return
}
let otpFinishInput = OtpFinishInput(otp: otp)
callback.onSuccess(input: otpFinishInput)
}
// Notify the SDK of any issues encountered while obtaining the OTP value or if the user cancels the OTP flow.
func handleOtpFinishError() {
guard let callback = self.callback else {
print("Error: OtpFinishStepCallback is not set ")
return
}
callback.onError()
}
}
```
Follow these instructions to allow the customer to re-enter their phone number. There is a max of three entries/send attempts.
Manual Request Required
To enable phone number change capabilities on your credentials, contact your Prove representative.
The start step is implemented the same as the previous tab:
```swift Swift theme={"dark"}
import Foundation
import ProveAuth
import SwiftUI
class MobileOtpStartStep: OtpStartStep {
@ObservedObject var sheetObservable: SheetObservable
var callback: OtpStartStepCallback?
init(sheetObservable: SheetObservable) {
self.sheetObservable = sheetObservable
}
func execute(
phoneNumberNeeded: Bool, phoneValidationError: ProveAuthError?, callback: OtpStartStepCallback
) {
self.callback = callback
if !phoneNumberNeeded {
// If no phone number is needed, then don't prompt the user.
callback.onSuccess(input: nil)
} else {
DispatchQueue.main.async {
// If a phone number validation error is detected, ensure it is handled to provide feedback to the user.
if case .phoneNumberValidationError = phoneValidationError {
print(
"found phoneValidationError: \(String(describing: phoneValidationError?.localizedDescription))"
)
// Update UI components to display OtpStartView with the phone number validation error.
self.sheetObservable.isPhoneValidationError = true
} else {
self.sheetObservable.isPhoneValidationError = false
}
// Update UI components to display OtpStartView if a phone number is needed.
self.sheetObservable.isOtpStartActive = true
}
}
}
// Return collected phone number to the SDK
func handlePhoneNumber(phoneNumber: String) {
guard let callback = self.callback else {
print("Error: OtpStartStepCallback is not set ")
return
}
let otpStartInput = OtpStartInput(phoneNumber: phoneNumber)
// This is how you pass collected phone number to SDK
callback.onSuccess(input: otpStartInput)
}
// Communicate any issues encountered while trying to obtain the phone number to the SDK.
// Error should be reported if the customer explicitly cancels the SMS OTP transaction
// or presses the back button to exit out the SMS OTP start step screen.
func handleOtpStartError() {
guard let callback = self.callback else {
print("Error: OtpStartStepCallback is not set ")
return
}
callback.onError()
}
}
```
You can prompt for a new phone number by implementing the finish step like this:
```swift Swift theme={"dark"}
import Foundation
import SwiftUI
import ProveAuth
class MobileOtpFinishStep: OtpFinishStep {
@ObservedObject var sheetObservable: SheetObservable
var callback: OtpFinishStepCallback?
init(sheetObservable: SheetObservable){
self.sheetObservable = sheetObservable
}
// Implement this method to collect the OTP value delivered via SMS.
func execute(otpError: ProveAuthError?, callback: OtpFinishStepCallback) {
self.callback = callback
// Handle the OTP validation error if present.
if case .otpValidationError = otpError {
print("found otpError: \(String(describing: otpError?.localizedDescription))")
// Update your UI to indicate that the provided OTP is invalid.
self.sheetObservable.otpError = true
} else {
self.sheetObservable.otpError = false
}
// Update your UI to display the OTP finish view.
DispatchQueue.main.async {
self.sheetObservable.isOtpFinishActive = true
}
}
// Return the collected OTP value to the SDK.
func handleOtp(_ otp: String) {
guard let callback = self.callback else {
print("Error: OtpFinishStepCallback is not set ")
return
}
let otpFinishInput = OtpFinishInput(otp: otp)
callback.onSuccess(input: otpFinishInput)
}
// When callback.onMobileNumberChange() is evoked, OtpStartStep will be re-initiated
// so that end-users can enter a different phone number via OtpStartStep.
func handleMobileNumberChange() {
guard let callback = self.callback else {
print("Error: OtpFinishStepCallback is not set")
return
}
callback.onMobileNumberChange()
}
}
```
## Verify the Customer Information
Once the customer has made any edits to their prefill information, submit that information to the back end server so the `Complete()` call can then verify the customer information.
```swift Swift theme={"dark"}
// Send request to the backend to verify customer information.
// The below example uses native iOS URLSession, but any other
// alternative networking approaches should also work
func sendInfo(firstName: String, lastName: String, completion: @escaping (Result\<[String:Any], Error>) -> Void) {
guard let url = URL(string: "\(backendUrl)/finish") else {
completion(.failure(URLError(.badURL)))
return
}
var request = URLRequest(url: url)
request.httpMethod = "POST"
request.addValue("application/json", forHTTPHeaderField: "Accept")
request.addValue("application/json", forHTTPHeaderField: "Content-Type")
// Set up the request body
let body: [String: Any] = [
"firstName": firstName,
"lastName": lastName
]
do {
request.httpBody = try JSONSerialization.data(withJSONObject: body, options: \[])
} catch {
completion(.failure(error))
return
}
let task = URLSession.shared.dataTask(with: request) { \_, response, error in
// Handle network or connection errors
if let error = error {
completion(.failure(error))
return
}
do {
if let results = try JSONSerialization.jsonObject(with: data, options: \[]) as? [String: Any] {
completion(.success(results))
} else {
let parsingError = NSError(domain: "", code: 0, userInfo: [NSLocalizedDescriptionKey : "Failed to parse JSON or authToken is missing"])
completion(.failure(parsingError))
}
} catch {
completion(.failure(error))
}
}
// Start the network call
task.resume()
}
```
# Activate Identity
Source: https://developer.prove.com/reference/identity-manager-activate-identity
post /v3/identity/{identityId}/activate
Sets an identity as active for monitoring.
# Batch Enroll Identities
Source: https://developer.prove.com/reference/identity-manager-batch-create-identity
post /v3/identity/batch
Enrolls multiple customers in a single request for efficient bulk operations (up to 100).
# Enroll Identity
Source: https://developer.prove.com/reference/identity-manager-create-identity
post /v3/identity
Enrolls a single customer for monitoring using their phone number and unique identifier.
# Deactivate Identity
Source: https://developer.prove.com/reference/identity-manager-deactivate-identity
post /v3/identity/{identityId}/deactivate
Stops webhook notifications without disenrolling the identity.
# Disenroll Identity
Source: https://developer.prove.com/reference/identity-manager-delete-identity
delete /v3/identity/{identityId}
Disenrolls an identity from Identity Manager. If you wish to monitor in future, re-enrollment of that identity is required.
# Batch Get Identities
Source: https://developer.prove.com/reference/identity-manager-get-identities
get /v3/identity
Return a list of all identities you have enrolled in Identity Manager.
# Get Identity
Source: https://developer.prove.com/reference/identity-manager-get-identity
get /v3/identity/{identityId}
Return details of an identity given the identity ID.
# Get Identities By Phone Number
Source: https://developer.prove.com/reference/identity-manager-lookup-identity
get /v3/identity/{mobileNumber}/lookup
Return list of all identities you have enrolled that are associated with this phone number.
# Server-Side SDK Guide
Source: https://developer.prove.com/reference/identity-manager-server
Learn more about the details of the server-side SDK for Identity Manager
## Installation
Install the server-side SDK of your choice by running a command in your terminal, or by using a dependency management tool specific to your project.
```go Go theme={"dark"}
# The Go library is hosted on GitHub so you can use this command to import it
# to your Go application.
go get github.com/prove-identity/prove-sdk-server-go
# Ensure you import the SDK in your code like this:
import (
provesdkservergo "github.com/prove-identity/prove-sdk-server-go"
"github.com/prove-identity/prove-sdk-server-go/models/components"
)
```
```typescript TypeScript theme={"dark"}
# Run this command to install package from GitHub and save as a dependency
npm install -S @prove-identity/prove-api
# Import the SDK in your code like this:
import { Proveapi } from "@prove-identity/prove-api";
import { OAuthClient, WithAuthorization } from "@prove-identity/prove-api/sdk/oauth"
```
```java Java theme={"dark"}
# See the latest version number here: https://central.sonatype.com/artifact/com.prove/proveapi
Gradle:
implementation 'com.prove:proveapi:0.10.0'
Maven:
com.prove
proveapi
0.10.0
```
```csharp .NET theme={"dark"}
# Install the NuGet package
dotnet add package Prove.Proveapi
# Or using Package Manager Console
Install-Package Prove.Proveapi
```
## Authentication
Identity Manager uses OAuth 2.0 client credentials authentication. Obtain an access token before making API calls.
```go Go theme={"dark"}
clientID := os.Getenv("PROVE_CLIENT_ID")
clientSecret := os.Getenv("PROVE_CLIENT_SECRET")
proveEnv := "uat-us" // Use UAT in US region.
client := provesdkservergo.New(
provesdkservergo.WithServer(proveEnv),
provesdkservergo.WithSecurity(components.Security{
ClientID: provesdkservergo.String(clientID),
ClientSecret: provesdkservergo.String(clientSecret),
}),
)
```
```typescript TypeScript theme={"dark"}
export const DEVICE_API_BASE_URL = process.env.DEVICE_API_BASE_URL || '';
export const PROVE_CLIENT_ID = process.env.PROVE_CLIENT_ID;
export const PROVE_CLIENT_SECRET = process.env.PROVE_CLIENT_SECRET;
export function getProveSdk(): Proveapi {
return new Proveapi({
server: 'uat-us',
security: {
clientID: PROVE_CLIENT_ID,
clientSecret: PROVE_CLIENT_SECRET,
},
});
}
```
```java Java theme={"dark"}
String clientId = System.getenv("PROVE_CLIENT_ID");
String clientSecret = System.getenv("PROVE_CLIENT_SECRET");
Proveapi sdk = Proveapi.builder()
.security(Security.builder()
.clientID(clientId)
.clientSecret(clientSecret)
.build())
.build();
```
```csharp .NET theme={"dark"}
var clientId = Environment.GetEnvironmentVariable("PROVE_CLIENT_ID");
var clientSecret = Environment.GetEnvironmentVariable("PROVE_CLIENT_SECRET");
var sdk = new ProveAPI(serverUrl: "https://platform.uat.proveapis.com");
var tokenRequest = new V3TokenRequest
{
ClientId = clientId,
ClientSecret = clientSecret,
GrantType = "client_credentials"
};
var tokenResponse = await sdk.V3.V3TokenRequestAsync(tokenRequest);
var accessToken = tokenResponse.V3TokenResponse?.AccessToken;
_sdk = new ProveAPI(auth: accessToken, serverUrl: "https://platform.uat.proveapis.com");
```
Token Expiration
The OAuth token expires after 60 minutes, requiring you to get another token. The SDK handles token refresh automatically.
## API functions
Identity Manager provides eight core functions for comprehensive identity management. Refer to the [API reference documentation](https://developer.prove.com/reference/identity-manager-create-identity) for detailed information on each endpoint.
### Enroll Identity
Enrolls a single identity for monitoring.
```go Go theme={"dark"}
rspEnrollIdentity, err := client.IdentityManager.V3EnrollIdentity(ctx &components.V3EnrollIdentityRequest{
PhoneNumber: "2001004031",
ClientCustomerId: provesdkservergo.String("customer-123"),
ClientRequestId: provesdkservergo.String("request-456"),
})
if err != nil {
return fmt.Errorf("error creating identity: %w", err)
}
// Access response fields
identityId := rspEnrollIdentity.V3EnrollIdentityResponse.IdentityId
success := rspEnrollIdentity.V3EnrollIdentityResponse.Success
```
```typescript TypeScript theme={"dark"}
const enrollIdentityReq = {
phoneNumber: '2001004031',
clientCustomerId: 'customer-123',
clientRequestId: 'request-456'
};
const rspEnrollIdentity = await sdk.identityManager.v3EnrollIdentity(enrollIdentityReq);
// Access response fields
const identityId = rspEnrollIdentity.v3EnrollIdentityResponse?.identityId;
const success = rspEnrollIdentity.v3EnrollIdentityResponse?.success;
```
```java Java theme={"dark"}
EnrollIdentityRequest req = V3EnrollIdentityRequest.builder()
.phoneNumber("2001004031")
.clientCustomerId("customer-123")
.clientRequestId("request-456")
.build();
EnrollIdentityResponse res = sdk.identityManager().enrollIdentity()
.request(req)
.call();
// Access response fields
String identityId = res.enrollIdentityResponse().identityId();
String success = res.enrollIdentityResponse().success();
```
**Parameters:**
* `phoneNumber` : The number of the consumer you want to enroll.
**Optional Parameters:**
* `clientCustomerId` : A client-generated unique ID for a specific customer.
* `clientRequestId` : A client-generated unique ID for a specific session.
* `deviceId` : A string that's the unique identifier for the Prove Key on the device. Only applicable if you are leveraging Prove Unified Authentication.
**Returns:**
* `identityId`: A unique Prove-generated identifier for the enrolled identity.
* `success`: If true, the request succeeded and the system created the identity.
### Batch enroll identities
Enrolls several customers in a single request for efficient bulk operations.
```go Go theme={"dark"}
identities := []components.IdentityData{
{
PhoneNumber: "2001004031",
ClientCustomerId: provesdkservergo.String("customer-123"),
},
{
PhoneNumber: "2001004035",
ClientCustomerId: provesdkservergo.String("customer-124"),
},
}
rspBatchEnroll, err := client.IdentityManager.V3BatchEnrollIdentities(ctx, &components.V3BatchEnrollIdentitiesRequest{
Identities: identities,
})
```
```typescript TypeScript theme={"dark"}
const batchEnrollReq = {
identities: [
{
phoneNumber: '2001004031',
clientCustomerId: 'customer-123'
},
{
phoneNumber: '2001004035',
clientCustomerId: 'customer-124'
}
]
};
const rspBatchEnroll = await sdk.identityManager.v3BatchEnrollIdentities(batchEnrollReq);
```
```java Java theme={"dark"}
List identities = Arrays.asList(
IdentityData.builder()
.phoneNumber("2001004031")
.clientCustomerId("customer-123")
.build(),
IdentityData.builder()
.phoneNumber("2001004035")
.clientCustomerId("customer-124")
.build()
);
V3BatchEnrollIdentitiesRequest req = V3BatchEnrollIdentitiesRequest.builder()
.identities(identities)
.build();
V3BatchEnrollIdentitiesResponse res = sdk.identityManager().v3BatchEnrollIdentities()
.request(req)
.call();
```
**Parameters:**
* `clientRequestId` : A client-generated unique ID for a specific session.
* `items`: Represents a list of identities that you wish to enroll.
**Returns:**
* `results`: Represents a list of identities that were either successfully enrolled or an error message.
### Batch get identities
Return a list of all identities you have enrolled in Identity Manager with pagination support.
```go Go theme={"dark"}
rspGetIdentities, err := client.IdentityManager.V3BatchGetIdentities(ctx, &components.GetIdentitiesRequest{
Limit: provesdkservergo.Int(50),
})
```
```typescript TypeScript theme={"dark"}
const rspGetIdentities = await sdk.identityManager.getIdentities({
limit: 50
});
```
```java Java theme={"dark"}
GetIdentitiesRequest req = GetIdentitiesRequest.builder()
.limit(50)
.build();
GetIdentitiesResponse res = sdk.identityManager().getIdentities()
.request(req)
.call();
```
**Parameters:**
* `limit` : The maximum number of identities to return per call.
**Returns:**
* `lastKey`: A pagination token for callers that have more identities to return.
* `results`: The list of identity IDs associated with the client.
### Get Identity
Return details of an identity given the identity ID.
```go Go theme={"dark"}
rspGetIdentity, err := client.IdentityManager.V3GetIdentity(ctx, "identity-id-123")
```
```typescript TypeScript theme={"dark"}
const rspGetIdentity = await sdk.identityManager.v3GetIdentity("identity-id-123");
```
```java Java theme={"dark"}
GetIdentityResponse res = sdk.identityManager().v3GetIdentity("identity-id-123").call();
```
**Parameters:**
* `identityId` : A unique Prove-generated identifier for the enrolled identity.
**Returns:**
* Complete identity object with all associated data.
### Get identities by phone number
Return a list of all identities you have enrolled with this phone number.
```go Go theme={"dark"}
rspLookup, err := client.IdentityManager.V3GetIdentitiesByPhoneNumber(ctx, &components.LookupIdentityRequest{
PhoneNumber: "2001004031",
})
```
```typescript TypeScript theme={"dark"}
const rspLookup = await sdk.identityManager.v3GetIdentitiesByPhoneNumber({
phoneNumber: '2001004031'
});
```
```java Java theme={"dark"}
LookupIdentityRequest req = LookupIdentityRequest.builder()
.phoneNumber("2001004031")
.build();
LookupIdentityResponse res = sdk.identityManager().v3GetIdentitiesByPhoneNumber()
.request(req)
.call();
```
**Parameters:**
* `mobileNumber` : The phone number to retrieve identities for.
**Returns:**
* `items`: The list of identities associated with the given phone number.
### Activate Identity
Sets an identity as active for monitoring.
```go Go theme={"dark"}
rspActivate, err := client.IdentityManager.V3ActivateIdentity(ctx, "identity-id-123")
```
```typescript TypeScript theme={"dark"}
const rspActivate = await sdk.identityManager.v3ActivateIdentity("identity-id-123");
```
```java Java theme={"dark"}
ActivateIdentityResponse res = sdk.identityManager().v3ActivateIdentity("identity-id-123").call();
```
**Parameters:**
* `identityId` : A Prove-generated unique ID for a specific identity.
**Returns:**
* `success`: Boolean indicating if activation was successful.
### Deactivate Identity
Sets an identity as inactive, stopping webhook notifications.
```go Go theme={"dark"}
rspDeactivate, err := client.IdentityManager.V3DeactivateIdentity(ctx, "identity-id-123")
```
```typescript TypeScript theme={"dark"}
const rspDeactivate = await sdk.identityManager.v3DeactivateIdentity("identity-id-123");
```
```java Java theme={"dark"}
DeactivateIdentityResponse res = sdk.identityManager().v3DeactivateIdentity("identity-id-123").call();
```
**Parameters:**
* `identityId`: The unique identifier of the identity.
**Returns:**
* `success`: If true, the deactivate operation was successful.
Deactivated identities remain in the system and can be reactivated later. Use this instead of disenroll for temporary monitoring suspension.
### Disenroll identity
Disenrolls an identity from Identity Manager. If you wish to watch it in the future, you must re-enroll that identity.
```go Go theme={"dark"}
rspDelete, err := client.IdentityManager.V3DisenrollIdentity(ctx, "identity-id-123")
```
```typescript TypeScript theme={"dark"}
const rspDelete = await sdk.identityManager.v3DisenrollIdentity("identity-id-123");
```
```java Java theme={"dark"}
DisenrollIdentityResponse res = sdk.identityManager().v3DisenrollIdentity("identity-id-123").call();
```
**Parameters:**
* `identityId`: The unique identifier of the identity.
**Returns:**
* `success`: If true, the disenroll operation was successful.
Disenrolled identities can't be recovered through the API. Consider using deactivation instead for temporary suspension.
Always test your implementation in the sandbox environment before moving to production.
# Server-Side SDK Guide
Source: https://developer.prove.com/reference/identity-server
Learn more about the details of the server-side SDK
Prove provides server-side SDKs in the following languages: Go, Java, .NET, TypeScript, and JavaScript. If you use a different back end language, you can interact with the API endpoints.
## Installation
Install the server-side SDK of your choice by running a command in your terminal, or by using a dependency management tool specific to your project.
```go Go theme={"dark"}
# The Go library is hosted on GitHub so you can use this command to import it
# to your Go application.
go get github.com/prove-identity/prove-sdk-server-go
# Ensure you import the SDK in your code like this:
import (
provesdkservergo "github.com/prove-identity/prove-sdk-server-go"
"github.com/prove-identity/prove-sdk-server-go/models/components"
)
```
```typescript TypeScript theme={"dark"}
# Run this command to install package from GitHub and save as a dependency
npm install -S @prove-identity/prove-api
# Import the SDK in your code like this:
import { Proveapi } from "@prove-identity/prove-api";
import { OAuthClient, WithAuthorization } from "@prove-identity/prove-api/sdk/oauth"
```
```java Java theme={"dark"}
# See the latest version number here: https://central.sonatype.com/artifact/com.prove/proveapi
Gradle:
implementation 'com.prove:proveapi:0.10.0'
Maven:
com.prove
proveapi
0.10.0
```
```csharp .NET theme={"dark"}
// Run this command to install package from Nuget and save as a dependency
dotnet add package Prove.Proveapi --version 1.0.1
// Ensure you import the SDK in your code like this:
using Prove.Proveapi;
using Prove.Proveapi.Models.Components;
```
Prove provides code samples for how to interact with the API endpoints in many different languages. Browse the API Reference page and select your language.
## Authentication
To access the Prove API, use your OAuth 2.0 client ID and client secret.
You can load these from environment variables or another method:
```go Go theme={"dark"}
clientID := os.Getenv("PROVE_CLIENT_ID")
clientSecret := os.Getenv("PROVE_CLIENT_SECRET")
proveEnv := "uat-us" // Use UAT in US region.
client := provesdkservergo.New(
provesdkservergo.WithServer(proveEnv),
provesdkservergo.WithSecurity(components.Security{
ClientID: provesdkservergo.String(clientID),
ClientSecret: provesdkservergo.String(clientSecret),
}),
)
```
```typescript TypeScript theme={"dark"}
export const DEVICE_API_BASE_URL = process.env.DEVICE_API_BASE_URL || '';
export const PROVE_CLIENT_ID = process.env.PROVE_CLIENT_ID;
export const PROVE_CLIENT_SECRET = process.env.PROVE_CLIENT_SECRET;
export function getProveSdk(): Proveapi {
return new Proveapi({
server: 'uat-us',
security: {
clientID: PROVE_CLIENT_ID,
clientSecret: PROVE_CLIENT_SECRET,
},
});
}
```
```java Java theme={"dark"}
String clientId = System.getenv("PROVE_CLIENT_ID");
String clientSecret = System.getenv("PROVE_CLIENT_SECRET");
Proveapi sdk = Proveapi.builder()
.security(Security.builder()
.clientID(clientId)
.clientSecret(clientSecret)
.build())
.build();
```
```csharp .NET theme={"dark"}
var clientId = Environment.GetEnvironmentVariable("PROVE_CLIENT_ID");
var clientSecret = Environment.GetEnvironmentVariable("PROVE_CLIENT_SECRET");
var sdk = new ProveAPI(serverUrl: "https://platform.uat.proveapis.com");
var tokenRequest = new V3TokenRequest
{
ClientId = clientId,
ClientSecret = clientSecret,
GrantType = "client_credentials"
};
var tokenResponse = await sdk.V3.V3TokenRequestAsync(tokenRequest);
var accessToken = tokenResponse.V3TokenResponse?.AccessToken;
_sdk = new ProveAPI(auth: accessToken, serverUrl: "https://platform.uat.proveapis.com");
```
Token Expiration
The OAuth token expires after 60 minutes, requiring you to get another token.
## Next field
Each of the functions return a `Next` field. This field signals which function you call next.
## `Start()`
Add an endpoint to your server such as `POST /initiate` so the front end can submit the flow type, phone number, and the challenge. On the back end, start a Prove flow with a call to the `Start()` function. This function takes these required parameters:
* Flow Type: either `desktop` or `mobile` to describe which type of device the customer is starting their flow on.
Possession Timeouts
When flow type is `desktop`, Instant Link performs the possession check. When flow type is `mobile`, first Mobile Auth, if enabled, and then one-time password (OTP) as a fallback. The Instant Link session has a three minute timeout from when it's sent through SMS to when the customer can selects it. The OTP session has a two minute timeout from when it's sent through SMS to when the customer can enter in the OTP.
* Final Target URL: required when `flowType=desktop`. This should be a URL you support. When the customer clicks the Instant Link, the workflow sends the customer to this URL, which instructs them to continue the process. Maximum length is 128 characters.
These parameters are optional:
* `ssn`: full or last four digits of the customer's social security number. You can pass it into `Start()` or `Challenge()`.
* `dob`: date of birth in one of these formats: `YYYY-MM-DD`, `YYYY-MM`, `MM-DD`. You can pass it into `Start()` or `Challenge()`.
* `allowOTPRetry`: set to `true` to allow the customer to re-enter the OTP up to three times. Defaults to `false`.
For OTP retries, make sure to implement client SDK changes as detailed in the [Implementation Guide](https://developer.prove.com/docs/prove-pre-fill-implementation-guide#request-new-otp-code).
```go Go theme={"dark"}
ctx := context.TODO()
rspStart, err := client.V3.V3StartRequest(ctx, &components.V3StartRequest{
FlowType: "desktop",
FinalTargetURL: provesdkservergo.String("https://prove.com"),
PhoneNumber: provesdkservergo.String("2001001686"),
Ssn: provesdkservergo.String("8370"),
})
if err != nil {
t.Fatal(err)
}
```
```typescript TypeScript theme={"dark"}
const startReq = {
flowType: 'desktop',
finalTargetUrl: 'https://prove.com',
phoneNumber: '2001001686',
ssn: '8370',
};
const rspStart = await sdk.v3.v3StartRequest(startReq);
```
```java Java theme={"dark"}
V3StartRequest req = V3StartRequest.builder()
.flowType("desktop")
.finalTargetUrl("https://prove.com")
.phoneNumber("2001001686")
.ssn("8370")
.build();
V3StartRequestResponse startReqResp = sdk.v3().v3StartRequest()
.request(req)
.call();
V3StartResponse startResponse = startReqResp.v3StartResponse().get();
```
```csharp .NET theme={"dark"}
var startReq = new V3StartRequest
{
FlowType = "desktop",
FinalTargetUrl = "https://prove.com",
PhoneNumber = "2001001686",
Ssn = "8370"
};
var rspStart = await _sdk.V3.V3StartRequestAsync(startReq);
```
The function returns the following fields:
* Auth Token: send this to your client-side code through the `Authenticate()` function - it's a short lived JSON Web Token (JWT) tied to the current flow and used for the possession checks.
* Correlation ID: save this in your current session, then pass it in to each of the `Validate()`, `Challenge()`, and `Complete()` function calls of the same flow. The correlation ID ties together different system calls for the same Prove flow. It can aids in troubleshooting. The session expires in 15 minutes from when the correlation ID returns from the `Start()` call.
* Next: map of the next API call you make.
Return the auth token in a response to the front end.
The phone number field is also required in Sandbox to determine which scenario you're testing. Neglecting to pass in the phone number of a valid test user returns a "no test user found matching the phone number" error.
## `Validate()`
Once the possession checks finish on the mobile device, the finish handler on the client-side SDK executes. You then make a request to your server such as `POST /verify` to make the next call in the flow to the `Validate()` function.
This function requires the Correlation ID: the ID returned by the `Start()` function.
```go Go theme={"dark"}
rspValidate, err := client.V3.V3ValidateRequest(ctx, &components.V3ValidateRequest{
CorrelationID: rspStart.V3StartResponse.CorrelationID,
})
if err != nil {
t.Fatal(err)
}
```
```typescript TypeScript theme={"dark"}
const rspValidate = await sdk.v3.v3ValidateRequest({
correlationId: rspStart.v3StartResponse?.correlationId || '',
});
```
```java Java theme={"dark"}
V3ValidateRequest validateReq = V3ValidateRequest.builder()
.correlationId(startResponse.correlationId())
.build();
V3ValidateRequestResponse validateReqResp = sdk.v3().v3ValidateRequest()
.request(validateReq)
.call();
V3ValidateResponse validateResp = validateReqResp.v3ValidateResponse().get();
```
```csharp .NET theme={"dark"}
var rspValidate = await _sdk.V3.V3ValidateRequestAsync(new V3ValidateRequest
{
CorrelationId = rspStart.V3StartResponse?.CorrelationId
});
```
The function returns the following fields:
* Success: either `true` if the mobile number validation was successful, or `false` if it failed.
* Challenge Missing: when `true`, pass the challenge into the `Challenge()` function.
* Phone Number: either the validated phone number or no field.
* Next: map of the next API call.
The challenge missing field determines if you must return to the front end and request either the last four of their social security number or date of birth. If the challenge was already passed into the `Start()` call, the back end can then make a call to the `Challenge()` function and return the results to the front end.
## `Complete()`
Once the customer reviews their information and makes any edits, submit the customer information to the back end for verification.
This function is the final call in the flow that verifies the customer information.
This function takes these required parameters:
* Correlation ID: this is the ID returned by the `Start()` function. It validates against this regular expression: `^[0-9a-f]{8}-[0-9a-f]{4}-[0-9a-f]{4}-[0-9a-f]{4}-[0-9a-f]{12}$`.
* Individual: customer information in a map.
```go Go theme={"dark"}
rspComplete, err := client.V3.V3CompleteRequest(ctx, &components.V3CompleteRequest{
CorrelationID: rspStart.V3StartResponse.CorrelationID,
Individual: components.V3CompleteIndividualRequest{
FirstName: provesdkservergo.String("Tod"),
LastName: provesdkservergo.String("Weedall"),
Addresses: []components.V3CompleteAddressEntryRequest{
{
Address: provesdkservergo.String("39 South Trail"),
City: provesdkservergo.String("San Antonio"),
Region: provesdkservergo.String("TX"),
PostalCode: provesdkservergo.String("78285"),
},
},
Ssn: provesdkservergo.String("565228370"),
Dob: provesdkservergo.String("1984-12-10"),
EmailAddresses: []string{
"tweedalld@ehow.com",
},
},
})
if err != nil {
t.Fatal(err)
}
```
```typescript TypeScript theme={"dark"}
const rspComplete = await sdk.v3.v3CompleteRequest({
correlationId: rspStart.v3StartResponse?.correlationId || '',
individual: {
addresses: [
{
address: '39 South Trail',
city: 'San Antonio',
postalCode: '78285-2622',
region: 'TX',
},
],
dob: '1984-12-10',
emailAddresses: ['tweedalld@ehow.com'],
firstName: 'Tod',
lastName: 'Weedall',
ssn: '565228370',
},
});
```
```java Java theme={"dark"}
List addresses = new ArrayList<>(
Arrays.asList(V3CompleteAddressEntryRequest.builder().address("39 South Trail").city("San Antonio")
.postalCode("78285-2622").region("TX").build()));
V3CompleteRequest completeReq = V3CompleteRequest.builder()
.correlationId(startResponse.correlationId())
.individual(V3CompleteIndividualRequest.builder()
.ssn("565228370")
.firstName("Tod")
.lastName("Weedall")
.emailAddresses(new ArrayList<>(Arrays.asList("tweedalld@ehow.com")))
.dob("1984-12-10")
.addresses(addresses)
.build())
.build();
V3CompleteRequestResponse completeReqResp = sdk.v3().v3CompleteRequest()
.request(completeReq)
.call();
V3CompleteResponse completeResp = completeReqResp.v3CompleteResponse().get();
```
```csharp .NET theme={"dark"}
var rspComplete = await _sdk.V3.V3CompleteRequestAsync(new V3CompleteRequest
{
CorrelationId = rspStart.V3StartResponse?.CorrelationId,
Individual = new V3CompleteIndividualRequest
{
FirstName = rspChallenge.V3ChallengeResponse?.Individual?.FirstName,
LastName = rspChallenge.V3ChallengeResponse?.Individual?.LastName,
Ssn = rspChallenge.V3ChallengeResponse?.Individual?.Ssn,
Dob = rspChallenge.V3ChallengeResponse?.Individual?.Dob,
EmailAddresses = rspChallenge.V3ChallengeResponse?.Individual?.EmailAddresses,
Addresses = rspChallenge.V3ChallengeResponse?.Individual?.Addresses?.Select(addr => new V3CompleteAddressEntryRequest
{
Address = addr.Address,
City = addr.City,
Region = addr.Region,
PostalCode = addr.PostalCode
}).ToList()
}
});
```
The function returns the following fields:
* Success: `true` if customer information returned.
* Next: map of the next API call you need to make, in this case, `Done`.
You can then respond to the front end with the results of the customer verification.
SDK Updates
Prove hosts the server-side SDKs on [GitHub](https://github.com/prove-identity). Once you create a free GitHub account, you can Watch any of the projects to receive notifications.
# Client-Side Web SDK
Source: https://developer.prove.com/reference/identity-web-sdk
Learn how to integrate the client-side web SDK into your web app
## Supported languages
Prove provides client web SDKs in the following languages: TypeScript and JavaScript.
## Installation
The Prove Platform Web SDK has an unpacked size of 171 KB, and a single dependency: `@prove-identity/mobile-auth`. Install the client-side SDK of your choice by running a command in your terminal, or by using a dependency management tool specific to your project.
```shell NPM theme={"dark"}
# Run this command to install the package (ensure you have the latest version).
npm install @prove-identity/prove-auth@3.1.1
```
```html No Package Manager theme={"dark"}
# You can include this file in your web application from jsDelivr (update with the latest version).
# You can also download the JavaScript file from https://cdn.jsdelivr.net/npm/@prove-identity/prove-auth@3.1.1/build/bundle/release/prove-auth.js and store it locally.
```
**Angular TypeScript Compilation Error**
Some Angular projects may experience TypeScript compilation errors when building with the Prove Web SDK. This is a known issue that affects various Angular versions.
To correct this, add or update the `skipLibCheck` setting in your `tsconfig.json` file:
```json tsconfig.json theme={"dark"}
{
"compilerOptions": {
"skipLibCheck": true,
// ... other options
}
}
```
This setting tells TypeScript to skip type checking of declaration files (`.d.ts` files) from external libraries, which resolves the compilation issues while maintaining type safety for your own code.
**Affected Versions:**
* Angular 17.x (confirmed with Angular 17.3.3)
* Other Angular versions may also be affected
## Find the type of flow: mobile or desktop
You can find if the customer is on a mobile or desktop browser using this example. If the `isMobile` is true, pass `mobile` to the `Start()` function on the server, otherwise you can pass `desktop`:
```javascript JavaScript theme={"dark"}
// Check if the customer is on a mobile or desktop browser.
const authCheck = new proveAuth.AuthenticatorBuilder().build();
let isMobile = authCheck.isMobileWeb()
```
```typescript TypeScript theme={"dark"}
// Check if the customer is on a mobile or desktop browser.
const authCheck = new proveAuth.AuthenticatorBuilder().build();
let isMobile = authCheck.isMobileWeb()
```
In a mobile flow, Mobile Auth executes first and if that fails, performs one-time password (OTP) validation on the mobile phone. In a desktop flow, Instant Link sends a text message to the mobile phone for verification.
In the mobile flow, once either Mobile Auth or the OTP validation completes, the `AuthFinishStep` function finishes.
Mobile Auth
In order for Mobile Auth to succeed:
* Disable VPN.
* Disable Private Relay on iOS.
When testing, you can ignore any Chrome error messages that mention `ERR_TUNNEL_CONNECTION_FAILED` - this is due to the VPN, but the SDK fallbacks to OTP.
In the desktop flow, a WebSocket opens for 3 minutes on the desktop browser while waiting for the customer to select the link in the text message. Once clicked, the WebSocket closes and the `AuthFinishStep` function finishes.
## `Authenticate()`
The SDK requires an `authToken` as a parameter for the `Authenticate()` function. This token returns from the `Start()` call of the server-side SDK. The token is session specific, limiting it to a single flow. It also expires after 15 minutes.
## Retrieve `authToken`
Send a request to your back end server with the phone number, flow type, and an optional challenge to start the flow. This can either be the date of birth or last four digits of the social security number.
```javascript JavaScript theme={"dark"}
async function initialize(phoneNumber, ssn, flowType) {
const response = await fetch(backendUrl + "/initialize", {
method: "POST",
headers: {
Accept: "application/json",
"Content-Type": "application/json",
},
body: JSON.stringify({
phoneNumber: phoneNumber,
flowType: flowType,
ssn: ssn,
}),
});
const rsp = await response.json();
const authToken = rsp.authToken;
return authToken;
}
```
```typescript TypeScript theme={"dark"}
async function initialize(
phoneNumber: string,
ssn: string,
flowType: string
): Promise {
const response = await fetch(backendUrl + "/initialize", {
method: "POST",
headers: {
Accept: "application/json",
"Content-Type": "application/json",
},
body: JSON.stringify({
phoneNumber: phoneNumber,
flowType: flowType,
ssn: ssn,
}),
});
const rsp = await response.json();
const authToken = rsp.authToken;
return authToken;
}
```
## Setup authenticator
Once you have the `authToken`, build the authenticator for both the mobile and desktop flows.
Mobile Auth Implementations Only
If your application uses [Content Security Policy headers](https://content-security-policy.com/), you must configure them to allow WebSocket connections to Prove's authentication services:
Sandbox Environment
* `https://device.uat.proveapis.com:4443`
* `https://device.uat.proveapis.com`
* `http://device.uat.proveapis.com:4443`
* `http://device.uat.proveapis.com`
Production Environment
* `https://device.proveapis.com:4443`
* `https://device.proveapis.com`
* `http://device.proveapis.com:4443`
* `http://device.proveapis.com`
* `https://auth.svcs.verizon.com:22790`
Failure to configure these properly will prevent Mobile Auth functionality from working correctly in web flows.
```javascript JavaScript theme={"dark"}
async function authenticate(isMobileWeb, authToken) {
// Set up the authenticator for either mobile or desktop flow.
let builder = new proveAuth.AuthenticatorBuilder();
if (isMobileWeb) {
// Set up Mobile Auth and OTP.
builder = builder
.withAuthFinishStep((input) => verify(input.authId))
.withOtpFallback(otpStart, otpFinish);
} else {
// Set up Instant Link.
builder = builder
.withAuthFinishStep((input) => verify(input.authId))
.withInstantLinkFallback(instantLink)
.withRole("secondary");
}
const authenticator = builder.build();
// Authenticate with the authToken.
return authenticator.authenticate(authToken);
}
```
```typescript TypeScript theme={"dark"}
async function authenticate(isMobileWeb: boolean, authToken: string) {
// Set up the authenticator for either mobile or desktop flow.
let builder = new proveAuth.AuthenticatorBuilder();
if (isMobileWeb) {
// Set up Mobile Auth and OTP.
builder = builder
.withAuthFinishStep((input) => verify(input.authId))
.withOtpFallback(otpStart, otpFinish);
} else {
// Set up Instant Link.
builder = builder
.withAuthFinishStep((input) => verify(input.authId))
.withInstantLinkFallback(instantLink)
.withRole("secondary");
}
const authenticator = builder.build();
// Authenticate with the authToken.
return authenticator.authenticate(authToken);
}
```
## Validate the mobile phone
In the `AuthFinishStep`, specify a function to call once the possession checks complete on the mobile phone. This endpoint on your back end server calls the `Validate()` function to validate the phone number. If it was successful, the server returns the results from the `Challenge()` function including customer information. Refer to the following example fields that return and then prefill on a form for the customer to verify. The `AuthFinishStep` then completes. If a user cancels, the server makes a call to the `Validate()` function and returns `success=false`.
```javascript JavaScript theme={"dark"}
// Send a verify request to get return customer information.
async function verify() {
const response = await fetch(backendUrl + "/verify", {
method: "POST",
headers: {
Accept: "application/json",
"Content-Type": "application/json",
},
body: JSON.stringify({}),
});
const results = await response.json();
const rsp = JSON.stringify(results);
const firstName = document.getElementById("firstNameInput");
const lastName = document.getElementById("lastNameInput");
firstName.value = rsp.firstName;
lastName.value = rsp.lastName;
return null;
}
```
```typescript TypeScript theme={"dark"}
// Send a verify request to get return customer information.
async function verify() {
const response = await fetch(backendUrl + "/verify", {
method: "POST",
headers: {
Accept: "application/json",
"Content-Type": "application/json",
},
body: JSON.stringify({}),
});
const results = await response.json();
const rsp = JSON.stringify(results);
const firstName = document.getElementById("firstNameInput");
const lastName = document.getElementById("lastNameInput");
firstName.value = rsp.firstName;
lastName.value = rsp.lastName;
return null;
}
```
## Configure OTP
To use the Resend/Retry/Phone Change features, you need to install the Web SDK version 2.15.1 or later.
To set the One-Time Password (OTP) handler, `withOtpFallback(startStep: OtpStartStep | OtpStartStepFn, finishStep: OtpFinishStep | OtpFinishStepFn)`, requires implementing the `OtpStartStep` and `OtpFinishStep`. When returning the phone number in the functions, ensure you return an object with the field `phoneNumber` to the `resolve()` function.
The OTP session has a two minute timeout from when it's sent through Short Message Service (SMS) to when the customer can enter in the OTP.
Follow these instructions if you are implementing OTP and you are passing in the phone number on the `/v3/start` endpoint. In this case, you've already prompted for a phone number so you don't need to prompt for it in the client SDK.
Since you passed the phone number in the `Start()` function, call `resolve(null)` to communicate to the SDK you have the customer's agreement to deliver the SMS message. Ensure you return an object to `resolve()` function.
```javascript JavaScript theme={"dark"}
function otpStartStep(phoneNumberNeeded, phoneValidationError) {
return new Promise((resolve, reject) => {
// Since no phone number is needed, don't prompt the user.
resolve(null);
});
}
```
```typescript TypeScript theme={"dark"}
const otpStartStep: OtpStartStep = {
execute: async (
phoneNumberNeeded: boolean,
phoneValidationError?: PhoneValidationError
): Promise => {
return new Promise((resolve, reject) => {
// Since no phone number is needed, don't prompt the user.
resolve(null);
});
},
};
```
Call the `reject('some error message')` method to communicate to the SDK any issues while trying to obtain the phone number or the OTP. Report an error if the customer cancels the SMS transaction or presses the back button to leave the screen.
In the finish step, call the `resolve(result: OtpFinishResult)` method to return the collected OTP value in which `result` variable has `OnSuccess` value for `OtpFinishResultType` and the OTP value wrapped in `OtpFinishInput`.
```javascript JavaScript theme={"dark"}
function otpFinishStep(otpError) {
return new Promise((resolve, reject) => {
// If error message is found, handle it.
if (otpError) {
// Set to a variable and display it in a field.
// In this example, we don't do anything with the error.
var someErrorMessage = otpError.message;
}
// Prompt the user for whether they received the SMS.
// Typically, this is a page that shows the OTP already. We are simplifying
// it by requiring an input.
var input = confirm('Did you receive a text message?');
if (!input) {
// Close the modal if a text message was not received.
return;
}
// Prompt the user for the OTP.
var otp = prompt('Enter OTP code:');
if (otp) {
// If the input is valid and the user clicked `OK`, return the OTP.
resolve({
input: { otp }, // OTP value
resultType: 0, // OnSuccess enum type = 0
});
} else {
// Else, exit the flow.
reject('phone invalid or user cancelled');
}
});
}
```
```typescript TypeScript theme={"dark"}
const otpFinishStep: OtpFinishStep = {
execute: async (otpError?: OtpError): Promise => {
return new Promise((resolve, reject) => {
// If error message is found, handle it.
if (otpError) {
// Set to a variable and display it in a field.
// In this example, we don't do anything with the error.
var someErrorMessage = otpError.message;
}
// Prompt the user for whether they received the SMS.
// Typically, this is a page that shows the OTP already. We are simplifying
// it by requiring an input.
var input = confirm('Did you receive a text message?');
if (!input) {
// Close the modal if a text message was not received.
return;
}
// Prompt the user for the OTP.
var otp = prompt('Enter OTP code:');
if (otp) {
// If the input is valid and the user clicked `OK`, return the OTP.
resolve({
input: { otp }, // OTP value
resultType: OtpFinishResultType.OnSuccess,
});
} else {
// Else, exit the flow.
reject('phone invalid or user cancelled');
}
});
},
};
```
Follow these instructions if implementing MobileAuth and collecting the phone number only if MobileAuth fails. This will implement OTP without allowing for SMS resends and phone number changes. If you do want those capabilities, please reference the subsequent tabs (Resend, Retry OTP, and Phone Number Change).
In the start step, call the `resolve(input: OtpStartInput)` method to return the collected phone number to the SDK.
```javascript JavaScript theme={"dark"}
function otpStartStep(phoneNumberNeeded, phoneValidationError) {
return new Promise((resolve, reject) => {
// If no phone number is needed, then don't prompt the user.
if (!phoneNumberNeeded) {
resolve(null);
return;
}
// If error message is found around phone number, handle it.
// The `phoneValidationError` is ONLY available when `phoneNumberNeeded`
// has a value.
if (phoneValidationError) {
// Set to a variable and display it in a field.
// In this example, we don't do anything with the error.
var someErrorMessage = phoneValidationError.message;
}
// Prompt the user for the phone number.
var input = prompt('Enter phone number:');
if (input) {
// If the input is valid and the user clicked `OK`, return the phone
// number.
resolve({
phoneNumber: input,
});
} else {
// Else, exit the flow.
reject('phone invalid or user cancelled');
}
});
}
```
```typescript TypeScript theme={"dark"}
const otpPromptStartStep: OtpStartStep = {
execute: async (
phoneNumberNeeded: boolean,
phoneValidationError?: PhoneValidationError
): Promise => {
return new Promise((resolve, reject) => {
// If no phone number is needed, then don't prompt the user.
if (!phoneNumberNeeded) {
resolve(null);
return;
}
// If error message is found around phone number, handle it.
// The `phoneValidationError` is ONLY available when `phoneNumberNeeded`
// has a value.
if (phoneValidationError) {
// Set to a variable and display it in a field.
// In this example, we don't do anything with the error.
var someErrorMessage = phoneValidationError.message;
}
// Prompt the user for the phone number.
var input = prompt('Enter phone number:');
if (input) {
// If the input is valid and the user clicked `OK`, return the phone
// number.
resolve({
phoneNumber: input,
});
} else {
// Else, exit the flow.
reject('phone invalid or user cancelled');
}
});
},
};
```
The finish step is implemented the same as the previous tab:
```javascript JavaScript theme={"dark"}
function otpFinishStep(otpError) {
return new Promise((resolve, reject) => {
// If error message is found, handle it.
if (otpError) {
// Set to a variable and display it in a field.
// In this example, we don't do anything with the error.
var someErrorMessage = otpError.message;
}
// Prompt the user for whether they received the SMS.
// Typically, this is a page that shows the OTP already. We are simplifying
// it by requiring an input.
var input = confirm('Did you receive a text message?');
if (!input) {
// Close the modal if a text message was not received.
return;
}
// Prompt the user for the OTP.
var otp = prompt('Enter OTP code:');
if (otp) {
// If the input is valid and the user clicked `OK`, return the OTP.
resolve({
input: { otp }, // OTP value
resultType: 0, // OnSuccess enum type = 0
});
} else {
// Else, exit the flow.
reject('phone invalid or user cancelled');
}
});
}
```
```typescript TypeScript theme={"dark"}
const otpFinishStep: OtpFinishStep = {
execute: async (otpError?: OtpError): Promise => {
return new Promise((resolve, reject) => {
// If error message is found, handle it.
if (otpError) {
// Set to a variable and display it in a field.
// In this example, we don't do anything with the error.
var someErrorMessage = otpError.message;
}
// Prompt the user for whether they received the SMS.
// Typically, this is a page that shows the OTP already. We are simplifying
// it by requiring an input.
var input = confirm('Did you receive a text message?');
if (!input) {
// Close the modal if a text message was not received.
return;
}
// Prompt the user for the OTP.
var otp = prompt('Enter OTP code:');
if (otp) {
// If the input is valid and the user clicked `OK`, return the OTP.
resolve({
input: { otp }, // OTP value
resultType: OtpFinishResultType.OnSuccess,
});
} else {
// Else, exit the flow.
reject('phone invalid or user cancelled');
}
});
},
};
```
Follow these instructions to allow the customer to request a new OTP via SMS using the same phone number. There is a max of three send attempts including the initial message.
The start step is implemented the same as the previous tab:
```javascript JavaScript theme={"dark"}
function otpStartStep(phoneNumberNeeded, phoneValidationError) {
return new Promise((resolve, reject) => {
// If no phone number is needed, then don't prompt the user.
if (!phoneNumberNeeded) {
resolve(null);
return;
}
// If error message is found around phone number, handle it.
// The `phoneValidationError` is ONLY available when `phoneNumberNeeded`
// has a value.
if (phoneValidationError) {
// Set to a variable and display it in a field.
// In this example, we don't do anything with the error.
var someErrorMessage = phoneValidationError.message;
}
// Prompt the user for the phone number.
var input = prompt('Enter phone number:');
if (input) {
// If the input is valid and the user clicked `OK`, return the phone
// number.
resolve({
phoneNumber: input,
});
} else {
// Else, exit the flow.
reject('phone invalid or user cancelled');
}
});
}
```
```typescript TypeScript theme={"dark"}
const otpPromptStartStep: OtpStartStep = {
execute: async (
phoneNumberNeeded: boolean,
phoneValidationError?: PhoneValidationError
): Promise => {
return new Promise((resolve, reject) => {
// If no phone number is needed, then don't prompt the user.
if (!phoneNumberNeeded) {
resolve(null);
return;
}
// If error message is found around phone number, handle it.
// The `phoneValidationError` is ONLY available when `phoneNumberNeeded`
// has a value.
if (phoneValidationError) {
// Set to a variable and display it in a field.
// In this example, we don't do anything with the error.
var someErrorMessage = phoneValidationError.message;
}
// Prompt the user for the phone number.
var input = prompt('Enter phone number:');
if (input) {
// If the input is valid and the user clicked `OK`, return the phone
// number.
resolve({
phoneNumber: input,
});
} else {
// Else, exit the flow.
reject('phone invalid or user cancelled');
}
});
},
};
```
You can then send a new OTP SMS to the same phone number by implementing the finish step like this:
```javascript JavaScript theme={"dark"}
function otpFinishStep(otpError) {
return new Promise((resolve, reject) => {
// If error message is found, handle it.
if (otpError) {
// Set to a variable and display it in a field.
// In this example, we don't do anything with the error.
var someErrorMessage = otpError.message;
}
// Prompt the user for whether they received the SMS.
// Typically, this is a page that shows the OTP already. We are simplifying
// it by requiring an input.
var input = confirm('Did you receive a text message?');
if (!input) {
// If `Cancel`, then resend to the same phone number.
resolve({
resultType: 1, // OnResendOtp enum type = 1
});
return;
}
// Prompt the user for the OTP.
var otp = prompt('Enter OTP code:');
if (otp) {
// If the input is valid and the user clicked `OK`, return the OTP.
resolve({
input: { otp }, // OTP value
resultType: 0, // OnSuccess enum type = 0
});
} else {
// Else, exit the flow.
reject('phone invalid or user cancelled');
}
});
}
```
```typescript TypeScript theme={"dark"}
const otpMultipleResendFinishStep: OtpFinishStep = {
execute: async (otpError?: OtpError): Promise => {
return new Promise((resolve, reject) => {
// If error message is found, handle it.
if (otpError) {
// Set to a variable and display it in a field.
// In this example, we don't do anything with the error.
var someErrorMessage = otpError.message;
}
// Prompt the user for whether they received the SMS.
// Typically, this is a page that shows the OTP already. We are simplifying
// it by requiring an input.
var input = confirm('Did you receive a text message?');
if (!input) {
// If `Cancel`, then resend to the same phone number.
resolve({
resultType: 1, // OnResendOtp enum type = 1
});
return;
}
// Prompt the user for the OTP.
var otp = prompt('Enter OTP code:');
if (otp) {
// If the input is valid and the user clicked `OK`, return the OTP.
resolve({
input: { otp }, // OTP value
resultType: OtpFinishResultType.OnSuccess,
});
} else {
// Else, exit the flow.
reject('phone invalid or user cancelled');
}
});
},
};
```
Follow these instructions to allow the customer to re-enter the OTP PIN if they type it wrong. There is a max of 3 attempts. To implement this functionality, you also need to pass in `allowOTPRetry=true` to the `/v3/start` endpoint.
The start step is implemented the same as either of the the previous tabs - no client side code changes necessary:
```javascript JavaScript theme={"dark"}
function otpStartStep(phoneNumberNeeded, phoneValidationError) {
return new Promise((resolve, reject) => {
// If no phone number is needed, then don't prompt the user.
if (!phoneNumberNeeded) {
resolve(null);
return;
}
// If error message is found around phone number, handle it.
// The `phoneValidationError` is ONLY available when `phoneNumberNeeded`
// has a value.
if (phoneValidationError) {
// Set to a variable and display it in a field.
// In this example, we don't do anything with the error.
var someErrorMessage = phoneValidationError.message;
}
// Prompt the user for the phone number.
var input = prompt('Enter phone number:');
if (input) {
// If the input is valid and the user clicked `OK`, return the phone
// number.
resolve({
phoneNumber: input,
});
} else {
// Else, exit the flow.
reject('phone invalid or user cancelled');
}
});
}
```
```typescript TypeScript theme={"dark"}
const otpPromptStartStep: OtpStartStep = {
execute: async (
phoneNumberNeeded: boolean,
phoneValidationError?: PhoneValidationError
): Promise => {
return new Promise((resolve, reject) => {
// If no phone number is needed, then don't prompt the user.
if (!phoneNumberNeeded) {
resolve(null);
return;
}
// If error message is found around phone number, handle it.
// The `phoneValidationError` is ONLY available when `phoneNumberNeeded`
// has a value.
if (phoneValidationError) {
// Set to a variable and display it in a field.
// In this example, we don't do anything with the error.
var someErrorMessage = phoneValidationError.message;
}
// Prompt the user for the phone number.
var input = prompt('Enter phone number:');
if (input) {
// If the input is valid and the user clicked `OK`, return the phone
// number.
resolve({
phoneNumber: input,
});
} else {
// Else, exit the flow.
reject('phone invalid or user cancelled');
}
});
},
};
```
The finish step is implemented the same as either of the the previous tabs - no client side code changes necessary. If the OTP is invalid, the finish step will be called again to prompt the user for a new input. Once the max attempts is reached, the `AuthFinish` function will be called.
```javascript JavaScript theme={"dark"}
function otpFinishStep(otpError) {
return new Promise((resolve, reject) => {
// If error message is found, handle it.
if (otpError) {
// Set to a variable and display it in a field.
// In this example, we don't do anything with the error.
var someErrorMessage = otpError.message;
}
// Prompt the user for whether they received the SMS.
// Typically, this is a page that shows the OTP already. We are simplifying
// it by requiring an input.
var input = confirm('Did you receive a text message?');
if (!input) {
// Close the modal if a text message was not received.
return;
}
// Prompt the user for the OTP.
var otp = prompt('Enter OTP code:');
if (otp) {
// If the input is valid and the user clicked `OK`, return the OTP.
resolve({
input: { otp }, // OTP value
resultType: 0, // OnSuccess enum type = 0
});
} else {
// Else, exit the flow.
reject('phone invalid or user cancelled');
}
});
}
```
```typescript TypeScript theme={"dark"}
const otpFinishStep: OtpFinishStep = {
execute: async (otpError?: OtpError): Promise => {
return new Promise((resolve, reject) => {
// If error message is found, handle it.
if (otpError) {
// Set to a variable and display it in a field.
// In this example, we don't do anything with the error.
var someErrorMessage = otpError.message;
}
// Prompt the user for whether they received the SMS.
// Typically, this is a page that shows the OTP already. We are simplifying
// it by requiring an input.
var input = confirm('Did you receive a text message?');
if (!input) {
// Close the modal if a text message was not received.
return;
}
// Prompt the user for the OTP.
var otp = prompt('Enter OTP code:');
if (otp) {
// If the input is valid and the user clicked `OK`, return the OTP.
resolve({
input: { otp }, // OTP value
resultType: OtpFinishResultType.OnSuccess,
});
} else {
// Else, exit the flow.
reject('phone invalid or user cancelled');
}
});
},
};
```
Follow these instructions to allow the customer to re-enter their phone number. There is a max of three entries/send attempts.
Manual Request Required
To enable phone number change capabilities on your credentials, contact your Prove representative.
The start step is implemented the same as the previous tab:
```javascript JavaScript theme={"dark"}
function otpStartStep(phoneNumberNeeded, phoneValidationError) {
return new Promise((resolve, reject) => {
// If no phone number is needed, then don't prompt the user.
if (!phoneNumberNeeded) {
resolve(null);
return;
}
// If error message is found around phone number, handle it.
// The `phoneValidationError` is ONLY available when `phoneNumberNeeded`
// has a value.
if (phoneValidationError) {
// Set to a variable and display it in a field.
// In this example, we don't do anything with the error.
var someErrorMessage = phoneValidationError.message;
}
// Prompt the user for the phone number.
var input = prompt('Enter phone number:');
if (input) {
// If the input is valid and the user clicked `OK`, return the phone
// number.
resolve({
phoneNumber: input,
});
} else {
// Else, exit the flow.
reject('phone invalid or user cancelled');
}
});
}
```
```typescript TypeScript theme={"dark"}
const otpPromptStartStep: OtpStartStep = {
execute: async (
phoneNumberNeeded: boolean,
phoneValidationError?: PhoneValidationError
): Promise => {
return new Promise((resolve, reject) => {
// If no phone number is needed, then don't prompt the user.
if (!phoneNumberNeeded) {
resolve(null);
return;
}
// If error message is found around phone number, handle it.
// The `phoneValidationError` is ONLY available when `phoneNumberNeeded`
// has a value.
if (phoneValidationError) {
// Set to a variable and display it in a field.
// In this example, we don't do anything with the error.
var someErrorMessage = phoneValidationError.message;
}
// Prompt the user for the phone number.
var input = prompt('Enter phone number:');
if (input) {
// If the input is valid and the user clicked `OK`, return the phone
// number.
resolve({
phoneNumber: input,
});
} else {
// Else, exit the flow.
reject('phone invalid or user cancelled');
}
});
},
};
```
You can prompt for a new phone numberby implementing the finish step like this:
```javascript JavaScript theme={"dark"}
function otpFinishStep(otpError) {
return new Promise((resolve, reject) => {
// If error message is found, handle it.
if (otpError) {
// Set to a variable and display it in a field.
// In this example, we don't do anything with the error.
var someErrorMessage = otpError.message;
}
// Prompt the user for whether they received the SMS.
// Typically, this is a page that shows the OTP already. We are simplifying
// it by requiring an input.
var input = confirm('Did you receive a text message?');
if (!input) {
// If `Cancel`, then trigger the otpStartStep to re-prompt for
// phone number.
resolve({
resultType: 2, // OnMobileNumberChange enum type = 2
});
return;
}
// Prompt the user for the OTP.
var otp = prompt('Enter OTP code:');
if (otp) {
// If the input is valid and the user clicked `OK`, return the OTP.
resolve({
input: { otp }, // OTP value
resultType: 0, // OnSuccess enum type = 0
});
} else {
// Else, exit the flow.
reject('phone invalid or user cancelled');
}
});
}
```
```typescript TypeScript theme={"dark"}
const otpPhoneChangeFinishStep: OtpFinishStep = {
execute: async (otpError?: OtpError): Promise => {
return new Promise((resolve, reject) => {
// If error message is found, handle it.
if (otpError) {
// Set to a variable and display it in a field.
// In this example, we don't do anything with the error.
var someErrorMessage = otpError.message;
}
// Prompt the user for whether they received the SMS.
// Typically, this is a page that shows the OTP already. We are simplifying
// it by requiring an input.
var input = confirm('Did you receive a text message?');
if (!input) {
// If `Cancel`, then trigger the otpStartStep to re-prompt for
// phone number.
resolve({
resultType: 2, // OnMobileNumberChange enum type = 2
});
return;
}
// Prompt the user for the OTP.
var otp = prompt('Enter OTP code:');
if (otp) {
// If the input is valid and the user clicked `OK`, return the OTP.
resolve({
input: { otp }, // OTP value
resultType: OtpFinishResultType.OnSuccess,
});
} else {
// Else, exit the flow.
reject('phone invalid or user cancelled');
}
});
},
};
```
## Configure Instant Link
To use the Resend/Retry/Phone Change features, you need to install the Web SDK version 2.15.1 or later.
To set the Instant Link handler, `withInstantLinkFallback(startStep: InstantLinkStartStep | InstantLinkStartStepFn, retryStep?: InstantLinkRetryStep | InstantLinkRetryStepFn)` requires implementing the `InstantLinkStartStep` interface and optionally the `InstantLinkRetryStep` interface if you wish for advanced capabilities. When returning the phone number in the functions, ensure you return an object with the field `phoneNumber` to the `resolve()` function.
The Instant Link session has a three minute timeout from when it's sent through Short Message Service (SMS) to when the customer can click the received link.
Follow these instructions if you are implementing Instant Link and you are passing in the phone number on the `/v3/start` endpoint. In this case, you've already prompted for a phone number so you don't need to prompt for it in the client SDK.
Since you passed the phone number in the `Start()` function, call `resolve(null)` to communicate to the SDK you have the customer's agreement to deliver the SMS message. Ensure you return an object to `resolve()` function.
```javascript JavaScript theme={"dark"}
function instantLinkStartStep(phoneNumberNeeded, phoneValidationError) {
return new Promise((resolve, reject) => {
// Since no phone number is needed, don't prompt the user.
resolve(null);
});
}
```
```typescript TypeScript theme={"dark"}
const instantLinkNoPromptStartStep: InstantLinkStartStep = {
execute: async (
phoneNumberNeeded: boolean,
phoneValidationError?: PhoneValidationError
): Promise => {
return new Promise((resolve, reject) => {
// Since no phone number is needed, don't prompt the user.
resolve(null);
});
},
};
```
Follow these instructions if implementing MobileAuth and collecting the phone number for desktop. This will implement Instant Link without allowing for SMS resends and phone number changes. If you do want those capabilities, please reference the subsequent tabs (Resend and Phone Number Change).
Call the `resolve(input: InstantStartInput)` method to return the collected phone number to the SDK.
Call the `reject('some error message')` method to communicate to the SDK any issues while trying to obtain the phone number. Report an error if the customer cancels the Instant Link transaction or presses the back button to leave the Instant Link start step dialog.
```javascript JavaScript theme={"dark"}
function instantLinkStartStep(phoneNumberNeeded, phoneValidationError) {
return new Promise((resolve, reject) => {
// If no phone number is needed, then don't prompt the user.
if (!phoneNumberNeeded) {
resolve(null);
return;
}
// If error message is found around phone number, handle it.
// The `phoneValidationError` is ONLY available when `phoneNumberNeeded`
// has a value.
if (phoneValidationError) {
// Set to a variable and display it in a field.
// In this example, we don't do anything with the error.
var someErrorMessage = phoneValidationError.message;
}
// Prompt the user for the phone number.
var input = prompt('Enter phone number:');
if (input) {
// If the input is valid and the user clicked `OK`, return the phone
// number.
resolve({
phoneNumber: input,
});
} else {
// Else, exit the flow.
reject('phone invalid or user cancelled');
}
});
}
```
```typescript TypeScript theme={"dark"}
const instantLinkStartStep: InstantLinkStartStep = {
execute: async (
phoneNumberNeeded: boolean,
phoneValidationError?: PhoneValidationError
): Promise => {
return new Promise((resolve, reject) => {
// If no phone number is needed, then don't prompt the user.
if (!phoneNumberNeeded) {
resolve(null);
return;
}
// If error message is found around phone number, handle it.
// The `phoneValidationError` is ONLY available when `phoneNumberNeeded`
// has a value.
if (phoneValidationError) {
// Set to a variable and display it in a field.
// In this example, we don't do anything with the error.
var someErrorMessage = phoneValidationError.message;
}
// Prompt the user for the phone number.
var input = prompt('Enter phone number:');
if (input) {
// If the input is valid and the user clicked `OK`, return the phone
// number.
resolve({
phoneNumber: input,
} as InstantLinkStartInput);
} else {
// Else, exit the flow.
reject('phone invalid or user cancelled');
}
});
},
};
```
Follow these instructions to allow the customer to request a new SMS using the same phone number. There is a max of three send attempts including the initial message.
The start step is implemented the same as the previous tab:
```javascript JavaScript theme={"dark"}
function instantLinkStartStep(phoneNumberNeeded, phoneValidationError) {
return new Promise((resolve, reject) => {
// If no phone number is needed, then don't prompt the user.
if (!phoneNumberNeeded) {
resolve(null);
return;
}
// If error message is found around phone number, handle it.
// The `phoneValidationError` is ONLY available when `phoneNumberNeeded`
// has a value.
if (phoneValidationError) {
// Set to a variable and display it in a field.
// In this example, we don't do anything with the error.
var someErrorMessage = phoneValidationError.message;
}
// Prompt the user for the phone number.
var input = prompt('Enter phone number:');
if (input) {
// If the input is valid and the user clicked `OK`, return the phone
// number.
resolve({
phoneNumber: input,
});
} else {
// Else, exit the flow.
reject('phone invalid or user cancelled');
}
});
}
```
```typescript TypeScript theme={"dark"}
const instantLinkStartStep: InstantLinkStartStep = {
execute: async (
phoneNumberNeeded: boolean,
phoneValidationError?: PhoneValidationError
): Promise => {
return new Promise((resolve, reject) => {
// If no phone number is needed, then don't prompt the user.
if (!phoneNumberNeeded) {
resolve(null);
return;
}
// If error message is found around phone number, handle it.
// The `phoneValidationError` is ONLY available when `phoneNumberNeeded`
// has a value.
if (phoneValidationError) {
// Set to a variable and display it in a field.
// In this example, we don't do anything with the error.
var someErrorMessage = phoneValidationError.message;
}
// Prompt the user for the phone number.
var input = prompt('Enter phone number:');
if (input) {
// If the input is valid and the user clicked `OK`, return the phone
// number.
resolve({
phoneNumber: input,
} as InstantLinkStartInput);
} else {
// Else, exit the flow.
reject('phone invalid or user cancelled');
}
});
},
};
```
You can then send a new Instant Link SMS to the same phone number by implementing the `InstantLinkRetryStep` interface, for example:
```javascript JavaScript theme={"dark"}
function instantLinkRetryStep() {
return new Promise((resolve, reject) => {
// There are multiple return options:
// - resolve(0): request resend to the same phone number
// - reject('user clicked cancel'): error out of the possession flow
// Prompt the user for the phone number.
// Typically, this is a page that is automatically closed or redirected
// once the `AuthFinish` function is called. We are simplifying it by
// requiring an input.
var input = confirm('Did you receive a text message?');
if (input) {
// If `OK`, close the modal.
return;
}
// Else `Cancel`, then resend to the same phone number.
resolve(0);
});
}
```
```typescript TypeScript theme={"dark"}
const instantLinkMultipleResendRetryStep: InstantLinkRetryStep = {
execute: async (): Promise => {
return new Promise((resolve, reject) => {
// There are multiple return options:
// - resolve(0): request resend to the same phone number
// - reject('user clicked cancel'): error out of the possession flow
// Prompt the user for the phone number.
// Typically, this is a page that is automatically closed or redirected
// once the `AuthFinish` function is called. We are simplifying it by
// requiring an input.
var input = confirm('Did you receive a text message?');
if (input) {
// If `OK`, close the modal.
return;
}
// Else `Cancel`, then resend to the same phone number.
resolve(InstantLinkResultType.OnResend);
});
},
};
```
Follow these instructions to allow the customer to re-enter their phone number. There is a max of three entries/send attempts.
Manual Request Required
To enable phone number change capabilities on your credentials, contact your Prove representative.
The start step is implemented the same as the previous tab:
```javascript JavaScript theme={"dark"}
function instantLinkStartStep(phoneNumberNeeded, phoneValidationError) {
return new Promise((resolve, reject) => {
// If no phone number is needed, then don't prompt the user.
if (!phoneNumberNeeded) {
resolve(null);
return;
}
// If error message is found around phone number, handle it.
// The `phoneValidationError` is ONLY available when `phoneNumberNeeded`
// has a value.
if (phoneValidationError) {
// Set to a variable and display it in a field.
// In this example, we don't do anything with the error.
var someErrorMessage = phoneValidationError.message;
}
// Prompt the user for the phone number.
var input = prompt('Enter phone number:');
if (input) {
// If the input is valid and the user clicked `OK`, return the phone
// number.
resolve({
phoneNumber: input,
});
} else {
// Else, exit the flow.
reject('phone invalid or user cancelled');
}
});
}
```
```typescript TypeScript theme={"dark"}
const instantLinkStartStep: InstantLinkStartStep = {
execute: async (
phoneNumberNeeded: boolean,
phoneValidationError?: PhoneValidationError
): Promise => {
return new Promise((resolve, reject) => {
// If no phone number is needed, then don't prompt the user.
if (!phoneNumberNeeded) {
resolve(null);
return;
}
// If error message is found around phone number, handle it.
// The `phoneValidationError` is ONLY available when `phoneNumberNeeded`
// has a value.
if (phoneValidationError) {
// Set to a variable and display it in a field.
// In this example, we don't do anything with the error.
var someErrorMessage = phoneValidationError.message;
}
// Prompt the user for the phone number.
var input = prompt('Enter phone number:');
if (input) {
// If the input is valid and the user clicked `OK`, return the phone
// number.
resolve({
phoneNumber: input,
} as InstantLinkStartInput);
} else {
// Else, exit the flow.
reject('phone invalid or user cancelled');
}
});
},
};
```
You can prompt for a new phone number by implementing the `InstantLinkRetryStep` interface, for example:
```javascript JavaScript theme={"dark"}
function instantLinkRetryStep() {
return new Promise((resolve, reject) => {
// There are multiple return options:
// - resolve(0): request resend to the same phone number
// - resolve(1): request phone number change/re-prompt
// - reject('user clicked cancel'): error out of the possession flow
// Prompt the user for the phone number.
// Typically, this is a page that is automatically closed or redirected
// once the `AuthFinish` function is called. We are simplifying it by
// requiring an input.
var input = confirm('Did you receive a text message?');
if (input) {
// If `OK`, close the modal.
return;
}
// Else `Cancel`, then trigger the instantLinkStartStep to re-prompt for
// phone number.
resolve(1);
});
}
```
```typescript TypeScript theme={"dark"}
const instantLinkPhoneChangeRetryStep: InstantLinkRetryStep = {
execute: async (): Promise => {
return new Promise((resolve, reject) => {
// There are multiple return options:
// - resolve(0): request resend to the same phone number
// - resolve(1): request phone number change/re-prompt
// - reject('user clicked cancel'): error out of the possession flow
// Prompt the user for the phone number.
// Typically, this is a page that is automatically closed or redirected
// once the `AuthFinish` function is called. We are simplifying it by
// requiring an input.
var input = confirm('Did you receive a text message?');
if (input) {
// If `OK`, close the modal.
return;
}
// Else `Cancel`, then trigger the instantLinkStartStep to re-prompt for
// phone number.
resolve(InstantLinkResultType.OnMobileNumberChange);
});
},
};
```
## Verify the Customer Information
Once the customer has made any edits to their prefill information, submit that information to the back end server so the `Complete()` call can then verify the customer information.
```javascript JavaScript theme={"dark"}
// Send request to the backend to verify customer information.
async function sendInfo(firstName, lastName) {
const response = await fetch(backendUrl + "/finish", {
method: "POST",
headers: {
Accept: "application/json",
"Content-Type": "application/json",
},
body: JSON.stringify({
firstName: firstName,
lastName: lastName,
}),
});
const results = await response.json();
const rsp = JSON.stringify(results);
return rsp;
}
```
```typescript TypeScript theme={"dark"}
// Send request to the backend to verify customer information.
async function sendInfo(firstName: string, lastName: string) {
const response = await fetch(backendUrl + "/finish", {
method: "POST",
headers: {
Accept: "application/json",
"Content-Type": "application/json",
},
body: JSON.stringify({
firstName: firstName,
lastName: lastName,
}),
});
const results = await response.json();
const rsp = JSON.stringify(results);
return rsp;
}
```
## Function reference
Start the flow with `Authenticator.authenticate()`, while creating an instance of Authenticator using `AuthenticatorBuilder.build()`.
Use the following methods to configure `Authenticator` before instantiating. All methods return the same instance of `AuthenticatorBuilder` to allow chaining of the configuration methods.
`withAuthFinishStep(step: AuthFinishStep | AuthFinishStepFn): AuthenticatorBuilder`
This step customizes the handling of the authentication finish call. The implementation calls the customer's back end to retrieve authentication results. The customer defines the format of the response to suit the needs of the app.
`withRole(role: DeviceRole): AuthenticatorBuilder`
Sets the authentication role for this device. It can be either `Primary` or `Secondary`. The `Primary` value sets when the customer is on a mobile device web browser that registers with the Prove system and later authenticated by verifying this registration. On other hand, the `Secondary` value sets when the customer is on a desktop web browser, which authenticates after receiving customer feedback on their `Primary` device.
`withMobileAuthImplementation(implementation: MobileAuthImplementation): AuthenticatorBuilder`
Sets the implementation type for Mobile Auth authenticator. Possible values are `Fetch` or `Pixel` with `Fetch` set by default.
`withDeviceIpAddress(deviceIp: string | (() => string | null) | null): AuthenticatorBuilder`
Sets the public IP address for this device to report during device registration. If you neglect to call this method, or the IP address value is `null`, the system attempts to autodetect the IP address using an external service. If the service is inaccessible, the system uses the client's IP address of the HTTP connection. Successful Mobile Auth authentication requires the client's public IP address.
`withOtpFallback(startStep: OtpStartStep | OtpStartStepFn, finishStep: OtpFinishStep | OtpFinishStepFn): AuthenticatorBuilder`
Configure start and finish handlers for SMS OTP authenticator. Collecting customer input requires using these handlers to enter the phone number for delivery of OTP codes, and to enter received OTP codes.
`withInstantLinkFallback(instantLinkStartStep: InstantLinkStartStep | InstantLinkStartStepFn, instantLinkRetryStep?: InstantLinkRetryStep | InstantLinkRetryStepFn): AuthenticatorBuilder`
Configure handler for Instant Link authenticator. This handler collects customer input to enter the phone number for Instant Link.
`build(): Authenticator`
Finalizes the configuration and returns an instance of the `Authenticator`.
# Client-Side iOS SDK
Source: https://developer.prove.com/reference/ios-sdk
Learn how to integrate the client-side iOS SDK into your native app
## Installation
Prove provides the iOS SDK in Swift. It has a download size of 2.5 MB and an install size of 1.5 MB for the minimum required components. It relies on iOS native APIs. The iOS SDK supports the earlier three major versions. Prove has seen successful transactions with iOS v11.
Xcode Requirement
To integrate with our iOS SDKs, Apps must be built with Xcode 16.0 or later.
Prove manages a repository with the libraries to enable integration. You can install the SDK using either CocoaPods or Swift Package Manager.
Execute the following to import CocoaPod from the Prove pod repository:
```shell shell theme={"dark"}
# Run this command to install the cocoapods-art plugin (authored by Artifactory)
gem install cocoapods-art
# Run this command to add the Prove pod repository
pod repo-art add prove.jfrog.io https://prove.jfrog.io/artifactory/api/pods/libs-public-cocoapods
# In your Podfile, paste in the Prove pod repository as a source
plugin 'cocoapods-art', :sources => [
'prove.jfrog.io'
]
# In your Podfile, paste in the SDK pods
pod 'ProveAuth', '6.9.1'
# Run this command to install the SDK pods
pod install
```
### Step 1: Connect to JFrog Registry
Set up the registry globally (required for both Xcode UI and Package.swift):
```bash theme={"dark"}
swift package-registry set --global "https://prove.jfrog.io/artifactory/api/swift/libs-public-swift"
swift package-registry login "https://prove.jfrog.io/artifactory/api/swift/libs-public-swift"
# Press Enter when prompted for access token
```
Public Registry
This is a publicly accessible registry - no password or access token is needed. Simply press Enter when prompted for an access token.
The registry connection is configured via command line only. Once this setup is complete, you can add packages using either Xcode UI or Package.swift.
### Step 2: Adding Dependencies
#### Method 1: Using Xcode UI
1. In Xcode, go to **File** → **Add Package Dependencies**
2. Search for the package you want (e.g., `swift.proveauth`)
3. Select the version and add to your target
The latest stable version is 6.9.1. Select "Exact Version" for production applications to ensure consistent builds.
Once the command line setup is complete, you only need to enter the package name (e.g., `swift.proveauth`) in Xcode - no need to enter the full registry URL to Xcode.
#### Method 2: Using Package.swift
Add dependencies to your `Package.swift` file:
```swift Swift theme={"dark"}
// swift-tools-version: 5.9
import PackageDescription
let package = Package(
name: "YourApp",
platforms: [.iOS(.v12)],
dependencies: [
.package(id: "swift.proveauth", from: "6.9.1"),
],
targets: [
.target(
name: "YourApp",
dependencies: [
.product(name: "ProveAuth", package: "swift.proveauth"),
]
)
]
)
```
Then run the following command to resolve and fetch the dependencies:
```bash theme={"dark"}
swift package resolve
```
## Send the type of flow: mobile
Unlike the Web SDK, when using the iOS SDK, use the mobile flow. Pass mobile to the `Start()` function on the server. In a mobile flow, Mobile Auth executes first and if that fails, performs one-time password (OTP) validation on the mobile phone.
In the mobile flow, once either Mobile Auth or the OTP validation is complete, the `AuthFinishStep` function executes.
Mobile Auth
In order for Mobile Auth to succeed, the customer needs to disable the VPN and Private Relay on iOS.
## `Authenticate()`
The SDK requires an `authToken` as a parameter for the `Authenticate()` function. This token returns from the `Start()` call of the server-side SDK. The token is session specific so it's used for a single flow. It also expires after 15 minutes.
## Retrieve `authToken`
To start the flow, send a request to your back end server with the phone number, flow type, and an optional challenge. Use either the date of birth, `YYYY-MM-DD`, or the last four digits of the social security number.
```swift Swift theme={"dark"}
// The below example uses native iOS URLSession, but any other
// alternative networking approaches should also work
func initialize(phoneNumber: String, ssn: String, flowType: String, completion: @escaping (Result\) -> Void) {
guard let url = URL(string: "\(backendUrl)/initialize") else {
completion(.failure(URLError(.badURL)))
return
}
var request = URLRequest(url: url)
request.httpMethod = "POST"
request.addValue("application/json", forHTTPHeaderField: "Accept")
request.addValue("application/json", forHTTPHeaderField: "Content-Type")
// Set up the request body
let body: [String: Any] = [
"phoneNumber": phoneNumber,
"flowType": flowType,
"ssn": ssn
]
do {
request.httpBody = try JSONSerialization.data(withJSONObject: body, options: \[])
} catch {
completion(.failure(error))
return
}
// Perform the request
let task = URLSession.shared.dataTask(with: request) { \_, response, error in
// Handle network or connection errors
if let error = error {
completion(.failure(error))
return
}
do {
if let json = try JSONSerialization.jsonObject(with: data, options: \[]) as? [String: Any],
let authToken = json["authToken"] as? String {
completion(.success(authToken))
} else {
let parsingError = NSError(domain: "", code: 0, userInfo: [NSLocalizedDescriptionKey : "Failed to parse JSON or authToken is missing"])
completion(.failure(parsingError))
}
} catch {
completion(.failure(error))
}
}
// Start the network call
task.resume()
}
```
## Setup authenticator
Once you have the `authToken`, build the authenticator for the mobile flow.
```swift Swift theme={"dark"}
// Object implementing ProveAuthFinishStep protocols
let finishStep = FinishAuthStep()
// Objects implementing OtpStartStep/OtpFinishStep protocols
let otpStartStep = MobileOtpStartStep()
let otpFinishStep = MobileOtpFinishStep()
let proveAuthSdk: ProveAuth
proveAuthSdk = ProveAuth.builder(authFinish: finishStep)
.withOtpFallback(otpStart: otpStartStep, otpFinish: otpFinishStep)
.build()
```
If a mobile data connection is unavailable during testing, use the Builder class. It permits simulated successful session results while connected to a Wi-Fi network. Testing using a Wi-Fi connection is useful in the Sandbox environment.
```swift Swift theme={"dark"}
proveAuthSdk = ProveAuth.builder(authFinish: finishStep)
.withMobileAuthTestMode() // Test mode flag
.build()
```
## Performing the authentication
The Prove Auth object is thread safe and used as a singleton. Most Prove Auth methods are blocking and therefore can't execute in the main app thread. The app employs an executor service with a minimum of two threads to manage threads due to the ability to process concurrent blocking requests.
```swift Swift theme={"dark"}
// authToken retrieved from your server via StartAuthRequest
proveAuthSdk.authenticate(authToken) { error in
DispatchQueue.main.async {
self.messages.finalResultMessage = "ProveAuth.authenticate returned error: \(error.localizedDescription)"
print(self.messages.finalResultMessage)
}
}
```
## Validate the mobile phone
In the `AuthFinishStep`, specify a function to call once the possession checks complete on the mobile phone. In the following code, notice an endpoint called `/verify`. This endpoint on your back end server calls the `Validate()` function to validate the phone number. If unsuccessful, the server calls the `Challenge()` function and then returns the results, including customer information. Refer to the following example fields that return and then prefill on a form for the customer to verify.
```swift Swift theme={"dark"}
// Send a verify request to get return customer information.
// The below example uses native iOS URLSession, but any other
// alternative networking approaches should also work
func verify(String: authId, completion: @escaping (Error?) -> Void) {
guard let url = URL(string: "\(backendUrl)/verify") else {
completion(URLError(.badURL))
return
}
// Create the request
var request = URLRequest(url: url)
request.httpMethod = "POST"
request.addValue("application/json", forHTTPHeaderField: "Accept")
request.addValue("application/json", forHTTPHeaderField: "Content-Type")
// Set up the request body (empty JSON object) - authId is not needed so you can ignore.
let body: [String: Any] = ["authId": authId]
do {
request.httpBody = try JSONSerialization.data(withJSONObject: body, options: \[])
} catch {
completion(error)
return
}
// Perform the request
let task = URLSession.shared.dataTask(with: request) { \_, response, error in
if let error = error {
completion(error)
return
}
// Parse the response
do {
if let json = try JSONSerialization.jsonObject(with: data, options: \[]) as? [String: Any],
let firstName = json["firstName"] as? String,
let lastName = json["lastName"] as? String {
// Update the UI on the main thread
DispatchQueue.main.async {
// Update your UI with the pre-fill customer information
// For example, assuming you have IBOutlet references for your text fields
self.firstNameInput.text = firstName
self.lastNameInput.text = lastName
}
completion(nil)
} else {
let parsingError = NSError(domain: "", code: 0, userInfo: [NSLocalizedDescriptionKey: "Failed to parse JSON"])
completion(parsingError)
}
} catch {
completion(error)
}
}
// Start the network call
task.resume()
}
```
## Configure OTP
To use the Resend/Retry/Phone Change features, you need to install the iOS SDK version 6.5.1 or later.
To set the One-Time Password (OTP) handler, `withOtpFallback(otpStart: otpStartStep, otpFinish: otpFinishStep)`, requires implementing the `OtpStartStep` and `OtpFinishStep`.
The OTP session has a two minute timeout from when it's sent through SMS to when the customer can enter in the OTP.
Follow these instructions if you are implementing OTP and you are passing in the phone number on the `/v3/start` endpoint. In this case, you've already prompted for a phone number so you don't need to prompt for it in the client SDK.
Since you passed the phone number in the `Start()` function, call `callback.onSuccess(input: nil)` to communicate to the SDK you have the customer's agreement to deliver the SMS message.
```swift Swift theme={"dark"}
import Foundation
import ProveAuth
import SwiftUI
class MobileOtpStartStep: OtpStartStep {
@ObservedObject var sheetObservable: SheetObservable
var callback: OtpStartStepCallback?
init(sheetObservable: SheetObservable) {
self.sheetObservable = sheetObservable
}
// Implement this method to handle phone number collection for SMS OTP,
// or to obtain user confirmation for initiating an SMS message.
func execute(
phoneNumberNeeded: Bool, phoneValidationError: ProveAuthError?, callback: OtpStartStepCallback
) {
self.callback = callback
// Since no phone number is needed, don't prompt the user.
callback.onSuccess(input: nil)
}
}
```
Call the `callback.onError()` method to communicate to the SDK any issues while trying to obtain the phone number or the OTP. Report an error if the customer cancels the SMS transaction or presses the back button to leave the screen.
```swift Swift theme={"dark"}
import Foundation
import SwiftUI
import ProveAuth
class MobileOtpFinishStep: OtpFinishStep {
@ObservedObject var sheetObservable: SheetObservable
var callback: OtpFinishStepCallback?
init(sheetObservable: SheetObservable){
self.sheetObservable = sheetObservable
}
// Implement this method to collect the OTP value delivered via SMS.
func execute(otpError: ProveAuthError?, callback: OtpFinishStepCallback) {
self.callback = callback
// Handle the OTP validation error if present.
if case .otpValidationError = otpError {
print("found otpError: \(String(describing: otpError?.localizedDescription))")
// Signal to your UI components that the last provided OTP is invalid
self.sheetObservable.otpError = true
} else {
self.sheetObservable.otpError = false
}
// Signal to UI components to display OtpFinishView
DispatchQueue.main.async {
self.sheetObservable.isOtpFinishActive = true
}
}
// Provide the collected OTP value to the SDK for validation.
func handleOtp(_ otp: String) {
guard let callback = self.callback else {
print("Error: OtpFinishStepCallback is not set ")
return
}
let otpFinishInput = OtpFinishInput(otp: otp)
callback.onSuccess(input: otpFinishInput)
}
// Notify the SDK of any issues encountered while obtaining the OTP value or if the user cancels the OTP flow.
func handleOtpFinishError() {
guard let callback = self.callback else {
print("Error: OtpFinishStepCallback is not set ")
return
}
callback.onError()
}
}
```
Follow these instructions if implementing MobileAuth and collecting the phone number only if MobileAuth fails. This will implement OTP without allowing for SMS resends and phone number changes. If you do want those capabilities, please reference the subsequent tabs (Resend, Retry OTP, and Phone Number Change).
In the start step, call the `callback.onSuccess(input: otpStartInput)` method to return the collected phone number to the SDK.
```swift Swift theme={"dark"}
import Foundation
import ProveAuth
import SwiftUI
class MobileOtpStartStep: OtpStartStep {
@ObservedObject var sheetObservable: SheetObservable
var callback: OtpStartStepCallback?
init(sheetObservable: SheetObservable) {
self.sheetObservable = sheetObservable
}
func execute(
phoneNumberNeeded: Bool, phoneValidationError: ProveAuthError?, callback: OtpStartStepCallback
) {
self.callback = callback
if !phoneNumberNeeded {
// If no phone number is needed, then don't prompt the user.
callback.onSuccess(input: nil)
} else {
DispatchQueue.main.async {
// If a phone number validation error is detected, ensure it is handled to provide feedback to the user.
if case .phoneNumberValidationError = phoneValidationError {
print(
"found phoneValidationError: \(String(describing: phoneValidationError?.localizedDescription))"
)
// Update UI components to display OtpStartView with the phone number validation error.
self.sheetObservable.isPhoneValidationError = true
} else {
self.sheetObservable.isPhoneValidationError = false
}
// Update UI components to display OtpStartView if a phone number is needed.
self.sheetObservable.isOtpStartActive = true
}
}
}
// Return collected phone number to the SDK
func handlePhoneNumber(phoneNumber: String) {
guard let callback = self.callback else {
print("Error: OtpStartStepCallback is not set ")
return
}
let otpStartInput = OtpStartInput(phoneNumber: phoneNumber)
// This is how you pass collected phone number to SDK
callback.onSuccess(input: otpStartInput)
}
// Communicate any issues encountered while trying to obtain the phone number to the SDK.
// Error should be reported if the customer explicitly cancels the SMS OTP transaction
// or presses the back button to exit out the SMS OTP start step screen.
func handleOtpStartError() {
guard let callback = self.callback else {
print("Error: OtpStartStepCallback is not set ")
return
}
callback.onError()
}
}
```
The finish step is implemented the same as the previous tab:
```swift Swift theme={"dark"}
import Foundation
import SwiftUI
import ProveAuth
class MobileOtpFinishStep: OtpFinishStep {
@ObservedObject var sheetObservable: SheetObservable
var callback: OtpFinishStepCallback?
init(sheetObservable: SheetObservable){
self.sheetObservable = sheetObservable
}
// Implement this method to collect the OTP value delivered via SMS.
func execute(otpError: ProveAuthError?, callback: OtpFinishStepCallback) {
self.callback = callback
// Handle the OTP validation error if present.
if case .otpValidationError = otpError {
print("found otpError: \(String(describing: otpError?.localizedDescription))")
// Signal to your UI components that the last provided OTP is invalid
self.sheetObservable.otpError = true
} else {
self.sheetObservable.otpError = false
}
// Signal to UI components to display OtpFinishView
DispatchQueue.main.async {
self.sheetObservable.isOtpFinishActive = true
}
}
// Provide the collected OTP value to the SDK for validation.
func handleOtp(_ otp: String) {
guard let callback = self.callback else {
print("Error: OtpFinishStepCallback is not set ")
return
}
let otpFinishInput = OtpFinishInput(otp: otp)
callback.onSuccess(input: otpFinishInput)
}
// Notify the SDK of any issues encountered while obtaining the OTP value or if the user cancels the OTP flow.
func handleOtpFinishError() {
guard let callback = self.callback else {
print("Error: OtpFinishStepCallback is not set ")
return
}
callback.onError()
}
}
```
Follow these instructions to allow the customer to request a new OTP via SMS using the same phone number. There is a max of three send attempts including the initial message.
The start step is implemented the same as the previous tab:
```swift Swift theme={"dark"}
import Foundation
import ProveAuth
import SwiftUI
class MobileOtpStartStep: OtpStartStep {
@ObservedObject var sheetObservable: SheetObservable
var callback: OtpStartStepCallback?
init(sheetObservable: SheetObservable) {
self.sheetObservable = sheetObservable
}
func execute(
phoneNumberNeeded: Bool, phoneValidationError: ProveAuthError?, callback: OtpStartStepCallback
) {
self.callback = callback
if !phoneNumberNeeded {
// If no phone number is needed, then don't prompt the user.
callback.onSuccess(input: nil)
} else {
DispatchQueue.main.async {
// If a phone number validation error is detected, ensure it is handled to provide feedback to the user.
if case .phoneNumberValidationError = phoneValidationError {
print(
"found phoneValidationError: \(String(describing: phoneValidationError?.localizedDescription))"
)
// Update UI components to display OtpStartView with the phone number validation error.
self.sheetObservable.isPhoneValidationError = true
} else {
self.sheetObservable.isPhoneValidationError = false
}
// Update UI components to display OtpStartView if a phone number is needed.
self.sheetObservable.isOtpStartActive = true
}
}
}
// Return collected phone number to the SDK
func handlePhoneNumber(phoneNumber: String) {
guard let callback = self.callback else {
print("Error: OtpStartStepCallback is not set ")
return
}
let otpStartInput = OtpStartInput(phoneNumber: phoneNumber)
// This is how you pass collected phone number to SDK
callback.onSuccess(input: otpStartInput)
}
// Communicate any issues encountered while trying to obtain the phone number to the SDK.
// Error should be reported if the customer explicitly cancels the SMS OTP transaction
// or presses the back button to exit out the SMS OTP start step screen.
func handleOtpStartError() {
guard let callback = self.callback else {
print("Error: OtpStartStepCallback is not set ")
return
}
callback.onError()
}
}
```
You can then send a new OTP SMS to the same phone number by implementing the finish step like this:
```swift Swift theme={"dark"}
import Foundation
import SwiftUI
import ProveAuth
class MobileOtpFinishStep: OtpFinishStep {
@ObservedObject var sheetObservable: SheetObservable
var callback: OtpFinishStepCallback?
init(sheetObservable: SheetObservable){
self.sheetObservable = sheetObservable
}
// Implement this method to collect the OTP value delivered in the SMS message.
func execute(otpError: ProveAuthError?, callback: OtpFinishStepCallback) {
self.callback = callback
// Handle the OTP validation error if present.
if case .otpValidationError = otpError {
print("found otpError: \(String(describing: otpError?.localizedDescription))")
// Update your UI to indicate that the provided OTP is invalid
self.sheetObservable.otpError = true
} else {
self.sheetObservable.otpError = false
}
// Update your UI to display the OtpFinishView
DispatchQueue.main.async {
self.sheetObservable.isOtpFinishActive = true
}
}
// Return the OTP value to the SDK
func handleOtp(_ otp: String) {
guard let callback = self.callback else {
print("Error: OtpFinishStepCallback is not set ")
return
}
let otpFinishInput = OtpFinishInput(otp: otp)
callback.onSuccess(input: otpFinishInput)
}
// Communicate to the SDK any issues when host app trys to obtain the OTP value
// or when users cancel the OTP flow
func handleOtpFinishError() {
guard let callback = self.callback else {
print("Error: OtpFinishStepCallback is not set ")
return
}
callback.onError()
}
// Call this method to request a new OTP code for the same mobile number.
func sendNewOtp() {
guard let callback = self.callback else {
print("Error: OtpFinishStepCallback is not set ")
return
}
callback.onOtpResend()
}
}
```
Follow these instructions to allow the customer to re-enter the OTP PIN if they type it wrong. There is a max of 3 attempts. To implement this functionality, you also need to pass in `allowOTPRetry=true` to the `/v3/start` endpoint.
The start step is implemented the same as either of the the previous tabs - no client side code changes necessary:
```swift Swift theme={"dark"}
import Foundation
import ProveAuth
import SwiftUI
class MobileOtpStartStep: OtpStartStep {
@ObservedObject var sheetObservable: SheetObservable
var callback: OtpStartStepCallback?
init(sheetObservable: SheetObservable) {
self.sheetObservable = sheetObservable
}
func execute(
phoneNumberNeeded: Bool, phoneValidationError: ProveAuthError?, callback: OtpStartStepCallback
) {
self.callback = callback
if !phoneNumberNeeded {
// If no phone number is needed, then don't prompt the user.
callback.onSuccess(input: nil)
} else {
DispatchQueue.main.async {
// If a phone number validation error is detected, ensure it is handled to provide feedback to the user.
if case .phoneNumberValidationError = phoneValidationError {
print(
"found phoneValidationError: \(String(describing: phoneValidationError?.localizedDescription))"
)
// Update UI components to display OtpStartView with the phone number validation error.
self.sheetObservable.isPhoneValidationError = true
} else {
self.sheetObservable.isPhoneValidationError = false
}
// Update UI components to display OtpStartView if a phone number is needed.
self.sheetObservable.isOtpStartActive = true
}
}
}
// Return collected phone number to the SDK
func handlePhoneNumber(phoneNumber: String) {
guard let callback = self.callback else {
print("Error: OtpStartStepCallback is not set ")
return
}
let otpStartInput = OtpStartInput(phoneNumber: phoneNumber)
// This is how you pass collected phone number to SDK
callback.onSuccess(input: otpStartInput)
}
// Communicate any issues encountered while trying to obtain the phone number to the SDK.
// Error should be reported if the customer explicitly cancels the SMS OTP transaction
// or presses the back button to exit out the SMS OTP start step screen.
func handleOtpStartError() {
guard let callback = self.callback else {
print("Error: OtpStartStepCallback is not set ")
return
}
callback.onError()
}
}
```
The finish step is implemented the same as either of the the previous tabs - no client side code changes necessary. If the OTP is invalid, the finish step will be called again to prompt the user for a new input. Once the max attempts is reached, the `AuthFinish` function will be called.
```swift Swift theme={"dark"}
import Foundation
import SwiftUI
import ProveAuth
class MobileOtpFinishStep: OtpFinishStep {
@ObservedObject var sheetObservable: SheetObservable
var callback: OtpFinishStepCallback?
init(sheetObservable: SheetObservable){
self.sheetObservable = sheetObservable
}
// Implement this method to collect the OTP value delivered via SMS.
func execute(otpError: ProveAuthError?, callback: OtpFinishStepCallback) {
self.callback = callback
// Handle the OTP validation error if present.
if case .otpValidationError = otpError {
print("found otpError: \(String(describing: otpError?.localizedDescription))")
// Signal to your UI components that the last provided OTP is invalid
self.sheetObservable.otpError = true
} else {
self.sheetObservable.otpError = false
}
// Signal to UI components to display OtpFinishView
DispatchQueue.main.async {
self.sheetObservable.isOtpFinishActive = true
}
}
// Provide the collected OTP value to the SDK for validation.
func handleOtp(_ otp: String) {
guard let callback = self.callback else {
print("Error: OtpFinishStepCallback is not set ")
return
}
let otpFinishInput = OtpFinishInput(otp: otp)
callback.onSuccess(input: otpFinishInput)
}
// Notify the SDK of any issues encountered while obtaining the OTP value or if the user cancels the OTP flow.
func handleOtpFinishError() {
guard let callback = self.callback else {
print("Error: OtpFinishStepCallback is not set ")
return
}
callback.onError()
}
}
```
Follow these instructions to allow the customer to re-enter their phone number. There is a max of three entries/send attempts.
Manual Request Required
To enable phone number change capabilities on your credentials, contact your Prove representative.
The start step is implemented the same as the previous tab:
```swift Swift theme={"dark"}
import Foundation
import ProveAuth
import SwiftUI
class MobileOtpStartStep: OtpStartStep {
@ObservedObject var sheetObservable: SheetObservable
var callback: OtpStartStepCallback?
init(sheetObservable: SheetObservable) {
self.sheetObservable = sheetObservable
}
func execute(
phoneNumberNeeded: Bool, phoneValidationError: ProveAuthError?, callback: OtpStartStepCallback
) {
self.callback = callback
if !phoneNumberNeeded {
// If no phone number is needed, then don't prompt the user.
callback.onSuccess(input: nil)
} else {
DispatchQueue.main.async {
// If a phone number validation error is detected, ensure it is handled to provide feedback to the user.
if case .phoneNumberValidationError = phoneValidationError {
print(
"found phoneValidationError: \(String(describing: phoneValidationError?.localizedDescription))"
)
// Update UI components to display OtpStartView with the phone number validation error.
self.sheetObservable.isPhoneValidationError = true
} else {
self.sheetObservable.isPhoneValidationError = false
}
// Update UI components to display OtpStartView if a phone number is needed.
self.sheetObservable.isOtpStartActive = true
}
}
}
// Return collected phone number to the SDK
func handlePhoneNumber(phoneNumber: String) {
guard let callback = self.callback else {
print("Error: OtpStartStepCallback is not set ")
return
}
let otpStartInput = OtpStartInput(phoneNumber: phoneNumber)
// This is how you pass collected phone number to SDK
callback.onSuccess(input: otpStartInput)
}
// Communicate any issues encountered while trying to obtain the phone number to the SDK.
// Error should be reported if the customer explicitly cancels the SMS OTP transaction
// or presses the back button to exit out the SMS OTP start step screen.
func handleOtpStartError() {
guard let callback = self.callback else {
print("Error: OtpStartStepCallback is not set ")
return
}
callback.onError()
}
}
```
You can prompt for a new phone number by implementing the finish step like this:
```swift Swift theme={"dark"}
import Foundation
import SwiftUI
import ProveAuth
class MobileOtpFinishStep: OtpFinishStep {
@ObservedObject var sheetObservable: SheetObservable
var callback: OtpFinishStepCallback?
init(sheetObservable: SheetObservable){
self.sheetObservable = sheetObservable
}
// Implement this method to collect the OTP value delivered via SMS.
func execute(otpError: ProveAuthError?, callback: OtpFinishStepCallback) {
self.callback = callback
// Handle the OTP validation error if present.
if case .otpValidationError = otpError {
print("found otpError: \(String(describing: otpError?.localizedDescription))")
// Update your UI to indicate that the provided OTP is invalid.
self.sheetObservable.otpError = true
} else {
self.sheetObservable.otpError = false
}
// Update your UI to display the OTP finish view.
DispatchQueue.main.async {
self.sheetObservable.isOtpFinishActive = true
}
}
// Return the collected OTP value to the SDK.
func handleOtp(_ otp: String) {
guard let callback = self.callback else {
print("Error: OtpFinishStepCallback is not set ")
return
}
let otpFinishInput = OtpFinishInput(otp: otp)
callback.onSuccess(input: otpFinishInput)
}
// When callback.onMobileNumberChange() is evoked, OtpStartStep will be re-initiated
// so that end-users can enter a different phone number via OtpStartStep.
func handleMobileNumberChange() {
guard let callback = self.callback else {
print("Error: OtpFinishStepCallback is not set")
return
}
callback.onMobileNumberChange()
}
}
```
## Verify the Customer Information
Once the customer has made any edits to their prefill information, submit that information to the back end server so the `Complete()` call can then verify the customer information.
```swift Swift theme={"dark"}
// Send request to the backend to verify customer information.
// The below example uses native iOS URLSession, but any other
// alternative networking approaches should also work
func sendInfo(firstName: String, lastName: String, completion: @escaping (Result\<[String:Any], Error>) -> Void) {
guard let url = URL(string: "\(backendUrl)/finish") else {
completion(.failure(URLError(.badURL)))
return
}
var request = URLRequest(url: url)
request.httpMethod = "POST"
request.addValue("application/json", forHTTPHeaderField: "Accept")
request.addValue("application/json", forHTTPHeaderField: "Content-Type")
// Set up the request body
let body: [String: Any] = [
"firstName": firstName,
"lastName": lastName
]
do {
request.httpBody = try JSONSerialization.data(withJSONObject: body, options: \[])
} catch {
completion(.failure(error))
return
}
let task = URLSession.shared.dataTask(with: request) { \_, response, error in
// Handle network or connection errors
if let error = error {
completion(.failure(error))
return
}
do {
if let results = try JSONSerialization.jsonObject(with: data, options: \[]) as? [String: Any] {
completion(.success(results))
} else {
let parsingError = NSError(domain: "", code: 0, userInfo: [NSLocalizedDescriptionKey : "Failed to parse JSON or authToken is missing"])
completion(.failure(parsingError))
}
} catch {
completion(.failure(error))
}
}
// Start the network call
task.resume()
}
```
# Server-Side SDK Guide
Source: https://developer.prove.com/reference/prefill-identity-server
Learn more about the details of the server-side SDK
Prove provides server-side SDKs in the following languages: Go, Java, .NET, TypeScript, and JavaScript. If you use a different back end language, you can interact with the API endpoints.
## Installation
Install the server-side SDK of your choice by running a command in your terminal, or by using a dependency management tool specific to your project.
```go Go theme={"dark"}
# The Go library is hosted on GitHub so you can use this command to import it
# to your Go application.
go get github.com/prove-identity/prove-sdk-server-go
# Ensure you import the SDK in your code like this:
import (
provesdkservergo "github.com/prove-identity/prove-sdk-server-go"
"github.com/prove-identity/prove-sdk-server-go/models/components"
)
```
```typescript TypeScript theme={"dark"}
# Run this command to install package from GitHub and save as a dependency
npm install -S @prove-identity/prove-api
# Import the SDK in your code like this:
import { Proveapi } from "@prove-identity/prove-api";
import { OAuthClient, WithAuthorization } from "@prove-identity/prove-api/sdk/oauth"
```
```java Java theme={"dark"}
# See the latest version number here: https://central.sonatype.com/artifact/com.prove/proveapi
Gradle:
implementation 'com.prove:proveapi:0.10.0'
Maven:
com.prove
proveapi
0.10.0
```
```csharp .NET theme={"dark"}
// Run this command to install package from Nuget and save as a dependency
dotnet add package Prove.Proveapi --version 1.0.1
// Ensure you import the SDK in your code like this:
using Prove.Proveapi;
using Prove.Proveapi.Models.Components;
```
Prove provides code samples for how to interact with the API endpoints in many different languages. Browse the API Reference page and select your language.
## Authentication
To access the Prove API, use your OAuth 2.0 client ID and client secret.
You can load these from environment variables or another method:
```go Go theme={"dark"}
clientID := os.Getenv("PROVE_CLIENT_ID")
clientSecret := os.Getenv("PROVE_CLIENT_SECRET")
proveEnv := "uat-us" // Use UAT in US region.
client := provesdkservergo.New(
provesdkservergo.WithServer(proveEnv),
provesdkservergo.WithSecurity(components.Security{
ClientID: provesdkservergo.String(clientID),
ClientSecret: provesdkservergo.String(clientSecret),
}),
)
```
```typescript TypeScript theme={"dark"}
export const DEVICE_API_BASE_URL = process.env.DEVICE_API_BASE_URL || '';
export const PROVE_CLIENT_ID = process.env.PROVE_CLIENT_ID;
export const PROVE_CLIENT_SECRET = process.env.PROVE_CLIENT_SECRET;
export function getProveSdk(): Proveapi {
return new Proveapi({
server: 'uat-us',
security: {
clientID: PROVE_CLIENT_ID,
clientSecret: PROVE_CLIENT_SECRET,
},
});
}
```
```java Java theme={"dark"}
String clientId = System.getenv("PROVE_CLIENT_ID");
String clientSecret = System.getenv("PROVE_CLIENT_SECRET");
Proveapi sdk = Proveapi.builder()
.security(Security.builder()
.clientID(clientId)
.clientSecret(clientSecret)
.build())
.build();
```
```csharp .NET theme={"dark"}
var clientId = Environment.GetEnvironmentVariable("PROVE_CLIENT_ID");
var clientSecret = Environment.GetEnvironmentVariable("PROVE_CLIENT_SECRET");
var sdk = new ProveAPI(serverUrl: "https://platform.uat.proveapis.com");
var tokenRequest = new V3TokenRequest
{
ClientId = clientId,
ClientSecret = clientSecret,
GrantType = "client_credentials"
};
var tokenResponse = await sdk.V3.V3TokenRequestAsync(tokenRequest);
var accessToken = tokenResponse.V3TokenResponse?.AccessToken;
_sdk = new ProveAPI(auth: accessToken, serverUrl: "https://platform.uat.proveapis.com");
```
Token Expiration
The OAuth token expires after 60 minutes, requiring you to get another token.
## Next field
Each of the functions return a `Next` field. This field signals which function you call next.
## `Start()`
Add an endpoint to your server such as `POST /initiate` so the front end can submit the flow type, phone number, and the challenge. On the back end, start a Prove flow with a call to the `Start()` function. This function takes these required parameters:
* Flow Type: either `desktop` or `mobile` to describe which type of device the customer is starting their flow on.
Possession Timeouts
When flow type is `desktop`, Instant Link performs the possession check. When flow type is `mobile`, first Mobile Auth, if enabled, and then one-time password (OTP) as a fallback. The Instant Link session has a three minute timeout from when it's sent through SMS to when the customer can selects it. The OTP session has a two minute timeout from when it's sent through SMS to when the customer can enter in the OTP.
* Final Target URL: required when `flowType=desktop`. This should be a URL you support. When the customer clicks the Instant Link, the workflow sends the customer to this URL, which instructs them to continue the process. Maximum length is 128 characters.
These parameters are optional:
* `ssn`: full or last four digits of the customer's social security number. You can pass it into `Start()` or `Challenge()`.
* `dob`: date of birth in one of these formats: `YYYY-MM-DD`, `YYYY-MM`, `MM-DD`. You can pass it into `Start()` or `Challenge()`.
* `allowOTPRetry`: set to `true` to allow the customer to re-enter the OTP up to three times. Defaults to `false`.
For OTP retries, make sure to implement client SDK changes as detailed in the [Implementation Guide](https://developer.prove.com/docs/prove-pre-fill-implementation-guide#request-new-otp-code).
```go Go theme={"dark"}
ctx := context.TODO()
rspStart, err := client.V3.V3StartRequest(ctx, &components.V3StartRequest{
FlowType: "desktop",
FinalTargetURL: provesdkservergo.String("https://prove.com"),
PhoneNumber: provesdkservergo.String("2001001686"),
Ssn: provesdkservergo.String("8370"),
})
if err != nil {
t.Fatal(err)
}
```
```typescript TypeScript theme={"dark"}
const startReq = {
flowType: 'desktop',
finalTargetUrl: 'https://prove.com',
phoneNumber: '2001001686',
ssn: '8370',
};
const rspStart = await sdk.v3.v3StartRequest(startReq);
```
```java Java theme={"dark"}
V3StartRequest req = V3StartRequest.builder()
.flowType("desktop")
.finalTargetUrl("https://prove.com")
.phoneNumber("2001001686")
.ssn("8370")
.build();
V3StartRequestResponse startReqResp = sdk.v3().v3StartRequest()
.request(req)
.call();
V3StartResponse startResponse = startReqResp.v3StartResponse().get();
```
```csharp .NET theme={"dark"}
var startReq = new V3StartRequest
{
FlowType = "desktop",
FinalTargetUrl = "https://prove.com",
PhoneNumber = "2001001686",
Ssn = "8370"
};
var rspStart = await _sdk.V3.V3StartRequestAsync(startReq);
```
The function returns the following fields:
* Auth Token: send this to your client-side code through the `Authenticate()` function - it's a short lived JSON Web Token (JWT) tied to the current flow and used for the possession checks.
* Correlation ID: save this in your current session, then pass it in to each of the `Validate()`, `Challenge()`, and `Complete()` function calls of the same flow. The correlation ID ties together different system calls for the same Prove flow. It can aids in troubleshooting. The session expires in 15 minutes from when the correlation ID returns from the `Start()` call.
* Next: map of the next API call you make.
Return the auth token in a response to the front end.
The phone number field is also required in Sandbox to determine which scenario you're testing. Neglecting to pass in the phone number of a valid test user returns a "no test user found matching the phone number" error.
## `Validate()`
Once the possession checks finish on the mobile device, the finish handler on the client-side SDK executes. You then make a request to your server such as `POST /verify` to make the next call in the flow to the `Validate()` function.
This function requires the Correlation ID: the ID returned by the `Start()` function.
```go Go theme={"dark"}
rspValidate, err := client.V3.V3ValidateRequest(ctx, &components.V3ValidateRequest{
CorrelationID: rspStart.V3StartResponse.CorrelationID,
})
if err != nil {
t.Fatal(err)
}
```
```typescript TypeScript theme={"dark"}
const rspValidate = await sdk.v3.v3ValidateRequest({
correlationId: rspStart.v3StartResponse?.correlationId || '',
});
```
```java Java theme={"dark"}
V3ValidateRequest validateReq = V3ValidateRequest.builder()
.correlationId(startResponse.correlationId())
.build();
V3ValidateRequestResponse validateReqResp = sdk.v3().v3ValidateRequest()
.request(validateReq)
.call();
V3ValidateResponse validateResp = validateReqResp.v3ValidateResponse().get();
```
```csharp .NET theme={"dark"}
var rspValidate = await _sdk.V3.V3ValidateRequestAsync(new V3ValidateRequest
{
CorrelationId = rspStart.V3StartResponse?.CorrelationId
});
```
The function returns the following fields:
* Success: either `true` if the mobile number validation was successful, or `false` if it failed.
* Challenge Missing: when `true`, pass the challenge into the `Challenge()` function.
* Phone Number: either the validated phone number or no field.
* Next: map of the next API call.
The challenge missing field determines if you must return to the front end and request either the last four of their social security number or date of birth. If the challenge was already passed into the `Start()` call, the back end can then make a call to the `Challenge()` function and return the results to the front end.
## `Challenge()`
If the `Validate()` function returns `v3-challenge` as one of the keys in the `Next` field map, call the `Challenge()` function to return the customer information matching the mobile number and challenge. The `Challenge()` capability is available in Prove Pre-Fill. When using Prove Identity, if `Validate()` is successful, it returns `v3-complete` as one of the keys in the `Next` field map instead of `v3-challenge`.
This function takes has one required parameter:
* Correlation ID: the ID returned by the `Start()` function.
If the `Validate()` function returned `Challenge Missing=true`, send one of these parameters in the request:
* `ssn`: full or last four digits of the customer's social security number.
* `dob`: date of birth in one of these formats: `YYYY-MM-DD`, `YYYY-MM`, `MM-DD`.
```go Go theme={"dark"}
rspChallenge, err := client.V3.V3ChallengeRequest(ctx, &components.V3ChallengeRequest{
CorrelationID: rspStart.V3StartResponse.CorrelationID,
Ssn: provesdkservergo.String("565228370"),
})
if err != nil {
t.Fatal(err)
}
```
```typescript TypeScript theme={"dark"}
const rspChallenge = await sdk.v3.v3ChallengeRequest({
correlationId: rspStart.v3StartResponse?.correlationId || '',
ssn: '565228370',
});
```
```java Java theme={"dark"}
V3ChallengeRequest challengeReq = V3ChallengeRequest.builder()
.correlationId(startResponse.correlationId())
.ssn("565228370")
.build();
V3ChallengeRequestResponse challengeReqResp = sdk.v3().v3ChallengeRequest()
.request(challengeReq)
.call();
V3ChallengeResponse challengeResp = challengeReqResp.v3ChallengeResponse().get();
```
```csharp .NET theme={"dark"}
var rspChallenge = await _sdk.V3.V3ChallengeRequestAsync(new V3ChallengeRequest
{
CorrelationId = rspStart.V3StartResponse?.CorrelationId,
Ssn = "565228370"
});
```
The function returns the following fields:
* Success: `true` if customer info returned.
* Individual: customer information in a map.
* Next: map of the next API call.
If the `success=true`, return the customer information in a response to the front end to prefill the form.
## `Complete()`
Once the customer reviews their information and makes any edits, submit the customer information to the back end for verification.
This function is the final call in the flow that verifies the customer information.
This function takes these required parameters:
* Correlation ID: this is the ID returned by the `Start()` function. It validates against this regular expression: `^[0-9a-f]{8}-[0-9a-f]{4}-[0-9a-f]{4}-[0-9a-f]{4}-[0-9a-f]{12}$`.
* Individual: customer information in a map.
```go Go theme={"dark"}
rspComplete, err := client.V3.V3CompleteRequest(ctx, &components.V3CompleteRequest{
CorrelationID: rspStart.V3StartResponse.CorrelationID,
Individual: components.V3CompleteIndividualRequest{
FirstName: provesdkservergo.String("Tod"),
LastName: provesdkservergo.String("Weedall"),
Addresses: []components.V3CompleteAddressEntryRequest{
{
Address: provesdkservergo.String("39 South Trail"),
City: provesdkservergo.String("San Antonio"),
Region: provesdkservergo.String("TX"),
PostalCode: provesdkservergo.String("78285"),
},
},
Ssn: provesdkservergo.String("565228370"),
Dob: provesdkservergo.String("1984-12-10"),
EmailAddresses: []string{
"tweedalld@ehow.com",
},
},
})
if err != nil {
t.Fatal(err)
}
```
```typescript TypeScript theme={"dark"}
const rspComplete = await sdk.v3.v3CompleteRequest({
correlationId: rspStart.v3StartResponse?.correlationId || '',
individual: {
addresses: [
{
address: '39 South Trail',
city: 'San Antonio',
postalCode: '78285-2622',
region: 'TX',
},
],
dob: '1984-12-10',
emailAddresses: ['tweedalld@ehow.com'],
firstName: 'Tod',
lastName: 'Weedall',
ssn: '565228370',
},
});
```
```java Java theme={"dark"}
List addresses = new ArrayList<>(
Arrays.asList(V3CompleteAddressEntryRequest.builder().address("39 South Trail").city("San Antonio")
.postalCode("78285-2622").region("TX").build()));
V3CompleteRequest completeReq = V3CompleteRequest.builder()
.correlationId(startResponse.correlationId())
.individual(V3CompleteIndividualRequest.builder()
.ssn("565228370")
.firstName("Tod")
.lastName("Weedall")
.emailAddresses(new ArrayList<>(Arrays.asList("tweedalld@ehow.com")))
.dob("1984-12-10")
.addresses(addresses)
.build())
.build();
V3CompleteRequestResponse completeReqResp = sdk.v3().v3CompleteRequest()
.request(completeReq)
.call();
V3CompleteResponse completeResp = completeReqResp.v3CompleteResponse().get();
```
```csharp .NET theme={"dark"}
var rspComplete = await _sdk.V3.V3CompleteRequestAsync(new V3CompleteRequest
{
CorrelationId = rspStart.V3StartResponse?.CorrelationId,
Individual = new V3CompleteIndividualRequest
{
FirstName = rspChallenge.V3ChallengeResponse?.Individual?.FirstName,
LastName = rspChallenge.V3ChallengeResponse?.Individual?.LastName,
Ssn = rspChallenge.V3ChallengeResponse?.Individual?.Ssn,
Dob = rspChallenge.V3ChallengeResponse?.Individual?.Dob,
EmailAddresses = rspChallenge.V3ChallengeResponse?.Individual?.EmailAddresses,
Addresses = rspChallenge.V3ChallengeResponse?.Individual?.Addresses?.Select(addr => new V3CompleteAddressEntryRequest
{
Address = addr.Address,
City = addr.City,
Region = addr.Region,
PostalCode = addr.PostalCode
}).ToList()
}
});
```
The function returns the following fields:
* Success: `true` if customer information returned.
* Next: map of the next API call you need to make, in this case, `Done`.
You can then respond to the front end with the results of the customer verification.
SDK Updates
Prove hosts the server-side SDKs on [GitHub](https://github.com/prove-identity). Once you create a free GitHub account, you can Watch any of the projects to receive notifications.
# Start Flow
Source: https://developer.prove.com/reference/start-request
post /v3/start
This endpoint allows you to start the solution flow.
Use the following base URLs when integrating:
`https://platform.uat.proveapis.com` - North America Sandbox Environment
`https://platform.proveapis.com` - North America Production Environment
# Errors and Status Codes
Source: https://developer.prove.com/reference/status-and-error-codes
Discover the various error and status codes generated by Prove APIs
## API conventions
Prove Platform APIs follow consistent API conventions. The API responses follow these conventions:
* Optional fields that have no values aren't returned.
* JSON maps that have no values aren't returned.
* JSON arrays that have no values aren't returned.
## HTTP status codes
The following table has a list of the HTTP status codes returned by the Prove services:
| Code | Definition | Description |
| :--- | :-------------------- | :---------------------------------------------------------------------------------------------------------------------------------------------------------------------------------------------------------------------- |
| 200 | OK | The request completed successfully. |
| 400 | Bad Request | There was a problem with the submitted request. |
| 401 | Unauthorized | The request lacks valid authentication credentials for the target resource. Check for no missing chars or whitespace. Validate that you are calling the correct environment such as US or EU and Production or Sandbox. |
| 403 | Forbidden | The client doesn't have permission to access the target resource. |
| 404 | Not Found | The server didn't find anything matching the Request-URI. |
| 429 | Too Many Requests | The rate limit of 25 requests per second has been exceeded. Wait for the time specified in the `Retry-After` header before making additional requests. |
| 500 | Internal Server Error | The server encountered an unexpected condition preventing it from fulfilling the request. Retry the request, and if the problem persists, contact Prove support. |
## API error codes
When a Prove API encounters a request error, the JSON response object includes a `code` field and a `message` field to give further context.
This table has a list of the API error codes:
| Error Code | Description | Resolution Path |
| :--------- | :------------------------------ | :----------------------------------------------------------------------------------------------------------------------------------------------------------------------------------------------------------------------------------------------------------------------------------------------- |
| 8000 | Internal Error | The server encountered an unexpected condition preventing it from fulfilling the request. Retry the request, and if the problem persists, contact Prove support. |
| 8001 | Malformed Request | Ensure the request is valid JSON, is under 4 KB in size, and correct any invalid parameters. The API specifies invalid parameters and includes the reason in the `message` field. |
| 8002 | Unauthorized Request | The request lacks valid authentication credentials for the target resource. Ensure you used the correct credentials. |
| 8003 | Step Called Out of Order | The request called an endpoint out of order. Check the `next` field for the proper endpoint to call. |
| 8007 | Sandbox User Not Found | Only use test user information as input for requests unless otherwise specified in the test cases. |
| 8008 | Invalid Correlation ID | Check the Correlation ID for errors. The Correlation ID is unique per session. |
| 8009 | Sandbox Test User Access Denied | Your current product credentials can't access the test user. Ensure you're using test users with the matching Prove solution credentials. |
| 8010 | Unauthorized for Country | This can mean one of two things: - The customer is not authorized to verify numbers for the requested country. Contact your Prove representative.
- An EU number is being passed to our US endpoint, or vice versa. Use the correct endpoint for the given phone number.
|
| 8011 | Identity Not Found | No identity exists for the provided Identity ID. |
## Rate limiting
Prove APIs enforce a rate limit of **25 requests per second** to ensure fair resource usage and system stability. When you exceed this limit, the API returns an HTTP 429 status code with the following headers:
| Header | Description |
| :---------------------- | :---------------------------------------------------------- |
| `X-RateLimit-Limit` | The maximum number of requests allowed per second |
| `X-RateLimit-Remaining` | The number of requests remaining in the current time window |
| `X-RateLimit-Reset` | The time, in Unix epoch seconds, when the rate limit resets |
| `Retry-After` | The number of seconds to wait before making another request |
### Example rate limit response
```json theme={"dark"}
HTTP/1.1 429 Too Many Requests
X-RateLimit-Limit: 25
X-RateLimit-Remaining: 0
X-RateLimit-Reset: 1699632000
Retry-After: 1
{
"code": 8012,
"message": "Rate limit exceeded. Please wait before making more requests."
}
```
### Best practices for handling rate limits
* Check the `X-RateLimit-Remaining` header to track your usage.
* Implement exponential backoff when you receive a 429 response.
* Respect the `Retry-After` header value before retrying requests.
* Distribute requests evenly over time rather than sending bursts.
## Retry behavior after errors
When an HTTP status code other than 200 returns, you can fix and retry the request. If you retry a request that resulted in 200, you receive an HTTP 403 code with either `step called out of order` or `correlation ID is expired or invalid`. Prove prevents retries to ensure proper behavior and mitigate issues with replay attacks.
# Client-Side Android SDK
Source: https://developer.prove.com/reference/unify-android-sdk
Learn how to integrate the client-side Android SDK into your web app
## Installation
The Android SDK is a set of lightweight libraries delivered as Android Archive Repository files, `.aar`. The minimum supported version of Android is v7, level 24.
Prove manages a maven repository with Android binaries to enable integration with Gradle.
Update the dependencies object in the `build.gradle` file:
```java Java theme={"dark"}
dependencies {
// Existing dependencies are here.
// Add the Prove Link dependencies:
implementation 'com.prove.sdk:proveauth:6.9.0'
}
```
Point to the repository by updating your `settings.gradle` file with the Maven repository:
```java Java theme={"dark"}
dependencyResolutionManagement {
// Existing repository settings are here.
repositories {
// Existing repositories are here.
// Add the Prove Link Maven repository:
maven {
url = "https://prove.jfrog.io/artifactory/libs-public-maven/"
}
}
}
```
The following needs added to the `build.gradle` file to also download dependency libraries:
```java Java theme={"dark"}
dependencies {
implementation fileTree('libs')
}
```
If you receive an error message on the `application@fullBackupContent` value, you can resolve it by adding this line of code to your application `AndroidManifest.xml` file inside the `...` node. Add it as an attribute to the opening `application` tag:
```xml XML theme={"dark"}
```
## Permissions
The Prove Auth SDK and its children SDKs merge the following permissions into the main app:
```xml XML theme={"dark"}
```
## Send the type of flow: mobile
Unlike the Web SDK, when using the Android SDK, use the mobile flow. Pass `mobile` to the `Unify()` function on the server. In a mobile flow, the mobile phone performs OTP validation.
In the mobile flow, once OTP validation is complete, the AuthFinishStep function executes.
## Authenticate()
The SDK requires an `authToken` as a parameter for the `Authenticate()` function. This token returns from the `Unify()` call of the server SDK. The token is session specific, limiting it to a single flow. It also expires after 15 minutes.
## Retrieve `authToken`
Send a request to your backend server with possession type, and an optional phone number if using the Prove possession check.
```java Java theme={"dark"}
String initialize(String phoneNumber, String possessionType) {
YourBackendClient backend = new YourBackendClient(); // Backend API client
// TODO: Build your InitializeRequest object
InitializeRequest initializeRequest = new InitializeRequest(phoneNumber, possessionType);
// Send an initialize request to your backend server to get authToken
InitializeResponse response = backend.initialize(initializeRequest);
// TODO: define your own InitializeResponse object to parse authToken string
return response.getAuthToken();
}
```
## Setup authenticator
Once you have the `authToken`, build the authenticator for the mobile flow.
```java Java theme={"dark"}
// Object implementing AuthFinishStep interface
AuthFinishStep authFinishStep = new AuthFinishStep() {
...
};
// Objects implementing OtpStartStep/OtpFinishStep interfaces
OtpStartStep otpStartStep = new OtpStartStep() {
...
};
OtpFinishStep otpFinishStep = new OtpFinishStep() {
...
};
ProveAuth proveAuth = ProveAuth.builder()
.withAuthFinishStep(authId -> verify(authId)) // verify(authId) call defined in #Validate the Mobile Phone section
.withOtpFallback(otpStartStep, otpFinishStep)
.withContext(this)
.build();
```
The cellular data connection can sometimes be unavailable during testing. The `Builder` class offers a `withTestMode(boolean testMode)` method. This method permits simulated successful session results while connected to a Wi-Fi network only. Testing using a Wi-Fi connection is useful in the Sandbox environment.
```java Java theme={"dark"}
ProveAuth proveAuth = ProveAuth.builder()
.withAuthFinishStep(authId -> verify(authId))
.withOtpFallback(otpStartStep, otpFinishStep)
.withContext(this)
.withTestMode(true) // Test mode flag
.build();
```
```java Java theme={"dark"}
// Object implementing AuthFinishStep interface
AuthFinishStep authFinishStep = new AuthFinishStep() {
...
};
ProveAuth proveAuth = ProveAuth.builder()
.withAuthFinishStep(authId -> verify(authId)) // verify(authId) call defined in #Validate the Mobile Phone section
.withContext(this)
.build();
```
The cellular data connection can sometimes be unavailable during testing. The `Builder` class offers a `withTestMode(boolean testMode)` method. This method permits simulated successful session results while connected to a Wi-Fi network only. Testing using a Wi-Fi connection is useful in the Sandbox environment.
```java Java theme={"dark"}
ProveAuth proveAuth = ProveAuth.builder()
.withAuthFinishStep(authId -> verify(authId))
.withContext(this)
.withTestMode(true) // Test mode flag
.build();
```
## Performing the authentication
The `ProveAuth` object is thread safe. You can use it as a singleton. Most Prove Auth methods are blocking and therefore can't execute in the main app thread. The app employs an executor service with a minimum of two threads to manage threads due to the ability to process concurrent blocking requests.
```java Java theme={"dark"}
public class MyAuthenticator {
private final MyBackendClient backend = new MyBackendClient(); // Backend API client
private ExecutorService executor = Executors.newCachedThreadPool();
private final AuthFinishStep authFinishStep = new AuthFinishStep() {
@Override
void execute(String authId) {
try {
AuthFinishResponse response = backend.authFinish("My App", authId);
... // Check the authentication status returned in the response
} catch (IOException e) {
String failureCause = e.getCause() != null ? e.getCause().getMessage() : "Failed to request authentication results";
// Authentication failed due to request failure
}
}
};
private ProveAuth proveAuth;
public MyAuthenticator(Context context) {
proveAuth = ProveAuth.builder()
.withAuthFinishStep(authFinishStep)
.withOtpFallback(otpStartStep, otpFinishStep)
.withContext(context)
.build();
}
public void authenticate() throws IOException, ProveAuthException {
AuthStartResponse response = backend.authStart("My Prove Auth App");
proveAuth.authenticate(response.getAuthToken());
}
}
public void authenticate() throws IOException, ProveAuthException {
// NOTE: blocking method proveAuth.authenticate() should be run in background thread
executor.submit(() -> {
AuthStartResponse response = backend.authStart("My Prove Auth App");
proveAuth.authenticate(response.getAuthToken());
}
}
```
## Validate the mobile phone
In the AuthFinishStep, specify a function to call once the possession checks are complete on the mobile phone. This endpoint on your back end server calls the `Validate()` function to check phone number validation. If it was successful, the server returns the results from the `Challenge()` function, including customer information.
```java Java theme={"dark"}
// Send a verify request to get return customer information.
void verify(String: authId) {
YourBackendClient backend = new YourBackendClient(); // Backend API client
// Build your VerifyRequest object
VerifyRequest verifyRequest = new VerifyRequest(authId, ...);
// Send a verify request to your backend server to get return customer information.
VerifyResponse response = backend.verify(verifyRequest);
}
```
## Configure OTP
To use the Resend/Retry/Phone Change features, you need to install the Android SDK version 6.5.0 or later.
To set the One-Time Password (OTP) handler, `withOtpFallback(otpStart: otpStartStep, otpFinish: otpFinishStep)`, requires implementing the `OtpStartStep` and `OtpFinishStep`.
The OTP session has a two minute timeout from when it's sent through SMS to when the customer can enter in the OTP.
Follow these instructions if you are implementing OTP and you are passing in the phone number on the `/v3/start` endpoint. In this case, you've already prompted for a phone number so you don't need to prompt for it in the client SDK.
Since you passed the phone number in the `Start()` function, call `OtpStartStepCallback.onSuccess(OtpStartInput);` to communicate to the SDK you have the customer's agreement to deliver the SMS message. Ensure you return an instance of `OtpStartInput` with empty string or `null` to `OtpStartStepCallback.onSuccess()` function.
```java Java theme={"dark"}
import com.prove.sdk.proveauth.OtpStartInput;
import com.prove.sdk.proveauth.OtpStartStep;
import com.prove.sdk.proveauth.OtpStartStepCallback;
import com.prove.sdk.proveauth.ProveAuthException;
public class NoPromptStart implements OtpStartStep {
@Override
public void execute(boolean phoneNumberNeeded, ProveAuthException otpException,
OtpStartStepCallback callback) {
// No phone number needed, no need to ask end user for input.
callback.onSuccess(new OtpStartInput(""));
}
}
```
Call the `OtpStartStepCallback.onError();` method to communicate to the SDK any issues while trying to obtain the phone number or the OTP. Report an error if the customer cancels the SMS transaction or presses the back button to leave the screen.
In the finish step, call the `OtpFinishStepCallback.onSuccess(OtpFinishInput);` method to return the collected OTP value wrapped in `OtpFinishInput`.
```java Java theme={"dark"}
import com.prove.sdk.proveauth.OtpFinishInput;
import com.prove.sdk.proveauth.OtpFinishStep;
import com.prove.sdk.proveauth.OtpFinishStepCallback;
import com.prove.sdk.proveauth.OtpValidationException;
import com.prove.sdk.proveauth.ProveAuthException;
public class NoPromptFinish implements OtpFinishStep {
@Override
public void execute(@Nullable ProveAuthException otpException,
OtpFinishStepCallback otpFinishStepCallback) {
// If error message is found, handle it.
if (otpException instanceof OtpValidationException) {
// Set to a variable and display it in a field.
// In this example, we don't do anything with the error.
String errorMsg = otpException.getMessage();
}
try {
// Prompt the user for OTP delivered by SMS. You can build UI to provide
// best UX based on your application and business logic, here we simplify to a
// generic function named promptForOtpCode which gives us the OTP code.
String otpCode = promptForOtpCode();
otpFinishStepCallback.onSuccess(new OtpFinishInput(otpCode));
} catch (Exception e) {
// if any issue with the OTP collection from the end user or the user wants to cancel
// then call onError to exit the flow. In this example we simplify it as catching
// an exception.
otpFinishStepCallback.onError();
}
}
}
```
Follow these instructions if implementing MobileAuth and collecting the phone number only if MobileAuth fails. This will implement OTP without allowing for SMS resends and phone number changes. If you do want those capabilities, please reference the subsequent tabs (Resend, Retry OTP, and Phone Number Change).
In the start step, call the `OtpStartStepCallback.onSuccess(OtpStartInput);` method to return the collected phone number to the SDK.
```java Java theme={"dark"}
import com.prove.sdk.proveauth.OtpStartInput;
import com.prove.sdk.proveauth.OtpStartStep;
import com.prove.sdk.proveauth.OtpStartStepCallback;
import com.prove.sdk.proveauth.PhoneNumberValidationException;
import com.prove.sdk.proveauth.ProveAuthException;
public class PromptStart implements OtpStartStep {
@Override
public void execute(boolean phoneNumberNeeded, @Nullable ProveAuthException otpException,
OtpStartStepCallback callback) {
// If phone number is needed, need to ask the end user for phone number input.
if (phoneNumberNeeded) {
// If error message is found around phone number, handle it.
// The `PhoneNumberValidationException` is ONLY available when `phoneNumberNeeded`
// has a value.
if (otpException instanceof PhoneNumberValidationException) {
// Set to a variable and display it in a field.
// In this example, we don't do anything with the error.
String errorMsg = otpException.getMessage();
}
try {
// Prompt the user for phone number to receive OTP SMS. You can build UI to provide
// best UX based on your application and business logic, here we simplify to a
// generic function named promptForPhoneNumber which gives us the collected
// phone number.
String phoneNumber = promptForPhoneNumber();
callback.onSuccess(new OtpStartInput(phoneNumber));
} catch (Exception e) {
// if any issue with the phone number collection from the end user or the user
// wants to cancel then call onError to exit the flow.
// In this example we simplify it as catching an exception.
callback.onError();
}
} else {
// No phone number needed, no need to ask end user for input.
callback.onSuccess(new OtpStartInput(""));
}
}
}
```
The finish step is implemented the same as the previous tab:
```java Java theme={"dark"}
import com.prove.sdk.proveauth.OtpFinishInput;
import com.prove.sdk.proveauth.OtpFinishStep;
import com.prove.sdk.proveauth.OtpFinishStepCallback;
import com.prove.sdk.proveauth.OtpValidationException;
import com.prove.sdk.proveauth.ProveAuthException;
public class NoPromptFinish implements OtpFinishStep {
@Override
public void execute(@Nullable ProveAuthException otpException,
OtpFinishStepCallback otpFinishStepCallback) {
// If error message is found, handle it.
if (otpException instanceof OtpValidationException) {
// Set to a variable and display it in a field.
// In this example, we don't do anything with the error.
String errorMsg = otpException.getMessage();
}
try {
// Prompt the user for OTP delivered by SMS. You can build UI to provide
// best UX based on your application and business logic, here we simplify to a
// generic function named promptForOtpCode which gives us the OTP code.
String otpCode = promptForOtpCode();
otpFinishStepCallback.onSuccess(new OtpFinishInput(otpCode));
} catch (Exception e) {
// if any issue with the OTP collection from the end user or the user wants to cancel
// then call onError to exit the flow. In this example we simplify it as catching
// an exception.
otpFinishStepCallback.onError();
}
}
}
```
Follow these instructions to allow the customer to request a new OTP via SMS using the same phone number. There is a max of three send attempts including the initial message.
The start step is implemented the same as the previous tab:
```java Java theme={"dark"}
import com.prove.sdk.proveauth.OtpStartInput;
import com.prove.sdk.proveauth.OtpStartStep;
import com.prove.sdk.proveauth.OtpStartStepCallback;
import com.prove.sdk.proveauth.PhoneNumberValidationException;
import com.prove.sdk.proveauth.ProveAuthException;
public class PromptStart implements OtpStartStep {
@Override
public void execute(boolean phoneNumberNeeded, @Nullable ProveAuthException otpException,
OtpStartStepCallback callback) {
// If phone number is needed, need to ask the end user for phone number input.
if (phoneNumberNeeded) {
// If error message is found around phone number, handle it.
// The `PhoneNumberValidationException` is ONLY available when `phoneNumberNeeded`
// has a value.
if (otpException instanceof PhoneNumberValidationException) {
// Set to a variable and display it in a field.
// In this example, we don't do anything with the error.
String errorMsg = otpException.getMessage();
}
try {
// Prompt the user for phone number to receive OTP SMS. You can build UI to provide
// best UX based on your application and business logic, here we simplify to a
// generic function named promptForPhoneNumber which gives us the collected
// phone number.
String phoneNumber = promptForPhoneNumber();
callback.onSuccess(new OtpStartInput(phoneNumber));
} catch (Exception e) {
// if any issue with the phone number collection from the end user or the user
// wants to cancel then call onError to exit the flow.
// In this example we simplify it as catching an exception.
callback.onError();
}
} else {
// No phone number needed, no need to ask end user for input.
callback.onSuccess(new OtpStartInput(""));
}
}
}
```
You can then send a new OTP SMS to the same phone number by implementing the finish step like this:
```java Java theme={"dark"}
import com.prove.sdk.proveauth.OtpFinishInput;
import com.prove.sdk.proveauth.OtpFinishStep;
import com.prove.sdk.proveauth.OtpFinishStepCallback;
import com.prove.sdk.proveauth.OtpValidationException;
import com.prove.sdk.proveauth.ProveAuthException;
public class MultipleResendFinish implements OtpFinishStep {
@Override
public void execute(@Nullable ProveAuthException otpException,
OtpFinishStepCallback otpFinishStepCallback) {
// If error message is found, handle it.
if (otpException instanceof OtpValidationException) {
// Set to a variable and display it in a field.
// In this example, we don't do anything with the error.
String errorMsg = otpException.getMessage();
}
// Prompt the user for whether they received the SMS.
if (promptForResend("Didn't receive the SMS OTP? Click resend button for a new one!")) {
// If the end user wants to send again to the same phone number call onOtpResend().
otpFinishStepCallback.onOtpResend();
return;
}
try {
// Prompt the user for OTP delivered by SMS. You can build UI to provide
// best UX based on your application and business logic, here we simplify to a
// generic function named promptForOtpCode which gives us the OTP code.
String otpCode = promptForOtpCode();
otpFinishStepCallback.onSuccess(new OtpFinishInput(otpCode));
} catch (Exception e) {
// if any issue with the OTP collection from the end user or the user wants to cancel
// then call onError to exit the flow. In this example we simplify it as catching
// an exception.
otpFinishStepCallback.onError();
}
}
}
```
Follow these instructions to allow the customer to re-enter the OTP PIN if they type it wrong. There is a max of 3 attempts. To implement this functionality, you also need to pass in `allowOTPRetry=true` to the `/v3/start` endpoint.
The start step is implemented the same as either of the the previous tabs - no client side code changes necessary:
```java Java theme={"dark"}
import com.prove.sdk.proveauth.OtpStartInput;
import com.prove.sdk.proveauth.OtpStartStep;
import com.prove.sdk.proveauth.OtpStartStepCallback;
import com.prove.sdk.proveauth.PhoneNumberValidationException;
import com.prove.sdk.proveauth.ProveAuthException;
public class PromptStart implements OtpStartStep {
@Override
public void execute(boolean phoneNumberNeeded, @Nullable ProveAuthException otpException,
OtpStartStepCallback callback) {
// If phone number is needed, need to ask the end user for phone number input.
if (phoneNumberNeeded) {
// If error message is found around phone number, handle it.
// The `PhoneNumberValidationException` is ONLY available when `phoneNumberNeeded`
// has a value.
if (otpException instanceof PhoneNumberValidationException) {
// Set to a variable and display it in a field.
// In this example, we don't do anything with the error.
String errorMsg = otpException.getMessage();
}
try {
// Prompt the user for phone number to receive OTP SMS. You can build UI to provide
// best UX based on your application and business logic, here we simplify to a
// generic function named promptForPhoneNumber which gives us the collected
// phone number.
String phoneNumber = promptForPhoneNumber();
callback.onSuccess(new OtpStartInput(phoneNumber));
} catch (Exception e) {
// if any issue with the phone number collection from the end user or the user
// wants to cancel then call onError to exit the flow.
// In this example we simplify it as catching an exception.
callback.onError();
}
} else {
// No phone number needed, no need to ask end user for input.
callback.onSuccess(new OtpStartInput(""));
}
}
}
```
The finish step is implemented the same as either of the the previous tabs - no client side code changes necessary. If the OTP is invalid, the finish step will be called again to prompt the user for a new input. Once the max attempts is reached, the `AuthFinish` function will be called.
```java Java theme={"dark"}
import com.prove.sdk.proveauth.OtpFinishInput;
import com.prove.sdk.proveauth.OtpFinishStep;
import com.prove.sdk.proveauth.OtpFinishStepCallback;
import com.prove.sdk.proveauth.OtpValidationException;
import com.prove.sdk.proveauth.ProveAuthException;
public class NoPromptFinish implements OtpFinishStep {
@Override
public void execute(@Nullable ProveAuthException otpException,
OtpFinishStepCallback otpFinishStepCallback) {
// If error message is found, handle it.
if (otpException instanceof OtpValidationException) {
// Set to a variable and display it in a field.
// In this example, we don't do anything with the error.
String errorMsg = otpException.getMessage();
}
try {
// Prompt the user for OTP delivered by SMS. You can build UI to provide
// best UX based on your application and business logic, here we simplify to a
// generic function named promptForOtpCode which gives us the OTP code.
String otpCode = promptForOtpCode();
otpFinishStepCallback.onSuccess(new OtpFinishInput(otpCode));
} catch (Exception e) {
// if any issue with the OTP collection from the end user or the user wants to cancel
// then call onError to exit the flow. In this example we simplify it as catching
// an exception.
otpFinishStepCallback.onError();
}
}
}
```
Follow these instructions to allow the customer to re-enter their phone number. There is a max of three entries/send attempts.
Manual Request Required
To enable phone number change capabilities on your credentials, contact your Prove representative.
The start step is implemented the same as the previous tab:
```java Java theme={"dark"}
import com.prove.sdk.proveauth.OtpStartInput;
import com.prove.sdk.proveauth.OtpStartStep;
import com.prove.sdk.proveauth.OtpStartStepCallback;
import com.prove.sdk.proveauth.PhoneNumberValidationException;
import com.prove.sdk.proveauth.ProveAuthException;
public class PromptStart implements OtpStartStep {
@Override
public void execute(boolean phoneNumberNeeded, @Nullable ProveAuthException otpException,
OtpStartStepCallback callback) {
// If phone number is needed, need to ask the end user for phone number input.
if (phoneNumberNeeded) {
// If error message is found around phone number, handle it.
// The `PhoneNumberValidationException` is ONLY available when `phoneNumberNeeded`
// has a value.
if (otpException instanceof PhoneNumberValidationException) {
// Set to a variable and display it in a field.
// In this example, we don't do anything with the error.
String errorMsg = otpException.getMessage();
}
try {
// Prompt the user for phone number to receive OTP SMS. You can build UI to provide
// best UX based on your application and business logic, here we simplify to a
// generic function named promptForPhoneNumber which gives us the collected
// phone number.
String phoneNumber = promptForPhoneNumber();
callback.onSuccess(new OtpStartInput(phoneNumber));
} catch (Exception e) {
// if any issue with the phone number collection from the end user or the user
// wants to cancel then call onError to exit the flow.
// In this example we simplify it as catching an exception.
callback.onError();
}
} else {
// No phone number needed, no need to ask end user for input.
callback.onSuccess(new OtpStartInput(""));
}
}
}
```
You can prompt for a new phone number by implementing the finish step like this:
```java Java theme={"dark"}
import com.prove.sdk.proveauth.OtpFinishInput;
import com.prove.sdk.proveauth.OtpFinishStep;
import com.prove.sdk.proveauth.OtpFinishStepCallback;
import com.prove.sdk.proveauth.OtpValidationException;
import com.prove.sdk.proveauth.ProveAuthException;
public class PhoneChangeFinish implements OtpFinishStep {
@Override
public void execute(@Nullable ProveAuthException otpException,
OtpFinishStepCallback otpFinishStepCallback) {
// If error message is found, handle it.
if (otpException instanceof OtpValidationException) {
// Set to a variable and display it in a field.
// In this example, we don't do anything with the error.
String errorMsg = otpException.getMessage();
}
// Prompt the user for whether they received the SMS.
if (promptForPhoneNumberChange("Didn't receive the SMS OTP? Try a different phone number.")) {
// If the end user wants to correct the phone number already in use, or changing to a
// different phone number to receive the future SMS OTP, call onMobileNumberChange(), and
// the otpStartStep will re-prompt for phone number input from the end user.
otpFinishStepCallback.onMobileNumberChange();
return;
}
try {
// Prompt the user for OTP delivered by SMS. You can build UI to provide
// best UX based on your application and business logic, here we simplify to a
// generic function named promptForOtpCode which gives us the OTP code.
String otpCode = promptForOtpCode();
otpFinishStepCallback.onSuccess(new OtpFinishInput(otpCode));
} catch (Exception e) {
// if any issue with the OTP collection from the end user or the user wants to cancel
// then call onError to exit the flow. In this example we simplify it as catching
// an exception.
otpFinishStepCallback.onError();
}
}
}
```
# Bind Prove Key
Source: https://developer.prove.com/reference/unify-bind-request
post /v3/unify-bind
This endpoint allows you to bind a Prove Key to a phone number of a Unify session and get the possession result.
export const product_0 = undefined
Use the following base URLs when integrating {product_0}:
`https://platform.uat.proveapis.com` - North America Sandbox Environment
`https://platform.proveapis.com` - North America Production Environment
`https://platform.uat.eu.proveapis.com` - European Union Sandbox Environment
`https://platform.eu.proveapis.com` - European Union Production Environment
# Client-Side iOS SDK
Source: https://developer.prove.com/reference/unify-ios-sdk
Learn how to integrate the client-side iOS SDK into your web app
## Installation
Prove provides the iOS SDK in Swift. It has a download size of 2.5 MB and an install size of 1.5 MB for the minimum required components. It relies on iOS native APIs. The iOS SDK supports the earlier three major versions. Prove has seen successful transactions with iOS v11.
Xcode Requirement
To integrate with our iOS SDKs, Apps must be built with Xcode 16.0 or later.
Prove manages a repository with the libraries to enable integration. You can install the SDK using either CocoaPods or Swift Package Manager.
Execute the following to import CocoaPod from the Prove pod repository:
```shell shell theme={"dark"}
# Run this command to install the cocoapods-art plugin (authored by Artifactory)
gem install cocoapods-art
# Run this command to add the Prove pod repository
pod repo-art add prove.jfrog.io https://prove.jfrog.io/artifactory/api/pods/libs-public-cocoapods
# In your Podfile, paste in the Prove pod repository as a source
plugin 'cocoapods-art', :sources => [
'prove.jfrog.io'
]
# In your Podfile, paste in the SDK pods
pod 'ProveAuth', '6.9.1'
# Run this command to install the SDK pods
pod install
```
### Step 1: Connect to JFrog Registry
Set up the registry globally (required for both Xcode UI and Package.swift):
```bash theme={"dark"}
swift package-registry set --global "https://prove.jfrog.io/artifactory/api/swift/libs-public-swift"
swift package-registry login "https://prove.jfrog.io/artifactory/api/swift/libs-public-swift"
# Press Enter when prompted for access token
```
Public Registry
This is a publicly accessible registry - no password or access token is needed. Simply press Enter when prompted for an access token.
The registry connection is configured via command line only. Once this setup is complete, you can add packages using either Xcode UI or Package.swift.
### Step 2: Adding Dependencies
#### Method 1: Using Xcode UI
1. In Xcode, go to **File** → **Add Package Dependencies**
2. Search for the package you want (e.g., `swift.proveauth`)
3. Select the version and add to your target
The latest stable version is 6.9.1. Select "Exact Version" for production applications to ensure consistent builds.
Once the command line setup is complete, you only need to enter the package name (e.g., `swift.proveauth`) in Xcode - no need to enter the full registry URL to Xcode.
#### Method 2: Using Package.swift
Add dependencies to your `Package.swift` file:
```swift Swift theme={"dark"}
// swift-tools-version: 5.9
import PackageDescription
let package = Package(
name: "YourApp",
platforms: [.iOS(.v12)],
dependencies: [
.package(id: "swift.proveauth", from: "6.9.1"),
],
targets: [
.target(
name: "YourApp",
dependencies: [
.product(name: "ProveAuth", package: "swift.proveauth"),
]
)
]
)
```
Then run the following command to resolve and fetch the dependencies:
```bash theme={"dark"}
swift package resolve
```
## Send the type of flow: mobile
Unlike the Web SDK, when using the iOS SDK, use the mobile flow. Pass `mobile` to the `Unify()` function on the server. In a mobile flow, the mobile phone performs one-time password (OTP) validation.
In the mobile flow, once OTP validation is complete, the `AuthFinishStep` function executes.
## `Authenticate()`
The SDK requires an `authToken` as a parameter for the `Authenticate()` function. This token returns from the `Unify()` call of the server-side SDK. The token is session specific so it's used for a single flow. It also expires after 15 minutes.
## Retrieve `authToken`
To start the flow, send a request to your back-end server with the possession type. Include a phone number if you are using Prove’s possession check.
```swift Swift theme={"dark"}
// The below example uses native iOS URLSession, but any other
// alternative networking approaches should also work
func initialize(phoneNumber: String, possessionType: String, completion: @escaping (Result\) -> Void) {
guard let url = URL(string: "\(backendUrl)/initialize") else {
completion(.failure(URLError(.badURL)))
return
}
var request = URLRequest(url: url)
request.httpMethod = "POST"
request.addValue("application/json", forHTTPHeaderField: "Accept")
request.addValue("application/json", forHTTPHeaderField: "Content-Type")
// Set up the request body
let body: [String: Any] = [
"phoneNumber": phoneNumber,
"possessionType": possessionType
]
do {
request.httpBody = try JSONSerialization.data(withJSONObject: body, options: \[])
} catch {
completion(.failure(error))
return
}
// Perform the request
let task = URLSession.shared.dataTask(with: request) { \_, response, error in
// Handle network or connection errors
if let error = error {
completion(.failure(error))
return
}
do {
if let json = try JSONSerialization.jsonObject(with: data, options: \[]) as? [String: Any],
let authToken = json["authToken"] as? String {
completion(.success(authToken))
} else {
let parsingError = NSError(domain: "", code: 0, userInfo: [NSLocalizedDescriptionKey : "Failed to parse JSON or authToken is missing"])
completion(.failure(parsingError))
}
} catch {
completion(.failure(error))
}
}
// Start the network call
task.resume()
}
```
## Setup authenticator
Once you have the `authToken`, build the authenticator for the mobile flow.
```swift Swift theme={"dark"}
// Object implementing ProveAuthFinishStep protocols
let finishStep = FinishAuthStep()
// Objects implementing OtpStartStep/OtpFinishStep protocols
let otpStartStep = MobileOtpStartStep()
let otpFinishStep = MobileOtpFinishStep()
let proveAuthSdk: ProveAuth
proveAuthSdk = ProveAuth.builder(authFinish: finishStep)
.withOtpFallback(otpStart: otpStartStep, otpFinish: otpFinishStep)
.build()
```
```swift Swift theme={"dark"}
// Object implementing ProveAuthFinishStep protocols
let finishStep = FinishAuthStep()
let proveAuthSdk: ProveAuth
proveAuthSdk = ProveAuth.builder(authFinish: finishStep)
.build()
```
If a mobile data connection is unavailable during testing, use the Builder class. It permits simulated successful session results while connected to a Wi-Fi network. Testing using a Wi-Fi connection is useful in the Sandbox environment.
```swift Swift theme={"dark"}
proveAuthSdk = ProveAuth.builder(authFinish: finishStep)
.withMobileAuthTestMode() // Test mode flag
.build()
```
## Performing the authentication
The Prove Auth object is thread safe and used as a singleton. Most Prove Auth methods are blocking and therefore can't execute in the main app thread. The app employs an executor service with a minimum of two threads to manage threads due to the ability to process concurrent blocking requests.
```swift Swift theme={"dark"}
// authToken retrieved from your server via StartAuthRequest
proveAuthSdk.authenticate(authToken) { error in
DispatchQueue.main.async {
self.messages.finalResultMessage = "ProveAuth.authenticate returned error: \(error.localizedDescription)"
print(self.messages.finalResultMessage)
}
}
```
## Validate the mobile phone
In the `AuthFinishStep`, specify a function to call once the possession checks complete on the mobile phone. In the following code, notice an endpoint called `/verify`. This endpoint on your back end server calls the `UnifyStatus()` function to validate the phone number.
```swift Swift theme={"dark"}
// Send a verify request.
// The below example uses native iOS URLSession, but any other
// alternative networking approaches should also work
func verify(String: authId, completion: @escaping (Error?) -> Void) {
guard let url = URL(string: "\(backendUrl)/verify") else {
completion(URLError(.badURL))
return
}
// Create the request
var request = URLRequest(url: url)
request.httpMethod = "POST"
request.addValue("application/json", forHTTPHeaderField: "Accept")
request.addValue("application/json", forHTTPHeaderField: "Content-Type")
// Set up the request body (empty JSON object) - authId is not needed so you can ignore.
let body: [String: Any] = ["authId": authId]
do {
request.httpBody = try JSONSerialization.data(withJSONObject: body, options: \[])
} catch {
completion(error)
return
}
// Perform the request
let task = URLSession.shared.dataTask(with: request) { \_, response, error in
if let error = error {
completion(error)
return
} catch {
completion(error)
}
}
// Start the network call
task.resume()
}
```
## Configure OTP
To use the Resend/Retry/Phone Change features, you need to install the iOS SDK version 6.5.1 or later.
To set the One-Time Password (OTP) handler, `withOtpFallback(otpStart: otpStartStep, otpFinish: otpFinishStep)`, requires implementing the `OtpStartStep` and `OtpFinishStep`.
The OTP session has a two minute timeout from when it's sent through SMS to when the customer can enter in the OTP.
Follow these instructions if you are implementing OTP and you are passing in the phone number on the `/v3/start` endpoint. In this case, you've already prompted for a phone number so you don't need to prompt for it in the client SDK.
Since you passed the phone number in the `Start()` function, call `callback.onSuccess(input: nil)` to communicate to the SDK you have the customer's agreement to deliver the SMS message.
```swift Swift theme={"dark"}
import Foundation
import ProveAuth
import SwiftUI
class MobileOtpStartStep: OtpStartStep {
@ObservedObject var sheetObservable: SheetObservable
var callback: OtpStartStepCallback?
init(sheetObservable: SheetObservable) {
self.sheetObservable = sheetObservable
}
// Implement this method to handle phone number collection for SMS OTP,
// or to obtain user confirmation for initiating an SMS message.
func execute(
phoneNumberNeeded: Bool, phoneValidationError: ProveAuthError?, callback: OtpStartStepCallback
) {
self.callback = callback
// Since no phone number is needed, don't prompt the user.
callback.onSuccess(input: nil)
}
}
```
Call the `callback.onError()` method to communicate to the SDK any issues while trying to obtain the phone number or the OTP. Report an error if the customer cancels the SMS transaction or presses the back button to leave the screen.
```swift Swift theme={"dark"}
import Foundation
import SwiftUI
import ProveAuth
class MobileOtpFinishStep: OtpFinishStep {
@ObservedObject var sheetObservable: SheetObservable
var callback: OtpFinishStepCallback?
init(sheetObservable: SheetObservable){
self.sheetObservable = sheetObservable
}
// Implement this method to collect the OTP value delivered via SMS.
func execute(otpError: ProveAuthError?, callback: OtpFinishStepCallback) {
self.callback = callback
// Handle the OTP validation error if present.
if case .otpValidationError = otpError {
print("found otpError: \(String(describing: otpError?.localizedDescription))")
// Signal to your UI components that the last provided OTP is invalid
self.sheetObservable.otpError = true
} else {
self.sheetObservable.otpError = false
}
// Signal to UI components to display OtpFinishView
DispatchQueue.main.async {
self.sheetObservable.isOtpFinishActive = true
}
}
// Provide the collected OTP value to the SDK for validation.
func handleOtp(_ otp: String) {
guard let callback = self.callback else {
print("Error: OtpFinishStepCallback is not set ")
return
}
let otpFinishInput = OtpFinishInput(otp: otp)
callback.onSuccess(input: otpFinishInput)
}
// Notify the SDK of any issues encountered while obtaining the OTP value or if the user cancels the OTP flow.
func handleOtpFinishError() {
guard let callback = self.callback else {
print("Error: OtpFinishStepCallback is not set ")
return
}
callback.onError()
}
}
```
Follow these instructions if implementing MobileAuth and collecting the phone number only if MobileAuth fails. This will implement OTP without allowing for SMS resends and phone number changes. If you do want those capabilities, please reference the subsequent tabs (Resend, Retry OTP, and Phone Number Change).
In the start step, call the `callback.onSuccess(input: otpStartInput)` method to return the collected phone number to the SDK.
```swift Swift theme={"dark"}
import Foundation
import ProveAuth
import SwiftUI
class MobileOtpStartStep: OtpStartStep {
@ObservedObject var sheetObservable: SheetObservable
var callback: OtpStartStepCallback?
init(sheetObservable: SheetObservable) {
self.sheetObservable = sheetObservable
}
func execute(
phoneNumberNeeded: Bool, phoneValidationError: ProveAuthError?, callback: OtpStartStepCallback
) {
self.callback = callback
if !phoneNumberNeeded {
// If no phone number is needed, then don't prompt the user.
callback.onSuccess(input: nil)
} else {
DispatchQueue.main.async {
// If a phone number validation error is detected, ensure it is handled to provide feedback to the user.
if case .phoneNumberValidationError = phoneValidationError {
print(
"found phoneValidationError: \(String(describing: phoneValidationError?.localizedDescription))"
)
// Update UI components to display OtpStartView with the phone number validation error.
self.sheetObservable.isPhoneValidationError = true
} else {
self.sheetObservable.isPhoneValidationError = false
}
// Update UI components to display OtpStartView if a phone number is needed.
self.sheetObservable.isOtpStartActive = true
}
}
}
// Return collected phone number to the SDK
func handlePhoneNumber(phoneNumber: String) {
guard let callback = self.callback else {
print("Error: OtpStartStepCallback is not set ")
return
}
let otpStartInput = OtpStartInput(phoneNumber: phoneNumber)
// This is how you pass collected phone number to SDK
callback.onSuccess(input: otpStartInput)
}
// Communicate any issues encountered while trying to obtain the phone number to the SDK.
// Error should be reported if the customer explicitly cancels the SMS OTP transaction
// or presses the back button to exit out the SMS OTP start step screen.
func handleOtpStartError() {
guard let callback = self.callback else {
print("Error: OtpStartStepCallback is not set ")
return
}
callback.onError()
}
}
```
The finish step is implemented the same as the previous tab:
```swift Swift theme={"dark"}
import Foundation
import SwiftUI
import ProveAuth
class MobileOtpFinishStep: OtpFinishStep {
@ObservedObject var sheetObservable: SheetObservable
var callback: OtpFinishStepCallback?
init(sheetObservable: SheetObservable){
self.sheetObservable = sheetObservable
}
// Implement this method to collect the OTP value delivered via SMS.
func execute(otpError: ProveAuthError?, callback: OtpFinishStepCallback) {
self.callback = callback
// Handle the OTP validation error if present.
if case .otpValidationError = otpError {
print("found otpError: \(String(describing: otpError?.localizedDescription))")
// Signal to your UI components that the last provided OTP is invalid
self.sheetObservable.otpError = true
} else {
self.sheetObservable.otpError = false
}
// Signal to UI components to display OtpFinishView
DispatchQueue.main.async {
self.sheetObservable.isOtpFinishActive = true
}
}
// Provide the collected OTP value to the SDK for validation.
func handleOtp(_ otp: String) {
guard let callback = self.callback else {
print("Error: OtpFinishStepCallback is not set ")
return
}
let otpFinishInput = OtpFinishInput(otp: otp)
callback.onSuccess(input: otpFinishInput)
}
// Notify the SDK of any issues encountered while obtaining the OTP value or if the user cancels the OTP flow.
func handleOtpFinishError() {
guard let callback = self.callback else {
print("Error: OtpFinishStepCallback is not set ")
return
}
callback.onError()
}
}
```
Follow these instructions to allow the customer to request a new OTP via SMS using the same phone number. There is a max of three send attempts including the initial message.
The start step is implemented the same as the previous tab:
```swift Swift theme={"dark"}
import Foundation
import ProveAuth
import SwiftUI
class MobileOtpStartStep: OtpStartStep {
@ObservedObject var sheetObservable: SheetObservable
var callback: OtpStartStepCallback?
init(sheetObservable: SheetObservable) {
self.sheetObservable = sheetObservable
}
func execute(
phoneNumberNeeded: Bool, phoneValidationError: ProveAuthError?, callback: OtpStartStepCallback
) {
self.callback = callback
if !phoneNumberNeeded {
// If no phone number is needed, then don't prompt the user.
callback.onSuccess(input: nil)
} else {
DispatchQueue.main.async {
// If a phone number validation error is detected, ensure it is handled to provide feedback to the user.
if case .phoneNumberValidationError = phoneValidationError {
print(
"found phoneValidationError: \(String(describing: phoneValidationError?.localizedDescription))"
)
// Update UI components to display OtpStartView with the phone number validation error.
self.sheetObservable.isPhoneValidationError = true
} else {
self.sheetObservable.isPhoneValidationError = false
}
// Update UI components to display OtpStartView if a phone number is needed.
self.sheetObservable.isOtpStartActive = true
}
}
}
// Return collected phone number to the SDK
func handlePhoneNumber(phoneNumber: String) {
guard let callback = self.callback else {
print("Error: OtpStartStepCallback is not set ")
return
}
let otpStartInput = OtpStartInput(phoneNumber: phoneNumber)
// This is how you pass collected phone number to SDK
callback.onSuccess(input: otpStartInput)
}
// Communicate any issues encountered while trying to obtain the phone number to the SDK.
// Error should be reported if the customer explicitly cancels the SMS OTP transaction
// or presses the back button to exit out the SMS OTP start step screen.
func handleOtpStartError() {
guard let callback = self.callback else {
print("Error: OtpStartStepCallback is not set ")
return
}
callback.onError()
}
}
```
You can then send a new OTP SMS to the same phone number by implementing the finish step like this:
```swift Swift theme={"dark"}
import Foundation
import SwiftUI
import ProveAuth
class MobileOtpFinishStep: OtpFinishStep {
@ObservedObject var sheetObservable: SheetObservable
var callback: OtpFinishStepCallback?
init(sheetObservable: SheetObservable){
self.sheetObservable = sheetObservable
}
// Implement this method to collect the OTP value delivered in the SMS message.
func execute(otpError: ProveAuthError?, callback: OtpFinishStepCallback) {
self.callback = callback
// Handle the OTP validation error if present.
if case .otpValidationError = otpError {
print("found otpError: \(String(describing: otpError?.localizedDescription))")
// Update your UI to indicate that the provided OTP is invalid
self.sheetObservable.otpError = true
} else {
self.sheetObservable.otpError = false
}
// Update your UI to display the OtpFinishView
DispatchQueue.main.async {
self.sheetObservable.isOtpFinishActive = true
}
}
// Return the OTP value to the SDK
func handleOtp(_ otp: String) {
guard let callback = self.callback else {
print("Error: OtpFinishStepCallback is not set ")
return
}
let otpFinishInput = OtpFinishInput(otp: otp)
callback.onSuccess(input: otpFinishInput)
}
// Communicate to the SDK any issues when host app trys to obtain the OTP value
// or when users cancel the OTP flow
func handleOtpFinishError() {
guard let callback = self.callback else {
print("Error: OtpFinishStepCallback is not set ")
return
}
callback.onError()
}
// Call this method to request a new OTP code for the same mobile number.
func sendNewOtp() {
guard let callback = self.callback else {
print("Error: OtpFinishStepCallback is not set ")
return
}
callback.onOtpResend()
}
}
```
Follow these instructions to allow the customer to re-enter the OTP PIN if they type it wrong. There is a max of 3 attempts. To implement this functionality, you also need to pass in `allowOTPRetry=true` to the `/v3/start` endpoint.
The start step is implemented the same as either of the the previous tabs - no client side code changes necessary:
```swift Swift theme={"dark"}
import Foundation
import ProveAuth
import SwiftUI
class MobileOtpStartStep: OtpStartStep {
@ObservedObject var sheetObservable: SheetObservable
var callback: OtpStartStepCallback?
init(sheetObservable: SheetObservable) {
self.sheetObservable = sheetObservable
}
func execute(
phoneNumberNeeded: Bool, phoneValidationError: ProveAuthError?, callback: OtpStartStepCallback
) {
self.callback = callback
if !phoneNumberNeeded {
// If no phone number is needed, then don't prompt the user.
callback.onSuccess(input: nil)
} else {
DispatchQueue.main.async {
// If a phone number validation error is detected, ensure it is handled to provide feedback to the user.
if case .phoneNumberValidationError = phoneValidationError {
print(
"found phoneValidationError: \(String(describing: phoneValidationError?.localizedDescription))"
)
// Update UI components to display OtpStartView with the phone number validation error.
self.sheetObservable.isPhoneValidationError = true
} else {
self.sheetObservable.isPhoneValidationError = false
}
// Update UI components to display OtpStartView if a phone number is needed.
self.sheetObservable.isOtpStartActive = true
}
}
}
// Return collected phone number to the SDK
func handlePhoneNumber(phoneNumber: String) {
guard let callback = self.callback else {
print("Error: OtpStartStepCallback is not set ")
return
}
let otpStartInput = OtpStartInput(phoneNumber: phoneNumber)
// This is how you pass collected phone number to SDK
callback.onSuccess(input: otpStartInput)
}
// Communicate any issues encountered while trying to obtain the phone number to the SDK.
// Error should be reported if the customer explicitly cancels the SMS OTP transaction
// or presses the back button to exit out the SMS OTP start step screen.
func handleOtpStartError() {
guard let callback = self.callback else {
print("Error: OtpStartStepCallback is not set ")
return
}
callback.onError()
}
}
```
The finish step is implemented the same as either of the the previous tabs - no client side code changes necessary. If the OTP is invalid, the finish step will be called again to prompt the user for a new input. Once the max attempts is reached, the `AuthFinish` function will be called.
```swift Swift theme={"dark"}
import Foundation
import SwiftUI
import ProveAuth
class MobileOtpFinishStep: OtpFinishStep {
@ObservedObject var sheetObservable: SheetObservable
var callback: OtpFinishStepCallback?
init(sheetObservable: SheetObservable){
self.sheetObservable = sheetObservable
}
// Implement this method to collect the OTP value delivered via SMS.
func execute(otpError: ProveAuthError?, callback: OtpFinishStepCallback) {
self.callback = callback
// Handle the OTP validation error if present.
if case .otpValidationError = otpError {
print("found otpError: \(String(describing: otpError?.localizedDescription))")
// Signal to your UI components that the last provided OTP is invalid
self.sheetObservable.otpError = true
} else {
self.sheetObservable.otpError = false
}
// Signal to UI components to display OtpFinishView
DispatchQueue.main.async {
self.sheetObservable.isOtpFinishActive = true
}
}
// Provide the collected OTP value to the SDK for validation.
func handleOtp(_ otp: String) {
guard let callback = self.callback else {
print("Error: OtpFinishStepCallback is not set ")
return
}
let otpFinishInput = OtpFinishInput(otp: otp)
callback.onSuccess(input: otpFinishInput)
}
// Notify the SDK of any issues encountered while obtaining the OTP value or if the user cancels the OTP flow.
func handleOtpFinishError() {
guard let callback = self.callback else {
print("Error: OtpFinishStepCallback is not set ")
return
}
callback.onError()
}
}
```
Follow these instructions to allow the customer to re-enter their phone number. There is a max of three entries/send attempts.
Manual Request Required
To enable phone number change capabilities on your credentials, contact your Prove representative.
The start step is implemented the same as the previous tab:
```swift Swift theme={"dark"}
import Foundation
import ProveAuth
import SwiftUI
class MobileOtpStartStep: OtpStartStep {
@ObservedObject var sheetObservable: SheetObservable
var callback: OtpStartStepCallback?
init(sheetObservable: SheetObservable) {
self.sheetObservable = sheetObservable
}
func execute(
phoneNumberNeeded: Bool, phoneValidationError: ProveAuthError?, callback: OtpStartStepCallback
) {
self.callback = callback
if !phoneNumberNeeded {
// If no phone number is needed, then don't prompt the user.
callback.onSuccess(input: nil)
} else {
DispatchQueue.main.async {
// If a phone number validation error is detected, ensure it is handled to provide feedback to the user.
if case .phoneNumberValidationError = phoneValidationError {
print(
"found phoneValidationError: \(String(describing: phoneValidationError?.localizedDescription))"
)
// Update UI components to display OtpStartView with the phone number validation error.
self.sheetObservable.isPhoneValidationError = true
} else {
self.sheetObservable.isPhoneValidationError = false
}
// Update UI components to display OtpStartView if a phone number is needed.
self.sheetObservable.isOtpStartActive = true
}
}
}
// Return collected phone number to the SDK
func handlePhoneNumber(phoneNumber: String) {
guard let callback = self.callback else {
print("Error: OtpStartStepCallback is not set ")
return
}
let otpStartInput = OtpStartInput(phoneNumber: phoneNumber)
// This is how you pass collected phone number to SDK
callback.onSuccess(input: otpStartInput)
}
// Communicate any issues encountered while trying to obtain the phone number to the SDK.
// Error should be reported if the customer explicitly cancels the SMS OTP transaction
// or presses the back button to exit out the SMS OTP start step screen.
func handleOtpStartError() {
guard let callback = self.callback else {
print("Error: OtpStartStepCallback is not set ")
return
}
callback.onError()
}
}
```
You can prompt for a new phone number by implementing the finish step like this:
```swift Swift theme={"dark"}
import Foundation
import SwiftUI
import ProveAuth
class MobileOtpFinishStep: OtpFinishStep {
@ObservedObject var sheetObservable: SheetObservable
var callback: OtpFinishStepCallback?
init(sheetObservable: SheetObservable){
self.sheetObservable = sheetObservable
}
// Implement this method to collect the OTP value delivered via SMS.
func execute(otpError: ProveAuthError?, callback: OtpFinishStepCallback) {
self.callback = callback
// Handle the OTP validation error if present.
if case .otpValidationError = otpError {
print("found otpError: \(String(describing: otpError?.localizedDescription))")
// Update your UI to indicate that the provided OTP is invalid.
self.sheetObservable.otpError = true
} else {
self.sheetObservable.otpError = false
}
// Update your UI to display the OTP finish view.
DispatchQueue.main.async {
self.sheetObservable.isOtpFinishActive = true
}
}
// Return the collected OTP value to the SDK.
func handleOtp(_ otp: String) {
guard let callback = self.callback else {
print("Error: OtpFinishStepCallback is not set ")
return
}
let otpFinishInput = OtpFinishInput(otp: otp)
callback.onSuccess(input: otpFinishInput)
}
// When callback.onMobileNumberChange() is evoked, OtpStartStep will be re-initiated
// so that end-users can enter a different phone number via OtpStartStep.
func handleMobileNumberChange() {
guard let callback = self.callback else {
print("Error: OtpFinishStepCallback is not set")
return
}
callback.onMobileNumberChange()
}
}
```
# Initiate Possession Check
Source: https://developer.prove.com/reference/unify-request
post /v3/unify
This endpoint allows you to initiate the possession check.
export const product_0 = undefined
Use the following base URLs when integrating {product_0}:
`https://platform.uat.proveapis.com` - North America Sandbox Environment
`https://platform.proveapis.com` - North America Production Environment
`https://platform.uat.eu.proveapis.com` - European Union Sandbox Environment
`https://platform.eu.proveapis.com` - European Union Production Environment
# Server-Side SDK Guide
Source: https://developer.prove.com/reference/unify-server
Learn more about the details of the server-side SDK for Unified Authentication
Prove provides server-side SDKs in the following languages: Go, Java, .NET, TypeScript, and JavaScript. If you use a different back end language, you can interact with the API endpoints.
## Installation
Install the server-side SDK of your choice by running a command in your terminal, or by using a dependency management tool specific to your project.
```go Go theme={"dark"}
// The Go library is hosted on GitHub so you can use this command to import it
// to your Go application.
go get github.com/prove-identity/prove-sdk-server-go
// Ensure you import the SDK in your code like this:
import (
provesdkservergo "github.com/prove-identity/prove-sdk-server-go"
"github.com/prove-identity/prove-sdk-server-go/models/components"
)
```
```typescript TypeScript theme={"dark"}
// Run this command to install package from GitHub and save as a dependency
npm install -S @prove-identity/prove-api
// Import the SDK in your code like this:
import { Proveapi } from "@prove-identity/prove-api";
import { OAuthClient, WithAuthorization } from "@prove-identity/prove-api/sdk/oauth"
```
```java Java theme={"dark"}
// See the latest version number here: https://central.sonatype.com/artifact/com.prove/proveapi
Gradle:
implementation 'com.prove:proveapi:0.10.0'
Maven:
com.prove
proveapi
0.10.0
```
```csharp .NET theme={"dark"}
// Run this command to install package from Nuget and save as a dependency
dotnet add package Prove.Proveapi --version 1.0.1
// Ensure you import the SDK in your code like this:
using Prove.Proveapi;
using Prove.Proveapi.Models.Components;
```
To view API endpoint code samples in different languages, browse the API Reference page and select your language.
## Authentication
To access the Prove API, configure your OAuth 2.0 client ID and client secret.
You can use environment variables or another method:
```go Go theme={"dark"}
clientID := os.Getenv("PROVE_CLIENT_ID")
clientSecret := os.Getenv("PROVE_CLIENT_SECRET")
proveEnv := "uat-us" // Use UAT in US region.
client := provesdkservergo.New(
provesdkservergo.WithServer(proveEnv),
provesdkservergo.WithSecurity(components.Security{
ClientID: provesdkservergo.String(clientID),
ClientSecret: provesdkservergo.String(clientSecret),
}),
)
```
```typescript TypeScript theme={"dark"}
export const DEVICE_API_BASE_URL = process.env.DEVICE_API_BASE_URL || '';
export const PROVE_CLIENT_ID = process.env.PROVE_CLIENT_ID;
export const PROVE_CLIENT_SECRET = process.env.PROVE_CLIENT_SECRET;
export function getProveSdk(): Proveapi {
return new Proveapi({
server: 'uat-us',
security: {
clientID: PROVE_CLIENT_ID,
clientSecret: PROVE_CLIENT_SECRET,
},
});
}
```
```java Java theme={"dark"}
String clientId = System.getenv("PROVE_CLIENT_ID");
String clientSecret = System.getenv("PROVE_CLIENT_SECRET");
Proveapi sdk = Proveapi.builder()
.security(Security.builder()
.clientID(clientId)
.clientSecret(clientSecret)
.build())
.build();
```
```csharp .NET theme={"dark"}
var clientId = Environment.GetEnvironmentVariable("PROVE_CLIENT_ID");
var clientSecret = Environment.GetEnvironmentVariable("PROVE_CLIENT_SECRET");
var sdk = new ProveAPI(serverUrl: "https://platform.uat.proveapis.com");
var tokenRequest = new V3TokenRequest
{
ClientId = clientId,
ClientSecret = clientSecret,
GrantType = "client_credentials"
};
var tokenResponse = await sdk.V3.V3TokenRequestAsync(tokenRequest);
var accessToken = tokenResponse.V3TokenResponse?.AccessToken;
_sdk = new ProveAPI(auth: accessToken, serverUrl: "https://platform.uat.proveapis.com");
```
When you test in the European Union, set `proveEnv` to `uat-eu`.
Token Expiration
The OAuth token expires after 60 minutes. If it expires, generate another token.
## `Unify()`
Add an endpoint to your server such as `POST /unify` so the front end can submit the possession type and phone number. On the back end, start a Prove Unified Authentication flow with a call to the `Unify()` function. This function takes these required parameters:
* Possession Type: specify `mobile`, `desktop`, or `none` for customer-supplied possession to describe which type of device the end user is starting their flow on.
* Phone Number: phone number of the end user.
In sandbox, the phone number field determines which scenario to test. If you forget to pass in the phone number of a valid test user, then it returns a "no test user found matching the phone number" error.
Possession Timeouts
When possession type is `desktop`, Instant Link executes the possession check. When possession type is `mobile`, first Prove Key is checked, then fallback to one-time password (OTP). The Instant Link session has a three minute timeout from when it's sent through SMS to when the end user can select the link. The OTP session has a two minute timeout from when it's sent through SMS to when the end user can enter in the OTP.
Optional parameters:
* Final Target URL: required when `possessionType=desktop`. This should be a URL you support. Once the customer clicks the Instant Link, they're redirected to this URL. It should instruct the customer to continue the workflow. Maximum length is 128 characters.
* Check Reputation: if true, performs TrustScore verification.
* Client Human ID: a client-generated unique ID to identify a specific customer across business lines.
* SMS Message: optional field to customize the message body sent in the Instant Link or OTP SMS message. Otherwise, you can use Prove defaults.
* Client Customer ID: a client-generated unique ID for a specific customer. You can link calls related to the same customer, across different requests or sessions. The client defines the format of this ID.
* Client Request ID: a client-generated unique ID for a specific session. You can identify specific requests using this field. You decide the format of this ID.
* Device ID: the unique identifier for the Prove Key on the device.
* Email: optional customer identifier.
* IP Address: optional customer identifier.
* proveId: a unique ID to identify a specific customer obtained from an earlier successful authentication.
* rebind: if true, rebinds the Prove Key with the newly verified phone number.
* Allow OTP Retry: set to `true` to allow the customer to re-enter the OTP up to three times. Defaults to `false`.
For OTP retries, make sure to implement client SDK changes as detailed in the [Implementation Guide](https://developer.prove.com/docs/unify-implementation-guide#request-new-otp-code).
```go Go theme={"dark"}
rspUnify, err := client.V3.V3UnifyRequest(ctx, &components.V3UnifyRequest{
PossessionType: "desktop",
FinalTargetURL: provesdkservergo.String("https://google.com"),
PhoneNumber: provesdkservergo.String("2001004014"),
})
if err != nil {
t.Fatal(err)
}
```
```typescript TypeScript theme={"dark"}
const rspUnify = await sdk.v3.v3UnifyRequest({
possessionType: 'desktop',
finalTargetUrl: 'https://google.com',
phoneNumber: '2001004014',
});
```
```java Java theme={"dark"}
V3UnifyRequest unifyReq = V3UnifyRequest.builder()
.possessionType("desktop")
.finalTargetUrl("https://google.com")
.phoneNumber("2001004014")
.build();
V3UnifyRequestResponse unifyReqResp = sdk.v3().v3UnifyRequest()
.request(unifyReq)
.call();
V3UnifyResponse unifyResp = unifyReqResp.v3UnifyResponse().get();
```
```csharp .NET theme={"dark"}
var unifyReq = new V3UnifyRequest
{
PossessionType = "desktop",
FinalTargetUrl = "https://google.com",
PhoneNumber = "2001004014"
};
var rspUnify = await _sdk.V3.V3UnifyRequestAsync(unifyReq);
```
The function returns the following fields:
* Auth Token: send this to your client-side code to pass into the `Authenticate()` function - it's a short lived JSON Web Token (JWT) tied to the current flow and used for the possession checks.
* Correlation ID: save this in your current session, then pass it in to the `UnifyStatus()` function call of the same flow. The correlation ID ties together different system calls for the same Prove flow. It also aids in troubleshooting. The session expires in 15 minutes from when the correlation ID returns from the `Unify()` call.
* Success: returns `pending` for this initial call.
If using possession, then the response has the `authToken`, returned to the front end.
## `UnifyStatus()`
Once the possession check is complete, your back end calls `UnifyStatus()` to get the final result in the `success` field.
This function takes this required parameter:
* Correlation ID: the ID returned by the `Unify()` function. It validates against this regular expression: `^[0-9a-f]{8}-[0-9a-f]{4}-[0-9a-f]{4}-[0-9a-f]{4}-[0-9a-f]{12}$`.
```go Go theme={"dark"}
rspUnifyStatus, err := client.V3.V3UnifyStatusRequest(ctx, &components.V3UnifyStatusRequest{
CorrelationID: &rspUnify.V3UnifyResponse.CorrelationID,
})
if err != nil {
t.Fatal(err)
}
```
```typescript TypeScript theme={"dark"}
const rspUnifyStatus = await sdk.v3.v3UnifyStatusRequest({
correlationId: rspUnify.v3UnifyResponse?.correlationId || '',
});
```
```java Java theme={"dark"}
V3UnifyStatusRequest statusReq = V3UnifyStatusRequest.builder()
.correlationId(correlationId)
.build();
V3UnifyStatusRequestResponse unifyStatusReqResp = sdk.v3().v3UnifyStatusRequest()
.request(statusReq)
.call();
V3UnifyStatusResponse unifyStatusResp = unifyStatusReqResp.v3UnifyStatusResponse().get();
```
```csharp .NET theme={"dark"}
var reqBody = new V3UnifyStatusRequest
{
CorrelationId = rspUnify.V3UnifyResponse?.CorrelationId
};
var rspUnifyStatus = await _sdk.V3.V3UnifyStatusRequestAsync(reqBody);
```
The function returns the following fields:
* Success: `true` if the possession check succeeded, `false` if it failed, or `possession_required` if Customer-supplied possession flow requires additional steps.
* Phone Number: the phone number associated with the possession check.
* clientHumanId: a client-generated unique ID to identify a specific customer across business lines.
* clientRequestId: a client-generated unique ID for a specific session. This can be used to identify specific requests.
* deviceId: the unique identifier for the Prove Key on the device.
* evaluation: the evaluation result for the Global Fraud Policy.
* proveId: a unique ID to identify a specific customer obtained from a successful possession check.
You can then respond to the front end with the results of the authentication.
## `UnifyBind()`
For customer-supplied possession flows only, call `UnifyBind()` after your own possession check has succeeded. This binds the phone number to the Prove Key for future authentications.
This function takes these required parameters:
* Correlation ID: the ID returned by the `Unify()` function.
* Phone Number: the phone number to bind to the Prove Key.
```go Go theme={"dark"}
rspUnifyBind, err := client.V3.V3UnifyBindRequest(context.TODO(), &components.V3UnifyBindRequest{
CorrelationID: rspUnify.V3UnifyResponse.CorrelationID,
PhoneNumber: "2001004018",
})
if err != nil {
return fmt.Errorf("error on UnifyBind(): %w", err)
}
```
```typescript TypeScript theme={"dark"}
const rspUnifyBind = await sdk.v3.v3UnifyBindRequest({
correlationId: rspUnify.v3UnifyResponse?.correlationId || '',
phoneNumber: '2001004018',
},
});
if (!rspUnifyBind) {
console.error("Unify Bind error.")
return
}
```
```java Java theme={"dark"}
V3UnifyBindRequest req = V3UnifyBindRequest.builder()
.correlationId("713189b8-5555-4b08-83ba-75d08780aebd")
.phoneNumber("2001004018")
.build();
V3UnifyBindResponse res = sdk.v3().v3UnifyBindRequest()
.request(req)
.call();
// You may want to use the .get() method when working with the response object.
```
```csharp .NET theme={"dark"}
using Prove.Proveapi;
using Prove.Proveapi.Models.Components;
var sdk = new ProveAPI(auth: "");
V3UnifyBindRequest req = new V3UnifyBindRequest() {
CorrelationId = "713189b8-5555-4b08-83ba-75d08780aebd",
PhoneNumber = "2001004018",
};
var res = await sdk.V3.V3UnifyBindRequestAsync(req);
```
The function returns the following fields:
* Success: `true` if the binding succeeded, `false` if it failed.
* Phone Number: the phone number that was bound to the Prove Key.
* clientHumanId: a client-generated unique ID to identify a specific customer across business lines.
* clientRequestId: a client-generated unique ID for a specific session. This can be used to identify specific requests.
* deviceId: the unique identifier for the Prove Key on the device.
SDK Updates
Find the server-side SDKs on [GitHub](https://github.com/prove-identity). Once you create a free GitHub account, you can Watch any of the projects to receive notifications when there are updates.
# Check Status
Source: https://developer.prove.com/reference/unify-status-request
post /v3/unify-status
This endpoint allows you to check the status of a Unify session and get the possession result.
export const product_0 = undefined
Use the following base URLs when integrating {product_0}:
`https://platform.uat.proveapis.com` - North America Sandbox Environment
`https://platform.proveapis.com` - North America Production Environment
`https://platform.uat.eu.proveapis.com` - European Union Sandbox Environment
`https://platform.eu.proveapis.com` - European Union Production Environment
# Client-Side Web SDK
Source: https://developer.prove.com/reference/unify-web-sdk
Learn how to integrate the client-side web SDK into your web app
## Supported languages
Prove provides client web SDKs in the following languages: TypeScript and JavaScript.
## Installation
The Prove Platform Web SDK has an unpacked size of 324 KB, and a single dependency: `@prove-identity/mobile-auth`. Install the client-side SDK of your choice by running a command in your terminal, or by using a dependency management tool specific to your project.
```shell NPM theme={"dark"}
# Run this command to install the package (ensure you have the latest version).
npm install @prove-identity/prove-auth@3.1.1
```
```html No Package Manager theme={"dark"}
# You can include this file in your web application from jsDelivr (update with the latest version).
# You can also download the JavaScript file from https://cdn.jsdelivr.net/npm/@prove-identity/prove-auth@3.1.1/build/bundle/release/prove-auth.js and store it locally.
```
## Find the type of flow: mobile or desktop
You can find if the customer is on a mobile or desktop browser using this example. If the `isMobile` is true, pass `mobile` to the `Start()` function on the server, otherwise you can pass `desktop`:
```javascript JavaScript theme={"dark"}
// Check if the customer is on a mobile or desktop browser.
const authCheck = new proveAuth.AuthenticatorBuilder().build();
let isMobile = authCheck.isMobileWeb()
```
```typescript TypeScript theme={"dark"}
// Check if the customer is on a mobile or desktop browser.
const authCheck = new proveAuth.AuthenticatorBuilder().build();
let isMobile = authCheck.isMobileWeb()
```
In a mobile flow, the mobile phone validates the one-time password (OTP). In a desktop flow, Instant Link sends a text message to the mobile phone for verification.
In the mobile flow, once the OTP validation completes, the `AuthFinishStep` function finishes.
In the desktop flow, a WebSocket opens for 3 minutes on the desktop browser while waiting for the customer to select the link in the text message. Once clicked, the WebSocket closes and the `AuthFinishStep` function finishes.
## `Authenticate()`
The SDK requires an `authToken` as a parameter for the `Authenticate()` function. This token returns from the `Start()` call of the server-side SDK. The token is session specific, limiting it to a single flow. It also expires after 15 minutes.
## Retrieve `authToken`
Send a request to your back end server with the possession type, and an optional phone number if you are using the Prove possession check.
```javascript JavaScript theme={"dark"}
async function initialize(phoneNumber, possessionType) {
const response = await fetch(backendUrl + "/initialize", {
method: "POST",
headers: {
Accept: "application/json",
"Content-Type": "application/json",
},
body: JSON.stringify({
phoneNumber: phoneNumber,
possessionType: possessionType,
}),
});
const rsp = await response.json();
const authToken = rsp.authToken;
return authToken;
}
```
```typescript TypeScript theme={"dark"}
async function initialize(
phoneNumber: string,
possessionType: string
): Promise {
const response = await fetch(backendUrl + "/initialize", {
method: "POST",
headers: {
Accept: "application/json",
"Content-Type": "application/json",
},
body: JSON.stringify({
phoneNumber: phoneNumber,
possessionType: possessionType,
}),
});
const rsp = await response.json();
const authToken = rsp.authToken;
return authToken;
}
```
## Setup authenticator
Once you have the `authToken`, build the authenticator for both the mobile and desktop flows.
Mobile Auth Implementations Only
If your application uses [Content Security Policy headers](https://content-security-policy.com/), you must configure them to allow WebSocket connections to Prove's authentication services:
Sandbox Environment
* `https://device.uat.proveapis.com:4443`
* `https://device.uat.proveapis.com`
* `http://device.uat.proveapis.com:4443`
* `http://device.uat.proveapis.com`
Production Environment
* `https://device.proveapis.com:4443`
* `https://device.proveapis.com`
* `http://device.proveapis.com:4443`
* `http://device.proveapis.com`
* `https://auth.svcs.verizon.com:22790`
Failure to configure these settings prevents Mobile Auth functionality from working correctly in web flows.
```javascript JavaScript theme={"dark"}
const isMobileWeb = flowType.value === "mobile";
const isDesktop = flowType.value === "desktop";
if (isMobileWeb) {
// Set up the authenticator for either mobile or desktop flow.
let builder = new proveAuth.AuthenticatorBuilder();
// Set up Mobile Auth and OTP.
builder = builder
.withAuthFinishStep(() => clientFinished())
.withMobileAuthImplementation("fetch")
.withOtpFallback(otpStart, otpFinish);
} else if (isDesktop){
// Set up Instant Link.
builder = builder
.withAuthFinishStep(() => clientFinished())
.withInstantLinkFallback(instantLink)
.withRole("secondary");
} else {
// Customer provided possession.
builder = builder
.withAuthFinishStep(() => clientFinished());
authenticator.authenticate(authToken);
}
```
```typescript TypeScript theme={"dark"}
const isMobileWeb = flowType.value === "mobile";
const isDesktop = flowType.value === "desktop";
if (isMobileWeb) {
// Set up the authenticator for either mobile or desktop flow.
let builder = new proveAuth.AuthenticatorBuilder();
// Set up Mobile Auth and OTP.
builder = builder
.withAuthFinishStep(() => clientFinished())
.withMobileAuthImplementation("fetch")
.withOtpFallback(otpStart, otpFinish);
} else if (isDesktop){
// Set up Instant Link.
builder = builder
.withAuthFinishStep(() => clientFinished())
.withInstantLinkFallback(instantLink)
.withRole("secondary");
} else {
// Customer provided possession.
builder = builder
.withAuthFinishStep(() => clientFinished());
authenticator.authenticate(authToken);
}
```
## Validate the mobile phone
In the `AuthFinishStep`, you’ll specify a function to call once the possession checks complete on the mobile phone. This endpoint on your back end server calls the `Unify-Status()` function to validate the phone number. The AuthFinishStep then completes. If the user cancels, the server makes a call to the `Unify-Status()` function and returns `success=false`.
```javascript JavaScript theme={"dark"}
// Send a verify request.
async function verify() {
const response = await fetch(backendUrl + "/verify", {
method: "POST",
headers: {
Accept: "application/json",
"Content-Type": "application/json",
},
body: JSON.stringify({}),
});
const results = await response.json();
const rsp = JSON.stringify(results);
return null;
}
```
```typescript TypeScript theme={"dark"}
// Send a verify request.
async function verify() {
const response = await fetch(backendUrl + "/verify", {
method: "POST",
headers: {
Accept: "application/json",
"Content-Type": "application/json",
},
body: JSON.stringify({}),
});
const results = await response.json();
const rsp = JSON.stringify(results);
return null;
}
```
## Configure OTP
To use the Resend/Retry/Phone Change features, you need to install the Web SDK version 2.15.1 or later.
To set the One-Time Password (OTP) handler, `withOtpFallback(startStep: OtpStartStep | OtpStartStepFn, finishStep: OtpFinishStep | OtpFinishStepFn)`, requires implementing the `OtpStartStep` and `OtpFinishStep`. When returning the phone number in the functions, ensure you return an object with the field `phoneNumber` to the `resolve()` function.
The OTP session has a two minute timeout from when it's sent through Short Message Service (SMS) to when the customer can enter in the OTP.
Follow these instructions if you are implementing OTP and you are passing in the phone number on the `/v3/start` endpoint. In this case, you've already prompted for a phone number so you don't need to prompt for it in the client SDK.
Since you passed the phone number in the `Start()` function, call `resolve(null)` to communicate to the SDK you have the customer's agreement to deliver the SMS message. Ensure you return an object to `resolve()` function.
```javascript JavaScript theme={"dark"}
function otpStartStep(phoneNumberNeeded, phoneValidationError) {
return new Promise((resolve, reject) => {
// Since no phone number is needed, don't prompt the user.
resolve(null);
});
}
```
```typescript TypeScript theme={"dark"}
const otpStartStep: OtpStartStep = {
execute: async (
phoneNumberNeeded: boolean,
phoneValidationError?: PhoneValidationError
): Promise => {
return new Promise((resolve, reject) => {
// Since no phone number is needed, don't prompt the user.
resolve(null);
});
},
};
```
Call the `reject('some error message')` method to communicate to the SDK any issues while trying to obtain the phone number or the OTP. Report an error if the customer cancels the SMS transaction or presses the back button to leave the screen.
In the finish step, call the `resolve(result: OtpFinishResult)` method to return the collected OTP value in which `result` variable has `OnSuccess` value for `OtpFinishResultType` and the OTP value wrapped in `OtpFinishInput`.
```javascript JavaScript theme={"dark"}
function otpFinishStep(otpError) {
return new Promise((resolve, reject) => {
// If error message is found, handle it.
if (otpError) {
// Set to a variable and display it in a field.
// In this example, we don't do anything with the error.
var someErrorMessage = otpError.message;
}
// Prompt the user for whether they received the SMS.
// Typically, this is a page that shows the OTP already. We are simplifying
// it by requiring an input.
var input = confirm('Did you receive a text message?');
if (!input) {
// Close the modal if a text message was not received.
return;
}
// Prompt the user for the OTP.
var otp = prompt('Enter OTP code:');
if (otp) {
// If the input is valid and the user clicked `OK`, return the OTP.
resolve({
input: { otp }, // OTP value
resultType: 0, // OnSuccess enum type = 0
});
} else {
// Else, exit the flow.
reject('phone invalid or user cancelled');
}
});
}
```
```typescript TypeScript theme={"dark"}
const otpFinishStep: OtpFinishStep = {
execute: async (otpError?: OtpError): Promise => {
return new Promise((resolve, reject) => {
// If error message is found, handle it.
if (otpError) {
// Set to a variable and display it in a field.
// In this example, we don't do anything with the error.
var someErrorMessage = otpError.message;
}
// Prompt the user for whether they received the SMS.
// Typically, this is a page that shows the OTP already. We are simplifying
// it by requiring an input.
var input = confirm('Did you receive a text message?');
if (!input) {
// Close the modal if a text message was not received.
return;
}
// Prompt the user for the OTP.
var otp = prompt('Enter OTP code:');
if (otp) {
// If the input is valid and the user clicked `OK`, return the OTP.
resolve({
input: { otp }, // OTP value
resultType: OtpFinishResultType.OnSuccess,
});
} else {
// Else, exit the flow.
reject('phone invalid or user cancelled');
}
});
},
};
```
Follow these instructions if implementing MobileAuth and collecting the phone number only if MobileAuth fails. This will implement OTP without allowing for SMS resends and phone number changes. If you do want those capabilities, please reference the subsequent tabs (Resend, Retry OTP, and Phone Number Change).
In the start step, call the `resolve(input: OtpStartInput)` method to return the collected phone number to the SDK.
```javascript JavaScript theme={"dark"}
function otpStartStep(phoneNumberNeeded, phoneValidationError) {
return new Promise((resolve, reject) => {
// If no phone number is needed, then don't prompt the user.
if (!phoneNumberNeeded) {
resolve(null);
return;
}
// If error message is found around phone number, handle it.
// The `phoneValidationError` is ONLY available when `phoneNumberNeeded`
// has a value.
if (phoneValidationError) {
// Set to a variable and display it in a field.
// In this example, we don't do anything with the error.
var someErrorMessage = phoneValidationError.message;
}
// Prompt the user for the phone number.
var input = prompt('Enter phone number:');
if (input) {
// If the input is valid and the user clicked `OK`, return the phone
// number.
resolve({
phoneNumber: input,
});
} else {
// Else, exit the flow.
reject('phone invalid or user cancelled');
}
});
}
```
```typescript TypeScript theme={"dark"}
const otpPromptStartStep: OtpStartStep = {
execute: async (
phoneNumberNeeded: boolean,
phoneValidationError?: PhoneValidationError
): Promise => {
return new Promise((resolve, reject) => {
// If no phone number is needed, then don't prompt the user.
if (!phoneNumberNeeded) {
resolve(null);
return;
}
// If error message is found around phone number, handle it.
// The `phoneValidationError` is ONLY available when `phoneNumberNeeded`
// has a value.
if (phoneValidationError) {
// Set to a variable and display it in a field.
// In this example, we don't do anything with the error.
var someErrorMessage = phoneValidationError.message;
}
// Prompt the user for the phone number.
var input = prompt('Enter phone number:');
if (input) {
// If the input is valid and the user clicked `OK`, return the phone
// number.
resolve({
phoneNumber: input,
});
} else {
// Else, exit the flow.
reject('phone invalid or user cancelled');
}
});
},
};
```
The finish step is implemented the same as the previous tab:
```javascript JavaScript theme={"dark"}
function otpFinishStep(otpError) {
return new Promise((resolve, reject) => {
// If error message is found, handle it.
if (otpError) {
// Set to a variable and display it in a field.
// In this example, we don't do anything with the error.
var someErrorMessage = otpError.message;
}
// Prompt the user for whether they received the SMS.
// Typically, this is a page that shows the OTP already. We are simplifying
// it by requiring an input.
var input = confirm('Did you receive a text message?');
if (!input) {
// Close the modal if a text message was not received.
return;
}
// Prompt the user for the OTP.
var otp = prompt('Enter OTP code:');
if (otp) {
// If the input is valid and the user clicked `OK`, return the OTP.
resolve({
input: { otp }, // OTP value
resultType: 0, // OnSuccess enum type = 0
});
} else {
// Else, exit the flow.
reject('phone invalid or user cancelled');
}
});
}
```
```typescript TypeScript theme={"dark"}
const otpFinishStep: OtpFinishStep = {
execute: async (otpError?: OtpError): Promise => {
return new Promise((resolve, reject) => {
// If error message is found, handle it.
if (otpError) {
// Set to a variable and display it in a field.
// In this example, we don't do anything with the error.
var someErrorMessage = otpError.message;
}
// Prompt the user for whether they received the SMS.
// Typically, this is a page that shows the OTP already. We are simplifying
// it by requiring an input.
var input = confirm('Did you receive a text message?');
if (!input) {
// Close the modal if a text message was not received.
return;
}
// Prompt the user for the OTP.
var otp = prompt('Enter OTP code:');
if (otp) {
// If the input is valid and the user clicked `OK`, return the OTP.
resolve({
input: { otp }, // OTP value
resultType: OtpFinishResultType.OnSuccess,
});
} else {
// Else, exit the flow.
reject('phone invalid or user cancelled');
}
});
},
};
```
Follow these instructions to allow the customer to request a new OTP via SMS using the same phone number. There is a max of three send attempts including the initial message.
The start step is implemented the same as the previous tab:
```javascript JavaScript theme={"dark"}
function otpStartStep(phoneNumberNeeded, phoneValidationError) {
return new Promise((resolve, reject) => {
// If no phone number is needed, then don't prompt the user.
if (!phoneNumberNeeded) {
resolve(null);
return;
}
// If error message is found around phone number, handle it.
// The `phoneValidationError` is ONLY available when `phoneNumberNeeded`
// has a value.
if (phoneValidationError) {
// Set to a variable and display it in a field.
// In this example, we don't do anything with the error.
var someErrorMessage = phoneValidationError.message;
}
// Prompt the user for the phone number.
var input = prompt('Enter phone number:');
if (input) {
// If the input is valid and the user clicked `OK`, return the phone
// number.
resolve({
phoneNumber: input,
});
} else {
// Else, exit the flow.
reject('phone invalid or user cancelled');
}
});
}
```
```typescript TypeScript theme={"dark"}
const otpPromptStartStep: OtpStartStep = {
execute: async (
phoneNumberNeeded: boolean,
phoneValidationError?: PhoneValidationError
): Promise => {
return new Promise((resolve, reject) => {
// If no phone number is needed, then don't prompt the user.
if (!phoneNumberNeeded) {
resolve(null);
return;
}
// If error message is found around phone number, handle it.
// The `phoneValidationError` is ONLY available when `phoneNumberNeeded`
// has a value.
if (phoneValidationError) {
// Set to a variable and display it in a field.
// In this example, we don't do anything with the error.
var someErrorMessage = phoneValidationError.message;
}
// Prompt the user for the phone number.
var input = prompt('Enter phone number:');
if (input) {
// If the input is valid and the user clicked `OK`, return the phone
// number.
resolve({
phoneNumber: input,
});
} else {
// Else, exit the flow.
reject('phone invalid or user cancelled');
}
});
},
};
```
You can then send a new OTP SMS to the same phone number by implementing the finish step like this:
```javascript JavaScript theme={"dark"}
function otpFinishStep(otpError) {
return new Promise((resolve, reject) => {
// If error message is found, handle it.
if (otpError) {
// Set to a variable and display it in a field.
// In this example, we don't do anything with the error.
var someErrorMessage = otpError.message;
}
// Prompt the user for whether they received the SMS.
// Typically, this is a page that shows the OTP already. We are simplifying
// it by requiring an input.
var input = confirm('Did you receive a text message?');
if (!input) {
// If `Cancel`, then resend to the same phone number.
resolve({
resultType: 1, // OnResendOtp enum type = 1
});
return;
}
// Prompt the user for the OTP.
var otp = prompt('Enter OTP code:');
if (otp) {
// If the input is valid and the user clicked `OK`, return the OTP.
resolve({
input: { otp }, // OTP value
resultType: 0, // OnSuccess enum type = 0
});
} else {
// Else, exit the flow.
reject('phone invalid or user cancelled');
}
});
}
```
```typescript TypeScript theme={"dark"}
const otpMultipleResendFinishStep: OtpFinishStep = {
execute: async (otpError?: OtpError): Promise => {
return new Promise((resolve, reject) => {
// If error message is found, handle it.
if (otpError) {
// Set to a variable and display it in a field.
// In this example, we don't do anything with the error.
var someErrorMessage = otpError.message;
}
// Prompt the user for whether they received the SMS.
// Typically, this is a page that shows the OTP already. We are simplifying
// it by requiring an input.
var input = confirm('Did you receive a text message?');
if (!input) {
// If `Cancel`, then resend to the same phone number.
resolve({
resultType: 1, // OnResendOtp enum type = 1
});
return;
}
// Prompt the user for the OTP.
var otp = prompt('Enter OTP code:');
if (otp) {
// If the input is valid and the user clicked `OK`, return the OTP.
resolve({
input: { otp }, // OTP value
resultType: OtpFinishResultType.OnSuccess,
});
} else {
// Else, exit the flow.
reject('phone invalid or user cancelled');
}
});
},
};
```
Follow these instructions to allow the customer to re-enter the OTP PIN if they type it wrong. There is a max of 3 attempts. To implement this functionality, you also need to pass in `allowOTPRetry=true` to the `/v3/start` endpoint.
The start step is implemented the same as either of the the previous tabs - no client side code changes necessary:
```javascript JavaScript theme={"dark"}
function otpStartStep(phoneNumberNeeded, phoneValidationError) {
return new Promise((resolve, reject) => {
// If no phone number is needed, then don't prompt the user.
if (!phoneNumberNeeded) {
resolve(null);
return;
}
// If error message is found around phone number, handle it.
// The `phoneValidationError` is ONLY available when `phoneNumberNeeded`
// has a value.
if (phoneValidationError) {
// Set to a variable and display it in a field.
// In this example, we don't do anything with the error.
var someErrorMessage = phoneValidationError.message;
}
// Prompt the user for the phone number.
var input = prompt('Enter phone number:');
if (input) {
// If the input is valid and the user clicked `OK`, return the phone
// number.
resolve({
phoneNumber: input,
});
} else {
// Else, exit the flow.
reject('phone invalid or user cancelled');
}
});
}
```
```typescript TypeScript theme={"dark"}
const otpPromptStartStep: OtpStartStep = {
execute: async (
phoneNumberNeeded: boolean,
phoneValidationError?: PhoneValidationError
): Promise => {
return new Promise((resolve, reject) => {
// If no phone number is needed, then don't prompt the user.
if (!phoneNumberNeeded) {
resolve(null);
return;
}
// If error message is found around phone number, handle it.
// The `phoneValidationError` is ONLY available when `phoneNumberNeeded`
// has a value.
if (phoneValidationError) {
// Set to a variable and display it in a field.
// In this example, we don't do anything with the error.
var someErrorMessage = phoneValidationError.message;
}
// Prompt the user for the phone number.
var input = prompt('Enter phone number:');
if (input) {
// If the input is valid and the user clicked `OK`, return the phone
// number.
resolve({
phoneNumber: input,
});
} else {
// Else, exit the flow.
reject('phone invalid or user cancelled');
}
});
},
};
```
The finish step is implemented the same as either of the the previous tabs - no client side code changes necessary. If the OTP is invalid, the finish step will be called again to prompt the user for a new input. Once the max attempts is reached, the `AuthFinish` function will be called.
```javascript JavaScript theme={"dark"}
function otpFinishStep(otpError) {
return new Promise((resolve, reject) => {
// If error message is found, handle it.
if (otpError) {
// Set to a variable and display it in a field.
// In this example, we don't do anything with the error.
var someErrorMessage = otpError.message;
}
// Prompt the user for whether they received the SMS.
// Typically, this is a page that shows the OTP already. We are simplifying
// it by requiring an input.
var input = confirm('Did you receive a text message?');
if (!input) {
// Close the modal if a text message was not received.
return;
}
// Prompt the user for the OTP.
var otp = prompt('Enter OTP code:');
if (otp) {
// If the input is valid and the user clicked `OK`, return the OTP.
resolve({
input: { otp }, // OTP value
resultType: 0, // OnSuccess enum type = 0
});
} else {
// Else, exit the flow.
reject('phone invalid or user cancelled');
}
});
}
```
```typescript TypeScript theme={"dark"}
const otpFinishStep: OtpFinishStep = {
execute: async (otpError?: OtpError): Promise => {
return new Promise((resolve, reject) => {
// If error message is found, handle it.
if (otpError) {
// Set to a variable and display it in a field.
// In this example, we don't do anything with the error.
var someErrorMessage = otpError.message;
}
// Prompt the user for whether they received the SMS.
// Typically, this is a page that shows the OTP already. We are simplifying
// it by requiring an input.
var input = confirm('Did you receive a text message?');
if (!input) {
// Close the modal if a text message was not received.
return;
}
// Prompt the user for the OTP.
var otp = prompt('Enter OTP code:');
if (otp) {
// If the input is valid and the user clicked `OK`, return the OTP.
resolve({
input: { otp }, // OTP value
resultType: OtpFinishResultType.OnSuccess,
});
} else {
// Else, exit the flow.
reject('phone invalid or user cancelled');
}
});
},
};
```
Follow these instructions to allow the customer to re-enter their phone number. There is a max of three entries/send attempts.
Manual Request Required
To enable phone number change capabilities on your credentials, contact your Prove representative.
The start step is implemented the same as the previous tab:
```javascript JavaScript theme={"dark"}
function otpStartStep(phoneNumberNeeded, phoneValidationError) {
return new Promise((resolve, reject) => {
// If no phone number is needed, then don't prompt the user.
if (!phoneNumberNeeded) {
resolve(null);
return;
}
// If error message is found around phone number, handle it.
// The `phoneValidationError` is ONLY available when `phoneNumberNeeded`
// has a value.
if (phoneValidationError) {
// Set to a variable and display it in a field.
// In this example, we don't do anything with the error.
var someErrorMessage = phoneValidationError.message;
}
// Prompt the user for the phone number.
var input = prompt('Enter phone number:');
if (input) {
// If the input is valid and the user clicked `OK`, return the phone
// number.
resolve({
phoneNumber: input,
});
} else {
// Else, exit the flow.
reject('phone invalid or user cancelled');
}
});
}
```
```typescript TypeScript theme={"dark"}
const otpPromptStartStep: OtpStartStep = {
execute: async (
phoneNumberNeeded: boolean,
phoneValidationError?: PhoneValidationError
): Promise => {
return new Promise((resolve, reject) => {
// If no phone number is needed, then don't prompt the user.
if (!phoneNumberNeeded) {
resolve(null);
return;
}
// If error message is found around phone number, handle it.
// The `phoneValidationError` is ONLY available when `phoneNumberNeeded`
// has a value.
if (phoneValidationError) {
// Set to a variable and display it in a field.
// In this example, we don't do anything with the error.
var someErrorMessage = phoneValidationError.message;
}
// Prompt the user for the phone number.
var input = prompt('Enter phone number:');
if (input) {
// If the input is valid and the user clicked `OK`, return the phone
// number.
resolve({
phoneNumber: input,
});
} else {
// Else, exit the flow.
reject('phone invalid or user cancelled');
}
});
},
};
```
You can prompt for a new phone numberby implementing the finish step like this:
```javascript JavaScript theme={"dark"}
function otpFinishStep(otpError) {
return new Promise((resolve, reject) => {
// If error message is found, handle it.
if (otpError) {
// Set to a variable and display it in a field.
// In this example, we don't do anything with the error.
var someErrorMessage = otpError.message;
}
// Prompt the user for whether they received the SMS.
// Typically, this is a page that shows the OTP already. We are simplifying
// it by requiring an input.
var input = confirm('Did you receive a text message?');
if (!input) {
// If `Cancel`, then trigger the otpStartStep to re-prompt for
// phone number.
resolve({
resultType: 2, // OnMobileNumberChange enum type = 2
});
return;
}
// Prompt the user for the OTP.
var otp = prompt('Enter OTP code:');
if (otp) {
// If the input is valid and the user clicked `OK`, return the OTP.
resolve({
input: { otp }, // OTP value
resultType: 0, // OnSuccess enum type = 0
});
} else {
// Else, exit the flow.
reject('phone invalid or user cancelled');
}
});
}
```
```typescript TypeScript theme={"dark"}
const otpPhoneChangeFinishStep: OtpFinishStep = {
execute: async (otpError?: OtpError): Promise => {
return new Promise((resolve, reject) => {
// If error message is found, handle it.
if (otpError) {
// Set to a variable and display it in a field.
// In this example, we don't do anything with the error.
var someErrorMessage = otpError.message;
}
// Prompt the user for whether they received the SMS.
// Typically, this is a page that shows the OTP already. We are simplifying
// it by requiring an input.
var input = confirm('Did you receive a text message?');
if (!input) {
// If `Cancel`, then trigger the otpStartStep to re-prompt for
// phone number.
resolve({
resultType: 2, // OnMobileNumberChange enum type = 2
});
return;
}
// Prompt the user for the OTP.
var otp = prompt('Enter OTP code:');
if (otp) {
// If the input is valid and the user clicked `OK`, return the OTP.
resolve({
input: { otp }, // OTP value
resultType: OtpFinishResultType.OnSuccess,
});
} else {
// Else, exit the flow.
reject('phone invalid or user cancelled');
}
});
},
};
```
## Configure Instant Link
To use the Resend/Retry/Phone Change features, you need to install the Web SDK version 2.15.1 or later.
To set the Instant Link handler, `withInstantLinkFallback(startStep: InstantLinkStartStep | InstantLinkStartStepFn, retryStep?: InstantLinkRetryStep | InstantLinkRetryStepFn)` requires implementing the `InstantLinkStartStep` interface and optionally the `InstantLinkRetryStep` interface if you wish for advanced capabilities. When returning the phone number in the functions, ensure you return an object with the field `phoneNumber` to the `resolve()` function.
The Instant Link session has a three minute timeout from when it's sent through Short Message Service (SMS) to when the customer can click the received link.
Follow these instructions if you are implementing Instant Link and you are passing in the phone number on the `/v3/start` endpoint. In this case, you've already prompted for a phone number so you don't need to prompt for it in the client SDK.
Since you passed the phone number in the `Start()` function, call `resolve(null)` to communicate to the SDK you have the customer's agreement to deliver the SMS message. Ensure you return an object to `resolve()` function.
```javascript JavaScript theme={"dark"}
function instantLinkStartStep(phoneNumberNeeded, phoneValidationError) {
return new Promise((resolve, reject) => {
// Since no phone number is needed, don't prompt the user.
resolve(null);
});
}
```
```typescript TypeScript theme={"dark"}
const instantLinkNoPromptStartStep: InstantLinkStartStep = {
execute: async (
phoneNumberNeeded: boolean,
phoneValidationError?: PhoneValidationError
): Promise => {
return new Promise((resolve, reject) => {
// Since no phone number is needed, don't prompt the user.
resolve(null);
});
},
};
```
Follow these instructions if implementing MobileAuth and collecting the phone number for desktop. This will implement Instant Link without allowing for SMS resends and phone number changes. If you do want those capabilities, please reference the subsequent tabs (Resend and Phone Number Change).
Call the `resolve(input: InstantStartInput)` method to return the collected phone number to the SDK.
Call the `reject('some error message')` method to communicate to the SDK any issues while trying to obtain the phone number. Report an error if the customer cancels the Instant Link transaction or presses the back button to leave the Instant Link start step dialog.
```javascript JavaScript theme={"dark"}
function instantLinkStartStep(phoneNumberNeeded, phoneValidationError) {
return new Promise((resolve, reject) => {
// If no phone number is needed, then don't prompt the user.
if (!phoneNumberNeeded) {
resolve(null);
return;
}
// If error message is found around phone number, handle it.
// The `phoneValidationError` is ONLY available when `phoneNumberNeeded`
// has a value.
if (phoneValidationError) {
// Set to a variable and display it in a field.
// In this example, we don't do anything with the error.
var someErrorMessage = phoneValidationError.message;
}
// Prompt the user for the phone number.
var input = prompt('Enter phone number:');
if (input) {
// If the input is valid and the user clicked `OK`, return the phone
// number.
resolve({
phoneNumber: input,
});
} else {
// Else, exit the flow.
reject('phone invalid or user cancelled');
}
});
}
```
```typescript TypeScript theme={"dark"}
const instantLinkStartStep: InstantLinkStartStep = {
execute: async (
phoneNumberNeeded: boolean,
phoneValidationError?: PhoneValidationError
): Promise => {
return new Promise((resolve, reject) => {
// If no phone number is needed, then don't prompt the user.
if (!phoneNumberNeeded) {
resolve(null);
return;
}
// If error message is found around phone number, handle it.
// The `phoneValidationError` is ONLY available when `phoneNumberNeeded`
// has a value.
if (phoneValidationError) {
// Set to a variable and display it in a field.
// In this example, we don't do anything with the error.
var someErrorMessage = phoneValidationError.message;
}
// Prompt the user for the phone number.
var input = prompt('Enter phone number:');
if (input) {
// If the input is valid and the user clicked `OK`, return the phone
// number.
resolve({
phoneNumber: input,
} as InstantLinkStartInput);
} else {
// Else, exit the flow.
reject('phone invalid or user cancelled');
}
});
},
};
```
Follow these instructions to allow the customer to request a new SMS using the same phone number. There is a max of three send attempts including the initial message.
The start step is implemented the same as the previous tab:
```javascript JavaScript theme={"dark"}
function instantLinkStartStep(phoneNumberNeeded, phoneValidationError) {
return new Promise((resolve, reject) => {
// If no phone number is needed, then don't prompt the user.
if (!phoneNumberNeeded) {
resolve(null);
return;
}
// If error message is found around phone number, handle it.
// The `phoneValidationError` is ONLY available when `phoneNumberNeeded`
// has a value.
if (phoneValidationError) {
// Set to a variable and display it in a field.
// In this example, we don't do anything with the error.
var someErrorMessage = phoneValidationError.message;
}
// Prompt the user for the phone number.
var input = prompt('Enter phone number:');
if (input) {
// If the input is valid and the user clicked `OK`, return the phone
// number.
resolve({
phoneNumber: input,
});
} else {
// Else, exit the flow.
reject('phone invalid or user cancelled');
}
});
}
```
```typescript TypeScript theme={"dark"}
const instantLinkStartStep: InstantLinkStartStep = {
execute: async (
phoneNumberNeeded: boolean,
phoneValidationError?: PhoneValidationError
): Promise => {
return new Promise((resolve, reject) => {
// If no phone number is needed, then don't prompt the user.
if (!phoneNumberNeeded) {
resolve(null);
return;
}
// If error message is found around phone number, handle it.
// The `phoneValidationError` is ONLY available when `phoneNumberNeeded`
// has a value.
if (phoneValidationError) {
// Set to a variable and display it in a field.
// In this example, we don't do anything with the error.
var someErrorMessage = phoneValidationError.message;
}
// Prompt the user for the phone number.
var input = prompt('Enter phone number:');
if (input) {
// If the input is valid and the user clicked `OK`, return the phone
// number.
resolve({
phoneNumber: input,
} as InstantLinkStartInput);
} else {
// Else, exit the flow.
reject('phone invalid or user cancelled');
}
});
},
};
```
You can then send a new Instant Link SMS to the same phone number by implementing the `InstantLinkRetryStep` interface, for example:
```javascript JavaScript theme={"dark"}
function instantLinkRetryStep() {
return new Promise((resolve, reject) => {
// There are multiple return options:
// - resolve(0): request resend to the same phone number
// - reject('user clicked cancel'): error out of the possession flow
// Prompt the user for the phone number.
// Typically, this is a page that is automatically closed or redirected
// once the `AuthFinish` function is called. We are simplifying it by
// requiring an input.
var input = confirm('Did you receive a text message?');
if (input) {
// If `OK`, close the modal.
return;
}
// Else `Cancel`, then resend to the same phone number.
resolve(0);
});
}
```
```typescript TypeScript theme={"dark"}
const instantLinkMultipleResendRetryStep: InstantLinkRetryStep = {
execute: async (): Promise => {
return new Promise((resolve, reject) => {
// There are multiple return options:
// - resolve(0): request resend to the same phone number
// - reject('user clicked cancel'): error out of the possession flow
// Prompt the user for the phone number.
// Typically, this is a page that is automatically closed or redirected
// once the `AuthFinish` function is called. We are simplifying it by
// requiring an input.
var input = confirm('Did you receive a text message?');
if (input) {
// If `OK`, close the modal.
return;
}
// Else `Cancel`, then resend to the same phone number.
resolve(InstantLinkResultType.OnResend);
});
},
};
```
Follow these instructions to allow the customer to re-enter their phone number. There is a max of three entries/send attempts.
Manual Request Required
To enable phone number change capabilities on your credentials, contact your Prove representative.
The start step is implemented the same as the previous tab:
```javascript JavaScript theme={"dark"}
function instantLinkStartStep(phoneNumberNeeded, phoneValidationError) {
return new Promise((resolve, reject) => {
// If no phone number is needed, then don't prompt the user.
if (!phoneNumberNeeded) {
resolve(null);
return;
}
// If error message is found around phone number, handle it.
// The `phoneValidationError` is ONLY available when `phoneNumberNeeded`
// has a value.
if (phoneValidationError) {
// Set to a variable and display it in a field.
// In this example, we don't do anything with the error.
var someErrorMessage = phoneValidationError.message;
}
// Prompt the user for the phone number.
var input = prompt('Enter phone number:');
if (input) {
// If the input is valid and the user clicked `OK`, return the phone
// number.
resolve({
phoneNumber: input,
});
} else {
// Else, exit the flow.
reject('phone invalid or user cancelled');
}
});
}
```
```typescript TypeScript theme={"dark"}
const instantLinkStartStep: InstantLinkStartStep = {
execute: async (
phoneNumberNeeded: boolean,
phoneValidationError?: PhoneValidationError
): Promise => {
return new Promise((resolve, reject) => {
// If no phone number is needed, then don't prompt the user.
if (!phoneNumberNeeded) {
resolve(null);
return;
}
// If error message is found around phone number, handle it.
// The `phoneValidationError` is ONLY available when `phoneNumberNeeded`
// has a value.
if (phoneValidationError) {
// Set to a variable and display it in a field.
// In this example, we don't do anything with the error.
var someErrorMessage = phoneValidationError.message;
}
// Prompt the user for the phone number.
var input = prompt('Enter phone number:');
if (input) {
// If the input is valid and the user clicked `OK`, return the phone
// number.
resolve({
phoneNumber: input,
} as InstantLinkStartInput);
} else {
// Else, exit the flow.
reject('phone invalid or user cancelled');
}
});
},
};
```
You can prompt for a new phone number by implementing the `InstantLinkRetryStep` interface, for example:
```javascript JavaScript theme={"dark"}
function instantLinkRetryStep() {
return new Promise((resolve, reject) => {
// There are multiple return options:
// - resolve(0): request resend to the same phone number
// - resolve(1): request phone number change/re-prompt
// - reject('user clicked cancel'): error out of the possession flow
// Prompt the user for the phone number.
// Typically, this is a page that is automatically closed or redirected
// once the `AuthFinish` function is called. We are simplifying it by
// requiring an input.
var input = confirm('Did you receive a text message?');
if (input) {
// If `OK`, close the modal.
return;
}
// Else `Cancel`, then trigger the instantLinkStartStep to re-prompt for
// phone number.
resolve(1);
});
}
```
```typescript TypeScript theme={"dark"}
const instantLinkPhoneChangeRetryStep: InstantLinkRetryStep = {
execute: async (): Promise => {
return new Promise((resolve, reject) => {
// There are multiple return options:
// - resolve(0): request resend to the same phone number
// - resolve(1): request phone number change/re-prompt
// - reject('user clicked cancel'): error out of the possession flow
// Prompt the user for the phone number.
// Typically, this is a page that is automatically closed or redirected
// once the `AuthFinish` function is called. We are simplifying it by
// requiring an input.
var input = confirm('Did you receive a text message?');
if (input) {
// If `OK`, close the modal.
return;
}
// Else `Cancel`, then trigger the instantLinkStartStep to re-prompt for
// phone number.
resolve(InstantLinkResultType.OnMobileNumberChange);
});
},
};
```
# Validate Phone Number
Source: https://developer.prove.com/reference/validate-request
post /v3/validate
This endpoint allows you to check if the phone number entered/discovered earlier in the flow is validated.
Use the following base URLs when integrating:
`https://platform.uat.proveapis.com` - North America Sandbox Environment
`https://platform.proveapis.com` - North America Production Environment
# Verify User
Source: https://developer.prove.com/reference/verify
POST /v3/verify
This endpoint allows you to verify a user depending on your particular use case.
# Client-Side SDK Guide
Source: https://developer.prove.com/reference/web-sdk
Learn how to integrate the client-side SDK into your web app
## Installation
The Android SDK is a set of lightweight libraries. The libraries deliver as Android Archive Repository, `.aar`, files. The minimum supported version of Android is v7, level 24.
Prove manages a maven repository with Android binaries to enable integration with Gradle.
Update the dependencies object in the `build.gradle` file:
```java Java theme={"dark"}
dependencies {
// Existing dependencies are here.
// Add the Prove Link dependencies:
implementation 'com.prove.sdk:proveauth:6.9.0'
}
```
Point to the repository by updating your `settings.gradle` file with the Maven repository:
```java Java theme={"dark"}
dependencyResolutionManagement {
// Existing repository settings are here.
repositories {
// Existing repositories are here.
// Add the Prove Link Maven repository:
maven {
url = "https://prove.jfrog.io/artifactory/libs-public-maven/"
}
}
}
```
The following needs added to the `build.gradle` file to also download dependency libraries:
```java Java theme={"dark"}
dependencies {
implementation fileTree('libs')
}
```
If you receive an error message on the `application@fullBackupContent` value, you can resolve it by adding this line of code to your application `AndroidManifest.xml` file inside the `...` node. Add it as an attribute to the opening `application` tag:
```xml XML theme={"dark"}
```
## Permissions
The Prove Auth SDK and its children SDKs merge the following permissions into the main app:
```xml XML theme={"dark"}
```
## Send the type of flow: mobile
Unlike the Web SDK, when using the Android SDK, use the mobile flow. Pass `mobile` to the `Start()` function on the server. In a mobile flow, Mobile Auth℠ executes first and if that fails, performs OTP validation on the mobile phone.
In the mobile flow, once either Mobile Auth or the OTP validation is complete, the AuthFinishStep function executes.
Mobile Auth
Mobile Auth requires the customer to disable any VPN.
## Authenticate()
The SDK requires an `authToken` as a parameter for the `Authenticate()` function. This token returns from the `Start()` call of the server SDK. The token is session specific, limiting it to a single flow. It also expires after 15 minutes.
## Retrieve `authToken`
Send a request to your backend server with the phone number, flow type, and an optional challenge of either the date of birth or social security number.
```java Java theme={"dark"}
String initialize(String phoneNumber, String ssn, String flowType) {
YourBackendClient backend = new YourBackendClient(); // Backend API client
// TODO: Build your InitializeRequest object
InitializeRequest initializeRequest = new InitializeRequest(phoneNumber, ssn, flowType);
// Send an initialize request to your backend server to get authToken
InitializeResponse response = backend.initialize(initializeRequest);
// TODO: define your own InitializeResponse object to parse authToken string
return response.getAuthToken();
}
```
## Setup authenticator
Once you have the `authToken`, build the authenticator for the mobile flow.
```java Java theme={"dark"}
// Object implementing AuthFinishStep interface
AuthFinishStep authFinishStep = new AuthFinishStep() {
...
};
// Objects implementing OtpStartStep/OtpFinishStep interfaces
OtpStartStep otpStartStep = new OtpStartStep() {
...
};
OtpFinishStep otpFinishStep = new OtpFinishStep() {
...
};
ProveAuth proveAuth = ProveAuth.builder()
.withAuthFinishStep(authId -> verify(authId)) // verify(authId) call defined in #Validate the Mobile Phone section
.withOtpFallback(otpStartStep, otpFinishStep)
.withContext(this)
.build();
```
The mobile data connection can sometimes be unavailable during testing. The `Builder` class offers a `withTestMode(boolean testMode)` method, which permits simulated successful session results while connected to a Wi-Fi network only. Testing using a Wi-Fi connection is useful in the Sandbox environment.
```java Java theme={"dark"}
ProveAuth proveAuth = ProveAuth.builder()
.withAuthFinishStep(authId -> verify(authId))
.withOtpFallback(otpStartStep, otpFinishStep)
.withContext(this)
.withTestMode(true) // Test mode flag
.build();
```
## Performing the authentication
The `ProveAuth` object is thread safe. You can use it as a singleton. Most Prove Auth methods are blocking and therefore can't execute in the main app thread. The app employs an executor service with a minimum of two threads to manage threads due to the ability to process concurrent blocking requests.
```java Java theme={"dark"}
public class MyAuthenticator {
private final MyBackendClient backend = new MyBackendClient(); // Backend API client
private ExecutorService executor = Executors.newCachedThreadPool();
private final AuthFinishStep authFinishStep = new AuthFinishStep() {
@Override
void execute(String authId) {
try {
AuthFinishResponse response = backend.authFinish("My App", authId);
... // Check the authentication status returned in the response
} catch (IOException e) {
String failureCause = e.getCause() != null ? e.getCause().getMessage() : "Failed to request authentication results";
// Authentication failed due to request failure
}
}
};
private ProveAuth proveAuth;
public MyAuthenticator(Context context) {
proveAuth = ProveAuth.builder()
.withAuthFinishStep(authFinishStep)
.withOtpFallback(otpStartStep, otpFinishStep)
.withContext(context)
.build();
}
public void authenticate() throws IOException, ProveAuthException {
AuthStartResponse response = backend.authStart("My Prove Auth App");
proveAuth.authenticate(response.getAuthToken());
}
}
public void authenticate() throws IOException, ProveAuthException {
// NOTE: blocking method proveAuth.authenticate() should be run in background thread
executor.submit(() -> {
AuthStartResponse response = backend.authStart("My Prove Auth App");
proveAuth.authenticate(response.getAuthToken());
}
}
```
## Validate the mobile phone
In the AuthFinishStep, specify a function to call once the possession checks are complete on the mobile phone. This endpoint on your back end server calls the `Validate()` function to check phone number validation. If it was successful, the server returns the results from the `Challenge()` function, including customer information.
```java Java theme={"dark"}
// Send a verify request to get return customer information.
void verify(String: authId) {
YourBackendClient backend = new YourBackendClient(); // Backend API client
// Build your VerifyRequest object
VerifyRequest verifyRequest = new VerifyRequest(authId, ...);
// Send a verify request to your backend server to get return customer information.
VerifyResponse response = backend.verify(verifyRequest);
// TODO: define your VerifyResponse object to parse customer information from the response
String firstName = response.getFirstName();
String lastName = response.getLastName();
// Pre-fill customer information to your Android App UI, for example:
firstNameEditText.setText(firstName);
lastNameEditText.setText(lastName);
}
```
## Configure OTP
To use the Resend/Retry/Phone Change features, you need to install the Android SDK version 6.5.0 or later.
To set the One-Time Password (OTP) handler, `withOtpFallback(otpStart: otpStartStep, otpFinish: otpFinishStep)`, requires implementing the `OtpStartStep` and `OtpFinishStep`.
The OTP session has a two minute timeout from when it's sent through SMS to when the customer can enter in the OTP.
Follow these instructions if you are implementing OTP and you are passing in the phone number on the `/v3/start` endpoint. In this case, you've already prompted for a phone number so you don't need to prompt for it in the client SDK.
Since you passed the phone number in the `Start()` function, call `OtpStartStepCallback.onSuccess(OtpStartInput);` to communicate to the SDK you have the customer's agreement to deliver the SMS message. Ensure you return an instance of `OtpStartInput` with empty string or `null` to `OtpStartStepCallback.onSuccess()` function.
```java Java theme={"dark"}
import com.prove.sdk.proveauth.OtpStartInput;
import com.prove.sdk.proveauth.OtpStartStep;
import com.prove.sdk.proveauth.OtpStartStepCallback;
import com.prove.sdk.proveauth.ProveAuthException;
public class NoPromptStart implements OtpStartStep {
@Override
public void execute(boolean phoneNumberNeeded, ProveAuthException otpException,
OtpStartStepCallback callback) {
// No phone number needed, no need to ask end user for input.
callback.onSuccess(new OtpStartInput(""));
}
}
```
Call the `OtpStartStepCallback.onError();` method to communicate to the SDK any issues while trying to obtain the phone number or the OTP. Report an error if the customer cancels the SMS transaction or presses the back button to leave the screen.
In the finish step, call the `OtpFinishStepCallback.onSuccess(OtpFinishInput);` method to return the collected OTP value wrapped in `OtpFinishInput`.
```java Java theme={"dark"}
import com.prove.sdk.proveauth.OtpFinishInput;
import com.prove.sdk.proveauth.OtpFinishStep;
import com.prove.sdk.proveauth.OtpFinishStepCallback;
import com.prove.sdk.proveauth.OtpValidationException;
import com.prove.sdk.proveauth.ProveAuthException;
public class NoPromptFinish implements OtpFinishStep {
@Override
public void execute(@Nullable ProveAuthException otpException,
OtpFinishStepCallback otpFinishStepCallback) {
// If error message is found, handle it.
if (otpException instanceof OtpValidationException) {
// Set to a variable and display it in a field.
// In this example, we don't do anything with the error.
String errorMsg = otpException.getMessage();
}
try {
// Prompt the user for OTP delivered by SMS. You can build UI to provide
// best UX based on your application and business logic, here we simplify to a
// generic function named promptForOtpCode which gives us the OTP code.
String otpCode = promptForOtpCode();
otpFinishStepCallback.onSuccess(new OtpFinishInput(otpCode));
} catch (Exception e) {
// if any issue with the OTP collection from the end user or the user wants to cancel
// then call onError to exit the flow. In this example we simplify it as catching
// an exception.
otpFinishStepCallback.onError();
}
}
}
```
Follow these instructions if implementing MobileAuth and collecting the phone number only if MobileAuth fails. This will implement OTP without allowing for SMS resends and phone number changes. If you do want those capabilities, please reference the subsequent tabs (Resend, Retry OTP, and Phone Number Change).
In the start step, call the `OtpStartStepCallback.onSuccess(OtpStartInput);` method to return the collected phone number to the SDK.
```java Java theme={"dark"}
import com.prove.sdk.proveauth.OtpStartInput;
import com.prove.sdk.proveauth.OtpStartStep;
import com.prove.sdk.proveauth.OtpStartStepCallback;
import com.prove.sdk.proveauth.PhoneNumberValidationException;
import com.prove.sdk.proveauth.ProveAuthException;
public class PromptStart implements OtpStartStep {
@Override
public void execute(boolean phoneNumberNeeded, @Nullable ProveAuthException otpException,
OtpStartStepCallback callback) {
// If phone number is needed, need to ask the end user for phone number input.
if (phoneNumberNeeded) {
// If error message is found around phone number, handle it.
// The `PhoneNumberValidationException` is ONLY available when `phoneNumberNeeded`
// has a value.
if (otpException instanceof PhoneNumberValidationException) {
// Set to a variable and display it in a field.
// In this example, we don't do anything with the error.
String errorMsg = otpException.getMessage();
}
try {
// Prompt the user for phone number to receive OTP SMS. You can build UI to provide
// best UX based on your application and business logic, here we simplify to a
// generic function named promptForPhoneNumber which gives us the collected
// phone number.
String phoneNumber = promptForPhoneNumber();
callback.onSuccess(new OtpStartInput(phoneNumber));
} catch (Exception e) {
// if any issue with the phone number collection from the end user or the user
// wants to cancel then call onError to exit the flow.
// In this example we simplify it as catching an exception.
callback.onError();
}
} else {
// No phone number needed, no need to ask end user for input.
callback.onSuccess(new OtpStartInput(""));
}
}
}
```
The finish step is implemented the same as the previous tab:
```java Java theme={"dark"}
import com.prove.sdk.proveauth.OtpFinishInput;
import com.prove.sdk.proveauth.OtpFinishStep;
import com.prove.sdk.proveauth.OtpFinishStepCallback;
import com.prove.sdk.proveauth.OtpValidationException;
import com.prove.sdk.proveauth.ProveAuthException;
public class NoPromptFinish implements OtpFinishStep {
@Override
public void execute(@Nullable ProveAuthException otpException,
OtpFinishStepCallback otpFinishStepCallback) {
// If error message is found, handle it.
if (otpException instanceof OtpValidationException) {
// Set to a variable and display it in a field.
// In this example, we don't do anything with the error.
String errorMsg = otpException.getMessage();
}
try {
// Prompt the user for OTP delivered by SMS. You can build UI to provide
// best UX based on your application and business logic, here we simplify to a
// generic function named promptForOtpCode which gives us the OTP code.
String otpCode = promptForOtpCode();
otpFinishStepCallback.onSuccess(new OtpFinishInput(otpCode));
} catch (Exception e) {
// if any issue with the OTP collection from the end user or the user wants to cancel
// then call onError to exit the flow. In this example we simplify it as catching
// an exception.
otpFinishStepCallback.onError();
}
}
}
```
Follow these instructions to allow the customer to request a new OTP via SMS using the same phone number. There is a max of three send attempts including the initial message.
The start step is implemented the same as the previous tab:
```java Java theme={"dark"}
import com.prove.sdk.proveauth.OtpStartInput;
import com.prove.sdk.proveauth.OtpStartStep;
import com.prove.sdk.proveauth.OtpStartStepCallback;
import com.prove.sdk.proveauth.PhoneNumberValidationException;
import com.prove.sdk.proveauth.ProveAuthException;
public class PromptStart implements OtpStartStep {
@Override
public void execute(boolean phoneNumberNeeded, @Nullable ProveAuthException otpException,
OtpStartStepCallback callback) {
// If phone number is needed, need to ask the end user for phone number input.
if (phoneNumberNeeded) {
// If error message is found around phone number, handle it.
// The `PhoneNumberValidationException` is ONLY available when `phoneNumberNeeded`
// has a value.
if (otpException instanceof PhoneNumberValidationException) {
// Set to a variable and display it in a field.
// In this example, we don't do anything with the error.
String errorMsg = otpException.getMessage();
}
try {
// Prompt the user for phone number to receive OTP SMS. You can build UI to provide
// best UX based on your application and business logic, here we simplify to a
// generic function named promptForPhoneNumber which gives us the collected
// phone number.
String phoneNumber = promptForPhoneNumber();
callback.onSuccess(new OtpStartInput(phoneNumber));
} catch (Exception e) {
// if any issue with the phone number collection from the end user or the user
// wants to cancel then call onError to exit the flow.
// In this example we simplify it as catching an exception.
callback.onError();
}
} else {
// No phone number needed, no need to ask end user for input.
callback.onSuccess(new OtpStartInput(""));
}
}
}
```
You can then send a new OTP SMS to the same phone number by implementing the finish step like this:
```java Java theme={"dark"}
import com.prove.sdk.proveauth.OtpFinishInput;
import com.prove.sdk.proveauth.OtpFinishStep;
import com.prove.sdk.proveauth.OtpFinishStepCallback;
import com.prove.sdk.proveauth.OtpValidationException;
import com.prove.sdk.proveauth.ProveAuthException;
public class MultipleResendFinish implements OtpFinishStep {
@Override
public void execute(@Nullable ProveAuthException otpException,
OtpFinishStepCallback otpFinishStepCallback) {
// If error message is found, handle it.
if (otpException instanceof OtpValidationException) {
// Set to a variable and display it in a field.
// In this example, we don't do anything with the error.
String errorMsg = otpException.getMessage();
}
// Prompt the user for whether they received the SMS.
if (promptForResend("Didn't receive the SMS OTP? Click resend button for a new one!")) {
// If the end user wants to send again to the same phone number call onOtpResend().
otpFinishStepCallback.onOtpResend();
return;
}
try {
// Prompt the user for OTP delivered by SMS. You can build UI to provide
// best UX based on your application and business logic, here we simplify to a
// generic function named promptForOtpCode which gives us the OTP code.
String otpCode = promptForOtpCode();
otpFinishStepCallback.onSuccess(new OtpFinishInput(otpCode));
} catch (Exception e) {
// if any issue with the OTP collection from the end user or the user wants to cancel
// then call onError to exit the flow. In this example we simplify it as catching
// an exception.
otpFinishStepCallback.onError();
}
}
}
```
Follow these instructions to allow the customer to re-enter the OTP PIN if they type it wrong. There is a max of 3 attempts. To implement this functionality, you also need to pass in `allowOTPRetry=true` to the `/v3/start` endpoint.
The start step is implemented the same as either of the the previous tabs - no client side code changes necessary:
```java Java theme={"dark"}
import com.prove.sdk.proveauth.OtpStartInput;
import com.prove.sdk.proveauth.OtpStartStep;
import com.prove.sdk.proveauth.OtpStartStepCallback;
import com.prove.sdk.proveauth.PhoneNumberValidationException;
import com.prove.sdk.proveauth.ProveAuthException;
public class PromptStart implements OtpStartStep {
@Override
public void execute(boolean phoneNumberNeeded, @Nullable ProveAuthException otpException,
OtpStartStepCallback callback) {
// If phone number is needed, need to ask the end user for phone number input.
if (phoneNumberNeeded) {
// If error message is found around phone number, handle it.
// The `PhoneNumberValidationException` is ONLY available when `phoneNumberNeeded`
// has a value.
if (otpException instanceof PhoneNumberValidationException) {
// Set to a variable and display it in a field.
// In this example, we don't do anything with the error.
String errorMsg = otpException.getMessage();
}
try {
// Prompt the user for phone number to receive OTP SMS. You can build UI to provide
// best UX based on your application and business logic, here we simplify to a
// generic function named promptForPhoneNumber which gives us the collected
// phone number.
String phoneNumber = promptForPhoneNumber();
callback.onSuccess(new OtpStartInput(phoneNumber));
} catch (Exception e) {
// if any issue with the phone number collection from the end user or the user
// wants to cancel then call onError to exit the flow.
// In this example we simplify it as catching an exception.
callback.onError();
}
} else {
// No phone number needed, no need to ask end user for input.
callback.onSuccess(new OtpStartInput(""));
}
}
}
```
The finish step is implemented the same as either of the the previous tabs - no client side code changes necessary. If the OTP is invalid, the finish step will be called again to prompt the user for a new input. Once the max attempts is reached, the `AuthFinish` function will be called.
```java Java theme={"dark"}
import com.prove.sdk.proveauth.OtpFinishInput;
import com.prove.sdk.proveauth.OtpFinishStep;
import com.prove.sdk.proveauth.OtpFinishStepCallback;
import com.prove.sdk.proveauth.OtpValidationException;
import com.prove.sdk.proveauth.ProveAuthException;
public class NoPromptFinish implements OtpFinishStep {
@Override
public void execute(@Nullable ProveAuthException otpException,
OtpFinishStepCallback otpFinishStepCallback) {
// If error message is found, handle it.
if (otpException instanceof OtpValidationException) {
// Set to a variable and display it in a field.
// In this example, we don't do anything with the error.
String errorMsg = otpException.getMessage();
}
try {
// Prompt the user for OTP delivered by SMS. You can build UI to provide
// best UX based on your application and business logic, here we simplify to a
// generic function named promptForOtpCode which gives us the OTP code.
String otpCode = promptForOtpCode();
otpFinishStepCallback.onSuccess(new OtpFinishInput(otpCode));
} catch (Exception e) {
// if any issue with the OTP collection from the end user or the user wants to cancel
// then call onError to exit the flow. In this example we simplify it as catching
// an exception.
otpFinishStepCallback.onError();
}
}
}
```
Follow these instructions to allow the customer to re-enter their phone number. There is a max of three entries/send attempts.
Manual Request Required
To enable phone number change capabilities on your credentials, contact your Prove representative.
The start step is implemented the same as the previous tab:
```java Java theme={"dark"}
import com.prove.sdk.proveauth.OtpStartInput;
import com.prove.sdk.proveauth.OtpStartStep;
import com.prove.sdk.proveauth.OtpStartStepCallback;
import com.prove.sdk.proveauth.PhoneNumberValidationException;
import com.prove.sdk.proveauth.ProveAuthException;
public class PromptStart implements OtpStartStep {
@Override
public void execute(boolean phoneNumberNeeded, @Nullable ProveAuthException otpException,
OtpStartStepCallback callback) {
// If phone number is needed, need to ask the end user for phone number input.
if (phoneNumberNeeded) {
// If error message is found around phone number, handle it.
// The `PhoneNumberValidationException` is ONLY available when `phoneNumberNeeded`
// has a value.
if (otpException instanceof PhoneNumberValidationException) {
// Set to a variable and display it in a field.
// In this example, we don't do anything with the error.
String errorMsg = otpException.getMessage();
}
try {
// Prompt the user for phone number to receive OTP SMS. You can build UI to provide
// best UX based on your application and business logic, here we simplify to a
// generic function named promptForPhoneNumber which gives us the collected
// phone number.
String phoneNumber = promptForPhoneNumber();
callback.onSuccess(new OtpStartInput(phoneNumber));
} catch (Exception e) {
// if any issue with the phone number collection from the end user or the user
// wants to cancel then call onError to exit the flow.
// In this example we simplify it as catching an exception.
callback.onError();
}
} else {
// No phone number needed, no need to ask end user for input.
callback.onSuccess(new OtpStartInput(""));
}
}
}
```
You can prompt for a new phone number by implementing the finish step like this:
```java Java theme={"dark"}
import com.prove.sdk.proveauth.OtpFinishInput;
import com.prove.sdk.proveauth.OtpFinishStep;
import com.prove.sdk.proveauth.OtpFinishStepCallback;
import com.prove.sdk.proveauth.OtpValidationException;
import com.prove.sdk.proveauth.ProveAuthException;
public class PhoneChangeFinish implements OtpFinishStep {
@Override
public void execute(@Nullable ProveAuthException otpException,
OtpFinishStepCallback otpFinishStepCallback) {
// If error message is found, handle it.
if (otpException instanceof OtpValidationException) {
// Set to a variable and display it in a field.
// In this example, we don't do anything with the error.
String errorMsg = otpException.getMessage();
}
// Prompt the user for whether they received the SMS.
if (promptForPhoneNumberChange("Didn't receive the SMS OTP? Try a different phone number.")) {
// If the end user wants to correct the phone number already in use, or changing to a
// different phone number to receive the future SMS OTP, call onMobileNumberChange(), and
// the otpStartStep will re-prompt for phone number input from the end user.
otpFinishStepCallback.onMobileNumberChange();
return;
}
try {
// Prompt the user for OTP delivered by SMS. You can build UI to provide
// best UX based on your application and business logic, here we simplify to a
// generic function named promptForOtpCode which gives us the OTP code.
String otpCode = promptForOtpCode();
otpFinishStepCallback.onSuccess(new OtpFinishInput(otpCode));
} catch (Exception e) {
// if any issue with the OTP collection from the end user or the user wants to cancel
// then call onError to exit the flow. In this example we simplify it as catching
// an exception.
otpFinishStepCallback.onError();
}
}
}
```
## Verify the Customer Information
Once the customer has made any edits to their pre-fill information, you should submit that information to the backend server so the `Complete()` call can then verify the customer information.
```java Java theme={"dark"}
// Send request to the backend to verify customer information.
SendInfoResponse sendInfo(String firstName, String lastName) {
YourBackendClient backend = new YourBackendClient(); // Backend API client
// TODO: Build your SendInfoRequest object
SendInfoRequest sendInfoRequest = new SendInfoRequest(firstName, lastName, ...);
// Send a sendInfoRequest to your backend server to get return customer information.
SendInfoResponse response = backend.verify(sendInfoRequest);
// TODO: define your own SendInfoResponse object to parse the response
return response;
}
```
## Installation
Prove provides the iOS SDK in Swift. It has a download size of 2.5 MB and an install size of 1.5 MB for the minimum required components. It relies on iOS native APIs. The iOS SDK supports the earlier three major versions. Prove has seen successful transactions with iOS v11.
Xcode Requirement
To integrate with our iOS SDKs, Apps must be built with Xcode 16.0 or later.
Prove manages a repository with the libraries to enable integration. You can install the SDK using either CocoaPods or Swift Package Manager.
Execute the following to import CocoaPod from the Prove pod repository:
```shell shell theme={"dark"}
# Run this command to install the cocoapods-art plugin (authored by Artifactory)
gem install cocoapods-art
# Run this command to add the Prove pod repository
pod repo-art add prove.jfrog.io https://prove.jfrog.io/artifactory/api/pods/libs-public-cocoapods
# In your Podfile, paste in the Prove pod repository as a source
plugin 'cocoapods-art', :sources => [
'prove.jfrog.io'
]
# In your Podfile, paste in the SDK pods
pod 'ProveAuth', '6.9.1'
# Run this command to install the SDK pods
pod install
```
### Step 1: Connect to JFrog Registry
Set up the registry globally (required for both Xcode UI and Package.swift):
```bash theme={"dark"}
swift package-registry set --global "https://prove.jfrog.io/artifactory/api/swift/libs-public-swift"
swift package-registry login "https://prove.jfrog.io/artifactory/api/swift/libs-public-swift"
# Press Enter when prompted for access token
```
Public Registry
This is a publicly accessible registry - no password or access token is needed. Simply press Enter when prompted for an access token.
The registry connection is configured via command line only. Once this setup is complete, you can add packages using either Xcode UI or Package.swift.
### Step 2: Adding Dependencies
#### Method 1: Using Xcode UI
1. In Xcode, go to **File** → **Add Package Dependencies**
2. Search for the package you want (e.g., `swift.proveauth`)
3. Select the version and add to your target
The latest stable version is 6.9.1. Select "Exact Version" for production applications to ensure consistent builds.
Once the command line setup is complete, you only need to enter the package name (e.g., `swift.proveauth`) in Xcode - no need to enter the full registry URL to Xcode.
#### Method 2: Using Package.swift
Add dependencies to your `Package.swift` file:
```swift Swift theme={"dark"}
// swift-tools-version: 5.9
import PackageDescription
let package = Package(
name: "YourApp",
platforms: [.iOS(.v12)],
dependencies: [
.package(id: "swift.proveauth", from: "6.9.1"),
],
targets: [
.target(
name: "YourApp",
dependencies: [
.product(name: "ProveAuth", package: "swift.proveauth"),
]
)
]
)
```
Then run the following command to resolve and fetch the dependencies:
```bash theme={"dark"}
swift package resolve
```
## Send the type of flow: mobile
Unlike the Web SDK, when using the iOS SDK, use the mobile flow. Pass mobile to the `Start()` function on the server. In a mobile flow, Mobile Auth executes first and if that fails, performs one-time password (OTP) validation on the mobile phone.
In the mobile flow, once either Mobile Auth or the OTP validation is complete, the `AuthFinishStep` function executes.
Mobile Auth
In order for Mobile Auth to succeed, the customer needs to disable the VPN and Private Relay on iOS.
## `Authenticate()`
The SDK requires an `authToken` as a parameter for the `Authenticate()` function. This token returns from the `Start()` call of the server-side SDK. The token is session specific so it's used for a single flow. It also expires after 15 minutes.
## Retrieve `authToken`
To start the flow, send a request to your back end server with the phone number, flow type, and an optional challenge. Use either the date of birth, `YYYY-MM-DD`, or the last four digits of the social security number.
```swift Swift theme={"dark"}
// The below example uses native iOS URLSession, but any other
// alternative networking approaches should also work
func initialize(phoneNumber: String, ssn: String, flowType: String, completion: @escaping (Result\) -> Void) {
guard let url = URL(string: "\(backendUrl)/initialize") else {
completion(.failure(URLError(.badURL)))
return
}
var request = URLRequest(url: url)
request.httpMethod = "POST"
request.addValue("application/json", forHTTPHeaderField: "Accept")
request.addValue("application/json", forHTTPHeaderField: "Content-Type")
// Set up the request body
let body: [String: Any] = [
"phoneNumber": phoneNumber,
"flowType": flowType,
"ssn": ssn
]
do {
request.httpBody = try JSONSerialization.data(withJSONObject: body, options: \[])
} catch {
completion(.failure(error))
return
}
// Perform the request
let task = URLSession.shared.dataTask(with: request) { \_, response, error in
// Handle network or connection errors
if let error = error {
completion(.failure(error))
return
}
do {
if let json = try JSONSerialization.jsonObject(with: data, options: \[]) as? [String: Any],
let authToken = json["authToken"] as? String {
completion(.success(authToken))
} else {
let parsingError = NSError(domain: "", code: 0, userInfo: [NSLocalizedDescriptionKey : "Failed to parse JSON or authToken is missing"])
completion(.failure(parsingError))
}
} catch {
completion(.failure(error))
}
}
// Start the network call
task.resume()
}
```
## Setup authenticator
Once you have the `authToken`, build the authenticator for the mobile flow.
```swift Swift theme={"dark"}
// Object implementing ProveAuthFinishStep protocols
let finishStep = FinishAuthStep()
// Objects implementing OtpStartStep/OtpFinishStep protocols
let otpStartStep = MobileOtpStartStep()
let otpFinishStep = MobileOtpFinishStep()
let proveAuthSdk: ProveAuth
proveAuthSdk = ProveAuth.builder(authFinish: finishStep)
.withOtpFallback(otpStart: otpStartStep, otpFinish: otpFinishStep)
.build()
```
If a mobile data connection is unavailable during testing, use the Builder class. It permits simulated successful session results while connected to a Wi-Fi network. Testing using a Wi-Fi connection is useful in the Sandbox environment.
```swift Swift theme={"dark"}
proveAuthSdk = ProveAuth.builder(authFinish: finishStep)
.withMobileAuthTestMode() // Test mode flag
.build()
```
## Performing the authentication
The Prove Auth object is thread safe and used as a singleton. Most Prove Auth methods are blocking and therefore can't execute in the main app thread. The app employs an executor service with a minimum of two threads to manage threads due to the ability to process concurrent blocking requests.
```swift Swift theme={"dark"}
// authToken retrieved from your server via StartAuthRequest
proveAuthSdk.authenticate(authToken) { error in
DispatchQueue.main.async {
self.messages.finalResultMessage = "ProveAuth.authenticate returned error: \(error.localizedDescription)"
print(self.messages.finalResultMessage)
}
}
```
## Validate the mobile phone
In the `AuthFinishStep`, specify a function to call once the possession checks complete on the mobile phone. In the following code, notice an endpoint called `/verify`. This endpoint on your back end server calls the `Validate()` function to validate the phone number. If unsuccessful, the server calls the `Challenge()` function and then returns the results, including customer information. Refer to the following example fields that return and then prefill on a form for the customer to verify.
```swift Swift theme={"dark"}
// Send a verify request to get return customer information.
// The below example uses native iOS URLSession, but any other
// alternative networking approaches should also work
func verify(String: authId, completion: @escaping (Error?) -> Void) {
guard let url = URL(string: "\(backendUrl)/verify") else {
completion(URLError(.badURL))
return
}
// Create the request
var request = URLRequest(url: url)
request.httpMethod = "POST"
request.addValue("application/json", forHTTPHeaderField: "Accept")
request.addValue("application/json", forHTTPHeaderField: "Content-Type")
// Set up the request body (empty JSON object) - authId is not needed so you can ignore.
let body: [String: Any] = ["authId": authId]
do {
request.httpBody = try JSONSerialization.data(withJSONObject: body, options: \[])
} catch {
completion(error)
return
}
// Perform the request
let task = URLSession.shared.dataTask(with: request) { \_, response, error in
if let error = error {
completion(error)
return
}
// Parse the response
do {
if let json = try JSONSerialization.jsonObject(with: data, options: \[]) as? [String: Any],
let firstName = json["firstName"] as? String,
let lastName = json["lastName"] as? String {
// Update the UI on the main thread
DispatchQueue.main.async {
// Update your UI with the pre-fill customer information
// For example, assuming you have IBOutlet references for your text fields
self.firstNameInput.text = firstName
self.lastNameInput.text = lastName
}
completion(nil)
} else {
let parsingError = NSError(domain: "", code: 0, userInfo: [NSLocalizedDescriptionKey: "Failed to parse JSON"])
completion(parsingError)
}
} catch {
completion(error)
}
}
// Start the network call
task.resume()
}
```
## Configure OTP
To use the Resend/Retry/Phone Change features, you need to install the iOS SDK version 6.5.1 or later.
To set the One-Time Password (OTP) handler, `withOtpFallback(otpStart: otpStartStep, otpFinish: otpFinishStep)`, requires implementing the `OtpStartStep` and `OtpFinishStep`.
The OTP session has a two minute timeout from when it's sent through SMS to when the customer can enter in the OTP.
Follow these instructions if you are implementing OTP and you are passing in the phone number on the `/v3/start` endpoint. In this case, you've already prompted for a phone number so you don't need to prompt for it in the client SDK.
Since you passed the phone number in the `Start()` function, call `callback.onSuccess(input: nil)` to communicate to the SDK you have the customer's agreement to deliver the SMS message.
```swift Swift theme={"dark"}
import Foundation
import ProveAuth
import SwiftUI
class MobileOtpStartStep: OtpStartStep {
@ObservedObject var sheetObservable: SheetObservable
var callback: OtpStartStepCallback?
init(sheetObservable: SheetObservable) {
self.sheetObservable = sheetObservable
}
// Implement this method to handle phone number collection for SMS OTP,
// or to obtain user confirmation for initiating an SMS message.
func execute(
phoneNumberNeeded: Bool, phoneValidationError: ProveAuthError?, callback: OtpStartStepCallback
) {
self.callback = callback
// Since no phone number is needed, don't prompt the user.
callback.onSuccess(input: nil)
}
}
```
Call the `callback.onError()` method to communicate to the SDK any issues while trying to obtain the phone number or the OTP. Report an error if the customer cancels the SMS transaction or presses the back button to leave the screen.
```swift Swift theme={"dark"}
import Foundation
import SwiftUI
import ProveAuth
class MobileOtpFinishStep: OtpFinishStep {
@ObservedObject var sheetObservable: SheetObservable
var callback: OtpFinishStepCallback?
init(sheetObservable: SheetObservable){
self.sheetObservable = sheetObservable
}
// Implement this method to collect the OTP value delivered via SMS.
func execute(otpError: ProveAuthError?, callback: OtpFinishStepCallback) {
self.callback = callback
// Handle the OTP validation error if present.
if case .otpValidationError = otpError {
print("found otpError: \(String(describing: otpError?.localizedDescription))")
// Signal to your UI components that the last provided OTP is invalid
self.sheetObservable.otpError = true
} else {
self.sheetObservable.otpError = false
}
// Signal to UI components to display OtpFinishView
DispatchQueue.main.async {
self.sheetObservable.isOtpFinishActive = true
}
}
// Provide the collected OTP value to the SDK for validation.
func handleOtp(_ otp: String) {
guard let callback = self.callback else {
print("Error: OtpFinishStepCallback is not set ")
return
}
let otpFinishInput = OtpFinishInput(otp: otp)
callback.onSuccess(input: otpFinishInput)
}
// Notify the SDK of any issues encountered while obtaining the OTP value or if the user cancels the OTP flow.
func handleOtpFinishError() {
guard let callback = self.callback else {
print("Error: OtpFinishStepCallback is not set ")
return
}
callback.onError()
}
}
```
Follow these instructions if implementing MobileAuth and collecting the phone number only if MobileAuth fails. This will implement OTP without allowing for SMS resends and phone number changes. If you do want those capabilities, please reference the subsequent tabs (Resend, Retry OTP, and Phone Number Change).
In the start step, call the `callback.onSuccess(input: otpStartInput)` method to return the collected phone number to the SDK.
```swift Swift theme={"dark"}
import Foundation
import ProveAuth
import SwiftUI
class MobileOtpStartStep: OtpStartStep {
@ObservedObject var sheetObservable: SheetObservable
var callback: OtpStartStepCallback?
init(sheetObservable: SheetObservable) {
self.sheetObservable = sheetObservable
}
func execute(
phoneNumberNeeded: Bool, phoneValidationError: ProveAuthError?, callback: OtpStartStepCallback
) {
self.callback = callback
if !phoneNumberNeeded {
// If no phone number is needed, then don't prompt the user.
callback.onSuccess(input: nil)
} else {
DispatchQueue.main.async {
// If a phone number validation error is detected, ensure it is handled to provide feedback to the user.
if case .phoneNumberValidationError = phoneValidationError {
print(
"found phoneValidationError: \(String(describing: phoneValidationError?.localizedDescription))"
)
// Update UI components to display OtpStartView with the phone number validation error.
self.sheetObservable.isPhoneValidationError = true
} else {
self.sheetObservable.isPhoneValidationError = false
}
// Update UI components to display OtpStartView if a phone number is needed.
self.sheetObservable.isOtpStartActive = true
}
}
}
// Return collected phone number to the SDK
func handlePhoneNumber(phoneNumber: String) {
guard let callback = self.callback else {
print("Error: OtpStartStepCallback is not set ")
return
}
let otpStartInput = OtpStartInput(phoneNumber: phoneNumber)
// This is how you pass collected phone number to SDK
callback.onSuccess(input: otpStartInput)
}
// Communicate any issues encountered while trying to obtain the phone number to the SDK.
// Error should be reported if the customer explicitly cancels the SMS OTP transaction
// or presses the back button to exit out the SMS OTP start step screen.
func handleOtpStartError() {
guard let callback = self.callback else {
print("Error: OtpStartStepCallback is not set ")
return
}
callback.onError()
}
}
```
The finish step is implemented the same as the previous tab:
```swift Swift theme={"dark"}
import Foundation
import SwiftUI
import ProveAuth
class MobileOtpFinishStep: OtpFinishStep {
@ObservedObject var sheetObservable: SheetObservable
var callback: OtpFinishStepCallback?
init(sheetObservable: SheetObservable){
self.sheetObservable = sheetObservable
}
// Implement this method to collect the OTP value delivered via SMS.
func execute(otpError: ProveAuthError?, callback: OtpFinishStepCallback) {
self.callback = callback
// Handle the OTP validation error if present.
if case .otpValidationError = otpError {
print("found otpError: \(String(describing: otpError?.localizedDescription))")
// Signal to your UI components that the last provided OTP is invalid
self.sheetObservable.otpError = true
} else {
self.sheetObservable.otpError = false
}
// Signal to UI components to display OtpFinishView
DispatchQueue.main.async {
self.sheetObservable.isOtpFinishActive = true
}
}
// Provide the collected OTP value to the SDK for validation.
func handleOtp(_ otp: String) {
guard let callback = self.callback else {
print("Error: OtpFinishStepCallback is not set ")
return
}
let otpFinishInput = OtpFinishInput(otp: otp)
callback.onSuccess(input: otpFinishInput)
}
// Notify the SDK of any issues encountered while obtaining the OTP value or if the user cancels the OTP flow.
func handleOtpFinishError() {
guard let callback = self.callback else {
print("Error: OtpFinishStepCallback is not set ")
return
}
callback.onError()
}
}
```
Follow these instructions to allow the customer to request a new OTP via SMS using the same phone number. There is a max of three send attempts including the initial message.
The start step is implemented the same as the previous tab:
```swift Swift theme={"dark"}
import Foundation
import ProveAuth
import SwiftUI
class MobileOtpStartStep: OtpStartStep {
@ObservedObject var sheetObservable: SheetObservable
var callback: OtpStartStepCallback?
init(sheetObservable: SheetObservable) {
self.sheetObservable = sheetObservable
}
func execute(
phoneNumberNeeded: Bool, phoneValidationError: ProveAuthError?, callback: OtpStartStepCallback
) {
self.callback = callback
if !phoneNumberNeeded {
// If no phone number is needed, then don't prompt the user.
callback.onSuccess(input: nil)
} else {
DispatchQueue.main.async {
// If a phone number validation error is detected, ensure it is handled to provide feedback to the user.
if case .phoneNumberValidationError = phoneValidationError {
print(
"found phoneValidationError: \(String(describing: phoneValidationError?.localizedDescription))"
)
// Update UI components to display OtpStartView with the phone number validation error.
self.sheetObservable.isPhoneValidationError = true
} else {
self.sheetObservable.isPhoneValidationError = false
}
// Update UI components to display OtpStartView if a phone number is needed.
self.sheetObservable.isOtpStartActive = true
}
}
}
// Return collected phone number to the SDK
func handlePhoneNumber(phoneNumber: String) {
guard let callback = self.callback else {
print("Error: OtpStartStepCallback is not set ")
return
}
let otpStartInput = OtpStartInput(phoneNumber: phoneNumber)
// This is how you pass collected phone number to SDK
callback.onSuccess(input: otpStartInput)
}
// Communicate any issues encountered while trying to obtain the phone number to the SDK.
// Error should be reported if the customer explicitly cancels the SMS OTP transaction
// or presses the back button to exit out the SMS OTP start step screen.
func handleOtpStartError() {
guard let callback = self.callback else {
print("Error: OtpStartStepCallback is not set ")
return
}
callback.onError()
}
}
```
You can then send a new OTP SMS to the same phone number by implementing the finish step like this:
```swift Swift theme={"dark"}
import Foundation
import SwiftUI
import ProveAuth
class MobileOtpFinishStep: OtpFinishStep {
@ObservedObject var sheetObservable: SheetObservable
var callback: OtpFinishStepCallback?
init(sheetObservable: SheetObservable){
self.sheetObservable = sheetObservable
}
// Implement this method to collect the OTP value delivered in the SMS message.
func execute(otpError: ProveAuthError?, callback: OtpFinishStepCallback) {
self.callback = callback
// Handle the OTP validation error if present.
if case .otpValidationError = otpError {
print("found otpError: \(String(describing: otpError?.localizedDescription))")
// Update your UI to indicate that the provided OTP is invalid
self.sheetObservable.otpError = true
} else {
self.sheetObservable.otpError = false
}
// Update your UI to display the OtpFinishView
DispatchQueue.main.async {
self.sheetObservable.isOtpFinishActive = true
}
}
// Return the OTP value to the SDK
func handleOtp(_ otp: String) {
guard let callback = self.callback else {
print("Error: OtpFinishStepCallback is not set ")
return
}
let otpFinishInput = OtpFinishInput(otp: otp)
callback.onSuccess(input: otpFinishInput)
}
// Communicate to the SDK any issues when host app trys to obtain the OTP value
// or when users cancel the OTP flow
func handleOtpFinishError() {
guard let callback = self.callback else {
print("Error: OtpFinishStepCallback is not set ")
return
}
callback.onError()
}
// Call this method to request a new OTP code for the same mobile number.
func sendNewOtp() {
guard let callback = self.callback else {
print("Error: OtpFinishStepCallback is not set ")
return
}
callback.onOtpResend()
}
}
```
Follow these instructions to allow the customer to re-enter the OTP PIN if they type it wrong. There is a max of 3 attempts. To implement this functionality, you also need to pass in `allowOTPRetry=true` to the `/v3/start` endpoint.
The start step is implemented the same as either of the the previous tabs - no client side code changes necessary:
```swift Swift theme={"dark"}
import Foundation
import ProveAuth
import SwiftUI
class MobileOtpStartStep: OtpStartStep {
@ObservedObject var sheetObservable: SheetObservable
var callback: OtpStartStepCallback?
init(sheetObservable: SheetObservable) {
self.sheetObservable = sheetObservable
}
func execute(
phoneNumberNeeded: Bool, phoneValidationError: ProveAuthError?, callback: OtpStartStepCallback
) {
self.callback = callback
if !phoneNumberNeeded {
// If no phone number is needed, then don't prompt the user.
callback.onSuccess(input: nil)
} else {
DispatchQueue.main.async {
// If a phone number validation error is detected, ensure it is handled to provide feedback to the user.
if case .phoneNumberValidationError = phoneValidationError {
print(
"found phoneValidationError: \(String(describing: phoneValidationError?.localizedDescription))"
)
// Update UI components to display OtpStartView with the phone number validation error.
self.sheetObservable.isPhoneValidationError = true
} else {
self.sheetObservable.isPhoneValidationError = false
}
// Update UI components to display OtpStartView if a phone number is needed.
self.sheetObservable.isOtpStartActive = true
}
}
}
// Return collected phone number to the SDK
func handlePhoneNumber(phoneNumber: String) {
guard let callback = self.callback else {
print("Error: OtpStartStepCallback is not set ")
return
}
let otpStartInput = OtpStartInput(phoneNumber: phoneNumber)
// This is how you pass collected phone number to SDK
callback.onSuccess(input: otpStartInput)
}
// Communicate any issues encountered while trying to obtain the phone number to the SDK.
// Error should be reported if the customer explicitly cancels the SMS OTP transaction
// or presses the back button to exit out the SMS OTP start step screen.
func handleOtpStartError() {
guard let callback = self.callback else {
print("Error: OtpStartStepCallback is not set ")
return
}
callback.onError()
}
}
```
The finish step is implemented the same as either of the the previous tabs - no client side code changes necessary. If the OTP is invalid, the finish step will be called again to prompt the user for a new input. Once the max attempts is reached, the `AuthFinish` function will be called.
```swift Swift theme={"dark"}
import Foundation
import SwiftUI
import ProveAuth
class MobileOtpFinishStep: OtpFinishStep {
@ObservedObject var sheetObservable: SheetObservable
var callback: OtpFinishStepCallback?
init(sheetObservable: SheetObservable){
self.sheetObservable = sheetObservable
}
// Implement this method to collect the OTP value delivered via SMS.
func execute(otpError: ProveAuthError?, callback: OtpFinishStepCallback) {
self.callback = callback
// Handle the OTP validation error if present.
if case .otpValidationError = otpError {
print("found otpError: \(String(describing: otpError?.localizedDescription))")
// Signal to your UI components that the last provided OTP is invalid
self.sheetObservable.otpError = true
} else {
self.sheetObservable.otpError = false
}
// Signal to UI components to display OtpFinishView
DispatchQueue.main.async {
self.sheetObservable.isOtpFinishActive = true
}
}
// Provide the collected OTP value to the SDK for validation.
func handleOtp(_ otp: String) {
guard let callback = self.callback else {
print("Error: OtpFinishStepCallback is not set ")
return
}
let otpFinishInput = OtpFinishInput(otp: otp)
callback.onSuccess(input: otpFinishInput)
}
// Notify the SDK of any issues encountered while obtaining the OTP value or if the user cancels the OTP flow.
func handleOtpFinishError() {
guard let callback = self.callback else {
print("Error: OtpFinishStepCallback is not set ")
return
}
callback.onError()
}
}
```
Follow these instructions to allow the customer to re-enter their phone number. There is a max of three entries/send attempts.
Manual Request Required
To enable phone number change capabilities on your credentials, contact your Prove representative.
The start step is implemented the same as the previous tab:
```swift Swift theme={"dark"}
import Foundation
import ProveAuth
import SwiftUI
class MobileOtpStartStep: OtpStartStep {
@ObservedObject var sheetObservable: SheetObservable
var callback: OtpStartStepCallback?
init(sheetObservable: SheetObservable) {
self.sheetObservable = sheetObservable
}
func execute(
phoneNumberNeeded: Bool, phoneValidationError: ProveAuthError?, callback: OtpStartStepCallback
) {
self.callback = callback
if !phoneNumberNeeded {
// If no phone number is needed, then don't prompt the user.
callback.onSuccess(input: nil)
} else {
DispatchQueue.main.async {
// If a phone number validation error is detected, ensure it is handled to provide feedback to the user.
if case .phoneNumberValidationError = phoneValidationError {
print(
"found phoneValidationError: \(String(describing: phoneValidationError?.localizedDescription))"
)
// Update UI components to display OtpStartView with the phone number validation error.
self.sheetObservable.isPhoneValidationError = true
} else {
self.sheetObservable.isPhoneValidationError = false
}
// Update UI components to display OtpStartView if a phone number is needed.
self.sheetObservable.isOtpStartActive = true
}
}
}
// Return collected phone number to the SDK
func handlePhoneNumber(phoneNumber: String) {
guard let callback = self.callback else {
print("Error: OtpStartStepCallback is not set ")
return
}
let otpStartInput = OtpStartInput(phoneNumber: phoneNumber)
// This is how you pass collected phone number to SDK
callback.onSuccess(input: otpStartInput)
}
// Communicate any issues encountered while trying to obtain the phone number to the SDK.
// Error should be reported if the customer explicitly cancels the SMS OTP transaction
// or presses the back button to exit out the SMS OTP start step screen.
func handleOtpStartError() {
guard let callback = self.callback else {
print("Error: OtpStartStepCallback is not set ")
return
}
callback.onError()
}
}
```
You can prompt for a new phone number by implementing the finish step like this:
```swift Swift theme={"dark"}
import Foundation
import SwiftUI
import ProveAuth
class MobileOtpFinishStep: OtpFinishStep {
@ObservedObject var sheetObservable: SheetObservable
var callback: OtpFinishStepCallback?
init(sheetObservable: SheetObservable){
self.sheetObservable = sheetObservable
}
// Implement this method to collect the OTP value delivered via SMS.
func execute(otpError: ProveAuthError?, callback: OtpFinishStepCallback) {
self.callback = callback
// Handle the OTP validation error if present.
if case .otpValidationError = otpError {
print("found otpError: \(String(describing: otpError?.localizedDescription))")
// Update your UI to indicate that the provided OTP is invalid.
self.sheetObservable.otpError = true
} else {
self.sheetObservable.otpError = false
}
// Update your UI to display the OTP finish view.
DispatchQueue.main.async {
self.sheetObservable.isOtpFinishActive = true
}
}
// Return the collected OTP value to the SDK.
func handleOtp(_ otp: String) {
guard let callback = self.callback else {
print("Error: OtpFinishStepCallback is not set ")
return
}
let otpFinishInput = OtpFinishInput(otp: otp)
callback.onSuccess(input: otpFinishInput)
}
// When callback.onMobileNumberChange() is evoked, OtpStartStep will be re-initiated
// so that end-users can enter a different phone number via OtpStartStep.
func handleMobileNumberChange() {
guard let callback = self.callback else {
print("Error: OtpFinishStepCallback is not set")
return
}
callback.onMobileNumberChange()
}
}
```
## Verify the Customer Information
Once the customer has made any edits to their prefill information, submit that information to the back end server so the `Complete()` call can then verify the customer information.
```swift Swift theme={"dark"}
// Send request to the backend to verify customer information.
// The below example uses native iOS URLSession, but any other
// alternative networking approaches should also work
func sendInfo(firstName: String, lastName: String, completion: @escaping (Result\<[String:Any], Error>) -> Void) {
guard let url = URL(string: "\(backendUrl)/finish") else {
completion(.failure(URLError(.badURL)))
return
}
var request = URLRequest(url: url)
request.httpMethod = "POST"
request.addValue("application/json", forHTTPHeaderField: "Accept")
request.addValue("application/json", forHTTPHeaderField: "Content-Type")
// Set up the request body
let body: [String: Any] = [
"firstName": firstName,
"lastName": lastName
]
do {
request.httpBody = try JSONSerialization.data(withJSONObject: body, options: \[])
} catch {
completion(.failure(error))
return
}
let task = URLSession.shared.dataTask(with: request) { \_, response, error in
// Handle network or connection errors
if let error = error {
completion(.failure(error))
return
}
do {
if let results = try JSONSerialization.jsonObject(with: data, options: \[]) as? [String: Any] {
completion(.success(results))
} else {
let parsingError = NSError(domain: "", code: 0, userInfo: [NSLocalizedDescriptionKey : "Failed to parse JSON or authToken is missing"])
completion(.failure(parsingError))
}
} catch {
completion(.failure(error))
}
}
// Start the network call
task.resume()
}
```
## Supported languages
Prove provides client web SDKs in the following languages: TypeScript and JavaScript.
## Installation
The Prove Platform Web SDK has an unpacked size of 171 KB, and a single dependency: `@prove-identity/mobile-auth`. Install the client-side SDK of your choice by running a command in your terminal, or by using a dependency management tool specific to your project.
```shell NPM theme={"dark"}
# Run this command to install the package (ensure you have the latest version).
npm install @prove-identity/prove-auth@3.1.1
```
```html No Package Manager theme={"dark"}
# You can include this file in your web application from jsDelivr (update with the latest version).
# You can also download the JavaScript file from https://cdn.jsdelivr.net/npm/@prove-identity/prove-auth@3.1.1/build/bundle/release/prove-auth.js and store it locally.
```
**Angular TypeScript Compilation Error**
Some Angular projects may experience TypeScript compilation errors when building with the Prove Web SDK. This is a known issue that affects various Angular versions.
To correct this, add or update the `skipLibCheck` setting in your `tsconfig.json` file:
```json tsconfig.json theme={"dark"}
{
"compilerOptions": {
"skipLibCheck": true,
// ... other options
}
}
```
This setting tells TypeScript to skip type checking of declaration files (`.d.ts` files) from external libraries, which resolves the compilation issues while maintaining type safety for your own code.
**Affected Versions:**
* Angular 17.x (confirmed with Angular 17.3.3)
* Other Angular versions may also be affected
## Find the type of flow: mobile or desktop
You can find if the customer is on a mobile or desktop browser using this example. If the `isMobile` is true, pass `mobile` to the `Start()` function on the server, otherwise you can pass `desktop`:
```javascript JavaScript theme={"dark"}
// Check if the customer is on a mobile or desktop browser.
const authCheck = new proveAuth.AuthenticatorBuilder().build();
let isMobile = authCheck.isMobileWeb()
```
```typescript TypeScript theme={"dark"}
// Check if the customer is on a mobile or desktop browser.
const authCheck = new proveAuth.AuthenticatorBuilder().build();
let isMobile = authCheck.isMobileWeb()
```
In a mobile flow, Mobile Auth executes first and if that fails, performs one-time password (OTP) validation on the mobile phone. In a desktop flow, Instant Link sends a text message to the mobile phone for verification.
In the mobile flow, once either Mobile Auth or the OTP validation completes, the `AuthFinishStep` function finishes.
Mobile Auth
In order for Mobile Auth to succeed:
* Disable VPN.
* Disable Private Relay on iOS.
When testing, you can ignore any Chrome error messages that mention `ERR_TUNNEL_CONNECTION_FAILED` - this is due to the VPN, but the SDK fallbacks to OTP.
In the desktop flow, a WebSocket opens for 3 minutes on the desktop browser while waiting for the customer to select the link in the text message. Once clicked, the WebSocket closes and the `AuthFinishStep` function finishes.
## `Authenticate()`
The SDK requires an `authToken` as a parameter for the `Authenticate()` function. This token returns from the `Start()` call of the server-side SDK. The token is session specific, limiting it to a single flow. It also expires after 15 minutes.
## Retrieve `authToken`
Send a request to your back end server with the phone number, flow type, and an optional challenge to start the flow. This can either be the date of birth or last four digits of the social security number.
```javascript JavaScript theme={"dark"}
async function initialize(phoneNumber, ssn, flowType) {
const response = await fetch(backendUrl + "/initialize", {
method: "POST",
headers: {
Accept: "application/json",
"Content-Type": "application/json",
},
body: JSON.stringify({
phoneNumber: phoneNumber,
flowType: flowType,
ssn: ssn,
}),
});
const rsp = await response.json();
const authToken = rsp.authToken;
return authToken;
}
```
```typescript TypeScript theme={"dark"}
async function initialize(
phoneNumber: string,
ssn: string,
flowType: string
): Promise {
const response = await fetch(backendUrl + "/initialize", {
method: "POST",
headers: {
Accept: "application/json",
"Content-Type": "application/json",
},
body: JSON.stringify({
phoneNumber: phoneNumber,
flowType: flowType,
ssn: ssn,
}),
});
const rsp = await response.json();
const authToken = rsp.authToken;
return authToken;
}
```
## Setup authenticator
Once you have the `authToken`, build the authenticator for both the mobile and desktop flows.
Mobile Auth Implementations Only
If your application uses [Content Security Policy headers](https://content-security-policy.com/), you must configure them to allow WebSocket connections to Prove's authentication services:
Sandbox Environment
* `https://device.uat.proveapis.com:4443`
* `https://device.uat.proveapis.com`
* `http://device.uat.proveapis.com:4443`
* `http://device.uat.proveapis.com`
Production Environment
* `https://device.proveapis.com:4443`
* `https://device.proveapis.com`
* `http://device.proveapis.com:4443`
* `http://device.proveapis.com`
* `https://auth.svcs.verizon.com:22790`
Failure to configure these properly will prevent Mobile Auth functionality from working correctly in web flows.
```javascript JavaScript theme={"dark"}
async function authenticate(isMobileWeb, authToken) {
// Set up the authenticator for either mobile or desktop flow.
let builder = new proveAuth.AuthenticatorBuilder();
if (isMobileWeb) {
// Set up Mobile Auth and OTP.
builder = builder
.withAuthFinishStep((input) => verify(input.authId))
.withOtpFallback(otpStart, otpFinish);
} else {
// Set up Instant Link.
builder = builder
.withAuthFinishStep((input) => verify(input.authId))
.withInstantLinkFallback(instantLink)
.withRole("secondary");
}
const authenticator = builder.build();
// Authenticate with the authToken.
return authenticator.authenticate(authToken);
}
```
```typescript TypeScript theme={"dark"}
async function authenticate(isMobileWeb: boolean, authToken: string) {
// Set up the authenticator for either mobile or desktop flow.
let builder = new proveAuth.AuthenticatorBuilder();
if (isMobileWeb) {
// Set up Mobile Auth and OTP.
builder = builder
.withAuthFinishStep((input) => verify(input.authId))
.withOtpFallback(otpStart, otpFinish);
} else {
// Set up Instant Link.
builder = builder
.withAuthFinishStep((input) => verify(input.authId))
.withInstantLinkFallback(instantLink)
.withRole("secondary");
}
const authenticator = builder.build();
// Authenticate with the authToken.
return authenticator.authenticate(authToken);
}
```
## Validate the mobile phone
In the `AuthFinishStep`, specify a function to call once the possession checks complete on the mobile phone. This endpoint on your back end server calls the `Validate()` function to validate the phone number. If it was successful, the server returns the results from the `Challenge()` function including customer information. Refer to the following example fields that return and then prefill on a form for the customer to verify. The `AuthFinishStep` then completes. If a user cancels, the server makes a call to the `Validate()` function and returns `success=false`.
```javascript JavaScript theme={"dark"}
// Send a verify request to get return customer information.
async function verify() {
const response = await fetch(backendUrl + "/verify", {
method: "POST",
headers: {
Accept: "application/json",
"Content-Type": "application/json",
},
body: JSON.stringify({}),
});
const results = await response.json();
const rsp = JSON.stringify(results);
const firstName = document.getElementById("firstNameInput");
const lastName = document.getElementById("lastNameInput");
firstName.value = rsp.firstName;
lastName.value = rsp.lastName;
return null;
}
```
```typescript TypeScript theme={"dark"}
// Send a verify request to get return customer information.
async function verify() {
const response = await fetch(backendUrl + "/verify", {
method: "POST",
headers: {
Accept: "application/json",
"Content-Type": "application/json",
},
body: JSON.stringify({}),
});
const results = await response.json();
const rsp = JSON.stringify(results);
const firstName = document.getElementById("firstNameInput");
const lastName = document.getElementById("lastNameInput");
firstName.value = rsp.firstName;
lastName.value = rsp.lastName;
return null;
}
```
## Configure OTP
To use the Resend/Retry/Phone Change features, you need to install the Web SDK version 2.15.1 or later.
To set the One-Time Password (OTP) handler, `withOtpFallback(startStep: OtpStartStep | OtpStartStepFn, finishStep: OtpFinishStep | OtpFinishStepFn)`, requires implementing the `OtpStartStep` and `OtpFinishStep`. When returning the phone number in the functions, ensure you return an object with the field `phoneNumber` to the `resolve()` function.
The OTP session has a two minute timeout from when it's sent through Short Message Service (SMS) to when the customer can enter in the OTP.
Follow these instructions if you are implementing OTP and you are passing in the phone number on the `/v3/start` endpoint. In this case, you've already prompted for a phone number so you don't need to prompt for it in the client SDK.
Since you passed the phone number in the `Start()` function, call `resolve(null)` to communicate to the SDK you have the customer's agreement to deliver the SMS message. Ensure you return an object to `resolve()` function.
```javascript JavaScript theme={"dark"}
function otpStartStep(phoneNumberNeeded, phoneValidationError) {
return new Promise((resolve, reject) => {
// Since no phone number is needed, don't prompt the user.
resolve(null);
});
}
```
```typescript TypeScript theme={"dark"}
const otpStartStep: OtpStartStep = {
execute: async (
phoneNumberNeeded: boolean,
phoneValidationError?: PhoneValidationError
): Promise => {
return new Promise((resolve, reject) => {
// Since no phone number is needed, don't prompt the user.
resolve(null);
});
},
};
```
Call the `reject('some error message')` method to communicate to the SDK any issues while trying to obtain the phone number or the OTP. Report an error if the customer cancels the SMS transaction or presses the back button to leave the screen.
In the finish step, call the `resolve(result: OtpFinishResult)` method to return the collected OTP value in which `result` variable has `OnSuccess` value for `OtpFinishResultType` and the OTP value wrapped in `OtpFinishInput`.
```javascript JavaScript theme={"dark"}
function otpFinishStep(otpError) {
return new Promise((resolve, reject) => {
// If error message is found, handle it.
if (otpError) {
// Set to a variable and display it in a field.
// In this example, we don't do anything with the error.
var someErrorMessage = otpError.message;
}
// Prompt the user for whether they received the SMS.
// Typically, this is a page that shows the OTP already. We are simplifying
// it by requiring an input.
var input = confirm('Did you receive a text message?');
if (!input) {
// Close the modal if a text message was not received.
return;
}
// Prompt the user for the OTP.
var otp = prompt('Enter OTP code:');
if (otp) {
// If the input is valid and the user clicked `OK`, return the OTP.
resolve({
input: { otp }, // OTP value
resultType: 0, // OnSuccess enum type = 0
});
} else {
// Else, exit the flow.
reject('phone invalid or user cancelled');
}
});
}
```
```typescript TypeScript theme={"dark"}
const otpFinishStep: OtpFinishStep = {
execute: async (otpError?: OtpError): Promise => {
return new Promise((resolve, reject) => {
// If error message is found, handle it.
if (otpError) {
// Set to a variable and display it in a field.
// In this example, we don't do anything with the error.
var someErrorMessage = otpError.message;
}
// Prompt the user for whether they received the SMS.
// Typically, this is a page that shows the OTP already. We are simplifying
// it by requiring an input.
var input = confirm('Did you receive a text message?');
if (!input) {
// Close the modal if a text message was not received.
return;
}
// Prompt the user for the OTP.
var otp = prompt('Enter OTP code:');
if (otp) {
// If the input is valid and the user clicked `OK`, return the OTP.
resolve({
input: { otp }, // OTP value
resultType: OtpFinishResultType.OnSuccess,
});
} else {
// Else, exit the flow.
reject('phone invalid or user cancelled');
}
});
},
};
```
Follow these instructions if implementing MobileAuth and collecting the phone number only if MobileAuth fails. This will implement OTP without allowing for SMS resends and phone number changes. If you do want those capabilities, please reference the subsequent tabs (Resend, Retry OTP, and Phone Number Change).
In the start step, call the `resolve(input: OtpStartInput)` method to return the collected phone number to the SDK.
```javascript JavaScript theme={"dark"}
function otpStartStep(phoneNumberNeeded, phoneValidationError) {
return new Promise((resolve, reject) => {
// If no phone number is needed, then don't prompt the user.
if (!phoneNumberNeeded) {
resolve(null);
return;
}
// If error message is found around phone number, handle it.
// The `phoneValidationError` is ONLY available when `phoneNumberNeeded`
// has a value.
if (phoneValidationError) {
// Set to a variable and display it in a field.
// In this example, we don't do anything with the error.
var someErrorMessage = phoneValidationError.message;
}
// Prompt the user for the phone number.
var input = prompt('Enter phone number:');
if (input) {
// If the input is valid and the user clicked `OK`, return the phone
// number.
resolve({
phoneNumber: input,
});
} else {
// Else, exit the flow.
reject('phone invalid or user cancelled');
}
});
}
```
```typescript TypeScript theme={"dark"}
const otpPromptStartStep: OtpStartStep = {
execute: async (
phoneNumberNeeded: boolean,
phoneValidationError?: PhoneValidationError
): Promise => {
return new Promise((resolve, reject) => {
// If no phone number is needed, then don't prompt the user.
if (!phoneNumberNeeded) {
resolve(null);
return;
}
// If error message is found around phone number, handle it.
// The `phoneValidationError` is ONLY available when `phoneNumberNeeded`
// has a value.
if (phoneValidationError) {
// Set to a variable and display it in a field.
// In this example, we don't do anything with the error.
var someErrorMessage = phoneValidationError.message;
}
// Prompt the user for the phone number.
var input = prompt('Enter phone number:');
if (input) {
// If the input is valid and the user clicked `OK`, return the phone
// number.
resolve({
phoneNumber: input,
});
} else {
// Else, exit the flow.
reject('phone invalid or user cancelled');
}
});
},
};
```
The finish step is implemented the same as the previous tab:
```javascript JavaScript theme={"dark"}
function otpFinishStep(otpError) {
return new Promise((resolve, reject) => {
// If error message is found, handle it.
if (otpError) {
// Set to a variable and display it in a field.
// In this example, we don't do anything with the error.
var someErrorMessage = otpError.message;
}
// Prompt the user for whether they received the SMS.
// Typically, this is a page that shows the OTP already. We are simplifying
// it by requiring an input.
var input = confirm('Did you receive a text message?');
if (!input) {
// Close the modal if a text message was not received.
return;
}
// Prompt the user for the OTP.
var otp = prompt('Enter OTP code:');
if (otp) {
// If the input is valid and the user clicked `OK`, return the OTP.
resolve({
input: { otp }, // OTP value
resultType: 0, // OnSuccess enum type = 0
});
} else {
// Else, exit the flow.
reject('phone invalid or user cancelled');
}
});
}
```
```typescript TypeScript theme={"dark"}
const otpFinishStep: OtpFinishStep = {
execute: async (otpError?: OtpError): Promise => {
return new Promise((resolve, reject) => {
// If error message is found, handle it.
if (otpError) {
// Set to a variable and display it in a field.
// In this example, we don't do anything with the error.
var someErrorMessage = otpError.message;
}
// Prompt the user for whether they received the SMS.
// Typically, this is a page that shows the OTP already. We are simplifying
// it by requiring an input.
var input = confirm('Did you receive a text message?');
if (!input) {
// Close the modal if a text message was not received.
return;
}
// Prompt the user for the OTP.
var otp = prompt('Enter OTP code:');
if (otp) {
// If the input is valid and the user clicked `OK`, return the OTP.
resolve({
input: { otp }, // OTP value
resultType: OtpFinishResultType.OnSuccess,
});
} else {
// Else, exit the flow.
reject('phone invalid or user cancelled');
}
});
},
};
```
Follow these instructions to allow the customer to request a new OTP via SMS using the same phone number. There is a max of three send attempts including the initial message.
The start step is implemented the same as the previous tab:
```javascript JavaScript theme={"dark"}
function otpStartStep(phoneNumberNeeded, phoneValidationError) {
return new Promise((resolve, reject) => {
// If no phone number is needed, then don't prompt the user.
if (!phoneNumberNeeded) {
resolve(null);
return;
}
// If error message is found around phone number, handle it.
// The `phoneValidationError` is ONLY available when `phoneNumberNeeded`
// has a value.
if (phoneValidationError) {
// Set to a variable and display it in a field.
// In this example, we don't do anything with the error.
var someErrorMessage = phoneValidationError.message;
}
// Prompt the user for the phone number.
var input = prompt('Enter phone number:');
if (input) {
// If the input is valid and the user clicked `OK`, return the phone
// number.
resolve({
phoneNumber: input,
});
} else {
// Else, exit the flow.
reject('phone invalid or user cancelled');
}
});
}
```
```typescript TypeScript theme={"dark"}
const otpPromptStartStep: OtpStartStep = {
execute: async (
phoneNumberNeeded: boolean,
phoneValidationError?: PhoneValidationError
): Promise => {
return new Promise((resolve, reject) => {
// If no phone number is needed, then don't prompt the user.
if (!phoneNumberNeeded) {
resolve(null);
return;
}
// If error message is found around phone number, handle it.
// The `phoneValidationError` is ONLY available when `phoneNumberNeeded`
// has a value.
if (phoneValidationError) {
// Set to a variable and display it in a field.
// In this example, we don't do anything with the error.
var someErrorMessage = phoneValidationError.message;
}
// Prompt the user for the phone number.
var input = prompt('Enter phone number:');
if (input) {
// If the input is valid and the user clicked `OK`, return the phone
// number.
resolve({
phoneNumber: input,
});
} else {
// Else, exit the flow.
reject('phone invalid or user cancelled');
}
});
},
};
```
You can then send a new OTP SMS to the same phone number by implementing the finish step like this:
```javascript JavaScript theme={"dark"}
function otpFinishStep(otpError) {
return new Promise((resolve, reject) => {
// If error message is found, handle it.
if (otpError) {
// Set to a variable and display it in a field.
// In this example, we don't do anything with the error.
var someErrorMessage = otpError.message;
}
// Prompt the user for whether they received the SMS.
// Typically, this is a page that shows the OTP already. We are simplifying
// it by requiring an input.
var input = confirm('Did you receive a text message?');
if (!input) {
// If `Cancel`, then resend to the same phone number.
resolve({
resultType: 1, // OnResendOtp enum type = 1
});
return;
}
// Prompt the user for the OTP.
var otp = prompt('Enter OTP code:');
if (otp) {
// If the input is valid and the user clicked `OK`, return the OTP.
resolve({
input: { otp }, // OTP value
resultType: 0, // OnSuccess enum type = 0
});
} else {
// Else, exit the flow.
reject('phone invalid or user cancelled');
}
});
}
```
```typescript TypeScript theme={"dark"}
const otpMultipleResendFinishStep: OtpFinishStep = {
execute: async (otpError?: OtpError): Promise => {
return new Promise((resolve, reject) => {
// If error message is found, handle it.
if (otpError) {
// Set to a variable and display it in a field.
// In this example, we don't do anything with the error.
var someErrorMessage = otpError.message;
}
// Prompt the user for whether they received the SMS.
// Typically, this is a page that shows the OTP already. We are simplifying
// it by requiring an input.
var input = confirm('Did you receive a text message?');
if (!input) {
// If `Cancel`, then resend to the same phone number.
resolve({
resultType: 1, // OnResendOtp enum type = 1
});
return;
}
// Prompt the user for the OTP.
var otp = prompt('Enter OTP code:');
if (otp) {
// If the input is valid and the user clicked `OK`, return the OTP.
resolve({
input: { otp }, // OTP value
resultType: OtpFinishResultType.OnSuccess,
});
} else {
// Else, exit the flow.
reject('phone invalid or user cancelled');
}
});
},
};
```
Follow these instructions to allow the customer to re-enter the OTP PIN if they type it wrong. There is a max of 3 attempts. To implement this functionality, you also need to pass in `allowOTPRetry=true` to the `/v3/start` endpoint.
The start step is implemented the same as either of the the previous tabs - no client side code changes necessary:
```javascript JavaScript theme={"dark"}
function otpStartStep(phoneNumberNeeded, phoneValidationError) {
return new Promise((resolve, reject) => {
// If no phone number is needed, then don't prompt the user.
if (!phoneNumberNeeded) {
resolve(null);
return;
}
// If error message is found around phone number, handle it.
// The `phoneValidationError` is ONLY available when `phoneNumberNeeded`
// has a value.
if (phoneValidationError) {
// Set to a variable and display it in a field.
// In this example, we don't do anything with the error.
var someErrorMessage = phoneValidationError.message;
}
// Prompt the user for the phone number.
var input = prompt('Enter phone number:');
if (input) {
// If the input is valid and the user clicked `OK`, return the phone
// number.
resolve({
phoneNumber: input,
});
} else {
// Else, exit the flow.
reject('phone invalid or user cancelled');
}
});
}
```
```typescript TypeScript theme={"dark"}
const otpPromptStartStep: OtpStartStep = {
execute: async (
phoneNumberNeeded: boolean,
phoneValidationError?: PhoneValidationError
): Promise => {
return new Promise((resolve, reject) => {
// If no phone number is needed, then don't prompt the user.
if (!phoneNumberNeeded) {
resolve(null);
return;
}
// If error message is found around phone number, handle it.
// The `phoneValidationError` is ONLY available when `phoneNumberNeeded`
// has a value.
if (phoneValidationError) {
// Set to a variable and display it in a field.
// In this example, we don't do anything with the error.
var someErrorMessage = phoneValidationError.message;
}
// Prompt the user for the phone number.
var input = prompt('Enter phone number:');
if (input) {
// If the input is valid and the user clicked `OK`, return the phone
// number.
resolve({
phoneNumber: input,
});
} else {
// Else, exit the flow.
reject('phone invalid or user cancelled');
}
});
},
};
```
The finish step is implemented the same as either of the the previous tabs - no client side code changes necessary. If the OTP is invalid, the finish step will be called again to prompt the user for a new input. Once the max attempts is reached, the `AuthFinish` function will be called.
```javascript JavaScript theme={"dark"}
function otpFinishStep(otpError) {
return new Promise((resolve, reject) => {
// If error message is found, handle it.
if (otpError) {
// Set to a variable and display it in a field.
// In this example, we don't do anything with the error.
var someErrorMessage = otpError.message;
}
// Prompt the user for whether they received the SMS.
// Typically, this is a page that shows the OTP already. We are simplifying
// it by requiring an input.
var input = confirm('Did you receive a text message?');
if (!input) {
// Close the modal if a text message was not received.
return;
}
// Prompt the user for the OTP.
var otp = prompt('Enter OTP code:');
if (otp) {
// If the input is valid and the user clicked `OK`, return the OTP.
resolve({
input: { otp }, // OTP value
resultType: 0, // OnSuccess enum type = 0
});
} else {
// Else, exit the flow.
reject('phone invalid or user cancelled');
}
});
}
```
```typescript TypeScript theme={"dark"}
const otpFinishStep: OtpFinishStep = {
execute: async (otpError?: OtpError): Promise => {
return new Promise((resolve, reject) => {
// If error message is found, handle it.
if (otpError) {
// Set to a variable and display it in a field.
// In this example, we don't do anything with the error.
var someErrorMessage = otpError.message;
}
// Prompt the user for whether they received the SMS.
// Typically, this is a page that shows the OTP already. We are simplifying
// it by requiring an input.
var input = confirm('Did you receive a text message?');
if (!input) {
// Close the modal if a text message was not received.
return;
}
// Prompt the user for the OTP.
var otp = prompt('Enter OTP code:');
if (otp) {
// If the input is valid and the user clicked `OK`, return the OTP.
resolve({
input: { otp }, // OTP value
resultType: OtpFinishResultType.OnSuccess,
});
} else {
// Else, exit the flow.
reject('phone invalid or user cancelled');
}
});
},
};
```
Follow these instructions to allow the customer to re-enter their phone number. There is a max of three entries/send attempts.
Manual Request Required
To enable phone number change capabilities on your credentials, contact your Prove representative.
The start step is implemented the same as the previous tab:
```javascript JavaScript theme={"dark"}
function otpStartStep(phoneNumberNeeded, phoneValidationError) {
return new Promise((resolve, reject) => {
// If no phone number is needed, then don't prompt the user.
if (!phoneNumberNeeded) {
resolve(null);
return;
}
// If error message is found around phone number, handle it.
// The `phoneValidationError` is ONLY available when `phoneNumberNeeded`
// has a value.
if (phoneValidationError) {
// Set to a variable and display it in a field.
// In this example, we don't do anything with the error.
var someErrorMessage = phoneValidationError.message;
}
// Prompt the user for the phone number.
var input = prompt('Enter phone number:');
if (input) {
// If the input is valid and the user clicked `OK`, return the phone
// number.
resolve({
phoneNumber: input,
});
} else {
// Else, exit the flow.
reject('phone invalid or user cancelled');
}
});
}
```
```typescript TypeScript theme={"dark"}
const otpPromptStartStep: OtpStartStep = {
execute: async (
phoneNumberNeeded: boolean,
phoneValidationError?: PhoneValidationError
): Promise => {
return new Promise((resolve, reject) => {
// If no phone number is needed, then don't prompt the user.
if (!phoneNumberNeeded) {
resolve(null);
return;
}
// If error message is found around phone number, handle it.
// The `phoneValidationError` is ONLY available when `phoneNumberNeeded`
// has a value.
if (phoneValidationError) {
// Set to a variable and display it in a field.
// In this example, we don't do anything with the error.
var someErrorMessage = phoneValidationError.message;
}
// Prompt the user for the phone number.
var input = prompt('Enter phone number:');
if (input) {
// If the input is valid and the user clicked `OK`, return the phone
// number.
resolve({
phoneNumber: input,
});
} else {
// Else, exit the flow.
reject('phone invalid or user cancelled');
}
});
},
};
```
You can prompt for a new phone numberby implementing the finish step like this:
```javascript JavaScript theme={"dark"}
function otpFinishStep(otpError) {
return new Promise((resolve, reject) => {
// If error message is found, handle it.
if (otpError) {
// Set to a variable and display it in a field.
// In this example, we don't do anything with the error.
var someErrorMessage = otpError.message;
}
// Prompt the user for whether they received the SMS.
// Typically, this is a page that shows the OTP already. We are simplifying
// it by requiring an input.
var input = confirm('Did you receive a text message?');
if (!input) {
// If `Cancel`, then trigger the otpStartStep to re-prompt for
// phone number.
resolve({
resultType: 2, // OnMobileNumberChange enum type = 2
});
return;
}
// Prompt the user for the OTP.
var otp = prompt('Enter OTP code:');
if (otp) {
// If the input is valid and the user clicked `OK`, return the OTP.
resolve({
input: { otp }, // OTP value
resultType: 0, // OnSuccess enum type = 0
});
} else {
// Else, exit the flow.
reject('phone invalid or user cancelled');
}
});
}
```
```typescript TypeScript theme={"dark"}
const otpPhoneChangeFinishStep: OtpFinishStep = {
execute: async (otpError?: OtpError): Promise => {
return new Promise((resolve, reject) => {
// If error message is found, handle it.
if (otpError) {
// Set to a variable and display it in a field.
// In this example, we don't do anything with the error.
var someErrorMessage = otpError.message;
}
// Prompt the user for whether they received the SMS.
// Typically, this is a page that shows the OTP already. We are simplifying
// it by requiring an input.
var input = confirm('Did you receive a text message?');
if (!input) {
// If `Cancel`, then trigger the otpStartStep to re-prompt for
// phone number.
resolve({
resultType: 2, // OnMobileNumberChange enum type = 2
});
return;
}
// Prompt the user for the OTP.
var otp = prompt('Enter OTP code:');
if (otp) {
// If the input is valid and the user clicked `OK`, return the OTP.
resolve({
input: { otp }, // OTP value
resultType: OtpFinishResultType.OnSuccess,
});
} else {
// Else, exit the flow.
reject('phone invalid or user cancelled');
}
});
},
};
```
## Configure Instant Link
To use the Resend/Retry/Phone Change features, you need to install the Web SDK version 2.15.1 or later.
To set the Instant Link handler, `withInstantLinkFallback(startStep: InstantLinkStartStep | InstantLinkStartStepFn, retryStep?: InstantLinkRetryStep | InstantLinkRetryStepFn)` requires implementing the `InstantLinkStartStep` interface and optionally the `InstantLinkRetryStep` interface if you wish for advanced capabilities. When returning the phone number in the functions, ensure you return an object with the field `phoneNumber` to the `resolve()` function.
The Instant Link session has a three minute timeout from when it's sent through Short Message Service (SMS) to when the customer can click the received link.
Follow these instructions if you are implementing Instant Link and you are passing in the phone number on the `/v3/start` endpoint. In this case, you've already prompted for a phone number so you don't need to prompt for it in the client SDK.
Since you passed the phone number in the `Start()` function, call `resolve(null)` to communicate to the SDK you have the customer's agreement to deliver the SMS message. Ensure you return an object to `resolve()` function.
```javascript JavaScript theme={"dark"}
function instantLinkStartStep(phoneNumberNeeded, phoneValidationError) {
return new Promise((resolve, reject) => {
// Since no phone number is needed, don't prompt the user.
resolve(null);
});
}
```
```typescript TypeScript theme={"dark"}
const instantLinkNoPromptStartStep: InstantLinkStartStep = {
execute: async (
phoneNumberNeeded: boolean,
phoneValidationError?: PhoneValidationError
): Promise => {
return new Promise((resolve, reject) => {
// Since no phone number is needed, don't prompt the user.
resolve(null);
});
},
};
```
Follow these instructions if implementing MobileAuth and collecting the phone number for desktop. This will implement Instant Link without allowing for SMS resends and phone number changes. If you do want those capabilities, please reference the subsequent tabs (Resend and Phone Number Change).
Call the `resolve(input: InstantStartInput)` method to return the collected phone number to the SDK.
Call the `reject('some error message')` method to communicate to the SDK any issues while trying to obtain the phone number. Report an error if the customer cancels the Instant Link transaction or presses the back button to leave the Instant Link start step dialog.
```javascript JavaScript theme={"dark"}
function instantLinkStartStep(phoneNumberNeeded, phoneValidationError) {
return new Promise((resolve, reject) => {
// If no phone number is needed, then don't prompt the user.
if (!phoneNumberNeeded) {
resolve(null);
return;
}
// If error message is found around phone number, handle it.
// The `phoneValidationError` is ONLY available when `phoneNumberNeeded`
// has a value.
if (phoneValidationError) {
// Set to a variable and display it in a field.
// In this example, we don't do anything with the error.
var someErrorMessage = phoneValidationError.message;
}
// Prompt the user for the phone number.
var input = prompt('Enter phone number:');
if (input) {
// If the input is valid and the user clicked `OK`, return the phone
// number.
resolve({
phoneNumber: input,
});
} else {
// Else, exit the flow.
reject('phone invalid or user cancelled');
}
});
}
```
```typescript TypeScript theme={"dark"}
const instantLinkStartStep: InstantLinkStartStep = {
execute: async (
phoneNumberNeeded: boolean,
phoneValidationError?: PhoneValidationError
): Promise => {
return new Promise((resolve, reject) => {
// If no phone number is needed, then don't prompt the user.
if (!phoneNumberNeeded) {
resolve(null);
return;
}
// If error message is found around phone number, handle it.
// The `phoneValidationError` is ONLY available when `phoneNumberNeeded`
// has a value.
if (phoneValidationError) {
// Set to a variable and display it in a field.
// In this example, we don't do anything with the error.
var someErrorMessage = phoneValidationError.message;
}
// Prompt the user for the phone number.
var input = prompt('Enter phone number:');
if (input) {
// If the input is valid and the user clicked `OK`, return the phone
// number.
resolve({
phoneNumber: input,
} as InstantLinkStartInput);
} else {
// Else, exit the flow.
reject('phone invalid or user cancelled');
}
});
},
};
```
Follow these instructions to allow the customer to request a new SMS using the same phone number. There is a max of three send attempts including the initial message.
The start step is implemented the same as the previous tab:
```javascript JavaScript theme={"dark"}
function instantLinkStartStep(phoneNumberNeeded, phoneValidationError) {
return new Promise((resolve, reject) => {
// If no phone number is needed, then don't prompt the user.
if (!phoneNumberNeeded) {
resolve(null);
return;
}
// If error message is found around phone number, handle it.
// The `phoneValidationError` is ONLY available when `phoneNumberNeeded`
// has a value.
if (phoneValidationError) {
// Set to a variable and display it in a field.
// In this example, we don't do anything with the error.
var someErrorMessage = phoneValidationError.message;
}
// Prompt the user for the phone number.
var input = prompt('Enter phone number:');
if (input) {
// If the input is valid and the user clicked `OK`, return the phone
// number.
resolve({
phoneNumber: input,
});
} else {
// Else, exit the flow.
reject('phone invalid or user cancelled');
}
});
}
```
```typescript TypeScript theme={"dark"}
const instantLinkStartStep: InstantLinkStartStep = {
execute: async (
phoneNumberNeeded: boolean,
phoneValidationError?: PhoneValidationError
): Promise => {
return new Promise((resolve, reject) => {
// If no phone number is needed, then don't prompt the user.
if (!phoneNumberNeeded) {
resolve(null);
return;
}
// If error message is found around phone number, handle it.
// The `phoneValidationError` is ONLY available when `phoneNumberNeeded`
// has a value.
if (phoneValidationError) {
// Set to a variable and display it in a field.
// In this example, we don't do anything with the error.
var someErrorMessage = phoneValidationError.message;
}
// Prompt the user for the phone number.
var input = prompt('Enter phone number:');
if (input) {
// If the input is valid and the user clicked `OK`, return the phone
// number.
resolve({
phoneNumber: input,
} as InstantLinkStartInput);
} else {
// Else, exit the flow.
reject('phone invalid or user cancelled');
}
});
},
};
```
You can then send a new Instant Link SMS to the same phone number by implementing the `InstantLinkRetryStep` interface, for example:
```javascript JavaScript theme={"dark"}
function instantLinkRetryStep() {
return new Promise((resolve, reject) => {
// There are multiple return options:
// - resolve(0): request resend to the same phone number
// - reject('user clicked cancel'): error out of the possession flow
// Prompt the user for the phone number.
// Typically, this is a page that is automatically closed or redirected
// once the `AuthFinish` function is called. We are simplifying it by
// requiring an input.
var input = confirm('Did you receive a text message?');
if (input) {
// If `OK`, close the modal.
return;
}
// Else `Cancel`, then resend to the same phone number.
resolve(0);
});
}
```
```typescript TypeScript theme={"dark"}
const instantLinkMultipleResendRetryStep: InstantLinkRetryStep = {
execute: async (): Promise => {
return new Promise((resolve, reject) => {
// There are multiple return options:
// - resolve(0): request resend to the same phone number
// - reject('user clicked cancel'): error out of the possession flow
// Prompt the user for the phone number.
// Typically, this is a page that is automatically closed or redirected
// once the `AuthFinish` function is called. We are simplifying it by
// requiring an input.
var input = confirm('Did you receive a text message?');
if (input) {
// If `OK`, close the modal.
return;
}
// Else `Cancel`, then resend to the same phone number.
resolve(InstantLinkResultType.OnResend);
});
},
};
```
Follow these instructions to allow the customer to re-enter their phone number. There is a max of three entries/send attempts.
Manual Request Required
To enable phone number change capabilities on your credentials, contact your Prove representative.
The start step is implemented the same as the previous tab:
```javascript JavaScript theme={"dark"}
function instantLinkStartStep(phoneNumberNeeded, phoneValidationError) {
return new Promise((resolve, reject) => {
// If no phone number is needed, then don't prompt the user.
if (!phoneNumberNeeded) {
resolve(null);
return;
}
// If error message is found around phone number, handle it.
// The `phoneValidationError` is ONLY available when `phoneNumberNeeded`
// has a value.
if (phoneValidationError) {
// Set to a variable and display it in a field.
// In this example, we don't do anything with the error.
var someErrorMessage = phoneValidationError.message;
}
// Prompt the user for the phone number.
var input = prompt('Enter phone number:');
if (input) {
// If the input is valid and the user clicked `OK`, return the phone
// number.
resolve({
phoneNumber: input,
});
} else {
// Else, exit the flow.
reject('phone invalid or user cancelled');
}
});
}
```
```typescript TypeScript theme={"dark"}
const instantLinkStartStep: InstantLinkStartStep = {
execute: async (
phoneNumberNeeded: boolean,
phoneValidationError?: PhoneValidationError
): Promise => {
return new Promise((resolve, reject) => {
// If no phone number is needed, then don't prompt the user.
if (!phoneNumberNeeded) {
resolve(null);
return;
}
// If error message is found around phone number, handle it.
// The `phoneValidationError` is ONLY available when `phoneNumberNeeded`
// has a value.
if (phoneValidationError) {
// Set to a variable and display it in a field.
// In this example, we don't do anything with the error.
var someErrorMessage = phoneValidationError.message;
}
// Prompt the user for the phone number.
var input = prompt('Enter phone number:');
if (input) {
// If the input is valid and the user clicked `OK`, return the phone
// number.
resolve({
phoneNumber: input,
} as InstantLinkStartInput);
} else {
// Else, exit the flow.
reject('phone invalid or user cancelled');
}
});
},
};
```
You can prompt for a new phone number by implementing the `InstantLinkRetryStep` interface, for example:
```javascript JavaScript theme={"dark"}
function instantLinkRetryStep() {
return new Promise((resolve, reject) => {
// There are multiple return options:
// - resolve(0): request resend to the same phone number
// - resolve(1): request phone number change/re-prompt
// - reject('user clicked cancel'): error out of the possession flow
// Prompt the user for the phone number.
// Typically, this is a page that is automatically closed or redirected
// once the `AuthFinish` function is called. We are simplifying it by
// requiring an input.
var input = confirm('Did you receive a text message?');
if (input) {
// If `OK`, close the modal.
return;
}
// Else `Cancel`, then trigger the instantLinkStartStep to re-prompt for
// phone number.
resolve(1);
});
}
```
```typescript TypeScript theme={"dark"}
const instantLinkPhoneChangeRetryStep: InstantLinkRetryStep = {
execute: async (): Promise => {
return new Promise((resolve, reject) => {
// There are multiple return options:
// - resolve(0): request resend to the same phone number
// - resolve(1): request phone number change/re-prompt
// - reject('user clicked cancel'): error out of the possession flow
// Prompt the user for the phone number.
// Typically, this is a page that is automatically closed or redirected
// once the `AuthFinish` function is called. We are simplifying it by
// requiring an input.
var input = confirm('Did you receive a text message?');
if (input) {
// If `OK`, close the modal.
return;
}
// Else `Cancel`, then trigger the instantLinkStartStep to re-prompt for
// phone number.
resolve(InstantLinkResultType.OnMobileNumberChange);
});
},
};
```
## Verify the Customer Information
Once the customer has made any edits to their prefill information, submit that information to the back end server so the `Complete()` call can then verify the customer information.
```javascript JavaScript theme={"dark"}
// Send request to the backend to verify customer information.
async function sendInfo(firstName, lastName) {
const response = await fetch(backendUrl + "/finish", {
method: "POST",
headers: {
Accept: "application/json",
"Content-Type": "application/json",
},
body: JSON.stringify({
firstName: firstName,
lastName: lastName,
}),
});
const results = await response.json();
const rsp = JSON.stringify(results);
return rsp;
}
```
```typescript TypeScript theme={"dark"}
// Send request to the backend to verify customer information.
async function sendInfo(firstName: string, lastName: string) {
const response = await fetch(backendUrl + "/finish", {
method: "POST",
headers: {
Accept: "application/json",
"Content-Type": "application/json",
},
body: JSON.stringify({
firstName: firstName,
lastName: lastName,
}),
});
const results = await response.json();
const rsp = JSON.stringify(results);
return rsp;
}
```
## Function reference
Start the flow with `Authenticator.authenticate()`, while creating an instance of Authenticator using `AuthenticatorBuilder.build()`.
Use the following methods to configure `Authenticator` before instantiating. All methods return the same instance of `AuthenticatorBuilder` to allow chaining of the configuration methods.
`withAuthFinishStep(step: AuthFinishStep | AuthFinishStepFn): AuthenticatorBuilder`
This step customizes the handling of the authentication finish call. The implementation calls the customer's back end to retrieve authentication results. The customer defines the format of the response to suit the needs of the app.
`withRole(role: DeviceRole): AuthenticatorBuilder`
Sets the authentication role for this device. It can be either `Primary` or `Secondary`. The `Primary` value sets when the customer is on a mobile device web browser that registers with the Prove system and later authenticated by verifying this registration. On other hand, the `Secondary` value sets when the customer is on a desktop web browser, which authenticates after receiving customer feedback on their `Primary` device.
`withMobileAuthImplementation(implementation: MobileAuthImplementation): AuthenticatorBuilder`
Sets the implementation type for Mobile Auth authenticator. Possible values are `Fetch` or `Pixel` with `Fetch` set by default.
`withDeviceIpAddress(deviceIp: string | (() => string | null) | null): AuthenticatorBuilder`
Sets the public IP address for this device to report during device registration. If you neglect to call this method, or the IP address value is `null`, the system attempts to autodetect the IP address using an external service. If the service is inaccessible, the system uses the client's IP address of the HTTP connection. Successful Mobile Auth authentication requires the client's public IP address.
`withOtpFallback(startStep: OtpStartStep | OtpStartStepFn, finishStep: OtpFinishStep | OtpFinishStepFn): AuthenticatorBuilder`
Configure start and finish handlers for SMS OTP authenticator. Collecting customer input requires using these handlers to enter the phone number for delivery of OTP codes, and to enter received OTP codes.
`withInstantLinkFallback(instantLinkStartStep: InstantLinkStartStep | InstantLinkStartStepFn, instantLinkRetryStep?: InstantLinkRetryStep | InstantLinkRetryStepFn): AuthenticatorBuilder`
Configure handler for Instant Link authenticator. This handler collects customer input to enter the phone number for Instant Link.
`build(): Authenticator`
Finalizes the configuration and returns an instance of the `Authenticator`.